This is an automated email from the ASF dual-hosted git repository.

qiaojialin pushed a commit to branch master
in repository https://gitbox.apache.org/repos/asf/iotdb.git
The following commit(s) were added to refs/heads/master by this push:
new 0452bc3 Improve openid user manual (#3062)
0452bc3 is described below
commit 0452bc3f9b4c473e606868cd1475173411f3f509
Author: CloudWise-Lukemiao
<[email protected]>
AuthorDate: Tue Apr 27 20:32:31 2021 +0800
Improve openid user manual (#3062)
---
docs/UserGuide/CLI/Command-Line-Interface.md | 69 +++++++++++++++++++----
docs/zh/UserGuide/CLI/Command-Line-Interface.md | 75 ++++++++++++++++++++-----
2 files changed, 120 insertions(+), 24 deletions(-)
diff --git a/docs/UserGuide/CLI/Command-Line-Interface.md
b/docs/UserGuide/CLI/Command-Line-Interface.md
index b845b00..4d4d1df 100644
--- a/docs/UserGuide/CLI/Command-Line-Interface.md
+++ b/docs/UserGuide/CLI/Command-Line-Interface.md
@@ -30,7 +30,7 @@ IoTDB provides Cli/shell tools for users to interact with
IoTDB server in comman
Under the root path of iotdb:
-```
+```shell
> mvn clean package -pl cli -am -DskipTests
```
@@ -51,12 +51,12 @@ You also can set your own environment variable at the front
of the start script
The Linux and MacOS system startup commands are as follows:
-```
+```shell
Shell > sbin/start-cli.sh -h 127.0.0.1 -p 6667 -u root -pw root
```
The Windows system startup commands are as follows:
-```
+```shell
Shell > sbin\start-cli.bat -h 127.0.0.1 -p 6667 -u root -pw root
```
After using these commands, the cli can be started successfully. The
successful status will be as follows:
@@ -94,21 +94,68 @@ Following is a cli command which connects the host with IP
The Linux and MacOS system startup commands are as follows:
-```
+```shell
Shell > sbin/start-cli.sh -h 10.129.187.21 -p 6667 -u root -pw root
-disableISO8601 -maxPRC 10
```
The Windows system startup commands are as follows:
-```
+```shell
Shell > sbin\start-cli.bat -h 10.129.187.21 -p 6667 -u root -pw root
-disableISO8601 -maxPRC 10
```
### Note on using the CLI with OpenID Connect Auth enabled on Server side
+Openid connect (oidc) uses keycloack as the authority authentication service
of oidc service
+
+#### configuration
+The configuration is located in iotdb-engines.properties , set the
author_provider_class is org.apache.iotdb.db.auth.authorizer.OpenIdAuthorizer
Openid service is enabled, and the default value is
org.apache.iotdb.db.auth.authorizer.LocalFileAuthorizer Indicates that the
openid service is not enabled.
+
+```
+authorizer_provider_class=org.apache.iotdb.db.auth.authorizer.OpenIdAuthorizer
+```
+If the openid service is turned on, openid_URL is required,openID_url value is
http://ip:port/auth/realms/{realmsName}
+
+```
+openID_url=http://127.0.0.1:8080/auth/realms/iotdb/
+```
+####keycloack configuration
+
+1、Download the keycloack file and start keycloack in keycloack/bin
+
+```shell
+Shell >cd bin
+Shell >./standalone.sh
+```
+2、use url(https://ip:port/auth) login keycloack, the first login needs to
create a user
+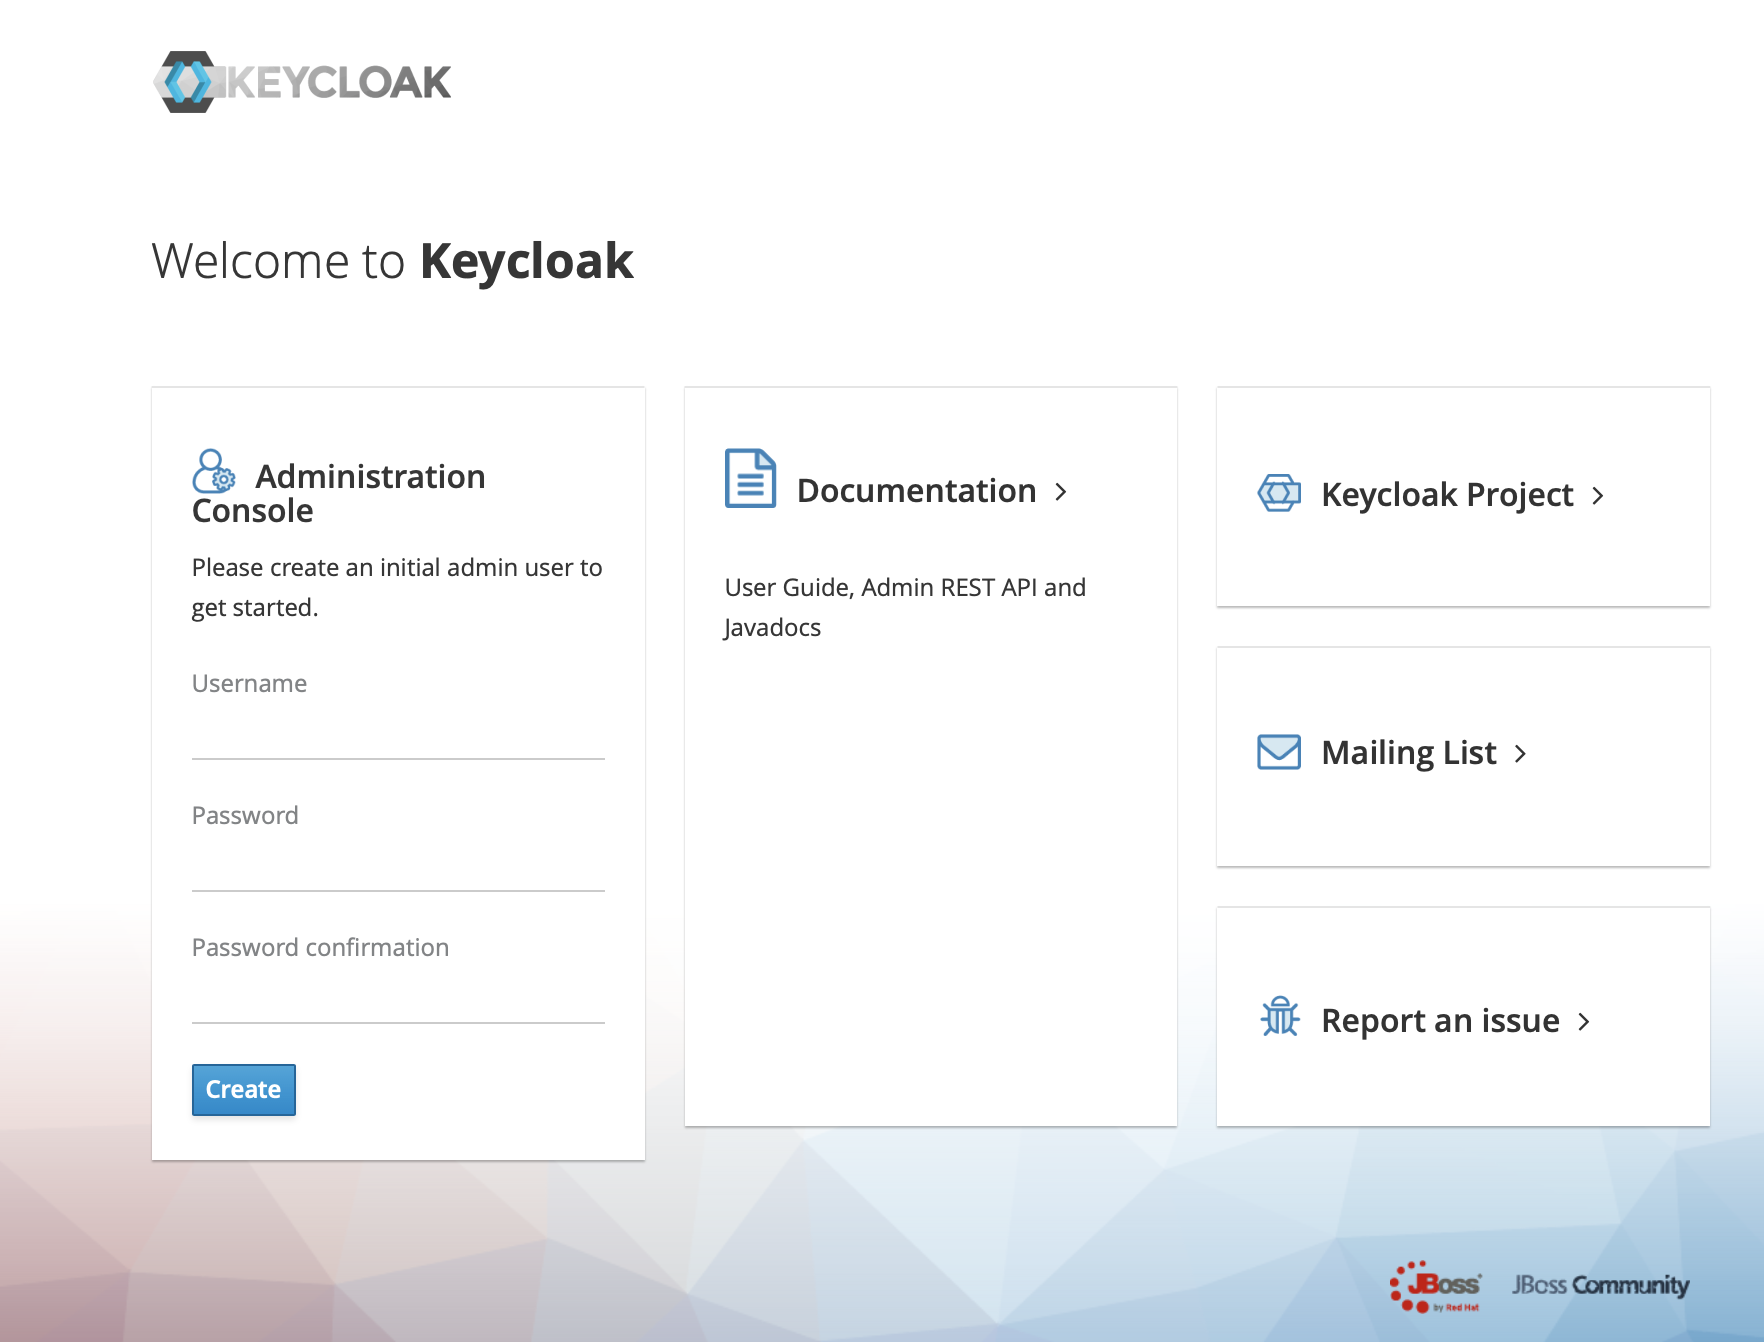
+
+3、Click administration console
+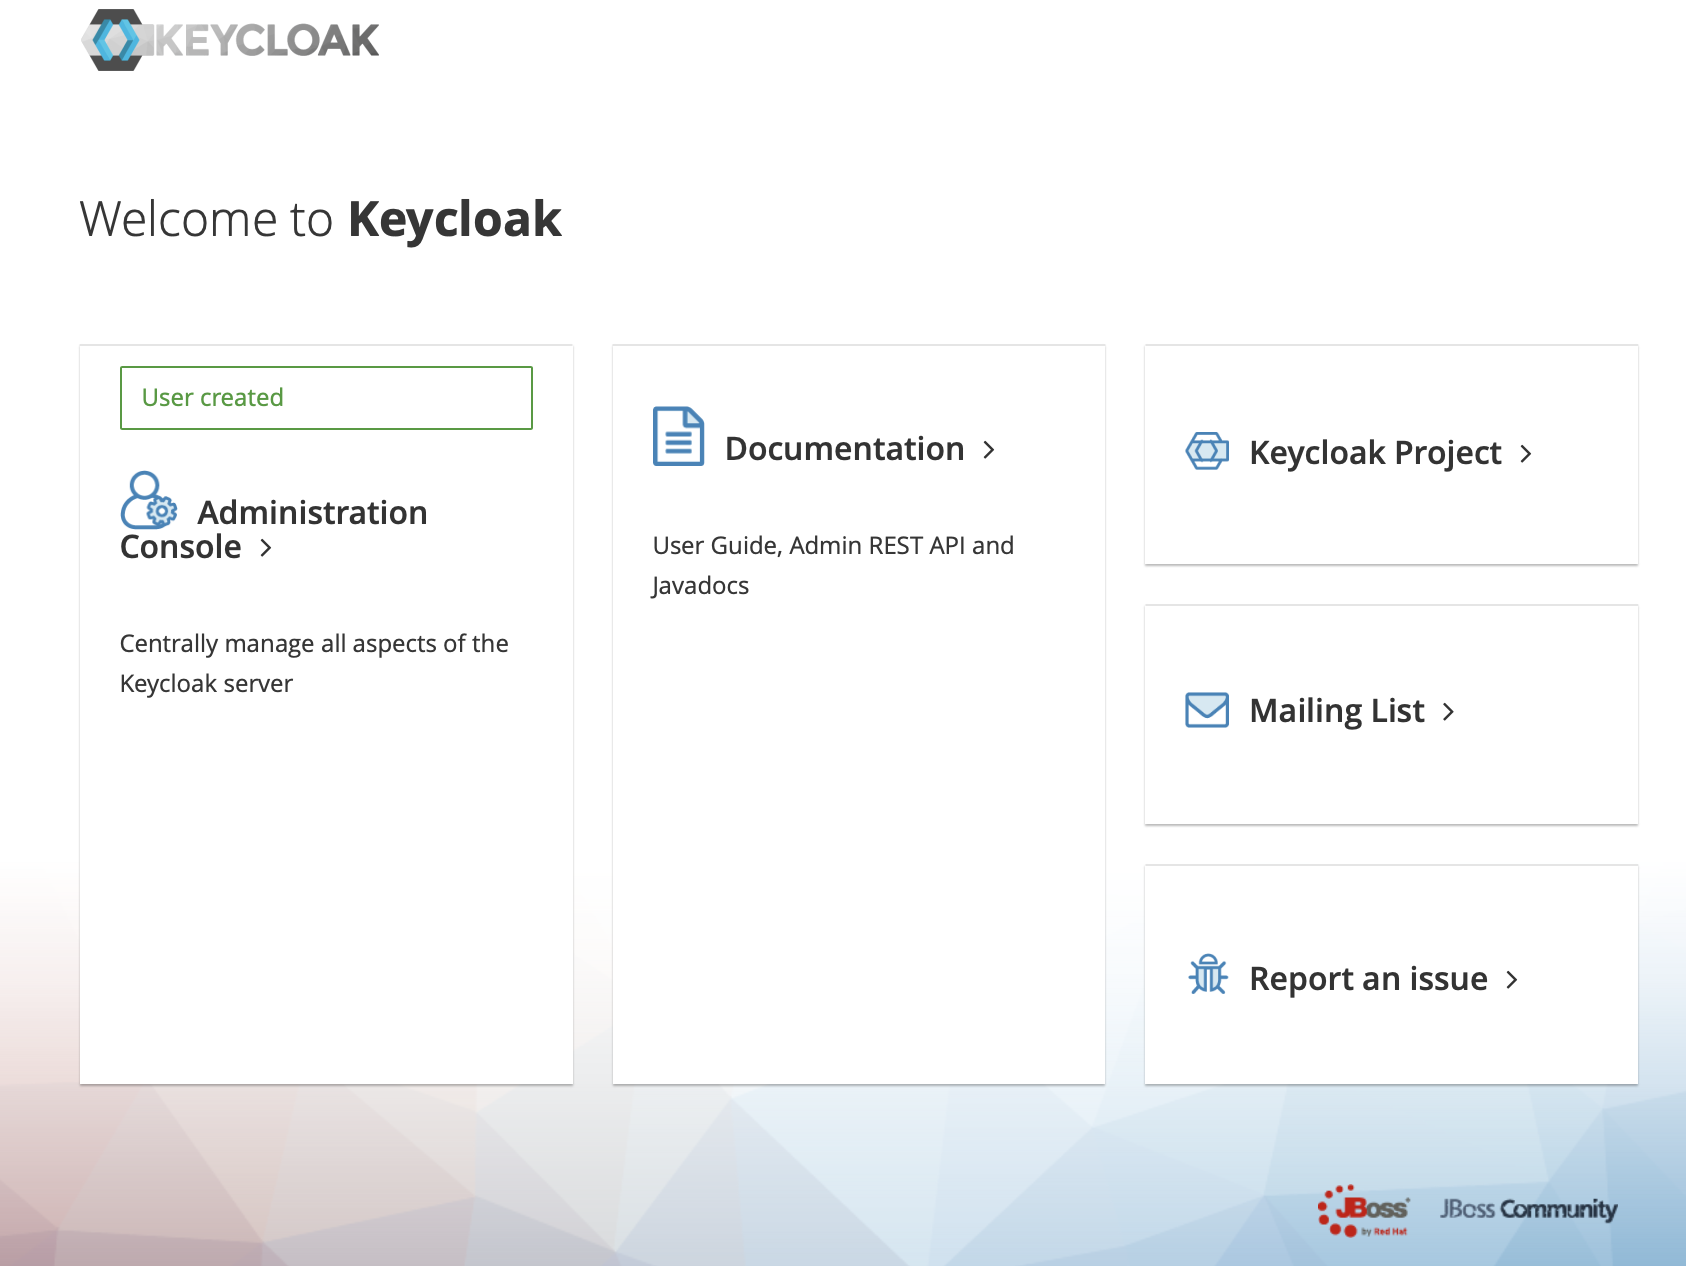
+
+4、In the master menu on the left, click Add realm and enter name to create a
new realm
+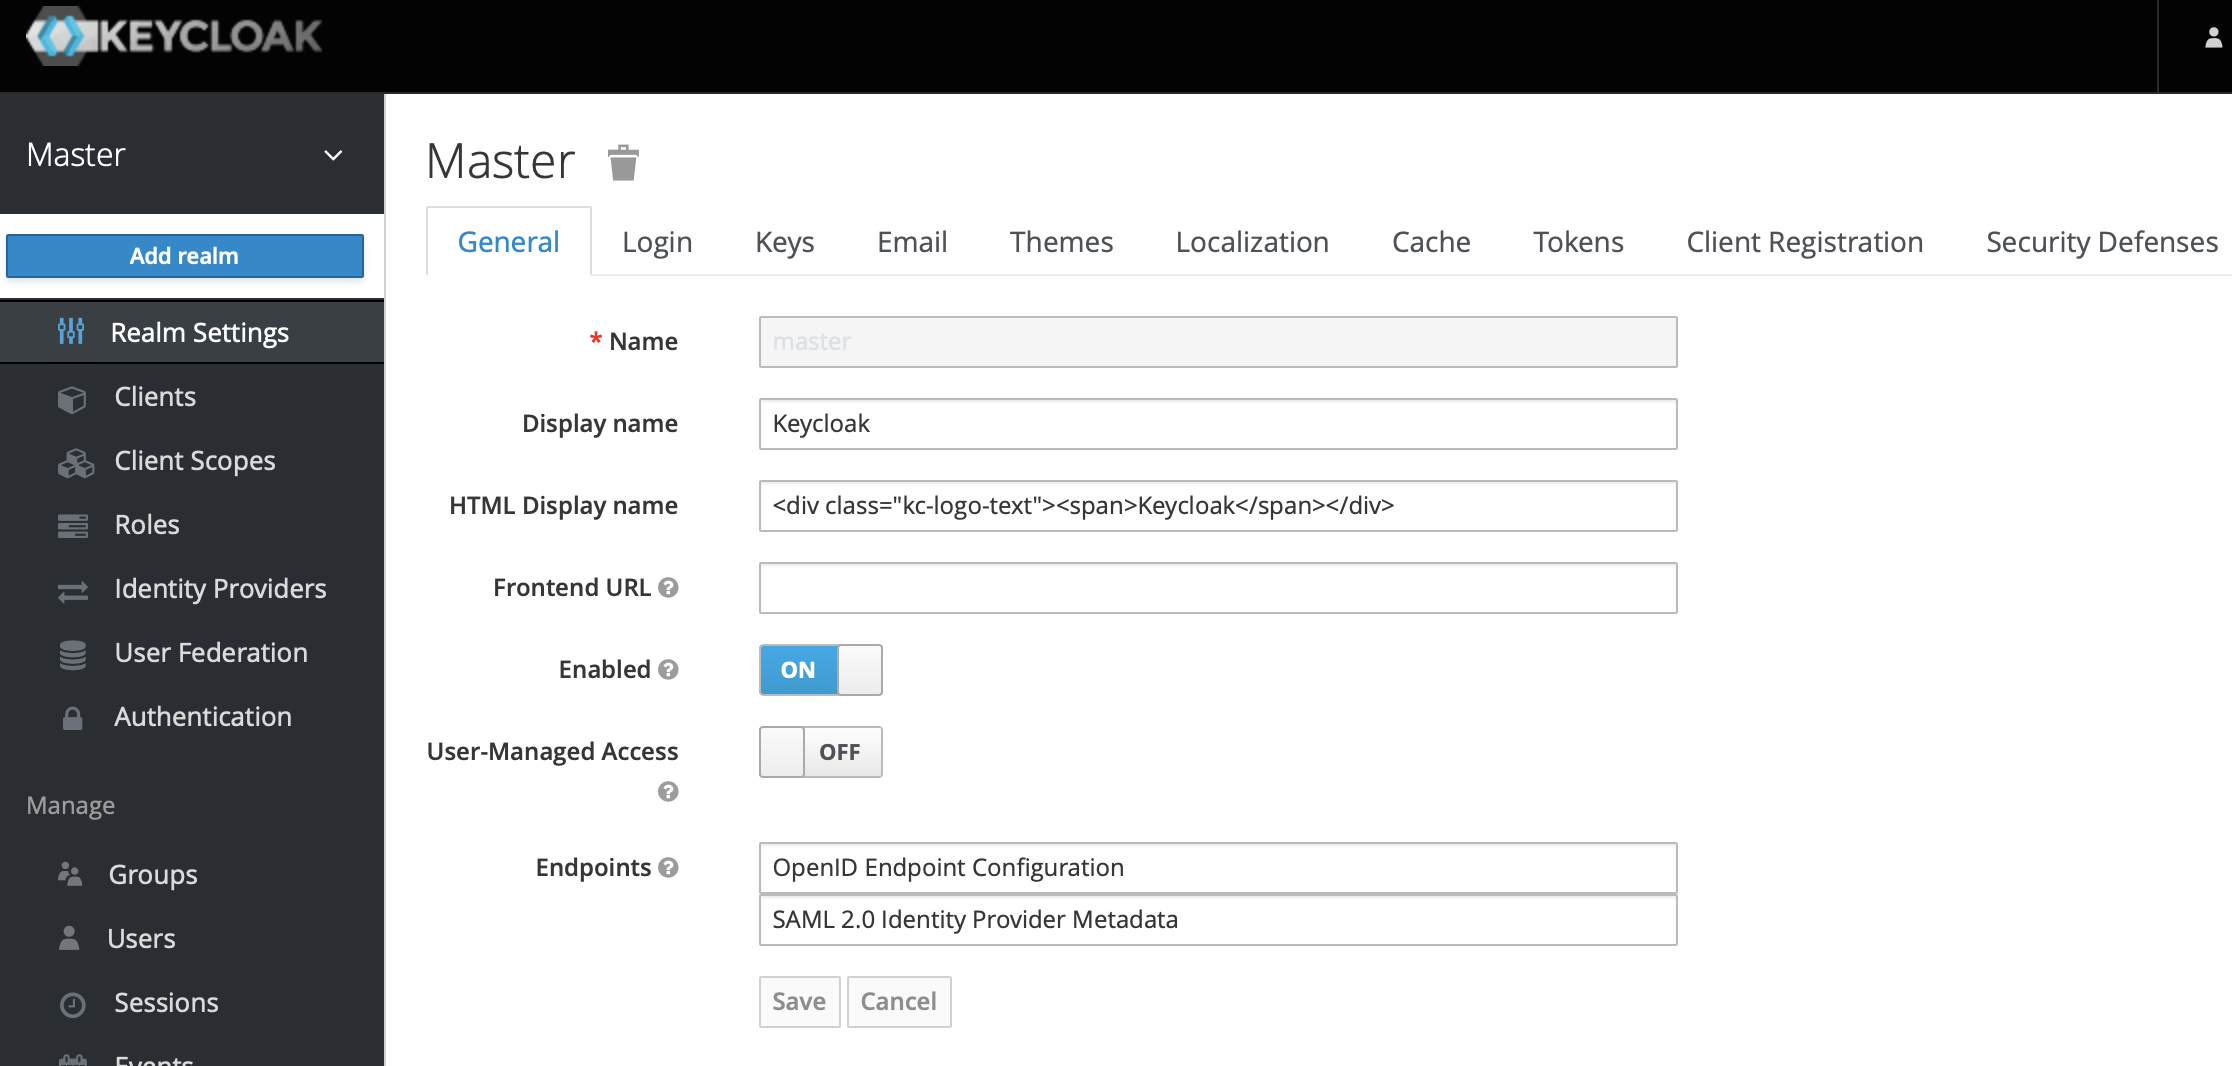
+
+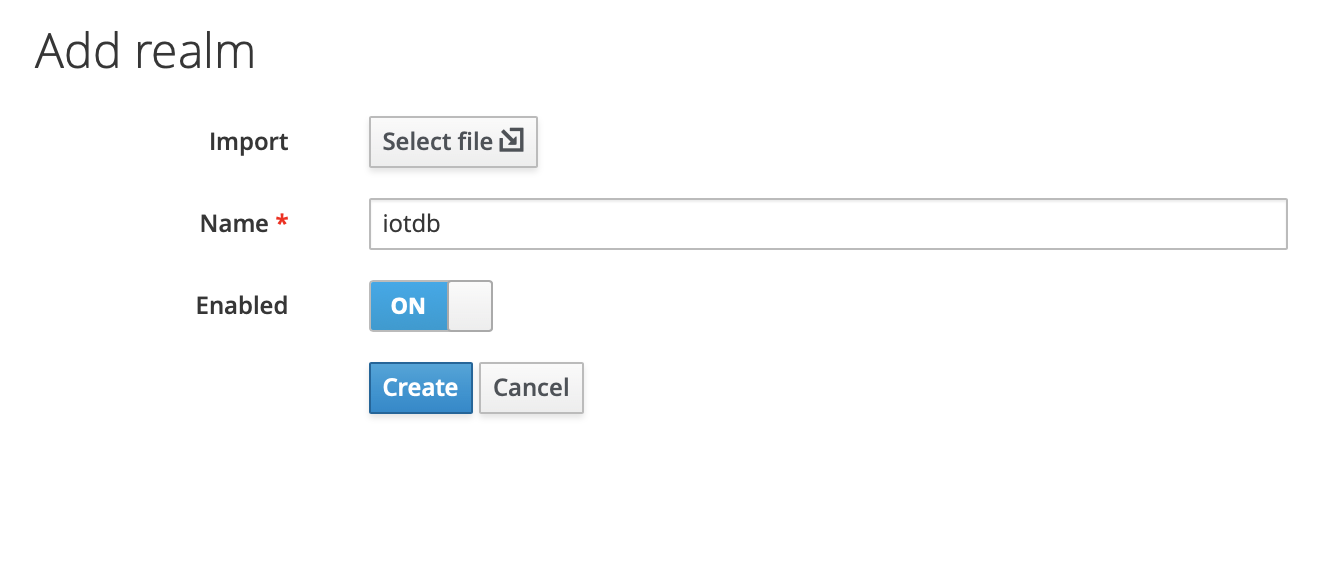
+
+
+5、Click the menu clients on the left to create clients
+
+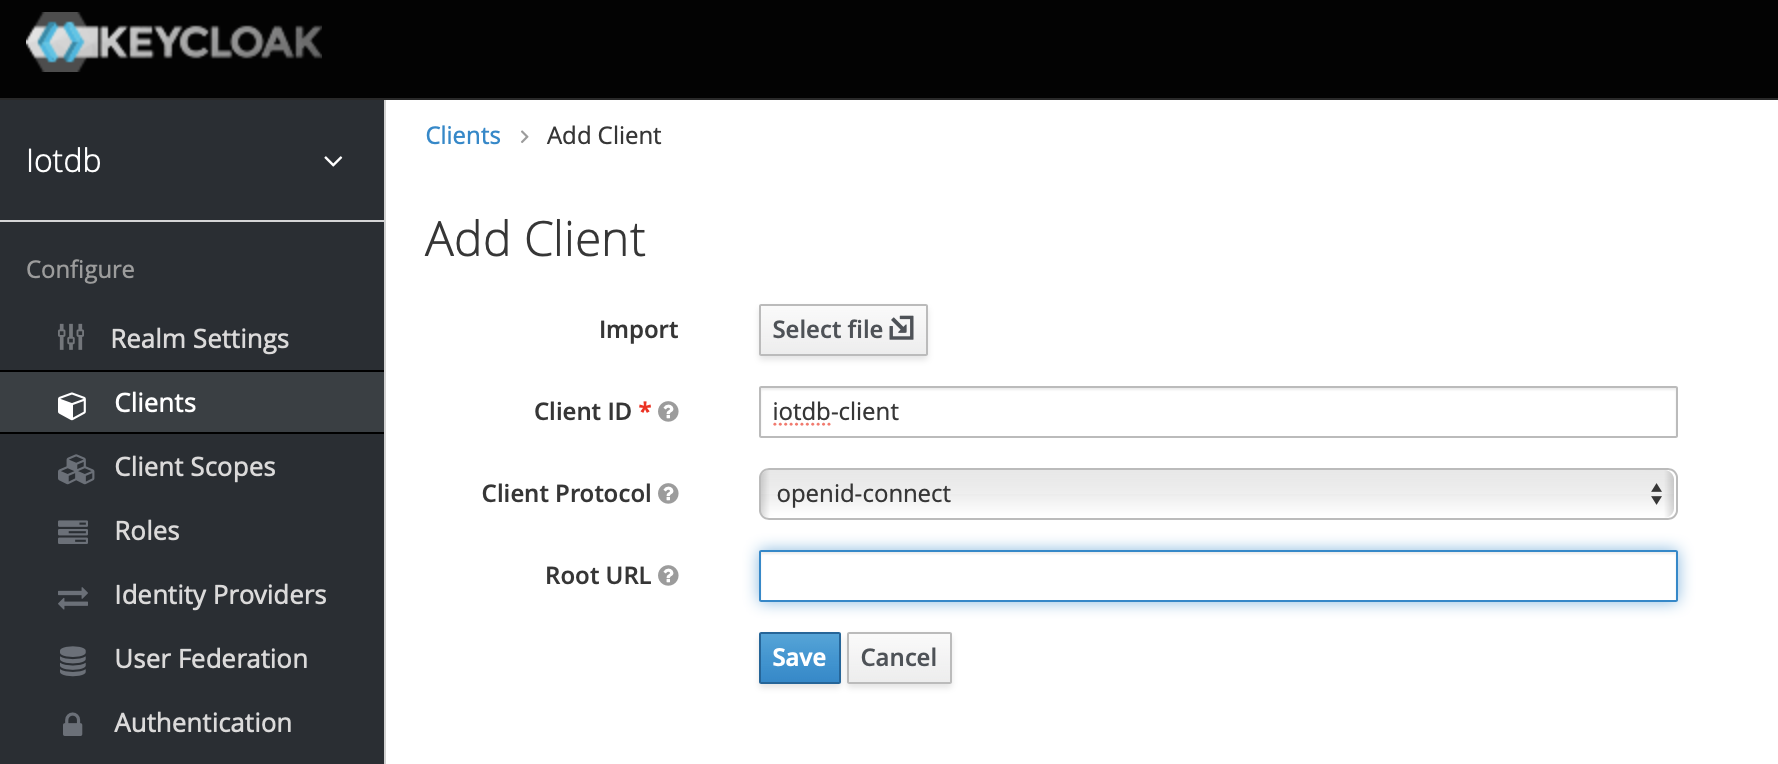
+
+6、Click user on the left menu to create user
+
+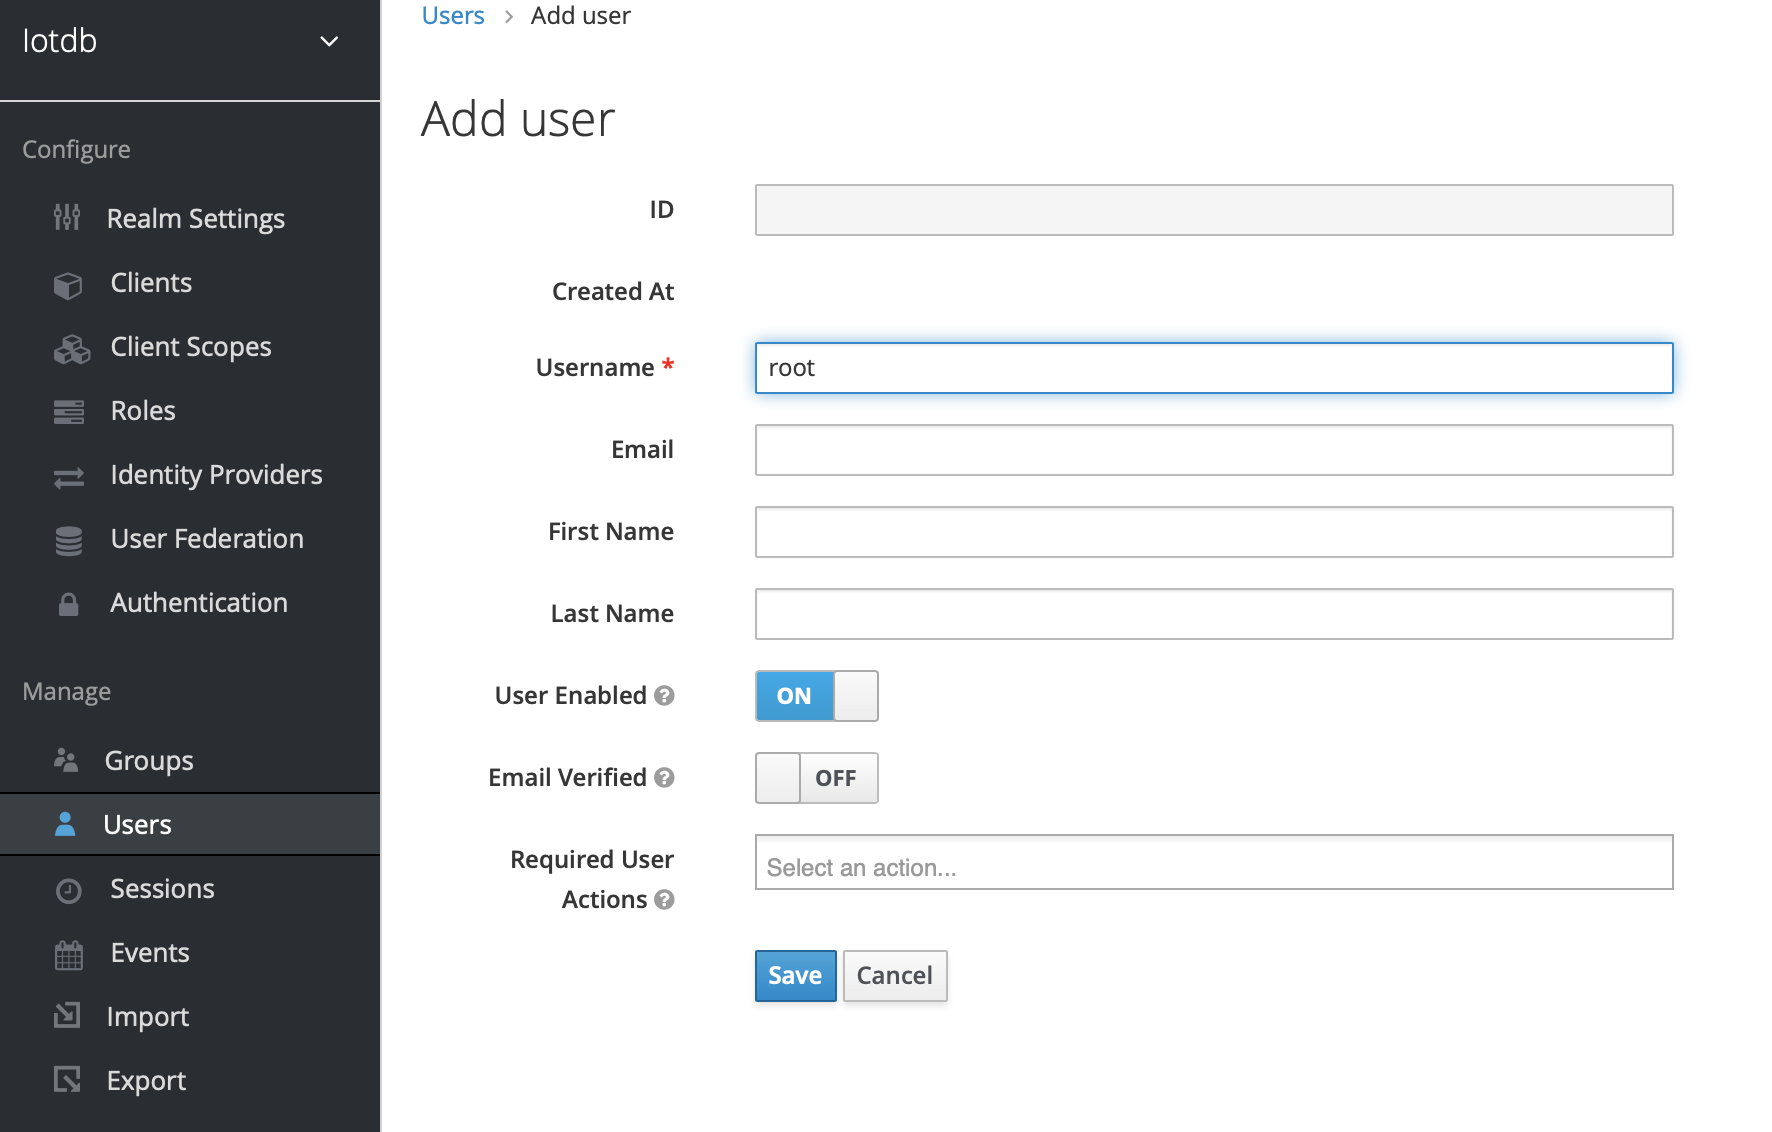
+
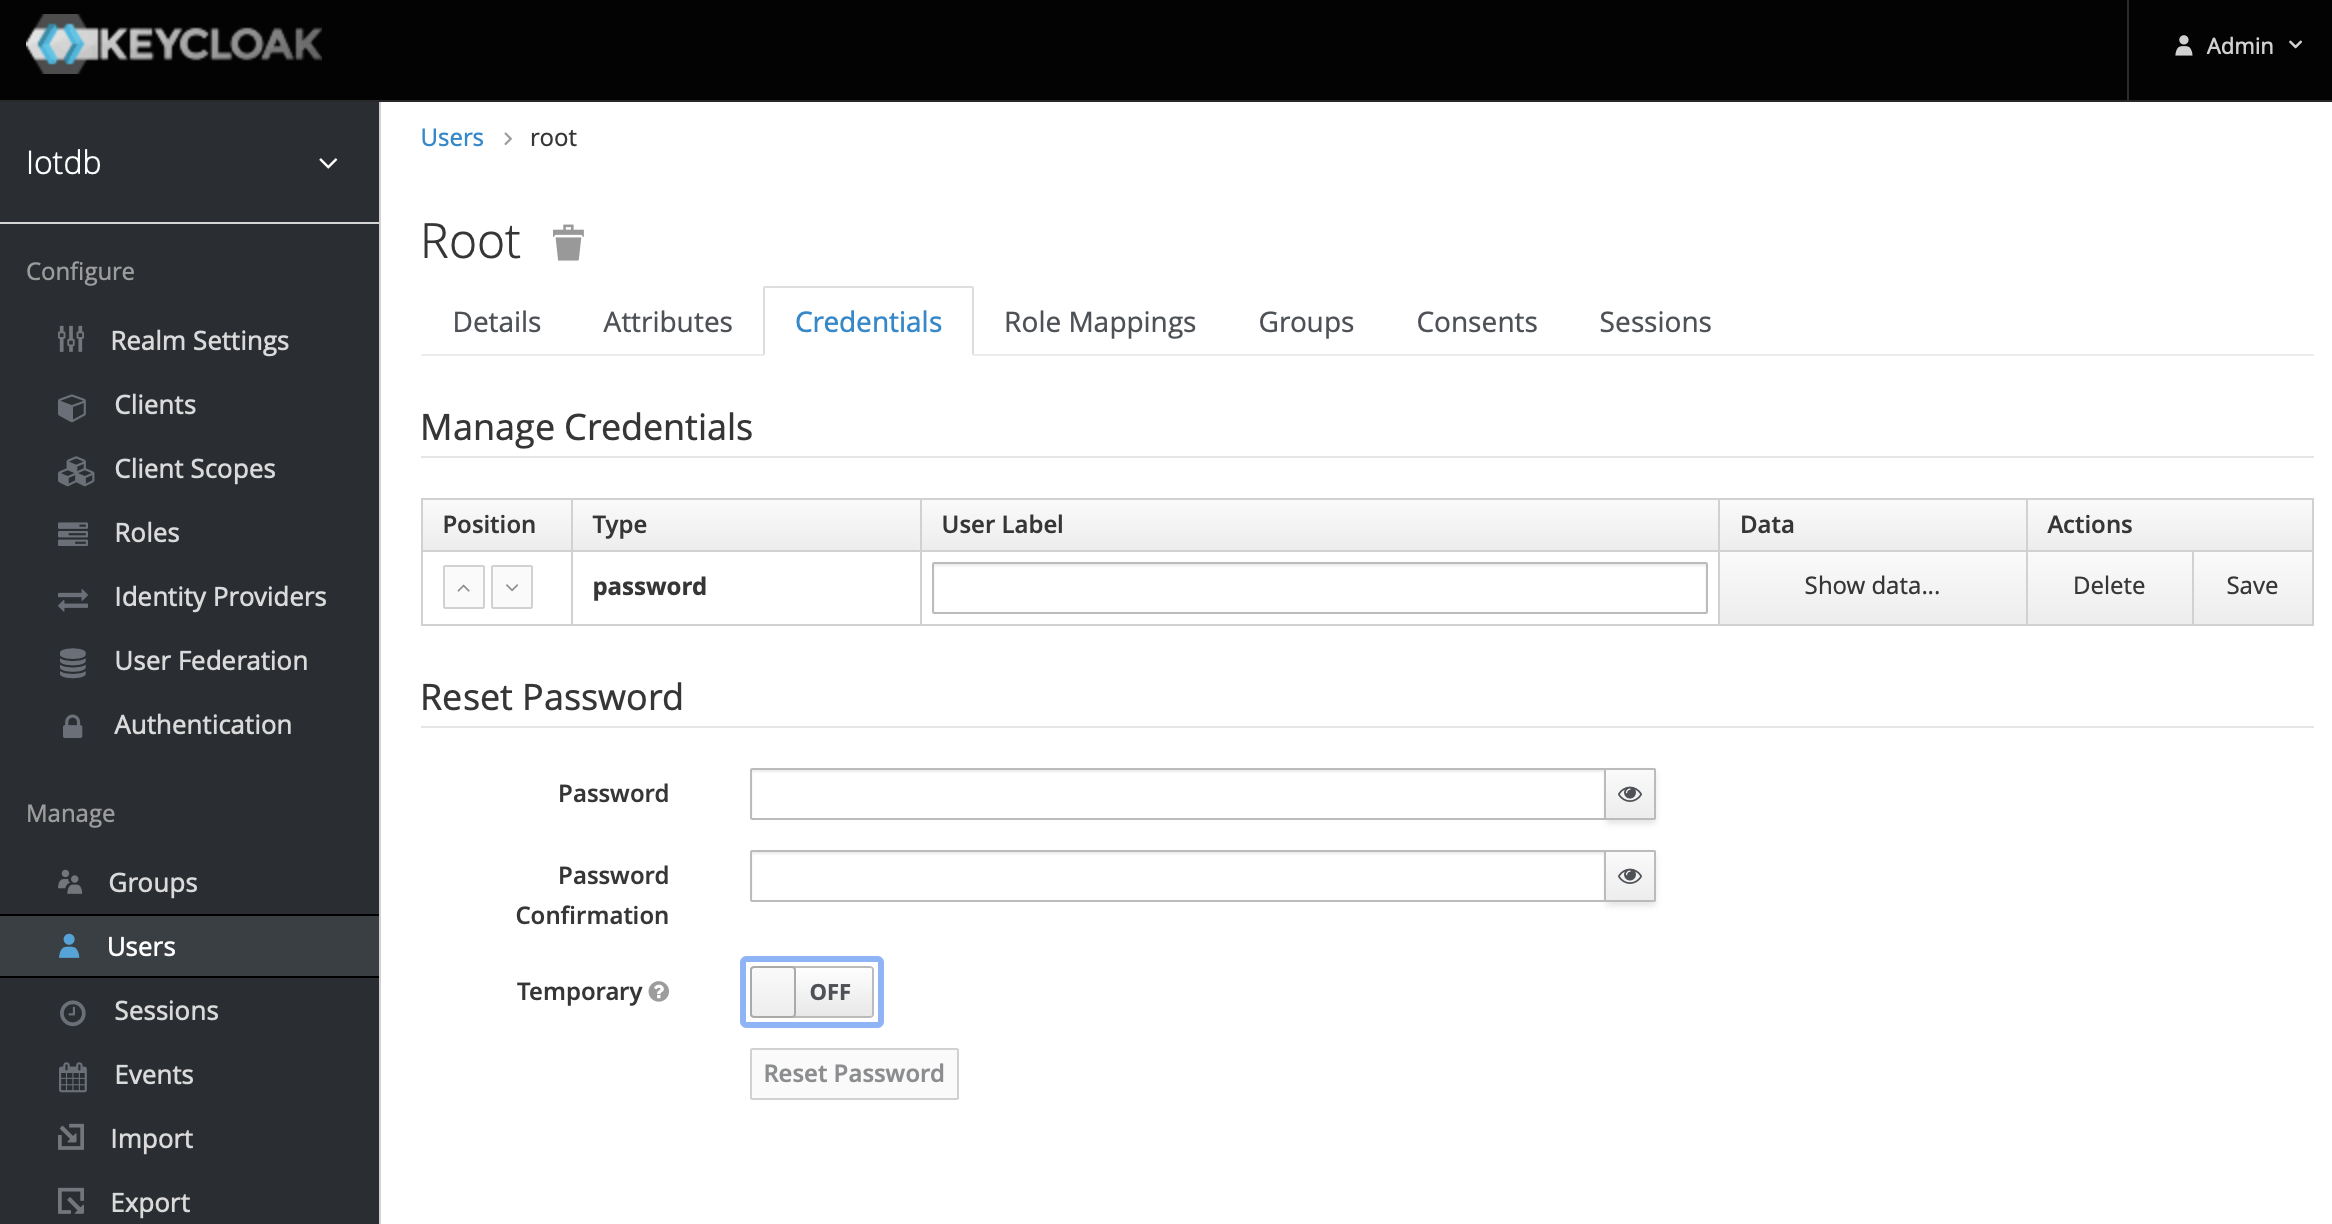
+7、Click the newly created user ID, click the credentials navigation, enter the
password and close the temporary option. The configuration of keycloud is
completed
+
+
+
+The above steps provide a way for keycloak to log into iotdb. For more ways,
please refer to keycloak configuration
+
If OIDC is enabled on server side then no username / passwort is needed but a
valid Access Token from the OIDC Provider.
So as username you use the token and the password has to be empty, e.g.
-```
+```shell
Shell > sbin/start-cli.sh -h 10.129.187.21 -p 6667 -u {my-access-token} -pw ""
```
@@ -117,7 +164,7 @@ In the simplest case you can get this via the command line
with the `passwort-gr
For example, if you use keycloack as OIDC and you have a realm with a client
`iotdb` defined as public you could use
the following `curl` command to fetch a token (replace all `{}` with
appropriate values).
-```
+```shell
curl -X POST
"https://{your-keycloack-server}/auth/realms/{your-realm}/protocol/openid-connect/token";
\
-H "Content-Type: application/x-www-form-urlencoded" \
-d "username={username}" \
@@ -144,13 +191,13 @@ The usage of -e parameter for Cli/shell is as follows:
The Linux and MacOS system commands:
-```
+```shell
Shell > sbin/start-cli.sh -h {host} -p {rpcPort} -u {user} -pw {password} -e
{sql for iotdb}
```
The Windows system commands:
-```
+```shell
Shell > sbin\start-cli.bat -h {host} -p {rpcPort} -u {user} -pw {password} -e
{sql for iotdb}
```
@@ -160,7 +207,7 @@ In order to better explain the use of -e parameter, take
following as an example
Suppose you want to create a storage group root.demo to a newly launched
IoTDB, create a timeseries root.demo.s1 and insert three data points into it.
With -e parameter, you could write a shell like this:
-```
+```shell
# !/bin/bash
host=127.0.0.1
@@ -178,7 +225,7 @@ pass=root
The print results are shown in the figure, which are consistent with the cli
and jdbc operations.
-```
+```shell
Shell > ./shell.sh
+-----------------------------+------------+
| Time|root.demo.s1|
diff --git a/docs/zh/UserGuide/CLI/Command-Line-Interface.md
b/docs/zh/UserGuide/CLI/Command-Line-Interface.md
index f3bf7da..93d4904 100644
--- a/docs/zh/UserGuide/CLI/Command-Line-Interface.md
+++ b/docs/zh/UserGuide/CLI/Command-Line-Interface.md
@@ -28,7 +28,7 @@ IOTDB为用户提供cli/Shell工具用于启动客户端和服务端程序。下
## 安装
在iotdb的根目录下执行
-```
+```shell
> mvn clean package -pl cli -am -DskipTests
```
@@ -44,12 +44,12 @@ IOTDB为用户提供cli/Shell工具用于启动客户端和服务端程序。下
Linux系统与MacOS系统启动命令如下:
-```
+```shell
Shell > sbin/start-cli.sh -h 127.0.0.1 -p 6667 -u root -pw root
```
Windows系统启动命令如下:
-```
+```shell
Shell > sbin\start-cli.bat -h 127.0.0.1 -p 6667 -u root -pw root
```
回车后即可成功启动客户端。启动后出现如图提示即为启动成功。
@@ -85,22 +85,71 @@ IoTDB> login successfully
Linux系统与MacOS系统启动命令如下:
-```
+```shell
Shell > sbin/start-cli.sh -h 10.129.187.21 -p 6667 -u root -pw root
-disableISO8601 -maxPRC 10
```
Windows系统启动命令如下:
-```
+```shell
Shell > sbin\start-cli.bat -h 10.129.187.21 -p 6667 -u root -pw root
-disableISO8601 -maxPRC 10
```
### 使用OpenID作为用户名认证登录
+OpenID Connect (OIDC)使用keycloack作为OIDC服务权限认证服务。
+
+#### 配置
+配置位于iotdb-engines.properties,设定authorizer_provider_class为org.apache.iotdb.db.auth.authorizer.OpenIdAuthorizer则开启了openID服务,默认情况下值为org.apache.iotdb.db.auth.authorizer.LocalFileAuthorizer表示没有开启openID服务。
+
+```
+authorizer_provider_class=org.apache.iotdb.db.auth.authorizer.OpenIdAuthorizer
+```
+如果开启了openID服务则openID_url为必填项,openID_url
值为http://ip:port/auth/realms/{realmsName}
+
+```
+openID_url=http://127.0.0.1:8080/auth/realms/iotdb/
+```
+####keycloack配置
+
+1、下载keycloack程序,在keycloack/bin中启动keycloack
+
+```shell
+Shell >cd bin
+Shell >./standalone.sh
+```
+2、使用https://ip:port/auth登陆keycloack,首次登陆需要创建用户
+
+
+
+3、点击Administration Console进入管理端
+
+
+
+4、在左侧的Master 菜单点击add Realm,输入Name创建一个新的Realm
+
+
+
+
+
+5、点击左侧菜单Clients,创建client
+
+
+
+6、点击左侧菜单User,创建user
+
+
+
+7、点击新创建的用户id,点击Credentials导航输入密码和关闭Temporary选项,至此keyclork 配置完成
+
+
+
+以上步骤提供了一种keycloak登陆iotdb方式,更多方式请参考keycloak配置
+
若对应的IoTDB服务器开启了使用OpenID Connect (OIDC)作为权限认证服务,那么就不再需要使用用户名密码进行登录。
替而代之的是使用Token,以及空密码。
此时,登录命令如下:
-```
+```shell
Shell > sbin/start-cli.sh -h 10.129.187.21 -p 6667 -u {my-access-token} -pw ""
```
@@ -108,9 +157,9 @@ Shell > sbin/start-cli.sh -h 10.129.187.21 -p 6667 -u
{my-access-token} -pw ""
如何获取token取决于你的OIDC设置。 最简单的一种情况是使用`password-grant`。例如,假设你在用keycloack作为你的OIDC服务,
并且你在keycloack中有一个被定义成publich的`iotdb`客户的realm,那么你可以使用如下`curl`命令获得token。
-(注意例子中的{}和里面的内容需要替换成具体的服务器地址和realm名字):
-```
-curl -X POST
"https://{your-keycloack-server}/auth/realms/{your-realm}/protocol/openid-connect/token";
\ -H "Content-Type: application/x-www-form-urlencoded" \
+(注意例子中的{}和里面的内容需要替换成具体的服务器地址和realm名字):
+```shell
+curl -X POST
"http://{your-keycloack-server}/auth/realms/{your-realm}/protocol/openid-connect/token";
\ -H "Content-Type: application/x-www-form-urlencoded" \
-d "username={username}" \
-d "password={password}" \
-d 'grant_type=password' \
@@ -132,12 +181,12 @@ curl -X POST
"https://{your-keycloack-server}/auth/realms/{your-realm}/protocol/
Linux系统与MacOS指令:
-```
+```shell
Shell > sbin/start-cli.sh -h {host} -p {rpcPort} -u {user} -pw {password} -e
{sql for iotdb}
```
Windows系统指令
-```
+```shell
Shell > sbin\start-cli.bat -h {host} -p {rpcPort} -u {user} -pw {password} -e
{sql for iotdb}
```
@@ -157,7 +206,7 @@ Shell > sbin\start-cli.bat -h {host} -p {rpcPort} -u {user}
-pw {password} -e {s
那么通过使用cli/Shell工具的-e参数,可以采用如下的脚本:
-```
+```shell
# !/bin/bash
host=127.0.0.1
@@ -175,7 +224,7 @@ pass=root
打印出来的结果显示如下,通过这种方式进行的操作与客户端的输入模式以及通过JDBC进行操作结果是一致的。
-```
+```shell
Shell > ./shell.sh
+-----------------------------+------------+
| Time|root.demo.s1|