This is an automated email from the ASF dual-hosted git repository.

leirui pushed a commit to branch rl
in repository https://gitbox.apache.org/repos/asf/iotdb-docs.git
The following commit(s) were added to refs/heads/rl by this push:
new abf334d before translating WorkBench into english
abf334d is described below
commit abf334db81a76bf93e2de05ec0139b884e84ad24
Author: Lei Rui <[email protected]>
AuthorDate: Thu Jul 27 18:41:28 2023 +0800
before translating WorkBench into english
---
.../Master/QuickStart/ClusterQuickStart.md | 2 +-
src/UserGuide/Master/Tools-System/CLI.md | 295 ++++++++++++++
.../Master/Tools-System/Import-Export-Tool.md | 428 +++++++++++++++++++++
.../Master/Tools-System/Maintenance-Tool.md | 228 +++++++++++
src/UserGuide/Master/Tools-System/Monitor-Tool.md | 116 ++++++
src/UserGuide/Master/Tools-System/Workbench.md | 365 ++++++++++++++++++
.../Master/Tools-System/Maintenance-Tool.md | 159 --------
src/zh/UserGuide/Master/Tools-System/Workbench.md | 365 ++++++++++++++++++
8 files changed, 1798 insertions(+), 160 deletions(-)
diff --git a/src/UserGuide/Master/QuickStart/ClusterQuickStart.md
b/src/UserGuide/Master/QuickStart/ClusterQuickStart.md
index 21d19dc..ec01428 100644
--- a/src/UserGuide/Master/QuickStart/ClusterQuickStart.md
+++ b/src/UserGuide/Master/QuickStart/ClusterQuickStart.md
@@ -19,7 +19,7 @@
-->
-## Quick Start
+## Cluster Quick Start
This article uses a local environment as an example to
illustrate how to start, expand, and shrink an IoTDB Cluster.
diff --git a/src/UserGuide/Master/Tools-System/CLI.md
b/src/UserGuide/Master/Tools-System/CLI.md
new file mode 100644
index 0000000..ff3f4a1
--- /dev/null
+++ b/src/UserGuide/Master/Tools-System/CLI.md
@@ -0,0 +1,295 @@
+<!--
+
+ Licensed to the Apache Software Foundation (ASF) under one
+ or more contributor license agreements. See the NOTICE file
+ distributed with this work for additional information
+ regarding copyright ownership. The ASF licenses this file
+ to you under the Apache License, Version 2.0 (the
+ "License"); you may not use this file except in compliance
+ with the License. You may obtain a copy of the License at
+
+ http://www.apache.org/licenses/LICENSE-2.0
+
+ Unless required by applicable law or agreed to in writing,
+ software distributed under the License is distributed on an
+ "AS IS" BASIS, WITHOUT WARRANTIES OR CONDITIONS OF ANY
+ KIND, either express or implied. See the License for the
+ specific language governing permissions and limitations
+ under the License.
+
+-->
+
+# Command Line Interface (CLI)
+
+
+IoTDB provides Cli/shell tools for users to interact with IoTDB server in
command lines. This document shows how Cli/shell tool works and the meaning of
its parameters.
+
+> Note: In this document, \$IOTDB\_HOME represents the path of the IoTDB
installation directory.
+
+## Installation
+
+If you use the source code version of IoTDB, then under the root path of
IoTDB, execute:
+
+```shell
+> mvn clean package -pl iotdb-client/cli -am -DskipTests -P
get-jar-with-dependencies
+```
+
+After build, the IoTDB Cli will be in the folder
"cli/target/iotdb-cli-{project.version}".
+
+If you download the binary version, then the Cli can be used directly in sbin
folder.
+
+## Running
+
+### Running Cli
+
+After installation, there is a default user in IoTDB: `root`, and the
+default password is `root`. Users can use this username to try IoTDB Cli/Shell
tool. The cli startup script is the `start-cli` file under the
\$IOTDB\_HOME/bin folder. When starting the script, you need to specify the IP
and PORT. (Make sure the IoTDB cluster is running properly when you use
Cli/Shell tool to connect to it.)
+
+Here is an example where the cluster is started locally and the user has not
changed the running port. The default rpc port is
+6667 <br>
+If you need to connect to the remote DataNode or changes
+the rpc port number of the DataNode running, set the specific IP and RPC PORT
at -h and -p.<br>
+You also can set your own environment variable at the front of the start
script ("/sbin/start-cli.sh" for linux and "/sbin/start-cli.bat" for windows)
+
+The Linux and MacOS system startup commands are as follows:
+
+```shell
+Shell > bash sbin/start-cli.sh -h 127.0.0.1 -p 6667 -u root -pw root
+```
+
+The Windows system startup commands are as follows:
+
+```shell
+Shell > sbin\start-cli.bat -h 127.0.0.1 -p 6667 -u root -pw root
+```
+
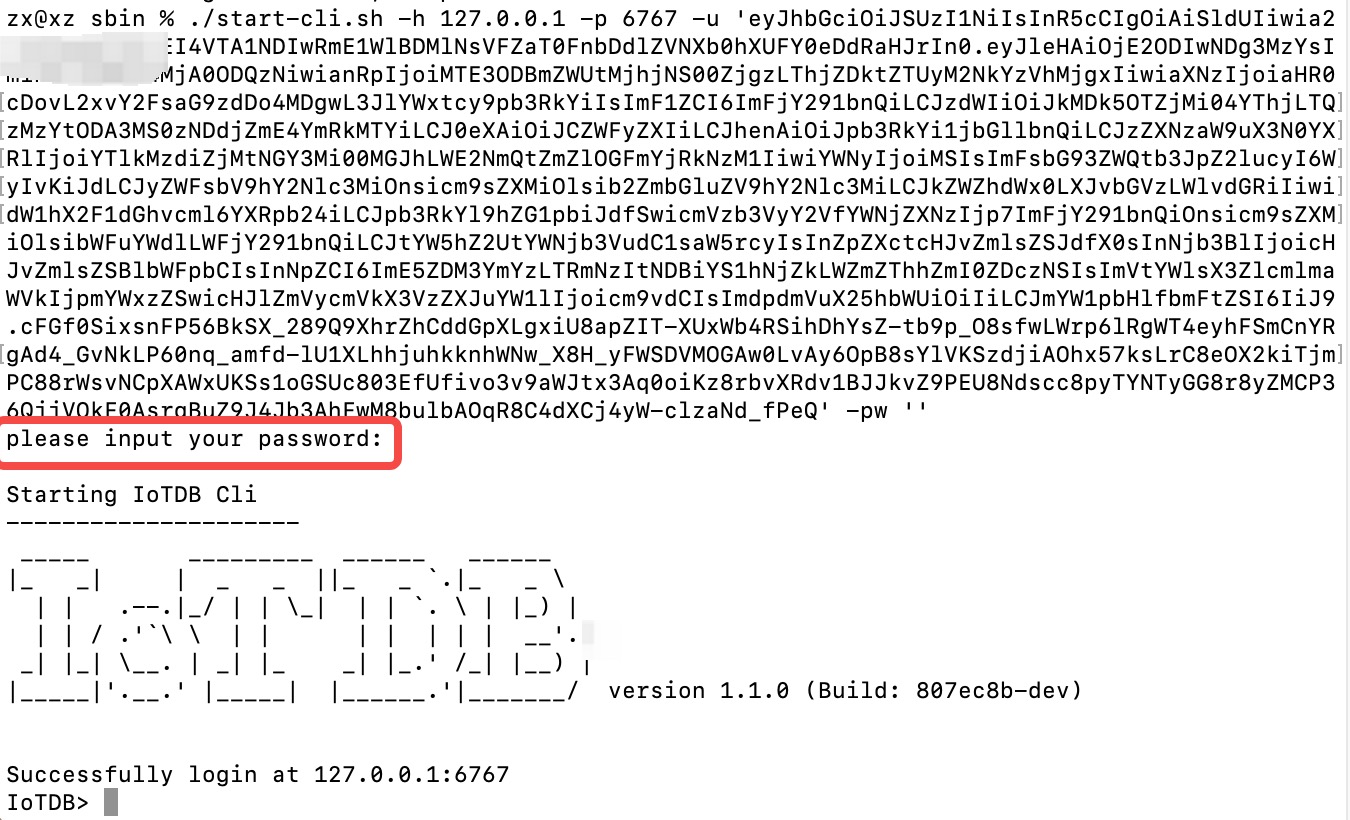
+After operating these commands, the cli can be started successfully. The
successful status will be as follows:
+
+```
+ _____ _________ ______ ______
+|_ _| | _ _ ||_ _ `.|_ _ \
+ | | .--.|_/ | | \_| | | `. \ | |_) |
+ | | / .'`\ \ | | | | | | | __'.
+ _| |_| \__. | _| |_ _| |_.' /_| |__) |
+|_____|'.__.' |_____| |______.'|_______/ version <version>
+
+
+Successfully login at 127.0.0.1:6667
+IoTDB>
+```
+
+Enter ```quit``` or `exit` can exit Cli.
+
+### Cli Parameters
+
+| Parameter name | Parameter type | Required |
Description | Example
|
+| :--------------------------- | :------------------------- | :------- |
:----------------------------------------------------------- |
:------------------ |
+| -disableISO8601 | No parameters | No | If
this parameter is set, IoTDB will print the timestamp in digital form |
-disableISO8601 |
+| -h <`host`> | string, no quotation marks | Yes | The
IP address of the IoTDB server | -h 10.129.187.21 |
+| -help | No parameters | No | Print
help information for IoTDB | -help |
+| -p <`rpcPort`> | int | Yes | The
rpc port number of the IoTDB server. IoTDB runs on rpc port 6667 by default |
-p 6667 |
+| -pw <`password`> | string, no quotation marks | No | The
password used for IoTDB to connect to the server. If no password is entered,
IoTDB will ask for password in Cli command | -pw root |
+| -u <`username`> | string, no quotation marks | Yes | User
name used for IoTDB to connect the server | -u root |
+| -maxPRC <`maxPrintRowCount`> | int | No | Set
the maximum number of rows that IoTDB returns | -maxPRC 10 |
+| -e <`execute`> | string | No |
manipulate IoTDB in batches without entering cli input mode | -e "show
databases" |
+| -c | empty | No | If
the server enables `rpc_thrift_compression_enable=true`, then cli must use `-c`
| -c |
+
+Following is a cli command which connects the host with IP
+10.129.187.21, rpc port 6667, username "root", password "root", and prints the
timestamp in digital form. The maximum number of lines displayed on the IoTDB
command line is 10.
+
+The Linux and MacOS system startup commands are as follows:
+
+```shell
+Shell > bash sbin/start-cli.sh -h 10.129.187.21 -p 6667 -u root -pw root
-disableISO8601 -maxPRC 10
+```
+
+The Windows system startup commands are as follows:
+
+```shell
+Shell > sbin\start-cli.bat -h 10.129.187.21 -p 6667 -u root -pw root
-disableISO8601 -maxPRC 10
+```
+
+### CLI Special Command
+
+Special commands of Cli are below.
+
+| Command | Description / Example
|
+| :-------------------------- |
:------------------------------------------------------ |
+| `set time_display_type=xxx` | eg. long, default, ISO8601, yyyy-MM-dd
HH:mm:ss |
+| `show time_display_type` | show time display type
|
+| `set time_zone=xxx` | eg. +08:00, Asia/Shanghai
|
+| `show time_zone` | show cli time zone
|
+| `set fetch_size=xxx` | set fetch size when querying data from server
|
+| `show fetch_size` | show fetch size
|
+| `set max_display_num=xxx` | set max lines for cli to output, -1 equals to
unlimited |
+| `help` | Get hints for CLI special commands
|
+| `exit/quit` | Exit CLI
|
+
+### Note on using the CLI with OpenID Connect Auth enabled on Server side
+
+Openid connect (oidc) uses keycloack as the authority authentication service
of oidc service
+
+
+#### configuration
+
+The configuration is located in iotdb-common.properties , set the
author_provider_class is
org.apache.iotdb.commons.auth.authorizer.OpenIdAuthorizer Openid service is
enabled, and the default value is
org.apache.iotdb.db.auth.authorizer.LocalFileAuthorizer Indicates that the
openid service is not enabled.
+
+```
+authorizer_provider_class=org.apache.iotdb.commons.auth.authorizer.OpenIdAuthorizer
+```
+
+If the openid service is turned on, openid_URL is required,openID_url value is
http://ip:port/realms/{realmsName}
+
+```
+openID_url=http://127.0.0.1:8080/realms/iotdb/
+```
+
+#### keycloack configuration
+
+1、Download the keycloack file (This tutorial is version 21.1.0) and start
keycloack in keycloack/bin
+
+```shell
+Shell >cd bin
+Shell >./kc.sh start-dev
+```
+
+2、use url(https://ip:port) login keycloack, the first login needs to create a
user
+
+
+3、Click administration console
+
+
+4、In the master menu on the left, click Create realm and enter Realm name to
create a new realm
+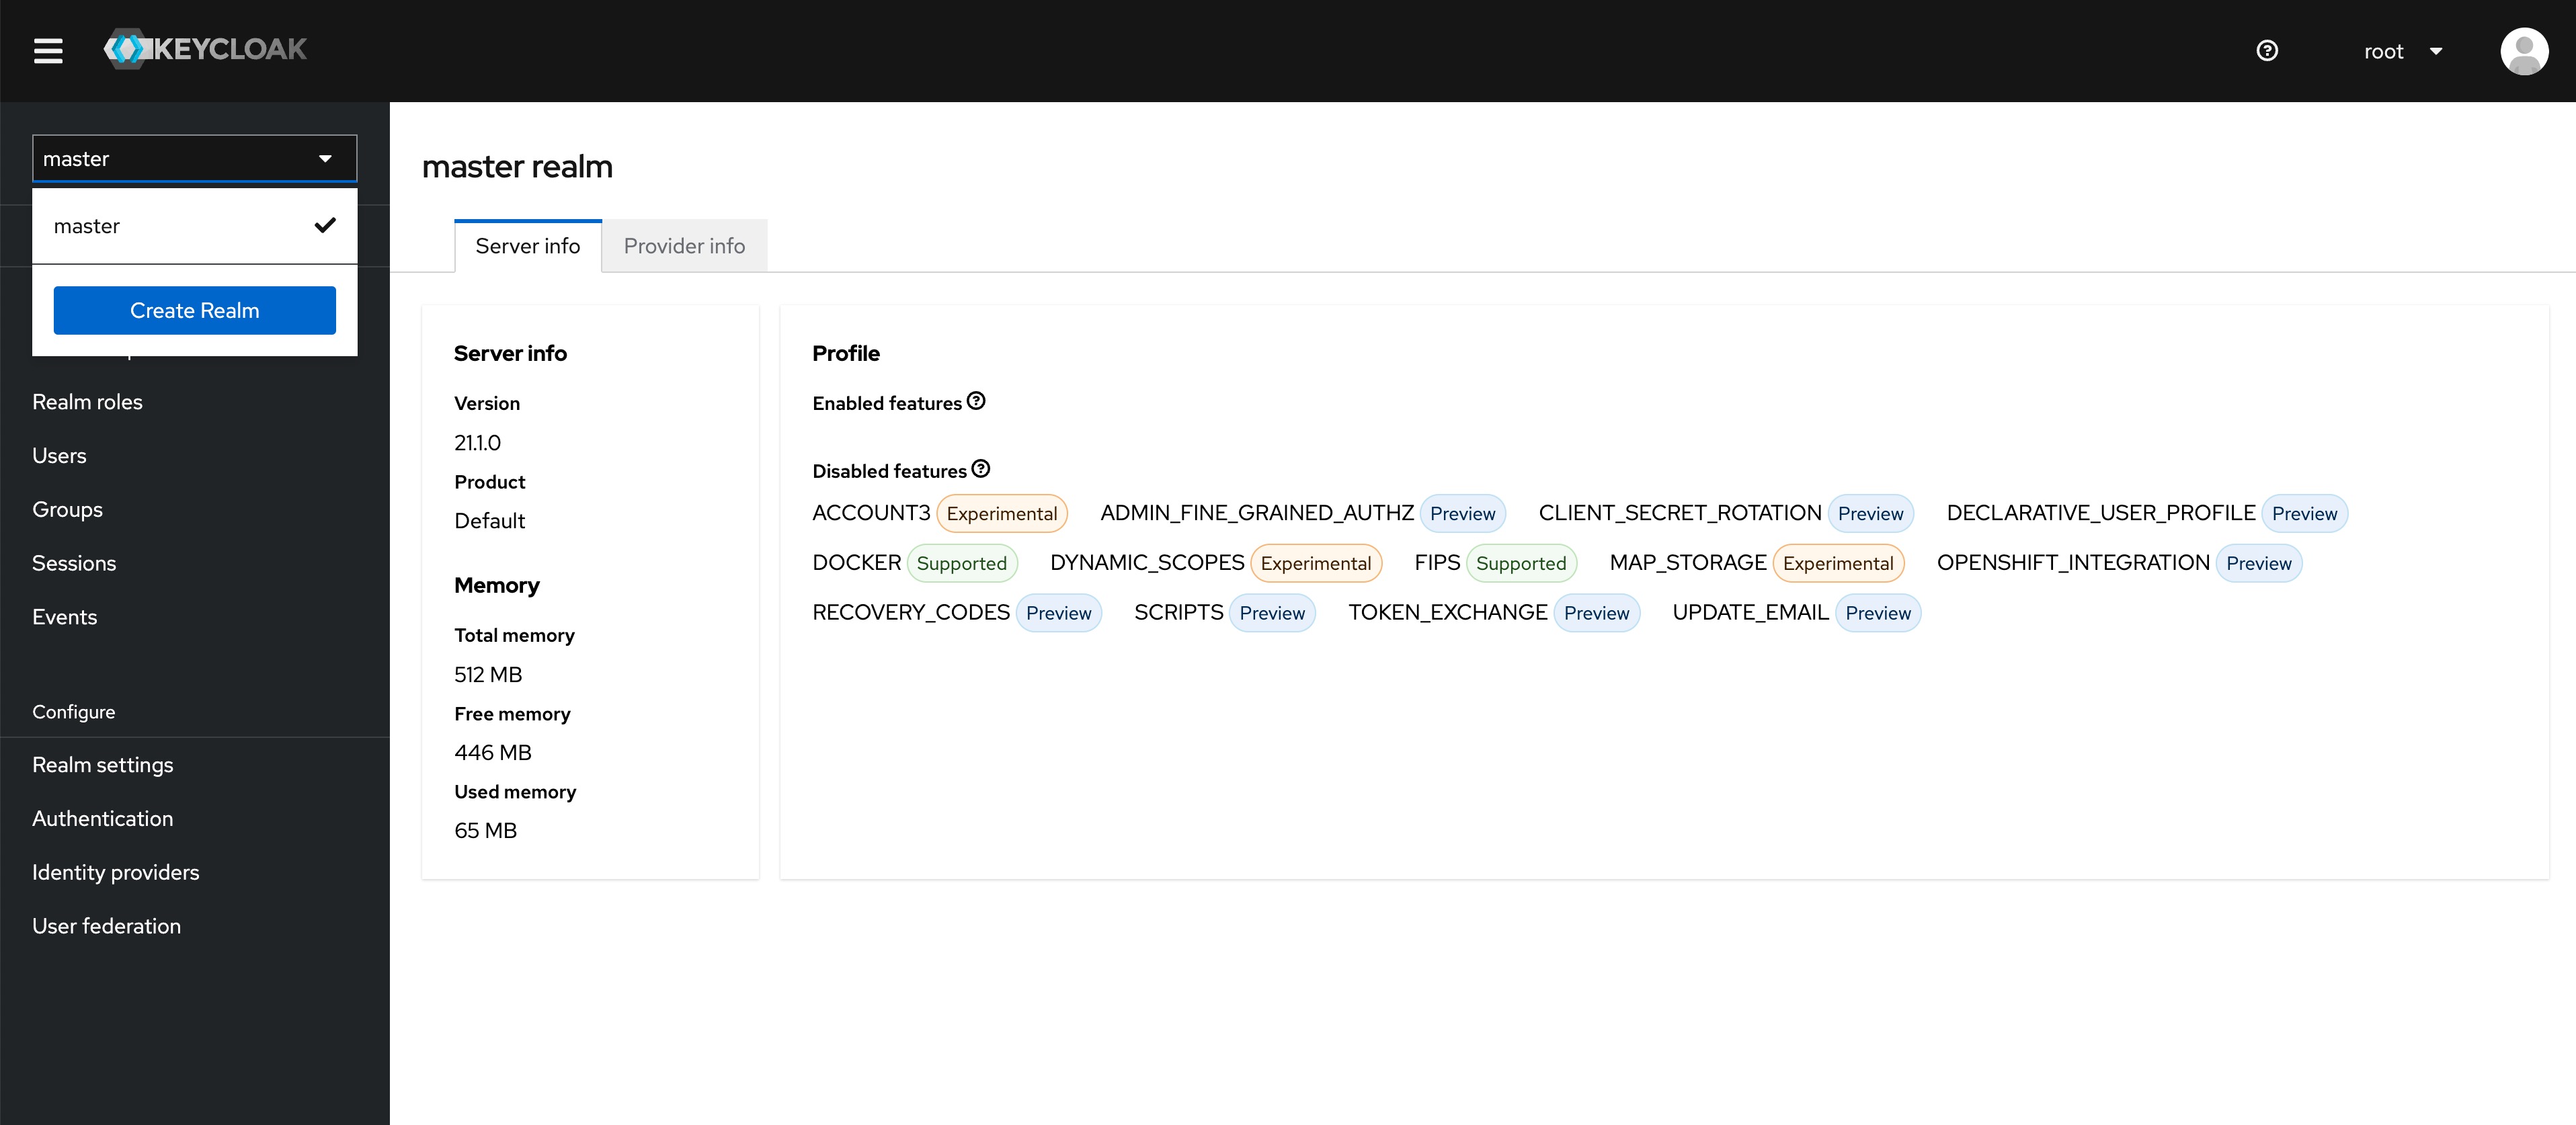
+
+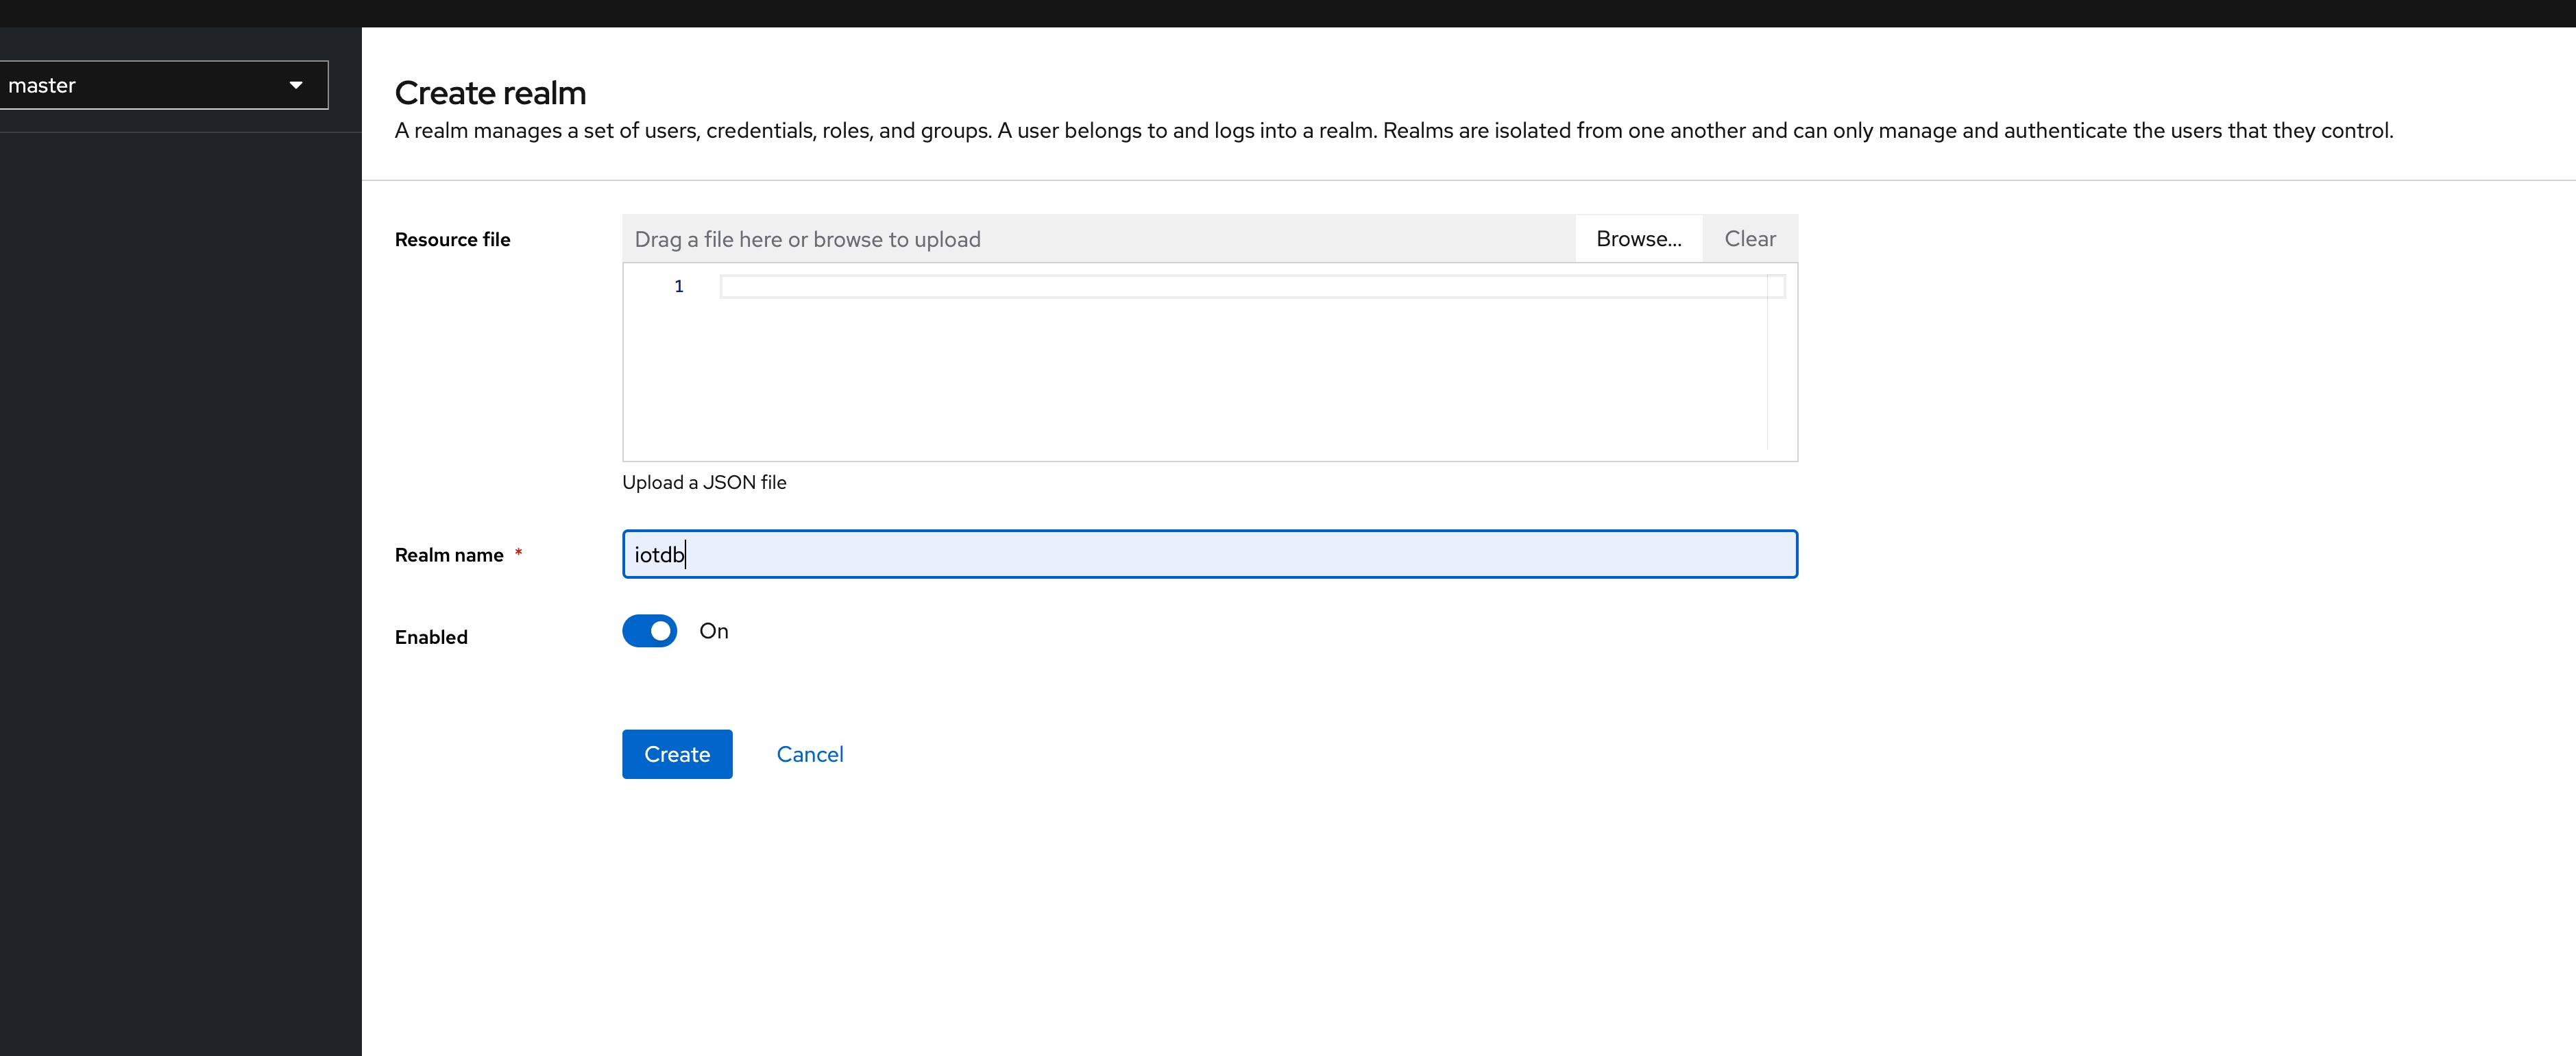
+
+
+5、Click the menu clients on the left to create clients
+
+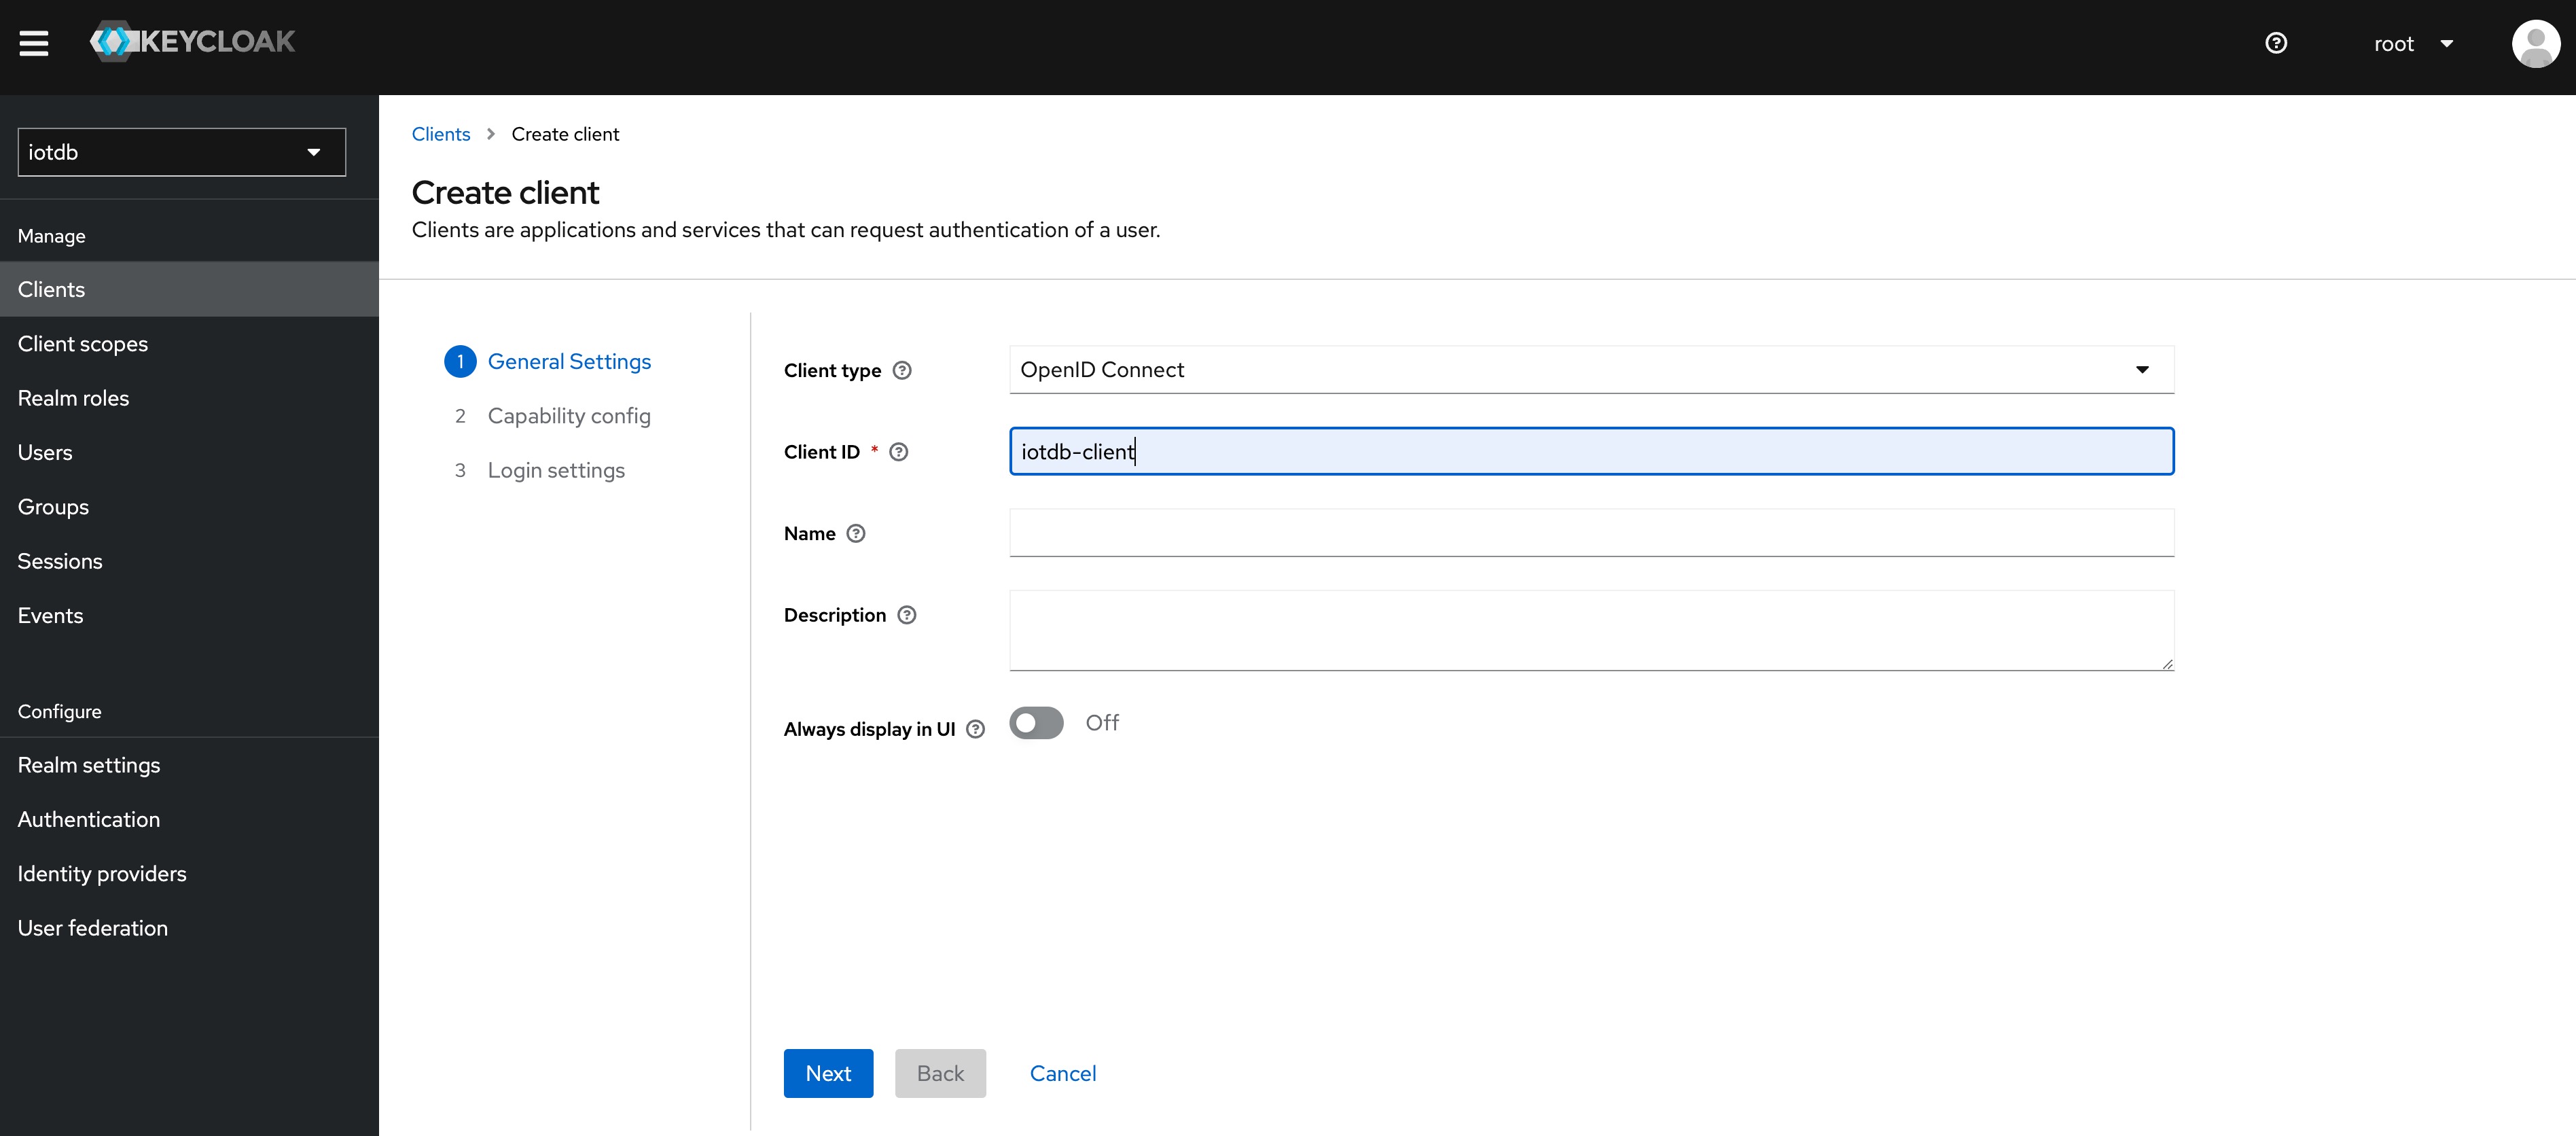
+
+6、Click user on the left menu to create user
+
+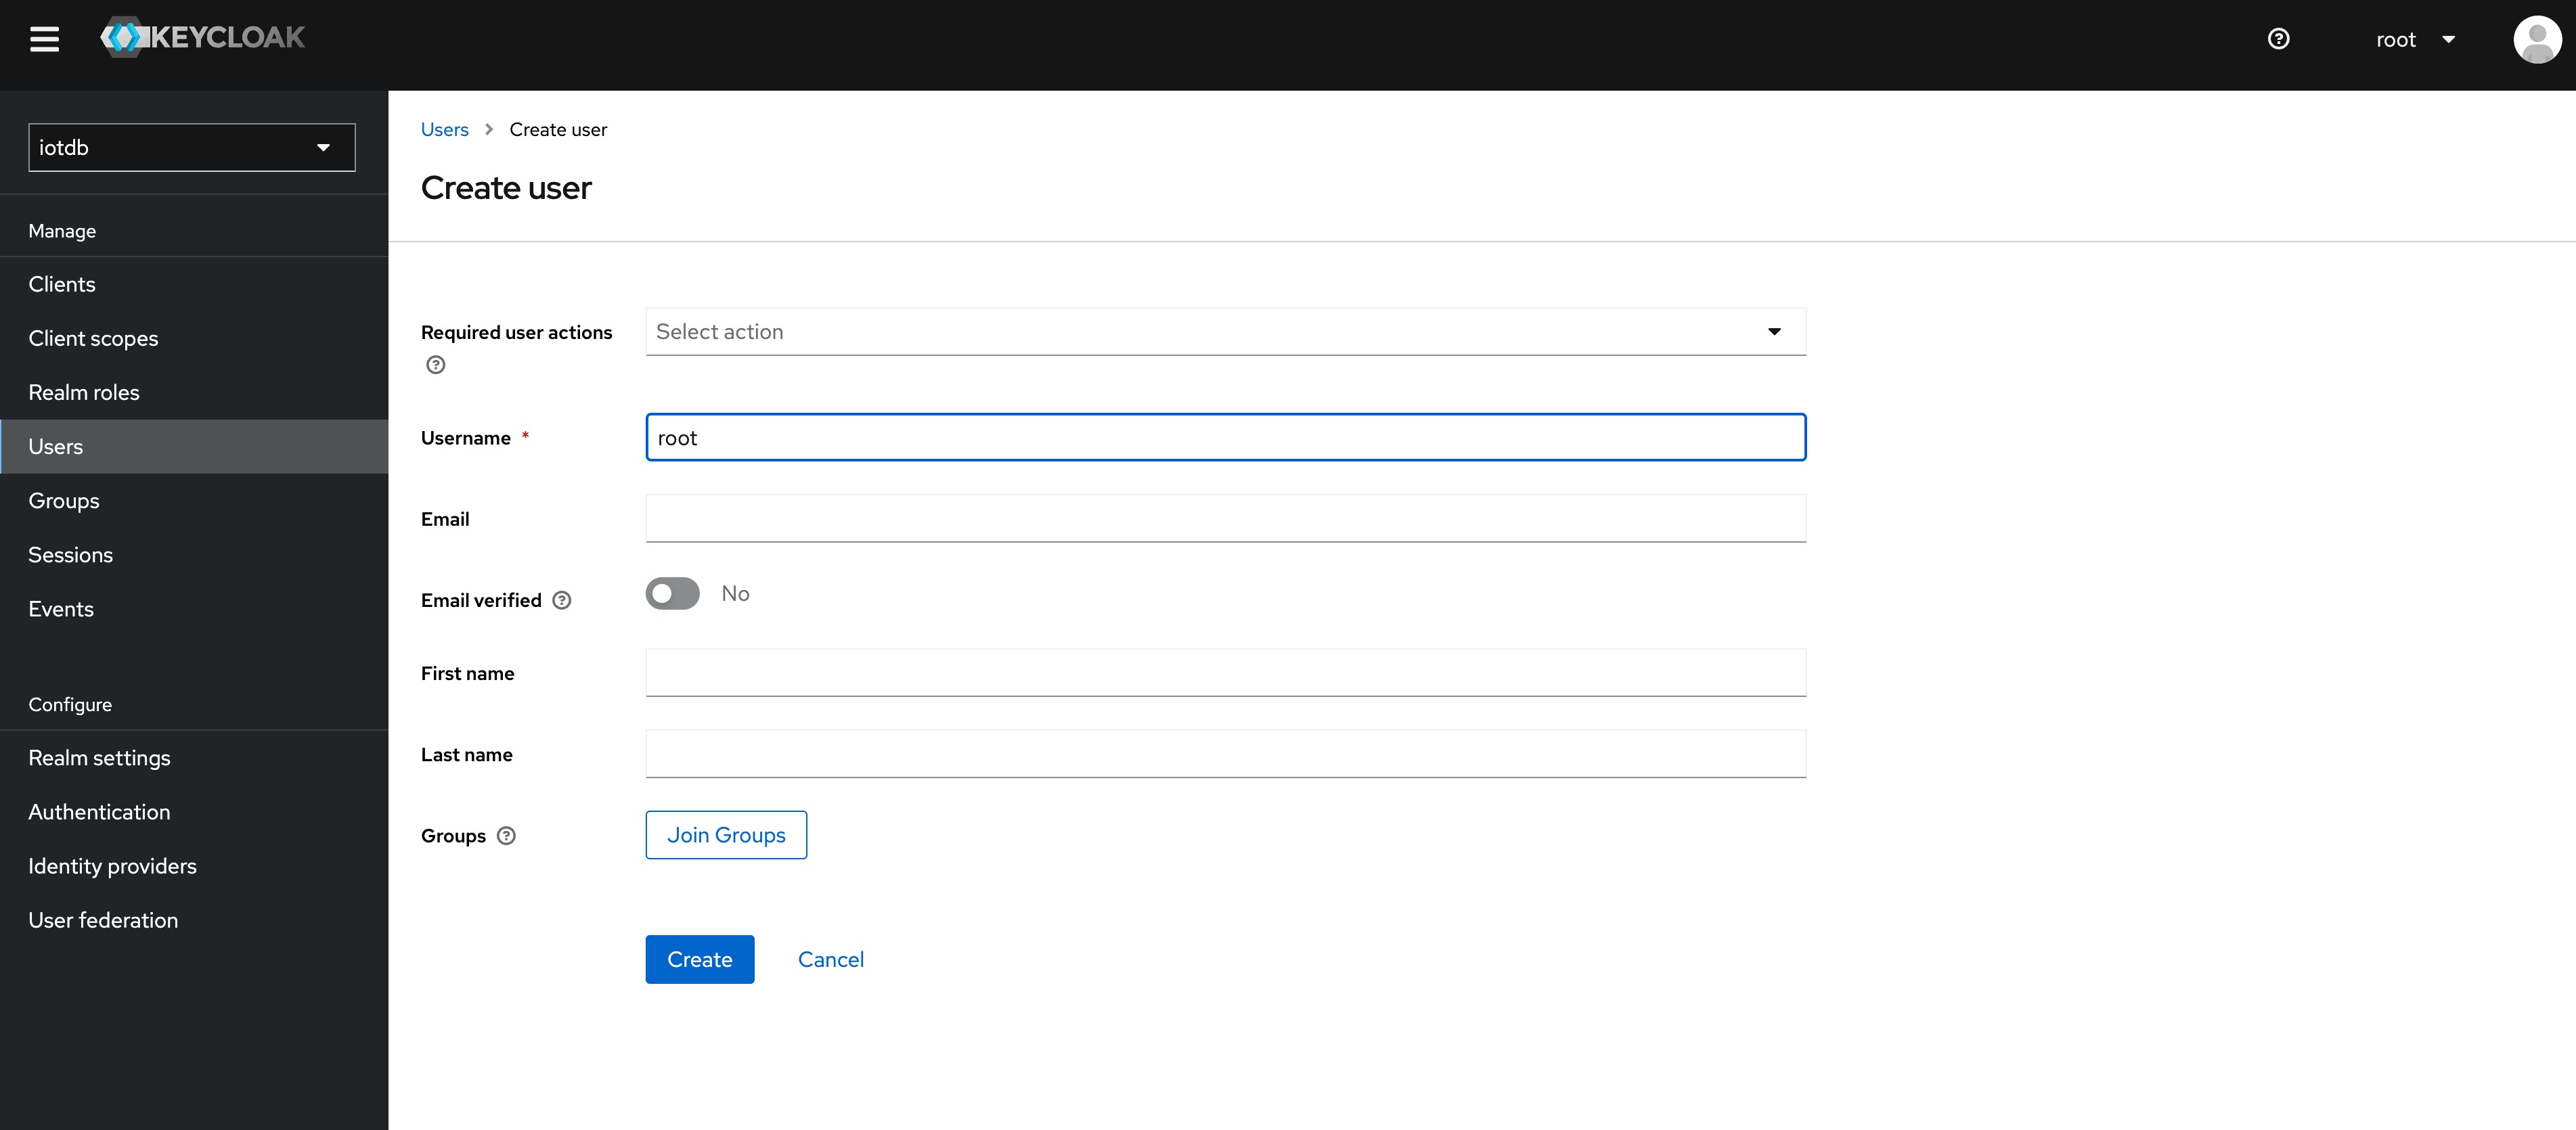
+
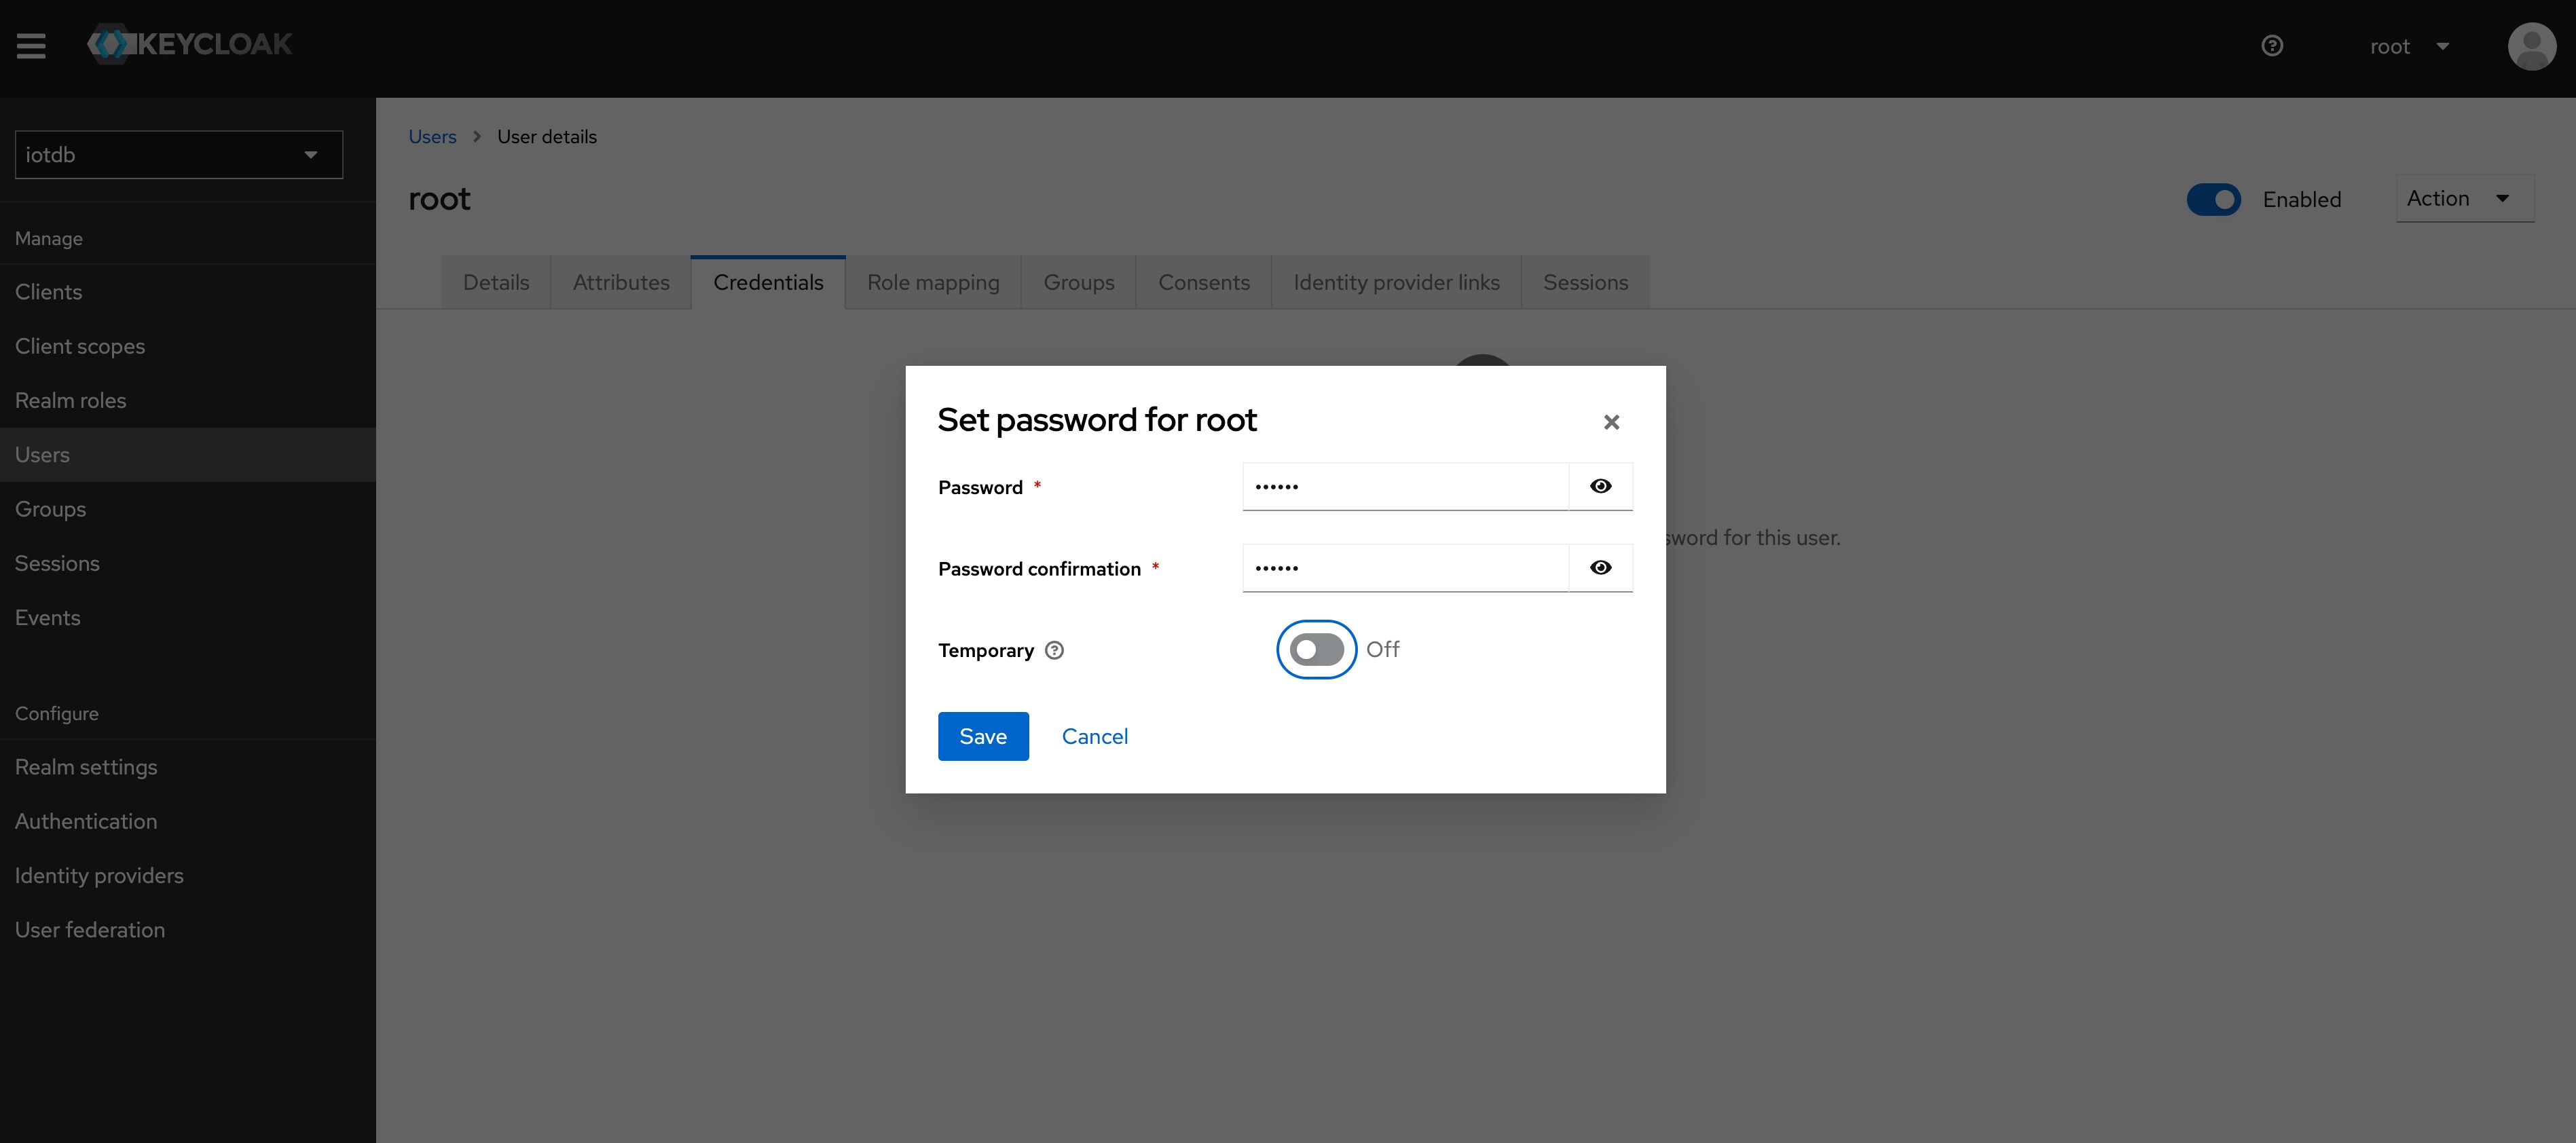
+7、Click the newly created user ID, click the credentials navigation, enter the
password and close the temporary option. The configuration of keycloud is
completed
+
+
+
+8、To create a role, click Roles on the left menu and then click the Create
Role button to add a role
+
+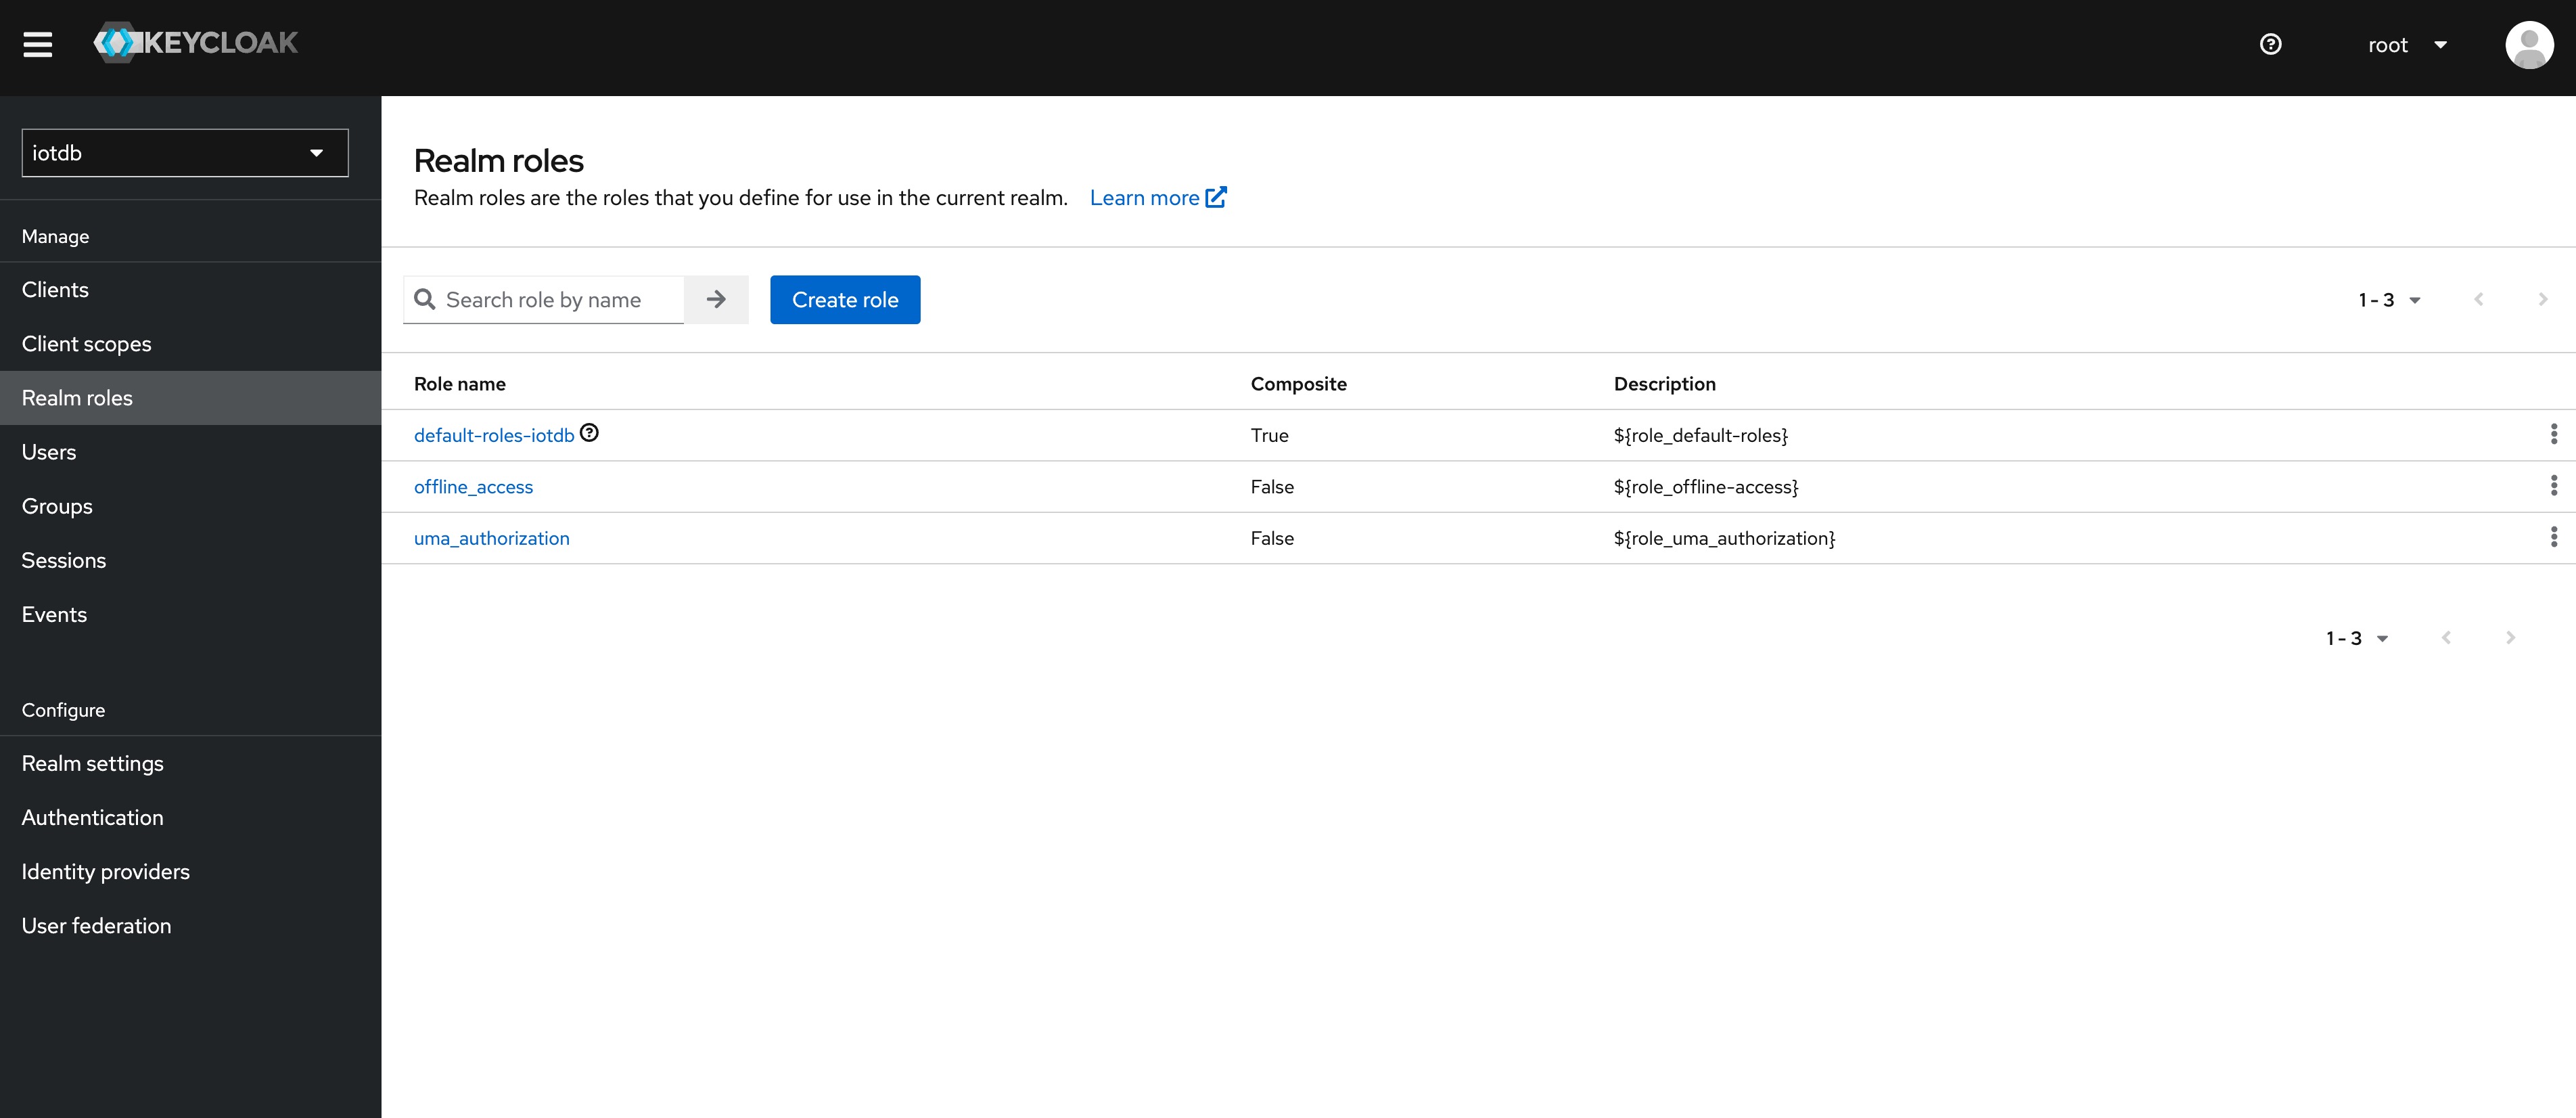
+
+9、 Enter `iotdb_admin` in the Role Name and click the save button. Tip:
`iotdb_admin` here cannot be any other name, otherwise even after successful
login, you will not have permission to use iotdb's query, insert, create
database, add users, roles and other functions
+
+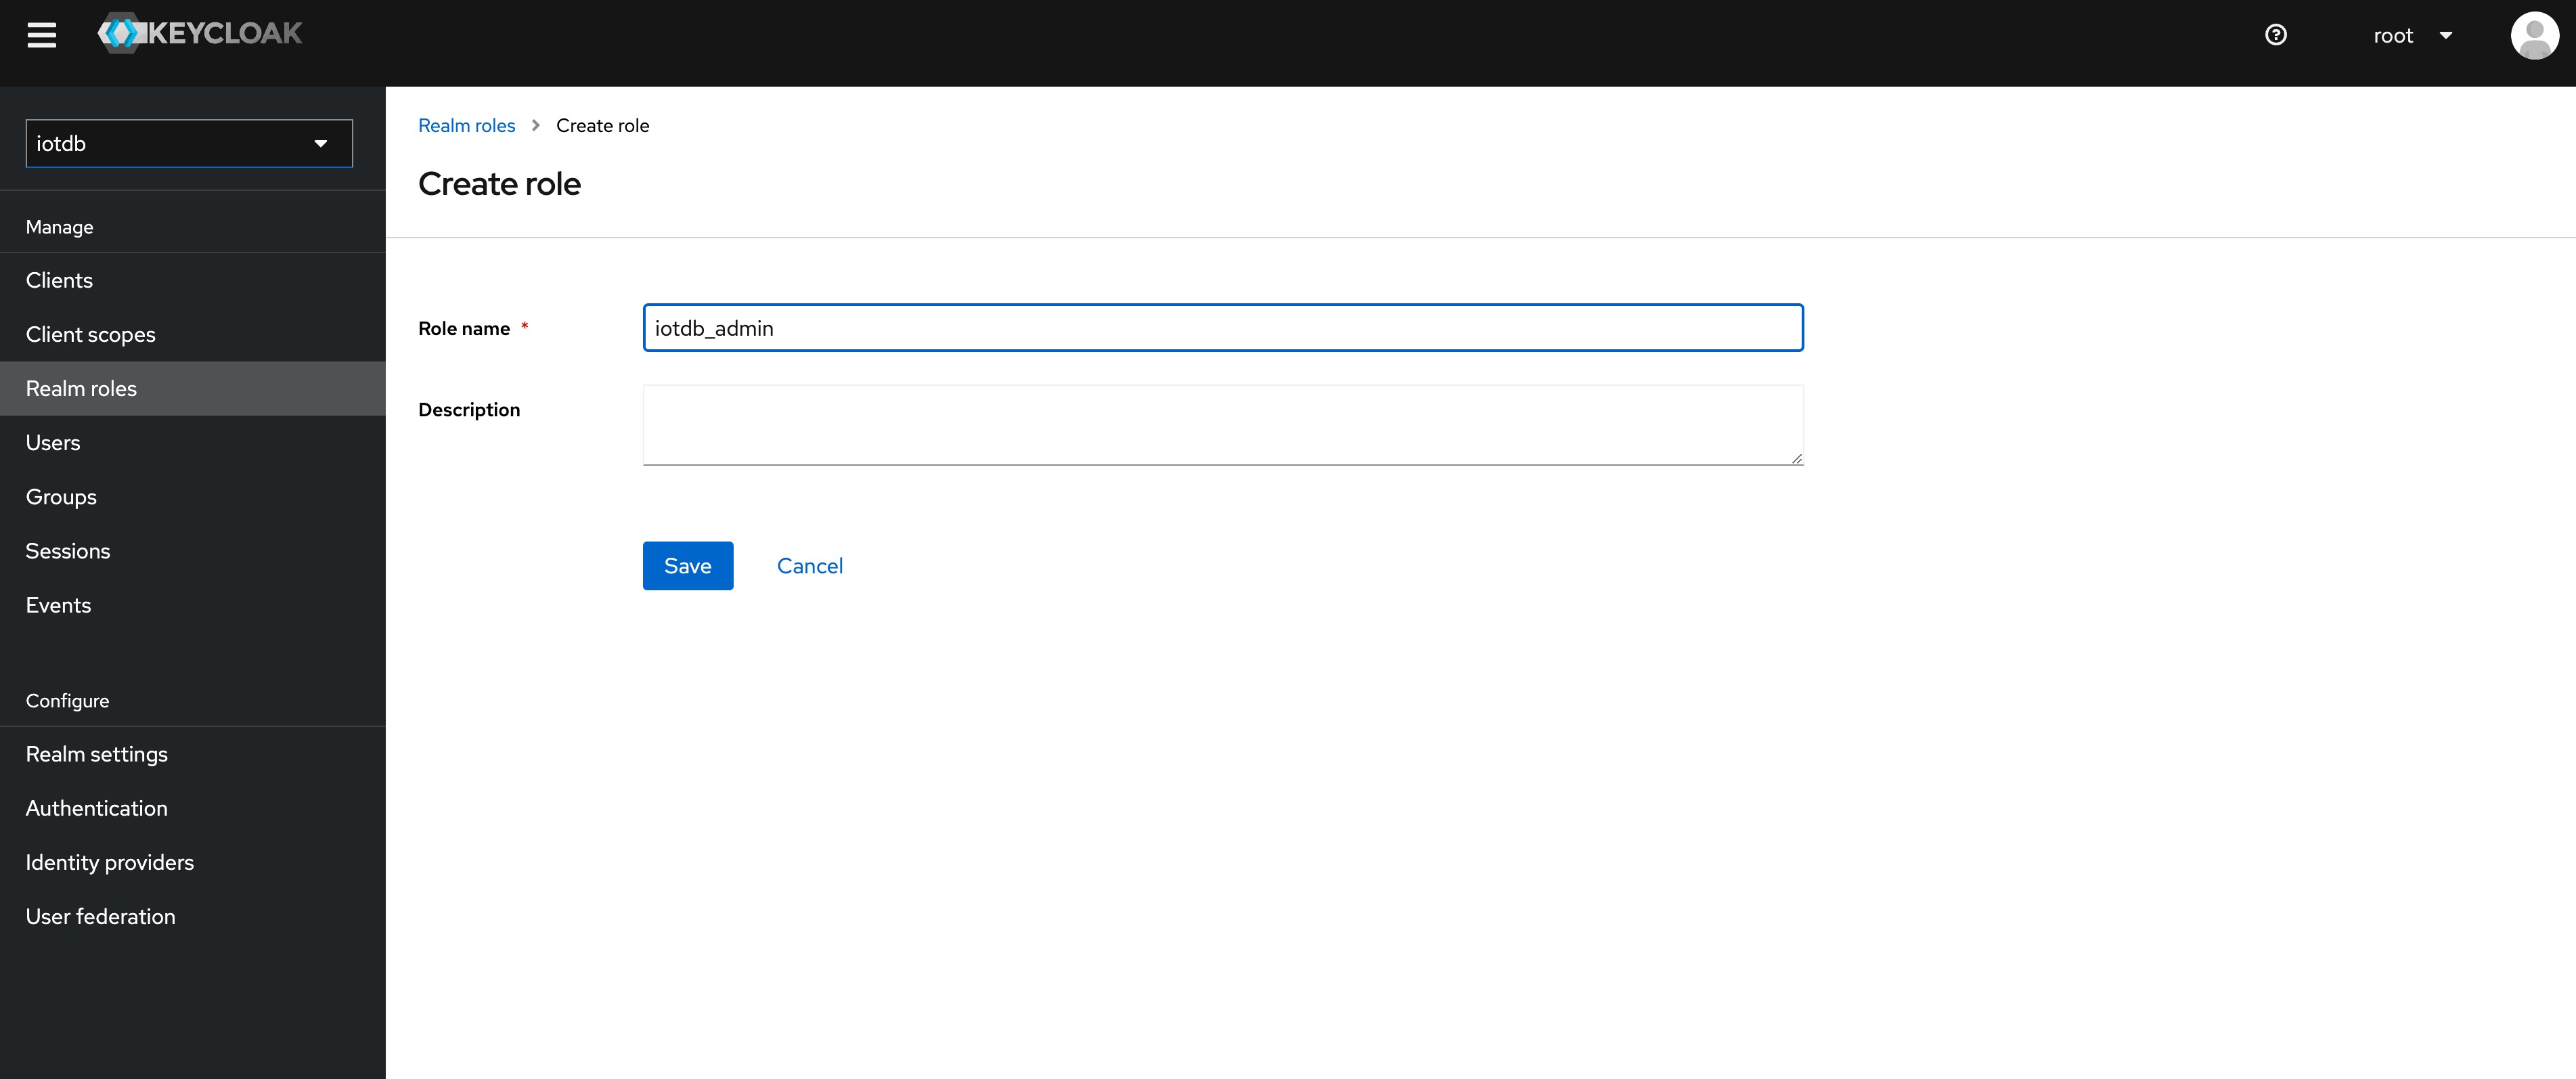
+
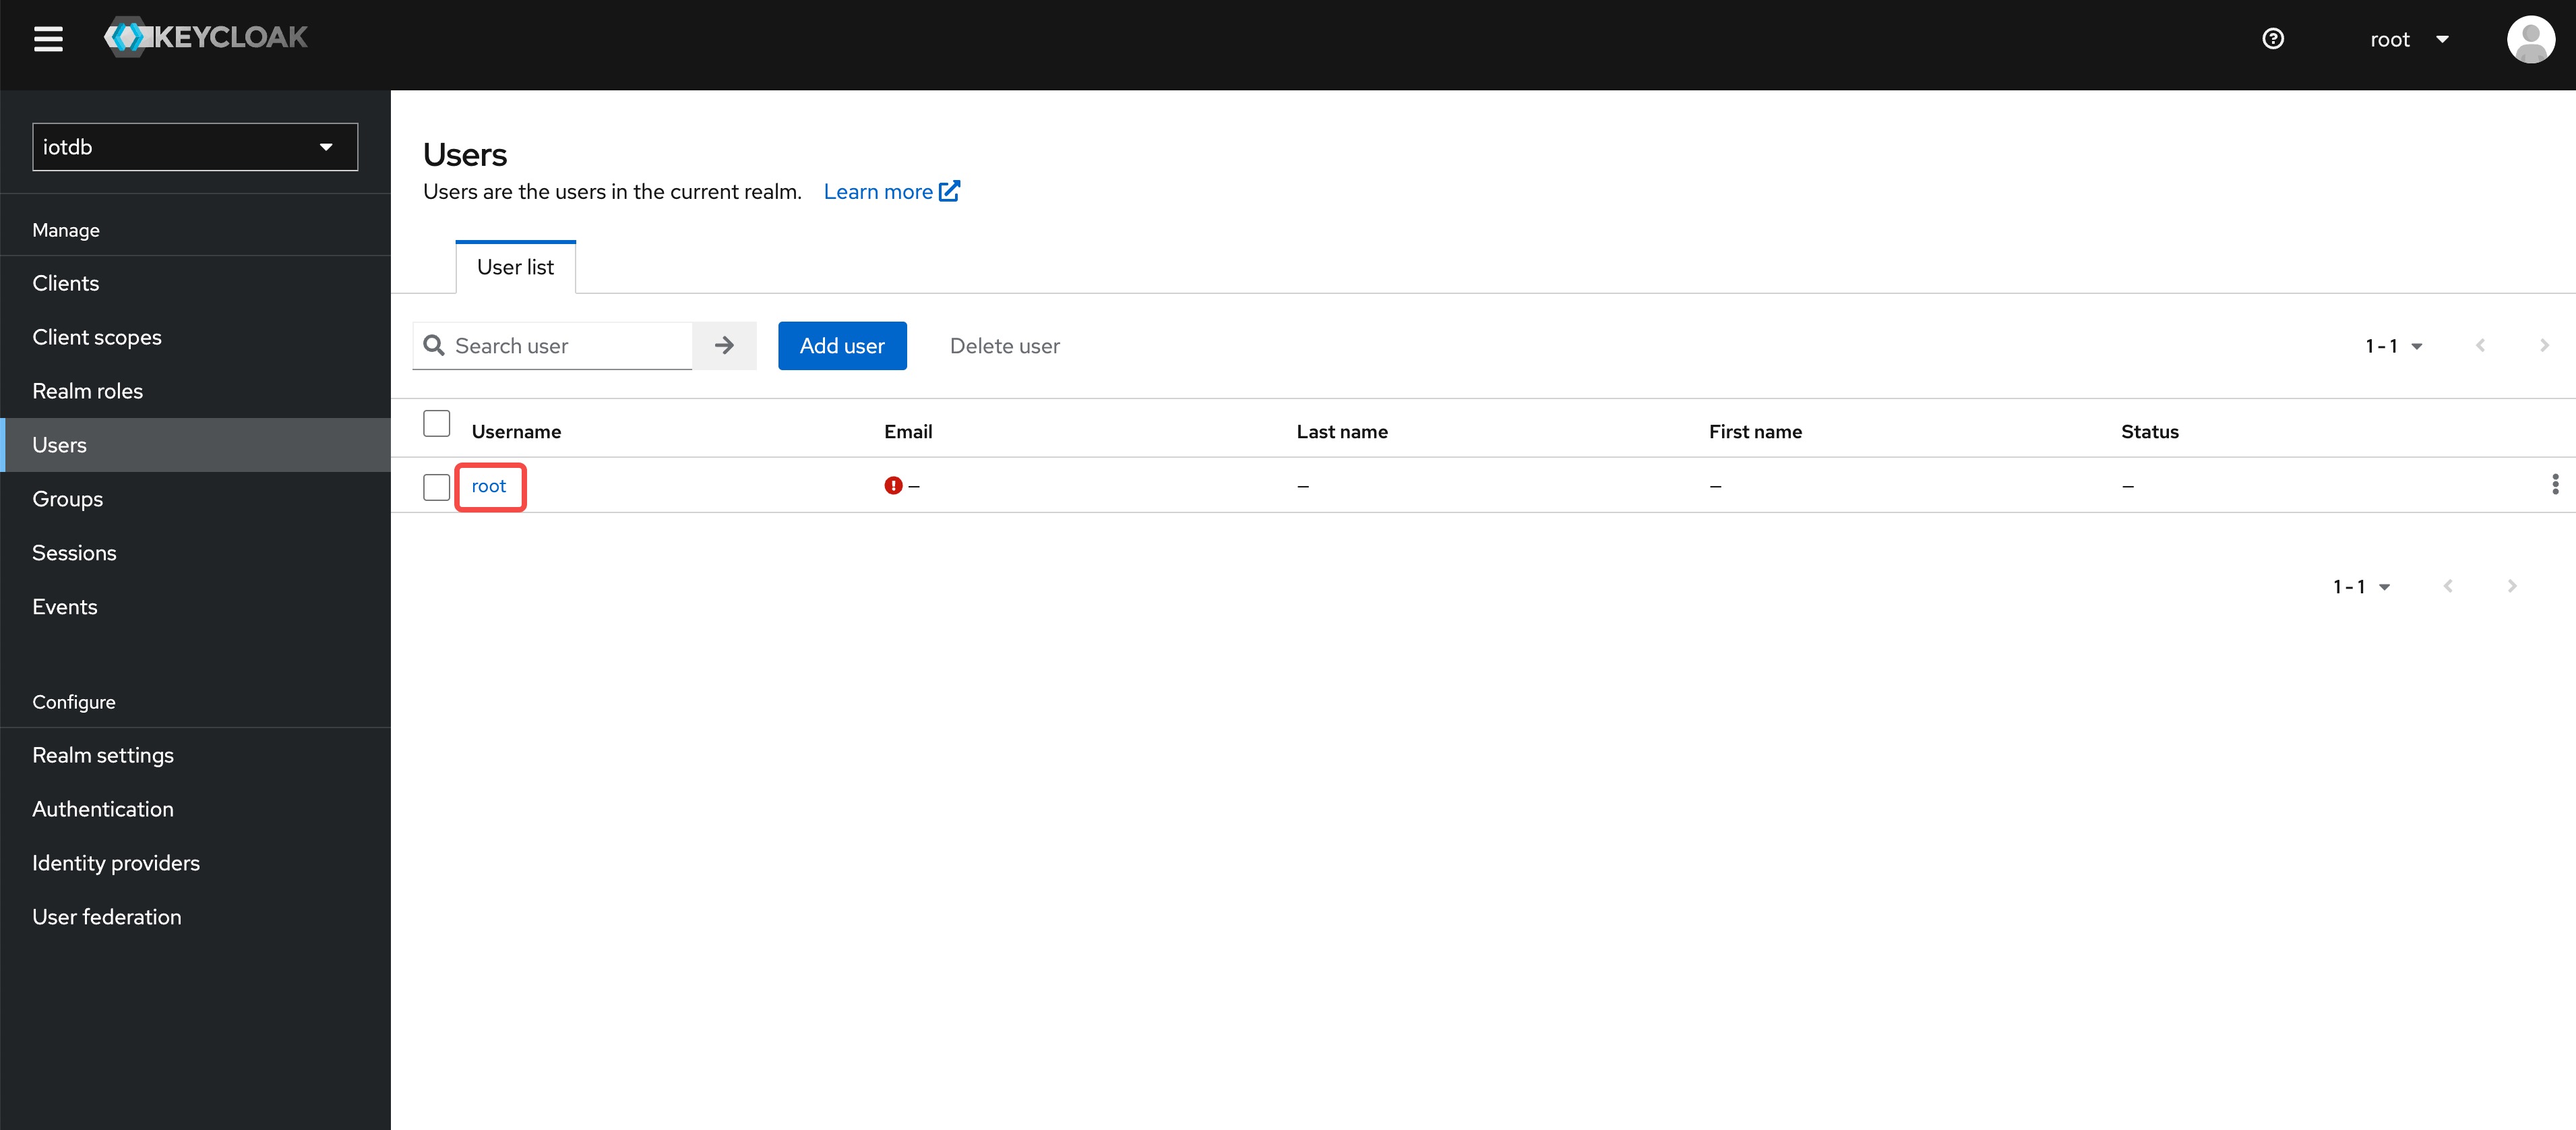
+10、Click on the User menu on the left and then click on the user in the user
list to add the `iotdb_admin` role we just created for that user
+
+
+
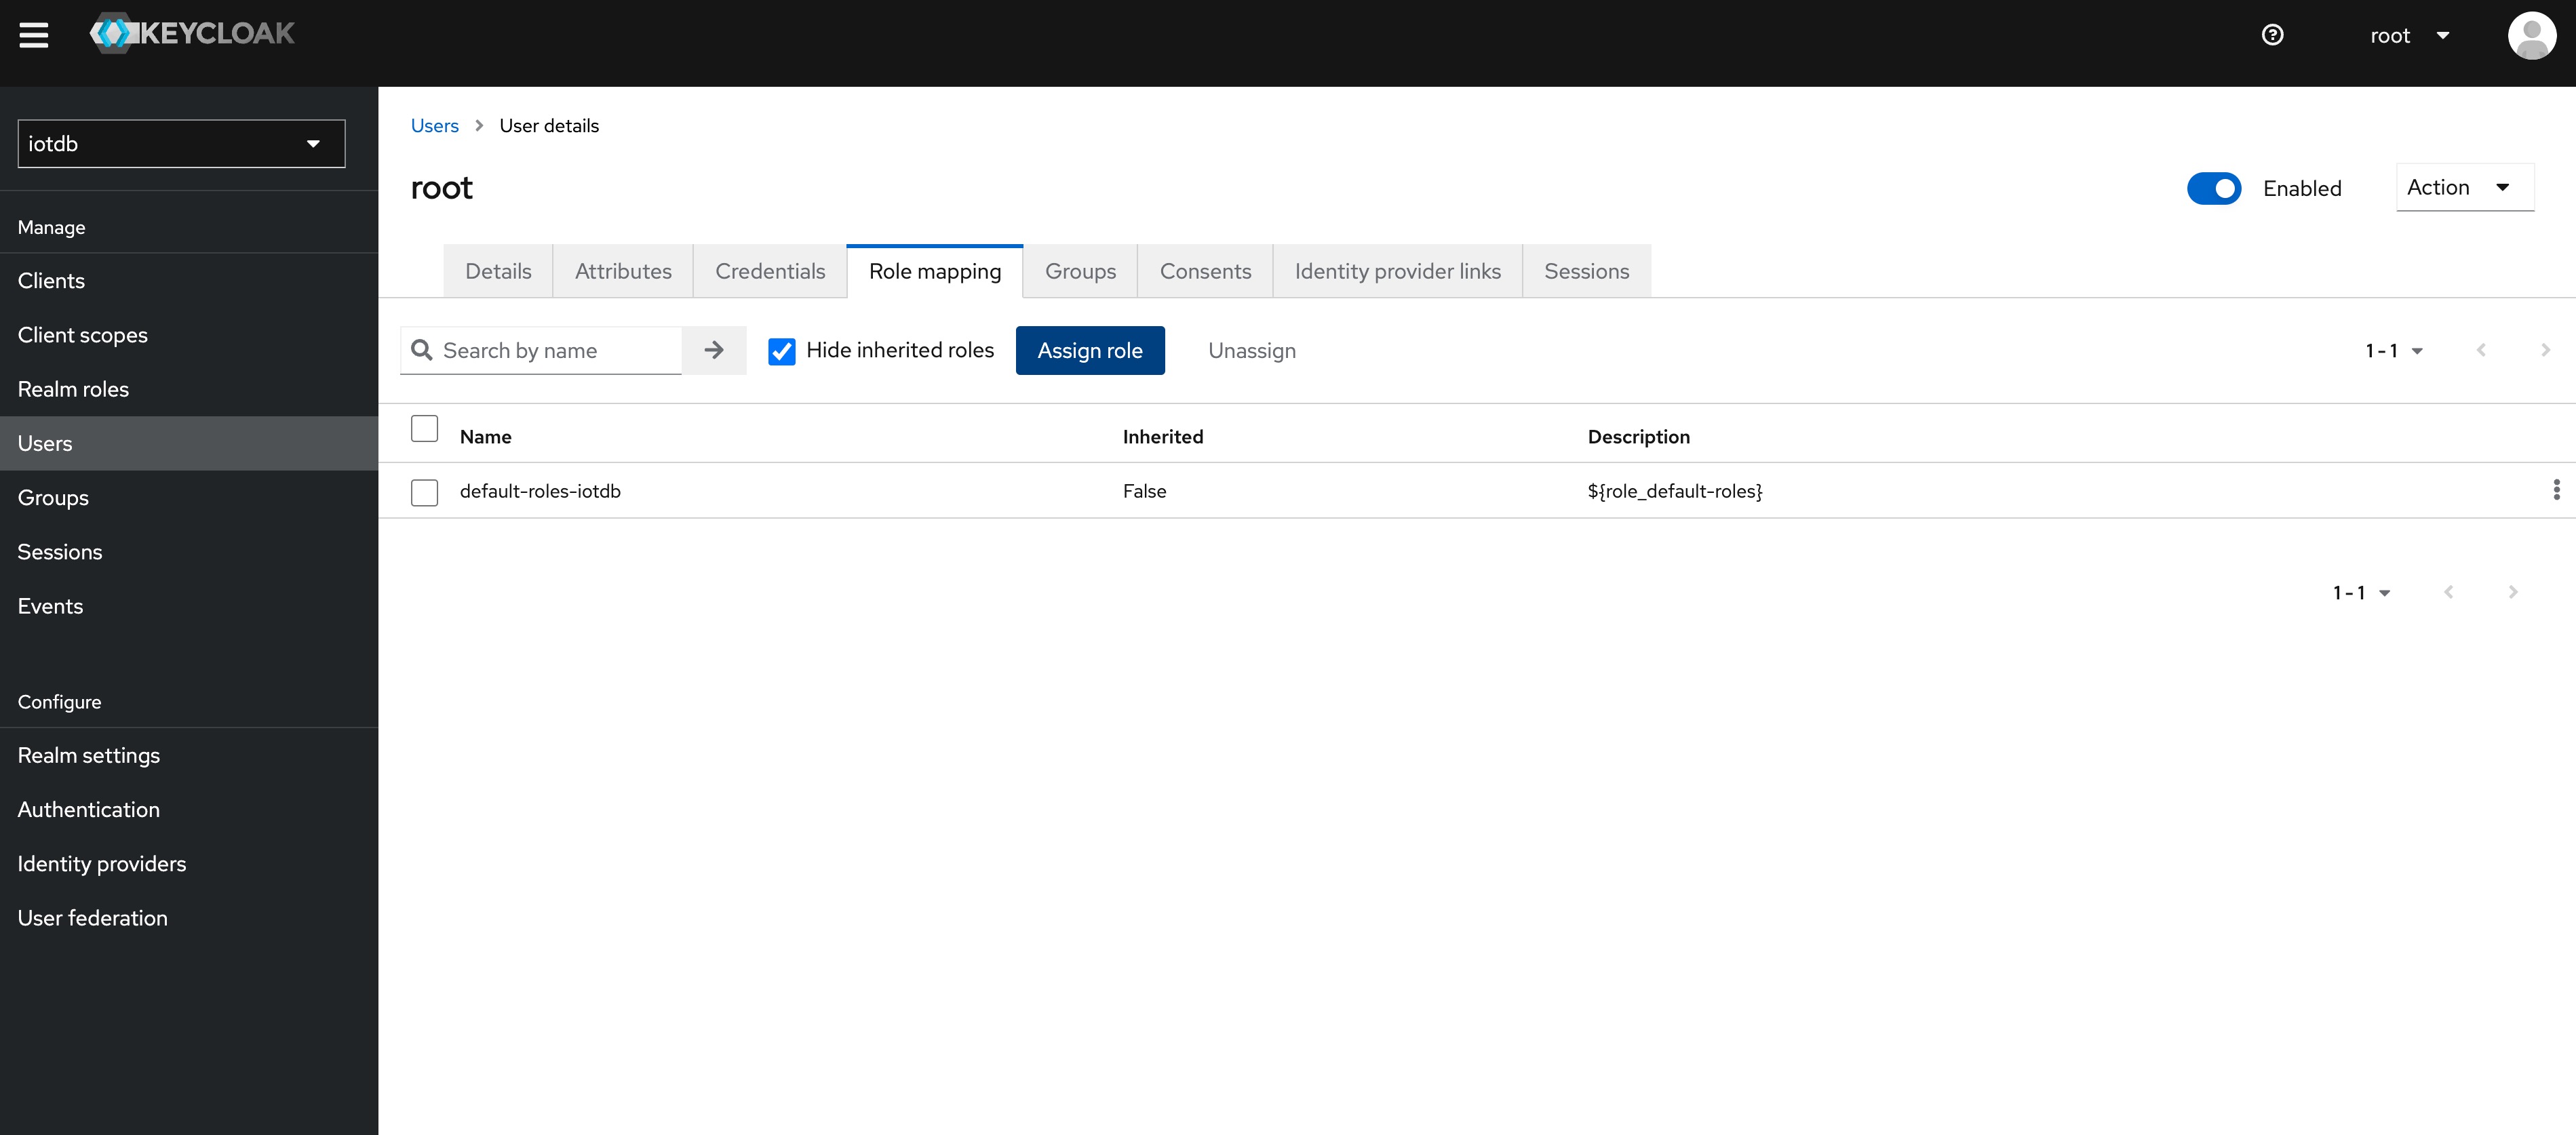
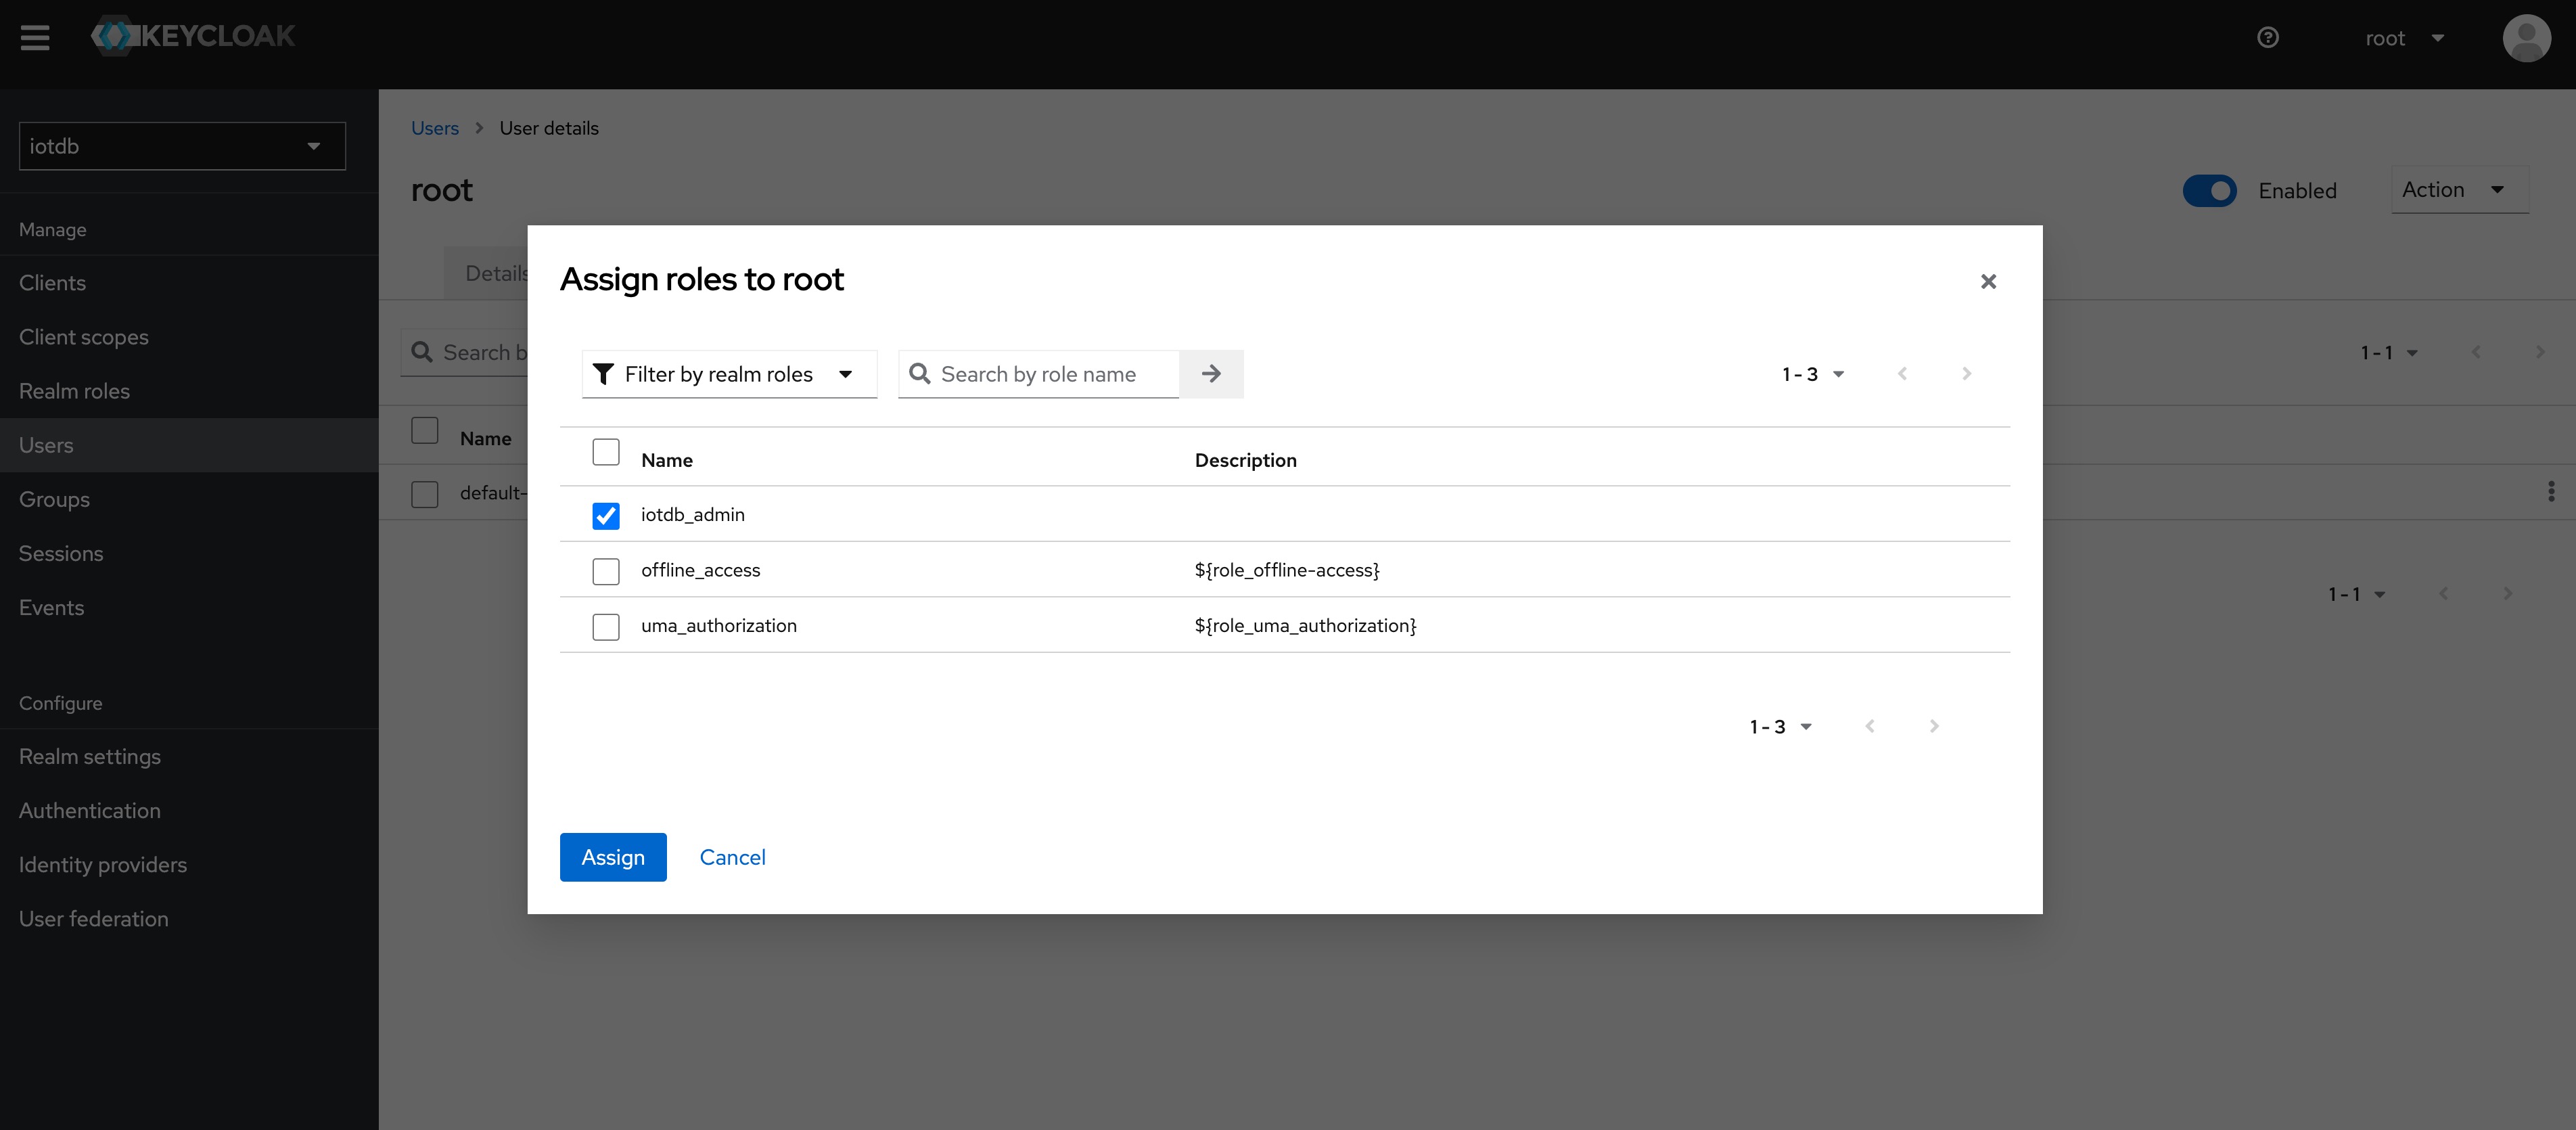
+11、 Select Role Mappings, select the `iotdb_admin` role in Assign Role
+
+
+
+
+
+
+Tip: If the user role is adjusted, you need to regenerate the token and log in
to iotdb again to take effect
+
+The above steps provide a way for keycloak to log into iotdb. For more ways,
please refer to keycloak configuration
+
+If OIDC is enabled on server side then no username / passwort is needed but a
valid Access Token from the OIDC Provider.
+So as username you use the token and the password has to be empty, e.g.
+
+```shell
+Shell > bash sbin/start-cli.sh -h 10.129.187.21 -p 6667 -u {my-access-token}
-pw ""
+```
+
+Among them, you need to replace {my access token} (note, including {}) with
your token, that is, the value corresponding to access_token. The password is
empty and needs to be confirmed again.
+
+
+
+
+How to get the token is dependent on your OpenID Connect setup and not covered
here.
+In the simplest case you can get this via the command line with the
`passwort-grant`.
+For example, if you use keycloack as OIDC and you have a realm with a client
`iotdb` defined as public you could use
+the following `curl` command to fetch a token (replace all `{}` with
appropriate values).
+
+```shell
+curl -X POST
"https://{your-keycloack-server}/realms/{your-realm}/protocol/openid-connect/token";
\
+ -H "Content-Type: application/x-www-form-urlencoded" \
+ -d "username={username}" \
+ -d "password={password}" \
+ -d 'grant_type=password' \
+ -d "client_id=iotdb-client"
+```
+
+The response looks something like
+
+```json
+{"access_token":"eyJhbGciOiJSUzI1NiIsInR5cCIgOiAiSldUIiwia2lkIiA6ICJxMS1XbTBvelE1TzBtUUg4LVNKYXAyWmNONE1tdWNXd25RV0tZeFpKNG93In0.eyJleHAiOjE1OTAzOTgwNzEsImlhdCI6MTU5MDM5Nzc3MSwianRpIjoiNjA0ZmYxMDctN2NiNy00NTRmLWIwYmQtY2M2ZDQwMjFiNGU4IiwiaXNzIjoiaHR0cDovL2F1dGguZGVtby5wcmFnbWF0aWNpbmR1c3RyaWVzLmRlL2F1dGgvcmVhbG1zL0lvVERCIiwiYXVkIjoiYWNjb3VudCIsInN1YiI6ImJhMzJlNDcxLWM3NzItNGIzMy04ZGE2LTZmZThhY2RhMDA3MyIsInR5cCI6IkJlYXJlciIsImF6cCI6ImlvdGRiIiwic2Vzc2lvbl9zdGF0ZSI6IjA2MGQyODYyLTE0ZWQtNDJmZS1
[...]
+```
+
+The interesting part here is the access token with the key `access_token`.
+This has to be passed as username (with parameter `-u`) and empty password to
the CLI.
+
+### Batch Operation of Cli
+
+-e parameter is designed for the Cli/shell tool in the situation where you
would like to manipulate IoTDB in batches through scripts. By using the -e
parameter, you can operate IoTDB without entering the cli's input mode.
+
+In order to avoid confusion between statements and other parameters, the
current version only supports the -e parameter as the last parameter.
+
+The usage of -e parameter for Cli/shell is as follows:
+
+The Linux and MacOS system commands:
+
+```shell
+Shell > bash sbin/start-cli.sh -h {host} -p {rpcPort} -u {user} -pw {password}
-e {sql for iotdb}
+```
+
+The Windows system commands:
+
+```shell
+Shell > sbin\start-cli.bat -h {host} -p {rpcPort} -u {user} -pw {password} -e
{sql for iotdb}
+```
+
+In the Windows environment, the SQL statement of the -e parameter needs to use
` `` ` to replace `" "`
+
+In order to better explain the use of -e parameter, take following as an
example(On linux system).
+
+Suppose you want to create a database root.demo to a newly launched IoTDB,
create a timeseries root.demo.s1 and insert three data points into it. With -e
parameter, you could write a shell like this:
+
+```shell
+# !/bin/bash
+
+host=127.0.0.1
+rpcPort=6667
+user=root
+pass=root
+
+bash ./sbin/start-cli.sh -h ${host} -p ${rpcPort} -u ${user} -pw ${pass} -e
"create database root.demo"
+bash ./sbin/start-cli.sh -h ${host} -p ${rpcPort} -u ${user} -pw ${pass} -e
"create timeseries root.demo.s1 WITH DATATYPE=INT32, ENCODING=RLE"
+bash ./sbin/start-cli.sh -h ${host} -p ${rpcPort} -u ${user} -pw ${pass} -e
"insert into root.demo(timestamp,s1) values(1,10)"
+bash ./sbin/start-cli.sh -h ${host} -p ${rpcPort} -u ${user} -pw ${pass} -e
"insert into root.demo(timestamp,s1) values(2,11)"
+bash ./sbin/start-cli.sh -h ${host} -p ${rpcPort} -u ${user} -pw ${pass} -e
"insert into root.demo(timestamp,s1) values(3,12)"
+bash ./sbin/start-cli.sh -h ${host} -p ${rpcPort} -u ${user} -pw ${pass} -e
"select s1 from root.demo"
+```
+
+The results are shown in the figure, which are consistent with the Cli and
jdbc operations.
+
+```shell
+ Shell > bash ./shell.sh
++-----------------------------+------------+
+| Time|root.demo.s1|
++-----------------------------+------------+
+|1970-01-01T08:00:00.001+08:00| 10|
+|1970-01-01T08:00:00.002+08:00| 11|
+|1970-01-01T08:00:00.003+08:00| 12|
++-----------------------------+------------+
+Total line number = 3
+It costs 0.267s
+```
+
+It should be noted that the use of the -e parameter in shell scripts requires
attention to the escaping of special characters.
diff --git a/src/UserGuide/Master/Tools-System/Import-Export-Tool.md
b/src/UserGuide/Master/Tools-System/Import-Export-Tool.md
new file mode 100644
index 0000000..2c81f85
--- /dev/null
+++ b/src/UserGuide/Master/Tools-System/Import-Export-Tool.md
@@ -0,0 +1,428 @@
+<!--
+
+ Licensed to the Apache Software Foundation (ASF) under one
+ or more contributor license agreements. See the NOTICE file
+ distributed with this work for additional information
+ regarding copyright ownership. The ASF licenses this file
+ to you under the Apache License, Version 2.0 (the
+ "License"); you may not use this file except in compliance
+ with the License. You may obtain a copy of the License at
+
+ http://www.apache.org/licenses/LICENSE-2.0
+
+ Unless required by applicable law or agreed to in writing,
+ software distributed under the License is distributed on an
+ "AS IS" BASIS, WITHOUT WARRANTIES OR CONDITIONS OF ANY
+ KIND, either express or implied. See the License for the
+ specific language governing permissions and limitations
+ under the License.
+
+-->
+
+# Import Export Tool
+
+For different scenarios, IoTDB provides users with a variety of operation
methods for batch importing data. This chapter introduces the two most commonly
used methods for importing in the form of CSV text and importing in the form of
TsFile files.
+
+## TsFile Load And Export Tool
+
+### TsFile Load Tool
+
+#### Introduction
+
+The load external tsfile tool allows users to load tsfiles, delete a tsfile,
or move a tsfile to target directory from the running Apache IoTDB instance.
Alternatively, you can use scripts to load tsfiles into IoTDB, for more
information.
+
+#### Load with SQL
+
+The user sends specified commands to the Apache IoTDB system through the Cli
tool or JDBC to use the tool.
+
+##### Load Tsfiles
+
+The command to load tsfiles is `load <path/dir>
[sglevel=int][verify=true/false][onSuccess=delete/none]`.
+
+This command has two usages:
+
+1. Load a single tsfile by specifying a file path (absolute path).
+
+The first parameter indicates the path of the tsfile to be loaded. This
command has three options: sglevel, verify, onSuccess.
+
+SGLEVEL option. If the database correspond to the tsfile does not exist, the
user can set the level of database through the fourth parameter. By default, it
uses the database level which is set in `iotdb-datanode.properties`.
+
+VERIFY option. If this parameter is true, All timeseries in this loading
tsfile will be compared with the timeseries in IoTDB. If existing a measurement
which has different datatype with the measurement in IoTDB, the loading process
will be stopped and exit. If consistence can be promised, setting false for
this parameter will be a better choice.
+
+ONSUCCESS option. The default value is DELETE, which means the processing
method of successfully loaded tsfiles, and DELETE means after the tsfile is
successfully loaded, it will be deleted. NONE means after the tsfile is
successfully loaded, it will be remained in the origin dir.
+
+If the `.resource` file corresponding to the file exists, it will be loaded
into the data directory and engine of the Apache IoTDB. Otherwise, the
corresponding `.resource` file will be regenerated from the tsfile file.
+
+Examples:
+
+* `load '/Users/Desktop/data/1575028885956-101-0.tsfile'`
+* `load '/Users/Desktop/data/1575028885956-101-0.tsfile' verify=true`
+* `load '/Users/Desktop/data/1575028885956-101-0.tsfile' verify=false`
+* `load '/Users/Desktop/data/1575028885956-101-0.tsfile' sglevel=1`
+* `load '/Users/Desktop/data/1575028885956-101-0.tsfile' onSuccess=delete`
+* `load '/Users/Desktop/data/1575028885956-101-0.tsfile' verify=true sglevel=1`
+* `load '/Users/Desktop/data/1575028885956-101-0.tsfile' verify=false
sglevel=1`
+* `load '/Users/Desktop/data/1575028885956-101-0.tsfile' verify=true
onSuccess=none`
+* `load '/Users/Desktop/data/1575028885956-101-0.tsfile' verify=false
sglevel=1 onSuccess=delete`
+
+2. Load a batch of files by specifying a folder path (absolute path).
+
+The first parameter indicates the path of the tsfile to be loaded. The options
above also works for this command.
+
+Examples:
+
+* `load '/Users/Desktop/data'`
+* `load '/Users/Desktop/data' verify=false`
+* `load '/Users/Desktop/data' verify=true`
+* `load '/Users/Desktop/data' verify=true sglevel=1`
+* `load '/Users/Desktop/data' verify=false sglevel=1 onSuccess=delete`
+
+**NOTICE**: When `$IOTDB_HOME$/conf/iotdb-datanode.properties` has
`enable_auto_create_schema=true`, it will automatically create metadata in
TSFILE, otherwise it will not be created automatically.
+
+#### Load with Script
+
+Run rewrite-tsfile.bat if you are in a Windows environment, or
rewrite-tsfile.sh if you are on Linux or Unix.
+
+```bash
+./load-tsfile.bat -f filePath [-h host] [-p port] [-u username] [-pw password]
[--sgLevel int] [--verify true/false] [--onSuccess none/delete]
+-f File/Directory to be load, required
+-h IoTDB Host address, optional field, 127.0.0.1 by default
+-p IoTDB port, optional field, 6667 by default
+-u IoTDB user name, optional field, root by default
+-pw IoTDB password, optional field, root by default
+--sgLevel Sg level of loading Tsfile, optional field,
default_storage_group_level in
iotdb-common.properties by default
+--verify Verify schema or not, optional field, True by default
+--onSuccess Delete or remain origin TsFile after loading, optional field, none
by default
+```
+
+##### Example
+
+Assuming that an IoTDB instance is running on server 192.168.0.101:6667, you
want to load all TsFile files from the locally saved TsFile backup folder
D:\IoTDB\data into this IoTDB instance.
+
+First move to the folder `$IOTDB_HOME/tools/`, open the command line, and
execute
+
+```bash
+./load-rewrite.bat -f D:\IoTDB\data -h 192.168.0.101 -p 6667 -u root -pw root
+```
+
+After waiting for the script execution to complete, you can check that the
data in the IoTDB instance has been loaded correctly.
+
+##### Q&A
+
+- Cannot find or load the main class
+ - It may be because the environment variable $IOTDB_HOME is not set,
please set the environment variable and try again
+- -f option must be set!
+ - The input command is missing the -f field (file or folder path to be
loaded) or the -u field (user name), please add it and re-execute
+- What if the execution crashes in the middle and you want to reload?
+ - You re-execute the command just now, reloading the data will not affect
the correctness after loading
+
+TsFile can help you export the result set in the format of TsFile file to the
specified path by executing the sql, command line sql, and sql file.
+
+### TsFile Export Tool
+
+#### Syntax
+
+```shell
+# Unix/OS X
+> tools/export-tsfile.sh -h <ip> -p <port> -u <username> -pw <password> -td
<directory> [-f <export filename> -q <query command> -s <sql file>]
+
+# Windows
+> tools\export-tsfile.bat -h <ip> -p <port> -u <username> -pw <password> -td
<directory> [-f <export filename> -q <query command> -s <sql file>]
+```
+
+* `-h <host>`:
+ - The host address of the IoTDB service.
+* `-p <port>`:
+ - The port number of the IoTDB service.
+* `-u <username>`:
+ - The username of the IoTDB service.
+* `-pw <password>`:
+ - Password for IoTDB service.
+* `-td <directory>`:
+ - Specify the output path for the exported TsFile file.
+* `-f <tsfile name>`:
+ - For the file name of the exported TsFile file, just write the file name,
and cannot include the file path and suffix. If the sql file or console input
contains multiple sqls, multiple files will be generated in the order of sql.
+ - Example: There are three SQLs in the file or command line, and -f param
is "dump", then three TsFile files: dump0.tsfile、dump1.tsfile、dump2.tsfile will
be generated in the target path.
+* `-q <query command>`:
+ - Directly specify the query statement you want to execute in the command.
+ - Example: `select * from root.** limit 100`
+* `-s <sql file>`:
+ - Specify a SQL file that contains one or more SQL statements. If an SQL
file contains multiple SQL statements, the SQL statements should be separated
by newlines. Each SQL statement corresponds to an output TsFile file.
+* `-t <timeout>`:
+ - Specifies the timeout period for session queries, in milliseconds
+
+
+In addition, if you do not use the `-s` and `-q` parameters, after the export
script is started, you need to enter the query statement as prompted by the
program, and different query results will be saved to different TsFile files.
+
+#### Example
+
+```shell
+# Unix/OS X
+> tools/export-tsfile.sh -h 127.0.0.1 -p 6667 -u root -pw root -td ./
+# or
+> tools/export-tsfile.sh -h 127.0.0.1 -p 6667 -u root -pw root -td ./ -q
"select * from root.**"
+# Or
+> tools/export-tsfile.sh -h 127.0.0.1 -p 6667 -u root -pw root -td ./ -s
./sql.txt
+# Or
+> tools/export-tsfile.sh -h 127.0.0.1 -p 6667 -u root -pw root -td ./ -s
./sql.txt -f myTsFile
+# Or
+> tools/export-tsfile.sh -h 127.0.0.1 -p 6667 -u root -pw root -td ./ -s
./sql.txt -f myTsFile -t 10000
+
+# Windows
+> tools/export-tsfile.bat -h 127.0.0.1 -p 6667 -u root -pw root -td ./
+# Or
+> tools/export-tsfile.bat -h 127.0.0.1 -p 6667 -u root -pw root -td ./ -q
"select * from root.**"
+# Or
+> tools/export-tsfile.bat -h 127.0.0.1 -p 6667 -u root -pw root -td ./ -s
./sql.txt
+# Or
+> tools/export-tsfile.bat -h 127.0.0.1 -p 6667 -u root -pw root -td ./ -s
./sql.txt -f myTsFile
+# Or
+> tools/export-tsfile.sh -h 127.0.0.1 -p 6667 -u root -pw root -td ./ -s
./sql.txt -f myTsFile -t 10000
+```
+
+#### Q&A
+
+- It is recommended not to execute the write data command at the same time
when loading data, which may lead to insufficient memory in the JVM.
+
+## CSV Tool
+
+The CSV tool can help you import data in CSV format to IoTDB or export data
from IoTDB to a CSV file.
+
+### Usage of export-csv.sh
+
+#### Syntax
+
+```shell
+# Unix/OS X
+> tools/export-csv.sh -h <ip> -p <port> -u <username> -pw <password> -td
<directory> [-tf <time-format> -datatype <true/false> -q <query command> -s
<sql file> -linesPerFile <int>]
+
+# Windows
+> tools\export-csv.bat -h <ip> -p <port> -u <username> -pw <password> -td
<directory> [-tf <time-format> -datatype <true/false> -q <query command> -s
<sql file> -linesPerFile <int>]
+```
+
+Description:
+
+* `-datatype`:
+ - true (by default): print the data type of timesries in the head line of
CSV file. i.e., `Time, root.sg1.d1.s1(INT32), root.sg1.d1.s2(INT64)`.
+ - false: only print the timeseries name in the head line of the CSV file.
i.e., `Time, root.sg1.d1.s1 , root.sg1.d1.s2`
+* `-q <query command>`:
+ - specifying a query command that you want to execute
+ - example: `select * from root.** limit 100`, or `select * from root.**
limit 100 align by device`
+* `-s <sql file>`:
+ - specifying a SQL file which can consist of more than one sql. If there
are multiple SQLs in one SQL file, the SQLs should be separated by line breaks.
And, for each SQL, a output CSV file will be generated.
+* `-td <directory>`:
+ - specifying the directory that the data will be exported
+* `-tf <time-format>`:
+ - specifying a time format that you want. The time format have to obey
[ISO 8601](https://calendars.wikia.org/wiki/ISO_8601) standard. If you want to
save the time as the timestamp, then setting `-tf timestamp`
+ - example: `-tf yyyy-MM-dd\ HH:mm:ss` or `-tf timestamp`
+* `-linesPerFile <int>`:
+ - Specifying lines of each dump file, `10000` is default.
+ - example: `-linesPerFile 1`
+* `-t <timeout>`:
+ - Specifies the timeout period for session queries, in milliseconds
+
+
+More, if you don't use one of `-s` and `-q`, you need to enter some queries
after running the export script. The results of the different query will be
saved to different CSV files.
+
+#### Example
+
+```shell
+# Unix/OS X
+> tools/export-csv.sh -h 127.0.0.1 -p 6667 -u root -pw root -td ./
+# Or
+> tools/export-csv.sh -h 127.0.0.1 -p 6667 -u root -pw root -td ./ -tf
yyyy-MM-dd\ HH:mm:ss
+# or
+> tools/export-csv.sh -h 127.0.0.1 -p 6667 -u root -pw root -td ./ -q "select
* from root.**"
+# Or
+> tools/export-csv.sh -h 127.0.0.1 -p 6667 -u root -pw root -td ./ -s sql.txt
+# Or
+> tools/export-csv.sh -h 127.0.0.1 -p 6667 -u root -pw root -td ./ -tf
yyyy-MM-dd\ HH:mm:ss -s sql.txt
+# Or
+> tools/export-csv.sh -h 127.0.0.1 -p 6667 -u root -pw root -td ./ -tf
yyyy-MM-dd\ HH:mm:ss -s sql.txt -linesPerFile 10
+# Or
+> tools/export-csv.sh -h 127.0.0.1 -p 6667 -u root -pw root -td ./ -tf
yyyy-MM-dd\ HH:mm:ss -s sql.txt -linesPerFile 10 -t 10000
+
+# Windows
+> tools/export-csv.bat -h 127.0.0.1 -p 6667 -u root -pw root -td ./
+# Or
+> tools/export-csv.bat -h 127.0.0.1 -p 6667 -u root -pw root -td ./ -tf
yyyy-MM-dd\ HH:mm:ss
+# or
+> tools/export-csv.bat -h 127.0.0.1 -p 6667 -u root -pw root -td ./ -q "select
* from root.**"
+# Or
+> tools/export-csv.bat -h 127.0.0.1 -p 6667 -u root -pw root -td ./ -s sql.txt
+# Or
+> tools/export-csv.bat -h 127.0.0.1 -p 6667 -u root -pw root -td ./ -tf
yyyy-MM-dd\ HH:mm:ss -s sql.txt
+# Or
+> tools/export-csv.bat -h 127.0.0.1 -p 6667 -u root -pw root -td ./ -tf
yyyy-MM-dd\ HH:mm:ss -s sql.txt -linesPerFile 10
+# Or
+> tools/export-csv.sh -h 127.0.0.1 -p 6667 -u root -pw root -td ./ -tf
yyyy-MM-dd\ HH:mm:ss -s sql.txt -linesPerFile 10 -t 10000
+```
+
+#### Sample SQL file
+
+```sql
+select * from root.**;
+select * from root.** align by device;
+```
+
+The result of `select * from root.**`
+
+```sql
+Time,root.ln.wf04.wt04.status(BOOLEAN),root.ln.wf03.wt03.hardware(TEXT),root.ln.wf02.wt02.status(BOOLEAN),root.ln.wf02.wt02.hardware(TEXT),root.ln.wf01.wt01.hardware(TEXT),root.ln.wf01.wt01.status(BOOLEAN)
+1970-01-01T08:00:00.001+08:00,true,"v1",true,"v1",v1,true
+1970-01-01T08:00:00.002+08:00,true,"v1",,,,true
+```
+
+The result of `select * from root.** align by device`
+
+```sql
+Time,Device,hardware(TEXT),status(BOOLEAN)
+1970-01-01T08:00:00.001+08:00,root.ln.wf01.wt01,"v1",true
+1970-01-01T08:00:00.002+08:00,root.ln.wf01.wt01,,true
+1970-01-01T08:00:00.001+08:00,root.ln.wf02.wt02,"v1",true
+1970-01-01T08:00:00.001+08:00,root.ln.wf03.wt03,"v1",
+1970-01-01T08:00:00.002+08:00,root.ln.wf03.wt03,"v1",
+1970-01-01T08:00:00.001+08:00,root.ln.wf04.wt04,,true
+1970-01-01T08:00:00.002+08:00,root.ln.wf04.wt04,,true
+```
+
+The data of boolean type signed by `true` and `false` without double quotes.
And the text data will be enclosed in double quotes.
+
+#### Note
+
+Note that if fields exported by the export tool have the following special
characters:
+
+1. `,`: the field will be escaped by `\`.
+
+### Usage of import-csv.sh
+
+#### Create Metadata (optional)
+
+```sql
+CREATE DATABASE root.fit.d1;
+CREATE DATABASE root.fit.d2;
+CREATE DATABASE root.fit.p;
+CREATE TIMESERIES root.fit.d1.s1 WITH DATATYPE=INT32,ENCODING=RLE;
+CREATE TIMESERIES root.fit.d1.s2 WITH DATATYPE=TEXT,ENCODING=PLAIN;
+CREATE TIMESERIES root.fit.d2.s1 WITH DATATYPE=INT32,ENCODING=RLE;
+CREATE TIMESERIES root.fit.d2.s3 WITH DATATYPE=INT32,ENCODING=RLE;
+CREATE TIMESERIES root.fit.p.s1 WITH DATATYPE=INT32,ENCODING=RLE;
+```
+
+IoTDB has the ability of type inference, so it is not necessary to create
metadata before data import. However, we still recommend creating metadata
before importing data using the CSV import tool, as this can avoid unnecessary
type conversion errors.
+
+#### Sample CSV File to Be Imported
+
+The data aligned by time, and headers without data type.
+
+```sql
+Time,root.test.t1.str,root.test.t2.str,root.test.t2.int
+1970-01-01T08:00:00.001+08:00,"123hello world","123\,abc",100
+1970-01-01T08:00:00.002+08:00,"123",,
+```
+
+The data aligned by time, and headers with data type.(Text type data supports
double quotation marks and no double quotation marks)
+
+```sql
+Time,root.test.t1.str(TEXT),root.test.t2.str(TEXT),root.test.t2.int(INT32)
+1970-01-01T08:00:00.001+08:00,"123hello world","123\,abc",100
+1970-01-01T08:00:00.002+08:00,123,hello world,123
+1970-01-01T08:00:00.003+08:00,"123",,
+1970-01-01T08:00:00.004+08:00,123,,12
+```
+
+The data aligned by device, and headers without data type.
+
+```sql
+Time,Device,str,int
+1970-01-01T08:00:00.001+08:00,root.test.t1,"123hello world",
+1970-01-01T08:00:00.002+08:00,root.test.t1,"123",
+1970-01-01T08:00:00.001+08:00,root.test.t2,"123\,abc",100
+```
+
+The data aligned by device, and headers with data type.(Text type data
supports double quotation marks and no double quotation marks)
+
+```sql
+Time,Device,str(TEXT),int(INT32)
+1970-01-01T08:00:00.001+08:00,root.test.t1,"123hello world",
+1970-01-01T08:00:00.002+08:00,root.test.t1,hello world,123
+1970-01-01T08:00:00.003+08:00,root.test.t1,,123
+```
+
+#### Syntax
+
+```shell
+# Unix/OS X
+> tools/import-csv.sh -h <ip> -p <port> -u <username> -pw <password> -f
<xxx.csv> [-fd <./failedDirectory>] [-aligned <true>] [-tp <ms/ns/us>]
[-typeInfer <boolean=text,float=double...>]
+# Windows
+> tools\import-csv.bat -h <ip> -p <port> -u <username> -pw <password> -f
<xxx.csv> [-fd <./failedDirectory>] [-aligned <true>] [-tp <ms/ns/us>]
[-typeInfer <boolean=text,float=double...>]
+```
+
+Description:
+
+* `-f`:
+ - the CSV file that you want to import, and it could be a file or a
folder. If a folder is specified, all TXT and CSV files in the folder will be
imported in batches.
+ - example: `-f filename.csv`
+
+* `-fd`:
+ - specifying a directory to save files which save failed lines. If you
don't use this parameter, the failed file will be saved at original directory,
and the filename will be the source filename with suffix `.failed`.
+ - example: `-fd ./failed/`
+
+* `-aligned`:
+ - whether to use the aligned interface? The option `false` is default.
+ - example: `-aligned true`
+
+* `-batch`:
+ - specifying the point's number of a batch. If the program throw the
exception `org.apache.thrift.transport.TTransportException: Frame size larger
than protect max size`, you can lower this parameter as appropriate.
+ - example: `-batch 100000`, `100000` is the default value.
+
+* `-tp <time-precision>`:
+ - specifying a time precision. Options includes `ms`(millisecond),
`ns`(nanosecond), and `us`(microsecond), `ms` is default.
+
+* `-typeInfer
<srcTsDataType1=dstTsDataType1,srcTsDataType2=dstTsDataType2,...>`:
+ - specifying rules of type inference.
+ - Option `srcTsDataType` includes
`boolean`,`int`,`long`,`float`,`double`,`NaN`.
+ - Option `dstTsDataType` includes
`boolean`,`int`,`long`,`float`,`double`,`text`.
+ - When `srcTsDataType` is `boolean`, `dstTsDataType` should be between
`boolean` and `text`.
+ - When `srcTsDataType` is `NaN`, `dstTsDataType` should be among `float`,
`double` and `text`.
+ - When `srcTsDataType` is Numeric type, `dstTsDataType` precision should
be greater than `srcTsDataType`.
+ - example: `-typeInfer boolean=text,float=double`
+
+* `-linesPerFailedFile <int>`:
+ - Specifying lines of each failed file, `10000` is default.
+ - example: `-linesPerFailedFile 1`
+
+#### Example
+
+```sh
+# Unix/OS X
+> tools/import-csv.sh -h 127.0.0.1 -p 6667 -u root -pw root -f
example-filename.csv -fd ./failed
+# or
+> tools/import-csv.sh -h 127.0.0.1 -p 6667 -u root -pw root -f
example-filename.csv -fd ./failed
+# or
+> tools\import-csv.sh -h 127.0.0.1 -p 6667 -u root -pw root -f
example-filename.csv -fd ./failed -tp ns
+# or
+> tools\import-csv.sh -h 127.0.0.1 -p 6667 -u root -pw root -f
example-filename.csv -fd ./failed -tp ns -typeInfer boolean=text,float=double
+# or
+> tools\import-csv.sh -h 127.0.0.1 -p 6667 -u root -pw root -f
example-filename.csv -fd ./failed -tp ns -typeInfer boolean=text,float=double
-linesPerFailedFile 10
+
+# Windows
+> tools\import-csv.bat -h 127.0.0.1 -p 6667 -u root -pw root -f
example-filename.csv
+# or
+> tools\import-csv.bat -h 127.0.0.1 -p 6667 -u root -pw root -f
example-filename.csv -fd .\failed
+# or
+> tools\import-csv.bat -h 127.0.0.1 -p 6667 -u root -pw root -f
example-filename.csv -fd .\failed -tp ns
+# or
+> tools\import-csv.bat -h 127.0.0.1 -p 6667 -u root -pw root -f
example-filename.csv -fd .\failed -tp ns -typeInfer boolean=text,float=double
+# or
+> tools\import-csv.bat -h 127.0.0.1 -p 6667 -u root -pw root -f
example-filename.csv -fd .\failed -tp ns -typeInfer boolean=text,float=double
-linesPerFailedFile 10
+
+```
+
+#### Note
+
+Note that the following special characters in fields need to be checked before
importing:
+
+1. `,` : fields containing `,` should be escaped by `\`.
+2. you can input time format like `yyyy-MM-dd'T'HH:mm:ss`, `yyy-MM-dd
HH:mm:ss`, or `yyyy-MM-dd'T'HH:mm:ss.SSSZ`.
+3. the `Time` column must be the first one.
\ No newline at end of file
diff --git a/src/UserGuide/Master/Tools-System/Maintenance-Tool.md
b/src/UserGuide/Master/Tools-System/Maintenance-Tool.md
new file mode 100644
index 0000000..017f448
--- /dev/null
+++ b/src/UserGuide/Master/Tools-System/Maintenance-Tool.md
@@ -0,0 +1,228 @@
+<!--
+
+ Licensed to the Apache Software Foundation (ASF) under one
+ or more contributor license agreements. See the NOTICE file
+ distributed with this work for additional information
+ regarding copyright ownership. The ASF licenses this file
+ to you under the Apache License, Version 2.0 (the
+ "License"); you may not use this file except in compliance
+ with the License. You may obtain a copy of the License at
+
+ http://www.apache.org/licenses/LICENSE-2.0
+
+ Unless required by applicable law or agreed to in writing,
+ software distributed under the License is distributed on an
+ "AS IS" BASIS, WITHOUT WARRANTIES OR CONDITIONS OF ANY
+ KIND, either express or implied. See the License for the
+ specific language governing permissions and limitations
+ under the License.
+
+-->
+# Maintenance Tool
+## IoTDB Data Directory Overview Tool
+
+IoTDB data directory overview tool is used to print an overview of the IoTDB
data directory structure. The location is tools/tsfile/print-iotdb-data-dir.
+
+### Usage
+
+- For Windows:
+
+```bash
+.\print-iotdb-data-dir.bat <IoTDB data folder path, separated by commas if
there are multiple folders> (<storage path of the output overview file>)
+```
+
+- For Linux or MacOs:
+
+```shell
+./print-iotdb-data-dir.sh <IoTDB data folder path, separated by commas if
there are multiple folders> (<storage path of the output overview file>)
+```
+
+Note: if the storage path of the output overview file is not set, the default
relative path "IoTDB_data_dir_overview.txt" will be used.
+
+### Example
+
+Use Windows in this example:
+
+`````````````````````````bash
+.\print-iotdb-data-dir.bat D:\github\master\iotdb\data\datanode\data
+````````````````````````
+Starting Printing the IoTDB Data Directory Overview
+````````````````````````
+output save path:IoTDB_data_dir_overview.txt
+data dir num:1
+143 [main] WARN o.a.i.t.c.conf.TSFileDescriptor - not found
iotdb-common.properties, use the default configs.
+|==============================================================
+|D:\github\master\iotdb\data\datanode\data
+|--sequence
+| |--root.redirect0
+| | |--1
+| | | |--0
+| |--root.redirect1
+| | |--2
+| | | |--0
+| |--root.redirect2
+| | |--3
+| | | |--0
+| |--root.redirect3
+| | |--4
+| | | |--0
+| |--root.redirect4
+| | |--5
+| | | |--0
+| |--root.redirect5
+| | |--6
+| | | |--0
+| |--root.sg1
+| | |--0
+| | | |--0
+| | | |--2760
+|--unsequence
+|==============================================================
+`````````````````````````
+
+## TsFile Sketch Tool
+
+TsFile sketch tool is used to print the content of a TsFile in sketch mode.
The location is tools/tsfile/print-tsfile.
+
+### Usage
+
+- For Windows:
+
+```
+.\print-tsfile-sketch.bat <TsFile path> (<storage path of the output sketch
file>)
+```
+
+- For Linux or MacOs:
+
+```
+./print-tsfile-sketch.sh <TsFile path> (<storage path of the output sketch
file>)
+```
+
+Note: if the storage path of the output sketch file is not set, the default
relative path "TsFile_sketch_view.txt" will be used.
+
+### Example
+
+Use Windows in this example:
+
+`````````````````````````bash
+.\print-tsfile.bat D:\github\master\1669359533965-1-0-0.tsfile
D:\github\master\sketch.txt
+````````````````````````
+Starting Printing the TsFile Sketch
+````````````````````````
+TsFile path:D:\github\master\1669359533965-1-0-0.tsfile
+Sketch save path:D:\github\master\sketch.txt
+148 [main] WARN o.a.i.t.c.conf.TSFileDescriptor - not found
iotdb-common.properties, use the default configs.
+-------------------------------- TsFile Sketch --------------------------------
+file path: D:\github\master\1669359533965-1-0-0.tsfile
+file length: 2974
+
+ POSITION| CONTENT
+ -------- -------
+ 0| [magic head] TsFile
+ 6| [version number] 3
+||||||||||||||||||||| [Chunk Group] of root.sg1.d1, num of Chunks:3
+ 7| [Chunk Group Header]
+ | [marker] 0
+ | [deviceID] root.sg1.d1
+ 20| [Chunk] of root.sg1.d1.s1, startTime: 1669359533948
endTime: 1669359534047 count: 100
[minValue:-9032452783138882770,maxValue:9117677033041335123,firstValue:7068645577795875906,lastValue:-5833792328174747265,sumValue:5.795959009889246E19]
+ | [chunk header] marker=5, measurementID=s1,
dataSize=864, dataType=INT64, compressionType=SNAPPY, encodingType=RLE
+ | [page] UncompressedSize:862,
CompressedSize:860
+ 893| [Chunk] of root.sg1.d1.s2, startTime: 1669359533948
endTime: 1669359534047 count: 100
[minValue:-8806861312244965718,maxValue:9192550740609853234,firstValue:1150295375739457693,lastValue:-2839553973758938646,sumValue:8.2822564314572677E18]
+ | [chunk header] marker=5, measurementID=s2,
dataSize=864, dataType=INT64, compressionType=SNAPPY, encodingType=RLE
+ | [page] UncompressedSize:862,
CompressedSize:860
+ 1766| [Chunk] of root.sg1.d1.s3, startTime: 1669359533948
endTime: 1669359534047 count: 100
[minValue:-9076669333460323191,maxValue:9175278522960949594,firstValue:2537897870994797700,lastValue:7194625271253769397,sumValue:-2.126008424849926E19]
+ | [chunk header] marker=5, measurementID=s3,
dataSize=864, dataType=INT64, compressionType=SNAPPY, encodingType=RLE
+ | [page] UncompressedSize:862,
CompressedSize:860
+||||||||||||||||||||| [Chunk Group] of root.sg1.d1 ends
+ 2656| [marker] 2
+ 2657| [TimeseriesIndex] of root.sg1.d1.s1, tsDataType:INT64,
startTime: 1669359533948 endTime: 1669359534047 count: 100
[minValue:-9032452783138882770,maxValue:9117677033041335123,firstValue:7068645577795875906,lastValue:-5833792328174747265,sumValue:5.795959009889246E19]
+ | [ChunkIndex] offset=20
+ 2728| [TimeseriesIndex] of root.sg1.d1.s2, tsDataType:INT64,
startTime: 1669359533948 endTime: 1669359534047 count: 100
[minValue:-8806861312244965718,maxValue:9192550740609853234,firstValue:1150295375739457693,lastValue:-2839553973758938646,sumValue:8.2822564314572677E18]
+ | [ChunkIndex] offset=893
+ 2799| [TimeseriesIndex] of root.sg1.d1.s3, tsDataType:INT64,
startTime: 1669359533948 endTime: 1669359534047 count: 100
[minValue:-9076669333460323191,maxValue:9175278522960949594,firstValue:2537897870994797700,lastValue:7194625271253769397,sumValue:-2.126008424849926E19]
+ | [ChunkIndex] offset=1766
+ 2870| [IndexOfTimerseriesIndex Node] type=LEAF_MEASUREMENT
+ | <s1, 2657>
+ | <endOffset, 2870>
+||||||||||||||||||||| [TsFileMetadata] begins
+ 2891| [IndexOfTimerseriesIndex Node] type=LEAF_DEVICE
+ | <root.sg1.d1, 2870>
+ | <endOffset, 2891>
+ | [meta offset] 2656
+ | [bloom filter] bit vector byte array length=31,
filterSize=256, hashFunctionSize=5
+||||||||||||||||||||| [TsFileMetadata] ends
+ 2964| [TsFileMetadataSize] 73
+ 2968| [magic tail] TsFile
+ 2974| END of TsFile
+---------------------------- IndexOfTimerseriesIndex Tree
-----------------------------
+ [MetadataIndex:LEAF_DEVICE]
+ └──────[root.sg1.d1,2870]
+ [MetadataIndex:LEAF_MEASUREMENT]
+ └──────[s1,2657]
+---------------------------------- TsFile Sketch End
----------------------------------
+`````````````````````````
+
+Explanations:
+
+- Separated by "|", the left is the actual position in the TsFile, and the
right is the summary content.
+- "||||||||||||||||||||" is the guide information added to enhance
readability, not the actual data stored in TsFile.
+- The last printed "IndexOfTimerseriesIndex Tree" is a reorganization of the
metadata index tree at the end of the TsFile, which is convenient for intuitive
understanding, and again not the actual data stored in TsFile.
+
+## TsFile Resource Sketch Tool
+
+TsFile resource sketch tool is used to print the content of a TsFile resource
file. The location is tools/tsfile/print-tsfile-resource-files.
+
+### Usage
+
+- For Windows:
+
+```bash
+.\print-tsfile-resource-files.bat <path of the parent directory of the TsFile
resource files, or path of a TsFile resource file>
+```
+
+- For Linux or MacOs:
+
+```
+./print-tsfile-resource-files.sh <path of the parent directory of the TsFile
resource files, or path of a TsFile resource file>
+```
+
+### Example
+
+Use Windows in this example:
+
+`````````````````````````bash
+.\print-tsfile-resource-files.bat
D:\github\master\iotdb\data\datanode\data\sequence\root.sg1\0\0
+````````````````````````
+Starting Printing the TsFileResources
+````````````````````````
+147 [main] WARN o.a.i.t.c.conf.TSFileDescriptor - not found
iotdb-common.properties, use the default configs.
+230 [main] WARN o.a.iotdb.db.conf.IoTDBDescriptor - Cannot find IOTDB_HOME
or IOTDB_CONF environment variable when loading config file
iotdb-common.properties, use default configuration
+231 [main] WARN o.a.iotdb.db.conf.IoTDBDescriptor - Couldn't load the
configuration iotdb-common.properties from any of the known sources.
+233 [main] WARN o.a.iotdb.db.conf.IoTDBDescriptor - Cannot find IOTDB_HOME
or IOTDB_CONF environment variable when loading config file
iotdb-datanode.properties, use default configuration
+237 [main] WARN o.a.iotdb.db.conf.IoTDBDescriptor - Couldn't load the
configuration iotdb-datanode.properties from any of the known sources.
+Analyzing
D:\github\master\iotdb\data\datanode\data\sequence\root.sg1\0\0\1669359533489-1-0-0.tsfile
...
+
+Resource plan index range [9223372036854775807, -9223372036854775808]
+device root.sg1.d1, start time 0 (1970-01-01T08:00+08:00[GMT+08:00]), end time
99 (1970-01-01T08:00:00.099+08:00[GMT+08:00])
+
+Analyzing the resource file folder
D:\github\master\iotdb\data\datanode\data\sequence\root.sg1\0\0 finished.
+`````````````````````````
+
+`````````````````````````bash
+.\print-tsfile-resource-files.bat
D:\github\master\iotdb\data\datanode\data\sequence\root.sg1\0\0\1669359533489-1-0-0.tsfile.resource
+````````````````````````
+Starting Printing the TsFileResources
+````````````````````````
+178 [main] WARN o.a.iotdb.db.conf.IoTDBDescriptor - Cannot find IOTDB_HOME
or IOTDB_CONF environment variable when loading config file
iotdb-common.properties, use default configuration
+186 [main] WARN o.a.i.t.c.conf.TSFileDescriptor - not found
iotdb-common.properties, use the default configs.
+187 [main] WARN o.a.iotdb.db.conf.IoTDBDescriptor - Couldn't load the
configuration iotdb-common.properties from any of the known sources.
+188 [main] WARN o.a.iotdb.db.conf.IoTDBDescriptor - Cannot find IOTDB_HOME
or IOTDB_CONF environment variable when loading config file
iotdb-datanode.properties, use default configuration
+192 [main] WARN o.a.iotdb.db.conf.IoTDBDescriptor - Couldn't load the
configuration iotdb-datanode.properties from any of the known sources.
+Analyzing
D:\github\master\iotdb\data\datanode\data\sequence\root.sg1\0\0\1669359533489-1-0-0.tsfile
...
+
+Resource plan index range [9223372036854775807, -9223372036854775808]
+device root.sg1.d1, start time 0 (1970-01-01T08:00+08:00[GMT+08:00]), end time
99 (1970-01-01T08:00:00.099+08:00[GMT+08:00])
+
+Analyzing the resource file
D:\github\master\iotdb\data\datanode\data\sequence\root.sg1\0\0\1669359533489-1-0-0.tsfile.resource
finished.
+`````````````````````````
+
diff --git a/src/UserGuide/Master/Tools-System/Monitor-Tool.md
b/src/UserGuide/Master/Tools-System/Monitor-Tool.md
new file mode 100644
index 0000000..dd562c0
--- /dev/null
+++ b/src/UserGuide/Master/Tools-System/Monitor-Tool.md
@@ -0,0 +1,116 @@
+<!--
+
+ Licensed to the Apache Software Foundation (ASF) under one
+ or more contributor license agreements. See the NOTICE file
+ distributed with this work for additional information
+ regarding copyright ownership. The ASF licenses this file
+ to you under the Apache License, Version 2.0 (the
+ "License"); you may not use this file except in compliance
+ with the License. You may obtain a copy of the License at
+
+ http://www.apache.org/licenses/LICENSE-2.0
+
+ Unless required by applicable law or agreed to in writing,
+ software distributed under the License is distributed on an
+ "AS IS" BASIS, WITHOUT WARRANTIES OR CONDITIONS OF ANY
+ KIND, either express or implied. See the License for the
+ specific language governing permissions and limitations
+ under the License.
+
+-->
+
+# Monitor Tool
+
+## Prometheus
+
+### The mapping from metric type to prometheus format
+
+> For metrics whose Metric Name is name and Tags are K1=V1, ..., Kn=Vn, the
mapping is as follows, where value is a
+> specific value
+
+| Metric Type | Mapping
|
+| ---------------- |
------------------------------------------------------------ |
+| Counter | name_total{cluster="clusterName", nodeType="nodeType",
nodeId="nodeId", k1="V1", ..., Kn="Vn"} value |
+| AutoGauge、Gauge | name{cluster="clusterName", nodeType="nodeType",
nodeId="nodeId", k1="V1", ..., Kn="Vn"} value |
+| Histogram | name_max{cluster="clusterName", nodeType="nodeType",
nodeId="nodeId", k1="V1", ..., Kn="Vn"} value <br>
name_sum{cluster="clusterName", nodeType="nodeType", nodeId="nodeId", k1="V1",
..., Kn="Vn"} value <br> name_count{cluster="clusterName", nodeType="nodeType",
nodeId="nodeId", k1="V1", ..., Kn="Vn"} value <br> name{cluster="clusterName",
nodeType="nodeType", nodeId="nodeId", k1="V1", ..., Kn="Vn", quantile="0.5"}
value <br> name{cluster="clusterName", nodeType="nod [...]
+| Rate | name_total{cluster="clusterName", nodeType="nodeType",
nodeId="nodeId", k1="V1", ..., Kn="Vn"} value <br>
name_total{cluster="clusterName", nodeType="nodeType", nodeId="nodeId",
k1="V1", ..., Kn="Vn", rate="m1"} value <br> name_total{cluster="clusterName",
nodeType="nodeType", nodeId="nodeId", k1="V1", ..., Kn="Vn", rate="m5"} value
<br> name_total{cluster="clusterName", nodeType="nodeType", nodeId="nodeId",
k1="V1", ..., Kn="Vn", rate="m15"} value <br> name_total{c [...]
+| Timer | name_seconds_max{cluster="clusterName",
nodeType="nodeType", nodeId="nodeId", k1="V1", ..., Kn="Vn"} value <br>
name_seconds_sum{cluster="clusterName", nodeType="nodeType", nodeId="nodeId",
k1="V1", ..., Kn="Vn"} value <br> name_seconds_count{cluster="clusterName",
nodeType="nodeType", nodeId="nodeId", k1="V1", ..., Kn="Vn"} value <br>
name_seconds{cluster="clusterName", nodeType="nodeType", nodeId="nodeId",
k1="V1", ..., Kn="Vn", quantile="0.5"} value <br> name_seco [...]
+
+### Config File
+
+1) Taking DataNode as an example, modify the iotdb-datanode.properties
configuration file as follows:
+
+```properties
+dn_metric_reporter_list=PROMETHEUS
+dn_metric_level=CORE
+dn_metric_prometheus_reporter_port=9091
+```
+
+Then you can get metrics data as follows
+
+2) Start IoTDB DataNodes
+3) Open a browser or use ```curl``` to visit
```http://servier_ip:9091/metrics```, you can get the following metric
+ data:
+
+```
+...
+# HELP file_count
+# TYPE file_count gauge
+file_count{name="wal",} 0.0
+file_count{name="unseq",} 0.0
+file_count{name="seq",} 2.0
+...
+```
+
+### Prometheus + Grafana
+
+As shown above, IoTDB exposes monitoring metrics data in the standard
Prometheus format to the outside world. Prometheus
+can be used to collect and store monitoring indicators, and Grafana can be
used to visualize monitoring indicators.
+
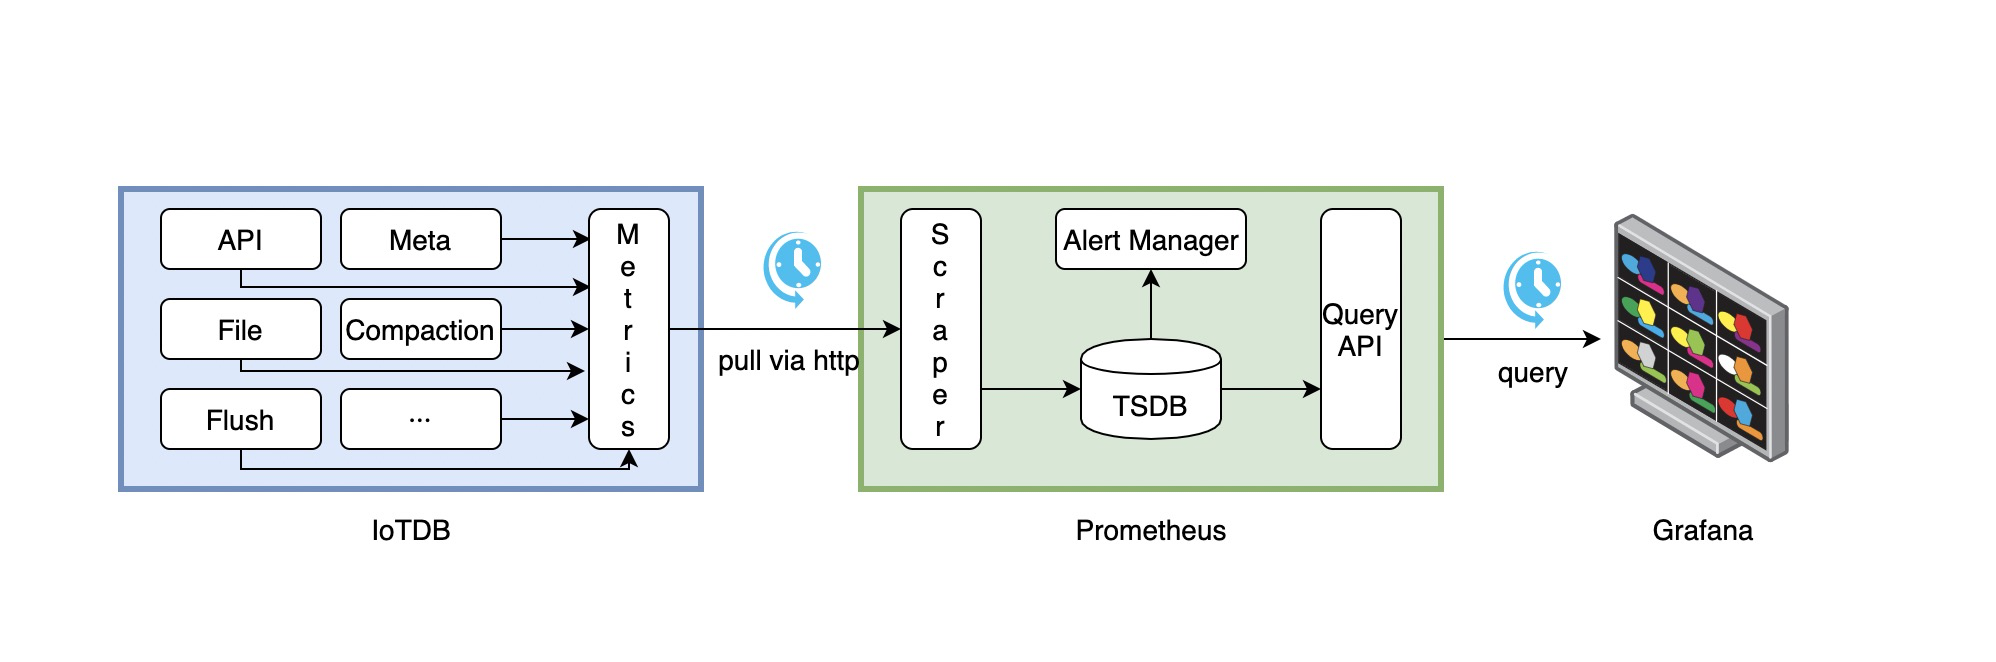
+The following picture describes the relationships among IoTDB, Prometheus and
Grafana
+
+
+
+1. Along with running, IoTDB will collect its metrics continuously.
+2. Prometheus scrapes metrics from IoTDB at a constant interval (can be
configured).
+3. Prometheus saves these metrics to its inner TSDB.
+4. Grafana queries metrics from Prometheus at a constant interval (can be
configured) and then presents them on the
+ graph.
+
+So, we need to do some additional works to configure and deploy Prometheus and
Grafana.
+
+For instance, you can config your Prometheus as follows to get metrics data
from IoTDB:
+
+```yaml
+job_name: pull-metrics
+honor_labels: true
+honor_timestamps: true
+scrape_interval: 15s
+scrape_timeout: 10s
+metrics_path: /metrics
+scheme: http
+follow_redirects: true
+static_configs:
+ - targets:
+ - localhost:9091
+```
+
+The following documents may help you have a good journey with Prometheus and
Grafana.
+
+[Prometheus
getting_started](https://prometheus.io/docs/prometheus/latest/getting_started/)
+
+[Prometheus scrape
metrics](https://prometheus.io/docs/prometheus/latest/configuration/configuration/#scrape_config)
+
+[Grafana
getting_started](https://grafana.com/docs/grafana/latest/getting-started/getting-started/)
+
+[Grafana query metrics from
Prometheus](https://prometheus.io/docs/visualization/grafana/#grafana-support-for-prometheus)
+
+### Apache IoTDB Dashboard
+
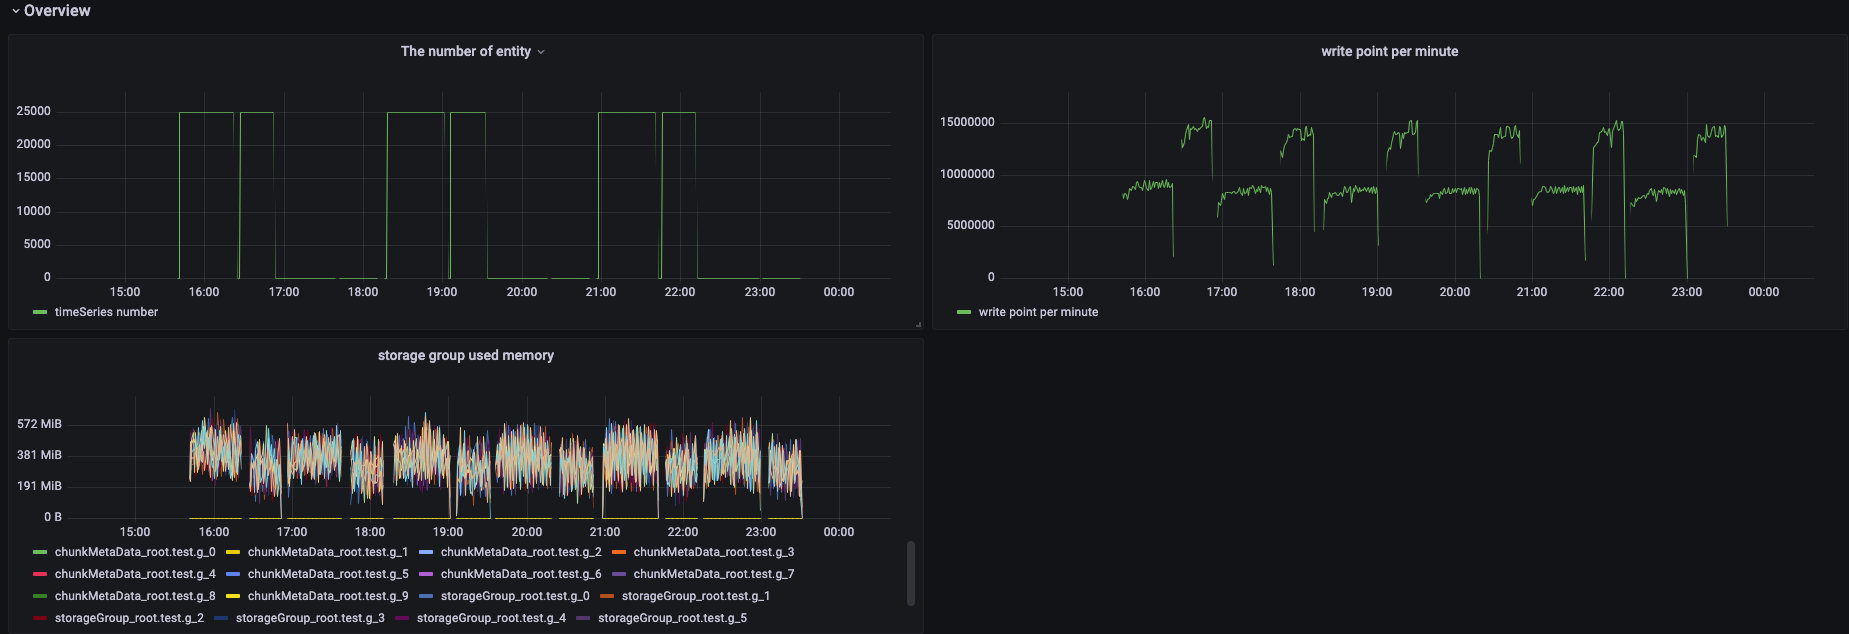
+We provide the Apache IoTDB Dashboard, and the rendering shown in Grafana is
as follows:
+
+
+
+You can obtain the json files of Dashboards in enterprise version.
+
+###
\ No newline at end of file
diff --git a/src/UserGuide/Master/Tools-System/Workbench.md
b/src/UserGuide/Master/Tools-System/Workbench.md
new file mode 100644
index 0000000..b01d7e3
--- /dev/null
+++ b/src/UserGuide/Master/Tools-System/Workbench.md
@@ -0,0 +1,365 @@
+<!--
+
+ Licensed to the Apache Software Foundation (ASF) under one
+ or more contributor license agreements. See the NOTICE file
+ distributed with this work for additional information
+ regarding copyright ownership. The ASF licenses this file
+ to you under the Apache License, Version 2.0 (the
+ "License"); you may not use this file except in compliance
+ with the License. You may obtain a copy of the License at
+
+ http://www.apache.org/licenses/LICENSE-2.0
+
+ Unless required by applicable law or agreed to in writing,
+ software distributed under the License is distributed on an
+ "AS IS" BASIS, WITHOUT WARRANTIES OR CONDITIONS OF ANY
+ KIND, either express or implied. See the License for the
+ specific language governing permissions and limitations
+ under the License.
+
+-->
+
+## Workbench
+
+Workbench是一个可创建多个连接的图形化数据库管理工具,用于管理IoTDB,提供元数据的可视化与管理、数据的增删改查以及权限控制等功能。Workbench不仅满足专业开发人员的所有需求,同时简洁友好的界面设计对初学者来说也易于上手。
+
+## 安装
+
+如果你在安装过程中遇到任何问题,你可以参考文档或向软件供应商或技术支持团队寻求帮助。
+
+环境要求:JDK1.8.0_162及以上。
+
+1. 下载并解压软件。第一步是从官方网站或一个可信赖的来源下载软件,下载地址为https://www.timecho.com/product 。
+2. 启动后端服务。输入指令:
+```
+java -jar workbench.jar
+```
+或:
+```
+nohup java -jar workbench.jar >/dev/null 2>&1 &
+```
+默认端口为 9090;
+
+1. 访问web界面。默认地址为`IP:9090`。
+
+## 登录
+
+默认用户名为root,密码为123456。用户名必须由字母、数字、下划线组成,不能以数字和下划线开始,须大于等于4个字符,密码必须大于等于6位。点击"**文A**"可切换语言,有中文、英文可选。
+
+
+
+## 用户界面
+
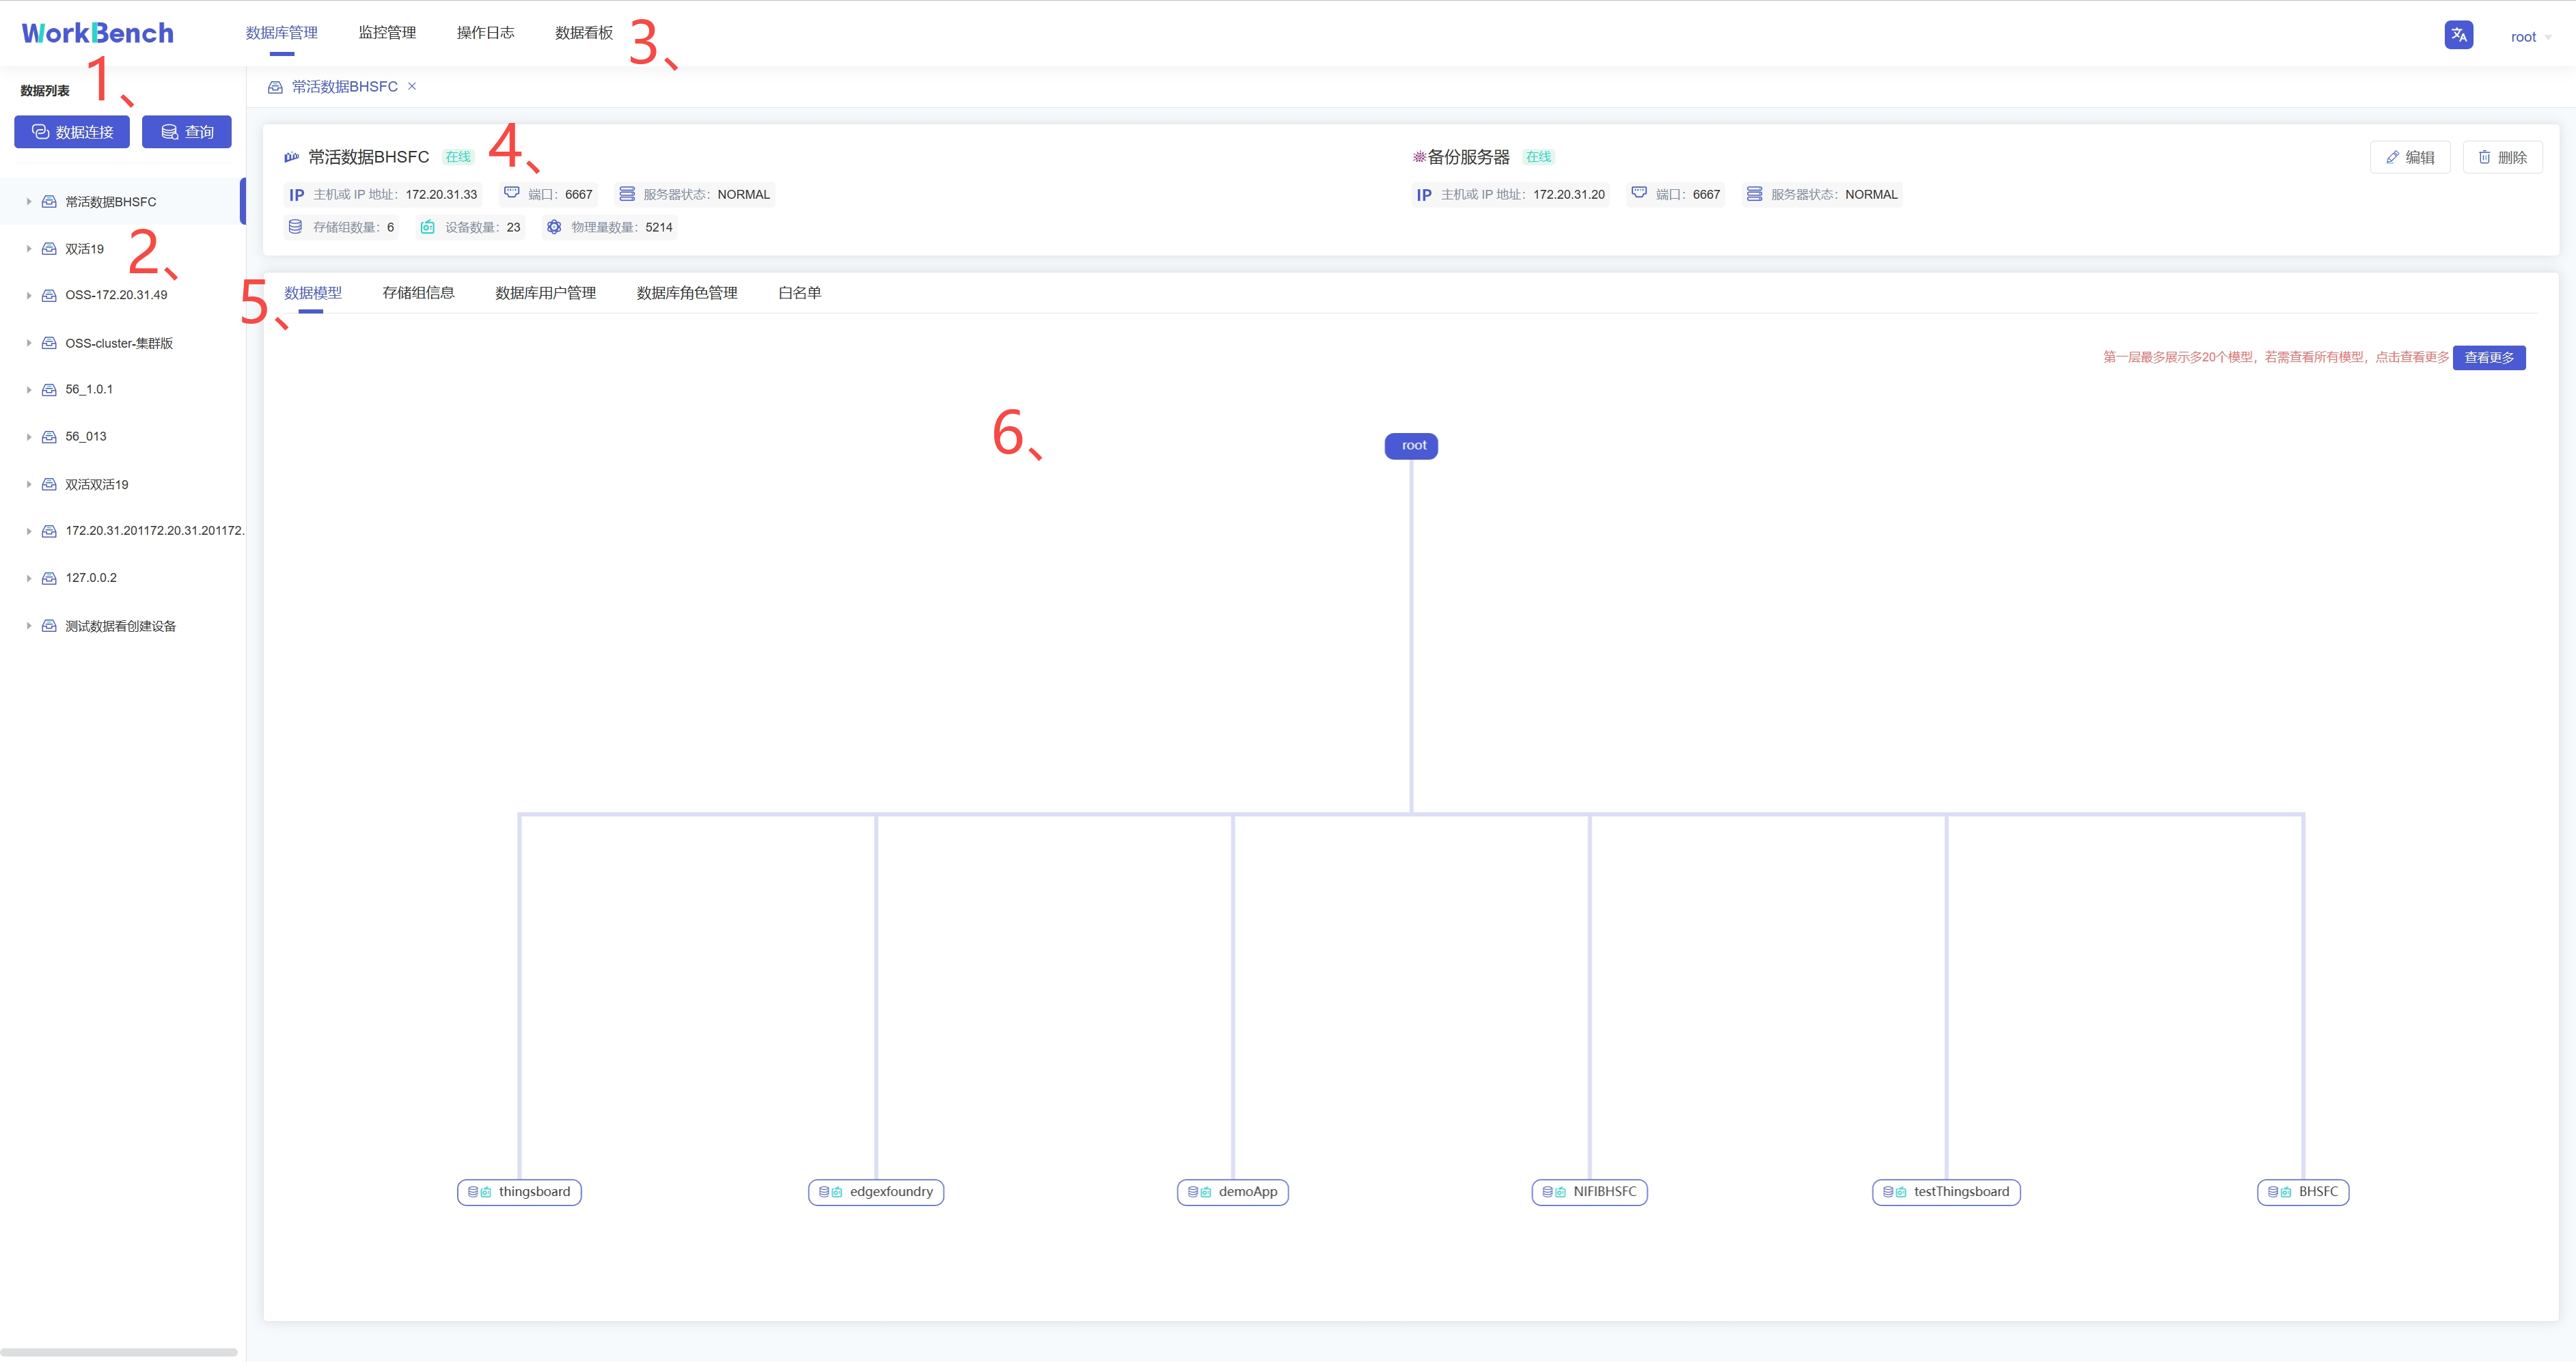
+**主界面**
+
+主界面由操作栏、导航栏、工具栏和几个窗格组成。
+
+
+
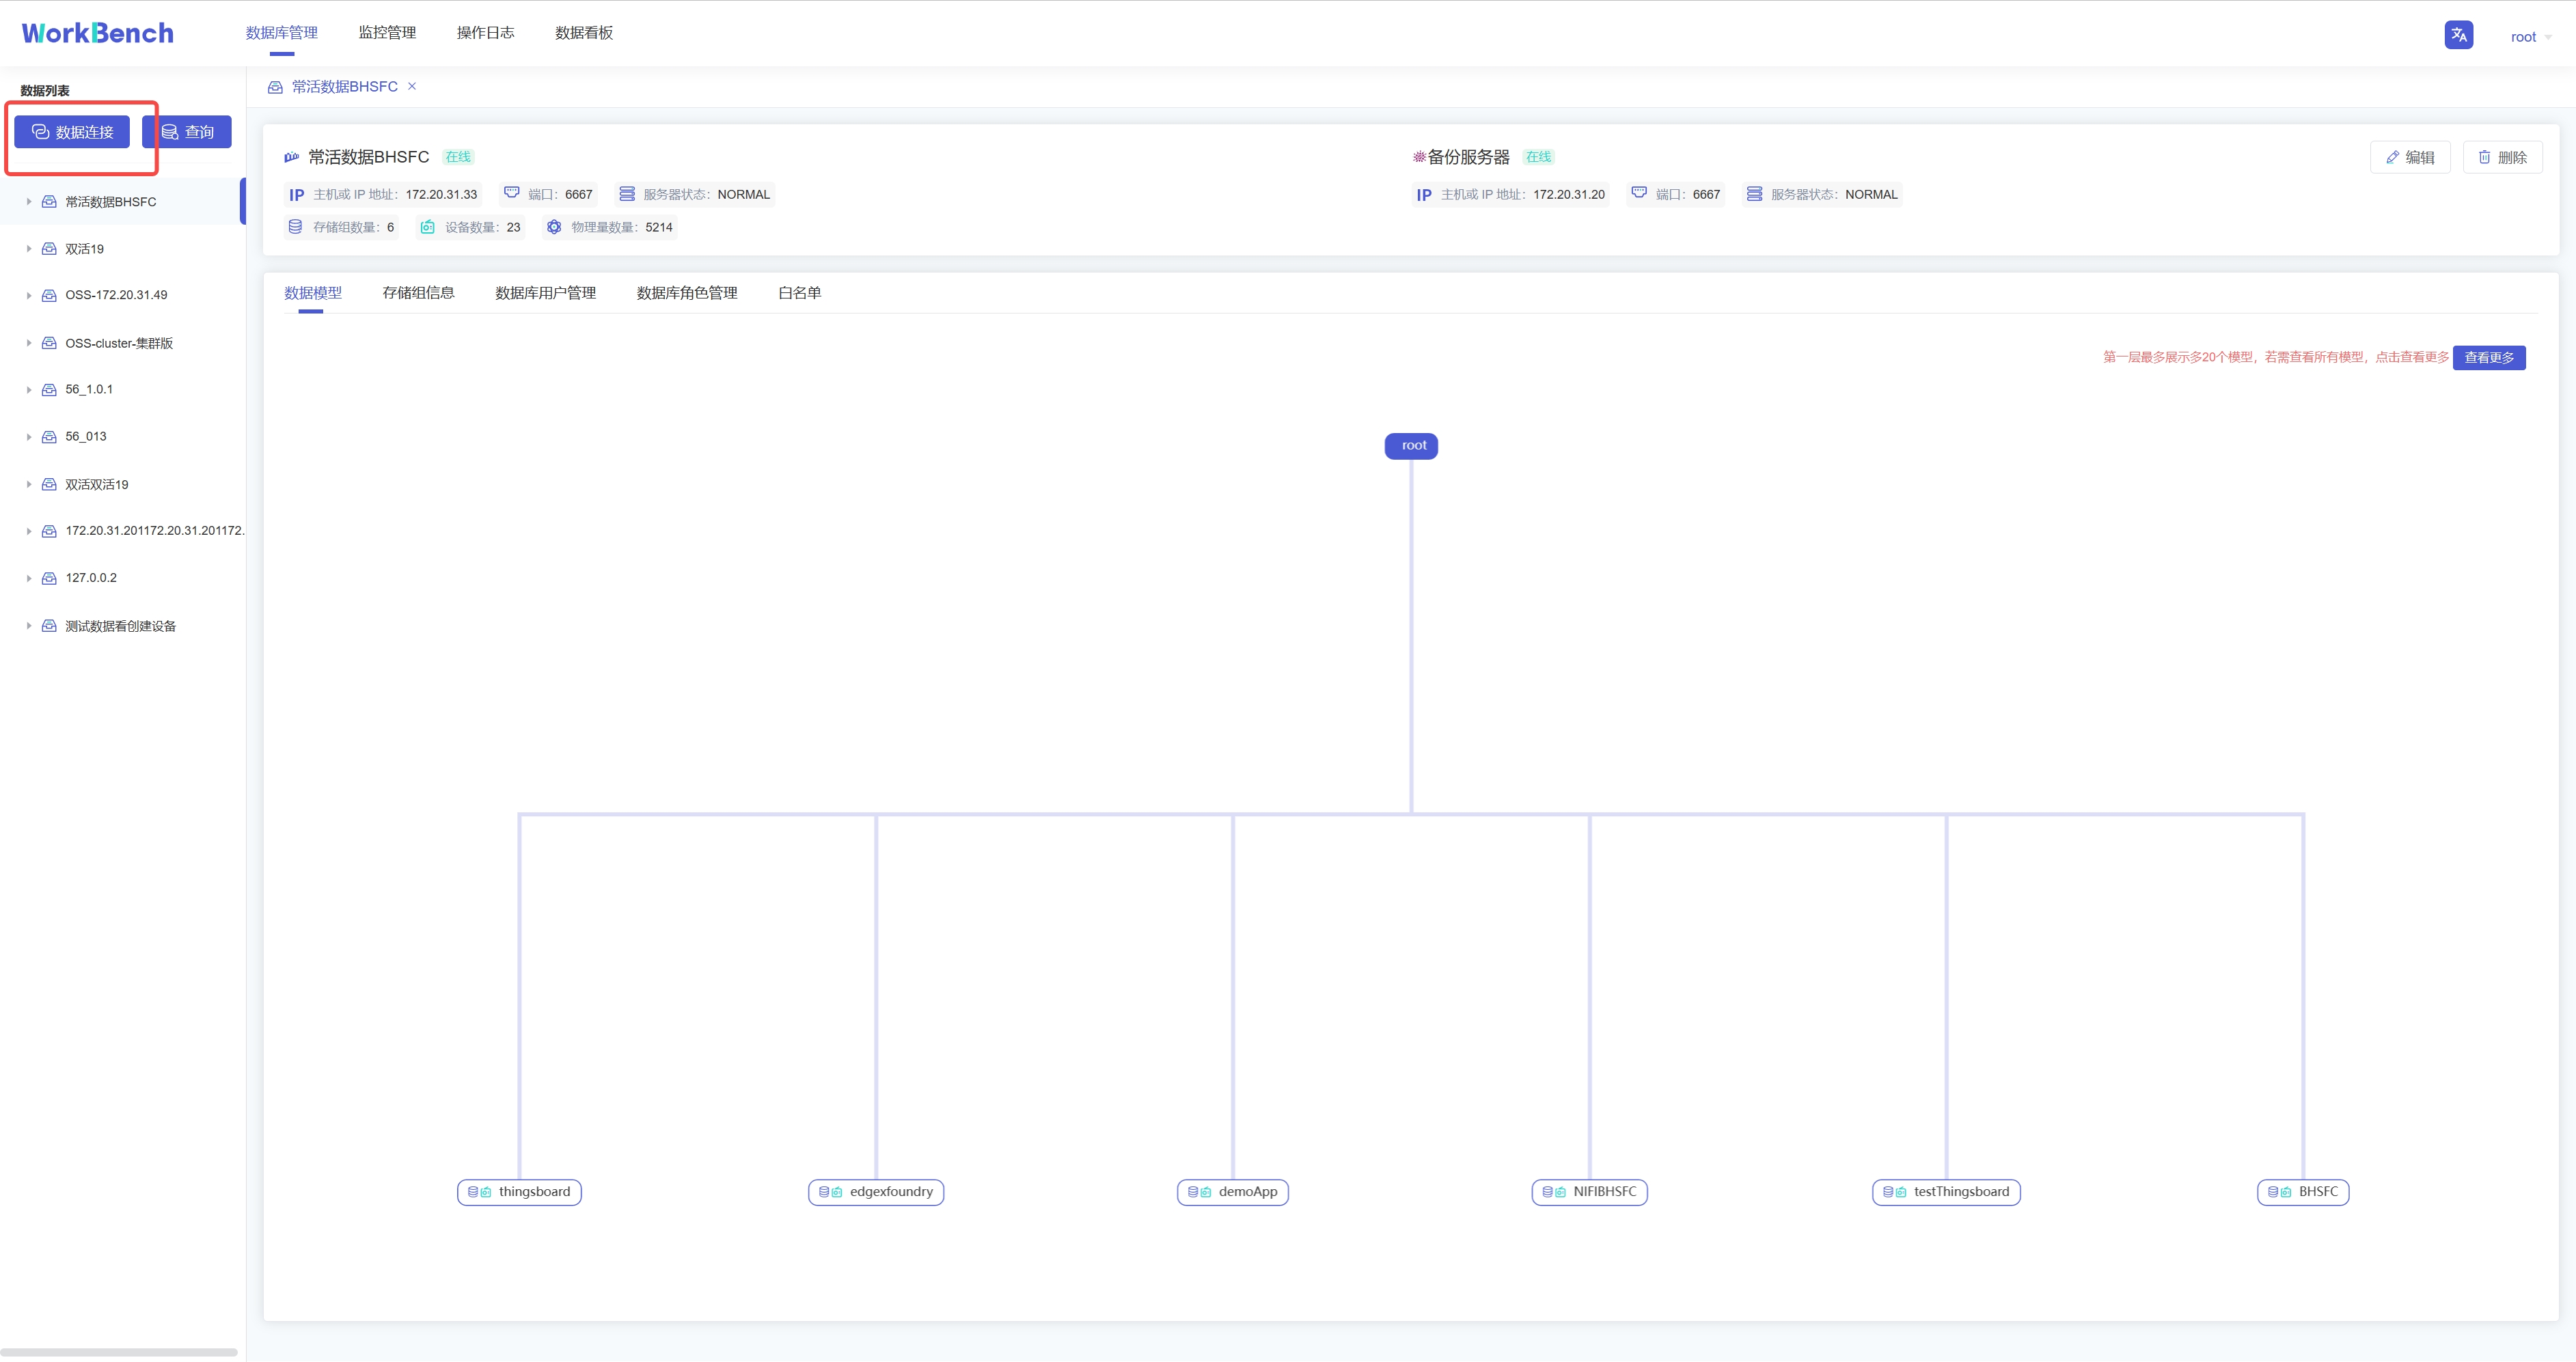
+1、连接操作栏
+
+可以新建数据库的连接或者数据库的查询。
+
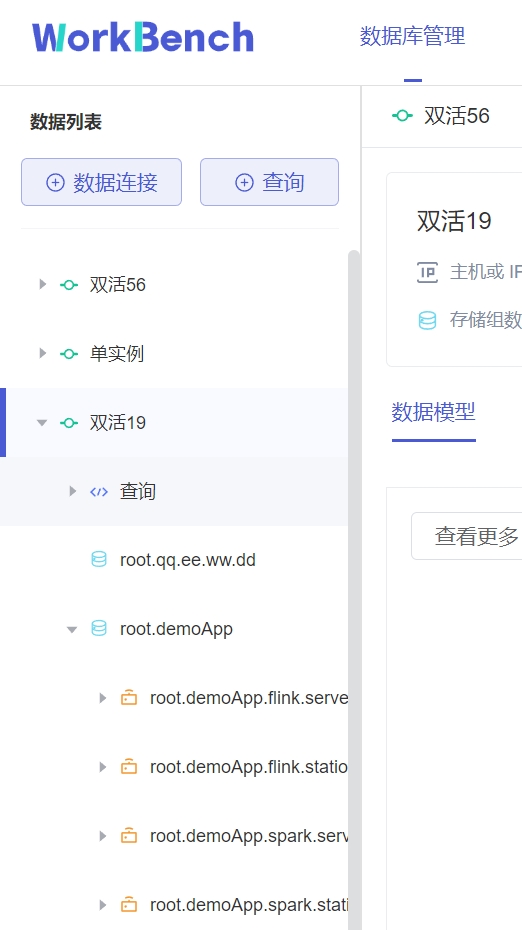
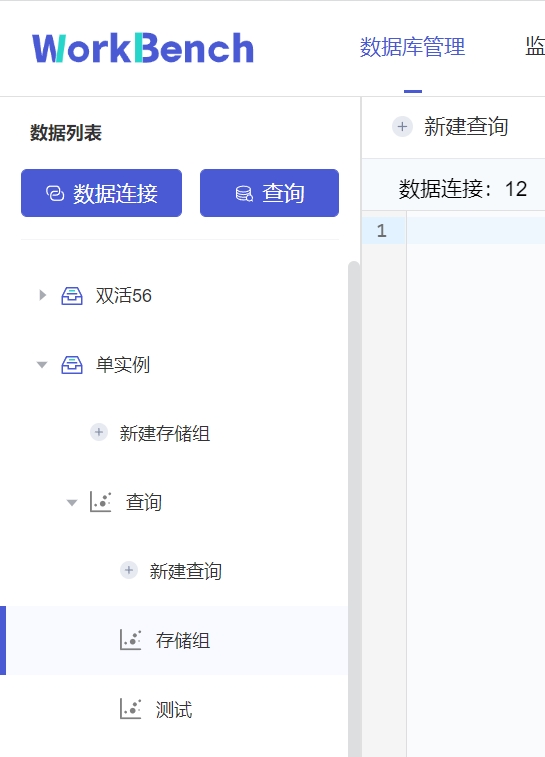
+2、对象窗格
+
+对象窗格显示已连接的数据库实例,采用树状结构设计,点击出现子节点可以方便地处理数据库和它们管理的对象,展示的最低层级是设备。
+
+
+
+3、导航栏
+
+导航栏可选择"**数据库管理**"、"**监控管理**"、"**操作日志**"、"**数据看板**"。
+
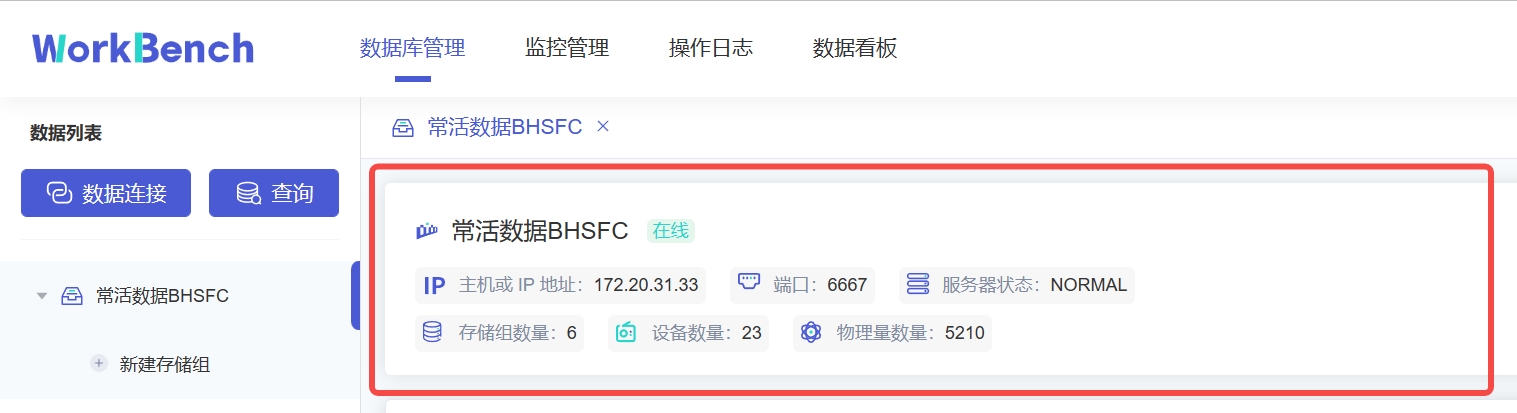
+4、状态栏
+
+状态栏显示当前选项下的状态信息,当选中"**数据库管理**"时,状态栏显示数据库的在线情况、IP、端口、服务器状态及其存储组、设备、物理量的数量信息。
+
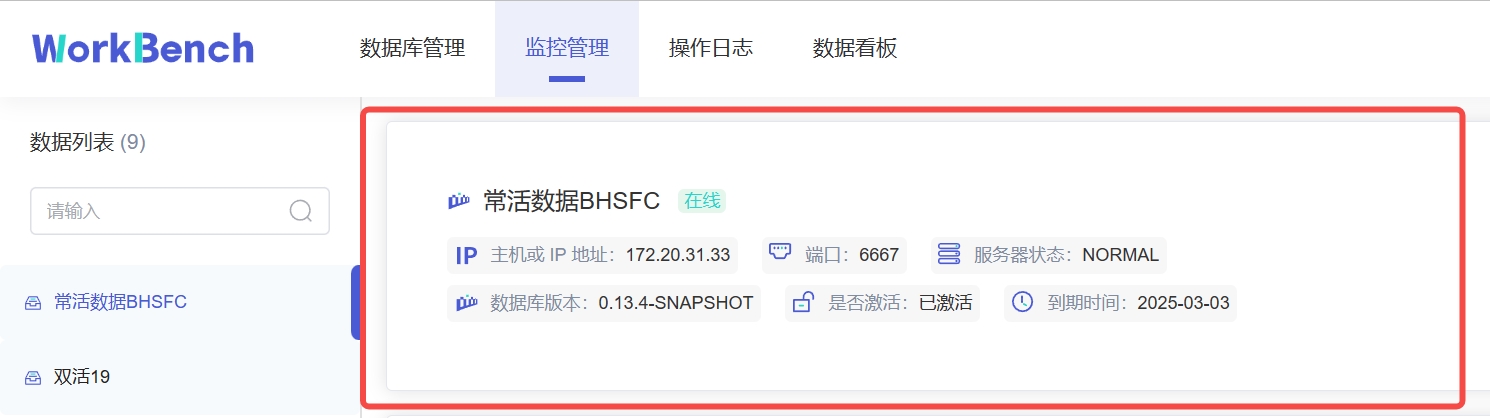
+
+
+当选\"**监控管理**\"时,状态栏显示数据库的在线情况、IP、端口、服务器状态、数据库版本、激活信息及到期时间。z注:"**数据库版本**"处的图标表示企业版或开源版,Workbench部分功能在开源版上无法使用。
+
+
+
+5、操作列
+
+操作列可以选择任意选项进行操作。
+
+6、信息窗格
+
+信息窗格显示对象的详细信息。
+
+## 连接
+
+首先用连接窗口创建一个或多个连接。点击"**数据连接**"创建新建连接。
+
+
+
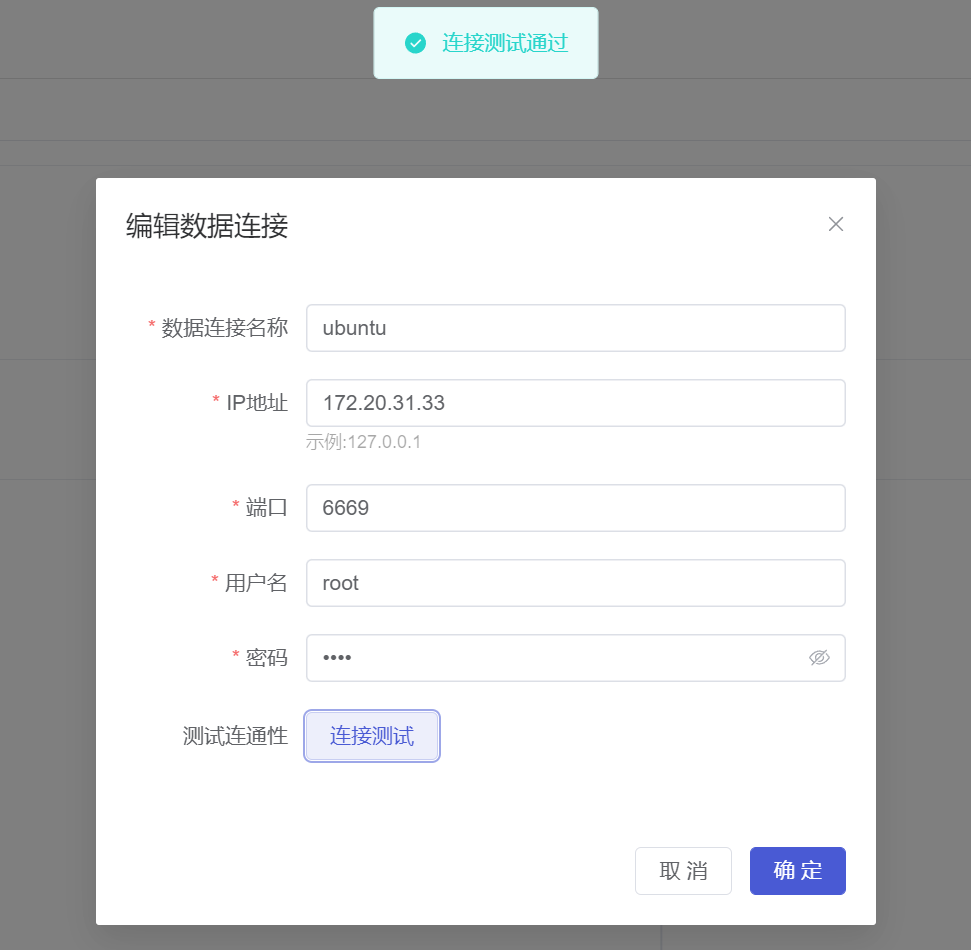
+在弹出的连接窗口输入需要填写的信息,其中数据连接名称必须大于等于3个字符。然后点击"**连接测试**",显示"**连接测试通过**"则表示正确连接,点击确定即可新建连接。
+
+
+
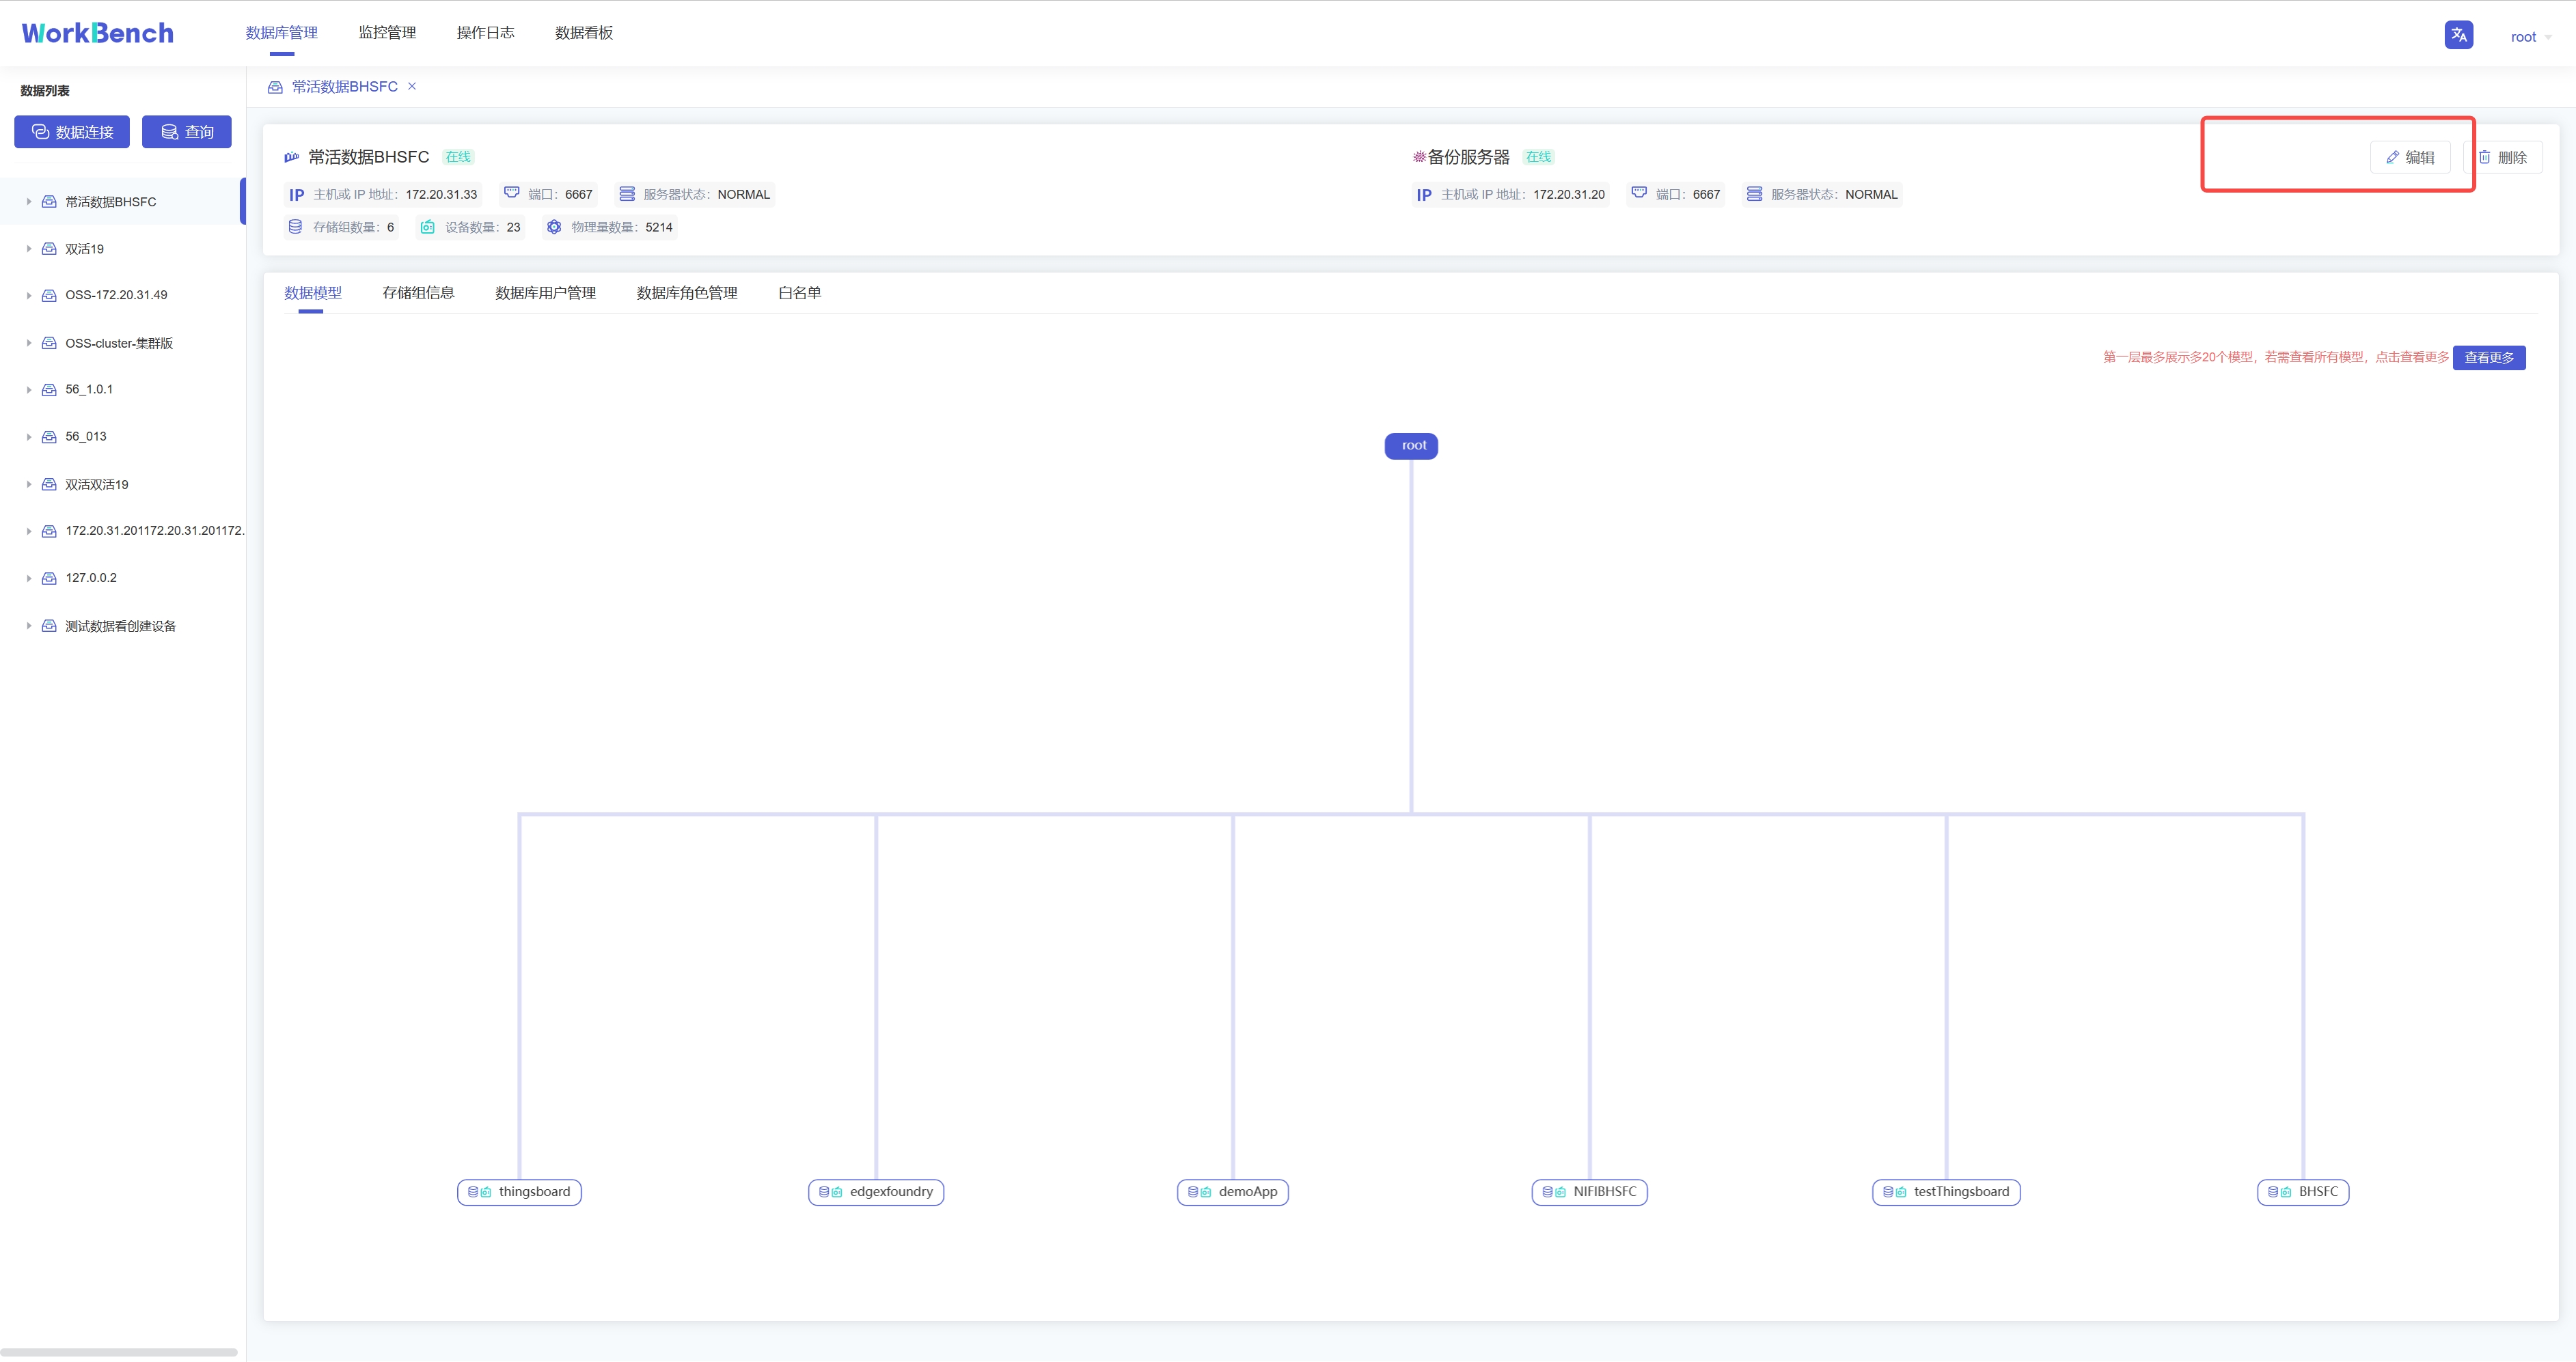
+若要修改连接情况,则可在状态栏右侧点"**编辑**"选项即可修改数据库连接信息。
+
+
+
+## 服务器安全性
+
+**白名单**
+
+企业版IoTDB可以通过添加白名单列表来设置允许访问IoTDB的IP。使用开源版IoTDB连接Workbench无法使用该功能。
+
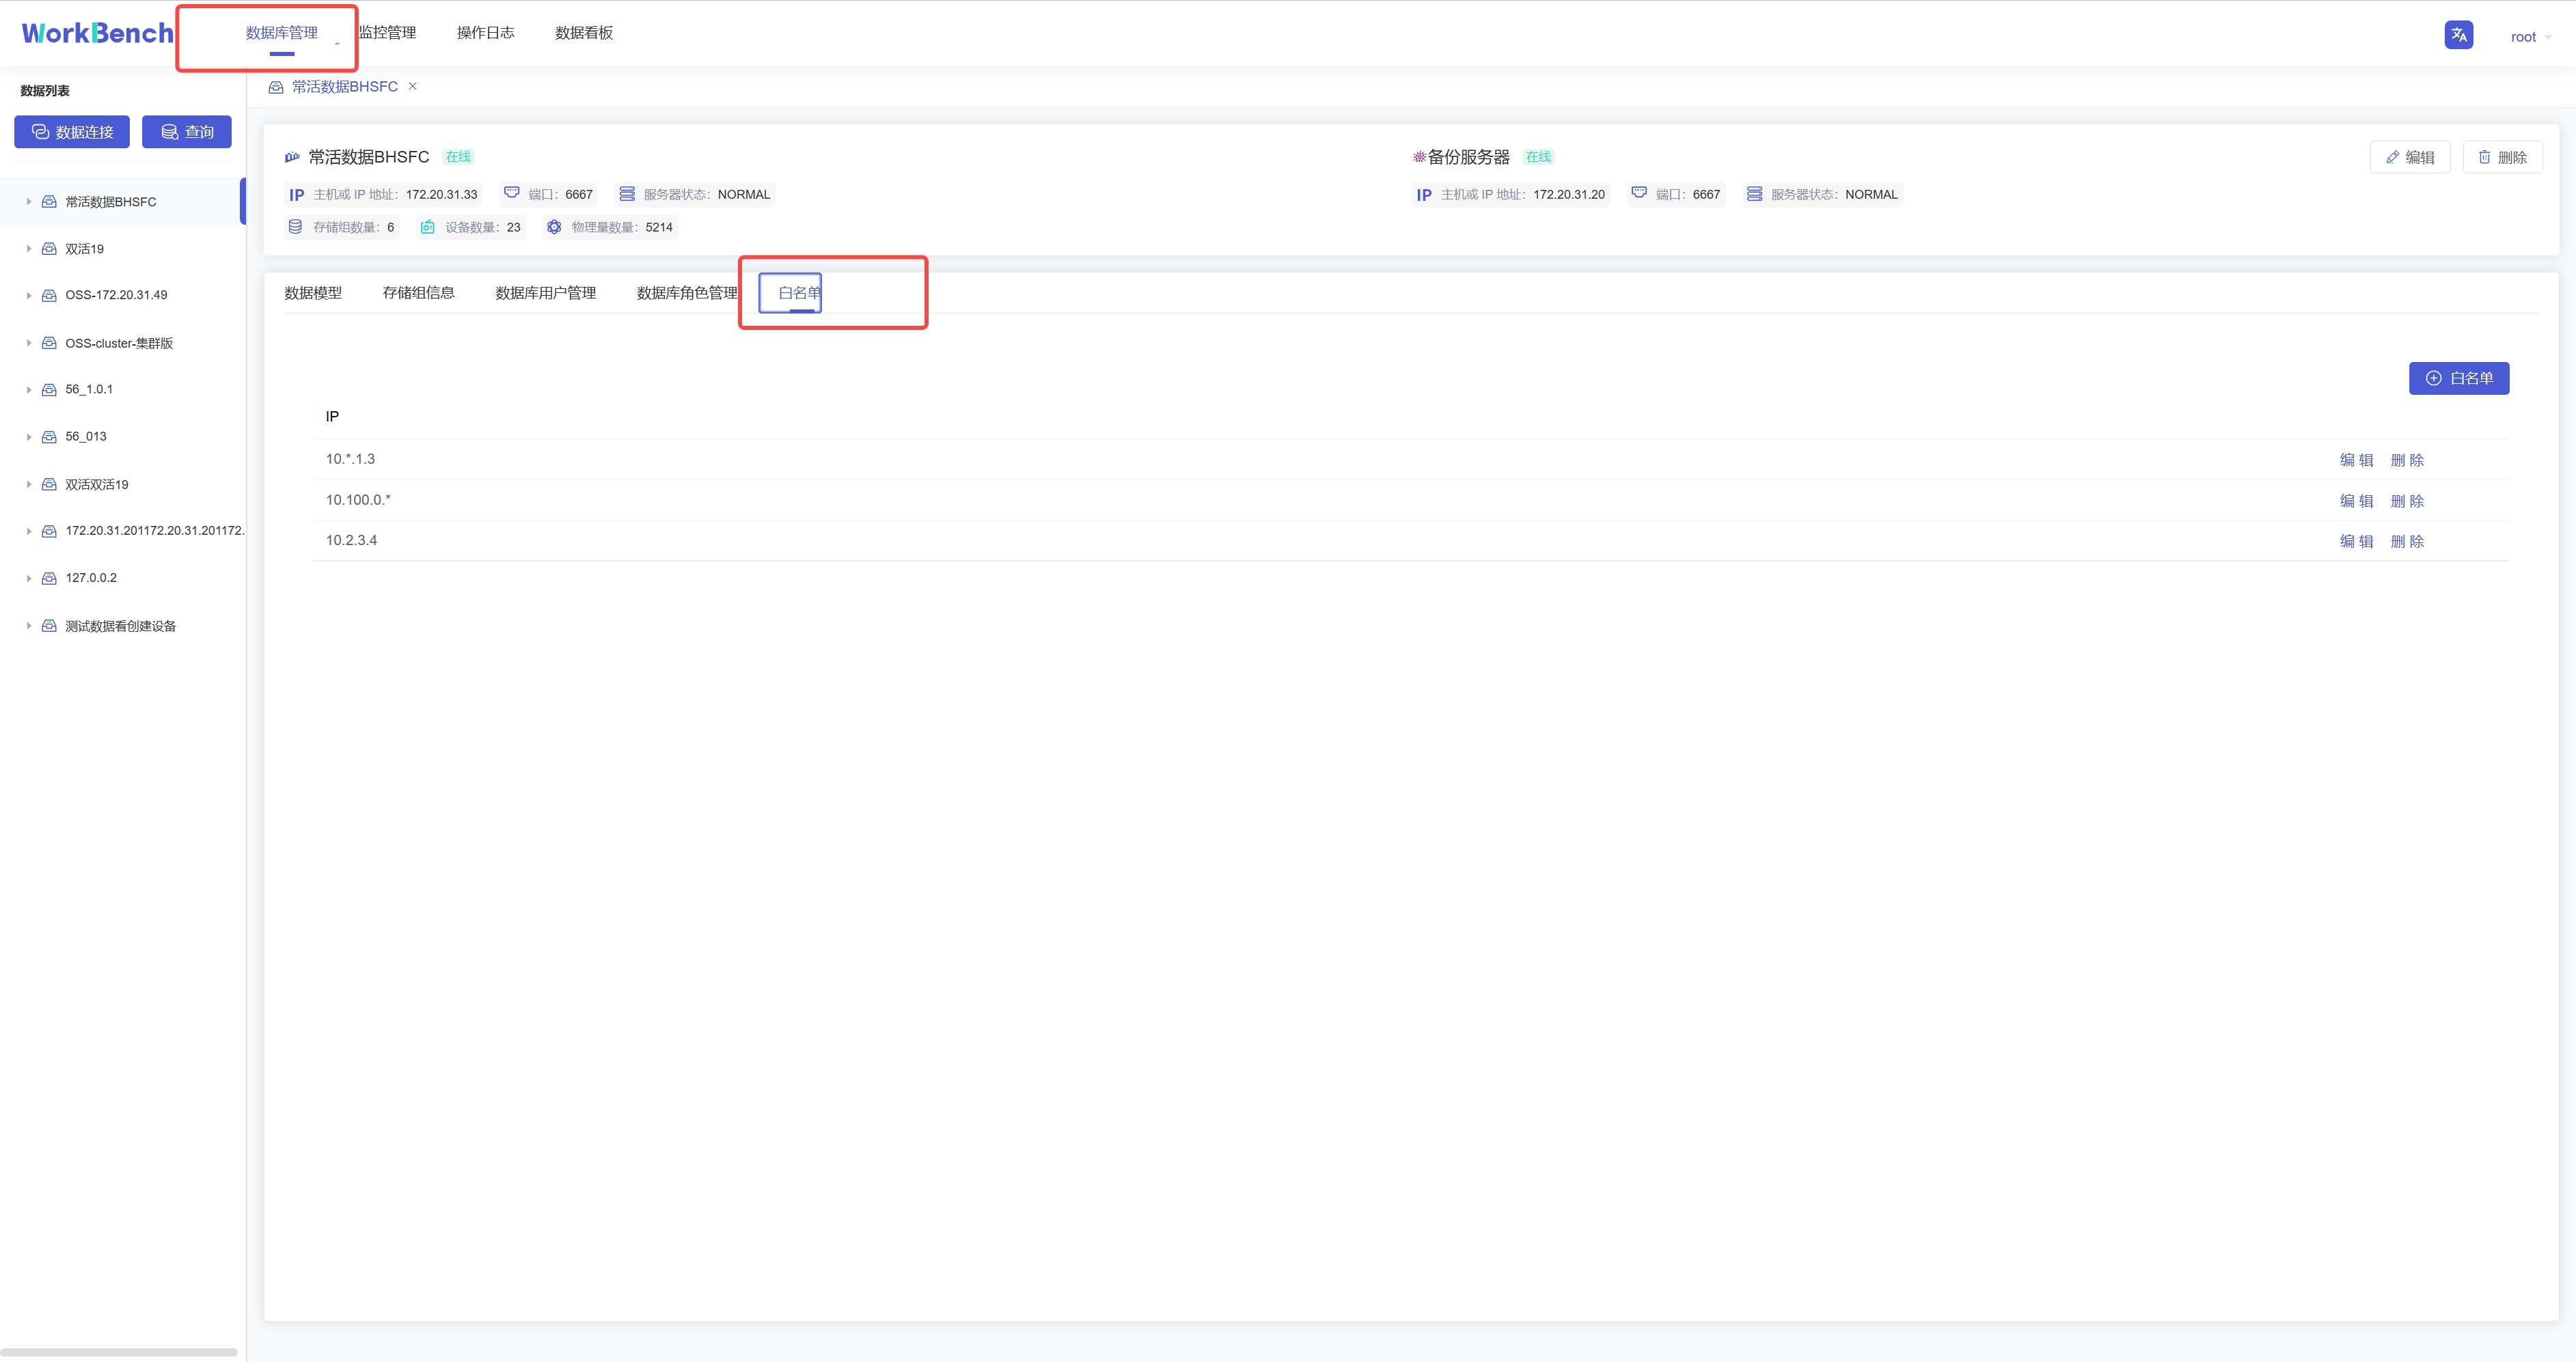
+从导航栏选择"**数据库管理**"-\>"**白名单**"可查看已添加的白名单IP列表。
+
+
+
+点击"**白名单**"可新增白名单IP,点击"**编辑**"/"**删除**"可修改白名单列表的IP信息。
+
+**权限管理**
+
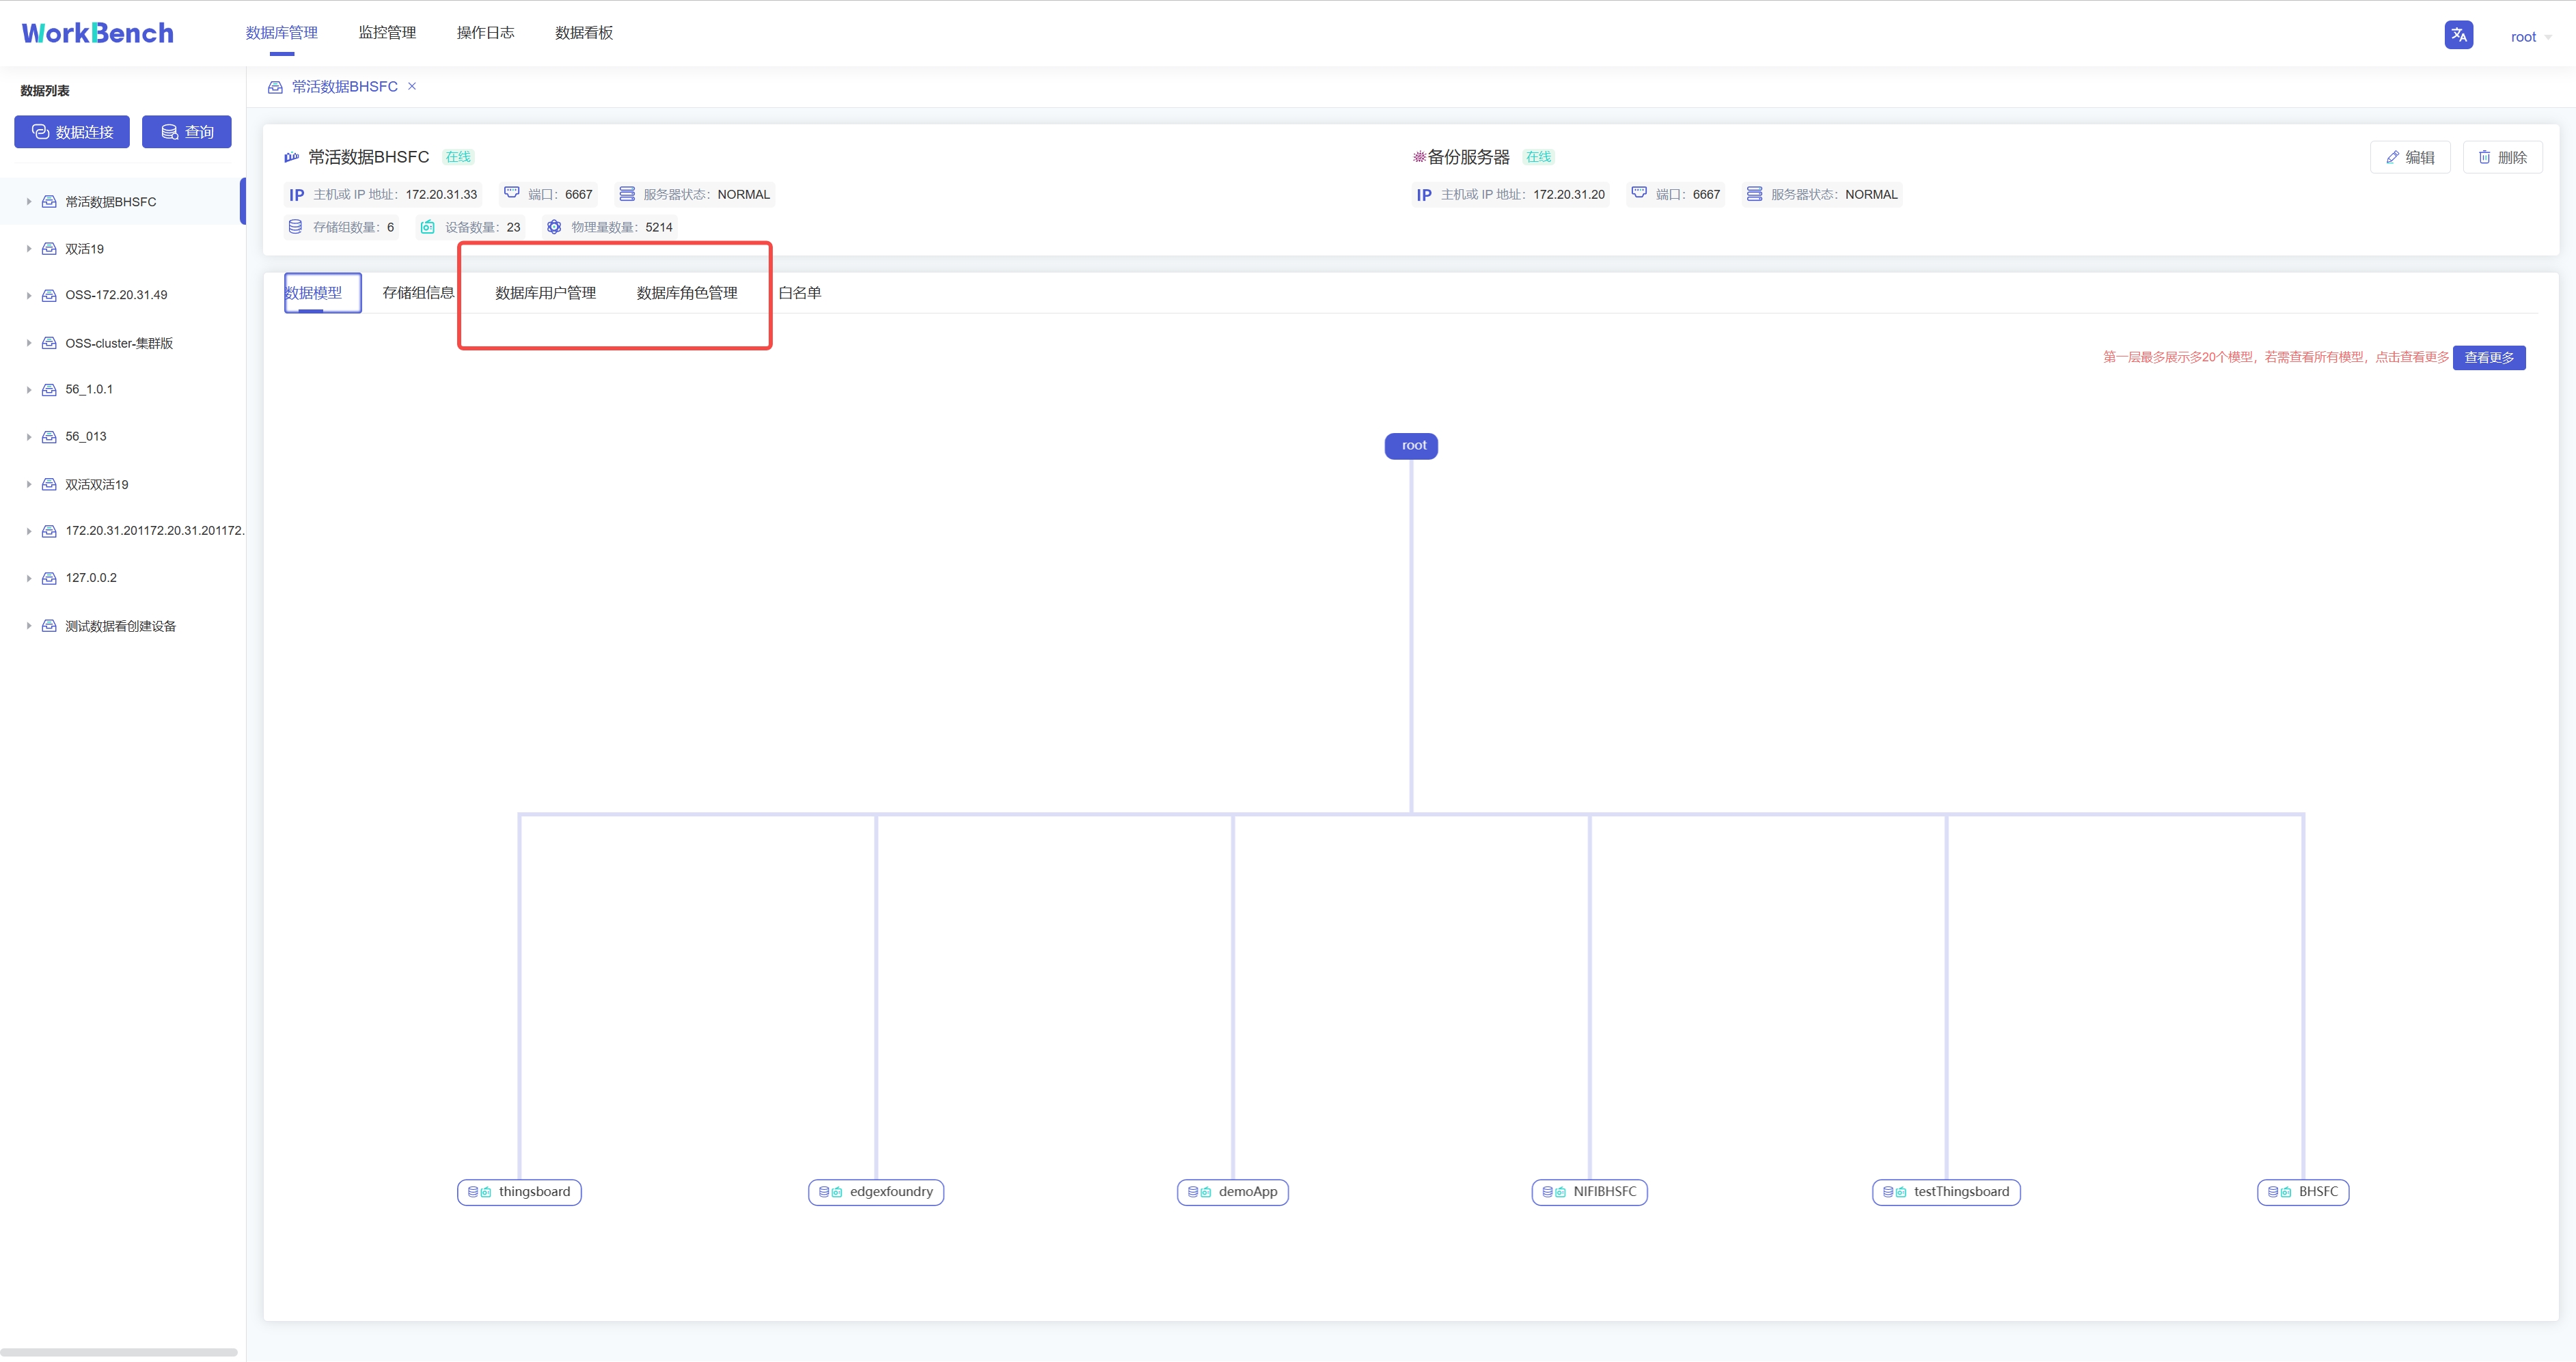
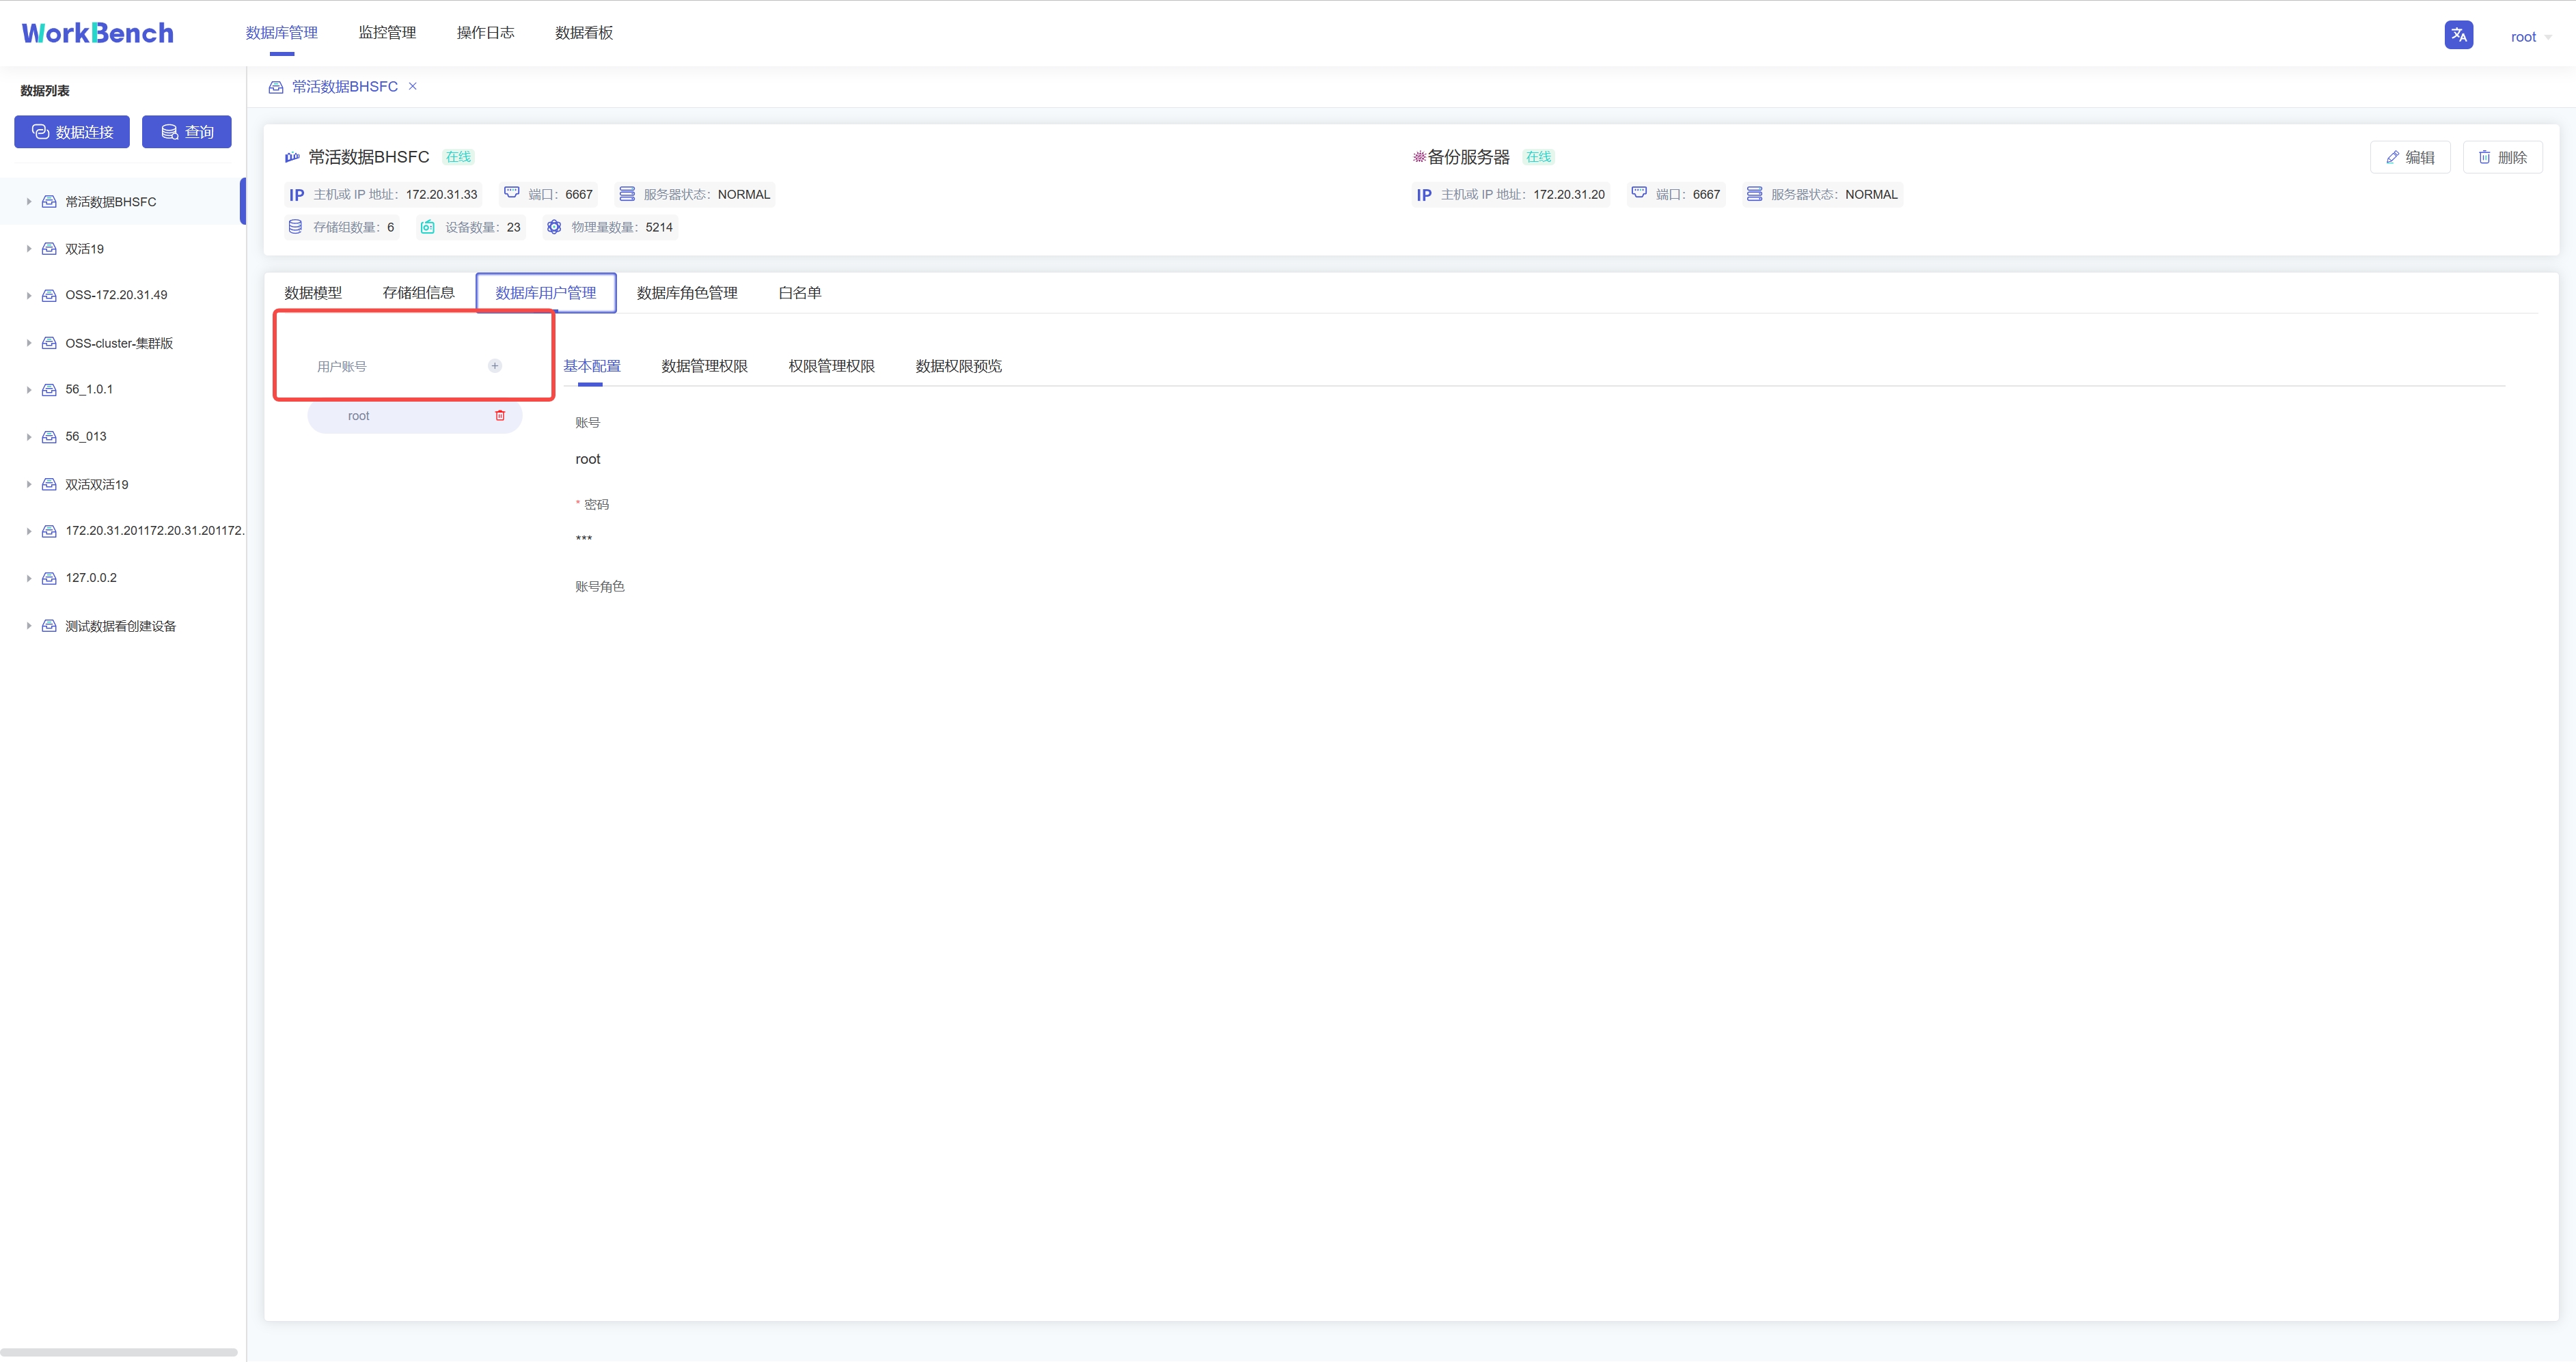
+Workbench提供强大的工具以管理服务器用户帐号和数据库对象的权限。在操作列中点击
+"**数据库用户管理**"或 "**数据库角色管理**"来打开用户或角色的对象列表。
+
+
+
+**新增用户**。选择"**数据库用户管理**"-\>"**用户账号+**"可新增用户,按要求填写用户名和密码即可,可以为用户添加角色信息。
+
+
+
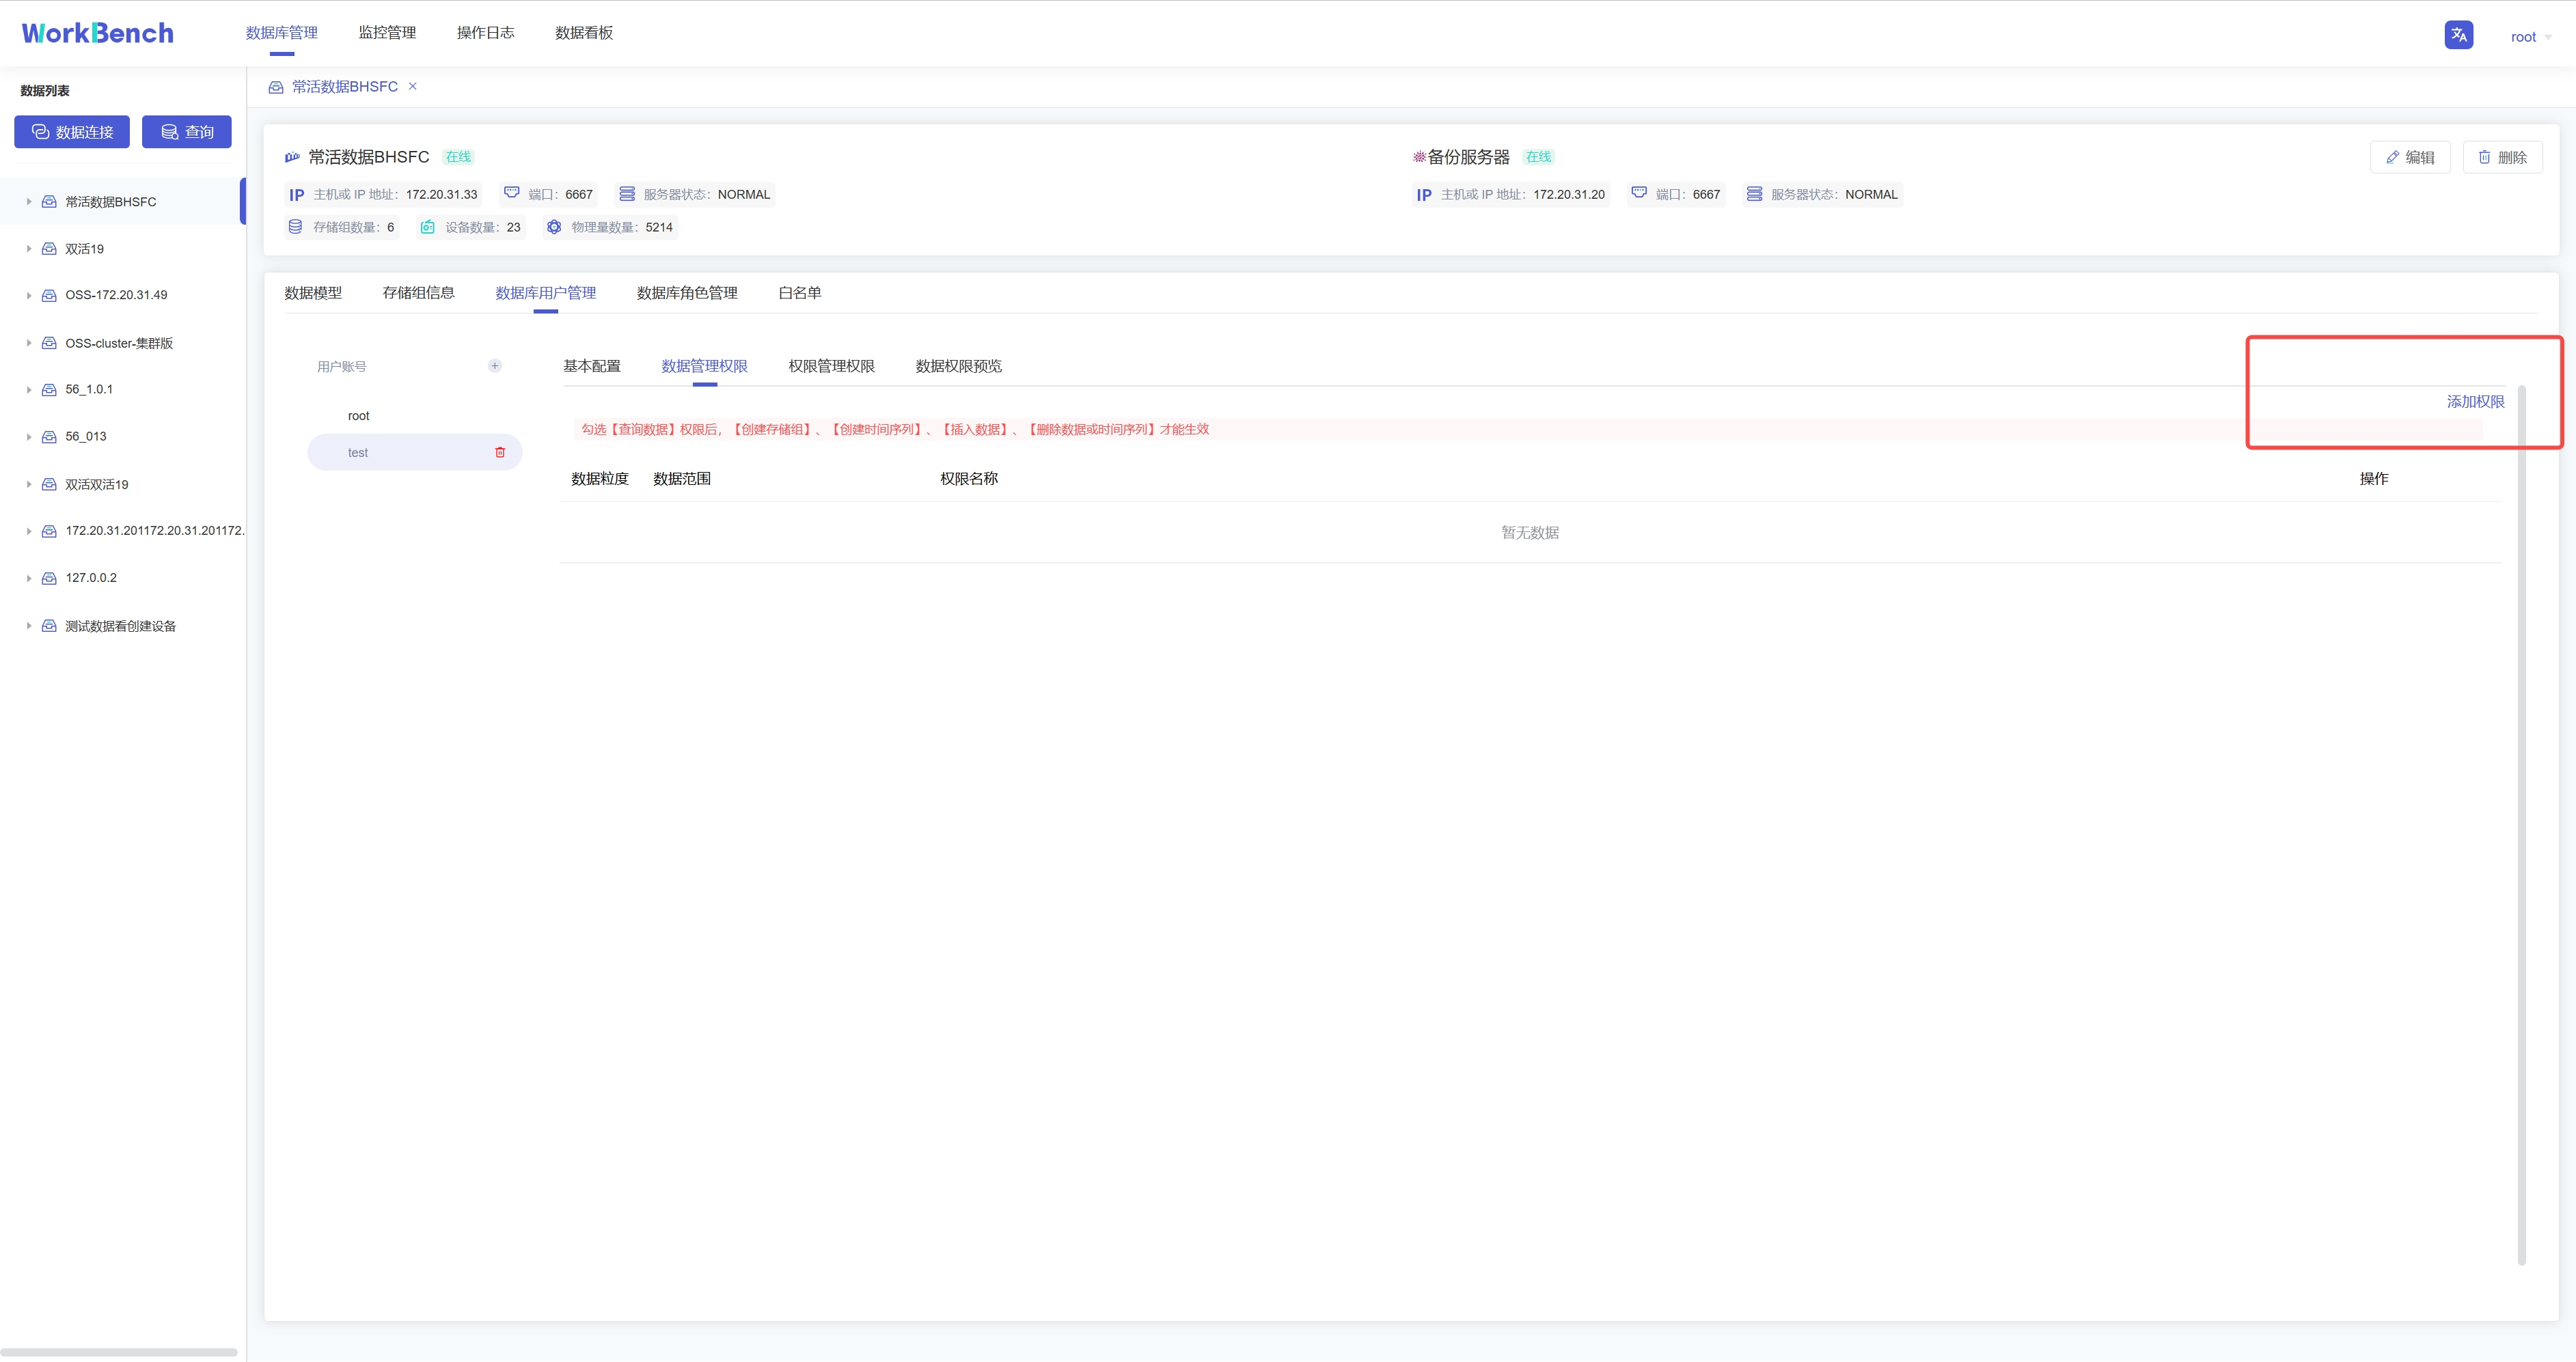
+**添加权限**。权限可分为数据管理权限(如对数据进行增删改查)以及权限管理权限(用户、角色的创建与删除,权限的赋予与撤销等)。选择"**数据库用户管理**"-\>"**数据管理权限**"-\>"**添加权限**"可为用户添加数据管理权限。在已添加的权限处可以选择"**编辑**"或"**删除**"以修改权限信息。
+
+
+
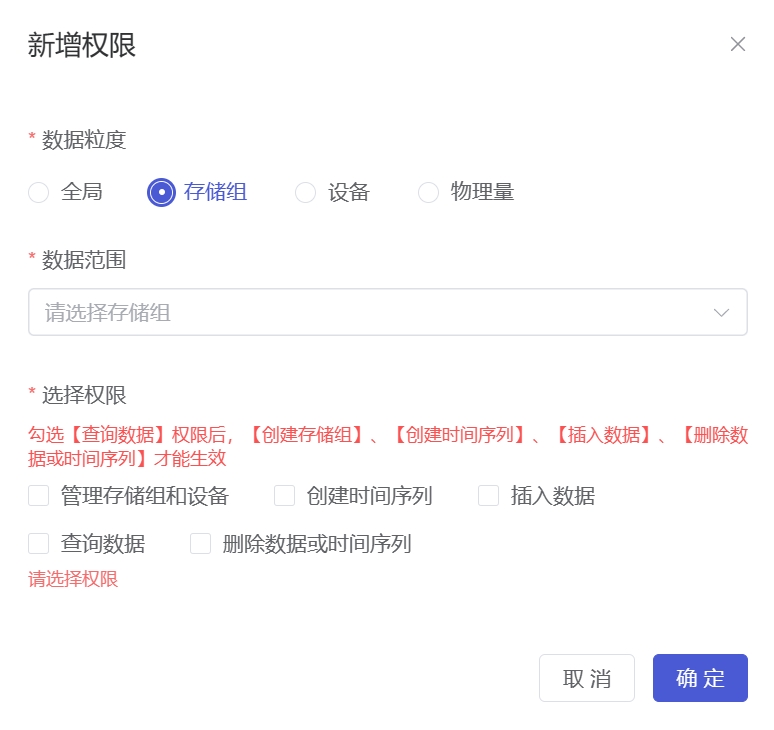
+弹出的界面可以选择权限作用的粒度以及具体权限内容。注意只有勾选【查询数据】权限和【查看用户】权限,其他权限才能在Workbench中生效查看。
+
+
+
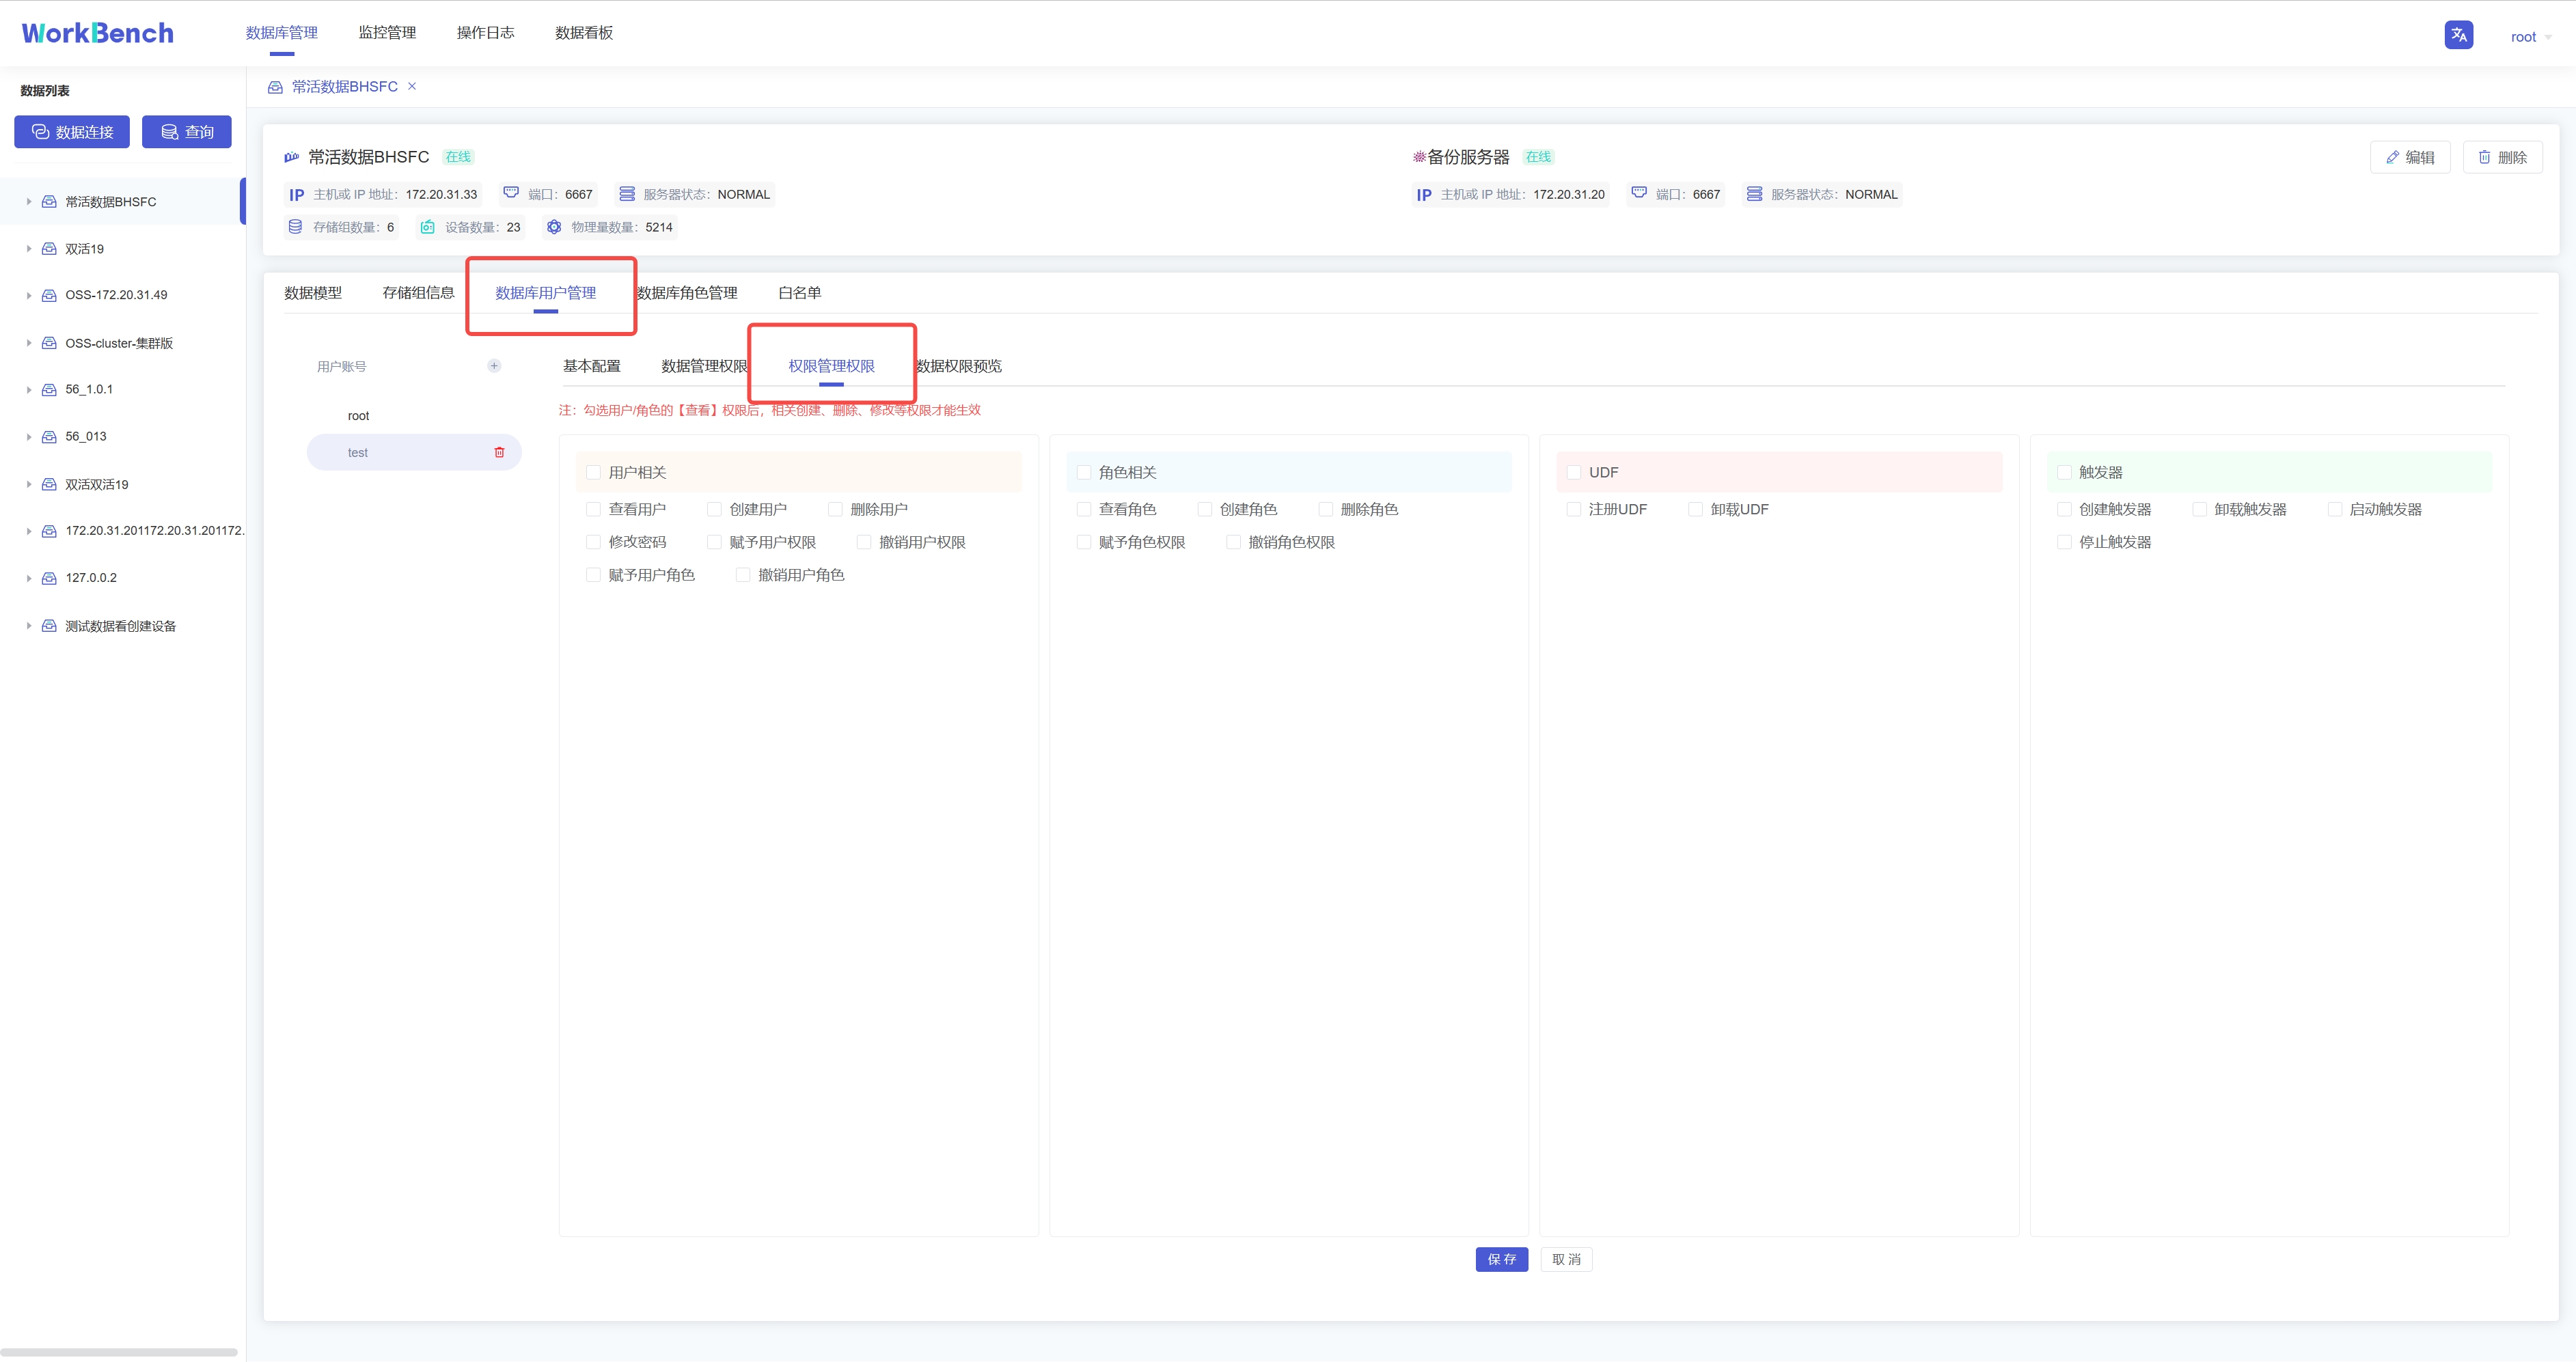
+选择"**数据库用户管理**"-\>"**权限管理权限**"勾选信息窗格中具体的权限信息,点击"保存"可为用户添加权限管理权限。
+
+
+
+**权限预览**。选择"**数据库用户管理**"-\>"**数据权限预览**"可预览该用户名下所有的数据权限。注:该功能仅支持企业版。
+
+## 数据迁移
+
+导入导出工具可将CSV格式的文件批量导入或导出IoTDB。
+
+**批量导入**
+
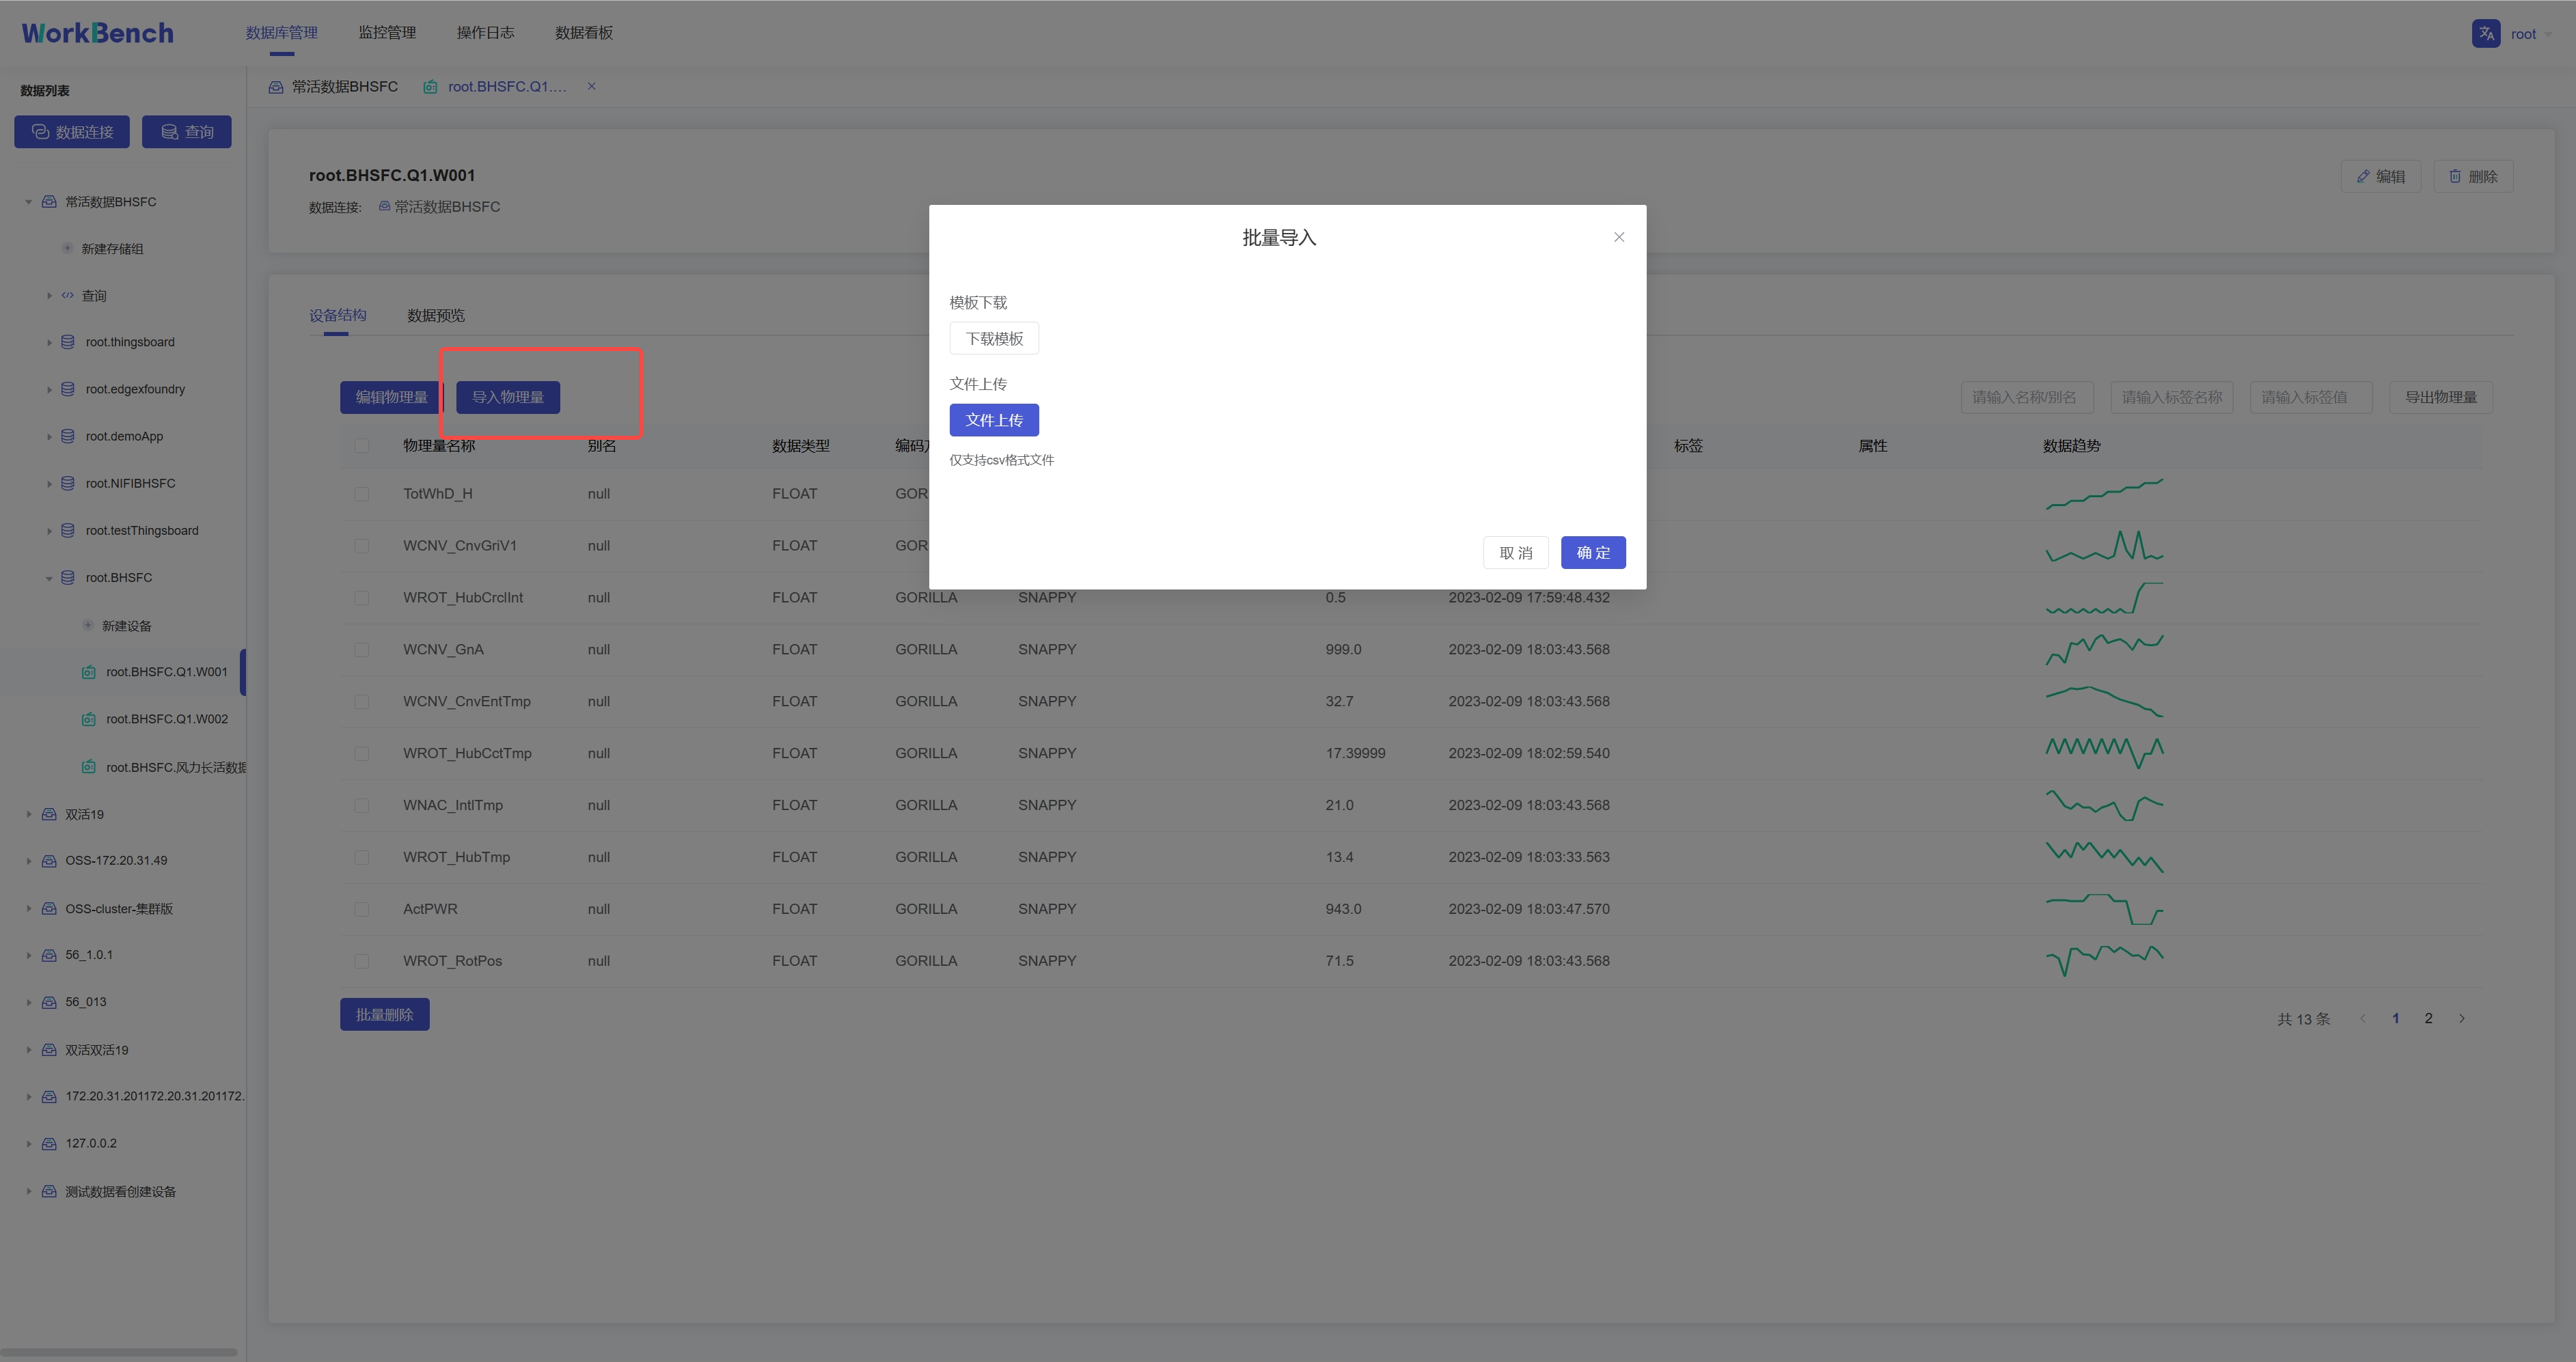
+批量导入功能仅在企业版中支持。在对象窗格中选择要操作的数据库,选择到设备节点,则右侧信息窗格将出现"**设备结构"**信息,点击"**导入物理量**",下载模板填写物理量信息,再上传该CSV文件即可批量导入物理量。注:当前版本不支持导入对齐物理量。
+
+
+
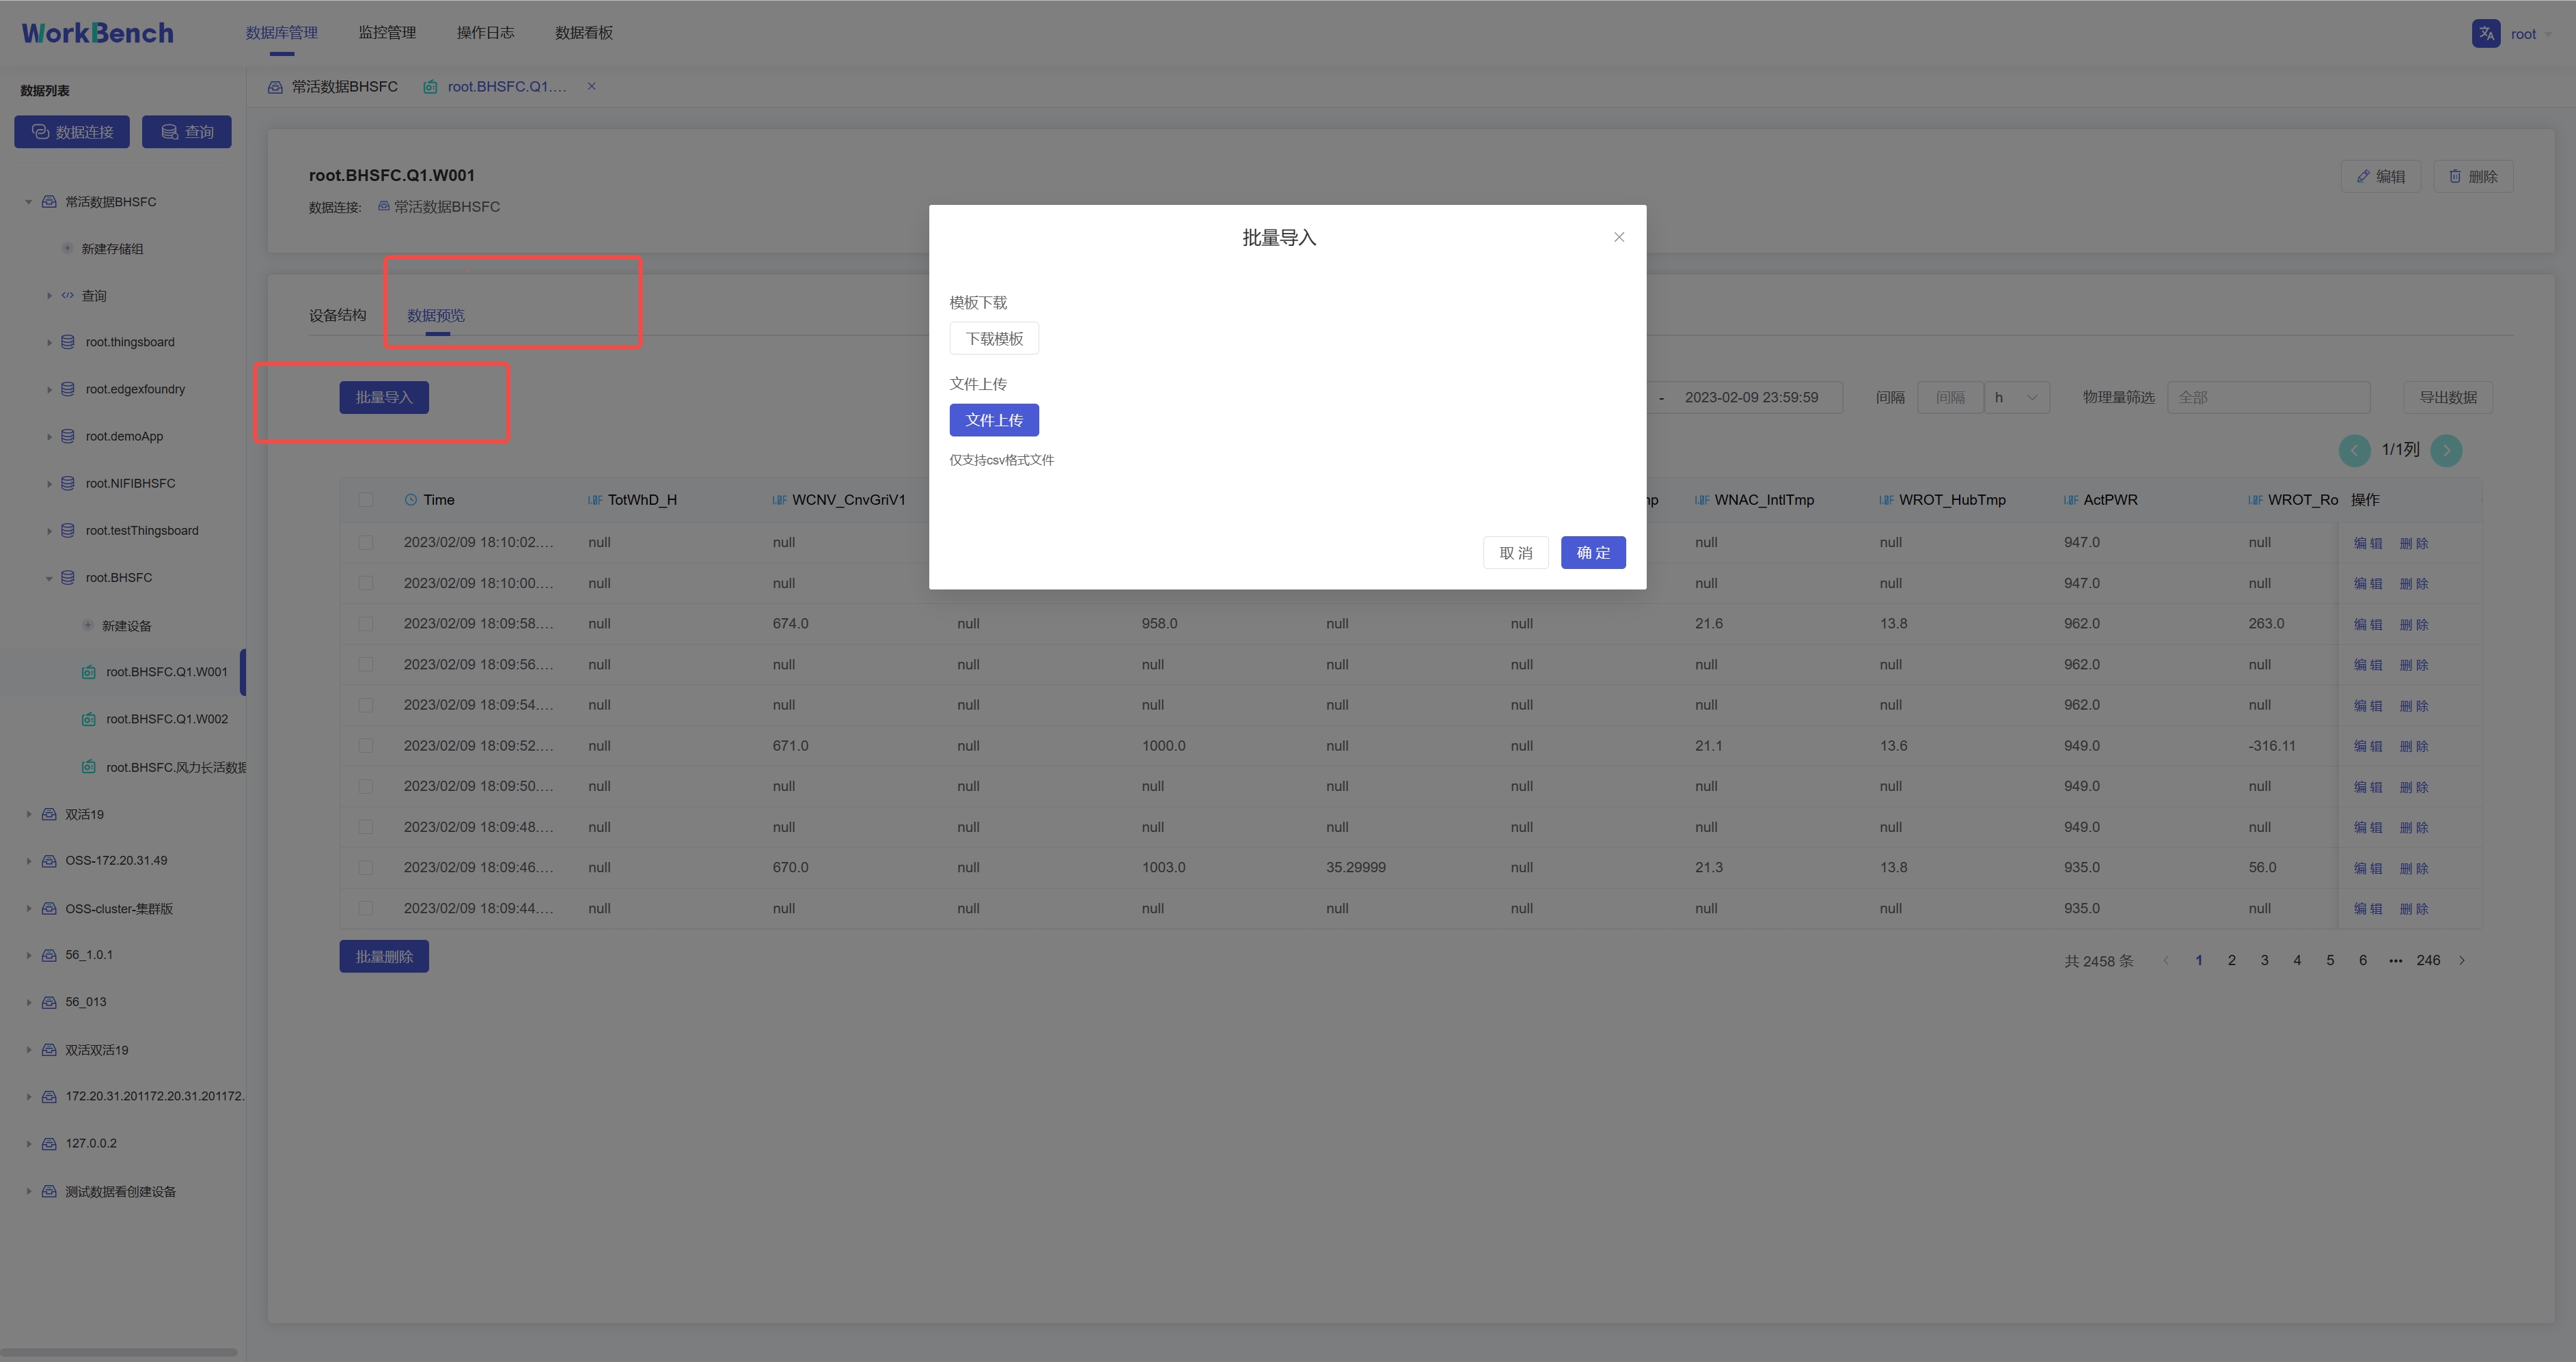
+选择"**数据预览**"-\>"**批量导入**"则可将符合模板要求的CSV文件数据导入,当前支持导入对齐时间序列。
+
+
+
+**批量导出**
+
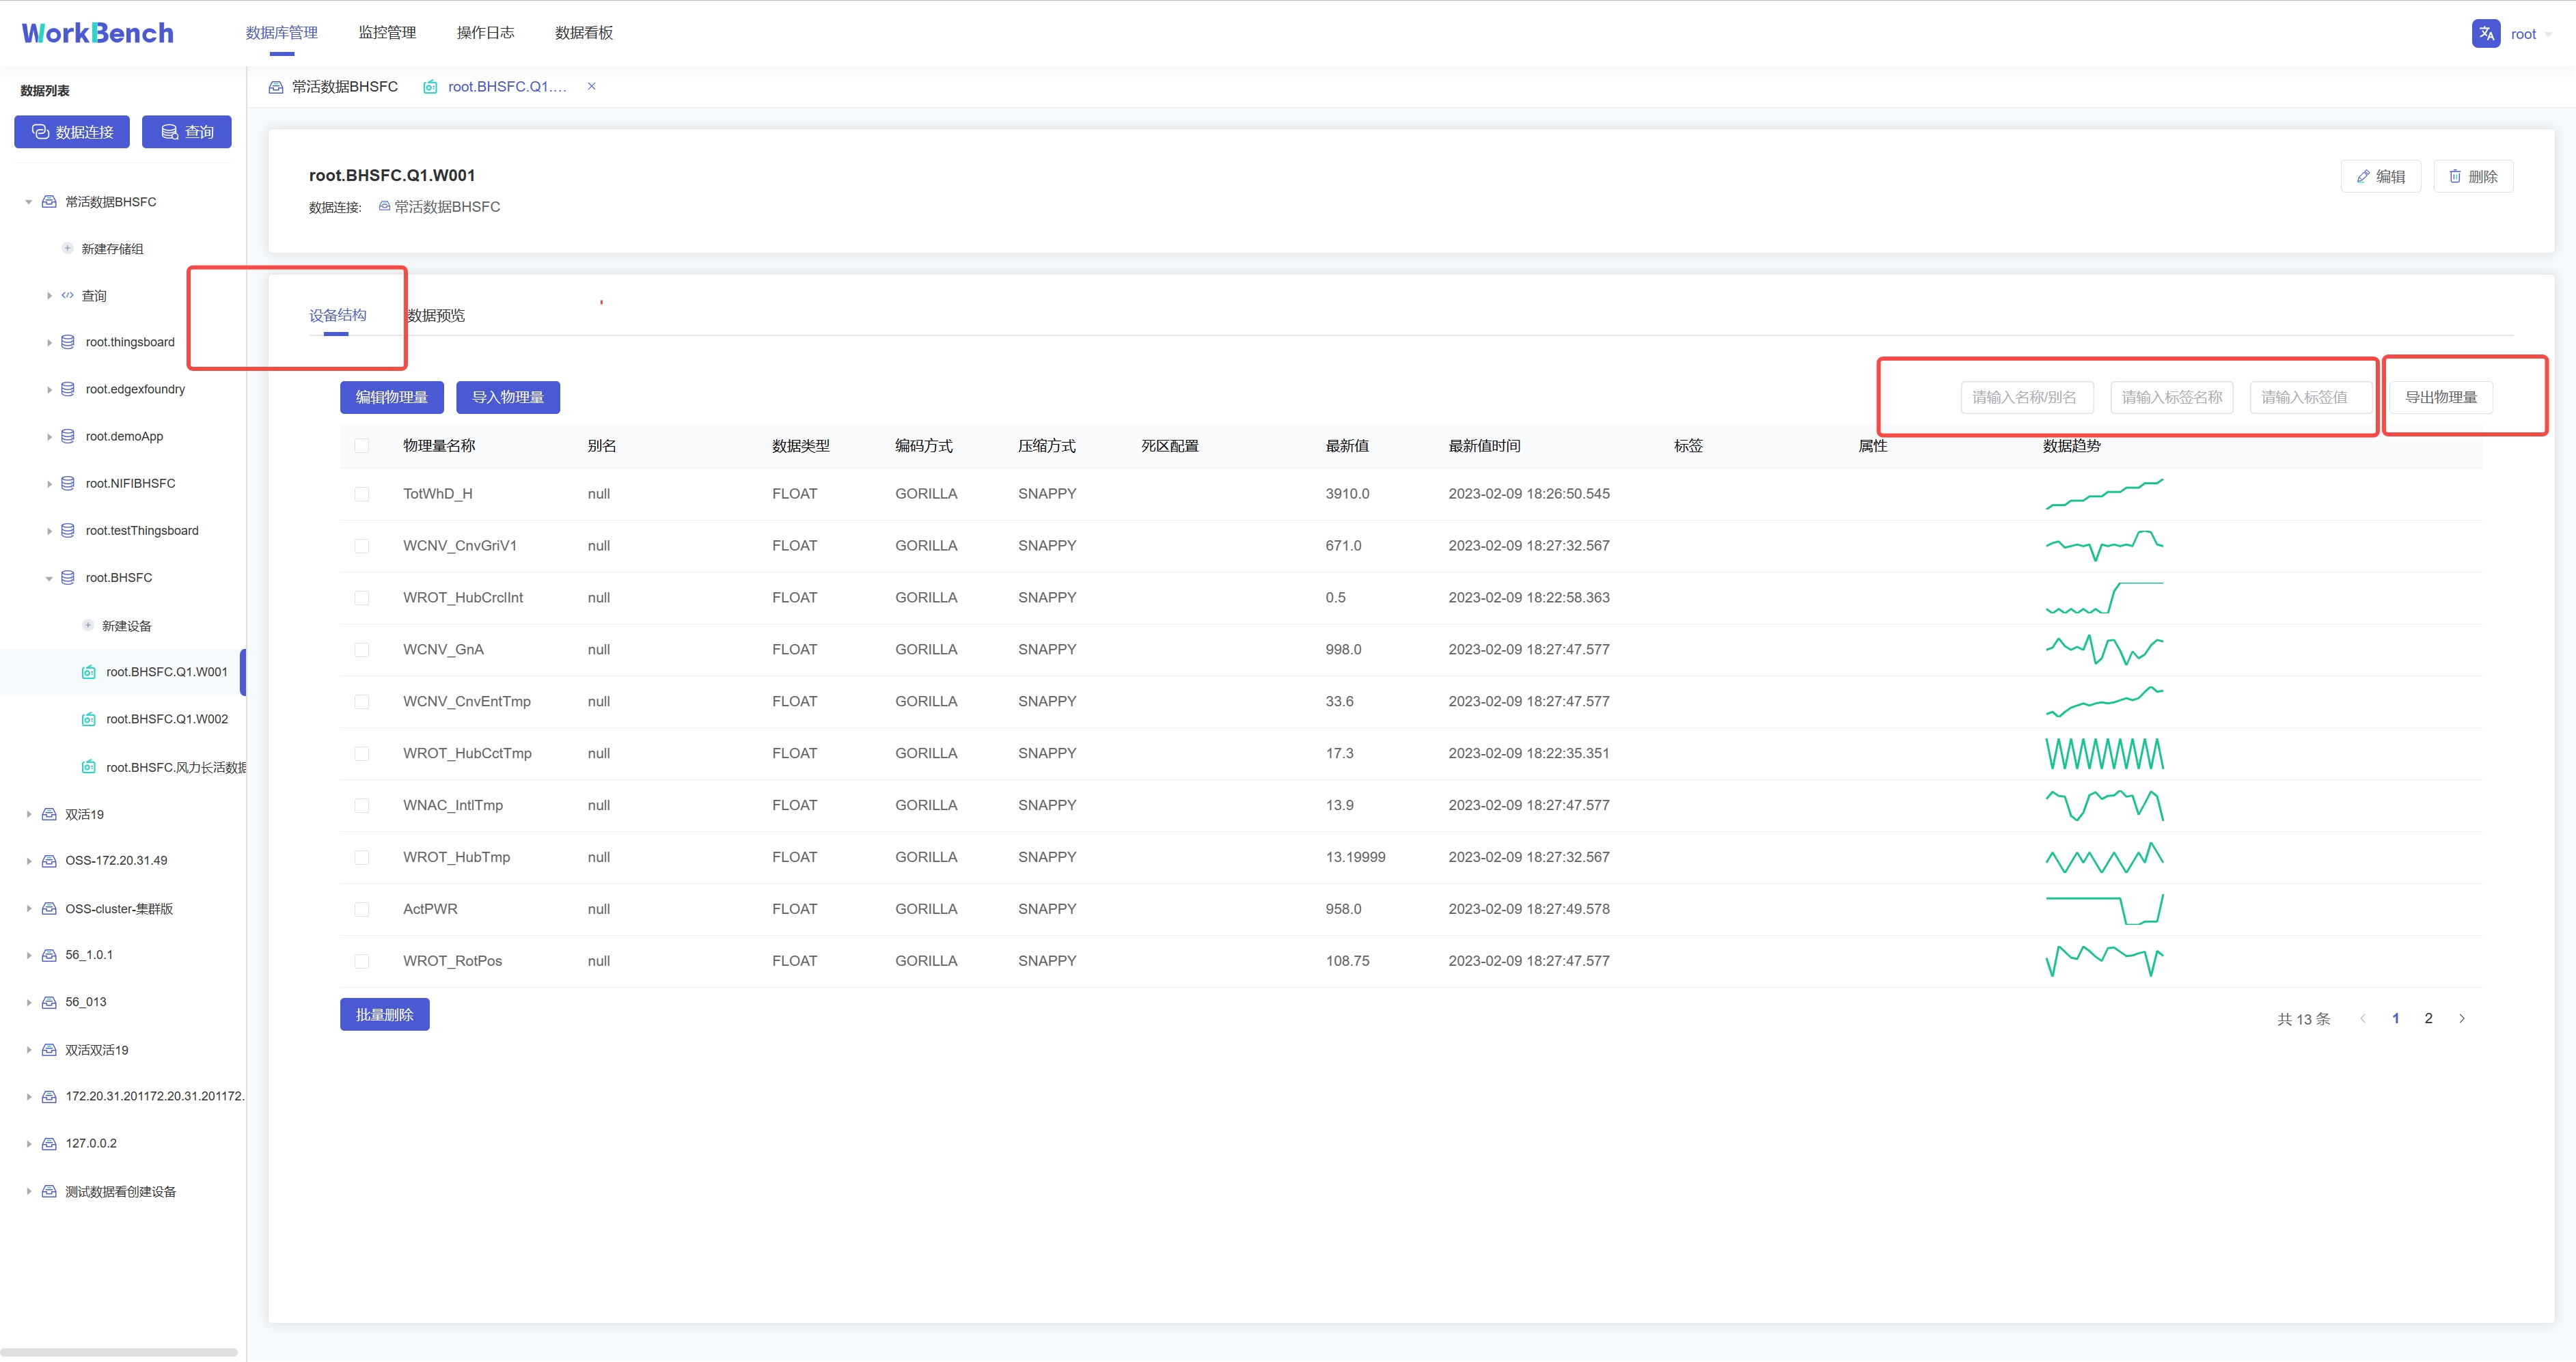
+批量导出功能仅在企业版中支持。在对象窗格中选择要操作的数据库,进入设备节点,选择"**设备结构**"-\>"**导出物理量**"即可批量导出该实体下的物理量元数据。搜索框内可输入名称/别名、标签名称、标签值进行过滤。
+
+
+
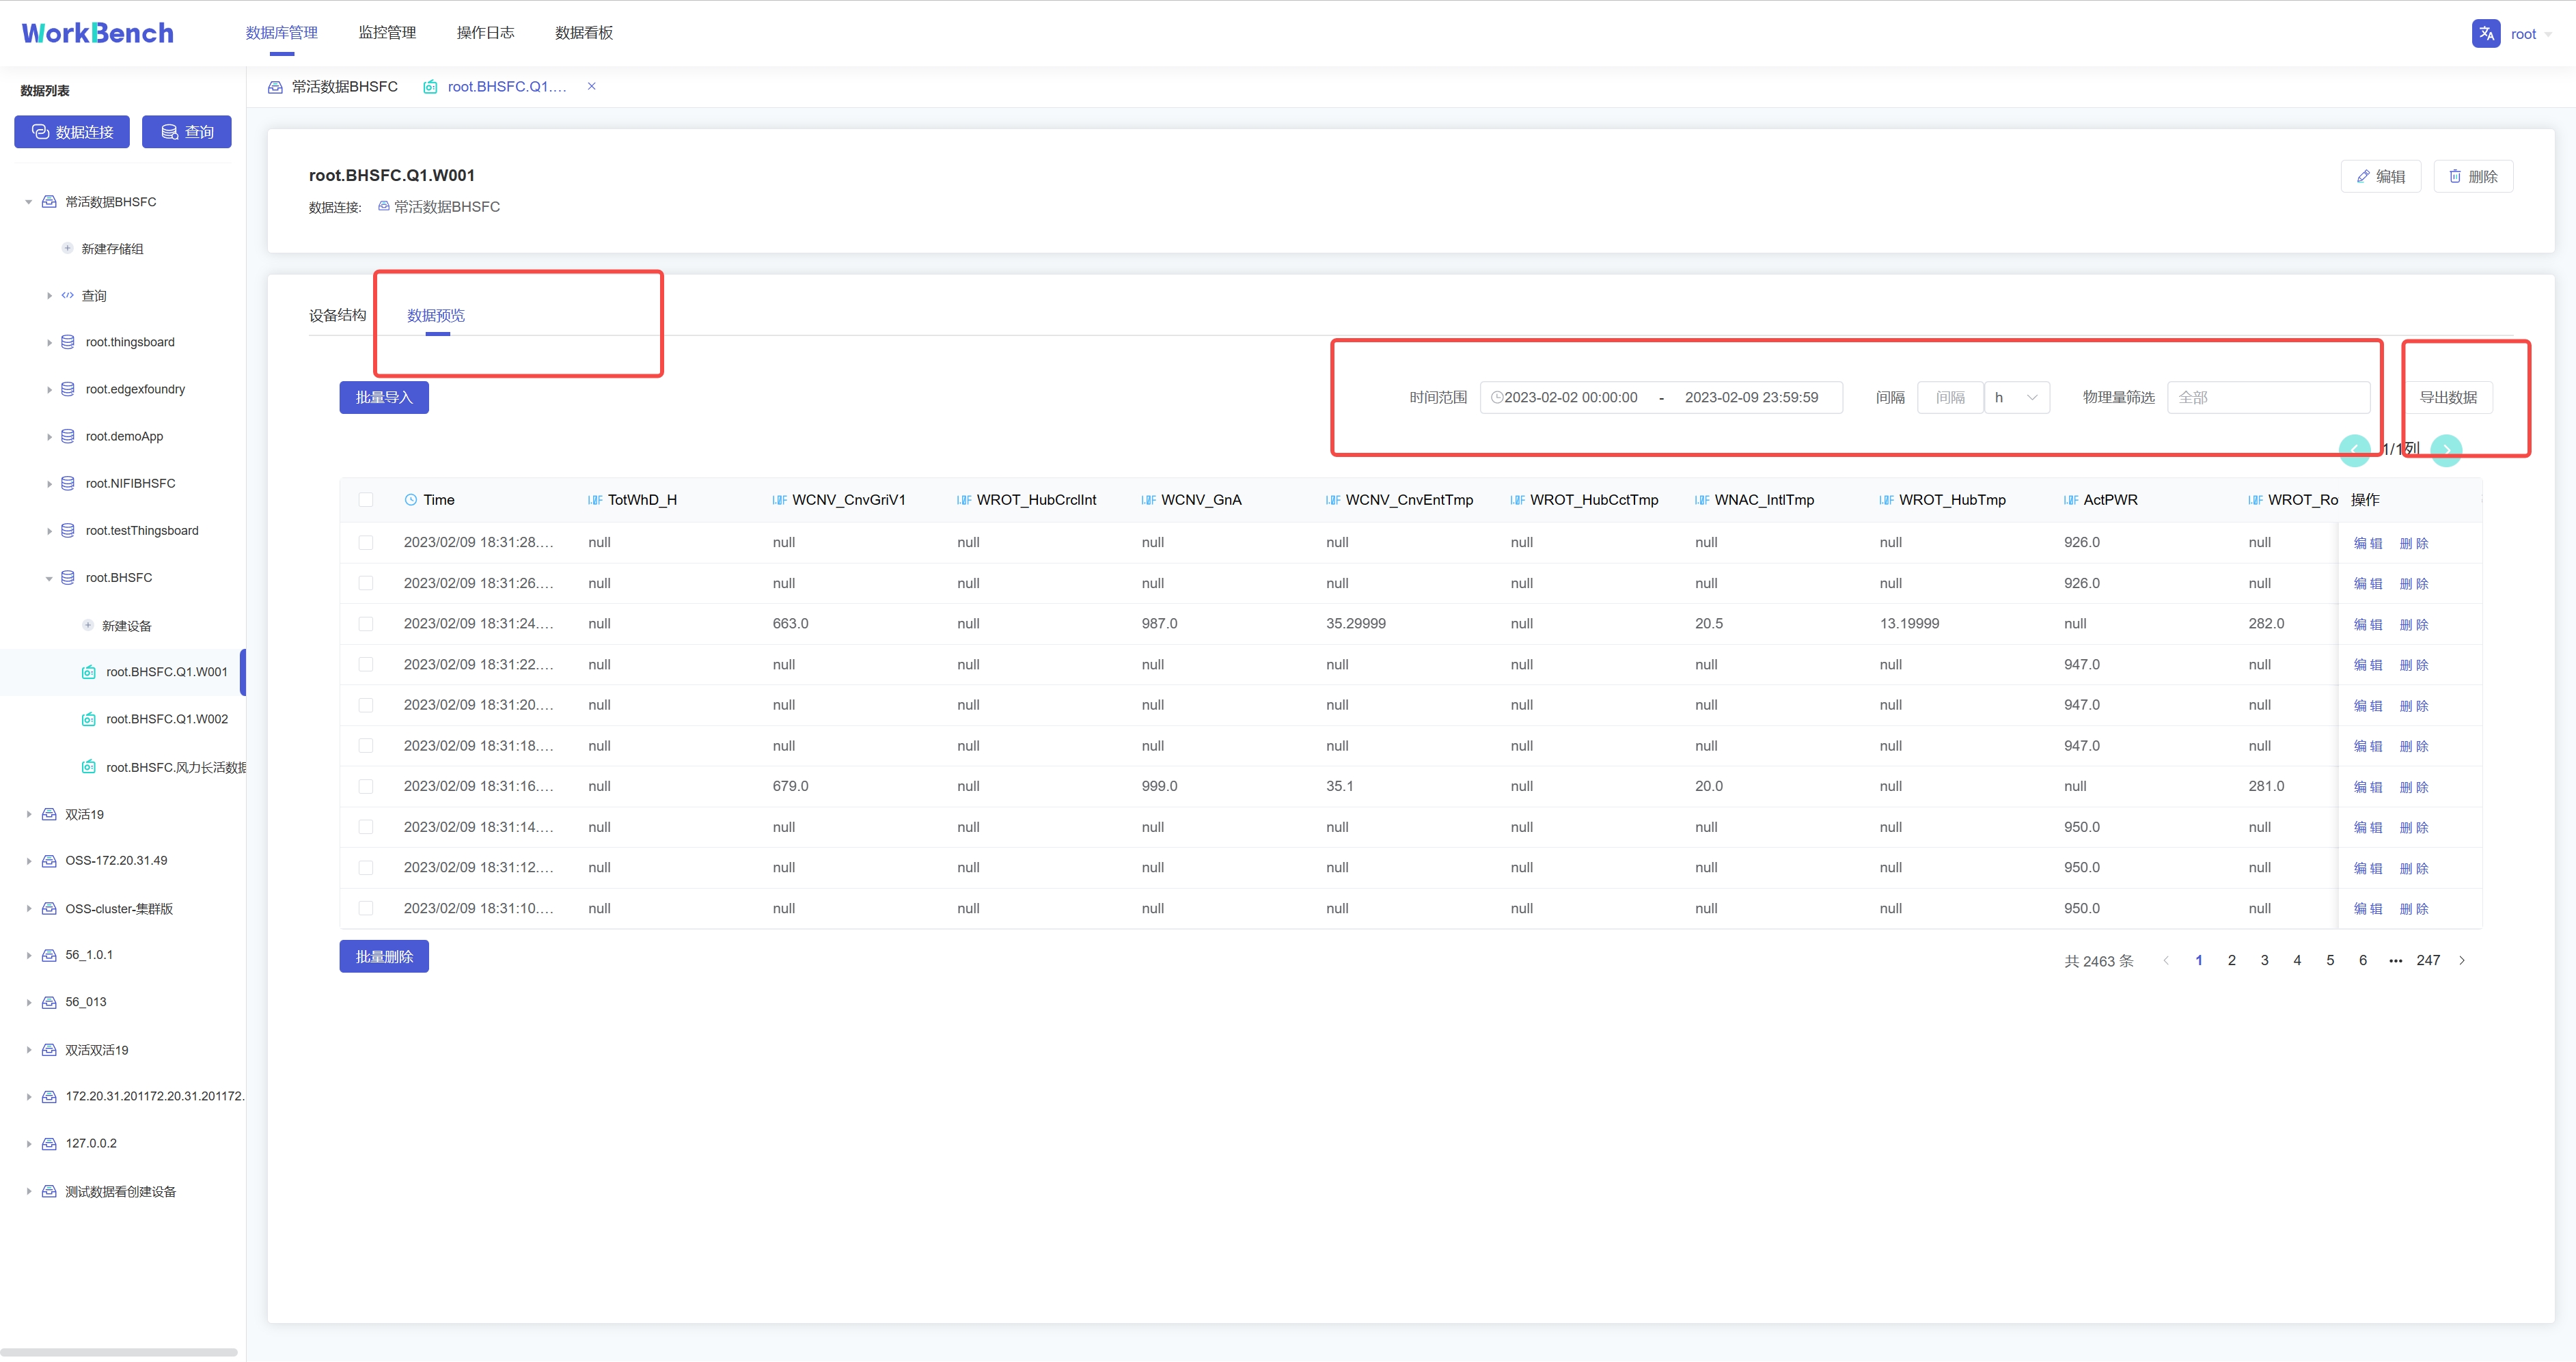
+选择"**数据预览**"-\>"**导出数据**"则可批量导出该实体下的数据。搜索框内可按时间范围、时间间隔和物理量进行过滤。
+
+
+
+## 数据预览
+
+Workbench提供多层次的数据预览工具。
+
+**数据模型**
+
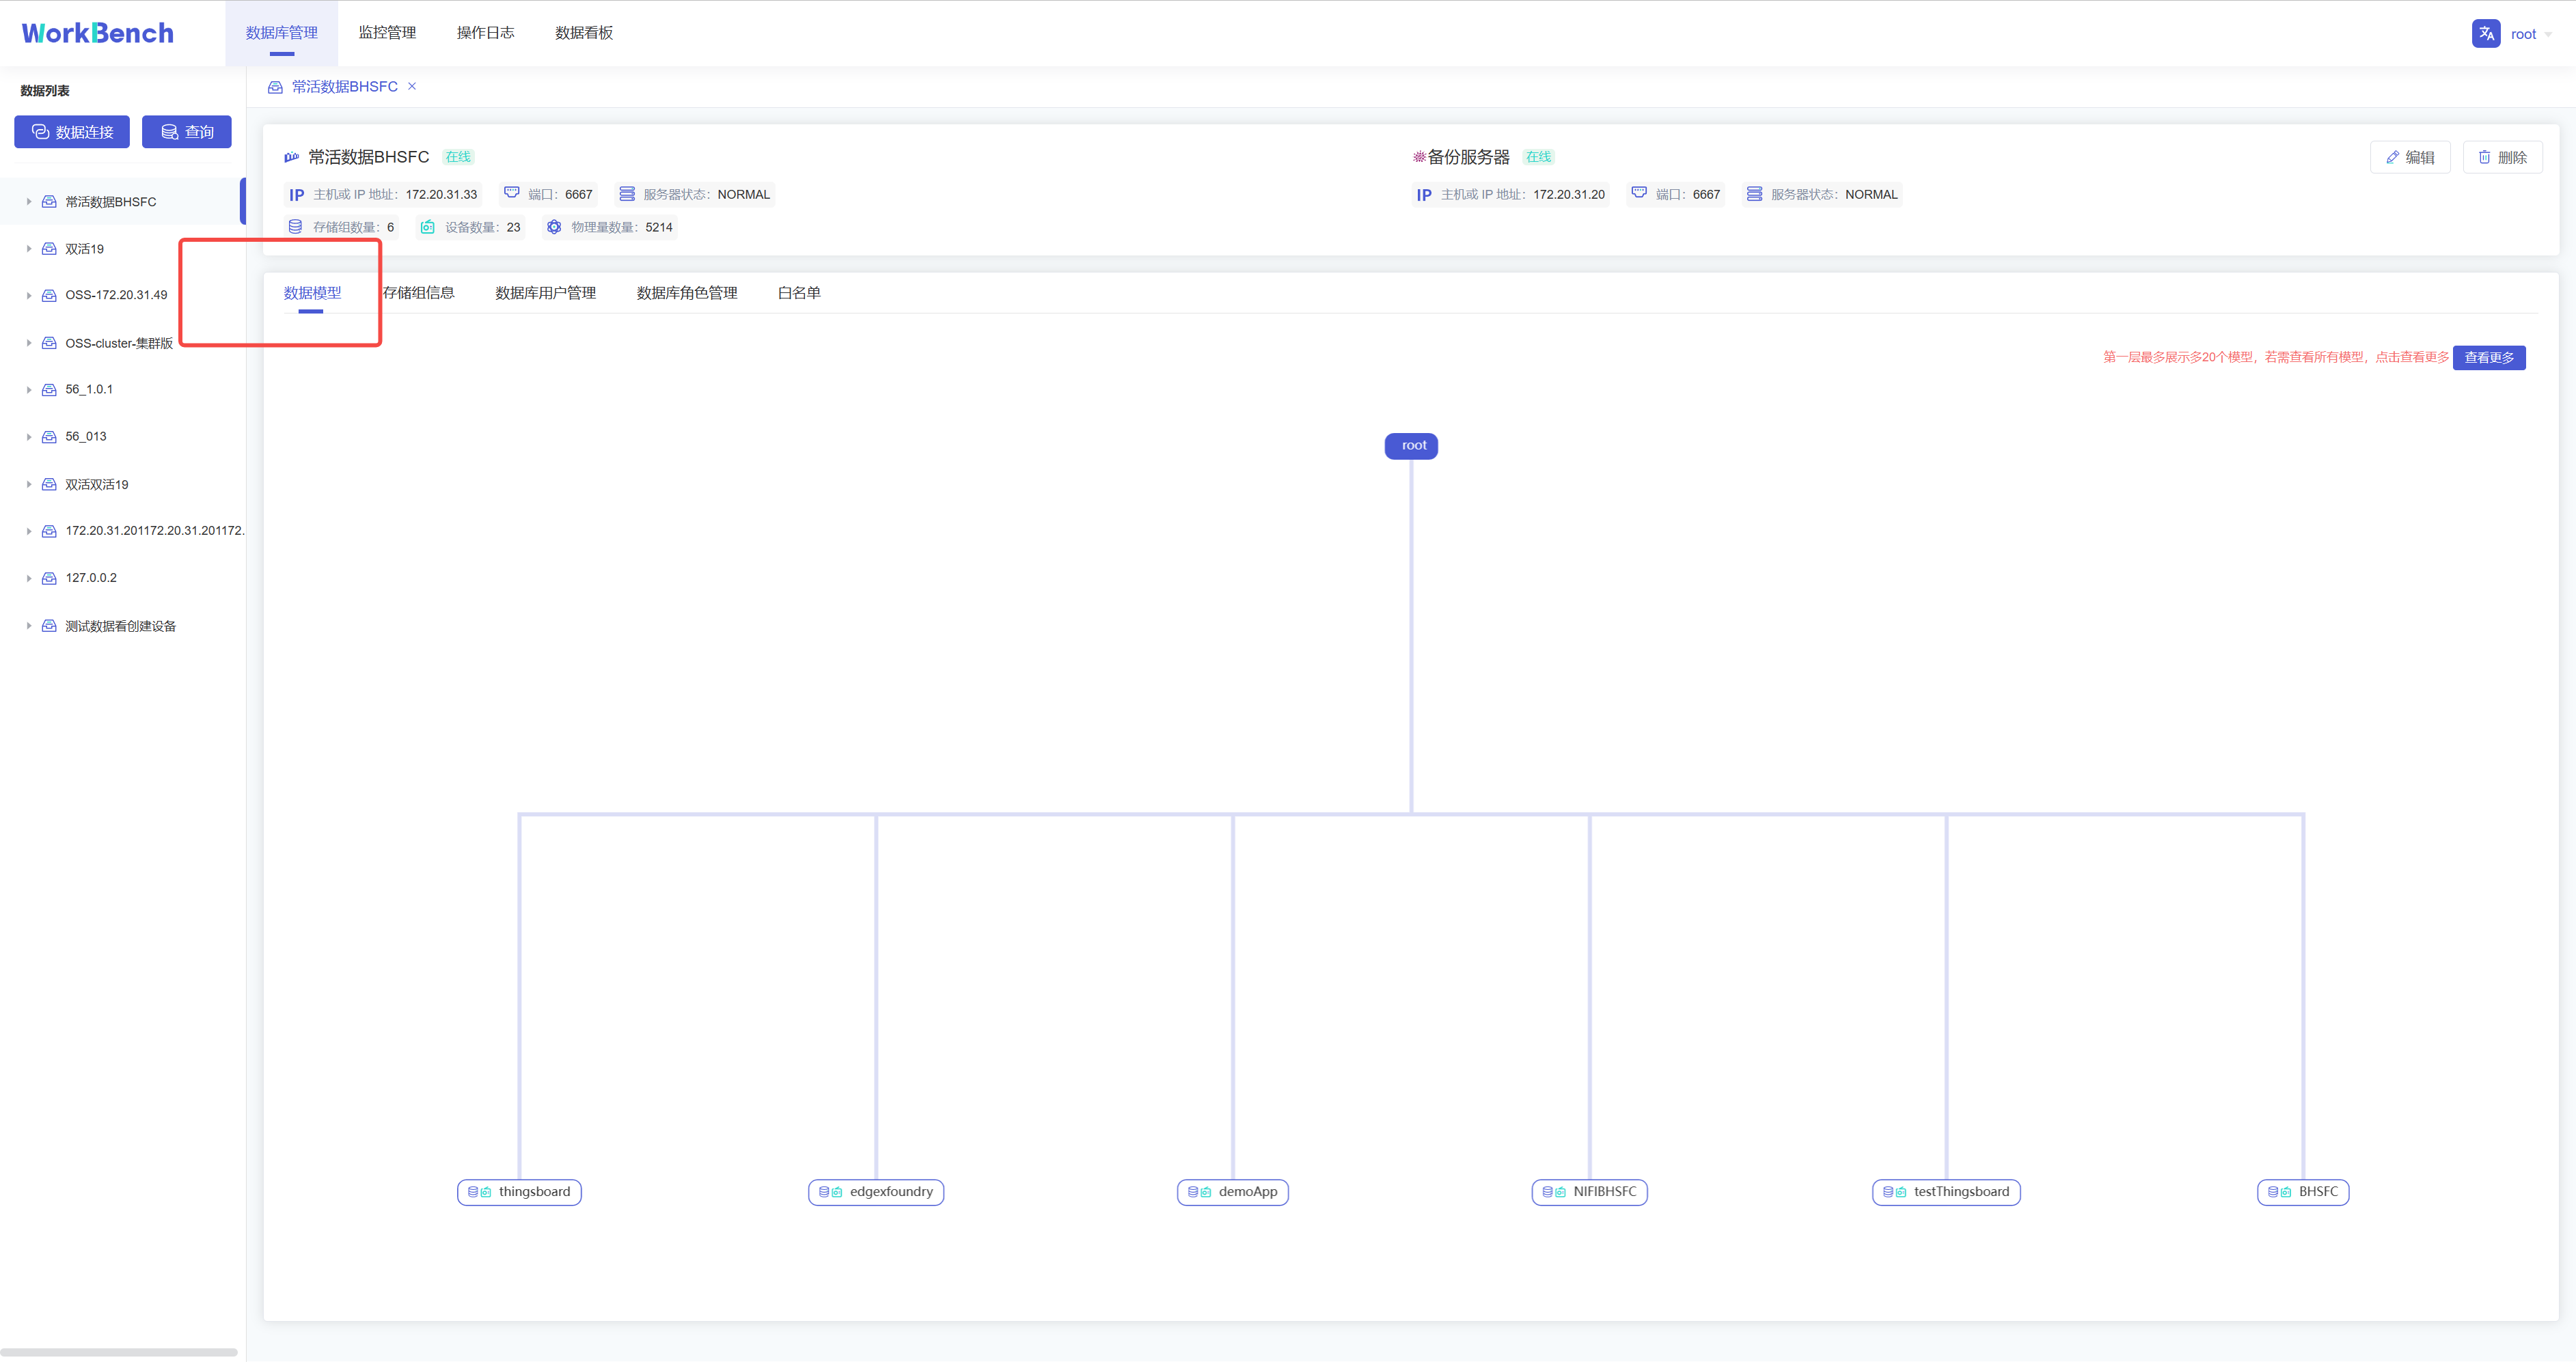
+在对象窗格中选择要预览的数据连接,点击操作列的"**数据模型**"即可预览数据模型,root被定义为LEVEL=0,Workbench中默认显示到LEVEL=1,点击"**查看更多**"可查看更多层级的数据模型信息。"**查看更多**"功能仅在企业版中支持。
+
+
+
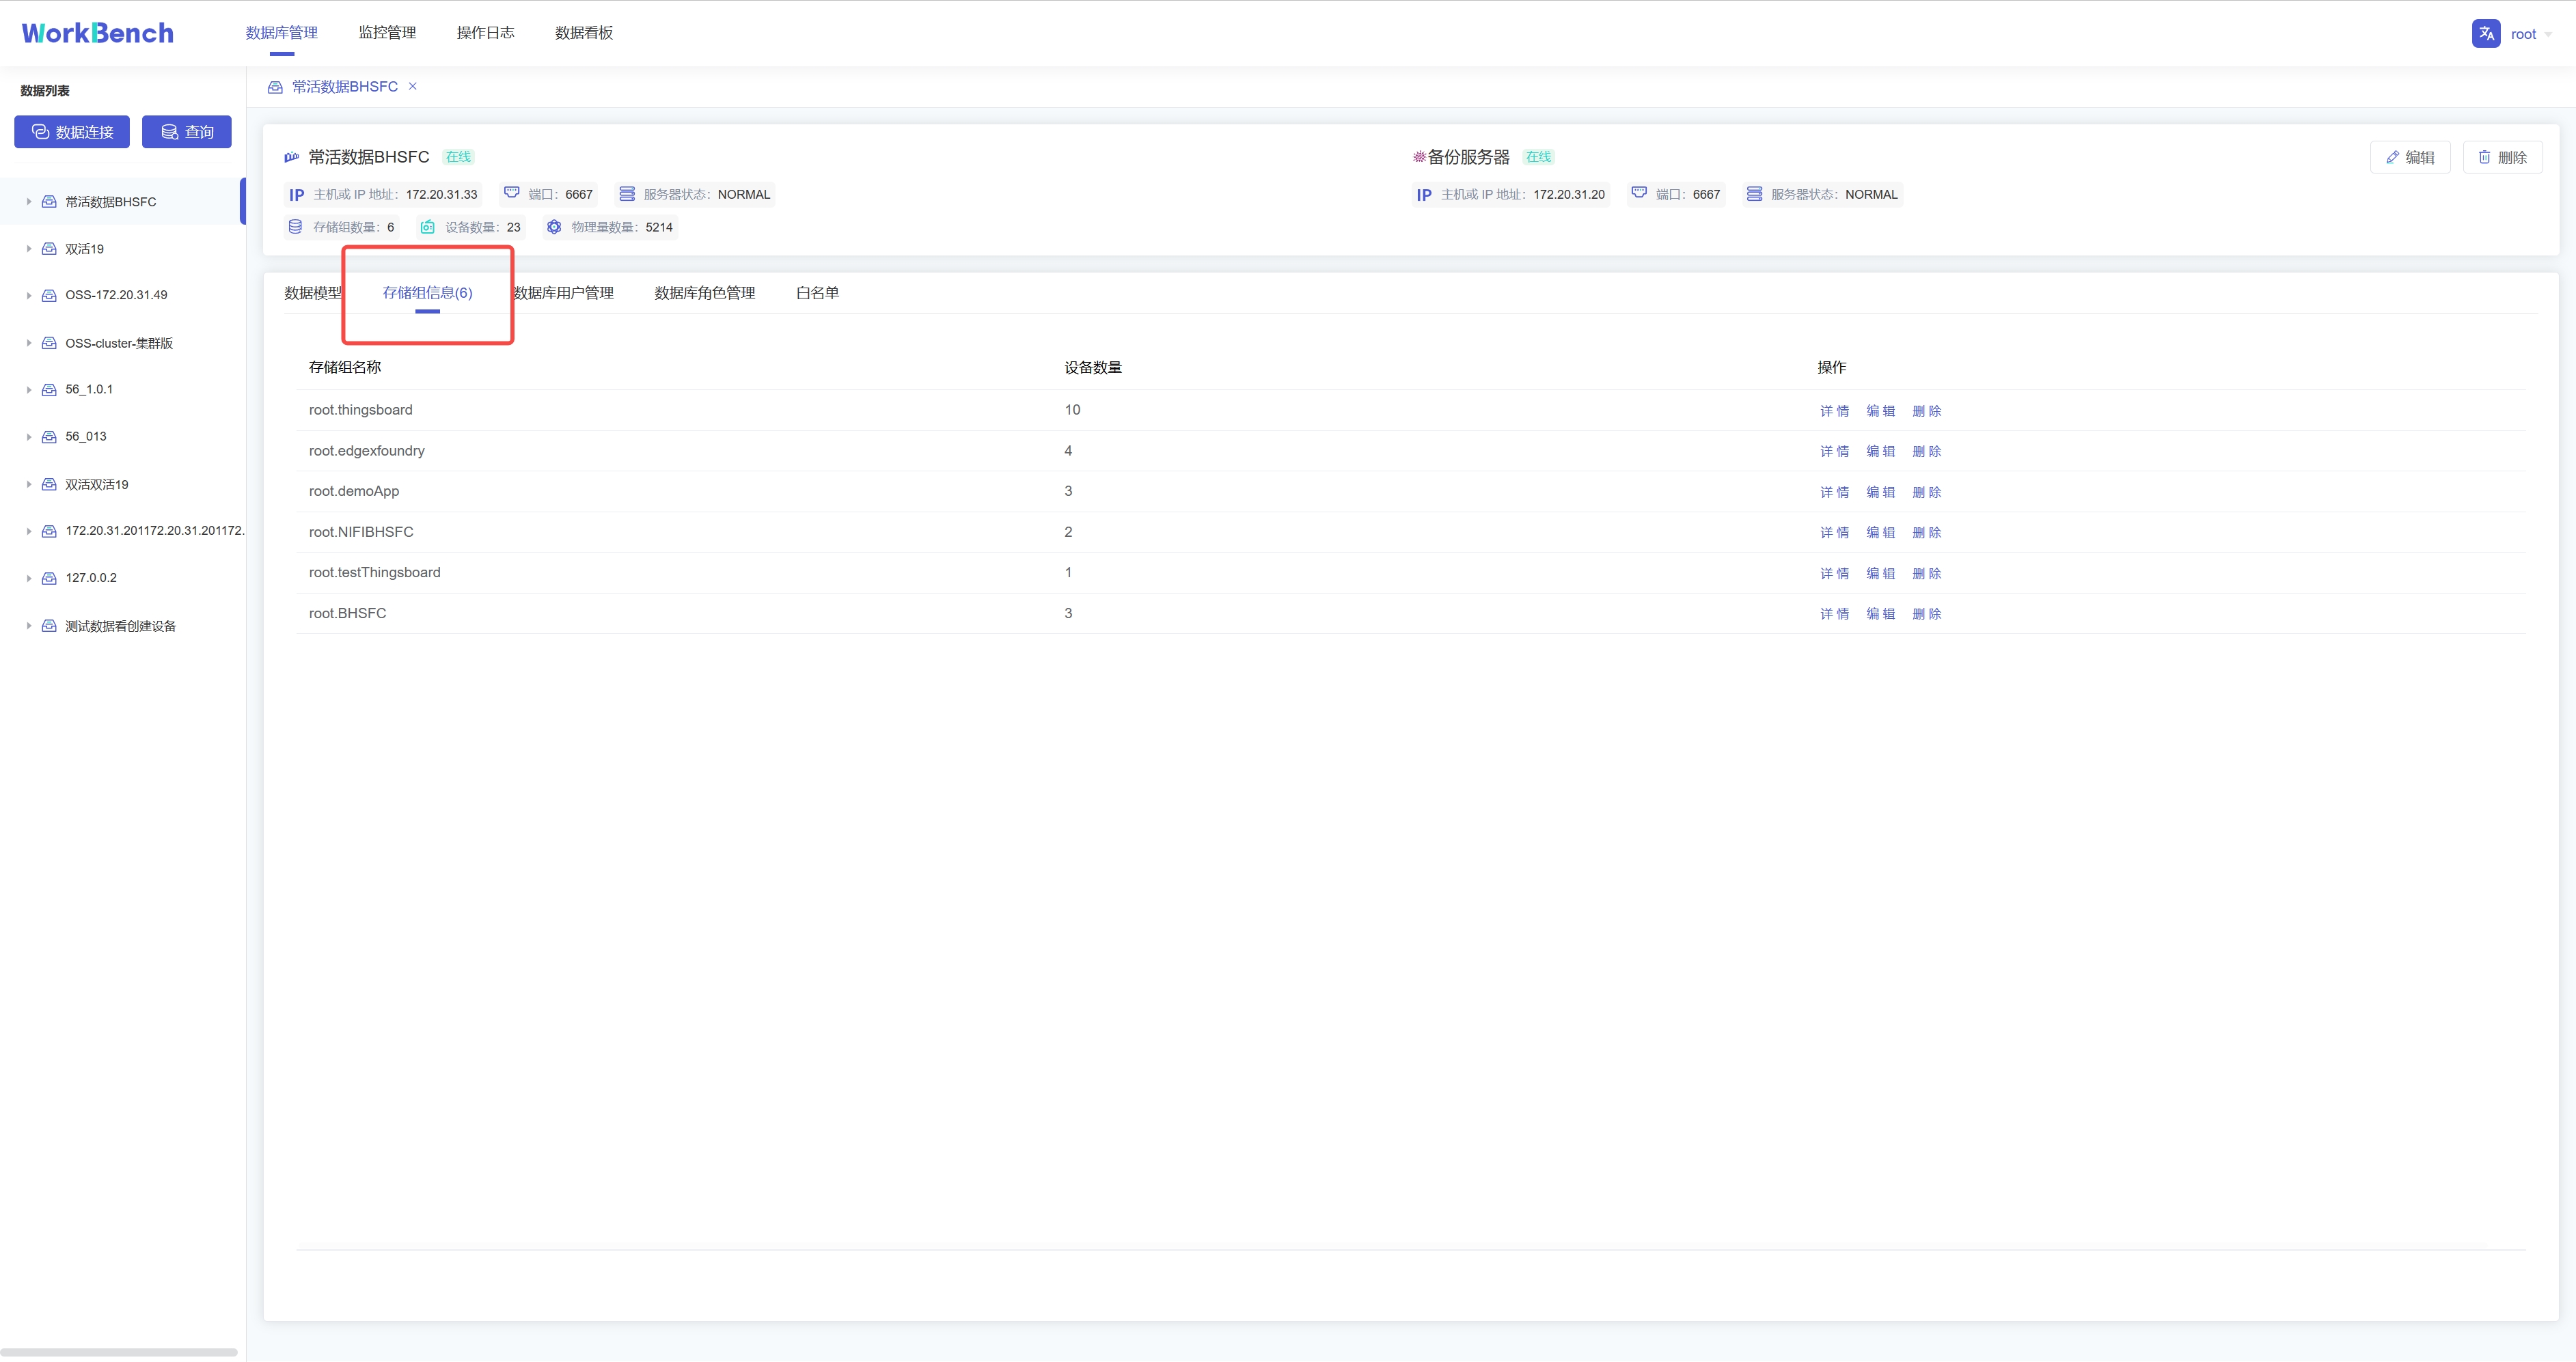
+**存储组信息**
+
+点击操作列的"**存储组信息**"即可预览该数据连接的所有存储组信息,点击"**详情**"可查看该存储组下的实体详情,继续点击实体详情可查看物理量详情。点击"**编辑**"可编辑该存储组的TTL信息。
+
+
+
+## 查询
+
+Workbench提供强大的查询工具,可直接编辑查询文本,保存查询,用于简化查询行任务。
+
+**新建查询**
+
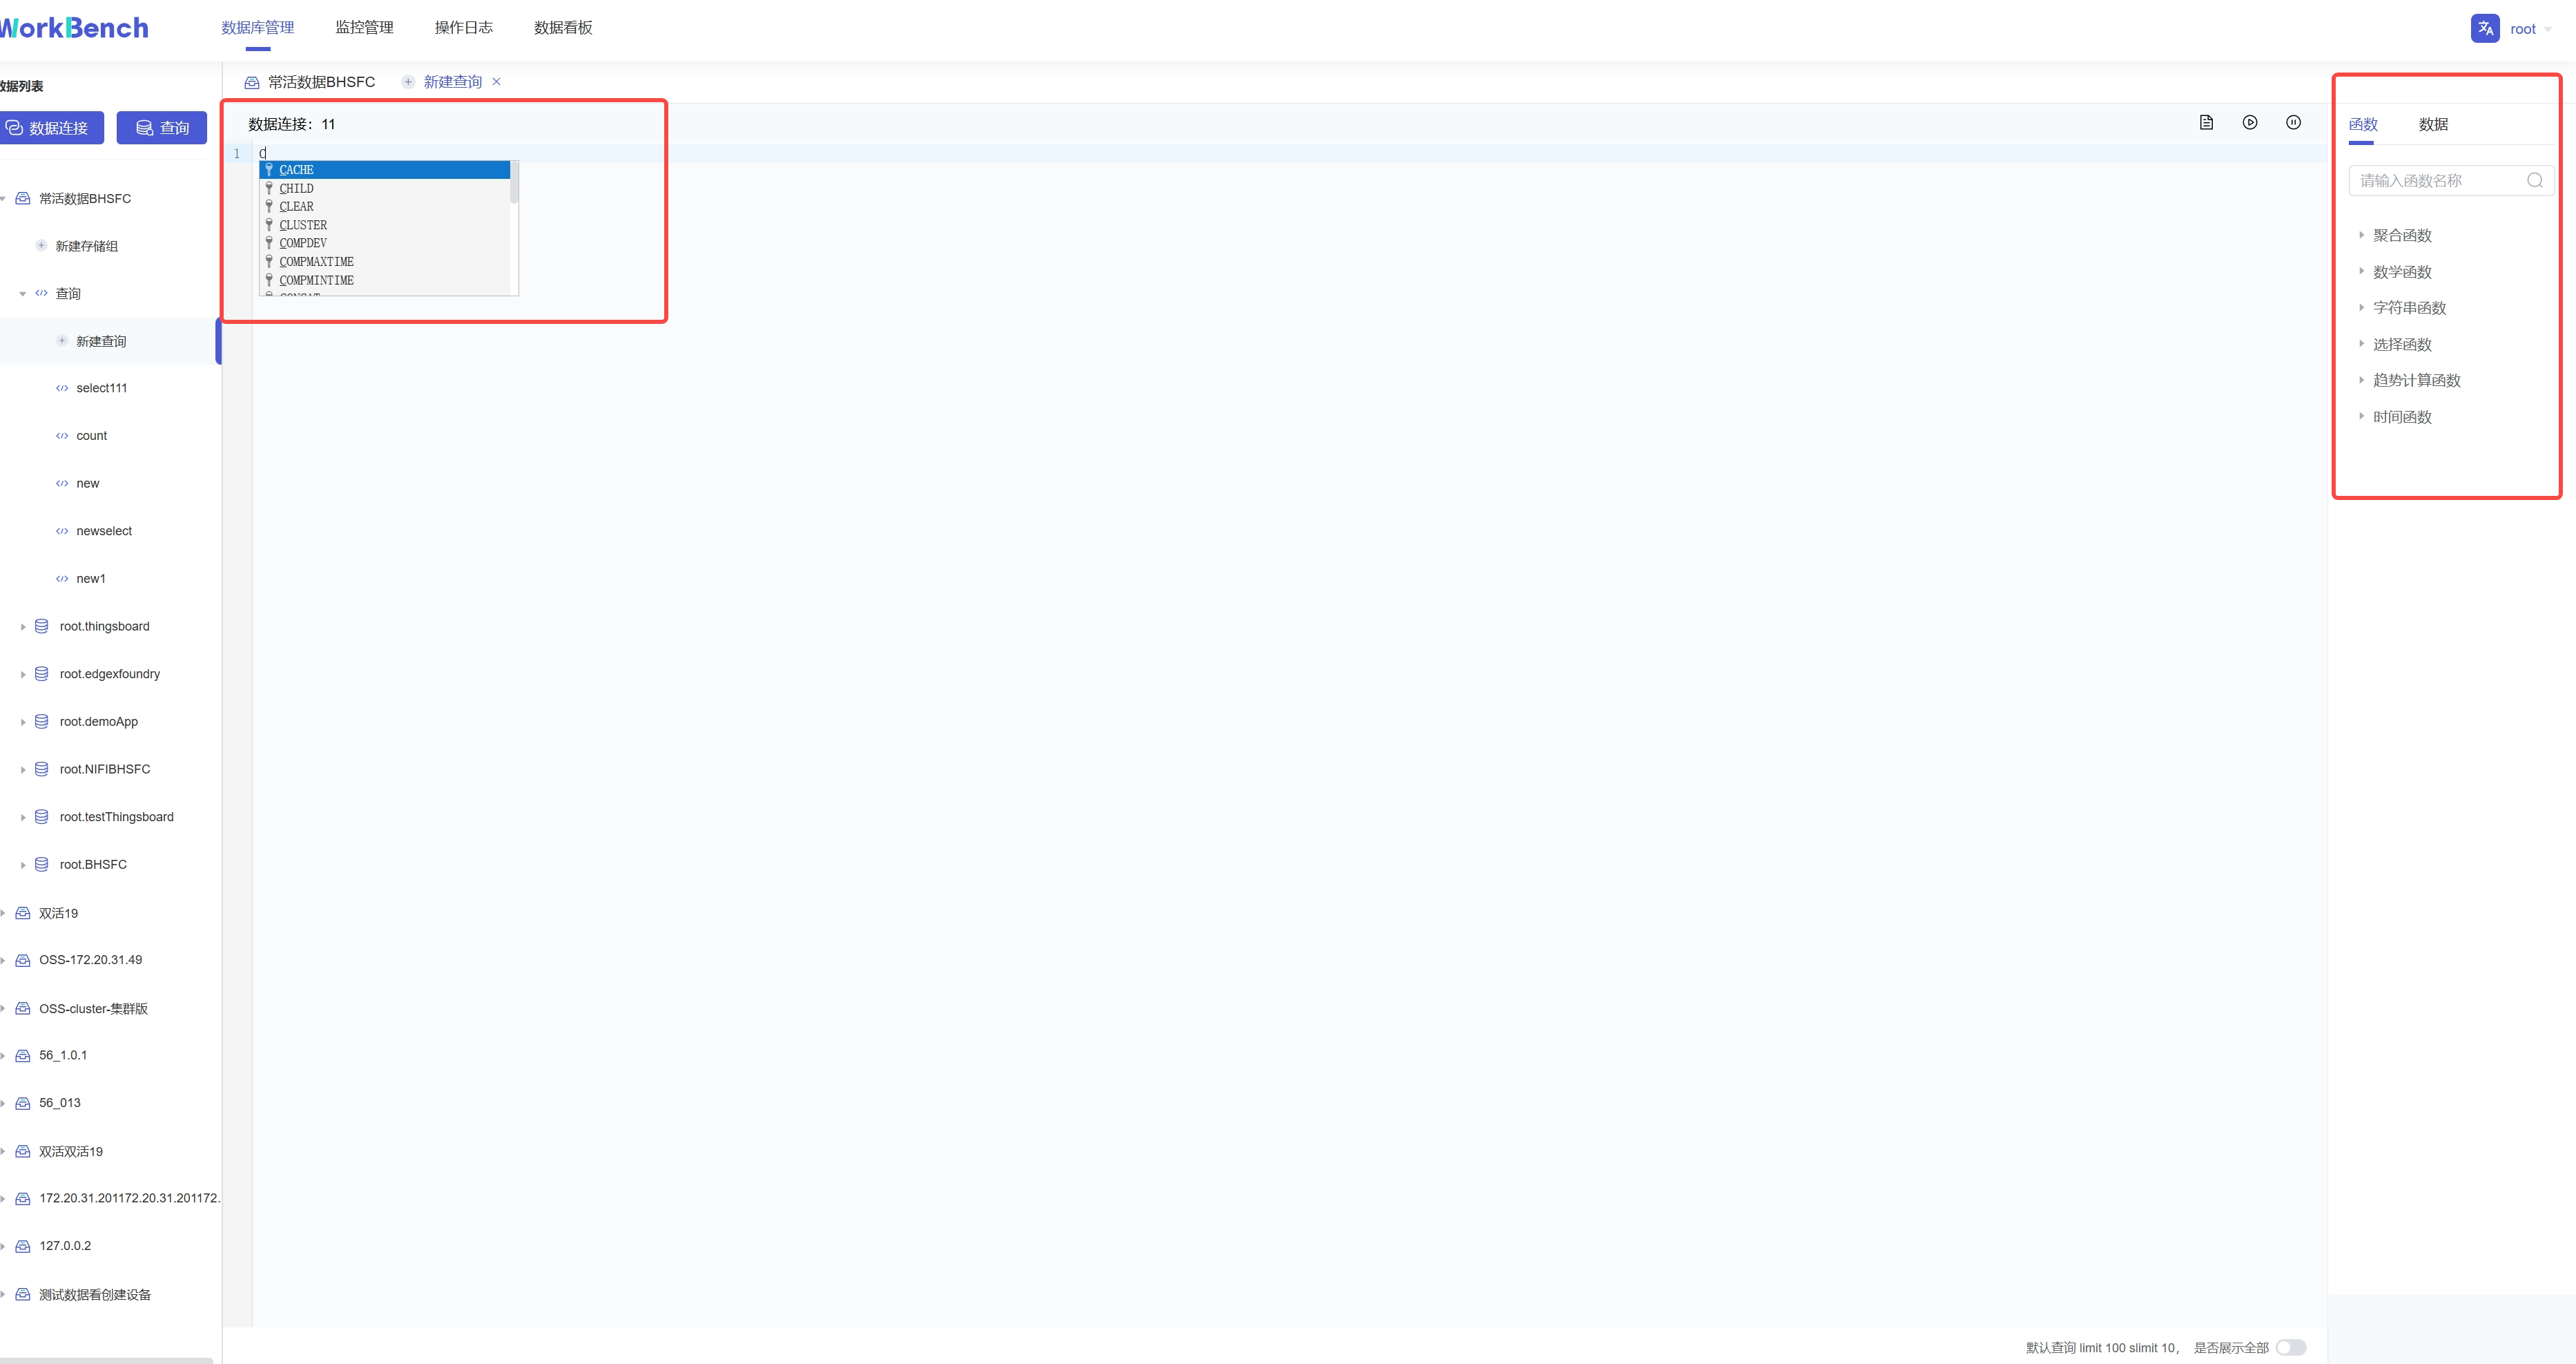
+点击"**连接操作栏**"的"**查询**",选择要进行操作的数据连接,即可进入查询编辑器。
+
+
+
+在查询编辑器界面可输入SQL语句,提示框会提示符合条件的关键字。右侧可按要求选择函数或数据进行计算。
+
+{width="5.90625in"
height="3.125in"}
+
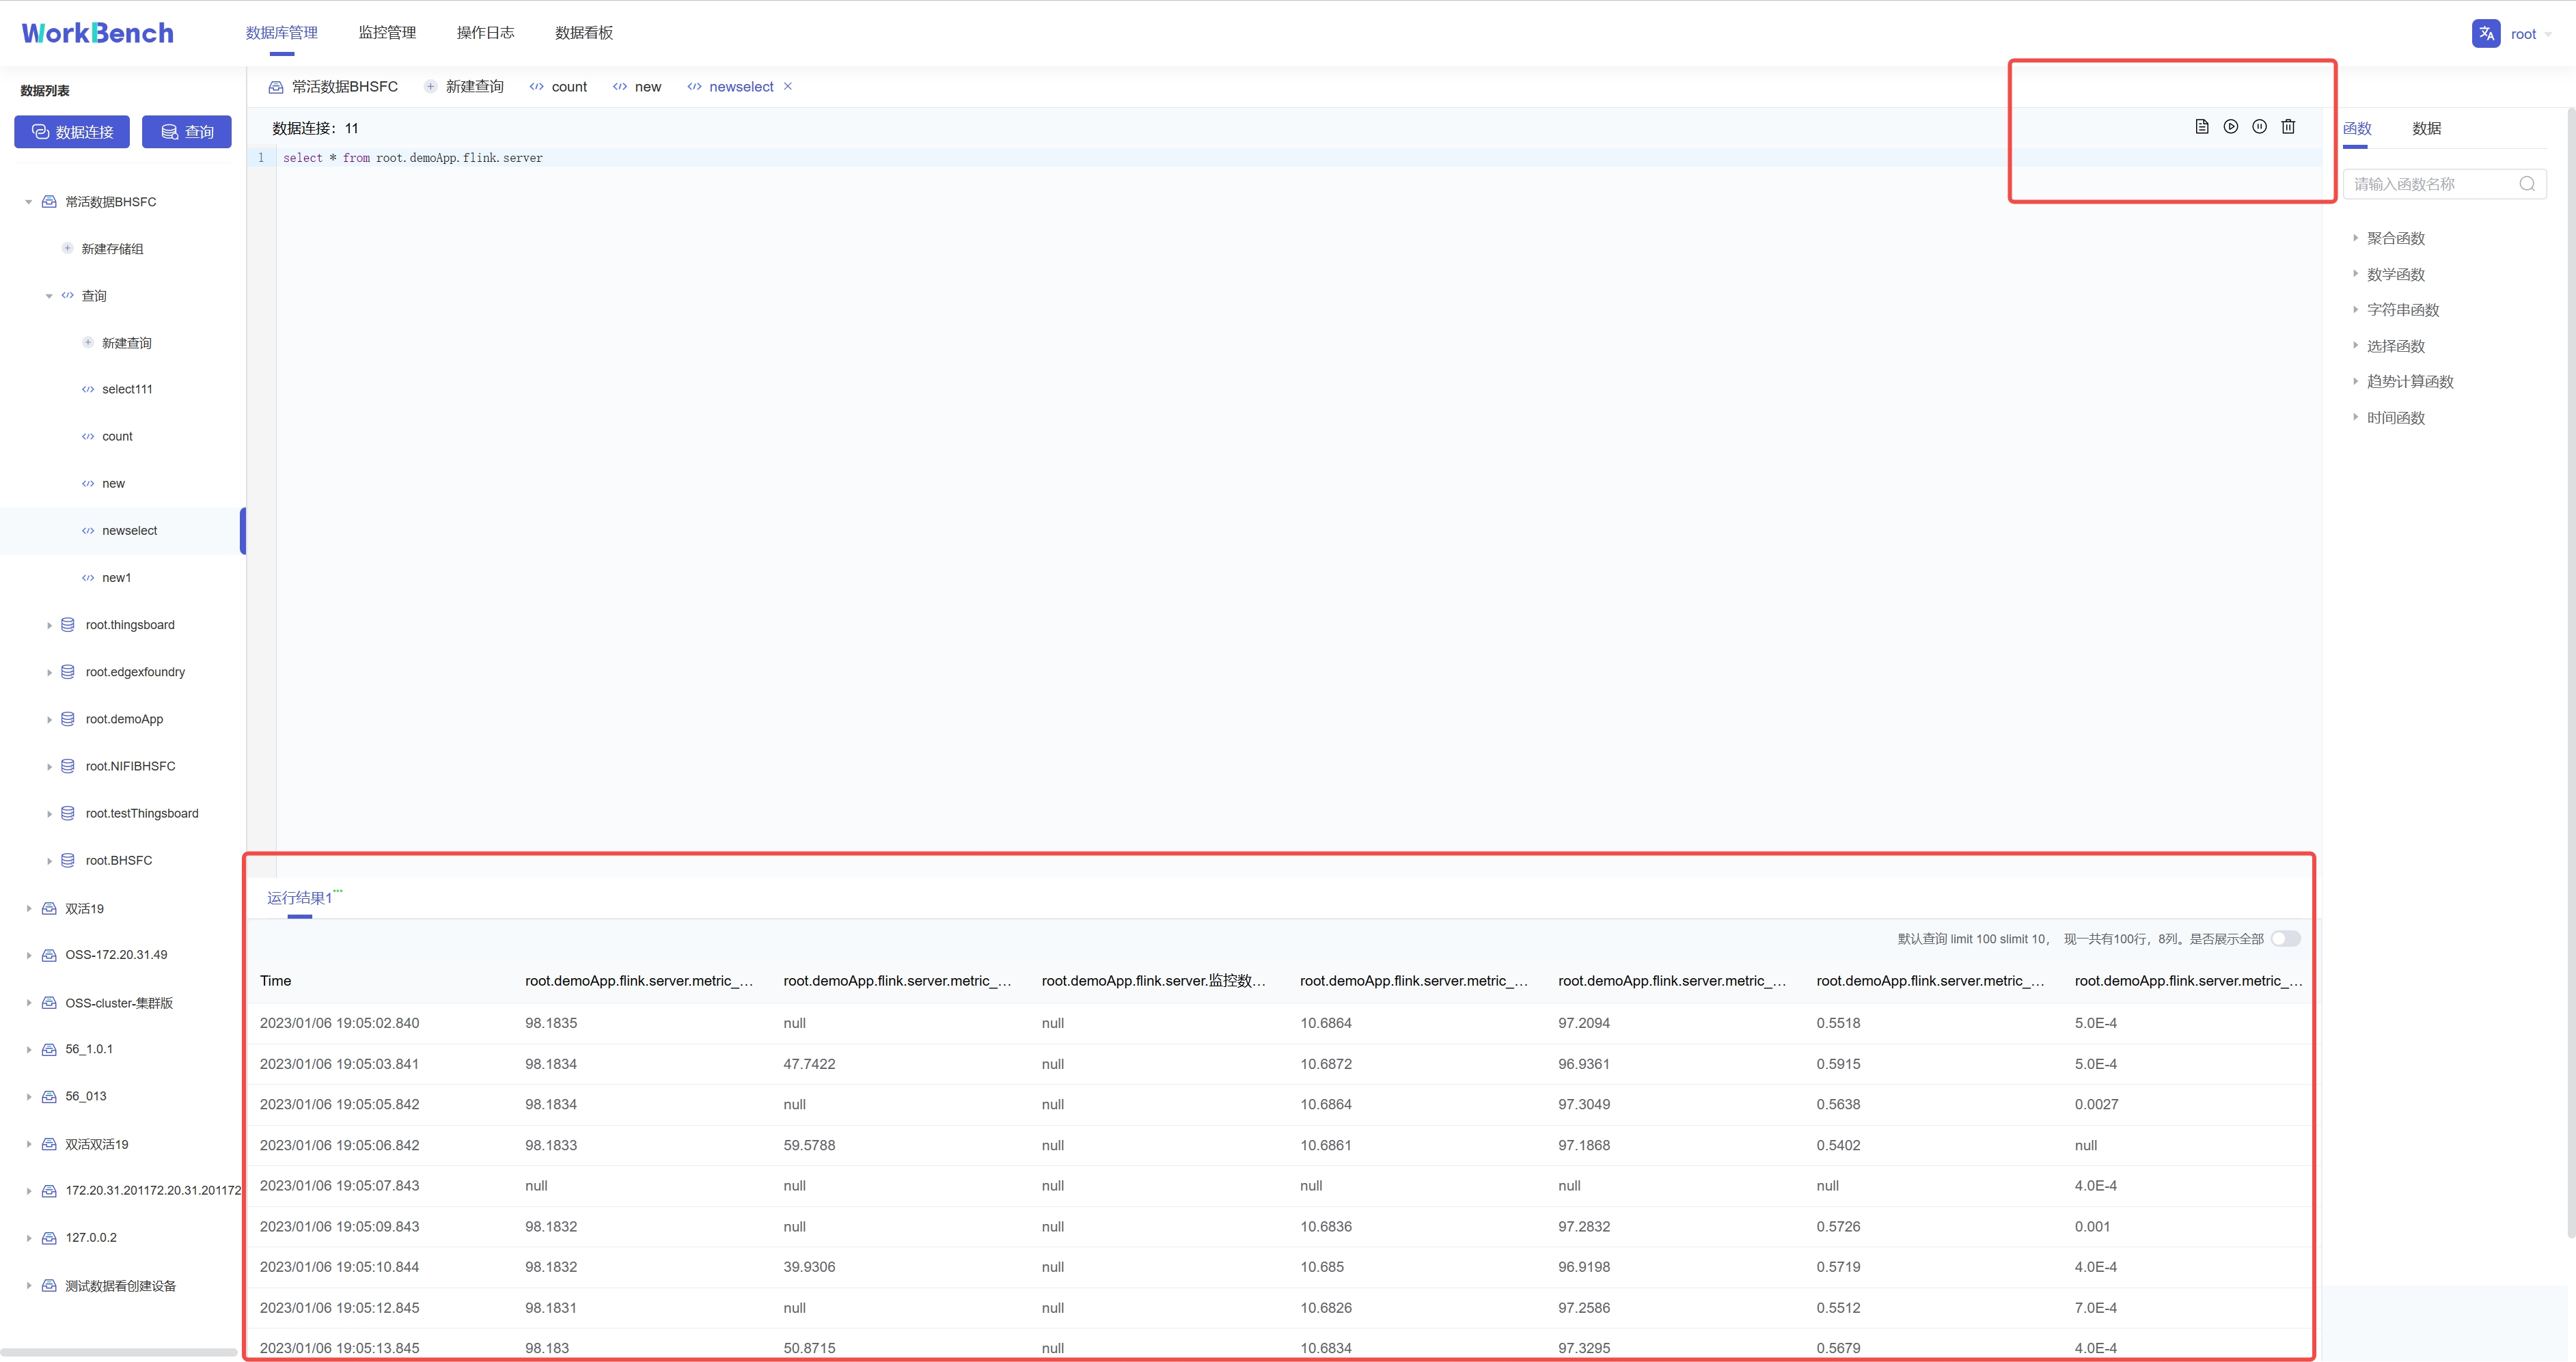
+输入SQL语句后,点击右上角可选择操作,分别是"保存"、"运行"、"暂停"和"删除"。运行结果显示10行每页,默认限制返回结果100行,也可选择取消限制全部展示。
+
+
+
+**查看查询**
+
+已保存的连接可在对象窗格中该数据连接下的"**查询**"下查看。
+
+
+
+## 集群管理
+
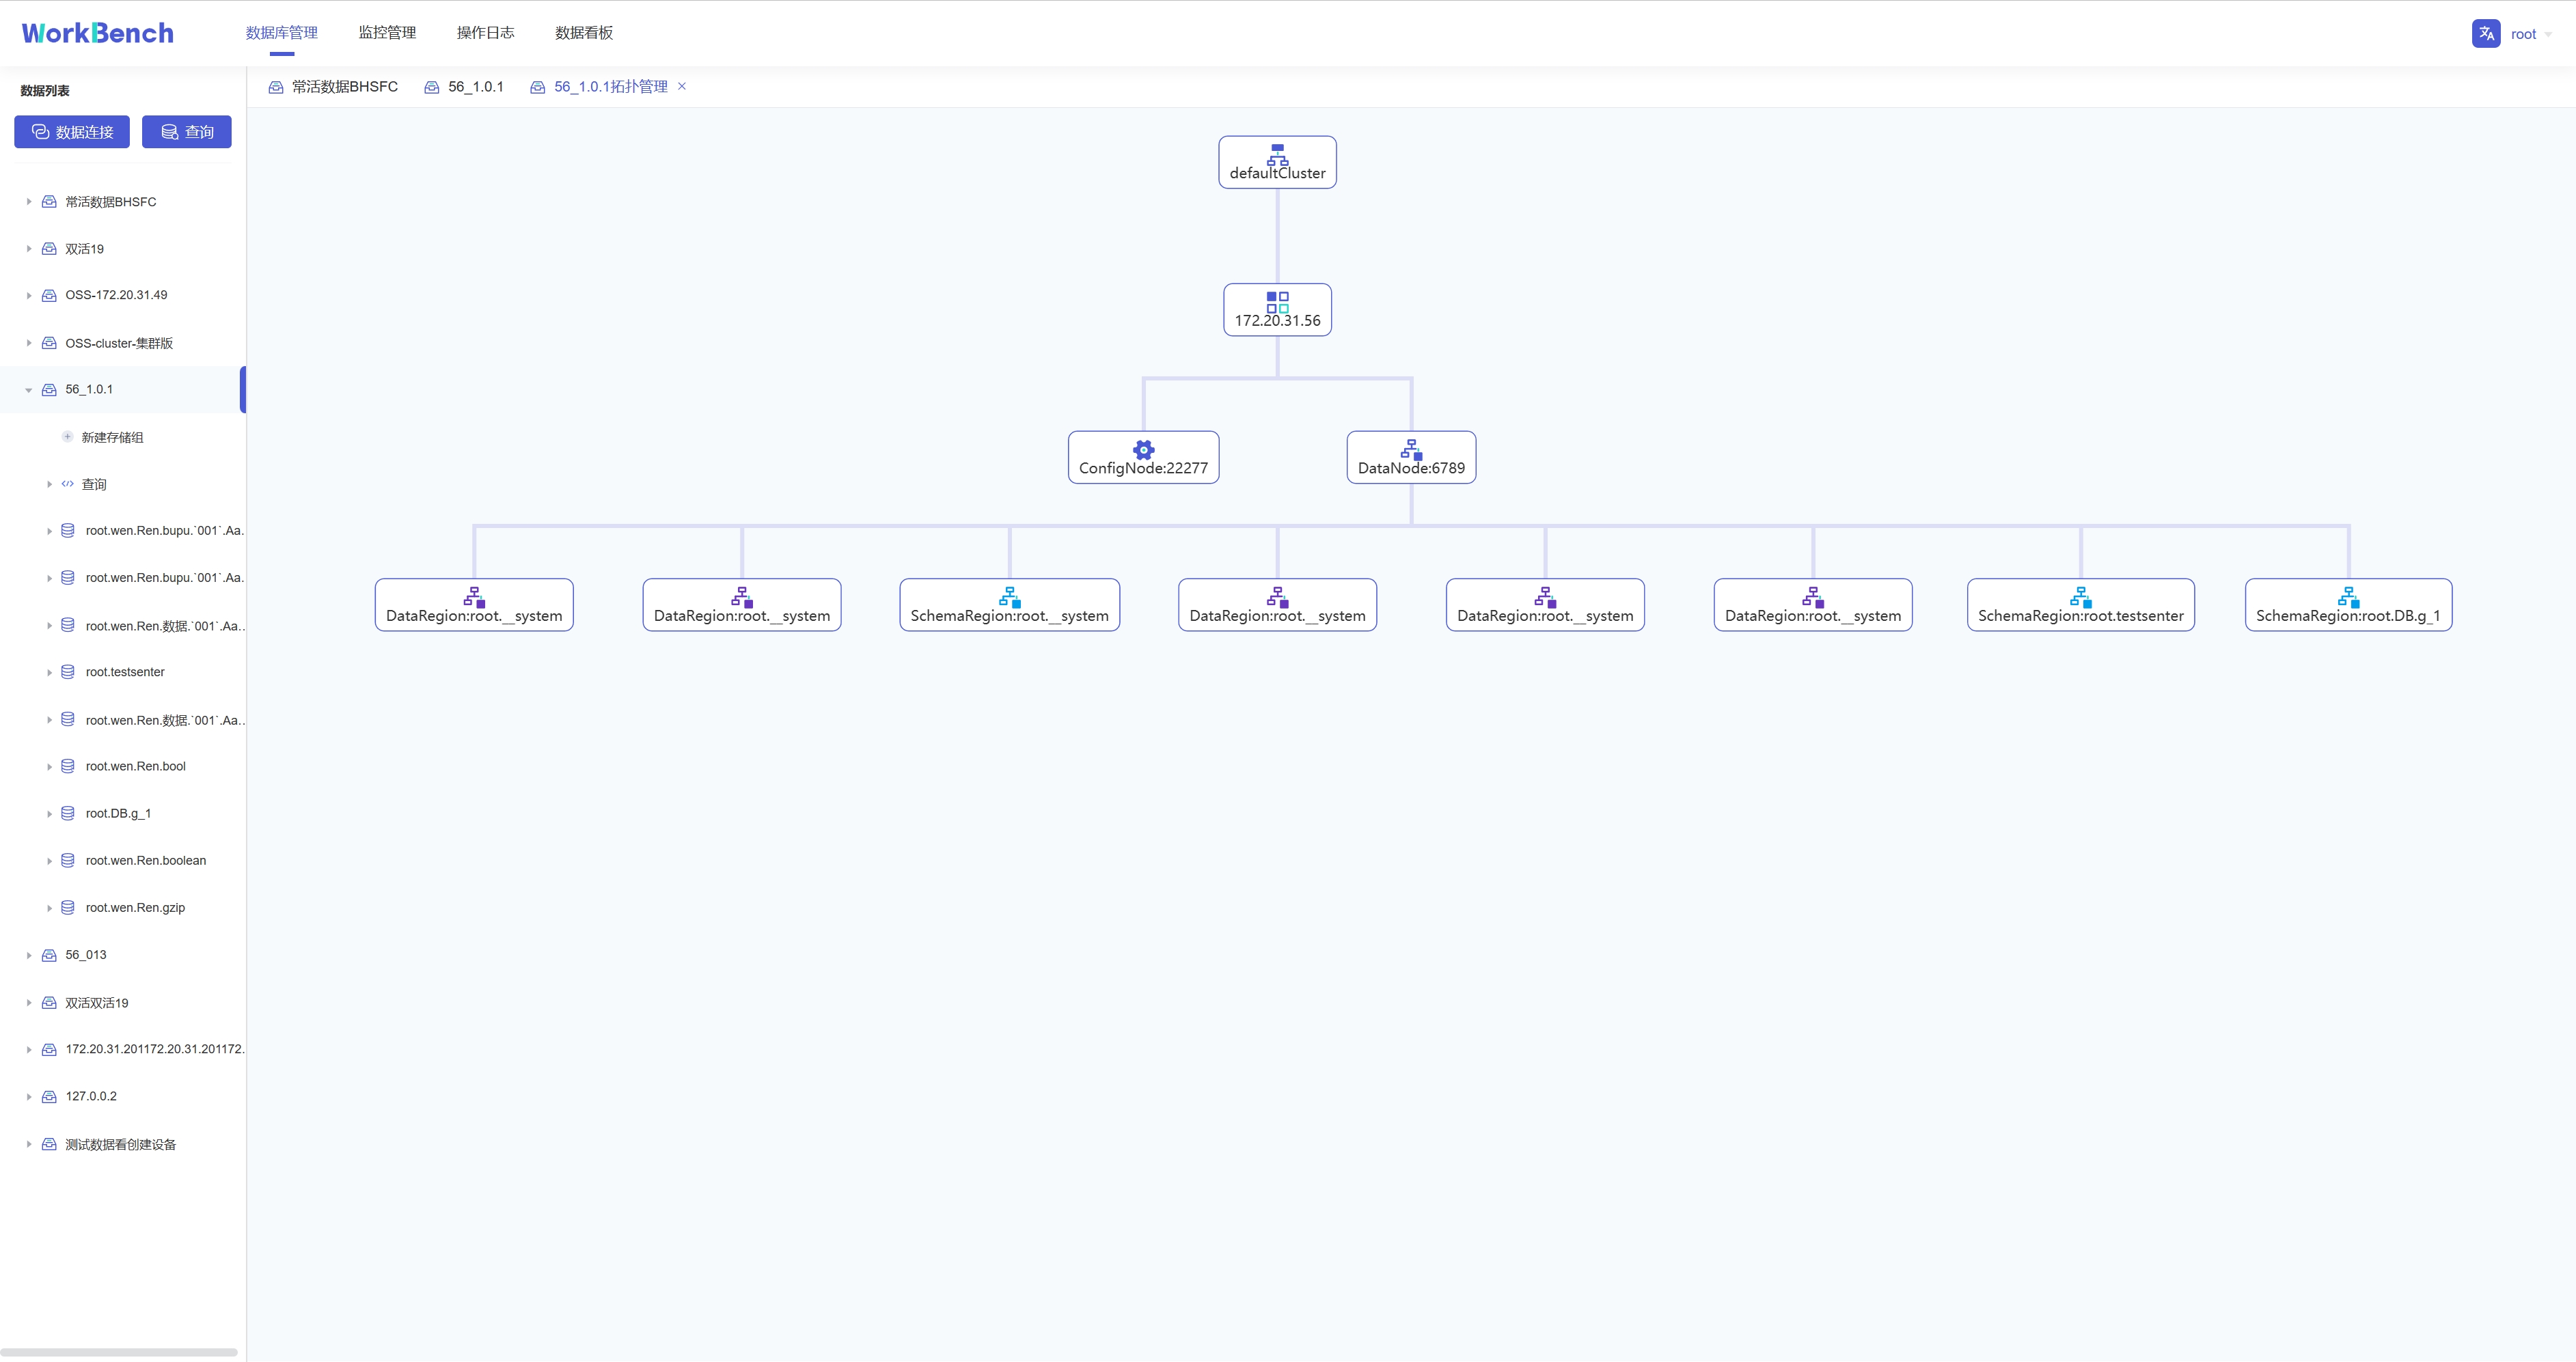
+**拓扑管理**
+
+Workbench提供对集群拓扑图的查看。选择"**数据库管理**"-\>"**节点管理**"\>"**拓扑管理**"可以查看拓扑图。"拓扑管理"功能仅在企业版中支持。
+
+
+
+拓扑图显示节点IP、节点类型及端口。
+
+
+
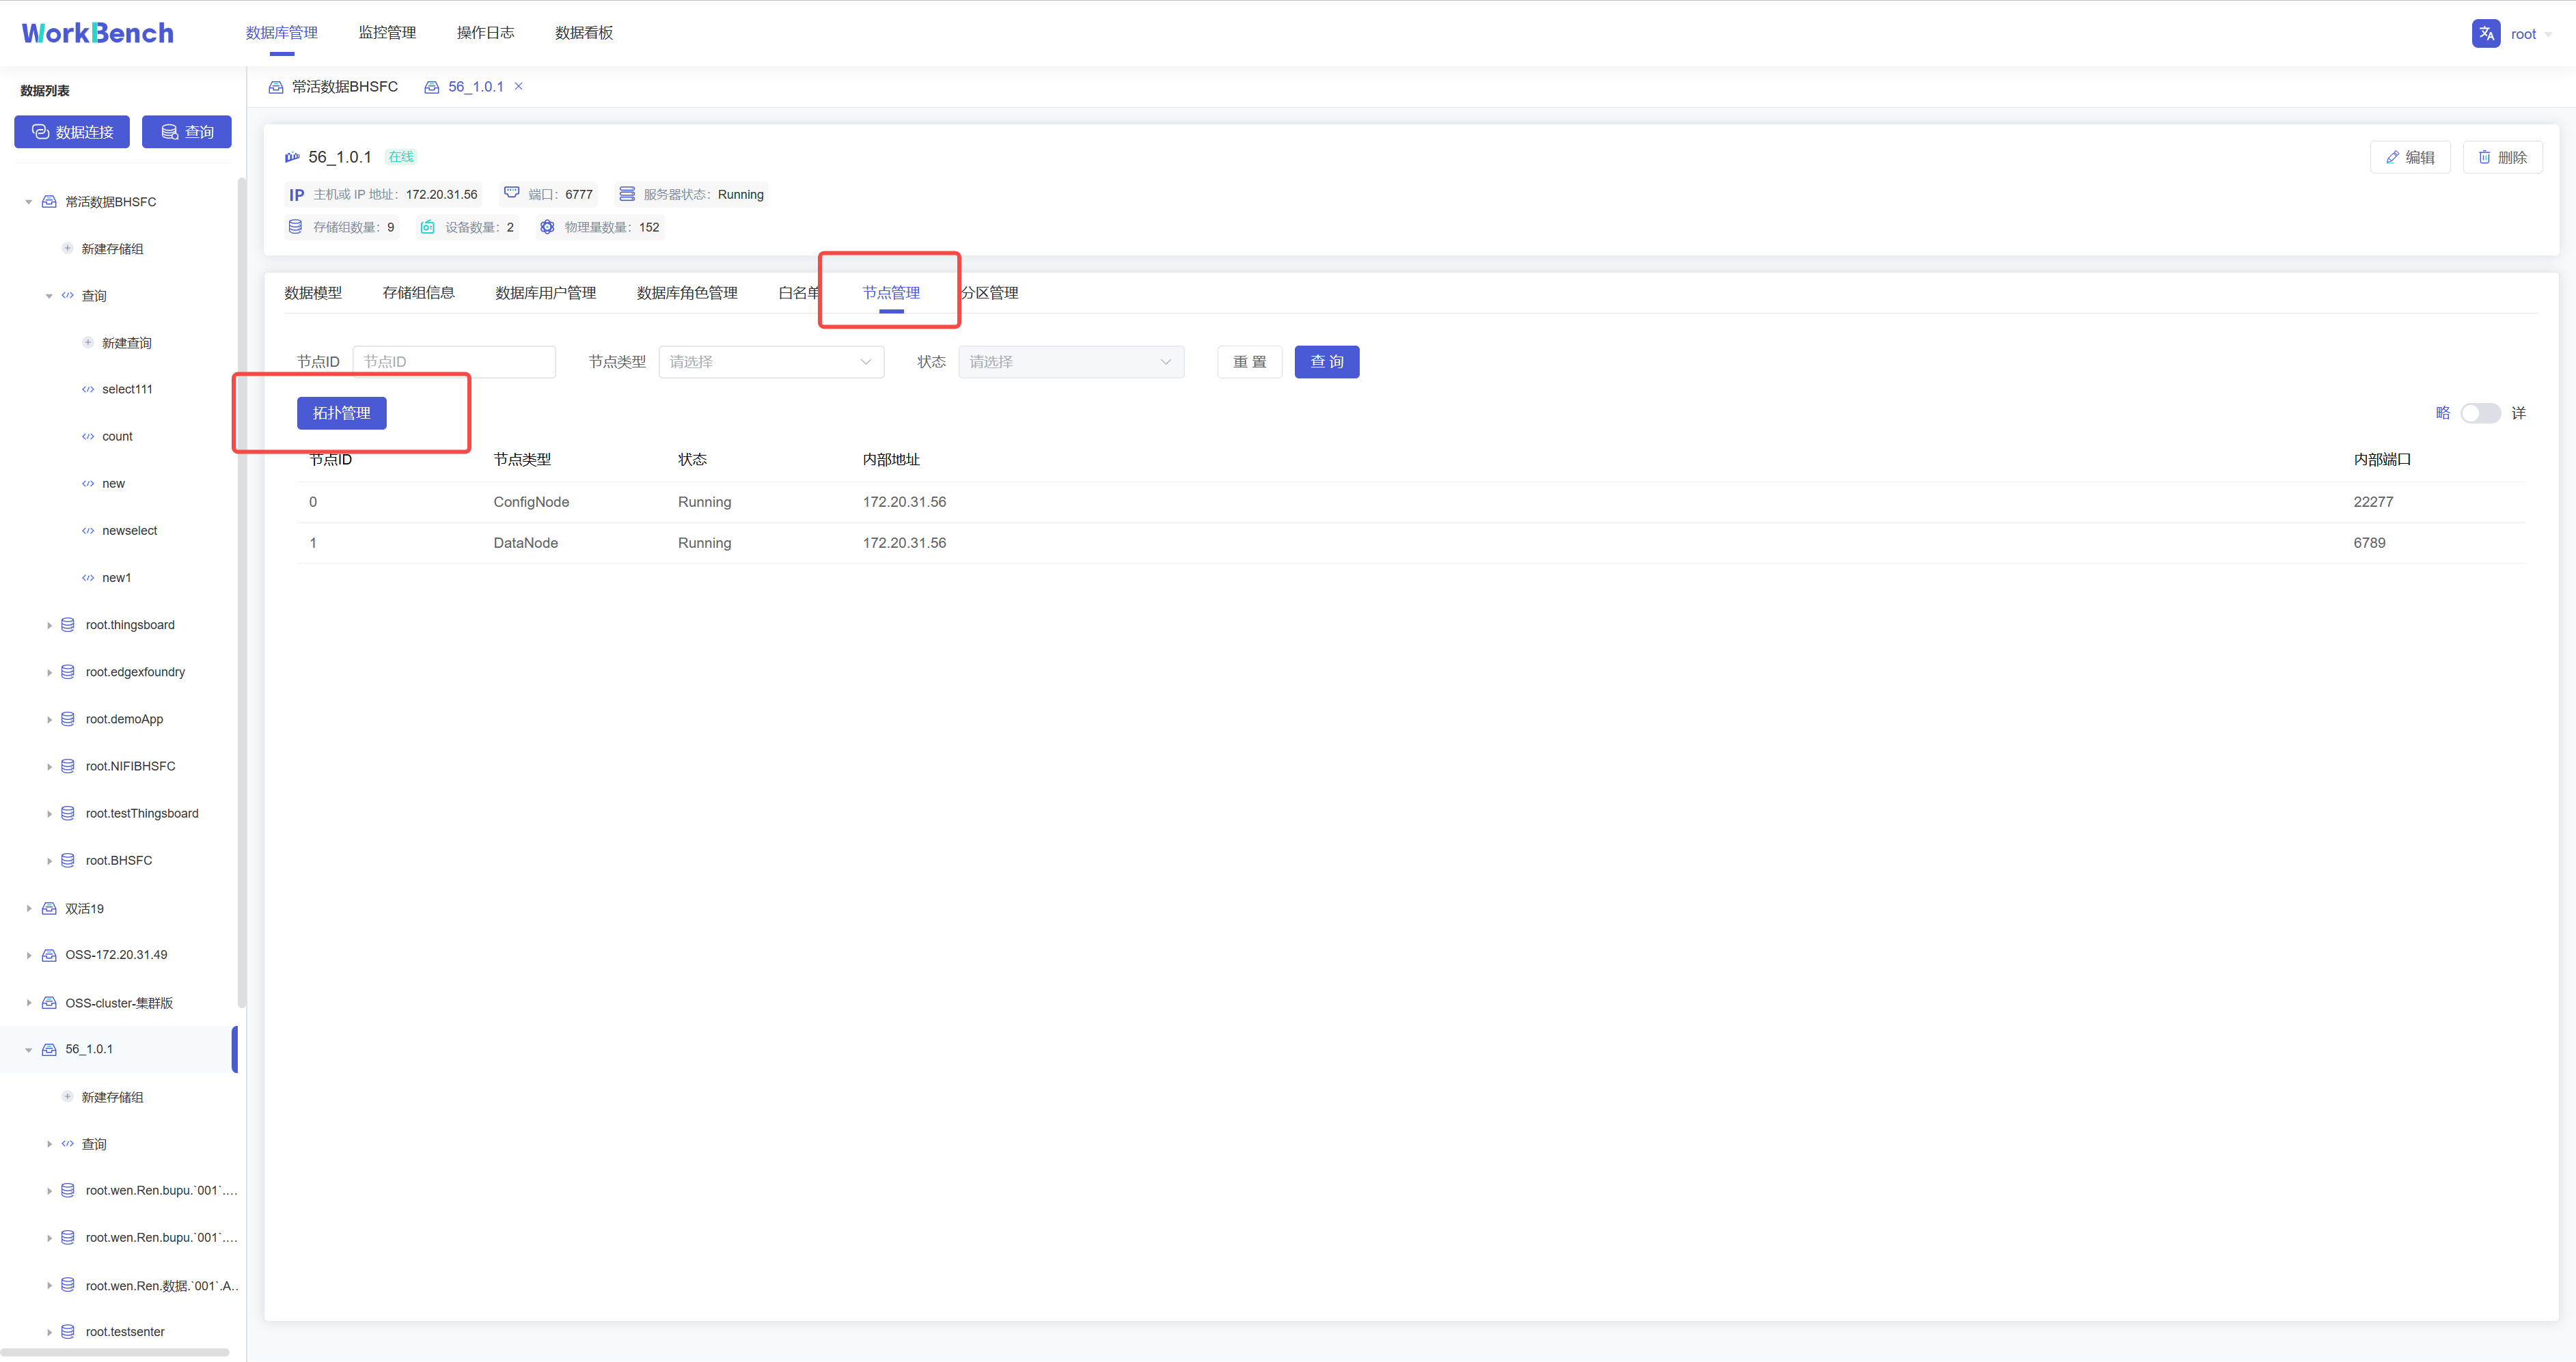
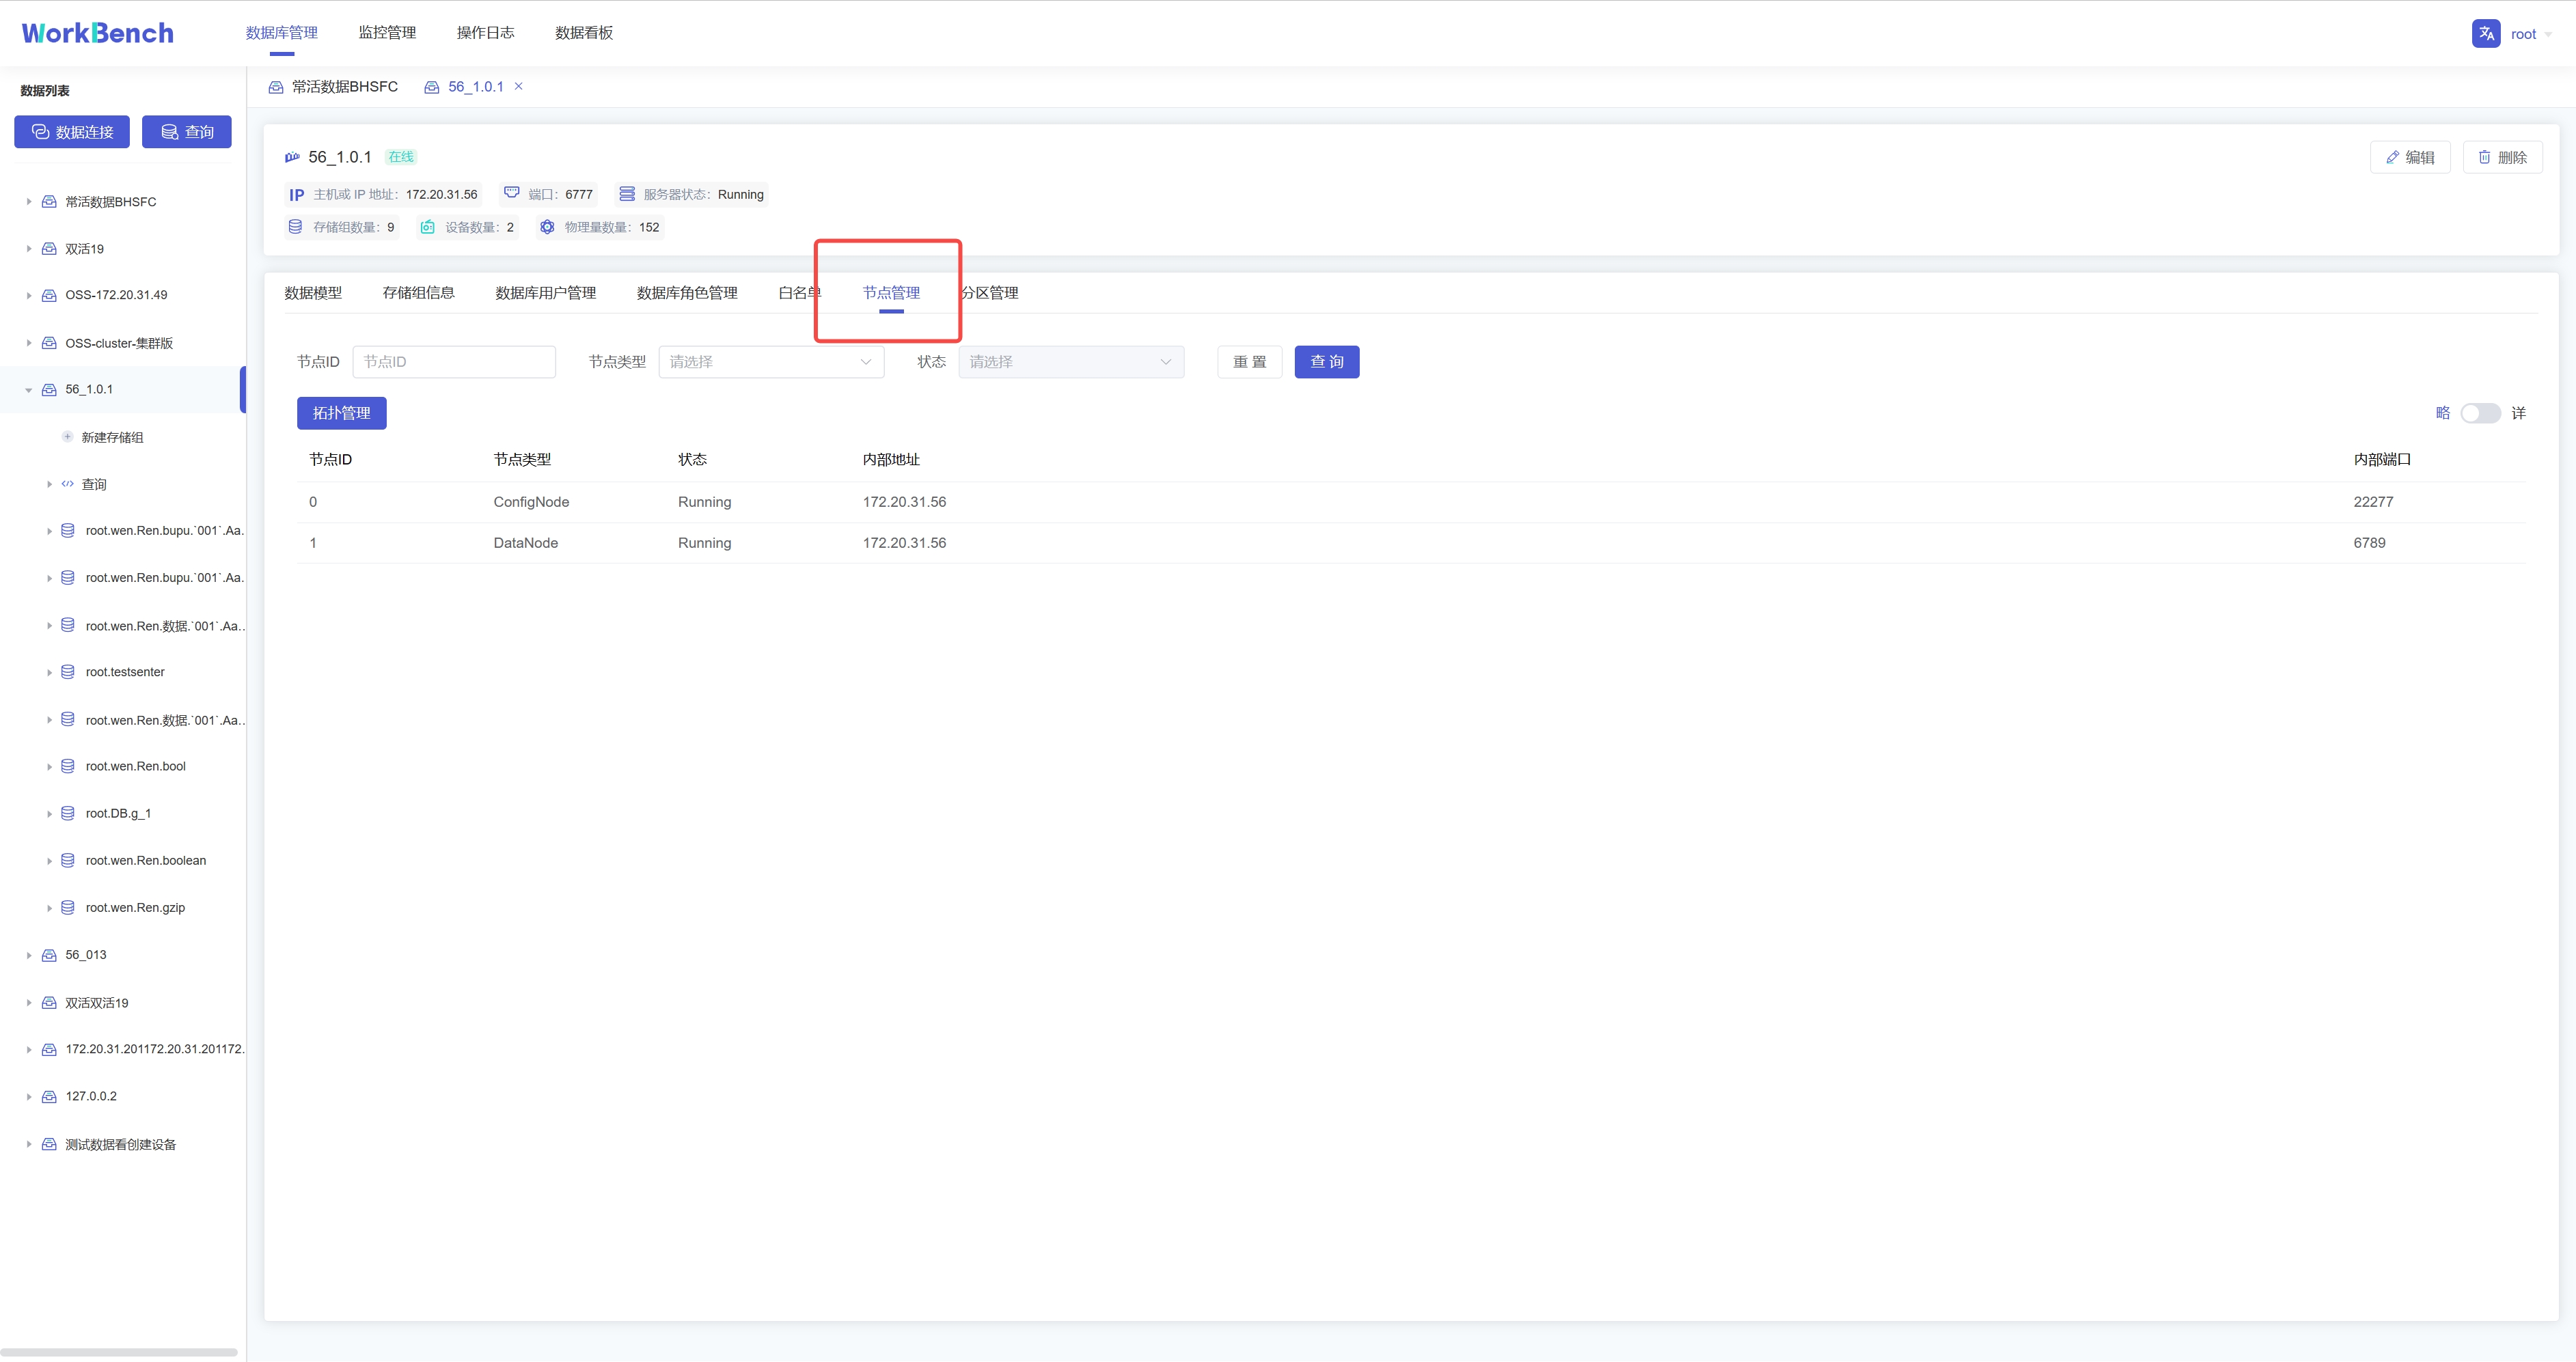
+**节点管理**
+
+Workbench提供对集群节点的管理。选择"**数据库管理**"-\>"**节点管理**"可以查看节点状态。可按节点ID或节点类型进行查询。
+
+
+
+**分区管理**
+
+Workbench提供对集群分区的管理。选择"**数据库管理**"-\>"**分区管理**"可以查看分区状态。可按分区ID或分区类型进行查询。
+
+
+
+## 存储组管理
+
+**新增存储组**
+
+在对象窗格中选择要操作的数据库对象,点击"**新建存储组**"即可创建存储组,存储组名称为必填,存储组名称为必填,正常情况下只能输入字母、数字、下划线以及UNICODE
+中文字符如果包含特殊字符,请使用反引号。存活时间选填。
+
+
+
+**删除存储组**
+
+在对象窗格中选择要操作的存储组,在操作列中选择"**编辑**"可修改存储组存活时间,选择"**删除**"可删除存储组。
+
+
+
+## 设备及物理量管理
+
+**新建物理量**
+
+在对象窗格中选择要操作的存储组,点击"**新建设备**",按要求填写信息则可创建该存储组下的物理量。物理量名称名称为必填,正常情况下只能输入字母、数字、下划线以及UNICODE
+中文字符如果包含特殊字符,请使用反引号。
+
+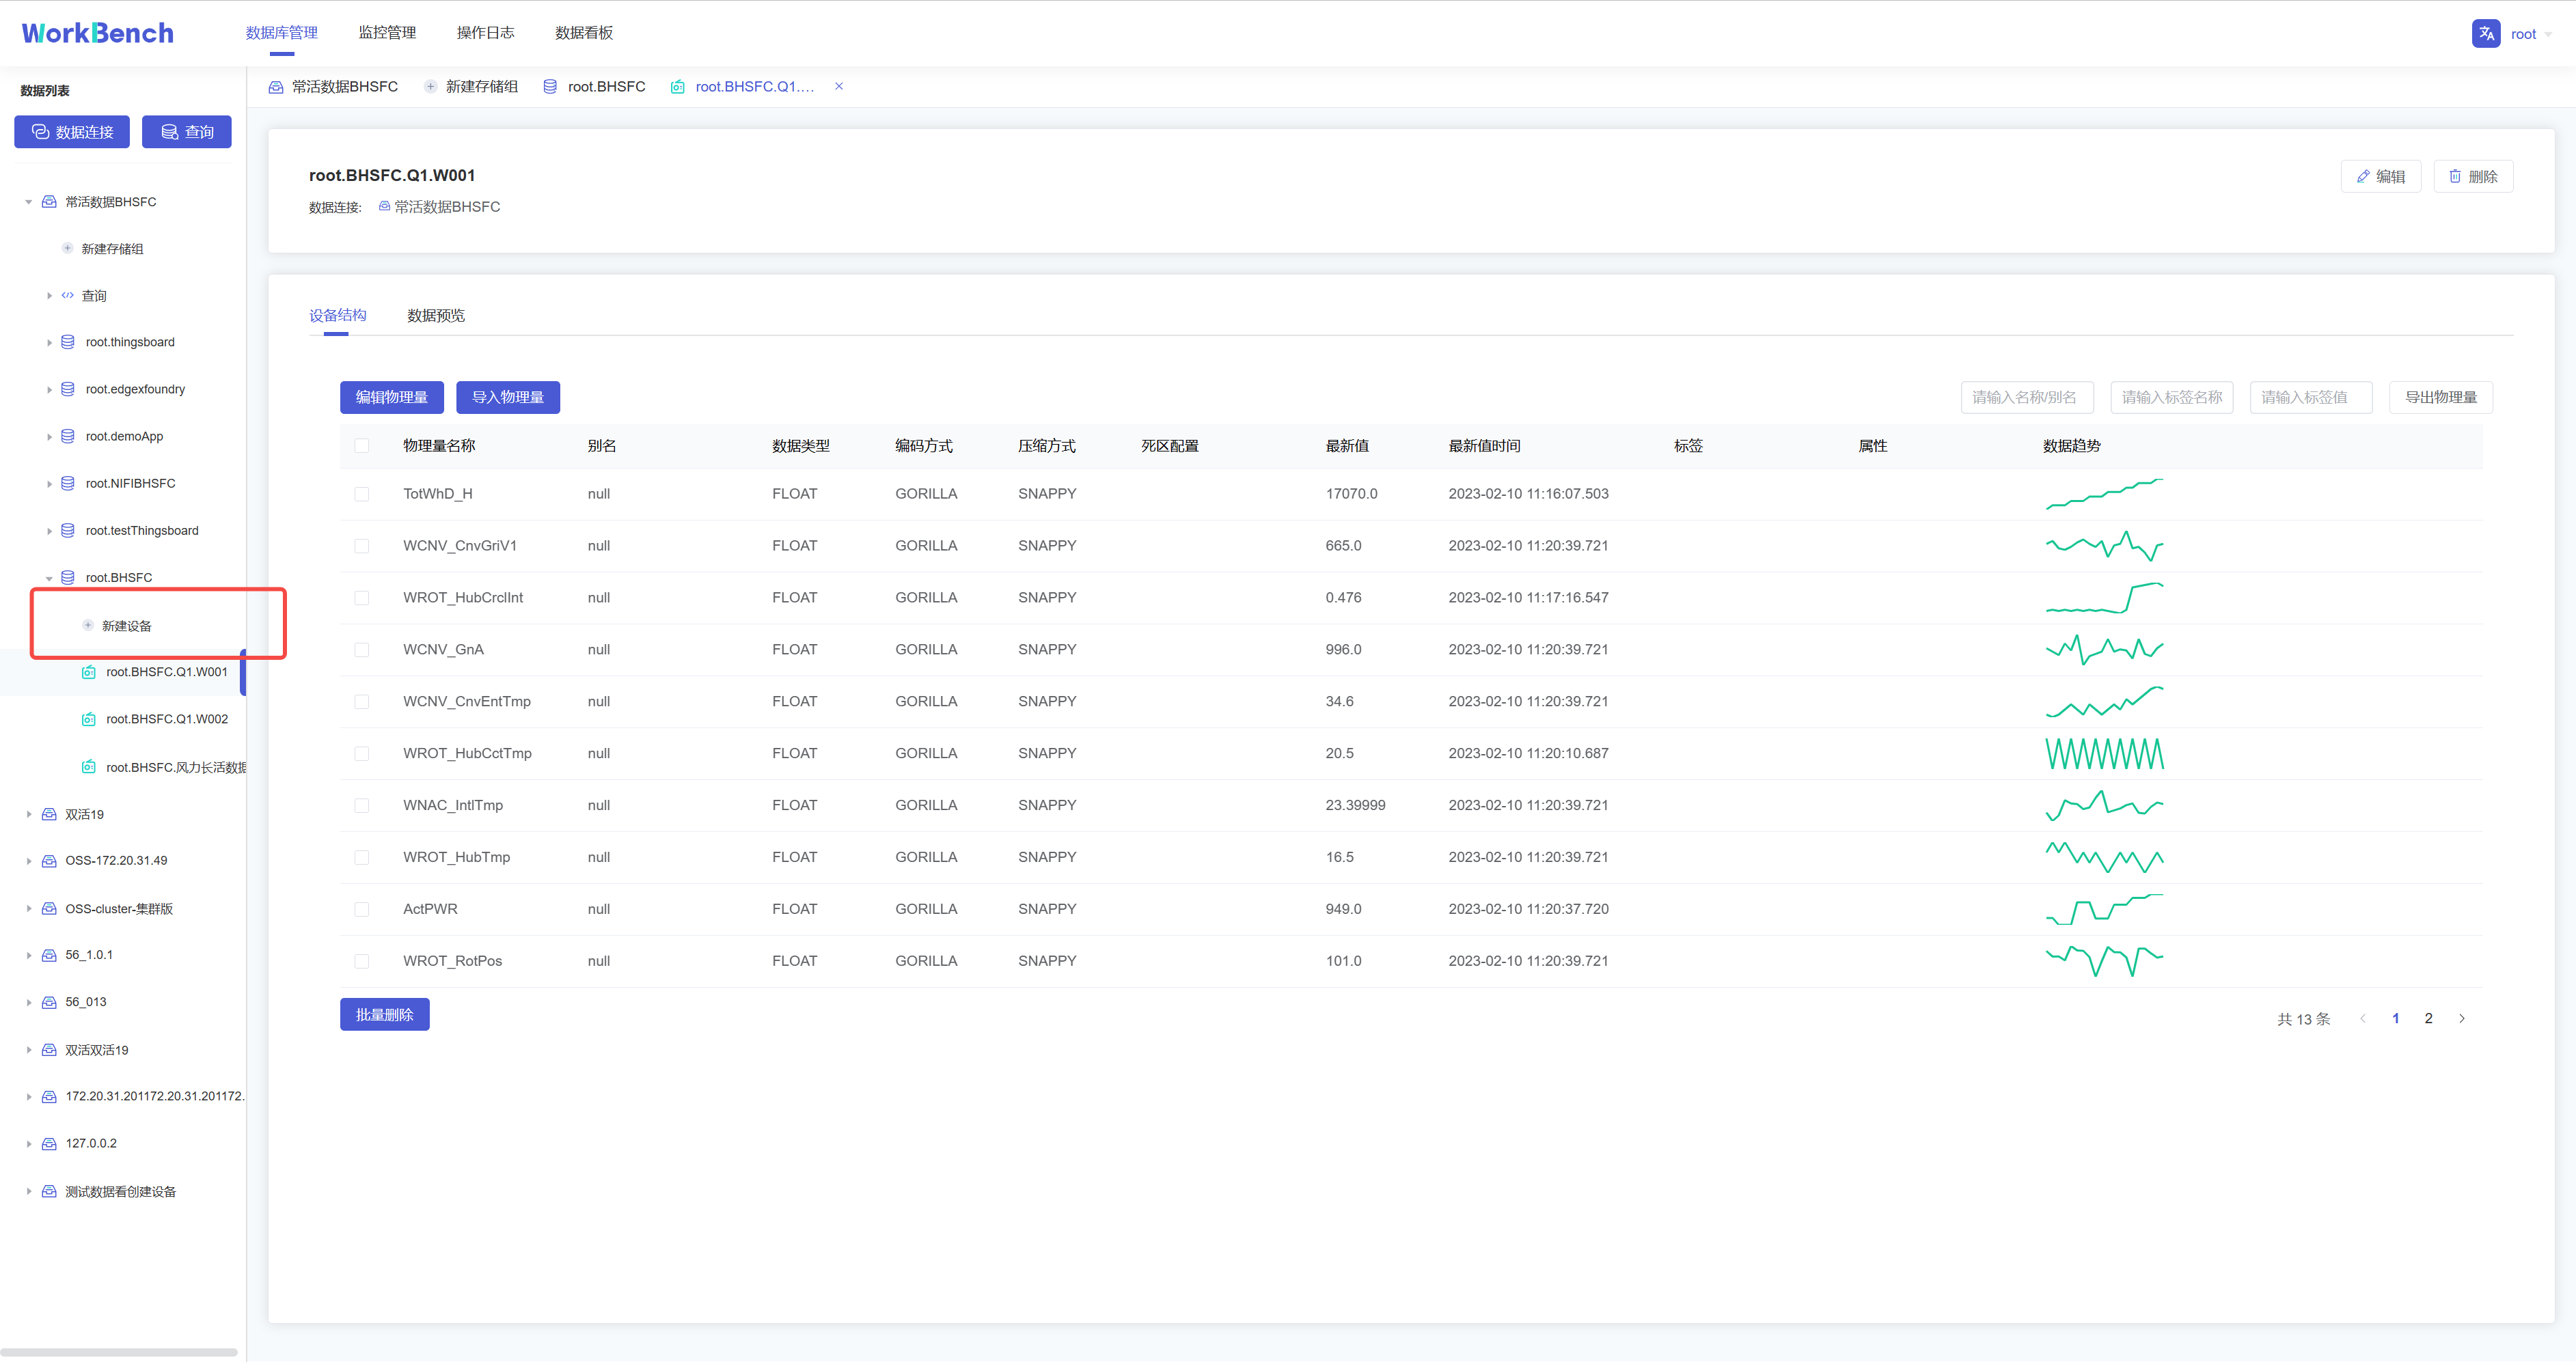
+
+**数据趋势预览**
+
+"数据趋势"功能仅在企业版中支持。在对象窗格中选定存储组,"**数据趋势**"显示该存储组下的物理量趋势图表,单击图表显示详细信息,可选定时间范围查询该区间内的数据,并显示最小值等数据
+
+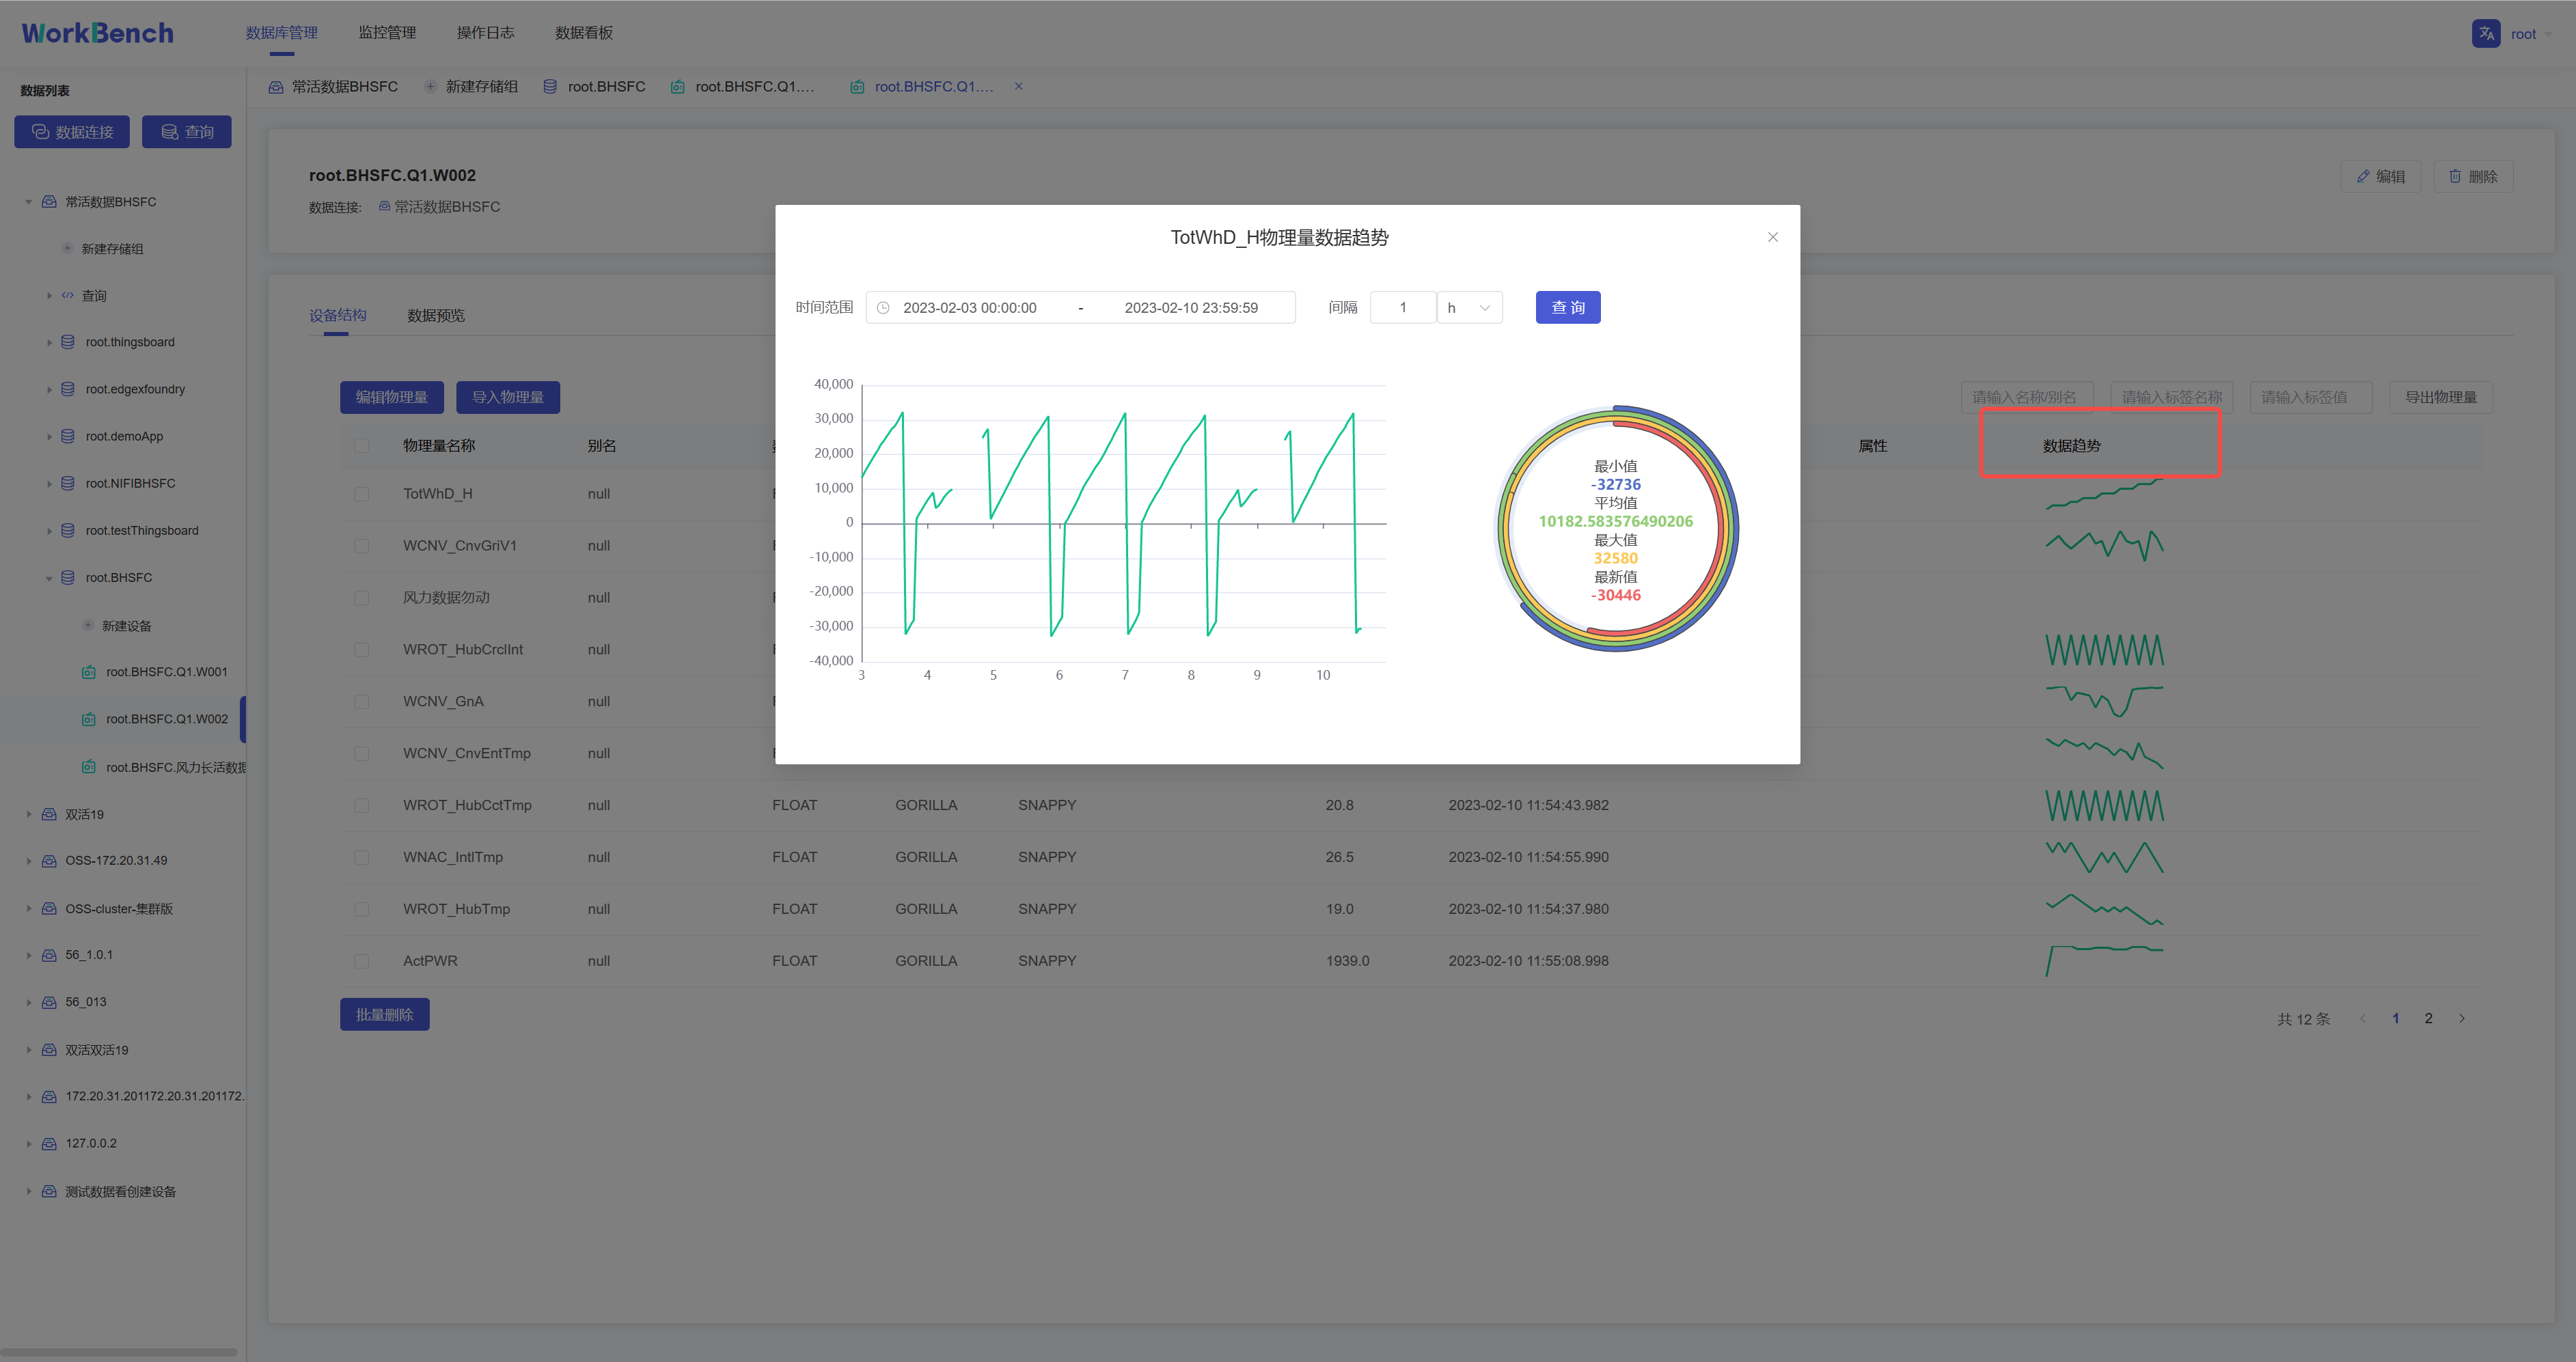
+
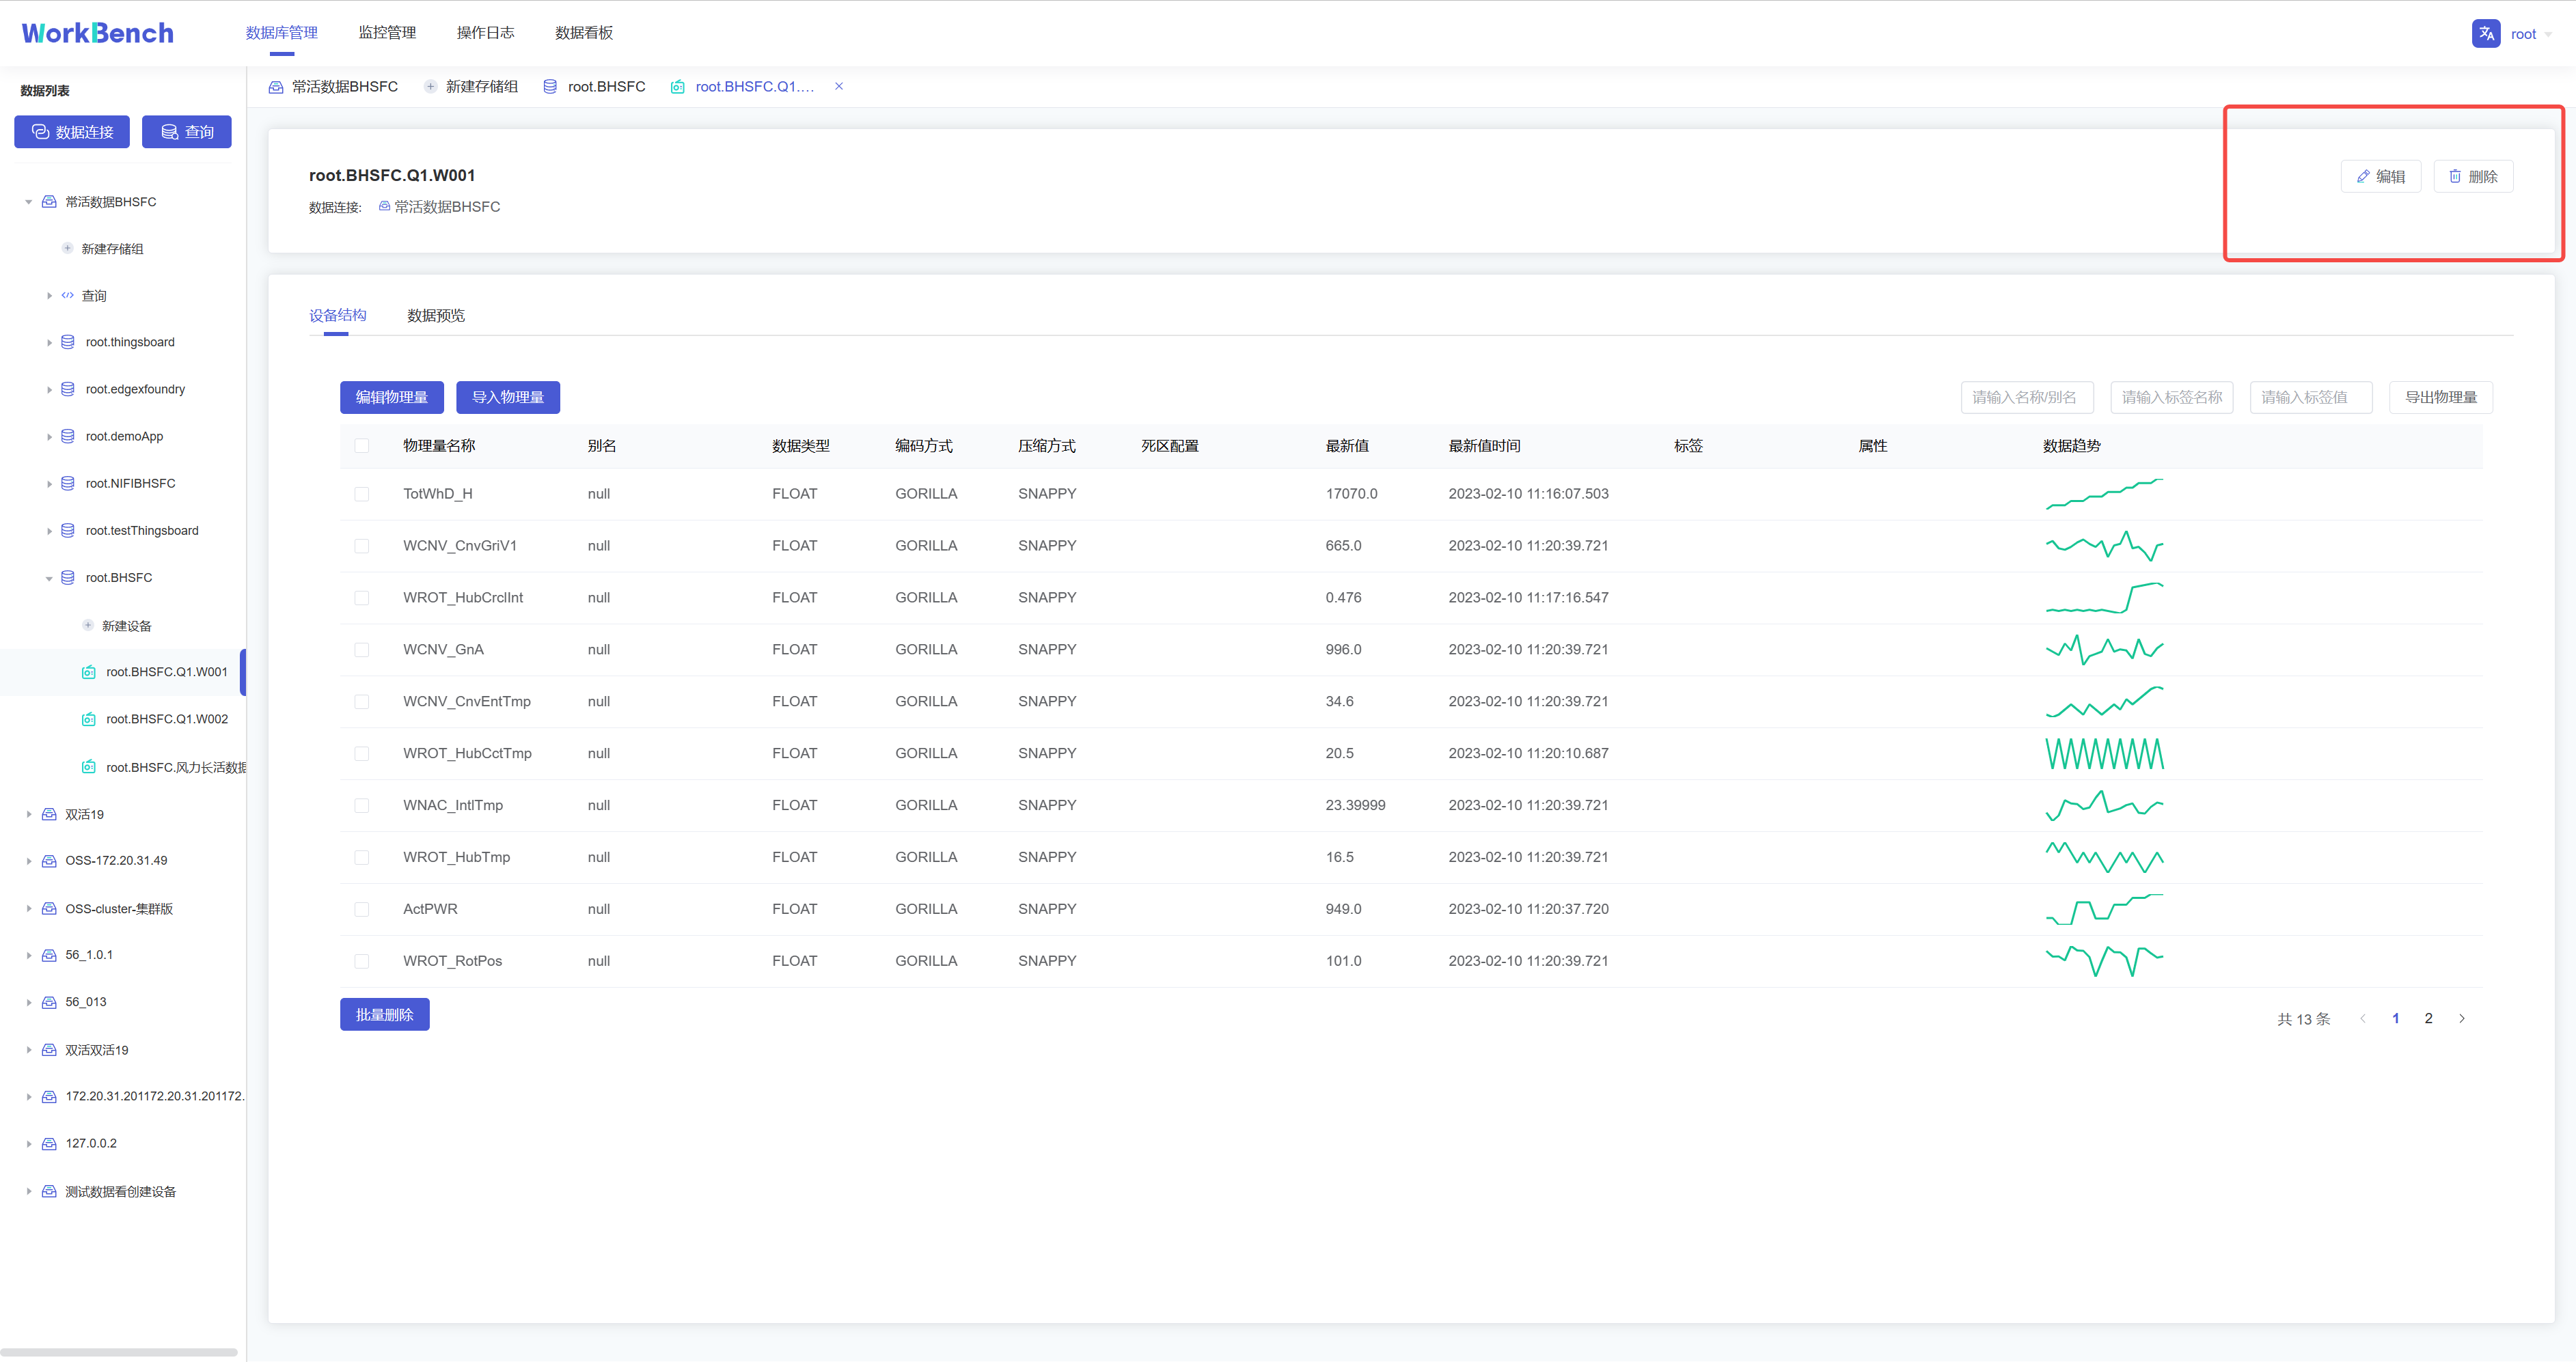
+**修改、删除物理量**
+
+在对象窗格中选择要操作的设备
+,点击右侧的"**编辑**"可修改该设备下的物理量信息(别名、标签和属性)。点击"**删除**"则可删除该设备。
+
+
+
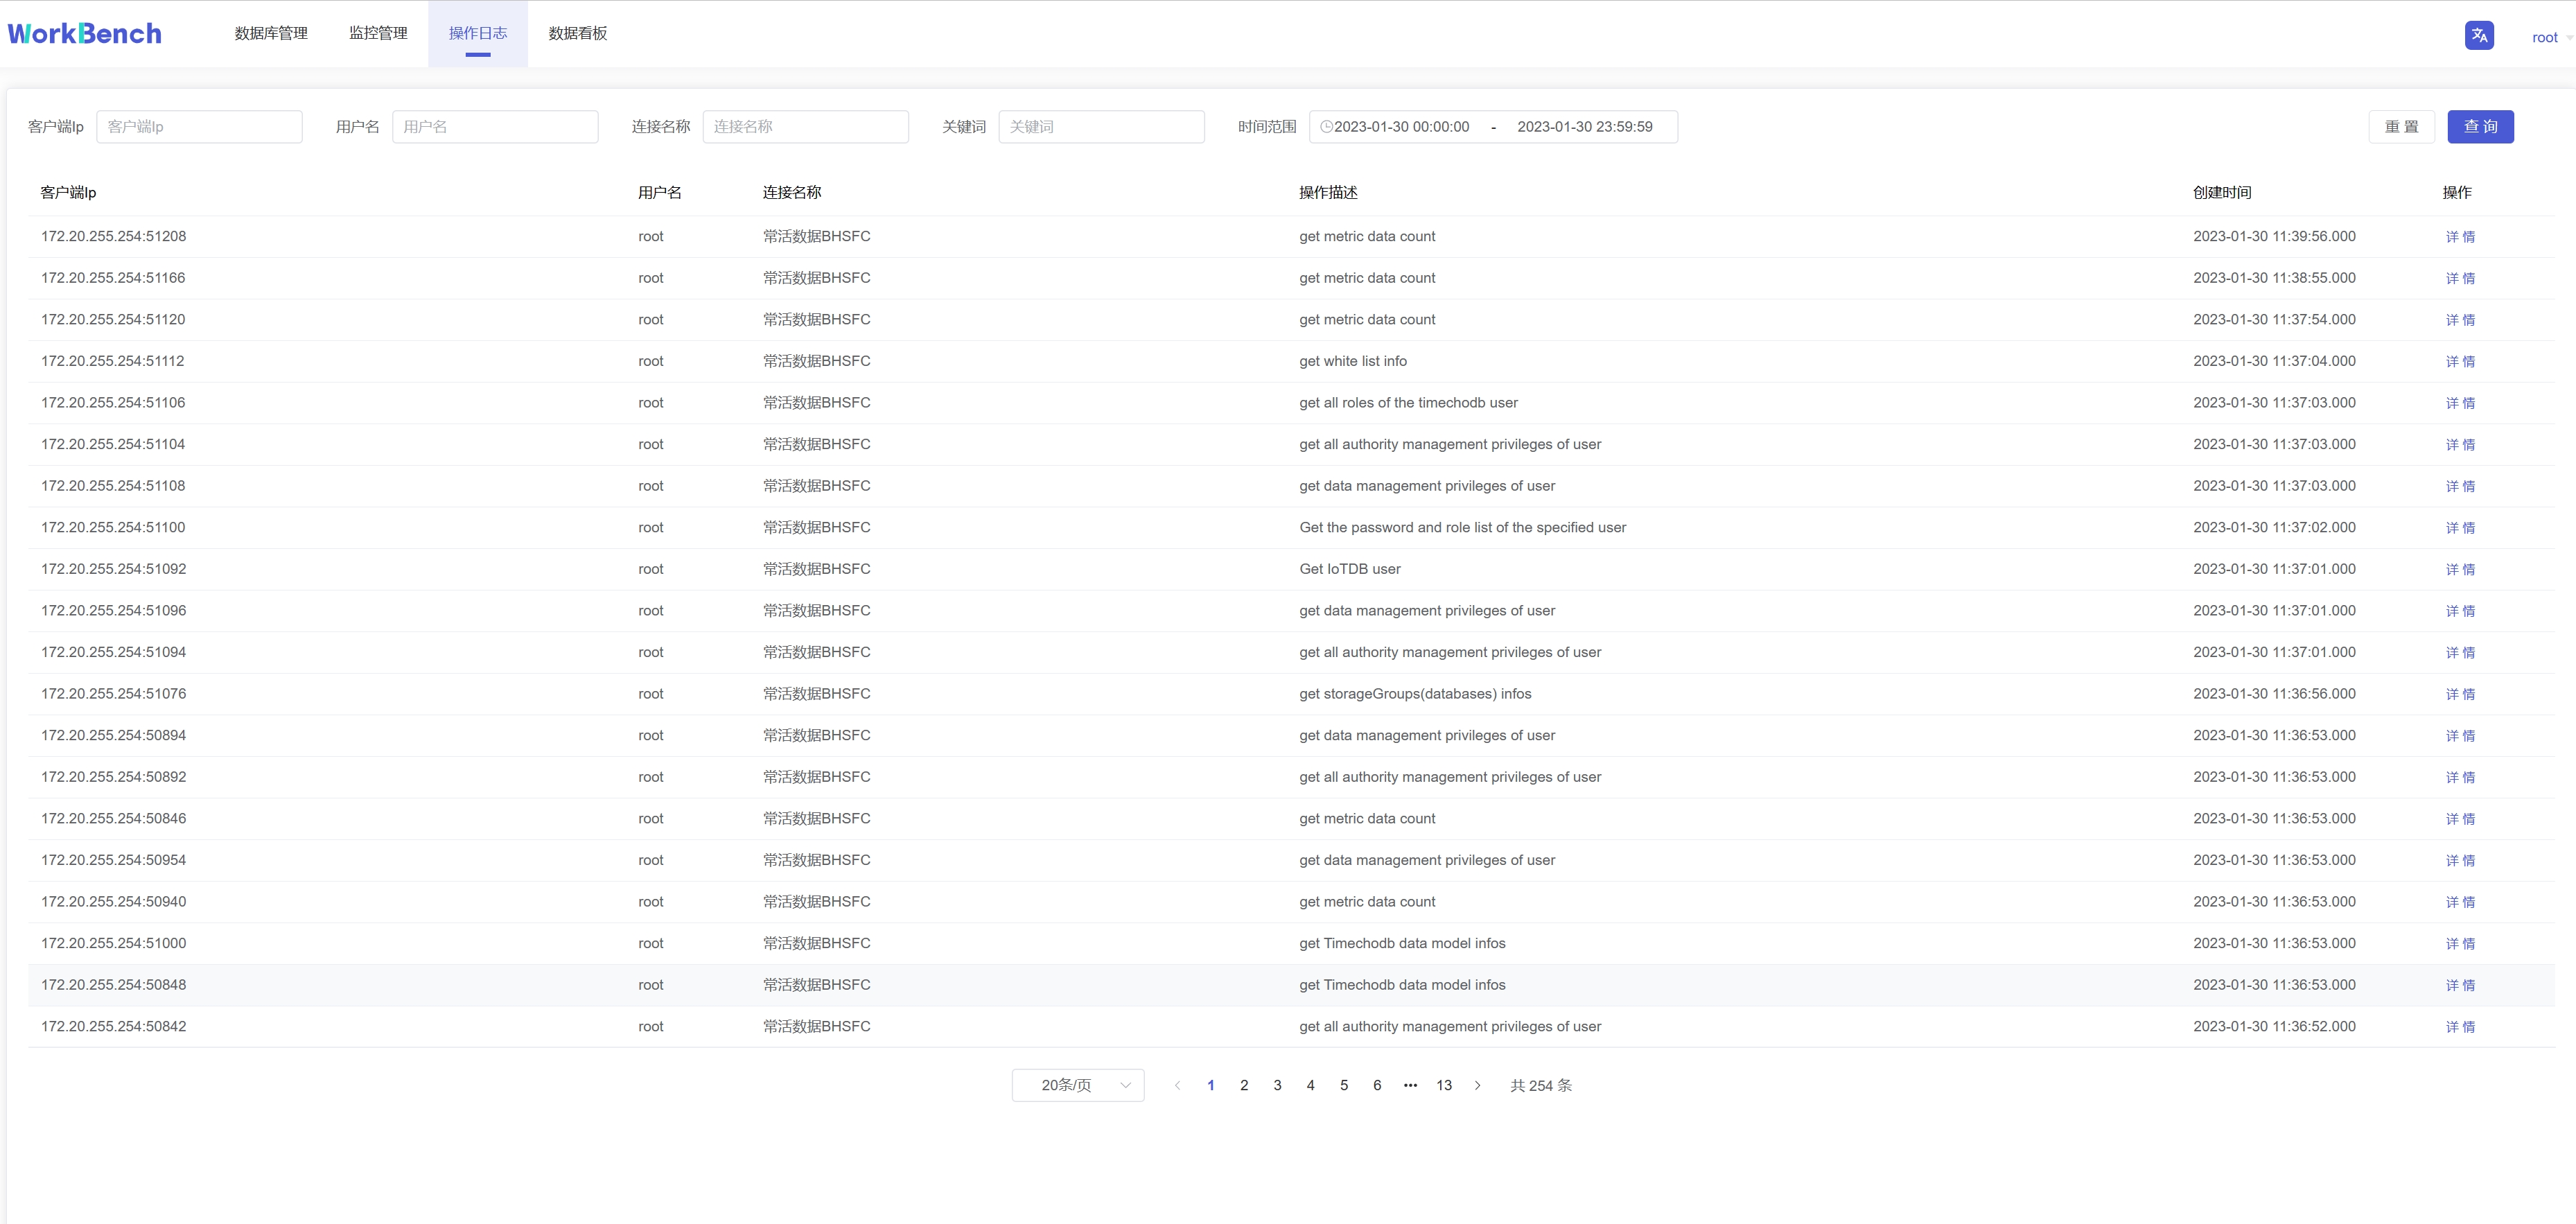
+## 操作日志
+
+"操作日志"提供所有在Workbench上进行的操作记录,可按IP、用户、数据连接、关键词和时间范围进行筛选。
+
+
+
+## 监控管理
+
+Workbench提供"**监控管理**"提供来查看已选择的服务器监控属性。从导航栏选择"**监控管理**"并选择你想要的监控类型。可选"**监控指标**","**连接信息**","**审计日志**"。
+
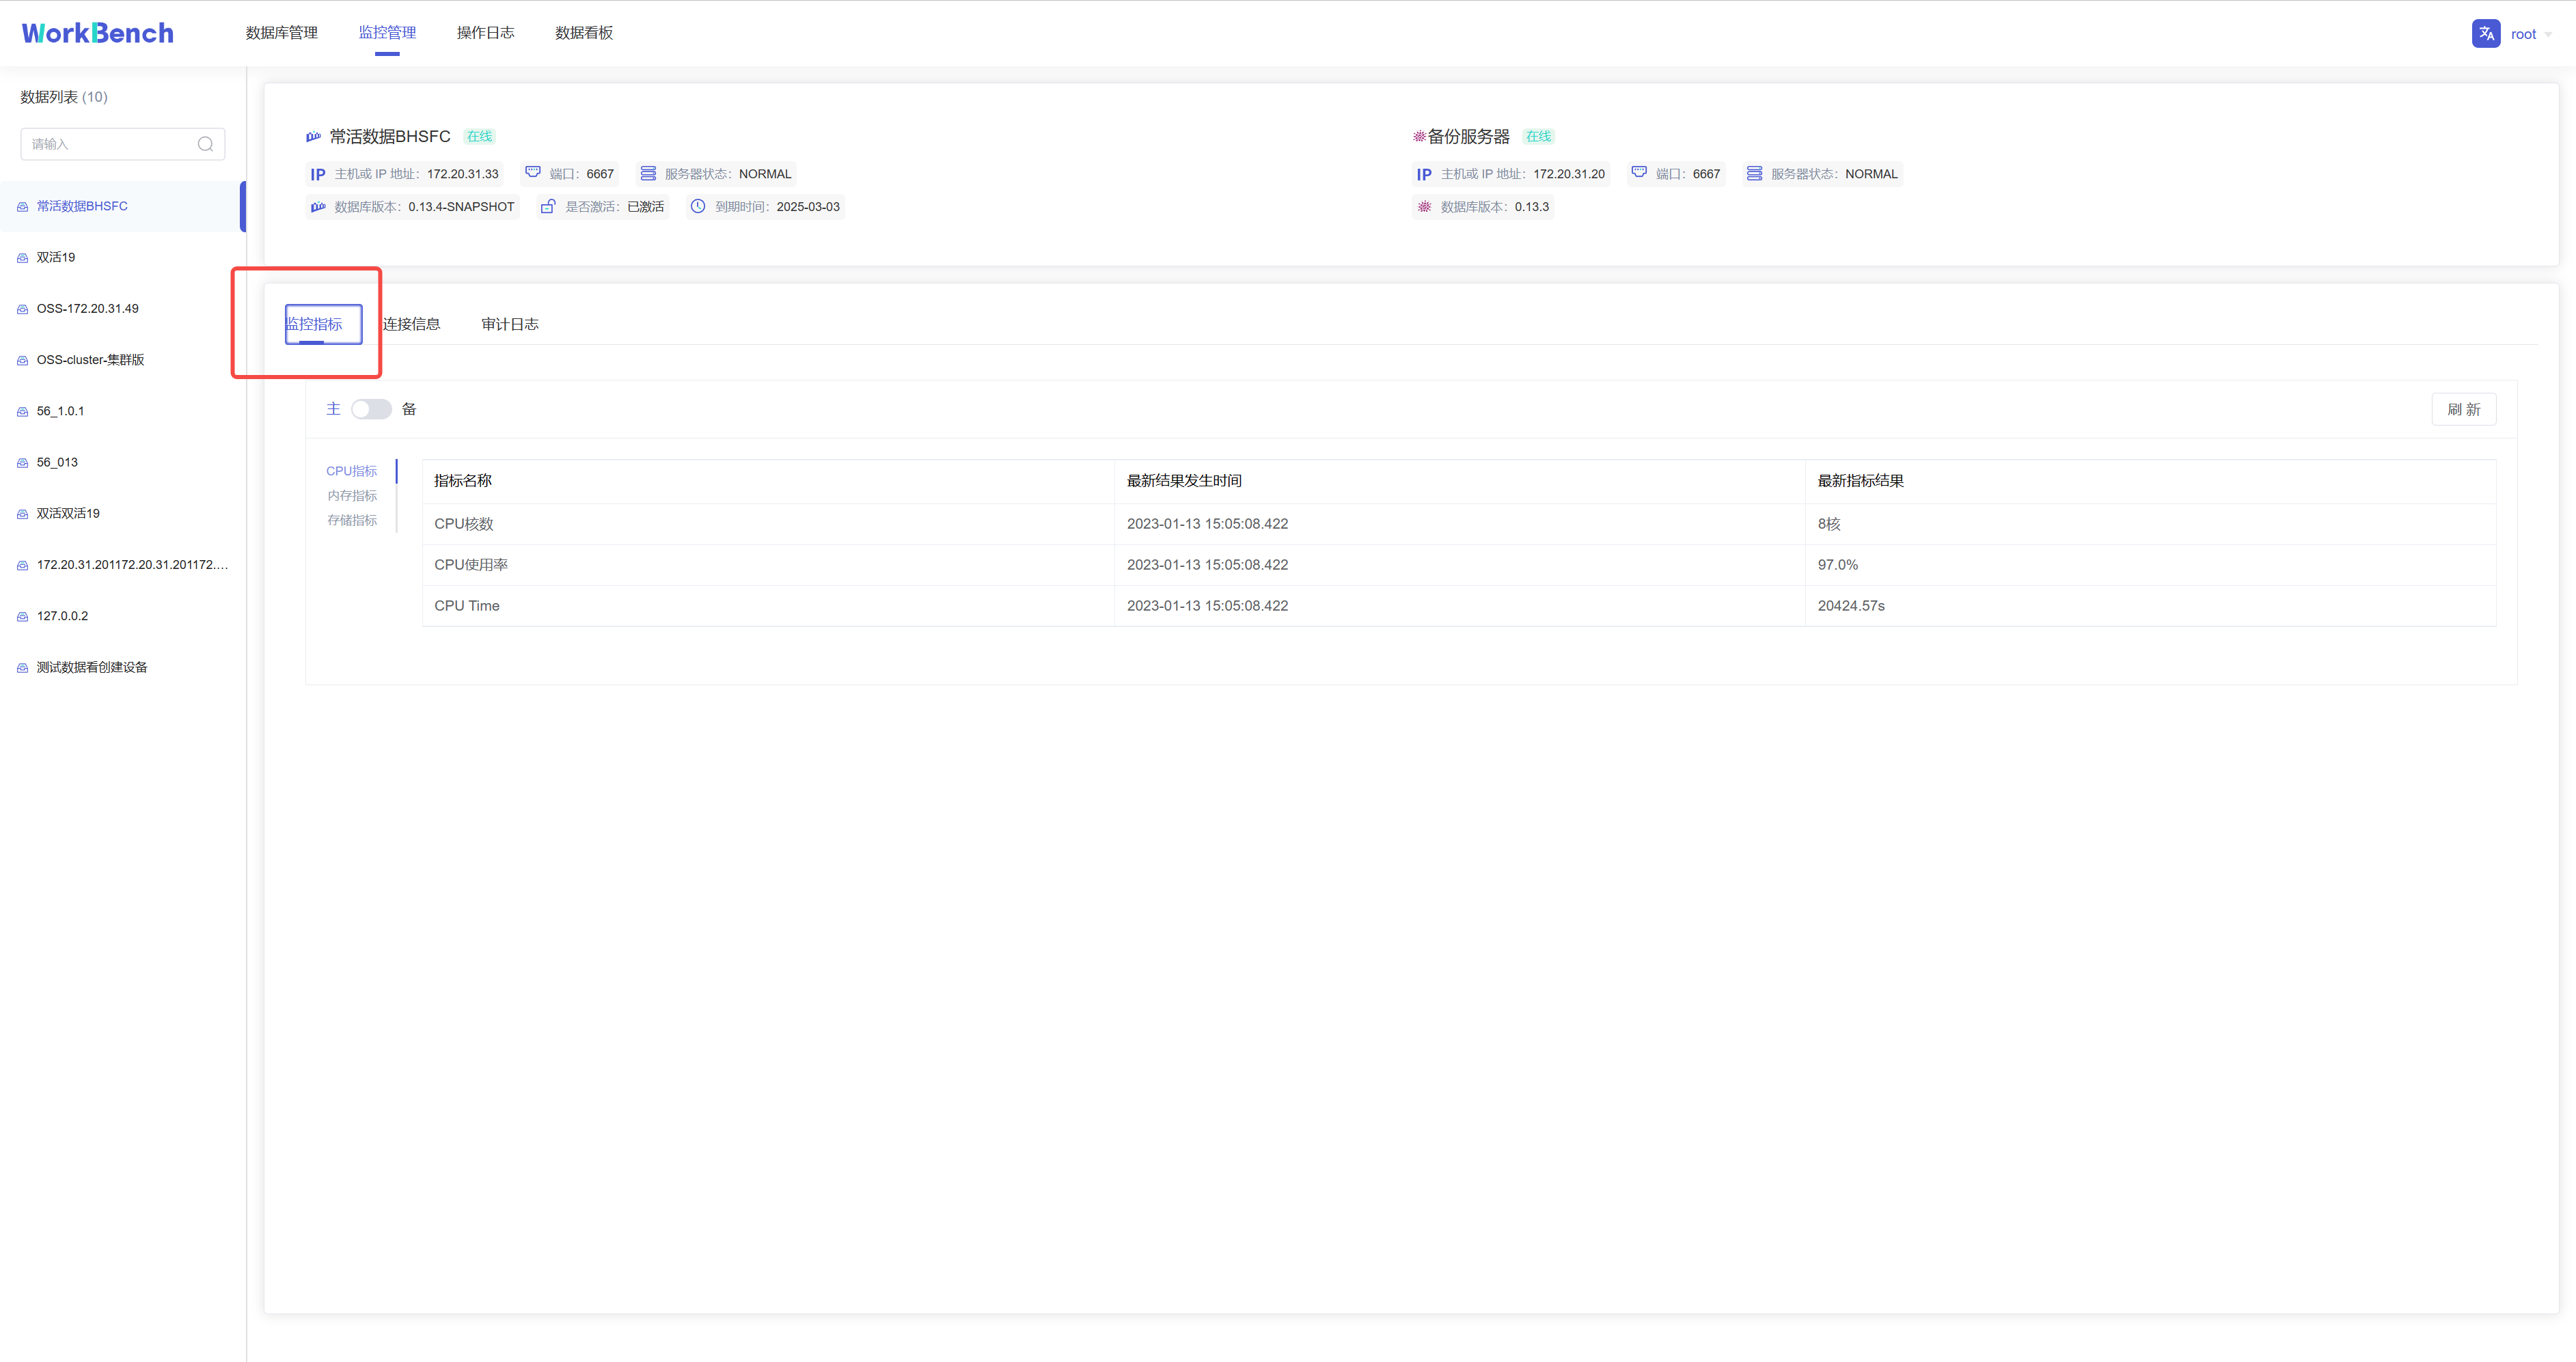
+**监控指标**
+
+监控指标可供查看CPU指标、内存指标和存储指标的最新信息。
+
+
+
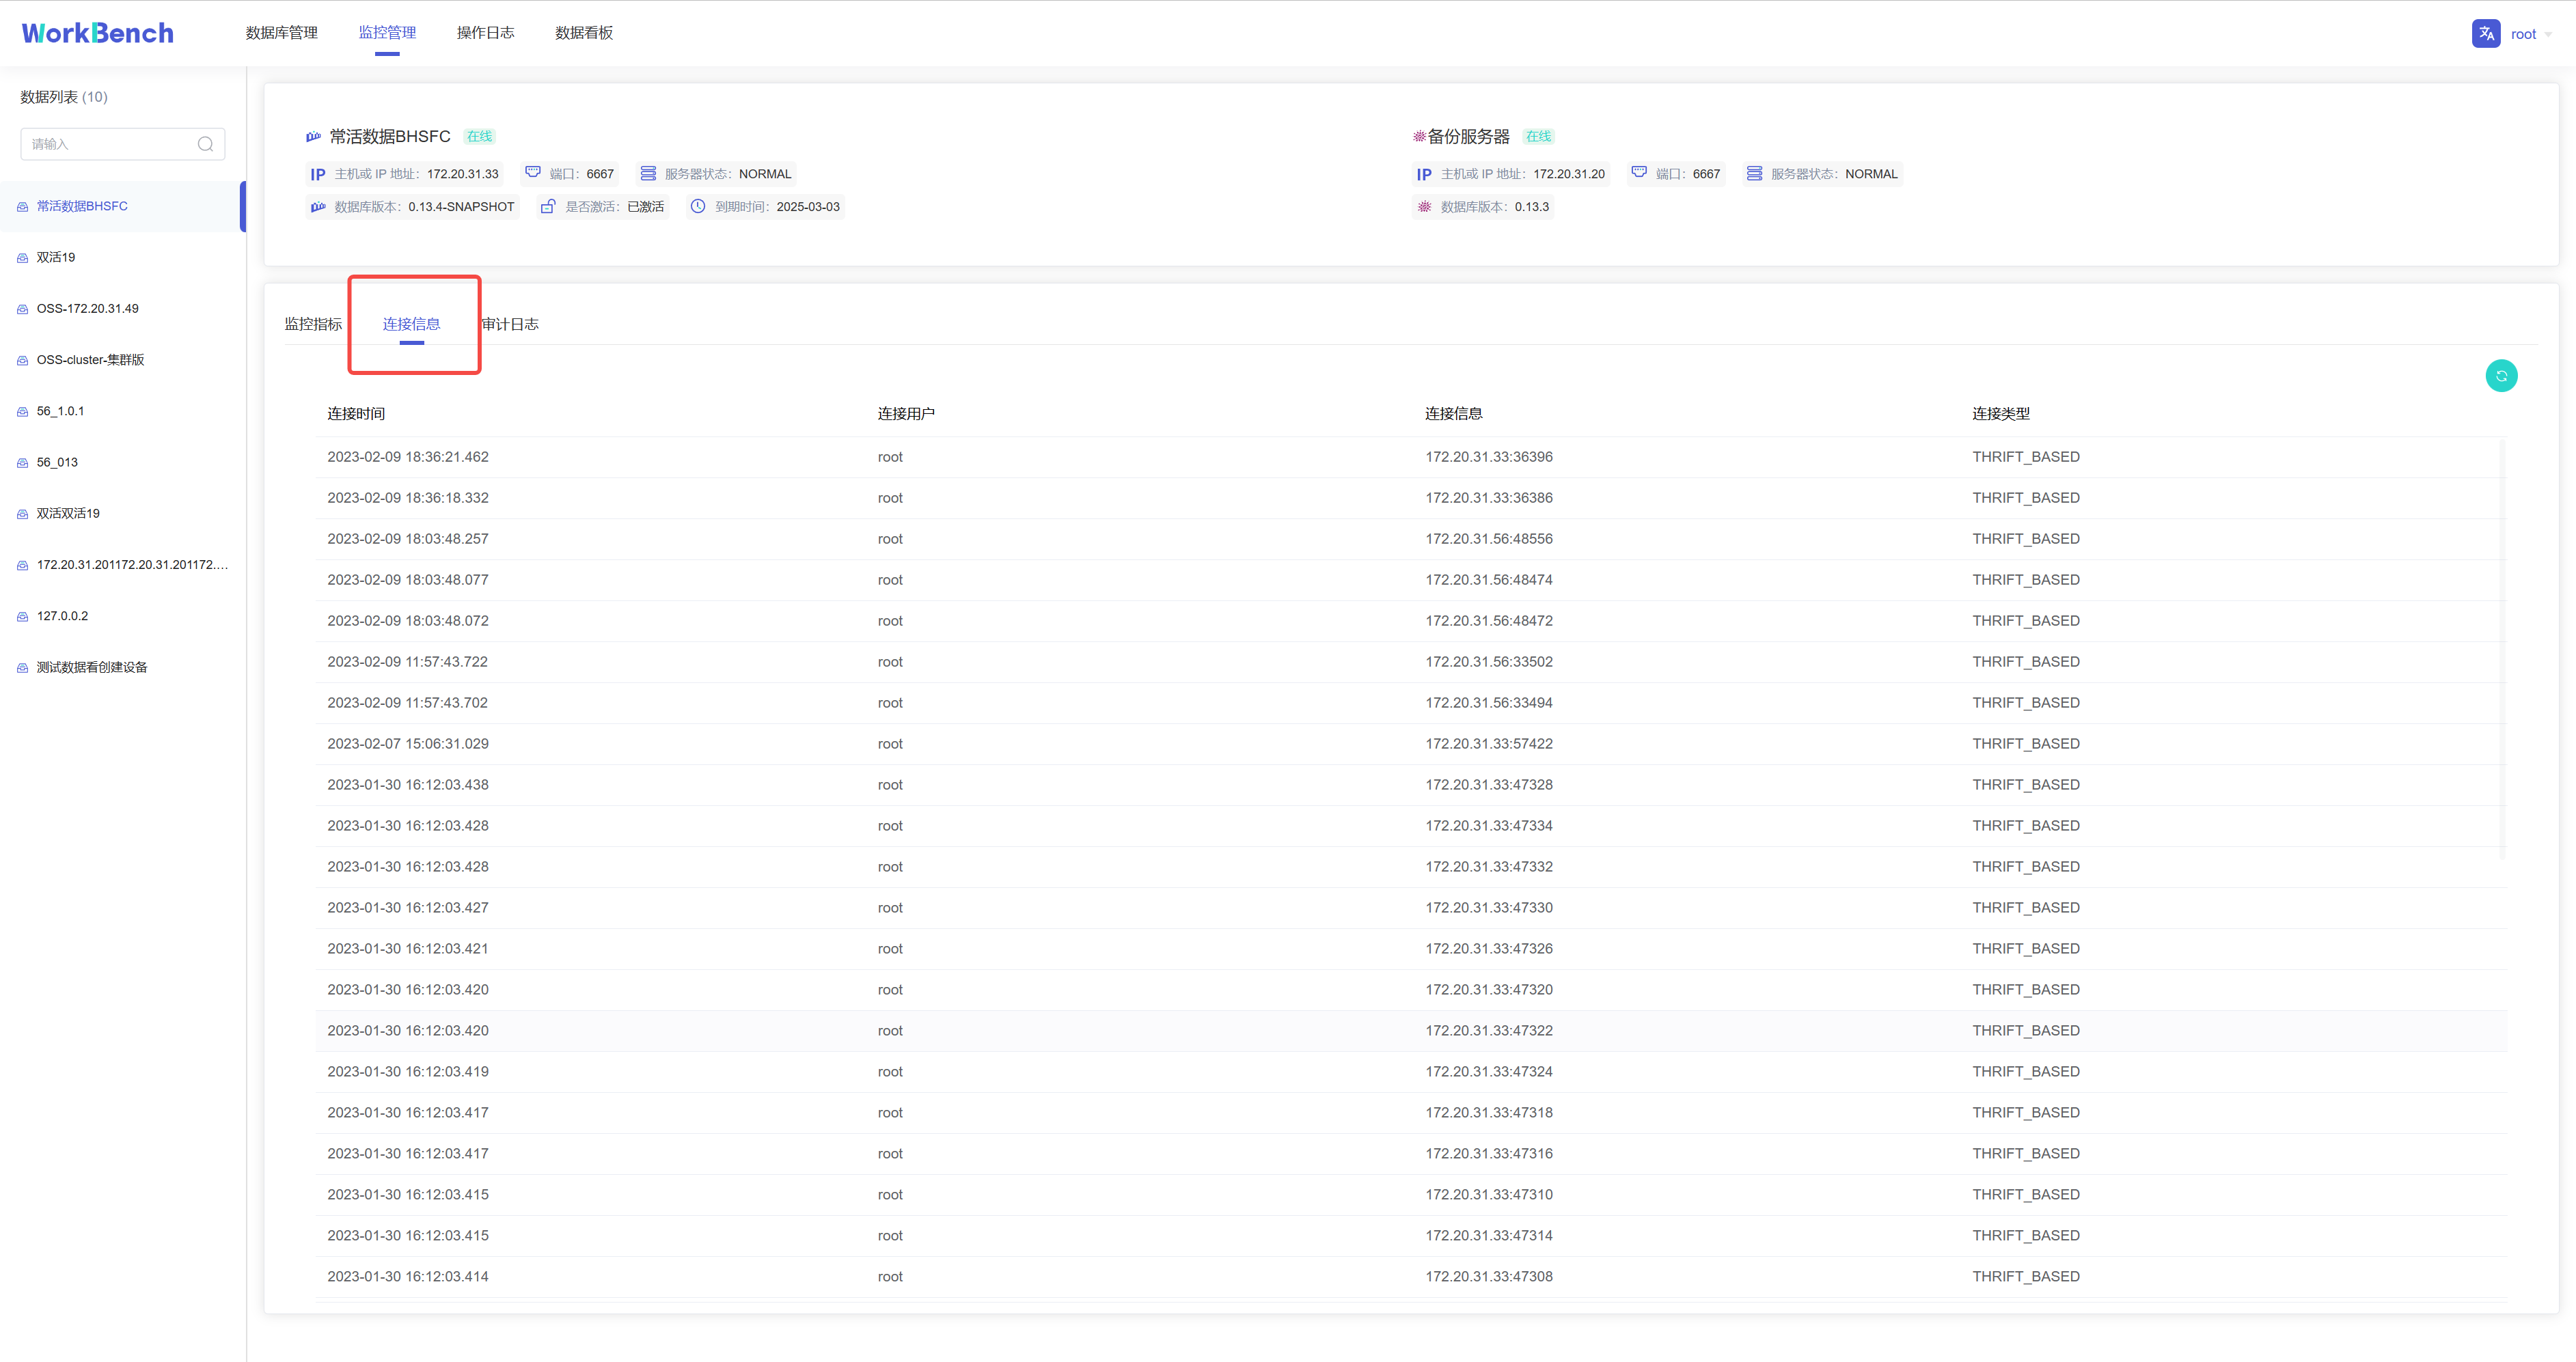
+**连接信息**
+
+连接信息可供查看连接到Workbench的用户和服务器信息。"连接信息"功能仅在企业版中支持。
+
+
+
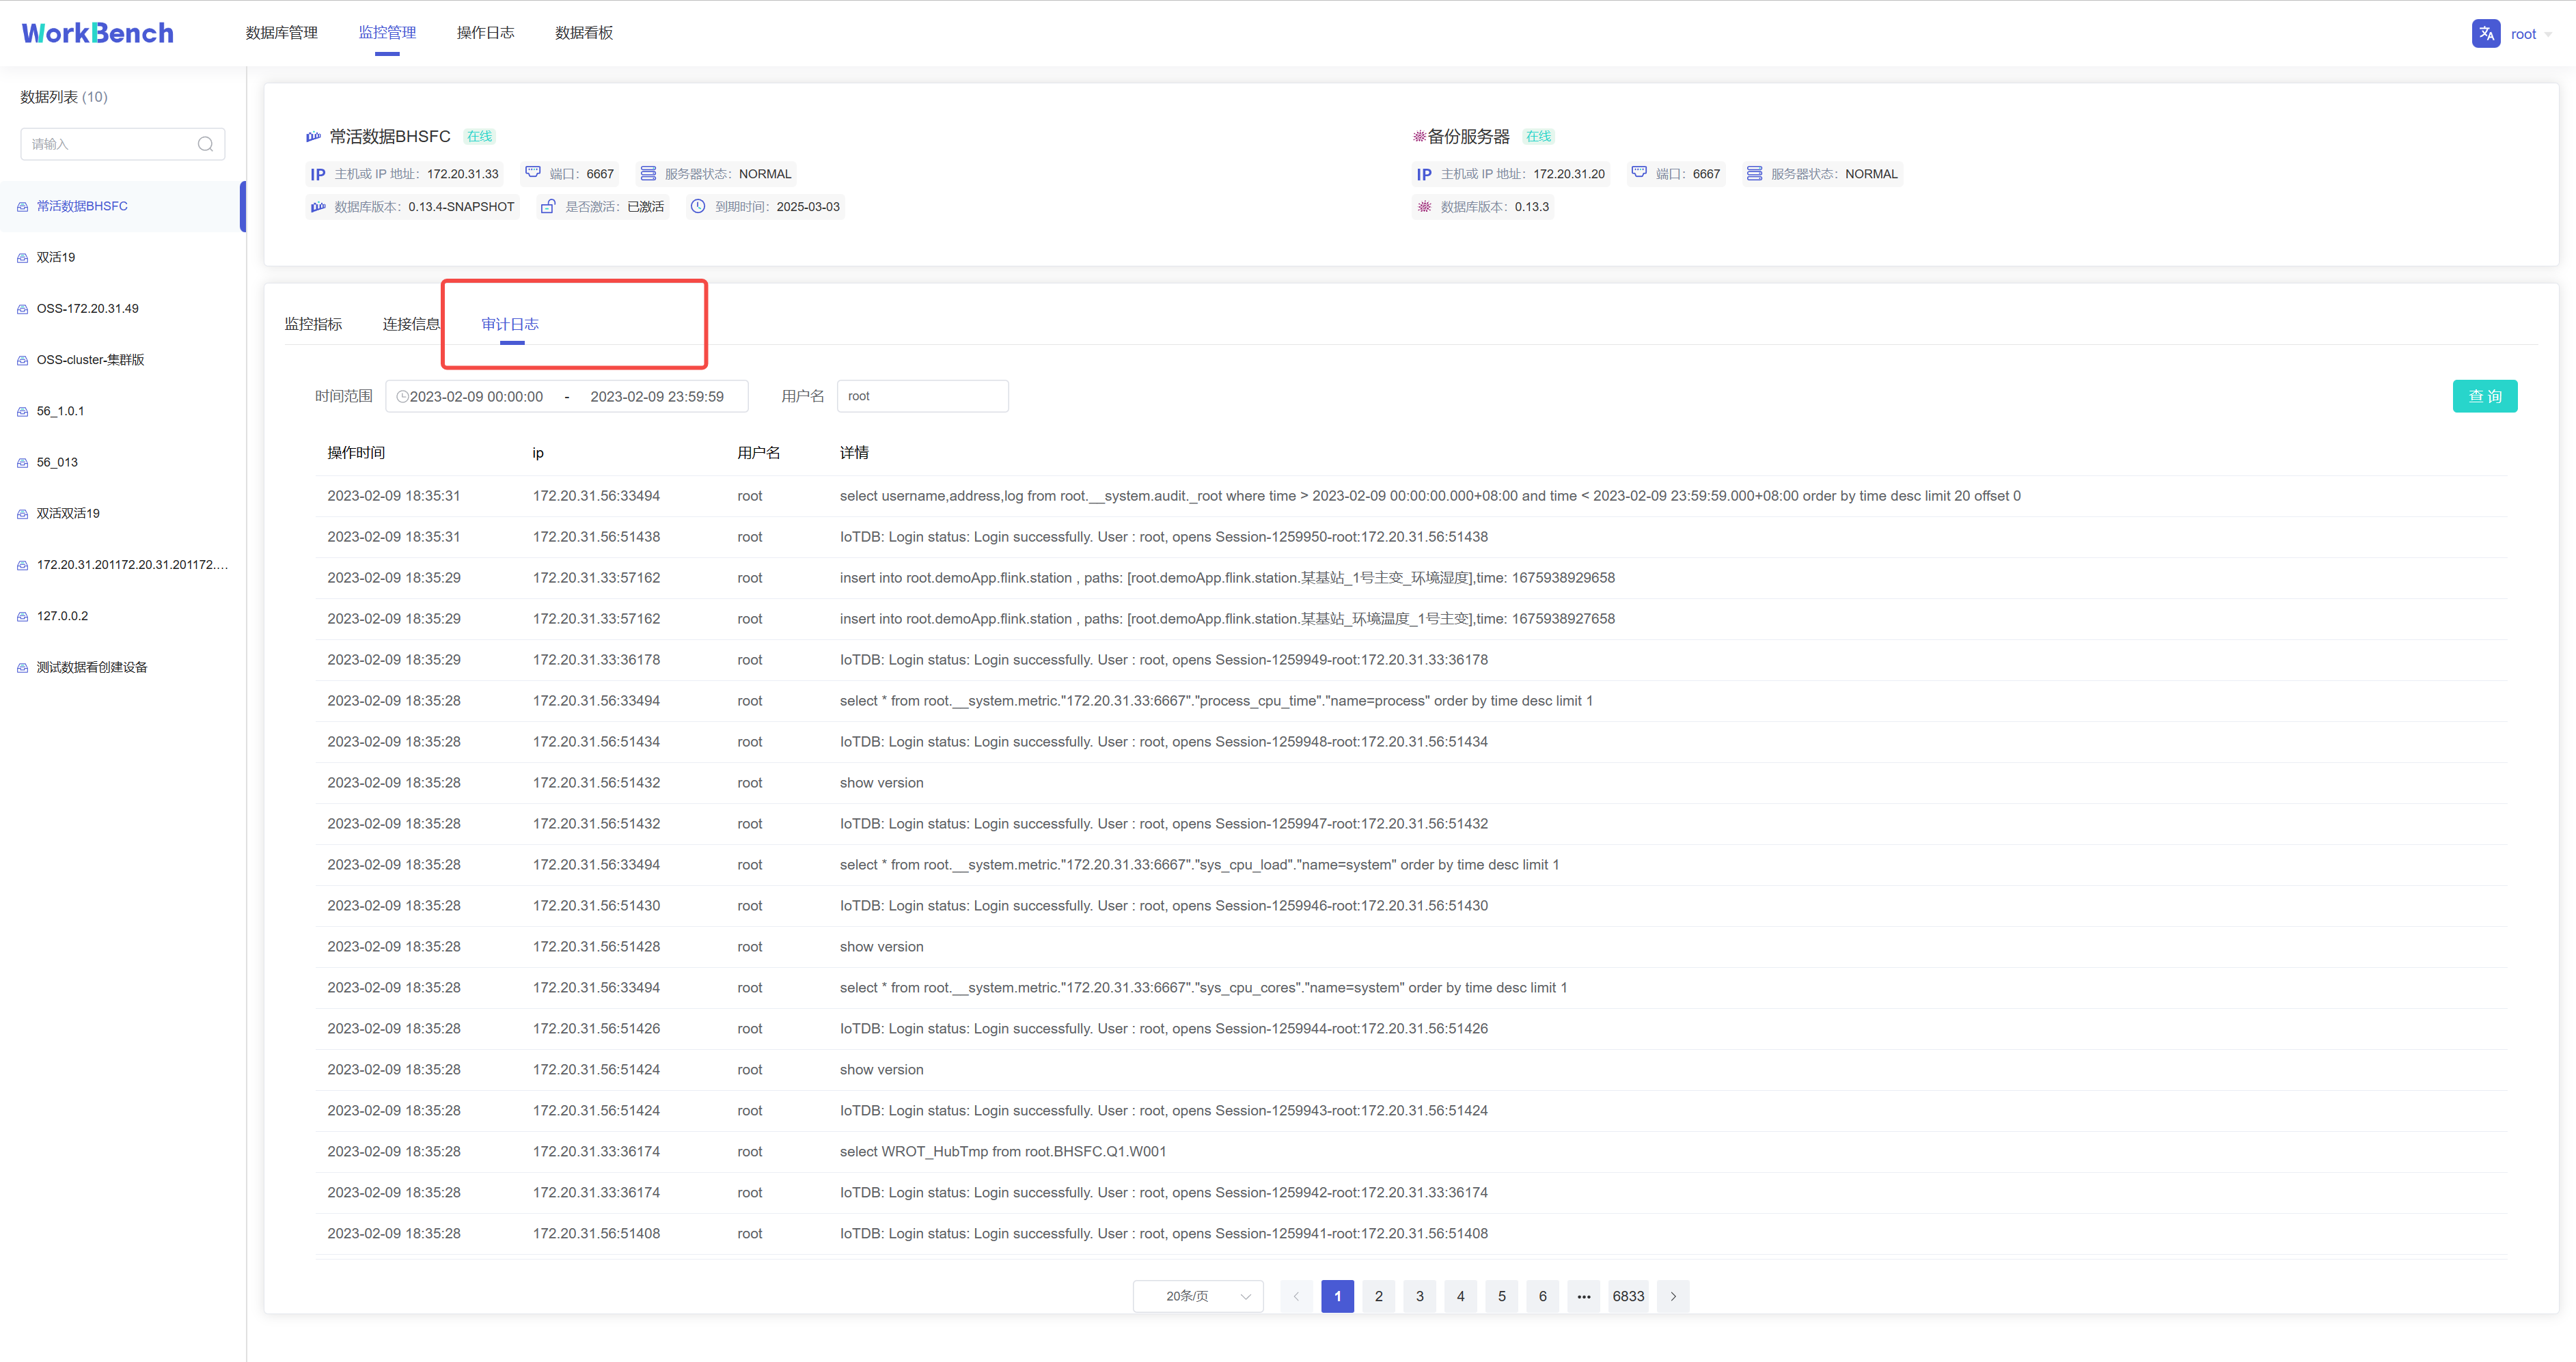
+**审计日志**
+
+审计日志显示所有在IoTDB执行的操作,Workbench提供查询接口,可按时间段或用户名进行查询。"审计日志"功能仅在企业版中支持。
+
+
+
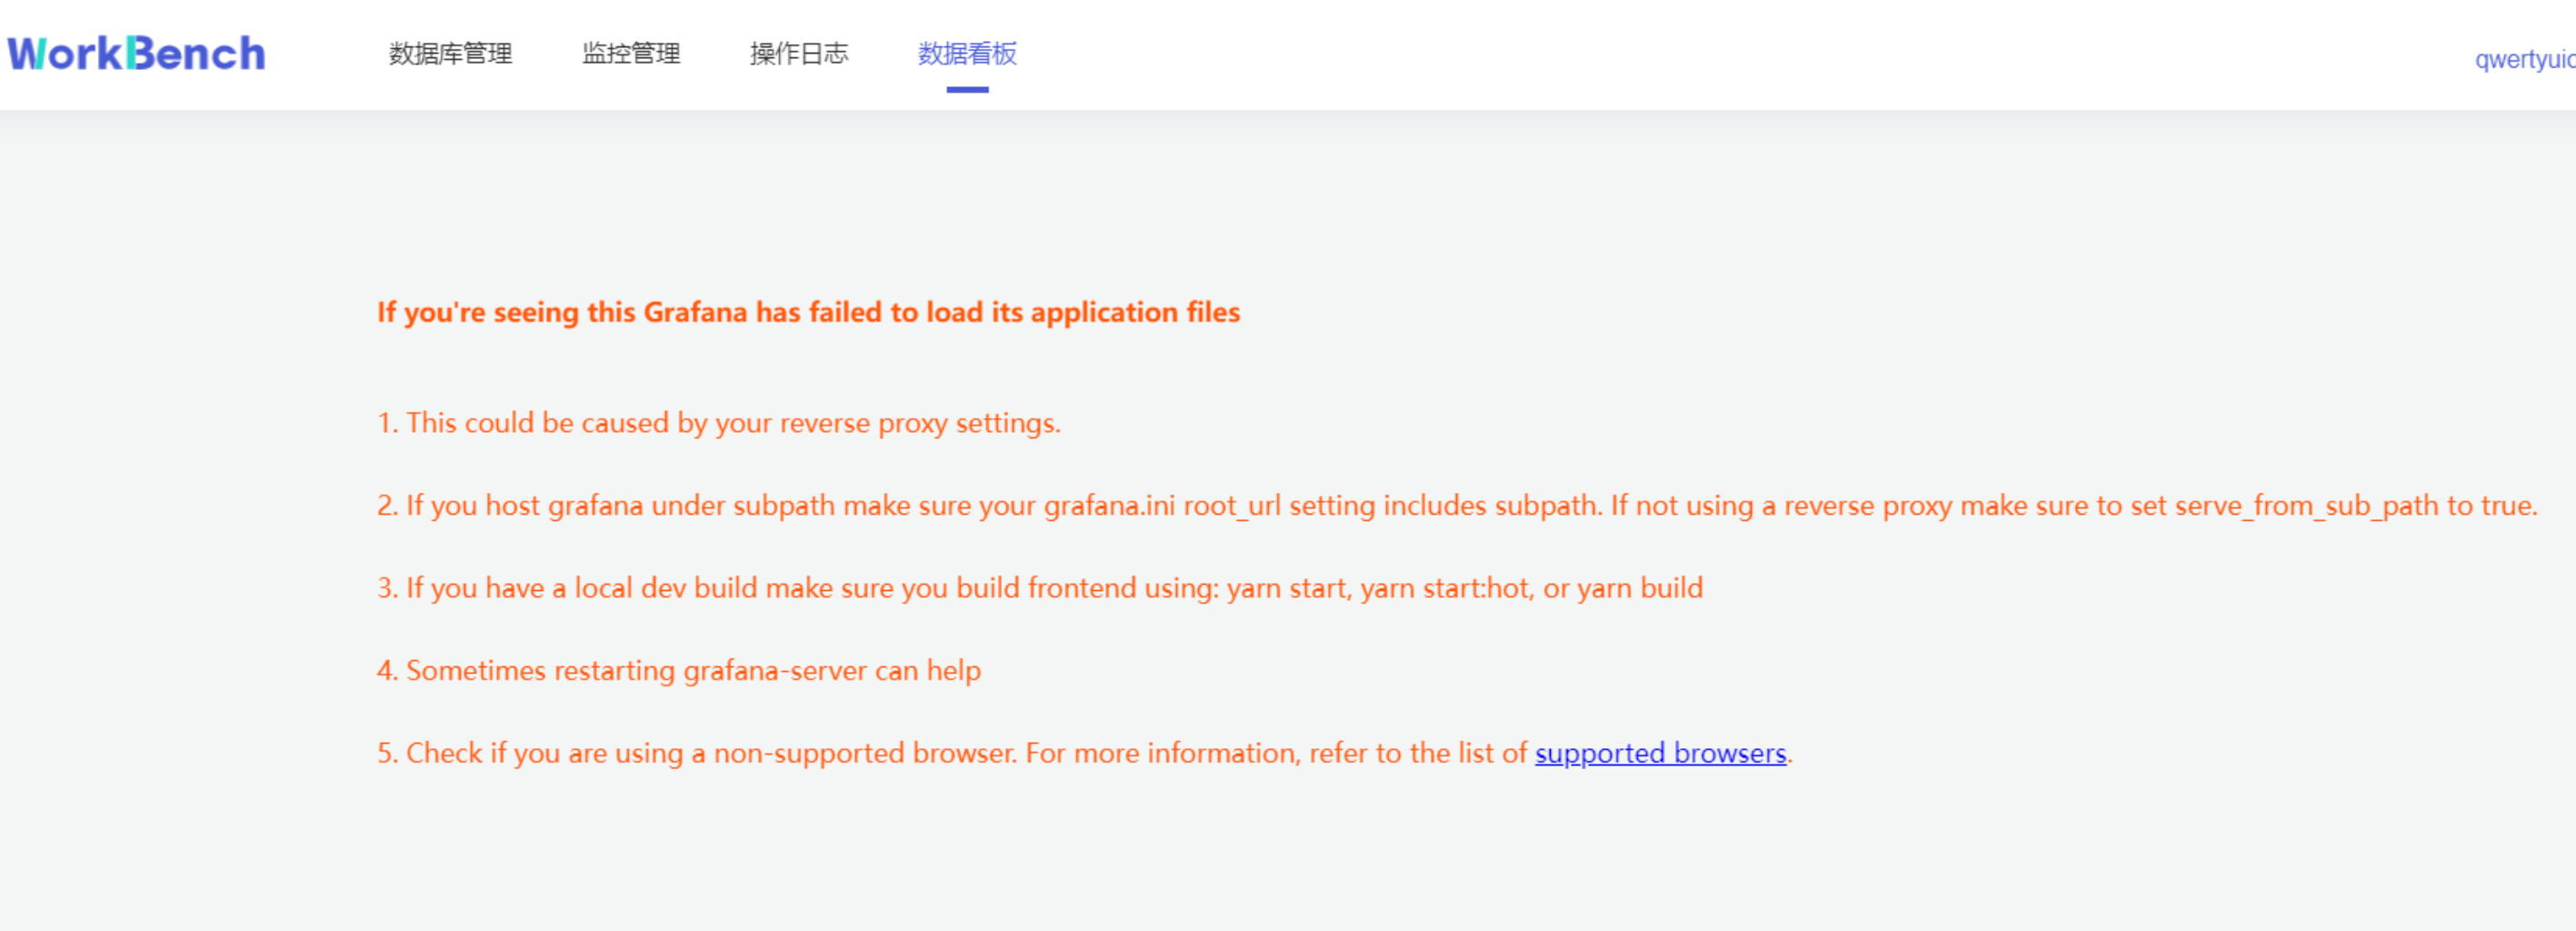
+## 数据看板
+
+数据看板可供创建数据库数据的直观表示,下图为挂载Grafana模板的仪表盘。
+
+
+
+**配置**
+
+**文件配置**
+
+在文件application-prod.properties中配置看板地址,找到配置项url.dashboard=https://grafana.com/,填写grafana
+URL。
+
+application-prod.properties源文件内容:
+ ```plain Text
+# Designate the log configuration file
+logging.config=classpath:log4j2.xml
+
+# Set port and context path
+server.port=9090
+server.servlet.context-path=/api
+
+# The following data source configuration method will cause data loss after
the project is repackaged.
+# To facilitate testing during development, refer to the
application-prod.properties file for configuration during actual project
deployment
+# sqlite
+spring.datasource.url=jdbc:sqlite:./iotdb.db
+spring.datasource.driver-class-name=org.sqlite.JDBC
+# mysql
+#spring.datasource.driver-class-name=com.mysql.cj.jdbc.Driver
+#spring.datasource.url=jdbc:mysql://
+#spring.datasource.username=
+#spring.datasource.password=
+
+# Enable the multipart uploading function
+spring.servlet.multipart.enabled=true
+spring.servlet.multipart.file-size-threshold=2KB
+spring.servlet.multipart.max-file-size=200MB
+spring.servlet.multipart.max-request-size=215MB
+
+# All files generated during CSV import and export are stored in this folder
+file.temp-dir=./tempFile
+
+spring.messages.basename=messages
+
+# enable open audit in iotdb
+enableIotdbAudit = false
+# enable open audit in workbench:
+enableWorkbenchAudit = true
+# timechodb config server rpc port
+configServerPort=8867
+# dashboard url
+url.dashboard=https://grafana.com/
+ ```
+
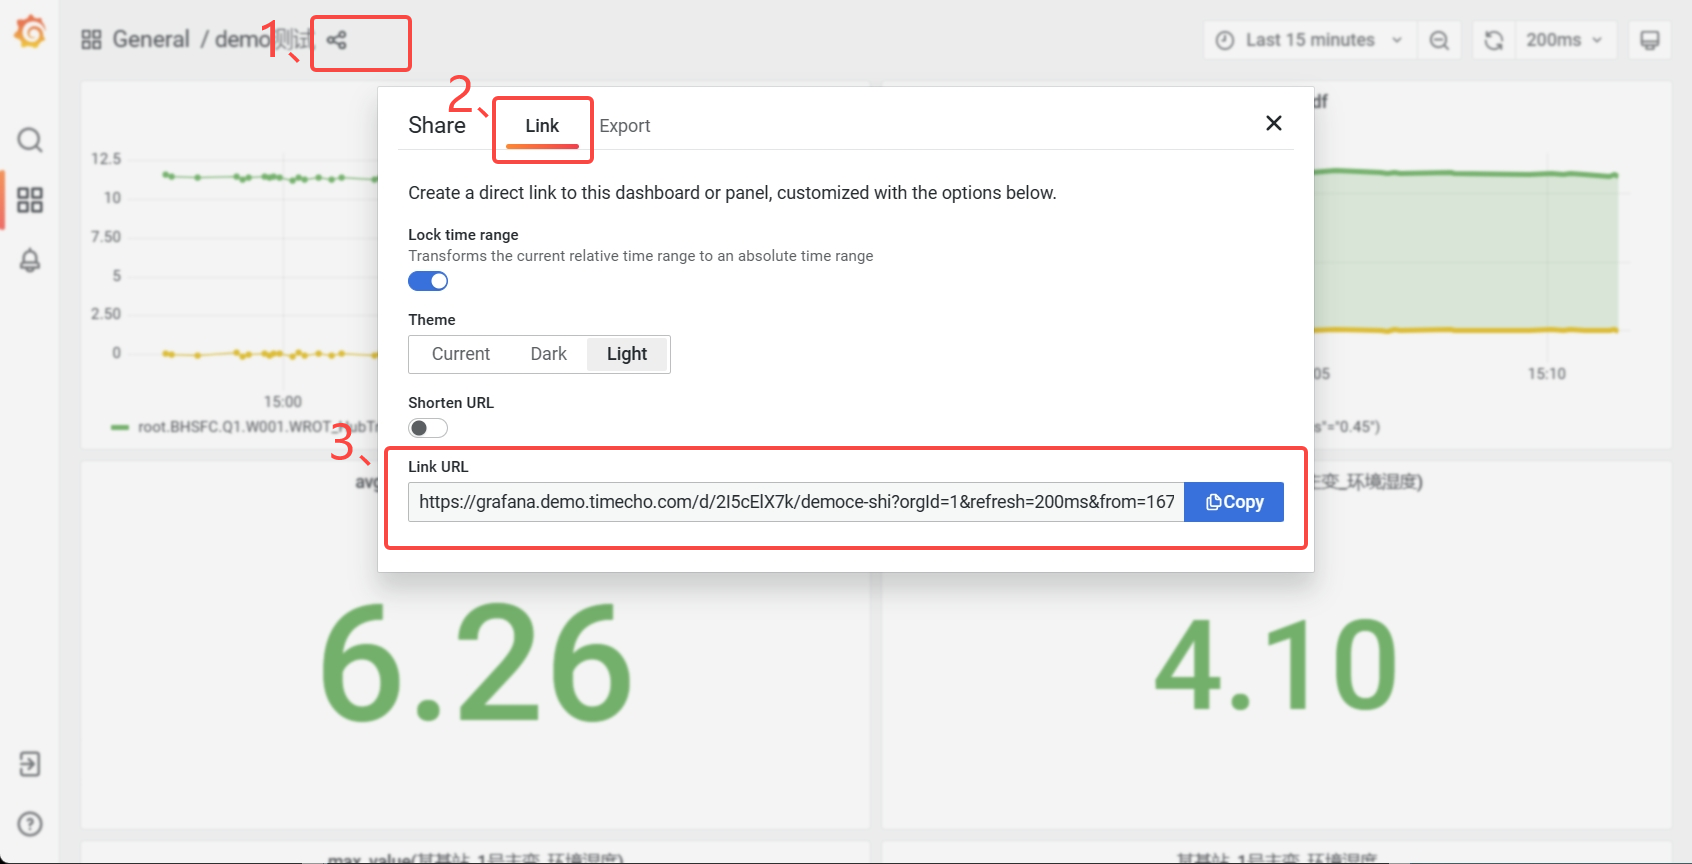
+**URL获取**
+
+登录Grafan面板,点击分享按钮,在弹出的窗口选择"**Link**",复制"**Link
+URL**"即可。
+
+
+
+## Q&A
+
+1. 如果遇到以下情况,请尝试退出"无痕模式"或者更换浏览器。
+
+
+
+2. 如果看不到监控信息,需要开启IoTDB的Metric。
+
+3. 双活配置发生变化时需建议重新建立连接。
+
diff --git a/src/zh/UserGuide/Master/Tools-System/Maintenance-Tool.md
b/src/zh/UserGuide/Master/Tools-System/Maintenance-Tool.md
index 611840b..bb5cb2b 100644
--- a/src/zh/UserGuide/Master/Tools-System/Maintenance-Tool.md
+++ b/src/zh/UserGuide/Master/Tools-System/Maintenance-Tool.md
@@ -20,165 +20,6 @@
-->
# 运维工具
-## 集群管理工具
-以本地环境为例,演示 IoTDB 集群的启动、扩容与缩容。
-
-**注意:本文档为使用本地不同端口,进行伪分布式环境部署的教程,仅用于练习。在真实环境部署时,一般不需要修改节点端口,仅需配置节点 IPV4
地址或域名即可。**
-
-### 1. 准备启动环境
-
-解压 apache-iotdb-1.0.0-all-bin.zip 至 cluster0 目录。
-
-### 2. 启动最小集群
-
-在 Linux 环境中,部署 1 个 ConfigNode 和 1 个 DataNode(1C1D)集群版,默认 1 副本:
-```
-./cluster0/sbin/start-confignode.sh
-./cluster0/sbin/start-datanode.sh
-```
-
-### 3. 验证最小集群
-
-+ 最小集群启动成功,启动 Cli 进行验证:
-```
-./cluster0/sbin/start-cli.sh
-```
-
-+ 在 Cli 执行 [show cluster
details](https://iotdb.apache.org/zh/UserGuide/Master/Maintenance-Tools/Maintenance-Command.html#%E6%9F%A5%E7%9C%8B%E5%85%A8%E9%83%A8%E8%8A%82%E7%82%B9%E4%BF%A1%E6%81%AF)
- 指令,结果如下所示:
-```
-IoTDB> show cluster details
-+------+----------+-------+---------------+------------+-------------------+----------+-------+--------+-------------------+-----------------+
-|NodeID| NodeType|
Status|InternalAddress|InternalPort|ConfigConsensusPort|RpcAddress|RpcPort|MppPort
|SchemaConsensusPort|DataConsensusPort|
-+------+----------+-------+---------------+------------+-------------------+----------+-------+--------+-------------------+-----------------+
-| 0|ConfigNode|Running| 127.0.0.1| 10710| 10720|
| | | | |
-| 1| DataNode|Running| 127.0.0.1| 10730| |
127.0.0.1| 6667| 10740| 10750| 10760|
-+------+----------+-------+---------------+------------+-------------------+----------+-------+--------+-------------------+-----------------+
-Total line number = 2
-It costs 0.242s
-```
-
-### 4. 准备扩容环境
-
-解压 apache-iotdb-1.0.0-all-bin.zip 至 cluster1 目录和 cluster2 目录
-
-### 5. 修改节点配置文件
-
-对于 cluster1 目录:
-
-+ 修改 ConfigNode 配置:
-
-| **配置项** | **值** |
-|--------------------------------|-----------------|
-| cn\_internal\_address | 127.0.0.1 |
-| cn\_internal\_port | 10711 |
-| cn\_consensus\_port | 10721 |
-| cn\_target\_config\_node\_list | 127.0.0.1:10710 |
-
-+ 修改 DataNode 配置:
-
-| **配置项** | **值** |
-|----------------------------------------|-----------------|
-| dn\_rpc\_address | 127.0.0.1 |
-| dn\_rpc\_port | 6668 |
-| dn\_internal\_address | 127.0.0.1 |
-| dn\_internal\_port | 10731 |
-| dn\_mpp\_data\_exchange\_port | 10741 |
-| dn\_schema\_region\_consensus\_port | 10751 |
-| dn\_data\_region\_consensus\_port | 10761 |
-| dn\_target\_config\_node\_list | 127.0.0.1:10710 |
-
-对于 cluster2 目录:
-
-+ 修改 ConfigNode 配置:
-
-| **配置项** | **值** |
-|--------------------------------|-----------------|
-| cn\_internal\_address | 127.0.0.1 |
-| cn\_internal\_port | 10712 |
-| cn\_consensus\_port | 10722 |
-| cn\_target\_config\_node\_list | 127.0.0.1:10710 |
-
-+ 修改 DataNode 配置:
-
-| **配置项** | **值** |
-|--------------------------------------|-----------------|
-| dn\_rpc\_address | 127.0.0.1 |
-| dn\_rpc\_port | 6669 |
-| dn\_internal\_address | 127.0.0.1 |
-| dn\_internal\_port | 10732 |
-| dn\_mpp\_data\_exchange\_port | 10742 |
-| dn\_schema\_region\_consensus\_port | 10752 |
-| dn\_data\_region\_consensus\_port | 10762 |
-| dn\_target\_config\_node\_list | 127.0.0.1:10710 |
-
-### 6. 集群扩容
-
-将集群扩容至 3 个 ConfigNode 和 3 个 DataNode(3C3D)集群版,
-指令执行顺序为先启动 ConfigNode,再启动 DataNode:
-```
-./cluster1/sbin/start-confignode.sh
-./cluster2/sbin/start-confignode.sh
-./cluster1/sbin/start-datanode.sh
-./cluster2/sbin/start-datanode.sh
-```
-
-### 7. 验证扩容结果
-
-在 Cli 执行 `show cluster details`,结果如下:
-```
-IoTDB> show cluster details
-+------+----------+-------+---------------+------------+-------------------+----------+-------+-------+-------------------+-----------------+
-|NodeID| NodeType|
Status|InternalAddress|InternalPort|ConfigConsensusPort|RpcAddress|RpcPort|MppPort|SchemaConsensusPort|DataConsensusPort|
-+------+----------+-------+---------------+------------+-------------------+----------+-------+-------+-------------------+-----------------+
-| 0|ConfigNode|Running| 127.0.0.1| 10710| 10720|
| | | | |
-| 2|ConfigNode|Running| 127.0.0.1| 10711| 10721|
| | | | |
-| 3|ConfigNode|Running| 127.0.0.1| 10712| 10722|
| | | | |
-| 1| DataNode|Running| 127.0.0.1| 10730| |
127.0.0.1| 6667| 10740| 10750| 10760|
-| 4| DataNode|Running| 127.0.0.1| 10731| |
127.0.0.1| 6668| 10741| 10751| 10761|
-| 5| DataNode|Running| 127.0.0.1| 10732| |
127.0.0.1| 6669| 10742| 10752| 10762|
-+------+----------+-------+---------------+------------+-------------------+----------+-------+-------+-------------------+-----------------+
-Total line number = 6
-It costs 0.012s
-```
-
-### 8. 集群缩容
-
-+ 缩容一个 ConfigNode:
-```
-# 使用 ip:port 移除
-./cluster0/sbin/remove-confignode.sh 127.0.0.1:10711
-
-# 使用节点编号移除
-./cluster0/sbin/remove-confignode.sh 2
-```
-
-+ 缩容一个 DataNode:
-```
-# 使用 ip:port 移除
-./cluster0/sbin/remove-datanode.sh 127.0.0.1:6668
-
-# 使用节点编号移除
-./cluster0/sbin/remove-confignode.sh 4
-```
-
-### 9. 验证缩容结果
-
-在 Cli 执行 `show cluster details`,结果如下:
-```
-IoTDB> show cluster details
-+------+----------+-------+---------------+------------+-------------------+----------+-------+-------+-------------------+-----------------+
-|NodeID| NodeType|
Status|InternalAddress|InternalPort|ConfigConsensusPort|RpcAddress|RpcPort|MppPort|SchemaConsensusPort|DataConsensusPort|
-+------+----------+-------+---------------+------------+-------------------+----------+-------+-------+-------------------+-----------------+
-| 0|ConfigNode|Running| 127.0.0.1| 10710| 10720|
| | | | |
-| 3|ConfigNode|Running| 127.0.0.1| 10712| 10722|
| | | | |
-| 1| DataNode|Running| 127.0.0.1| 10730| |
127.0.0.1| 6667| 10740| 10750| 10760|
-| 5| DataNode|Running| 127.0.0.1| 10732| |
127.0.0.1| 6669| 10742| 10752| 10762|
-+------+----------+-------+---------------+------------+-------------------+----------+-------+-------+-------------------+-----------------+
-Total line number = 4
-It costs 0.005s
-```
-
## 数据文件夹概览工具
diff --git a/src/zh/UserGuide/Master/Tools-System/Workbench.md
b/src/zh/UserGuide/Master/Tools-System/Workbench.md
new file mode 100644
index 0000000..6fe2458
--- /dev/null
+++ b/src/zh/UserGuide/Master/Tools-System/Workbench.md
@@ -0,0 +1,365 @@
+<!--
+
+ Licensed to the Apache Software Foundation (ASF) under one
+ or more contributor license agreements. See the NOTICE file
+ distributed with this work for additional information
+ regarding copyright ownership. The ASF licenses this file
+ to you under the Apache License, Version 2.0 (the
+ "License"); you may not use this file except in compliance
+ with the License. You may obtain a copy of the License at
+
+ http://www.apache.org/licenses/LICENSE-2.0
+
+ Unless required by applicable law or agreed to in writing,
+ software distributed under the License is distributed on an
+ "AS IS" BASIS, WITHOUT WARRANTIES OR CONDITIONS OF ANY
+ KIND, either express or implied. See the License for the
+ specific language governing permissions and limitations
+ under the License.
+
+-->
+
+
+## Workbench简介
+
+Workbench是一个可创建多个连接的图形化数据库管理工具,用于管理IoTDB,提供元数据的可视化与管理、数据的增删改查以及权限控制等功能。Workbench不仅满足专业开发人员的所有需求,同时简洁友好的界面设计对初学者来说也易于上手。
+
+## 安装
+
+如果你在安装过程中遇到任何问题,你可以参考文档或向软件供应商或技术支持团队寻求帮助。
+
+环境要求:JDK1.8.0_162及以上。
+
+1. 下载并解压软件。第一步是从官方网站或一个可信赖的来源下载软件,下载地址为https://www.timecho.com/product 。
+2. 启动后端服务。输入指令:
+```
+java -jar workbench.jar
+```
+或:
+```
+nohup java -jar workbench.jar >/dev/null 2>&1 &
+```
+默认端口为 9090;
+
+1. 访问web界面。默认地址为`IP:9090`。
+
+## 登录
+
+默认用户名为root,密码为123456。用户名必须由字母、数字、下划线组成,不能以数字和下划线开始,须大于等于4个字符,密码必须大于等于6位。点击"**文A**"可切换语言,有中文、英文可选。
+
+
+
+## 用户界面
+
+**主界面**
+
+主界面由操作栏、导航栏、工具栏和几个窗格组成。
+
+
+
+1、连接操作栏
+
+可以新建数据库的连接或者数据库的查询。
+
+2、对象窗格
+
+对象窗格显示已连接的数据库实例,采用树状结构设计,点击出现子节点可以方便地处理数据库和它们管理的对象,展示的最低层级是设备。
+
+
+
+3、导航栏
+
+导航栏可选择"**数据库管理**"、"**监控管理**"、"**操作日志**"、"**数据看板**"。
+
+4、状态栏
+
+状态栏显示当前选项下的状态信息,当选中"**数据库管理**"时,状态栏显示数据库的在线情况、IP、端口、服务器状态及其存储组、设备、物理量的数量信息。
+
+
+
+当选\"**监控管理**\"时,状态栏显示数据库的在线情况、IP、端口、服务器状态、数据库版本、激活信息及到期时间。z注:"**数据库版本**"处的图标表示企业版或开源版,Workbench部分功能在开源版上无法使用。
+
+
+
+5、操作列
+
+操作列可以选择任意选项进行操作。
+
+6、信息窗格
+
+信息窗格显示对象的详细信息。
+
+## 连接
+
+首先用连接窗口创建一个或多个连接。点击"**数据连接**"创建新建连接。
+
+
+
+在弹出的连接窗口输入需要填写的信息,其中数据连接名称必须大于等于3个字符。然后点击"**连接测试**",显示"**连接测试通过**"则表示正确连接,点击确定即可新建连接。
+
+
+
+若要修改连接情况,则可在状态栏右侧点"**编辑**"选项即可修改数据库连接信息。
+
+
+
+## 服务器安全性
+
+**白名单**
+
+企业版IoTDB可以通过添加白名单列表来设置允许访问IoTDB的IP。使用开源版IoTDB连接Workbench无法使用该功能。
+
+从导航栏选择"**数据库管理**"-\>"**白名单**"可查看已添加的白名单IP列表。
+
+
+
+点击"**白名单**"可新增白名单IP,点击"**编辑**"/"**删除**"可修改白名单列表的IP信息。
+
+**权限管理**
+
+Workbench提供强大的工具以管理服务器用户帐号和数据库对象的权限。在操作列中点击
+"**数据库用户管理**"或 "**数据库角色管理**"来打开用户或角色的对象列表。
+
+
+
+**新增用户**。选择"**数据库用户管理**"-\>"**用户账号+**"可新增用户,按要求填写用户名和密码即可,可以为用户添加角色信息。
+
+
+
+**添加权限**。权限可分为数据管理权限(如对数据进行增删改查)以及权限管理权限(用户、角色的创建与删除,权限的赋予与撤销等)。选择"**数据库用户管理**"-\>"**数据管理权限**"-\>"**添加权限**"可为用户添加数据管理权限。在已添加的权限处可以选择"**编辑**"或"**删除**"以修改权限信息。
+
+
+
+弹出的界面可以选择权限作用的粒度以及具体权限内容。注意只有勾选【查询数据】权限和【查看用户】权限,其他权限才能在Workbench中生效查看。
+
+
+
+选择"**数据库用户管理**"-\>"**权限管理权限**"勾选信息窗格中具体的权限信息,点击"保存"可为用户添加权限管理权限。
+
+
+
+**权限预览**。选择"**数据库用户管理**"-\>"**数据权限预览**"可预览该用户名下所有的数据权限。注:该功能仅支持企业版。
+
+## 数据迁移
+
+导入导出工具可将CSV格式的文件批量导入或导出IoTDB。
+
+**批量导入**
+
+批量导入功能仅在企业版中支持。在对象窗格中选择要操作的数据库,选择到设备节点,则右侧信息窗格将出现"**设备结构"**信息,点击"**导入物理量**",下载模板填写物理量信息,再上传该CSV文件即可批量导入物理量。注:当前版本不支持导入对齐物理量。
+
+
+
+选择"**数据预览**"-\>"**批量导入**"则可将符合模板要求的CSV文件数据导入,当前支持导入对齐时间序列。
+
+
+
+**批量导出**
+
+批量导出功能仅在企业版中支持。在对象窗格中选择要操作的数据库,进入设备节点,选择"**设备结构**"-\>"**导出物理量**"即可批量导出该实体下的物理量元数据。搜索框内可输入名称/别名、标签名称、标签值进行过滤。
+
+
+
+选择"**数据预览**"-\>"**导出数据**"则可批量导出该实体下的数据。搜索框内可按时间范围、时间间隔和物理量进行过滤。
+
+
+
+## 数据预览
+
+Workbench提供多层次的数据预览工具。
+
+**数据模型**
+
+在对象窗格中选择要预览的数据连接,点击操作列的"**数据模型**"即可预览数据模型,root被定义为LEVEL=0,Workbench中默认显示到LEVEL=1,点击"**查看更多**"可查看更多层级的数据模型信息。"**查看更多**"功能仅在企业版中支持。
+
+
+
+**存储组信息**
+
+点击操作列的"**存储组信息**"即可预览该数据连接的所有存储组信息,点击"**详情**"可查看该存储组下的实体详情,继续点击实体详情可查看物理量详情。点击"**编辑**"可编辑该存储组的TTL信息。
+
+
+
+## 查询
+
+Workbench提供强大的查询工具,可直接编辑查询文本,保存查询,用于简化查询行任务。
+
+**新建查询**
+
+点击"**连接操作栏**"的"**查询**",选择要进行操作的数据连接,即可进入查询编辑器。
+
+
+
+在查询编辑器界面可输入SQL语句,提示框会提示符合条件的关键字。右侧可按要求选择函数或数据进行计算。
+
+{width="5.90625in"
height="3.125in"}
+
+输入SQL语句后,点击右上角可选择操作,分别是"保存"、"运行"、"暂停"和"删除"。运行结果显示10行每页,默认限制返回结果100行,也可选择取消限制全部展示。
+
+
+
+**查看查询**
+
+已保存的连接可在对象窗格中该数据连接下的"**查询**"下查看。
+
+
+
+## 集群管理
+
+**拓扑管理**
+
+Workbench提供对集群拓扑图的查看。选择"**数据库管理**"-\>"**节点管理**"\>"**拓扑管理**"可以查看拓扑图。"拓扑管理"功能仅在企业版中支持。
+
+
+
+拓扑图显示节点IP、节点类型及端口。
+
+
+
+**节点管理**
+
+Workbench提供对集群节点的管理。选择"**数据库管理**"-\>"**节点管理**"可以查看节点状态。可按节点ID或节点类型进行查询。
+
+
+
+**分区管理**
+
+Workbench提供对集群分区的管理。选择"**数据库管理**"-\>"**分区管理**"可以查看分区状态。可按分区ID或分区类型进行查询。
+
+
+
+## 存储组管理
+
+**新增存储组**
+
+在对象窗格中选择要操作的数据库对象,点击"**新建存储组**"即可创建存储组,存储组名称为必填,存储组名称为必填,正常情况下只能输入字母、数字、下划线以及UNICODE
+中文字符如果包含特殊字符,请使用反引号。存活时间选填。
+
+
+
+**删除存储组**
+
+在对象窗格中选择要操作的存储组,在操作列中选择"**编辑**"可修改存储组存活时间,选择"**删除**"可删除存储组。
+
+
+
+## 设备及物理量管理
+
+**新建物理量**
+
+在对象窗格中选择要操作的存储组,点击"**新建设备**",按要求填写信息则可创建该存储组下的物理量。物理量名称名称为必填,正常情况下只能输入字母、数字、下划线以及UNICODE
+中文字符如果包含特殊字符,请使用反引号。
+
+
+
+**数据趋势预览**
+
+"数据趋势"功能仅在企业版中支持。在对象窗格中选定存储组,"**数据趋势**"显示该存储组下的物理量趋势图表,单击图表显示详细信息,可选定时间范围查询该区间内的数据,并显示最小值等数据
+
+
+
+**修改、删除物理量**
+
+在对象窗格中选择要操作的设备
+,点击右侧的"**编辑**"可修改该设备下的物理量信息(别名、标签和属性)。点击"**删除**"则可删除该设备。
+
+
+
+## 操作日志
+
+"操作日志"提供所有在Workbench上进行的操作记录,可按IP、用户、数据连接、关键词和时间范围进行筛选。
+
+
+
+## 监控管理
+
+Workbench提供"**监控管理**"提供来查看已选择的服务器监控属性。从导航栏选择"**监控管理**"并选择你想要的监控类型。可选"**监控指标**","**连接信息**","**审计日志**"。
+
+**监控指标**
+
+监控指标可供查看CPU指标、内存指标和存储指标的最新信息。
+
+
+
+**连接信息**
+
+连接信息可供查看连接到Workbench的用户和服务器信息。"连接信息"功能仅在企业版中支持。
+
+
+
+**审计日志**
+
+审计日志显示所有在IoTDB执行的操作,Workbench提供查询接口,可按时间段或用户名进行查询。"审计日志"功能仅在企业版中支持。
+
+
+
+## 数据看板
+
+数据看板可供创建数据库数据的直观表示,下图为挂载Grafana模板的仪表盘。
+
+
+
+**配置**
+
+**文件配置**
+
+在文件application-prod.properties中配置看板地址,找到配置项url.dashboard=https://grafana.com/,填写grafana
+URL。
+
+application-prod.properties源文件内容:
+ ```plain Text
+# Designate the log configuration file
+logging.config=classpath:log4j2.xml
+
+# Set port and context path
+server.port=9090
+server.servlet.context-path=/api
+
+# The following data source configuration method will cause data loss after
the project is repackaged.
+# To facilitate testing during development, refer to the
application-prod.properties file for configuration during actual project
deployment
+# sqlite
+spring.datasource.url=jdbc:sqlite:./iotdb.db
+spring.datasource.driver-class-name=org.sqlite.JDBC
+# mysql
+#spring.datasource.driver-class-name=com.mysql.cj.jdbc.Driver
+#spring.datasource.url=jdbc:mysql://
+#spring.datasource.username=
+#spring.datasource.password=
+
+# Enable the multipart uploading function
+spring.servlet.multipart.enabled=true
+spring.servlet.multipart.file-size-threshold=2KB
+spring.servlet.multipart.max-file-size=200MB
+spring.servlet.multipart.max-request-size=215MB
+
+# All files generated during CSV import and export are stored in this folder
+file.temp-dir=./tempFile
+
+spring.messages.basename=messages
+
+# enable open audit in iotdb
+enableIotdbAudit = false
+# enable open audit in workbench:
+enableWorkbenchAudit = true
+# timechodb config server rpc port
+configServerPort=8867
+# dashboard url
+url.dashboard=https://grafana.com/
+ ```
+
+**URL获取**
+
+登录Grafan面板,点击分享按钮,在弹出的窗口选择"**Link**",复制"**Link
+URL**"即可。
+
+
+
+## Q&A
+
+1. 如果遇到以下情况,请尝试退出"无痕模式"或者更换浏览器。
+
+
+
+2. 如果看不到监控信息,需要开启IoTDB的Metric。
+
+3. 双活配置发生变化时需建议重新建立连接。