This is an automated email from the ASF dual-hosted git repository.

leirui pushed a commit to branch rl
in repository https://gitbox.apache.org/repos/asf/iotdb-docs.git
The following commit(s) were added to refs/heads/rl by this push:
new f70051a fix header numbering
f70051a is described below
commit f70051aeab57db928c6d59d77593ae0c08bdab1e
Author: Lei Rui <[email protected]>
AuthorDate: Fri Jul 28 23:25:08 2023 +0800
fix header numbering
---
.../Master/API/Programming-Go-Native-API.md | 6 +--
src/UserGuide/Master/API/Programming-JDBC.md | 10 ++--
src/UserGuide/Master/API/Programming-MQTT.md | 14 ++---
.../Master/API/Programming-Python-Native-API.md | 62 +++++++++++-----------
src/UserGuide/Master/API/Programming-TsFile-API.md | 20 +++----
.../Administration-Management/Administration.md | 10 ++--
.../Basic-Concept/Encoding-and-Compression.md | 11 ++--
src/UserGuide/Master/Cluster/Cluster-Concept.md | 4 +-
src/UserGuide/Master/Cluster/Cluster-Setup.md | 60 +++++++++++----------
src/UserGuide/Master/Data-Modeling/DataRegion.md | 10 ++--
.../Master/Data-Modeling/SchemaRegion-rocksdb.md | 10 ++--
.../Deployment-and-Maintenance/Docker-Install.md | 6 +--
.../Master/Ecosystem-Integration/DBeaver.md | 10 ++--
.../Master/Ecosystem-Integration/Flink-IoTDB.md | 14 ++---
.../Master/Ecosystem-Integration/Flink-TsFile.md | 11 ++--
.../Master/Ecosystem-Integration/Grafana-Plugin.md | 38 ++++++-------
.../Master/Ecosystem-Integration/Hive-TsFile.md | 19 ++++---
.../Ecosystem-Integration/MapReduce-TsFile.md | 16 +++---
.../Master/Ecosystem-Integration/Spark-TsFile.md | 18 +++----
.../Ecosystem-Integration/Writing-Data-on-HDFS.md | 10 ++--
.../Master/Ecosystem-Integration/Zeppelin-IoTDB.md | 18 +++----
.../Master/IoTDB-Introduction/Architecture.md | 2 +-
.../Master/IoTDB-Introduction/Features.md | 2 +-
.../Master/IoTDB-Introduction/Publication.md | 2 +
src/UserGuide/Master/Maintenance-Tools/Log-Tool.md | 8 +--
.../Master/Maintenance-Tools/MLogParser-Tool.md | 8 +--
.../Maintenance-Tools/SchemaFileSketch-Tool.md | 8 +--
.../Master/Maintenance-Tools/TsFile-Settle-Tool.md | 9 ++--
.../Master/Maintenance-Tools/Watermark-Tool.md | 10 ++--
src/UserGuide/Master/Monitor-Alert/Metric-Tool.md | 2 +
.../Master/Operators-Functions/Selection.md | 2 +-
.../Master/QuickStart/ClusterQuickStart.md | 20 +++----
src/UserGuide/Master/QuickStart/WayToGetIoTDB.md | 12 ++---
src/UserGuide/Master/Write-Data/Session.md | 1 +
34 files changed, 238 insertions(+), 225 deletions(-)
diff --git a/src/UserGuide/Master/API/Programming-Go-Native-API.md
b/src/UserGuide/Master/API/Programming-Go-Native-API.md
index 7681850..894e677 100644
--- a/src/UserGuide/Master/API/Programming-Go-Native-API.md
+++ b/src/UserGuide/Master/API/Programming-Go-Native-API.md
@@ -19,9 +19,9 @@
-->
-## Go Native API
+# Go Native API
-### Dependencies
+## Dependencies
* golang >= 1.13
* make >= 3.0
@@ -33,7 +33,7 @@
-### Installation
+## Installation
* go mod
diff --git a/src/UserGuide/Master/API/Programming-JDBC.md
b/src/UserGuide/Master/API/Programming-JDBC.md
index 9b2bc43..78aa804 100644
--- a/src/UserGuide/Master/API/Programming-JDBC.md
+++ b/src/UserGuide/Master/API/Programming-JDBC.md
@@ -19,18 +19,18 @@
-->
-## JDBC
+# JDBC
*NOTICE: CURRENTLY, JDBC IS USED FOR CONNECTING SOME THIRD-PART TOOLS.
IT CAN NOT PROVIDE HIGH THROUGHPUT FOR WRITE OPERATIONS.
PLEASE USE [JAVA NATIVE
API](https://iotdb.apache.org/UserGuide/Master/API/Programming-Java-Native-API.html)
INSTEAD*
-### Dependencies
+## Dependencies
* JDK >= 1.8
* Maven >= 3.6
-### Installation
+## Installation
In root directory:
@@ -38,7 +38,7 @@ In root directory:
mvn clean install -pl iotdb-client/jdbc -am -Dmaven.test.skip=true
```
-### Use IoTDB JDBC with Maven
+## Use IoTDB JDBC with Maven
```xml
<dependencies>
@@ -50,7 +50,7 @@ mvn clean install -pl iotdb-client/jdbc -am
-Dmaven.test.skip=true
</dependencies>
```
-### Coding Examples
+## Coding Examples
This chapter provides an example of how to open a database connection, execute
a SQL query, and display the results.
diff --git a/src/UserGuide/Master/API/Programming-MQTT.md
b/src/UserGuide/Master/API/Programming-MQTT.md
index ffd8b57..eb21d15 100644
--- a/src/UserGuide/Master/API/Programming-MQTT.md
+++ b/src/UserGuide/Master/API/Programming-MQTT.md
@@ -7,9 +7,9 @@
to you under the Apache License, Version 2.0 (the
"License"); you may not use this file except in compliance
with the License. You may obtain a copy of the License at
-
+
http://www.apache.org/licenses/LICENSE-2.0
-
+
Unless required by applicable law or agreed to in writing,
software distributed under the License is distributed on an
"AS IS" BASIS, WITHOUT WARRANTIES OR CONDITIONS OF ANY
@@ -18,7 +18,7 @@
under the License.
-->
-## MQTT Protocol
+# MQTT Protocol
[MQTT](http://mqtt.org/) is a machine-to-machine (M2M)/"Internet of Things"
connectivity protocol.
It was designed as an extremely lightweight publish/subscribe messaging
transport.
@@ -30,7 +30,7 @@ IoTDB server includes a built-in MQTT service that allows
remote devices send me
<img style="width:100%; max-width:800px; max-height:600px; margin-left:auto;
margin-right:auto; display:block;"
src="https://alioss.timecho.com/docs/img/github/78357432-0c71cf80-75e4-11ea-98aa-c43a54d469ce.png";>
-### Built-in MQTT Service
+## Built-in MQTT Service
The Built-in MQTT Service provide the ability of direct connection to IoTDB
through MQTT. It listen the publish messages from MQTT clients
and then write the data into storage immediately.
The MQTT topic corresponds to IoTDB timeseries.
@@ -58,7 +58,7 @@ or json array of the above two.
<img style="width:100%; max-width:800px; max-height:600px; margin-left:auto;
margin-right:auto; display:block;"
src="https://alioss.timecho.com/docs/img/github/78357469-1bf11880-75e4-11ea-978f-a53996667a0d.png";>
-### MQTT Configurations
+## MQTT Configurations
The IoTDB MQTT service load configurations from
`${IOTDB_HOME}/${IOTDB_CONF}/iotdb-datanode.properties` by default.
Configurations are as follows:
@@ -73,7 +73,7 @@ Configurations are as follows:
| mqtt_max_message_size | the max mqtt message size in byte| 1048576 |
-### Coding Examples
+## Coding Examples
The following is an example which a mqtt client send messages to IoTDB server.
```java
@@ -101,7 +101,7 @@ connection.disconnect();
```
-### Customize your MQTT Message Format
+## Customize your MQTT Message Format
If you do not like the above Json format, you can customize your MQTT Message
format by just writing several lines
of codes. An example can be found in `example/mqtt-customize` project.
diff --git a/src/UserGuide/Master/API/Programming-Python-Native-API.md
b/src/UserGuide/Master/API/Programming-Python-Native-API.md
index 173d643..4905cf0 100644
--- a/src/UserGuide/Master/API/Programming-Python-Native-API.md
+++ b/src/UserGuide/Master/API/Programming-Python-Native-API.md
@@ -19,15 +19,15 @@
-->
-## Python Native API
+# Python Native API
-### Requirements
+## Requirements
You have to install thrift (>=0.13) before using the package.
-### How to use (Example)
+## How to use (Example)
First, download the package: `pip3 install apache-iotdb`
@@ -52,7 +52,7 @@ zone = session.get_time_zone()
session.close()
```
-### Initialization
+## Initialization
* Initialize a Session
@@ -94,11 +94,11 @@ Notice: this RPC compression status of client must comply
with that of IoTDB ser
```python
session.close()
```
-### Managing Session through SessionPool
+## Managing Session through SessionPool
Utilizing SessionPool to manage sessions eliminates the need to worry about
session reuse. When the number of session connections reaches the maximum
capacity of the pool, requests for acquiring a session will be blocked, and you
can set the blocking wait time through parameters. After using a session, it
should be returned to the SessionPool using the `putBack` method for proper
management.
-##### Create SessionPool
+### Create SessionPool
```python
pool_config = PoolConfig(host=ip,port=port, user_name=username,
@@ -110,7 +110,7 @@ wait_timeout_in_ms = 3000
# # Create the connection pool
session_pool = SessionPool(pool_config, max_pool_size, wait_timeout_in_ms)
```
-##### Create a SessionPool using distributed nodes.
+### Create a SessionPool using distributed nodes.
```python
pool_config = PoolConfig(node_urls=node_urls=["127.0.0.1:6667",
"127.0.0.1:6668", "127.0.0.1:6669"], user_name=username,
password=password, fetch_size=1024,
@@ -118,7 +118,7 @@ pool_config =
PoolConfig(node_urls=node_urls=["127.0.0.1:6667", "127.0.0.1:6668"
max_pool_size = 5
wait_timeout_in_ms = 3000
```
-##### Acquiring a session through SessionPool and manually calling PutBack
after use
+### Acquiring a session through SessionPool and manually calling PutBack after
use
```python
session = session_pool.get_session()
@@ -132,9 +132,9 @@ session_pool.put_back(session)
session_pool.close()
```
-### Data Definition Interface (DDL Interface)
+## Data Definition Interface (DDL Interface)
-#### Database Management
+### Database Management
* CREATE DATABASE
@@ -148,7 +148,7 @@ session.set_storage_group(group_name)
session.delete_storage_group(group_name)
session.delete_storage_groups(group_name_lst)
```
-#### Timeseries Management
+### Timeseries Management
* Create one or multiple timeseries
@@ -184,9 +184,9 @@ session.delete_time_series(paths_list)
session.check_time_series_exists(path)
```
-### Data Manipulation Interface (DML Interface)
+## Data Manipulation Interface (DML Interface)
-#### Insert
+### Insert
It is recommended to use insertTablet to help improve write efficiency.
@@ -310,7 +310,7 @@ session.insert_records(
session.insert_records_of_one_device(device_id, time_list, measurements_list,
data_types_list, values_list)
```
-#### Insert with type inference
+### Insert with type inference
When the data is of String type, we can use the following interface to perform
type inference based on the value of the value itself. For example, if value is
"true" , it can be automatically inferred to be a boolean type. If value is
"3.2" , it can be automatically inferred as a flout type. Without type
information, server has to do type inference, which may cost some time.
@@ -320,7 +320,7 @@ When the data is of String type, we can use the following
interface to perform t
session.insert_str_record(device_id, timestamp, measurements, string_values)
```
-#### Insert of Aligned Timeseries
+### Insert of Aligned Timeseries
The Insert of aligned timeseries uses interfaces like insert_aligned_XXX, and
others are similar to the above interfaces:
@@ -331,7 +331,7 @@ The Insert of aligned timeseries uses interfaces like
insert_aligned_XXX, and ot
* insert_aligned_tablets
-### IoTDB-SQL Interface
+## IoTDB-SQL Interface
* Execute query statement
@@ -351,8 +351,8 @@ session.execute_non_query_statement(sql)
session.execute_statement(sql)
```
-### Schema Template
-#### Create Schema Template
+## Schema Template
+### Create Schema Template
The step for creating a metadata template is as follows
1. Create the template class
2. Adding MeasurementNode
@@ -371,7 +371,7 @@ template.add_template(m_node_z)
session.create_schema_template(template)
```
-#### Modify Schema Template measurements
+### Modify Schema Template measurements
Modify measurements in a template, the template must be already created. These
are functions that add or delete some measurement nodes.
* add node in template
```python
@@ -383,17 +383,17 @@ session.add_measurements_in_template(template_name,
measurements_path, data_type
session.delete_node_in_template(template_name, path)
```
-#### Set Schema Template
+### Set Schema Template
```python
session.set_schema_template(template_name, prefix_path)
```
-#### Uset Schema Template
+### Uset Schema Template
```python
session.unset_schema_template(template_name, prefix_path)
```
-#### Show Schema Template
+### Show Schema Template
* Show all schema templates
```python
session.show_all_templates()
@@ -428,14 +428,14 @@ session.show_paths_template_set_on(template_name)
session.show_paths_template_using_on(template_name)
```
-#### Drop Schema Template
+### Drop Schema Template
Delete an existing metadata template,dropping an already set template is not
supported
```python
session.drop_schema_template("template_python")
```
-### Pandas Support
+## Pandas Support
To easily transform a query result to a [Pandas
Dataframe](https://pandas.pydata.org/pandas-docs/stable/reference/api/pandas.DataFrame.html)
the SessionDataSet has a method `.todf()` which consumes the dataset and
transforms it to a pandas dataframe.
@@ -463,7 +463,7 @@ df = ...
```
-### IoTDB Testcontainer
+## IoTDB Testcontainer
The Test Support is based on the lib `testcontainers`
(https://testcontainers-python.readthedocs.io/en/latest/index.html) which you
need to install in your project if you want to use the feature.
@@ -482,12 +482,12 @@ class MyTestCase(unittest.TestCase):
by default it will load the image `apache/iotdb:latest`, if you want a
specific version just pass it like e.g. `IoTDBContainer("apache/iotdb:0.12.0")`
to get version `0.12.0` running.
-### IoTDB DBAPI
+## IoTDB DBAPI
IoTDB DBAPI implements the Python DB API 2.0 specification
(https://peps.python.org/pep-0249/), which defines a common
interface for accessing databases in Python.
-#### Examples
+### Examples
+ Initialization
The initialized parameters are consistent with the session part (except for
the sqlalchemy_mode).
@@ -536,11 +536,11 @@ cursor.close()
conn.close()
```
-### IoTDB SQLAlchemy Dialect (Experimental)
+## IoTDB SQLAlchemy Dialect (Experimental)
The SQLAlchemy dialect of IoTDB is written to adapt to Apache Superset.
This part is still being improved.
Please do not use it in the production environment!
-#### Mapping of the metadata
+### Mapping of the metadata
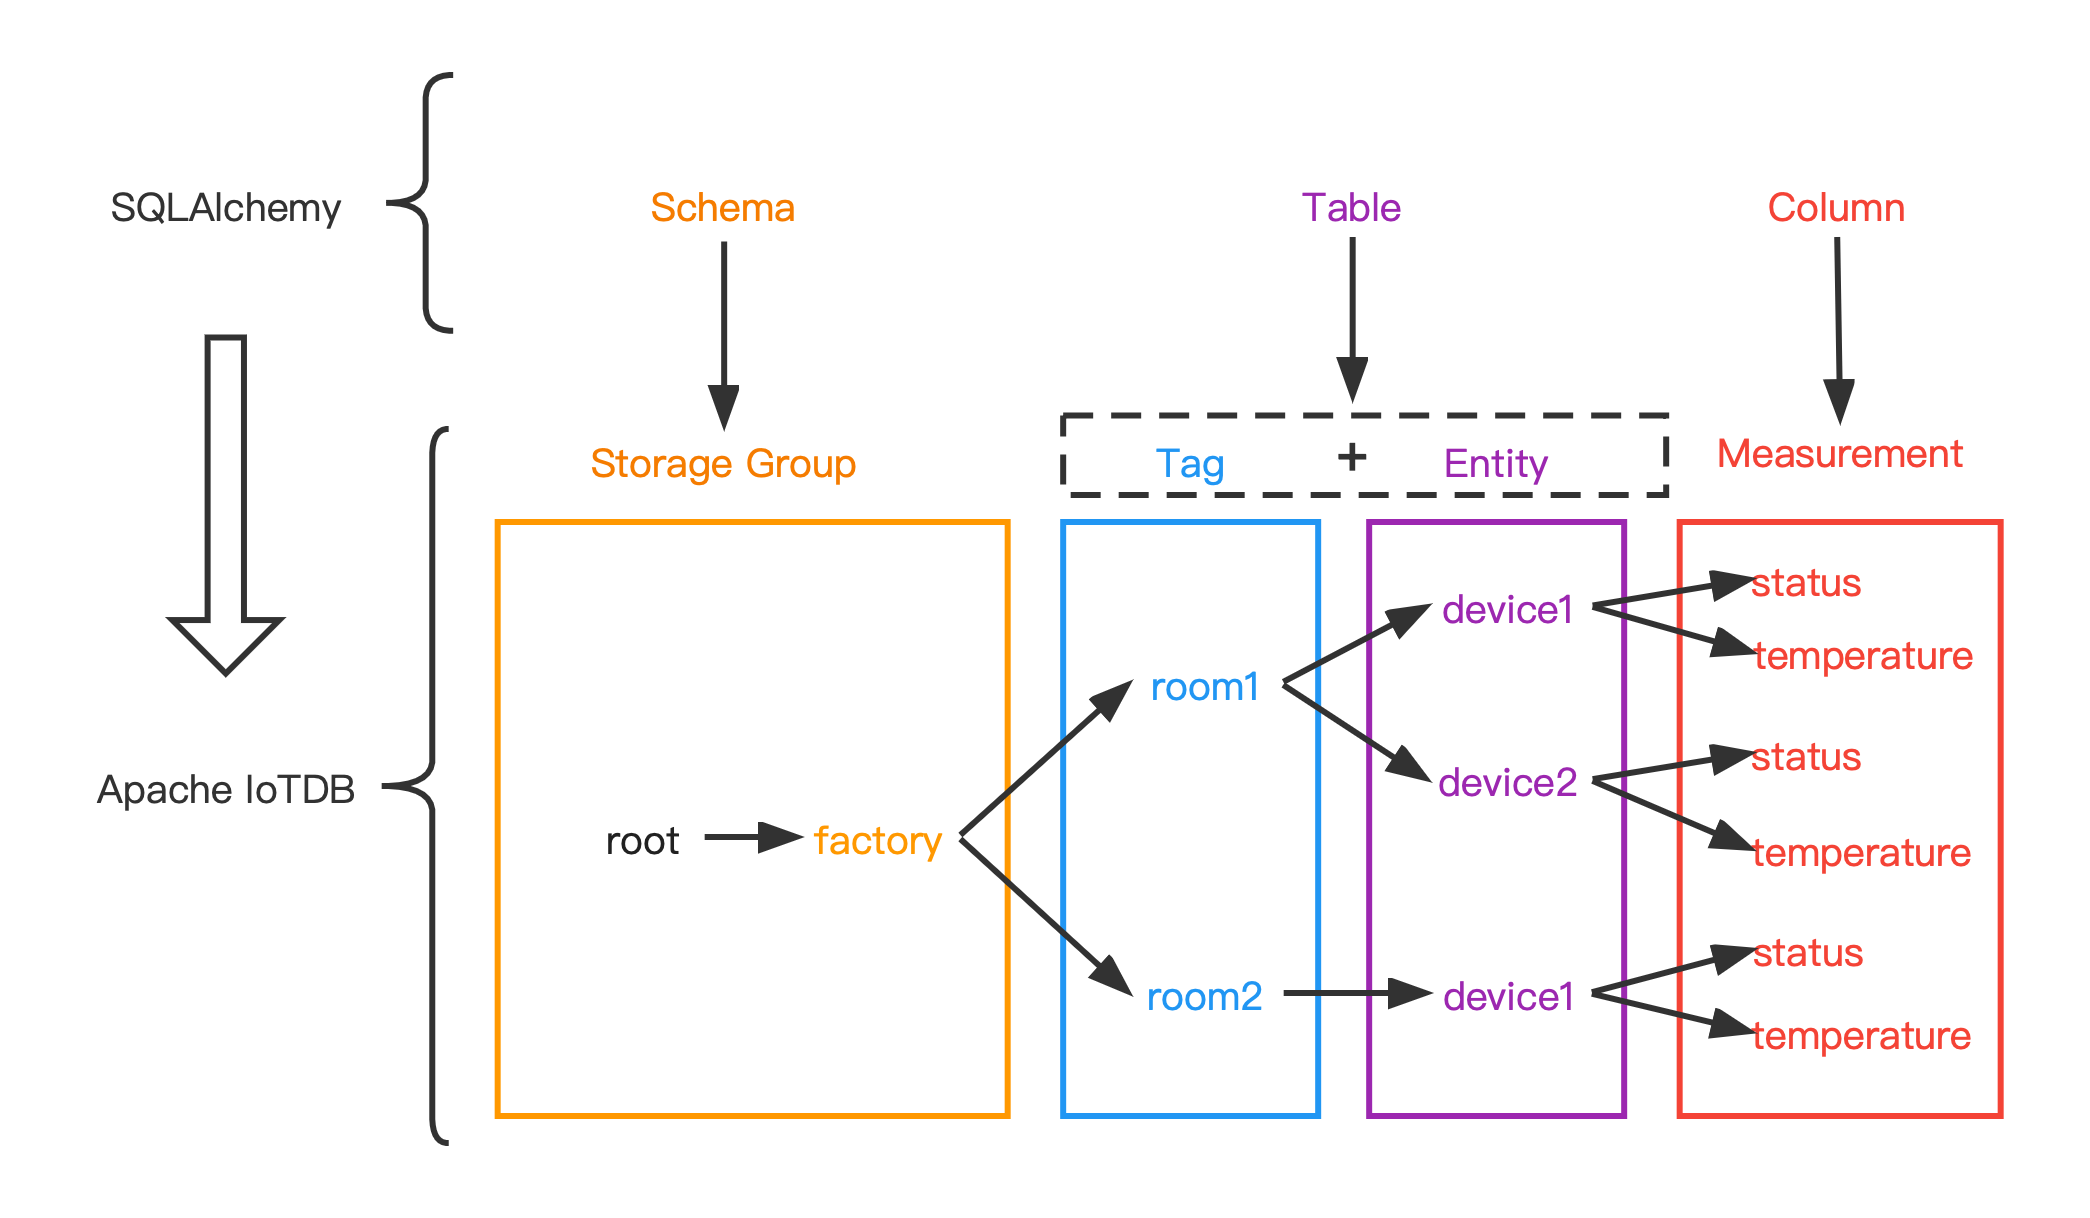
The data model used by SQLAlchemy is a relational data model, which describes
the relationships between different entities through tables.
While the data model of IoTDB is a hierarchical data model, which organizes
the data through a tree structure.
In order to adapt IoTDB to the dialect of SQLAlchemy, the original data model
in IoTDB needs to be reorganized.
@@ -570,7 +570,7 @@ The following figure shows the relationship between the two
more intuitively:
-#### Data type mapping
+### Data type mapping
| data type in IoTDB | data type in SQLAlchemy |
|--------------------|-------------------------|
| BOOLEAN | Boolean |
@@ -581,7 +581,7 @@ The following figure shows the relationship between the two
more intuitively:
| TEXT | Text |
| LONG | BigInteger |
-#### Example
+### Example
+ execute statement
diff --git a/src/UserGuide/Master/API/Programming-TsFile-API.md
b/src/UserGuide/Master/API/Programming-TsFile-API.md
index 5855b21..d1fceaf 100644
--- a/src/UserGuide/Master/API/Programming-TsFile-API.md
+++ b/src/UserGuide/Master/API/Programming-TsFile-API.md
@@ -19,13 +19,13 @@
-->
-## TsFile API
+# TsFile API
TsFile is a file format of Time Series used in IoTDB. This session introduces
the usage of this file format.
-### TsFile library Installation
+## TsFile library Installation
There are two ways to use TsFile in your own project.
@@ -102,7 +102,7 @@ Then, all the jars are in folder named `target/`. Import
`target/tsfile-0.12.0-j
-### TsFile Usage
+## TsFile Usage
This section demonstrates the detailed usages of TsFile.
@@ -137,7 +137,7 @@ device_1, 1490860659000, m1, 10, m2, 12.12
-#### Write TsFile
+### Write TsFile
A TsFile is generated by the following three steps and the complete code is
given in the section "Example for writing TsFile".
@@ -239,7 +239,7 @@ A TsFile is generated by the following three steps and the
complete code is give
addMeasurement(new MeasurementSchema("sensor_1", TSDataType.FLOAT,
TSEncoding.RLE));
// This call will throw a WriteProcessException exception
-addMeasurement(new MeasurementSchema("sensor_1", TSDataType.INT32,
TSEncoding.RLE));
+ addMeasurement(new MeasurementSchema("sensor_1", TSDataType.INT32,
TSEncoding.RLE));
```
```
@@ -251,7 +251,7 @@ addMeasurement(new MeasurementSchema("sensor_1",
TSDataType.INT32, TSEncoding.RL
```java
public TSRecord(long timestamp, String deviceId)
- ```
+ ```
```
Then create a `DataPoint`(a measurement and value pair), and use the
addTuple method to add the DataPoint to the correct
TsRecord.
@@ -287,7 +287,7 @@ Please note, we should redo the step of adding measurements
before writing new d
-#### Example for writing a TsFile
+### Example for writing a TsFile
You should install TsFile to your local maven repository.
@@ -309,7 +309,7 @@ A more thorough example can be found at
`/example/tsfile/src/main/java/org/apach
-#### Interface for Reading TsFile
+### Interface for Reading TsFile
* Definition of Path
@@ -493,7 +493,7 @@ Here's the useful interfaces for user.
-#### Example for reading an existing TsFile
+### Example for reading an existing TsFile
You should install TsFile to your local maven repository.
@@ -559,7 +559,7 @@ public class TsFileRead {
-### Change TsFile Configuration
+## Change TsFile Configuration
```java
TSFileConfig config = TSFileDescriptor.getInstance().getConfig();
diff --git a/src/UserGuide/Master/Administration-Management/Administration.md
b/src/UserGuide/Master/Administration-Management/Administration.md
index c963942..5f393a3 100644
--- a/src/UserGuide/Master/Administration-Management/Administration.md
+++ b/src/UserGuide/Master/Administration-Management/Administration.md
@@ -444,7 +444,7 @@ In distributed related permission operations, when changing
permissions other th
At present, the following SQL statements supported by iotdb can only be
operated by the `root` user, and no corresponding permission can be given to
the new user.
-###### TsFile Management
+#### TsFile Management
- Load TsFiles
@@ -464,7 +464,7 @@ Eg: IoTDB > remove
'/Users/Desktop/data/data/root.vehicle/0/0/1575028885956-101-
Eg: IoTDB > unload
'/Users/Desktop/data/data/root.vehicle/0/0/1575028885956-101-0.tsfile'
'/data/data/tmp'
```
-###### Delete Time Partition (experimental)
+#### Delete Time Partition (experimental)
- Delete Time Partition (experimental)
@@ -472,7 +472,7 @@ Eg: IoTDB > unload
'/Users/Desktop/data/data/root.vehicle/0/0/1575028885956-101-
Eg: IoTDB > DELETE PARTITION root.ln 0,1,2
```
-###### Continuous Query,CQ
+#### Continuous Query,CQ
- Continuous Query,CQ
@@ -480,7 +480,7 @@ Eg: IoTDB > DELETE PARTITION root.ln 0,1,2
Eg: IoTDB > CREATE CONTINUOUS QUERY cq1 BEGIN SELECT max_value(temperature)
INTO temperature_max FROM root.ln.*.* GROUP BY time(10s) END
```
-###### Maintenance Command
+#### Maintenance Command
- FLUSH
@@ -519,7 +519,7 @@ Eg: IoTDB > CREATE SNAPSHOT FOR SCHEMA
Eg: IoTDB > KILL QUERY 1
```
-###### Watermark Tool
+#### Watermark Tool
- Watermark new users
diff --git a/src/UserGuide/Master/Basic-Concept/Encoding-and-Compression.md
b/src/UserGuide/Master/Basic-Concept/Encoding-and-Compression.md
index b9dfbf4..5116b84 100644
--- a/src/UserGuide/Master/Basic-Concept/Encoding-and-Compression.md
+++ b/src/UserGuide/Master/Basic-Concept/Encoding-and-Compression.md
@@ -19,7 +19,7 @@
-->
-# Encoding
+# Encoding and Compression
## Encoding Methods
@@ -56,6 +56,7 @@ DICTIONARY encoding is lossless. It is suitable for TEXT data
with low cardinali
* ZIGZAG
+
ZIGZAG encoding maps signed integers to unsigned integers so that numbers with
a small absolute value (for instance, -1) have a small variant encoded value
too. It does this in a way that "zig-zags" back and forth through the positive
and negative integers.
* CHIMP
@@ -72,7 +73,7 @@ SPRINTZ coding is a type of lossless data compression
technique that involves pr
RLBE is a lossless encoding that combines the ideas of differential encoding,
bit-packing encoding, run-length encoding, Fibonacci encoding and
concatenation. RLBE encoding is suitable for time series data with increasing
and small increment value, and is not suitable for time series data with large
fluctuation.
-## Correspondence between data type and encoding
+### Correspondence between data type and encoding
The five encodings described in the previous sections are applicable to
different data types. If the correspondence is wrong, the time series cannot be
created correctly.
@@ -95,11 +96,11 @@ As shown below, the second-order difference encoding does
not support the Boolea
IoTDB> create timeseries root.ln.wf02.wt02.status WITH DATATYPE=BOOLEAN,
ENCODING=TS_2DIFF
Msg: 507: encoding TS_2DIFF does not support BOOLEAN
```
-# Compression
+## Compression
When the time series is written and encoded as binary data according to the
specified type, IoTDB compresses the data using compression technology to
further improve space storage efficiency. Although both encoding and
compression are designed to improve storage efficiency, encoding techniques are
usually available only for specific data types (e.g., second-order differential
encoding is only suitable for INT32 or INT64 data type, and storing
floating-point numbers requires multiplying t [...]
-## Basic Compression Methods
+### Basic Compression Methods
IoTDB allows you to specify the compression method of the column when creating
a time series, and supports the following compression methods:
@@ -117,7 +118,7 @@ IoTDB allows you to specify the compression method of the
column when creating a
The specified syntax for compression is detailed in [Create Timeseries
Statement](../Reference/SQL-Reference.md).
-## Compression Ratio Statistics
+### Compression Ratio Statistics
Compression ratio statistics file:
data/system/compression_ratio/Ratio-{ratio_sum}-{memtable_flush_time}
diff --git a/src/UserGuide/Master/Cluster/Cluster-Concept.md
b/src/UserGuide/Master/Cluster/Cluster-Concept.md
index aa9bc12..d2db549 100644
--- a/src/UserGuide/Master/Cluster/Cluster-Concept.md
+++ b/src/UserGuide/Master/Cluster/Cluster-Concept.md
@@ -21,6 +21,8 @@ under the License.
-->
+# Cluster Concept
+
## Basic Concepts of IoTDB Cluster
Apache IoTDB Cluster contains two types of nodes: ConfigNode and DataNode,
each is a process that could be deployed independently.
@@ -80,7 +82,7 @@ The database contains multiple SchemaRegions and DataRegions,
which are managed
* For a time series schema, the ConfigNode maps the device ID (full path
from root to the penultimate tier node) into a SeriesSlot and allocate this
SeriesSlot to a SchemaRegionGroup.
* Data partition strategy
* For a time series data point, the ConfigNode will map to a SeriesSlot
according to the DeviceId, and then map it to a SeriesTimeSlot according to the
timestamp, and allocate this SeriesTimeSlot to a DataRegionGroup.
-
+
IoTDB uses a slot-based partitioning strategy, so the size of the partition
information is controllable and does not grow infinitely with the number of
time series or devices.
Regions will be allocated to different DataNodes to avoid single point of
failure, and the load balance of different DataNodes will be ensured when
Regions are allocated.
diff --git a/src/UserGuide/Master/Cluster/Cluster-Setup.md
b/src/UserGuide/Master/Cluster/Cluster-Setup.md
index 01e8cd5..637428f 100644
--- a/src/UserGuide/Master/Cluster/Cluster-Setup.md
+++ b/src/UserGuide/Master/Cluster/Cluster-Setup.md
@@ -19,11 +19,13 @@
-->
-# 1. Purpose
+# Cluster Setup
+
+## 1. Purpose
This document describes how to install and start IoTDB Cluster (1.0.0).
-# 2. Prerequisites
+## 2. Prerequisites
1. JDK>=1.8.
2. Max open file 65535.
@@ -35,19 +37,19 @@ and data/datanode directory has been cleared when starting
DataNode for the firs
6667, 10730, 10740, 10750 and 10760 for the DataNode.
Please make sure those ports are not occupied, or you will modify the ports in
configuration files.
-# 3. Get the Installation Package
+## 3. Get the Installation Package
You can either download the binary release files (see Chap 3.1) or compile
with source code (see Chap 3.2).
-## 3.1 Download the binary distribution
+### 3.1 Download the binary distribution
1. Open our website [Download Page](https://iotdb.apache.org/Download/).
2. Download the binary distribution.
3. Decompress to get the apache-iotdb-1.0.0-all-bin directory.
-## 3.2 Compile with source code
+### 3.2 Compile with source code
-### 3.2.1 Download the source code
+#### 3.2.1 Download the source code
**Git**
```
@@ -60,7 +62,7 @@ git checkout v1.0.0
2. Download the source code.
3. Decompress to get the apache-iotdb-1.0.0 directory.
-### 3.2.2 Compile source code
+#### 3.2.2 Compile source code
Under the source root folder:
```
@@ -70,7 +72,7 @@ mvn clean package -pl distribution -am -DskipTests
Then you will get the binary distribution under
**distribution/target/apache-iotdb-1.0.0-SNAPSHOT-all-bin/apache-iotdb-1.0.0-SNAPSHOT-all-bin**.
-# 4. Binary Distribution Content
+## 4. Binary Distribution Content
| **Folder** | **Description**
|
|-------------------------|---------------------------------------------------------------------------------------------------|
@@ -82,9 +84,9 @@ Then you will get the binary distribution under
| sbin | Shell files folder, contains start/stop/remove
shell of ConfigNode and DataNode, cli shell |
| tools | System tools
|
-# 5. Cluster Installation and Configuration
+## 5. Cluster Installation and Configuration
-## 5.1 Cluster Installation
+### 5.1 Cluster Installation
`apache-iotdb-1.0.0-SNAPSHOT-all-bin` contains both the ConfigNode and the
DataNode.
Please deploy the files to all servers of your target cluster.
@@ -93,7 +95,7 @@ A best practice is deploying the files into the same
directory in all servers.
If you want to try the cluster mode on one server, please read
[Cluster Quick
Start](https://iotdb.apache.org/UserGuide/Master/QuickStart/ClusterQuickStart.html).
-## 5.2 Cluster Configuration
+### 5.2 Cluster Configuration
We need to modify the configurations on each server.
Therefore, login each server and switch the working directory to
`apache-iotdb-1.0.0-SNAPSHOT-all-bin`.
@@ -105,7 +107,7 @@ and ConfigNode configuration (see Chap 5.2.2).
For all DataNode servers, we need to modify the common configuration (see Chap
5.2.1)
and DataNode configuration (see Chap 5.2.3).
-### 5.2.1 Common configuration
+#### 5.2.1 Common configuration
Open the common configuration file ./conf/iotdb-common.properties,
and set the following parameters base on the
@@ -122,7 +124,7 @@ and set the following parameters base on the
**Notice: The preceding configuration parameters cannot be changed after the
cluster is started. Ensure that the common configurations of all Nodes are the
same. Otherwise, the Nodes cannot be started.**
-### 5.2.2 ConfigNode configuration
+#### 5.2.2 ConfigNode configuration
Open the ConfigNode configuration file ./conf/iotdb-confignode.properties,
and set the following parameters based on the IP address and available port of
the server or VM:
@@ -136,7 +138,7 @@ and set the following parameters based on the IP address
and available port of t
**Notice: The preceding configuration parameters cannot be changed after the
node is started. Ensure that all ports are not occupied. Otherwise, the Node
cannot be started.**
-### 5.2.3 DataNode configuration
+#### 5.2.3 DataNode configuration
Open the DataNode configuration file ./conf/iotdb-datanode.properties,
and set the following parameters based on the IP address and available port of
the server or VM:
@@ -154,9 +156,9 @@ and set the following parameters based on the IP address
and available port of t
**Notice: The preceding configuration parameters cannot be changed after the
node is started. Ensure that all ports are not occupied. Otherwise, the Node
cannot be started.**
-# 6. Cluster Operation
+## 6. Cluster Operation
-## 6.1 Starting the cluster
+### 6.1 Starting the cluster
This section describes how to start a cluster that includes several
ConfigNodes and DataNodes.
The cluster can provide services only by starting at least one ConfigNode
@@ -168,7 +170,7 @@ The total process are three steps:
* Add ConfigNode (Optional)
* Add DataNode
-### 6.1.1 Start the Seed-ConfigNode
+#### 6.1.1 Start the Seed-ConfigNode
**The first Node started in the cluster must be ConfigNode. The first started
ConfigNode must follow the tutorial in this section.**
@@ -212,7 +214,7 @@ nohup bash ./sbin/start-confignode.sh >/dev/null 2>&1 &
For more details about other configuration parameters of ConfigNode, see the
[ConfigNode
Configurations](https://iotdb.apache.org/UserGuide/Master/Reference/ConfigNode-Config-Manual.html).
-### 6.1.2 Add more ConfigNodes (Optional)
+#### 6.1.2 Add more ConfigNodes (Optional)
**The ConfigNode who isn't the first one started must follow the tutorial in
this section.**
@@ -257,7 +259,7 @@ nohup bash ./sbin/start-confignode.sh >/dev/null 2>&1 &
For more details about other configuration parameters of ConfigNode, see the
[ConfigNode
Configurations](https://iotdb.apache.org/UserGuide/Master/Reference/ConfigNode-Config-Manual.html).
-### 6.1.3 Start DataNode
+#### 6.1.3 Start DataNode
**Before adding DataNodes, ensure that there exists at least one ConfigNode is
running in the cluster.**
@@ -301,7 +303,7 @@ For more details about other configuration parameters of
DataNode, see the
**Notice: The cluster can provide services only if the number of its DataNodes
is no less than the number of replicas(max{schema\_replication\_factor,
data\_replication\_factor}).**
-## 6.2 Start Cli
+### 6.2 Start Cli
If the cluster is in local environment, you can directly run the Cli startup
script in the ./sbin directory:
@@ -316,7 +318,7 @@ If the cluster is in local environment, you can directly
run the Cli startup scr
If you want to use the Cli to connect to a cluster in the production
environment,
Please read the [Cli
manual](https://iotdb.apache.org/UserGuide/Master/QuickStart/Command-Line-Interface.html).
-## 6.3 Verify Cluster
+### 6.3 Verify Cluster
Use a 3C3D(3 ConfigNodes and 3 DataNodes) as an example.
Assumed that the IP addresses of the 3 ConfigNodes are 192.168.1.10,
192.168.1.11 and 192.168.1.12, and the default ports 10710 and 10720 are used.
@@ -344,11 +346,11 @@ If the status of all Nodes is **Running**, the cluster
deployment is successful.
Otherwise, read the run logs of the Node that fails to start and
check the corresponding configuration parameters.
-## 6.4 Stop IoTDB
+### 6.4 Stop IoTDB
This section describes how to manually shut down the ConfigNode or DataNode
process of the IoTDB.
-### 6.4.1 Stop ConfigNode by script
+#### 6.4.1 Stop ConfigNode by script
Run the stop ConfigNode script:
@@ -360,7 +362,7 @@ Run the stop ConfigNode script:
.\sbin\stop-confignode.bat
```
-### 6.4.2 Stop DataNode by script
+#### 6.4.2 Stop DataNode by script
Run the stop DataNode script:
@@ -372,7 +374,7 @@ Run the stop DataNode script:
.\sbin\stop-datanode.bat
```
-### 6.4.3 Kill Node process
+#### 6.4.3 Kill Node process
Get the process number of the Node:
@@ -392,11 +394,11 @@ kill -9 <pid>
**Notice Some ports require root access, in which case use sudo**
-## 6.5 Shrink the Cluster
+### 6.5 Shrink the Cluster
This section describes how to remove ConfigNode or DataNode from the cluster.
-### 6.5.1 Remove ConfigNode
+#### 6.5.1 Remove ConfigNode
Before removing a ConfigNode, ensure that there is at least one active
ConfigNode in the cluster after the removal.
Run the remove-confignode script on an active ConfigNode:
@@ -418,7 +420,7 @@ Run the remove-confignode script on an active ConfigNode:
.\sbin\remove-confignode.bat
<cn_internal_address>:<cn_internal_portcn_internal_port>
```
-### 6.5.2 Remove DataNode
+#### 6.5.2 Remove DataNode
Before removing a DataNode, ensure that the cluster has at least the number of
data/schema replicas DataNodes.
Run the remove-datanode script on an active DataNode:
@@ -440,6 +442,6 @@ Run the remove-datanode script on an active DataNode:
.\sbin\remove-datanode.bat <dn_rpc_address>:<dn_rpc_port>
```
-# 7. FAQ
+## 7. FAQ
See
[FAQ](https://iotdb.apache.org/UserGuide/Master/FAQ/FAQ-for-cluster-setup.html)
diff --git a/src/UserGuide/Master/Data-Modeling/DataRegion.md
b/src/UserGuide/Master/Data-Modeling/DataRegion.md
index 614e9c0..99f6357 100644
--- a/src/UserGuide/Master/Data-Modeling/DataRegion.md
+++ b/src/UserGuide/Master/Data-Modeling/DataRegion.md
@@ -19,7 +19,9 @@
-->
-# Background
+# Data Region
+
+## Background
The database is specified by the user display.
Use the statement "CREATE DATABASE" to create the database.
@@ -28,21 +30,21 @@ Each database has a corresponding StorageGroupProcessor.
To ensure eventually consistency, a insert lock (exclusive lock) is used to
synchronize each insert request in each database.
So the server side parallelism of data ingestion is equal to the number of
database.
-# Problem
+## Problem
From background, we can infer that the parallelism of data ingestion of IoTDB
is max(num of client, server side parallelism), which equals to max(num of
client, num of database)
The concept of database usually is related to real world entity such as
factory, location, country and so on.
The number of databases may be small which makes the parallelism of data
ingestion of IoTDB insufficient. We can't jump out of this dilemma even we
start hundreds of client for ingestion.
-# Solution
+## Solution
Our idea is to group devices into buckets and change the granularity of
synchronization from database level to device buckets level.
In detail, we use hash to group different devices into buckets called data
region.
For example, one device called "root.sg.d"(assume it's database is "root.sg")
is belonged to data region "root.sg.[hash("root.sg.d") mod num_of_data_region]"
-# Usage
+## Usage
To use data region, you can set this config below:
diff --git a/src/UserGuide/Master/Data-Modeling/SchemaRegion-rocksdb.md
b/src/UserGuide/Master/Data-Modeling/SchemaRegion-rocksdb.md
index cb13eec..b9a592a 100644
--- a/src/UserGuide/Master/Data-Modeling/SchemaRegion-rocksdb.md
+++ b/src/UserGuide/Master/Data-Modeling/SchemaRegion-rocksdb.md
@@ -19,13 +19,15 @@
-->
-# Background
+# Schema Region
+
+## Background
When IoTDB service is started, metadata information is organized by loading
log file `mlog.bin` and the results are held
in memory for a long time. As metadata continues to grow, memory continues to
grow. In order to support the controllable
fluctuation in the massive metadata scenario, we provide a metadata storage
type based on rocksDB.
-# Usage
+## Usage
Firstly, you should package **schema-engine-rocksdb** by the following command:
@@ -52,7 +54,7 @@ schema_engine_mode=Rocksdb_based
When rocksdb is specified as the metadata storage type, configuration
parameters of rocksDB are open to the public as file. You can modify the
configuration file `schema-rocksdb.properties` to adjust parameters according
to your own requirements, such as block cache. If there is no special
requirement, use the default value.
-# Function Support
+## Function Support
The module is still being improved, and some functions are not supported at
the moment. The function modules are supported as follows:
@@ -68,7 +70,7 @@ The module is still being improved, and some functions are
not supported at the
| continuous query | no |
-# Appendix: Interface support
+## Appendix: Interface support
The external interface, that is, the client can sense, related SQL is not
supported;
diff --git a/src/UserGuide/Master/Deployment-and-Maintenance/Docker-Install.md
b/src/UserGuide/Master/Deployment-and-Maintenance/Docker-Install.md
index c0a1817..ff5db87 100644
--- a/src/UserGuide/Master/Deployment-and-Maintenance/Docker-Install.md
+++ b/src/UserGuide/Master/Deployment-and-Maintenance/Docker-Install.md
@@ -19,12 +19,12 @@
-->
-### Installation by Docker
+# Installation by Docker
Apache IoTDB' Docker image is released on
[https://hub.docker.com/r/apache/iotdb](https://hub.docker.com/r/apache/iotdb)
Add environments of docker to update the configurations of Apache IoTDB.
-#### Have a try
+## Have a try
```shell
# get IoTDB official image
@@ -96,7 +96,7 @@ networks:
external: true
```
-#### deploy cluster
+## deploy cluster
Until now, we support host and overlay networks but haven't supported bridge
networks on multiple computers.
Overlay networks see
[1C2D](https://github.com/apache/iotdb/tree/master/docker/src/main/DockerCompose/docker-compose-cluster-1c2d.yml)
and here are the configurations and operation steps to start an IoTDB cluster
with docker using host networks。
diff --git a/src/UserGuide/Master/Ecosystem-Integration/DBeaver.md
b/src/UserGuide/Master/Ecosystem-Integration/DBeaver.md
index 026afba..4c8b906 100644
--- a/src/UserGuide/Master/Ecosystem-Integration/DBeaver.md
+++ b/src/UserGuide/Master/Ecosystem-Integration/DBeaver.md
@@ -19,15 +19,15 @@
-->
-## DBeaver-IoTDB
+# DBeaver-IoTDB
DBeaver is a SQL client software application and a database administration
tool. It can use the JDBC application programming interface (API) to interact
with IoTDB via the JDBC driver.
-### DBeaver Installation
+## DBeaver Installation
* From DBeaver site: https://dbeaver.io/download/
-### IoTDB Installation
+## IoTDB Installation
* Download binary version
* From IoTDB site: https://iotdb.apache.org/Download/
@@ -35,13 +35,13 @@ DBeaver is a SQL client software application and a database
administration tool.
* Or compile from source code
* See https://github.com/apache/iotdb
-### Connect IoTDB and DBeaver
+## Connect IoTDB and DBeaver
1. Start IoTDB server
```shell
./sbin/start-server.sh
- ```
+ ```
2. Start DBeaver
3. Open Driver Manager
diff --git a/src/UserGuide/Master/Ecosystem-Integration/Flink-IoTDB.md
b/src/UserGuide/Master/Ecosystem-Integration/Flink-IoTDB.md
index 982f563..45ba83c 100644
--- a/src/UserGuide/Master/Ecosystem-Integration/Flink-IoTDB.md
+++ b/src/UserGuide/Master/Ecosystem-Integration/Flink-IoTDB.md
@@ -19,16 +19,16 @@
-->
-## Flink-IoTDB-Connector
+# Flink-IoTDB-Connector
IoTDB integration for [Apache Flink](https://flink.apache.org/). This module
includes the IoTDB sink that allows a flink job to write events into
timeseries, and the IoTDB source allowing reading data from IoTDB.
-### IoTDBSink
+## IoTDBSink
To use the `IoTDBSink`, you need construct an instance of it by specifying
`IoTDBSinkOptions` and `IoTSerializationSchema` instances.
The `IoTDBSink` send only one event after another by default, but you can
change to batch by invoking `withBatchSize(int)`.
-#### Example
+### Example
This example shows a case that sends data to a IoTDB server from a Flink job:
@@ -115,17 +115,17 @@ public class FlinkIoTDBSink {
```
-#### Usage
+### Usage
* Launch the IoTDB server.
* Run `org.apache.iotdb.flink.FlinkIoTDBSink.java` to run the flink job on
local mini cluster.
-### IoTDBSource
+## IoTDBSource
To use the `IoTDBSource`, you need to construct an instance of `IoTDBSource`
by specifying `IoTDBSourceOptions`
and implementing the abstract method `convert()` in `IoTDBSource`. The
`convert` methods defines how
you want the row data to be transformed.
-#### Example
+### Example
This example shows a case where data are read from IoTDB.
```java
import org.apache.iotdb.flink.options.IoTDBSourceOptions;
@@ -209,7 +209,7 @@ public class FlinkIoTDBSource {
}
```
-#### Usage
+### Usage
Launch the IoTDB server.
Run org.apache.iotdb.flink.FlinkIoTDBSource.java to run the flink job on local
mini cluster.
diff --git a/src/UserGuide/Master/Ecosystem-Integration/Flink-TsFile.md
b/src/UserGuide/Master/Ecosystem-Integration/Flink-TsFile.md
index cad35ee..2750931 100644
--- a/src/UserGuide/Master/Ecosystem-Integration/Flink-TsFile.md
+++ b/src/UserGuide/Master/Ecosystem-Integration/Flink-TsFile.md
@@ -19,9 +19,9 @@
-->
-## Flink-TsFile-Connector
+# Flink-TsFile-Connector
-### About Flink-TsFile-Connector
+## About Flink-TsFile-Connector
Flink-TsFile-Connector implements the support of Flink for external data
sources of Tsfile type.
This enables users to read and write Tsfile by Flink via DataStream/DataSet
API.
@@ -31,9 +31,9 @@ With this connector, you can
* load a single TsFile or multiple TsFiles(only for DataSet), from either the
local file system or hdfs, into Flink
* load all files in a specific directory, from either the local file system or
hdfs, into Flink
-### Quick Start
+## Quick Start
-#### TsFileInputFormat Example
+### TsFileInputFormat Example
1. create TsFileInputFormat with default RowRowRecordParser.
@@ -93,7 +93,7 @@ for (String s : result) {
}
```
-#### Example of TSRecordOutputFormat
+### Example of TSRecordOutputFormat
1. create TSRecordOutputFormat with default RowTSRecordConverter.
@@ -178,4 +178,3 @@ source.map(t -> {
env.execute();
```
-
diff --git a/src/UserGuide/Master/Ecosystem-Integration/Grafana-Plugin.md
b/src/UserGuide/Master/Ecosystem-Integration/Grafana-Plugin.md
index d78d76e..dc1f6ad 100644
--- a/src/UserGuide/Master/Ecosystem-Integration/Grafana-Plugin.md
+++ b/src/UserGuide/Master/Ecosystem-Integration/Grafana-Plugin.md
@@ -19,7 +19,7 @@
-->
-## Grafana-Plugin
+# Grafana-Plugin
Grafana is an open source volume metrics monitoring and visualization tool,
which can be used to present time series data and analyze application runtime
status.
@@ -27,21 +27,21 @@ Grafana is an open source volume metrics monitoring and
visualization tool, whic
We developed the Grafana-Plugin for IoTDB, using the IoTDB REST service to
present time series data and providing many visualization methods for time
series data.
Compared with previous IoTDB-Grafana-Connector, current Grafana-Plugin
performs more efficiently and supports more query types. So, **we recommend
using Grafana-Plugin instead of IoTDB-Grafana-Connector**.
-### Installation and deployment
+## Installation and deployment
-#### Install Grafana
+### Install Grafana
* Download url: https://grafana.com/grafana/download
* Version >= 9.3.0
-#### Acquisition method of grafana plugin
+### Acquisition method of grafana plugin
-##### Method 1: grafana plugin binary Download
+#### Method 1: grafana plugin binary Download
Download url:https://iotdb.apache.org/zh/Download/
-##### Method 2: separate compilation of grafana plugin
+#### Method 2: separate compilation of grafana plugin
We need to compile the front-end project in the IoTDB `grafana-plugin`
directory and then generate the `dist` directory. The specific execution
process is as follows.
@@ -82,7 +82,7 @@ If compiling successful, you can see the `dist` directory ,
which contains the c
<img style="width:100%; max-width:333px; max-height:545px; margin-left:auto;
margin-right:auto; display:block;"
src="https://alioss.timecho.com/docs/img/UserGuide/Ecosystem-Integration/Grafana-plugin/grafana-plugin-build.png?raw=true";>
-##### Method 3: The distribution package of IoTDB is fully compiled
+#### Method 3: The distribution package of IoTDB is fully compiled
We can also obtain the front-end project of `grafana-plugin` and other IoTDB
executable files by executing the **package instruction** of the IoTDB project.
@@ -97,7 +97,7 @@ If compiling successful, you can see that the
`distribution/target` directory co
<img style="width:100%; max-width:333px; max-height:545px; margin-left:auto;
margin-right:auto; display:block;"
src="https://alioss.timecho.com/docs/img/UserGuide/Ecosystem-Integration/Grafana-plugin/distribution.png?raw=true";>
-#### Install Grafana-Plugin
+### Install Grafana-Plugin
* Copy the front-end project target folder generated above to Grafana's plugin
directory `${Grafana directory}\data\plugins\`。If there is no such directory,
you can manually create it or start grafana and it will be created
automatically. Of course, you can also modify the location of plugins. For
details, please refer to the following instructions for modifying the location
of Grafana's plugin directory.
@@ -116,7 +116,7 @@ If compiling successful, you can see that the
`distribution/target` directory co
For more details,please click
[here](https://grafana.com/docs/grafana/latest/plugins/installation/)
-#### Start Grafana
+### Start Grafana
Start Grafana with the following command in the Grafana directory:
@@ -141,7 +141,7 @@ For more details,please click
[here](https://grafana.com/docs/grafana/latest/i
-#### Configure IoTDB REST Service
+### Configure IoTDB REST Service
* Modify `{iotdb directory}/conf/iotdb-common.properties` as following:
@@ -156,9 +156,9 @@ rest_service_port=18080
Start IoTDB (restart if the IoTDB service is already started)
-### How to use Grafana-Plugin
+## How to use Grafana-Plugin
-#### Access Grafana dashboard
+### Access Grafana dashboard
Grafana displays data in a web page dashboard. Please open your browser and
visit `http://<ip>:<port>` when using it.
@@ -167,7 +167,7 @@ Grafana displays data in a web page dashboard. Please open
your browser and visi
* The default login username and password are both `admin`.
-#### Add IoTDB as Data Source
+### Add IoTDB as Data Source
Click the `Settings` icon on the left, select the `Data Source` option, and
then click `Add data source`.
@@ -187,7 +187,7 @@ Click `Save & Test`, and `Data source is working` will
appear.
<img style="width:100%; max-width:800px; max-height:600px; margin-left:auto;
margin-right:auto; display:block;"
src="https://alioss.timecho.com/docs/img/grafana9_datasource.png?raw=true";>
-#### Create a new Panel
+### Create a new Panel
Click the `Dashboards` icon on the left, and select `Manage` option.
@@ -201,7 +201,7 @@ Grafana plugin supports SQL: Full Customized mode and SQL:
Drop-down List mode,
<img style="width:100%; max-width:800px; max-height:600px; margin-left:auto;
margin-right:auto; display:block;"
src="https://alioss.timecho.com/docs/img/UserGuide/Ecosystem-Integration/Grafana-plugin/grafana_input_style.png?raw=true";>
-##### SQL: Full Customized input method
+#### SQL: Full Customized input method
Enter content in the SELECT, FROM , WHERE and CONTROL input box, where the
WHERE and CONTROL input boxes are optional.
@@ -241,13 +241,13 @@ Here are some examples of valid CONTROL content:
Tip: Statements like `select * from root.xx.**` are not recommended because
those statements may cause OOM.
-##### SQL: Drop-down List
+#### SQL: Drop-down List
Select a time series in the TIME-SERIES selection box, select a function in
the FUNCTION option, and enter the contents in the SAMPLING INTERVAL、SLIDING
STEP、LEVEL、FILL input boxes, where TIME-SERIES is a required item and the rest
are non required items.
<img style="width:100%; max-width:800px; max-height:600px; margin-left:auto;
margin-right:auto; display:block;"
src="https://alioss.timecho.com/docs/img/UserGuide/Ecosystem-Integration/Grafana-plugin/grafana_input2.png?raw=true";>
-#### Support for variables and template functions
+### Support for variables and template functions
Both SQL: Full Customized and SQL: Drop-down List input methods support the
variable and template functions of grafana. In the following example, raw input
method is used, and aggregation is similar.
@@ -298,7 +298,7 @@ In addition to the examples above, the following statements
are supported:
Tip: If the query field contains Boolean data, the result value will be
converted to 1 by true and 0 by false.
-#### Grafana alert function
+### Grafana alert function
This plugin supports Grafana alert function.
@@ -345,6 +345,6 @@ For example, we have 3 conditions in the following order:
Condition: B (Evaluate
10. We can also configure `Contact points` for alarms to receive alarm
notifications. For more detailed operations, please refer to the official
document
(https://grafana.com/docs/grafana/latest/alerting/manage-notifications/create-contact-point/).
-### More Details about Grafana
+## More Details about Grafana
For more details about Grafana operation, please refer to the official Grafana
documentation: http://docs.grafana.org/guides/getting_started/.
diff --git a/src/UserGuide/Master/Ecosystem-Integration/Hive-TsFile.md
b/src/UserGuide/Master/Ecosystem-Integration/Hive-TsFile.md
index a8a9cbf..cf92814 100644
--- a/src/UserGuide/Master/Ecosystem-Integration/Hive-TsFile.md
+++ b/src/UserGuide/Master/Ecosystem-Integration/Hive-TsFile.md
@@ -18,9 +18,9 @@
under the License.
-->
-## Hive-TsFile
+# Hive-TsFile
-### About Hive-TsFile-Connector
+## About Hive-TsFile-Connector
Hive-TsFile-Connector implements the support of Hive for external data sources
of Tsfile type. This enables users to operate TsFile by Hive.
@@ -31,7 +31,7 @@ With this connector, you can
* Query the tsfile through HQL.
* As of now, the write operation is not supported in hive-connector. So,
insert operation in HQL is not allowed while operating tsfile through hive.
-### System Requirements
+## System Requirements
|Hadoop Version |Hive Version | Java Version | TsFile |
|------------- |------------ | ------------ |------------ |
@@ -39,7 +39,7 @@ With this connector, you can
> Note: For more information about how to download and use TsFile, please see
> the following link: https://github.com/apache/iotdb/tree/master/tsfile.
-### Data Type Correspondence
+## Data Type Correspondence
| TsFile data type | Hive field type |
| ---------------- | --------------- |
@@ -51,7 +51,7 @@ With this connector, you can
| TEXT | STRING |
-### Add Dependency For Hive
+## Add Dependency For Hive
To use hive-connector in hive, we should add the hive-connector jar into hive.
@@ -67,7 +67,7 @@ Added resources:
[/Users/hive/iotdb/hive-connector/target/hive-connector-1.0.0-j
```
-### Create Tsfile-backed Hive tables
+## Create Tsfile-backed Hive tables
To create a Tsfile-backed table, specify the `serde` as
`org.apache.iotdb.hive.TsFileSerDe`,
specify the `inputformat` as `org.apache.iotdb.hive.TSFHiveInputFormat`,
@@ -110,7 +110,7 @@ Time taken: 0.053 seconds, Fetched: 2 row(s)
```
At this point, the Tsfile-backed table can be worked with in Hive like any
other table.
-### Query from TsFile-backed Hive tables
+## Query from TsFile-backed Hive tables
Before we do any queries, we should set the `hive.input.format` in hive by
executing the following command.
@@ -123,7 +123,7 @@ We can use any query operations through HQL to analyse it.
For example:
-#### Select Clause Example
+### Select Clause Example
```
hive> select * from only_sensor_1 limit 10;
@@ -141,7 +141,7 @@ OK
Time taken: 1.464 seconds, Fetched: 10 row(s)
```
-#### Aggregate Clause Example
+### Aggregate Clause Example
```
hive> select count(*) from only_sensor_1;
@@ -168,4 +168,3 @@ OK
Time taken: 11.334 seconds, Fetched: 1 row(s)
```
-
diff --git a/src/UserGuide/Master/Ecosystem-Integration/MapReduce-TsFile.md
b/src/UserGuide/Master/Ecosystem-Integration/MapReduce-TsFile.md
index 99e1e74..b77f416 100644
--- a/src/UserGuide/Master/Ecosystem-Integration/MapReduce-TsFile.md
+++ b/src/UserGuide/Master/Ecosystem-Integration/MapReduce-TsFile.md
@@ -18,10 +18,10 @@
under the License.
-->
-## Hadoop-TsFile
+# Hadoop-TsFile
-### About Hadoop-TsFile-Connector
+## About Hadoop-TsFile-Connector
TsFile-Hadoop-Connector implements the support of Hadoop for external data
sources of Tsfile type. This enables users to read, write and query Tsfile by
Hadoop.
@@ -30,7 +30,7 @@ With this connector, you can
* load all files in a specific directory, from either the local file system or
hdfs, into hadoop
* write data from Hadoop into TsFile
-### System Requirements
+## System Requirements
|Hadoop Version | Java Version | TsFile Version|
|:---:|:---:|:---:|
@@ -38,7 +38,7 @@ With this connector, you can
> Note: For more information about how to download and use TsFile, please see
> the following link: https://github.com/apache/iotdb/tree/master/tsfile.
-### Data Type Correspondence
+## Data Type Correspondence
| TsFile data type | Hadoop writable |
| ---------------- | --------------- |
@@ -49,7 +49,7 @@ With this connector, you can
| DOUBLE | DoubleWritable |
| TEXT | Text |
-### TSFInputFormat Explanation
+## TSFInputFormat Explanation
TSFInputFormat extract data from tsfile and format them into records of
`MapWritable`.
@@ -73,9 +73,9 @@ In the Map job of Hadoop, you can get any value you want by
key as following:
`mapwritable.get(new Text("s1"))`
> Note: All keys in `MapWritable` are `Text` type.
-### Examples
+## Examples
-#### Read Example: calculate the sum
+### Read Example: calculate the sum
First of all, we should tell InputFormat what kind of data we want from tsfile.
@@ -139,7 +139,7 @@ Then, the `mapper` and `reducer` class is how you deal with
the `MapWritable` pr
> Note: For the complete code, please see the following link:
> https://github.com/apache/iotdb/blob/master/example/hadoop/src/main/java/org/apache/iotdb//hadoop/tsfile/TSFMRReadExample.java
-#### Write Example: write the average into Tsfile
+### Write Example: write the average into Tsfile
Except for the `OutputFormatClass`, the rest of configuration code for hadoop
map-reduce job is almost same as above.
diff --git a/src/UserGuide/Master/Ecosystem-Integration/Spark-TsFile.md
b/src/UserGuide/Master/Ecosystem-Integration/Spark-TsFile.md
index a0f52c4..14d13a7 100644
--- a/src/UserGuide/Master/Ecosystem-Integration/Spark-TsFile.md
+++ b/src/UserGuide/Master/Ecosystem-Integration/Spark-TsFile.md
@@ -19,9 +19,9 @@
-->
-## Spark-TsFile
+# Spark-TsFile
-### About Spark-TsFile-Connector
+## About Spark-TsFile-Connector
Spark-TsFile-Connector implements the support of Spark for external data
sources of Tsfile type. This enables users to read, write and query Tsfile by
Spark.
@@ -31,7 +31,7 @@ With this connector, you can
* load all files in a specific directory, from either the local file system or
hdfs, into Spark
* write data from Spark into TsFile
-### System Requirements
+## System Requirements
|Spark Version | Scala Version | Java Version | TsFile |
|:-------------: | :-------------: | :------------: |:------------: |
@@ -40,8 +40,8 @@ With this connector, you can
> Note: For more information about how to download and use TsFile, please see
> the following link: https://github.com/apache/iotdb/tree/master/tsfile.
> Currently we only support spark version 2.4.3 and there are some known issue
> on 2.4.7, do no use it
-### Quick Start
-#### Local Mode
+## Quick Start
+### Local Mode
Start Spark with TsFile-Spark-Connector in local mode:
@@ -56,7 +56,7 @@ Note:
* See https://github.com/apache/iotdb/tree/master/tsfile for how to get TsFile.
-#### Distributed Mode
+### Distributed Mode
Start Spark with TsFile-Spark-Connector in distributed mode (That is, the
spark cluster is connected by spark-shell):
@@ -70,7 +70,7 @@ Note:
* Multiple jar packages are separated by commas without any spaces.
* See https://github.com/apache/iotdb/tree/master/tsfile for how to get TsFile.
-### Data Type Correspondence
+## Data Type Correspondence
| TsFile data type | SparkSQL data type|
| --------------| -------------- |
@@ -81,7 +81,7 @@ Note:
| DOUBLE | DoubleType |
| TEXT | StringType |
-### Schema Inference
+## Schema Inference
The way to display TsFile is dependent on the schema. Take the following
TsFile structure as an example: There are three measurements in the TsFile
schema: status, temperature, and hardware. The basic information of these three
measurements is listed:
@@ -122,7 +122,7 @@ You can also use narrow table form which as follows: (You
can see part 6 about h
-### Scala API
+## Scala API
NOTE: Remember to assign necessary read and write permissions in advance.
diff --git a/src/UserGuide/Master/Ecosystem-Integration/Writing-Data-on-HDFS.md
b/src/UserGuide/Master/Ecosystem-Integration/Writing-Data-on-HDFS.md
index 4b16899..bbf0b90 100644
--- a/src/UserGuide/Master/Ecosystem-Integration/Writing-Data-on-HDFS.md
+++ b/src/UserGuide/Master/Ecosystem-Integration/Writing-Data-on-HDFS.md
@@ -19,19 +19,19 @@
-->
-## Integration with HDFS
+# Integration with HDFS
-### Shared Storage Architecture
+## Shared Storage Architecture
Currently, TsFiles(including both TsFile and related data files) are supported
to be stored in local file system and hadoop distributed file system(HDFS). It
is very easy to config the storage file system of TSFile.
-#### System architecture
+## System architecture
When you config to store TSFile on HDFS, your data files will be in
distributed storage. The system architecture is as below:
<img style="width:100%; max-width:700px; max-height:600px; margin-left:auto;
margin-right:auto; display:block;"
src="https://alioss.timecho.com/docs/img/github/66922722-35180400-f05a-11e9-8ff0-7dd51716e4a8.png";>
-#### Config and usage
+## Config and usage
To store TSFile and related data files in HDFS, here are the steps:
@@ -155,7 +155,7 @@ Start server, and Tsfile will be stored on HDFS.
To reset storage file system to local, just edit configuration
`tsfile_storage_fs` to `LOCAL`. In this situation, if data files are already on
HDFS, you should either download them to local and move them to your config
data file folder (`../server/target/iotdb-server-X.X.X/data/data` by default),
or restart your process and import data to IoTDB.
-#### Frequent questions
+## Frequent questions
1. What Hadoop version does it support?
diff --git a/src/UserGuide/Master/Ecosystem-Integration/Zeppelin-IoTDB.md
b/src/UserGuide/Master/Ecosystem-Integration/Zeppelin-IoTDB.md
index 34abcd9..027c4b3 100644
--- a/src/UserGuide/Master/Ecosystem-Integration/Zeppelin-IoTDB.md
+++ b/src/UserGuide/Master/Ecosystem-Integration/Zeppelin-IoTDB.md
@@ -19,9 +19,9 @@
-->
-## Zeppelin-IoTDB
+# Zeppelin-IoTDB
-### About Zeppelin
+## About Zeppelin
Zeppelin is a web-based notebook that enables interactive data analytics. You
can connect to data sources and perform interactive operations with SQL, Scala,
etc. The operations can be saved as documents, just like Jupyter. Zeppelin has
already supported many data sources, including Spark, ElasticSearch, Cassandra,
and InfluxDB. Now, we have enabled Zeppelin to operate IoTDB via SQL.
@@ -29,9 +29,9 @@ Zeppelin is a web-based notebook that enables interactive
data analytics. You ca
-### Zeppelin-IoTDB Interpreter
+## Zeppelin-IoTDB Interpreter
-#### System Requirements
+### System Requirements
| IoTDB Version | Java Version | Zeppelin Version |
| :-----------: | :-----------: | :--------------: |
@@ -46,7 +46,7 @@ Install Zeppelin:
Suppose Zeppelin is placed at `$Zeppelin_HOME`.
-#### Build Interpreter
+### Build Interpreter
```
cd $IoTDB_HOME
@@ -61,7 +61,7 @@ The interpreter will be in the folder:
-#### Install Interpreter
+### Install Interpreter
Once you have built your interpreter, create a new folder under the Zeppelin
interpreter directory and put the built interpreter into it.
@@ -73,7 +73,7 @@ Once you have built your interpreter, create a new folder
under the Zeppelin int
-#### Running Zeppelin and IoTDB
+### Running Zeppelin and IoTDB
Go to `$Zeppelin_HOME` and start Zeppelin by running:
@@ -101,7 +101,7 @@ Go to `$IoTDB_HOME` and start IoTDB server:
-### Use Zeppelin-IoTDB
+## Use Zeppelin-IoTDB
Wait for Zeppelin server to start, then visit http://127.0.0.1:8080/
@@ -155,7 +155,7 @@ The above demo notebook can be found at
`$IoTDB_HOME/zeppelin-interpreter/Zeppe
-### Configuration
+## Configuration
You can configure the connection parameters in
http://127.0.0.1:8080/#/interpreter :
diff --git a/src/UserGuide/Master/IoTDB-Introduction/Architecture.md
b/src/UserGuide/Master/IoTDB-Introduction/Architecture.md
index d134e18..9718a00 100644
--- a/src/UserGuide/Master/IoTDB-Introduction/Architecture.md
+++ b/src/UserGuide/Master/IoTDB-Introduction/Architecture.md
@@ -19,7 +19,7 @@
-->
-## System Architecture
+# System Architecture
Besides IoTDB engine, we also developed several components to provide better
IoT service. All components are referred to below as the IoTDB suite, and IoTDB
refers specifically to the IoTDB engine.
diff --git a/src/UserGuide/Master/IoTDB-Introduction/Features.md
b/src/UserGuide/Master/IoTDB-Introduction/Features.md
index 89fb61b..44ba205 100644
--- a/src/UserGuide/Master/IoTDB-Introduction/Features.md
+++ b/src/UserGuide/Master/IoTDB-Introduction/Features.md
@@ -19,7 +19,7 @@
-->
-## Features
+# Features
* Flexible deployment.
diff --git a/src/UserGuide/Master/IoTDB-Introduction/Publication.md
b/src/UserGuide/Master/IoTDB-Introduction/Publication.md
index 9240b22..db23cdb 100644
--- a/src/UserGuide/Master/IoTDB-Introduction/Publication.md
+++ b/src/UserGuide/Master/IoTDB-Introduction/Publication.md
@@ -19,6 +19,8 @@
-->
+# Publication
+
## Research Papers
Apache IoTDB starts at Tsinghua University, School of Software. IoTDB is a
database for managing large amount of time series data with columnar storage,
data encoding, pre-computation, and index techniques. It has SQL-like interface
to write millions of data points per second per node and is optimized to get
query results in few seconds over trillions of data points. It can also be
easily integrated with Apache Hadoop MapReduce and Apache Spark for analytics.
diff --git a/src/UserGuide/Master/Maintenance-Tools/Log-Tool.md
b/src/UserGuide/Master/Maintenance-Tools/Log-Tool.md
index 3b6f859..fb0ae43 100644
--- a/src/UserGuide/Master/Maintenance-Tools/Log-Tool.md
+++ b/src/UserGuide/Master/Maintenance-Tools/Log-Tool.md
@@ -19,7 +19,7 @@
-->
-## System log
+# System log
IoTDB allows users to configure IoTDB system logs (such as log output level)
by modifying the log configuration file. The default location of the system log
configuration file is in \$IOTDB_HOME/conf folder.
@@ -27,9 +27,9 @@ The default log configuration file is named logback.xml. The
user can modify the
At the same time, in order to facilitate the debugging of the system by the
developers and DBAs, we provide several JMX interfaces to dynamically modify
the log configuration, and configure the Log module of the system in real time
without restarting the system.
-### Dynamic System Log Configuration
+## Dynamic System Log Configuration
-#### Connect JMX
+### Connect JMX
Here we use JConsole to connect with JMX.
@@ -44,7 +44,7 @@ In the JMXConfigurator Window, there are 6 operations
provided, as shown in fig
<img style="width:100%; max-width:800px; max-height:600px; margin-left:auto;
margin-right:auto; display:block;"
src="https://alioss.timecho.com/docs/img/github/51577216-09fdeb00-1ef4-11e9-9005-542ad7d9e9e0.png";>
-#### Interface Instruction
+### Interface Instruction
* reloadDefaultConfiguration
diff --git a/src/UserGuide/Master/Maintenance-Tools/MLogParser-Tool.md
b/src/UserGuide/Master/Maintenance-Tools/MLogParser-Tool.md
index cdc55c3..cb146ec 100644
--- a/src/UserGuide/Master/Maintenance-Tools/MLogParser-Tool.md
+++ b/src/UserGuide/Master/Maintenance-Tools/MLogParser-Tool.md
@@ -7,9 +7,9 @@
to you under the Apache License, Version 2.0 (the
"License"); you may not use this file except in compliance
with the License. You may obtain a copy of the License at
-
+
http://www.apache.org/licenses/LICENSE-2.0
-
+
Unless required by applicable law or agreed to in writing,
software distributed under the License is distributed on an
"AS IS" BASIS, WITHOUT WARRANTIES OR CONDITIONS OF ANY
@@ -19,7 +19,7 @@
-->
-## MlogParser Tool
+# MlogParser Tool
After version 0.12.x, IoTDB encodes metadata files into binary format.
@@ -29,7 +29,7 @@ Currently, the tool can only parse mlog.bin file.
If the consensus protocol used in cluster for SchemaRegion is RatisConsensus,
IoTDB won't use mlog.bin file to store metadata and won't generate mlog.bin
file.
-### How to use
+## How to use
Linux/MacOS
> ./print-schema-log.sh -f /your path/mlog.bin -o /your path/mlog.txt
diff --git a/src/UserGuide/Master/Maintenance-Tools/SchemaFileSketch-Tool.md
b/src/UserGuide/Master/Maintenance-Tools/SchemaFileSketch-Tool.md
index 0ccb77c..8fe0a51 100644
--- a/src/UserGuide/Master/Maintenance-Tools/SchemaFileSketch-Tool.md
+++ b/src/UserGuide/Master/Maintenance-Tools/SchemaFileSketch-Tool.md
@@ -7,9 +7,9 @@
to you under the Apache License, Version 2.0 (the
"License"); you may not use this file except in compliance
with the License. You may obtain a copy of the License at
-
+
http://www.apache.org/licenses/LICENSE-2.0
-
+
Unless required by applicable law or agreed to in writing,
software distributed under the License is distributed on an
"AS IS" BASIS, WITHOUT WARRANTIES OR CONDITIONS OF ANY
@@ -19,7 +19,7 @@
-->
-## PBTreeFileSketch Tool
+# PBTreeFileSketch Tool
Since version 1.1, IoTDB could store schema into a persistent slotted file.
@@ -27,7 +27,7 @@ If you want to parse PBTree file into a human-readable way,
you can use this too
The tool can sketch .pst file.
-### How to use
+## How to use
Linux/MacOS
> ./print-pbtree-file.sh -f your/path/to/pbtree.pst -o /your/path/to/sketch.txt
diff --git a/src/UserGuide/Master/Maintenance-Tools/TsFile-Settle-Tool.md
b/src/UserGuide/Master/Maintenance-Tools/TsFile-Settle-Tool.md
index e2cc13d..c8646bd 100644
--- a/src/UserGuide/Master/Maintenance-Tools/TsFile-Settle-Tool.md
+++ b/src/UserGuide/Master/Maintenance-Tools/TsFile-Settle-Tool.md
@@ -19,9 +19,10 @@
-->
-## TsFile Settle tool
+# TsFile Settle tool
+
The TsFile Settle tool is used to rewrite one or more TsFiles that have
modified record files, and submit the TsFile compaction task by sending an RPC
to the DataNode to rewrite the TsFile.
-### Usage:
+## Usage
```shell
#MacOs or Linux
./settle-tsfile.sh -h [host] -p [port] -f [filePaths]
@@ -29,11 +30,11 @@ The TsFile Settle tool is used to rewrite one or more
TsFiles that have modified
.\settle-tsfile.bat -h [host] -p [port] -f [filePaths]
```
The host and port parameters are the host and port of the
DataNodeInternalRPCService. If not specified, the default values are 127.0.0.1
and 10730 respectively. The filePaths parameter specifies the absolute paths of
all TsFiles to be submitted as a compaction task on this DataNode, separated by
spaces. Pass in at least one path.
-### Example:
+## Example
```shell
./settle-tsfile.sh -h 127.0.0.1 -p 10730 -f
/data/sequence/root.sg/0/0/1672133354759-2-0-0.tsfile
/data/sequence/root.sg/0/0/1672306417865-3-0-0.tsfile
/data/sequence/root.sg/0/0/1672306417865-3-0-0.tsfile
```
-### Requirement:
+## Requirement
* Specify at least one TsFile
* All specified TsFiles are in the same space and are continuous, and
cross-space compaction is not supported
* The specified file path is the absolute path of the TsFile of the node where
the specified DataNode is located
diff --git a/src/UserGuide/Master/Maintenance-Tools/Watermark-Tool.md
b/src/UserGuide/Master/Maintenance-Tools/Watermark-Tool.md
index 02a1204..9ec03a9 100644
--- a/src/UserGuide/Master/Maintenance-Tools/Watermark-Tool.md
+++ b/src/UserGuide/Master/Maintenance-Tools/Watermark-Tool.md
@@ -17,13 +17,13 @@ specific language governing permissions and limitations
under the License.
-->
-## Watermark Tool
+# Watermark Tool
This tool has two functions: 1) watermark embedding of the IoTDB query result
and 2) watermark detection of the suspected data.
-### Watermark Embedding
+## Watermark Embedding
-#### Configuration
+### Configuration
Watermark is disabled by default in IoTDB. To enable watermark embedding, the
first thing is to modify the following fields in the configuration file
`iotdb-datanode.properties`:
@@ -45,7 +45,7 @@ Notes:
- GroupBasedLSBMethod uses LSB embedding. `embed_lsb_num` controls the
number of least significant bits available for watermark embedding. The biggger
the `embed_lsb_num`, the larger the varying range of a data point.
- `watermark_secret_key`, `watermark_bit_string` and `watermark_method`
should be kept secret from possible attackers. That is, it is your
responsiblity to take care of `iotdb-datanode.properties`.
-#### Usage Example
+### Usage Example
* step 1. Create a new user Alice, grant read privilege and query
@@ -160,7 +160,7 @@ Note that you can use `revoke watermark_embedding from
user1,user2,...` to revok
Only root can run this command. After root revokes watermark_embedding from
Alice, all query results of Alice are original again.
-### Watermark Detection
+## Watermark Detection
`detect-watermark.sh` and `detect-watermark.bat` are provided for different
platforms.
diff --git a/src/UserGuide/Master/Monitor-Alert/Metric-Tool.md
b/src/UserGuide/Master/Monitor-Alert/Metric-Tool.md
index a4bb701..c737171 100644
--- a/src/UserGuide/Master/Monitor-Alert/Metric-Tool.md
+++ b/src/UserGuide/Master/Monitor-Alert/Metric-Tool.md
@@ -19,6 +19,8 @@
-->
+# Metric Tool
+
Along with IoTDB running, we hope to observe the status of IoTDB, so as to
troubleshoot system problems or discover
potential system risks in time. A series of metrics that can **reflect the
operating status of the system** are system
monitoring metrics.
diff --git a/src/UserGuide/Master/Operators-Functions/Selection.md
b/src/UserGuide/Master/Operators-Functions/Selection.md
index 9a276be..f5e07ba 100644
--- a/src/UserGuide/Master/Operators-Functions/Selection.md
+++ b/src/UserGuide/Master/Operators-Functions/Selection.md
@@ -19,7 +19,7 @@
-->
-## Selector Functions
+# Selector Functions
Currently, IoTDB supports the following selector functions:
diff --git a/src/UserGuide/Master/QuickStart/ClusterQuickStart.md
b/src/UserGuide/Master/QuickStart/ClusterQuickStart.md
index ec01428..d4ab2a3 100644
--- a/src/UserGuide/Master/QuickStart/ClusterQuickStart.md
+++ b/src/UserGuide/Master/QuickStart/ClusterQuickStart.md
@@ -19,18 +19,18 @@
-->
-## Cluster Quick Start
+# Cluster Quick Start
This article uses a local environment as an example to
illustrate how to start, expand, and shrink an IoTDB Cluster.
**Notice: This document is a tutorial for deploying in a pseudo-cluster
environment using different local ports, and is for exercise only. In real
deployment scenarios, you only need to configure the IPV4 address or domain
name of the server, and do not need to change the Node ports.**
-### 1. Prepare the Start Environment
+## 1. Prepare the Start Environment
Unzip the apache-iotdb-1.0.0-all-bin.zip file to cluster0 folder.
-### 2. Start a Minimum Cluster
+## 2. Start a Minimum Cluster
Start the Cluster version with one ConfigNode and one DataNode(1C1D), and
the default number of replicas is one.
@@ -39,7 +39,7 @@ the default number of replicas is one.
./cluster0/sbin/start-datanode.sh
```
-### 3. Verify the Minimum Cluster
+## 3. Verify the Minimum Cluster
+ If everything goes well, the minimum cluster will start successfully. Then,
we can start the Cli for verification.
```
@@ -60,11 +60,11 @@ Total line number = 2
It costs 0.242s
```
-### 4. Prepare the Expanding Environment
+## 4. Prepare the Expanding Environment
Unzip the apache-iotdb-1.0.0-all-bin.zip file to cluster1 and cluster2 folder.
-### 5. Modify the Node Configuration file
+## 5. Modify the Node Configuration file
For folder cluster1:
@@ -114,7 +114,7 @@ For folder cluster2:
| dn\_data\_region\_consensus\_port | 10762 |
| dn\_target\_config\_node\_list | 127.0.0.1:10710 |
-### 6. Expanding the Cluster
+## 6. Expanding the Cluster
Expanding the Cluster to three ConfigNode and three DataNode(3C3D).
The following commands can be executed in arbitrary order.
@@ -126,7 +126,7 @@ The following commands can be executed in arbitrary order.
./cluster2/sbin/start-datanode.sh
```
-### 7. Verify Cluster expansion
+## 7. Verify Cluster expansion
Execute the `show cluster details` command, then the result is shown below:
```
@@ -145,7 +145,7 @@ Total line number = 6
It costs 0.012s
```
-### 8. Shrinking the Cluster
+## 8. Shrinking the Cluster
+ Remove a ConfigNode:
```
@@ -165,7 +165,7 @@ It costs 0.012s
./cluster0/sbin/remove-confignode.sh 4
```
-### 9. Verify Cluster shrinkage
+## 9. Verify Cluster shrinkage
Execute the `show cluster details` command, then the result is shown below:
```
diff --git a/src/UserGuide/Master/QuickStart/WayToGetIoTDB.md
b/src/UserGuide/Master/QuickStart/WayToGetIoTDB.md
index bd8120d..08e0157 100644
--- a/src/UserGuide/Master/QuickStart/WayToGetIoTDB.md
+++ b/src/UserGuide/Master/QuickStart/WayToGetIoTDB.md
@@ -19,7 +19,7 @@
-->
-## Way to get IoTDB binary files
+# Way to get IoTDB binary files
IoTDB provides you three installation methods, you can refer to the following
suggestions, choose one of them:
@@ -27,7 +27,7 @@ IoTDB provides you three installation methods, you can refer
to the following su
* Installation from binary files. Download the binary files from the official
website. This is the recommended method, in which you will get a binary
released package which is out-of-the-box.
* Using Docker:The path to the dockerfile is
https://github.com/apache/iotdb/blob/master/docker
-### Prerequisites
+## Prerequisites
To use IoTDB, you need to have:
@@ -42,7 +42,7 @@ To use IoTDB, you need to have:
You can download the binary file from:
[Download page](https://iotdb.apache.org/Download/)
-### Installation from source code
+## Installation from source code
You can get the released source code from https://iotdb.apache.org/Download/,
or from the git repository https://github.com/apache/iotdb/tree/master
You can download the source code from:
@@ -84,10 +84,10 @@ If you need the jar with dependencies, you can add
parameter `-P get-jar-with-de
Then you can find it under the path `{module.name}/target`.
-### Installation by Docker
+## Installation by Docker
Apache IoTDB' Docker image is released on
[https://hub.docker.com/r/apache/iotdb](https://hub.docker.com/r/apache/iotdb)
Add environments of docker to update the configurations of Apache IoTDB.
-#### Have a try
+### Have a try
```shell
# get IoTDB official image
docker pull apache/iotdb:1.1.0-standalone
@@ -153,7 +153,7 @@ networks:
iotdb:
external: true
```
-#### deploy cluster
+### deploy cluster
Until now, we support host and overlay networks but haven't supported bridge
networks on multiple computers.
Overlay networks see
[1C2D](https://github.com/apache/iotdb/tree/master/docker/src/main/DockerCompose/docker-compose-cluster-1c2d.yml)
and here are the configurations and operation steps to start an IoTDB cluster
with docker using host networks。
diff --git a/src/UserGuide/Master/Write-Data/Session.md
b/src/UserGuide/Master/Write-Data/Session.md
index c3c0ec5..39445f6 100644
--- a/src/UserGuide/Master/Write-Data/Session.md
+++ b/src/UserGuide/Master/Write-Data/Session.md
@@ -20,6 +20,7 @@
-->
# Native API Write
+
The Native API ( Session ) is the most widely used series of APIs of IoTDB,
including multiple APIs, adapted to different data collection scenarios, with
high performance and multi-language support.
## Multi-language API write