This is an automated email from the ASF dual-hosted git repository.

qiaojialin pushed a commit to branch main
in repository https://gitbox.apache.org/repos/asf/iotdb-docs.git
The following commit(s) were added to refs/heads/main by this push:
new 507f2c6 Supplement the Chinese and English documents for "single
machine deployment" (#255)
507f2c6 is described below
commit 507f2c67310595cd21aaa11c8af727e3615c95b4
Author: majialin <[email protected]>
AuthorDate: Fri Jun 21 22:18:43 2024 +0800
Supplement the Chinese and English documents for "single machine
deployment" (#255)
---
src/.vuepress/sidebar/V1.3.x/en.ts | 3 +-
src/.vuepress/sidebar/V1.3.x/zh.ts | 3 +-
src/.vuepress/sidebar_timecho/V1.3.x/en.ts | 3 +-
src/.vuepress/sidebar_timecho/V1.3.x/zh.ts | 3 +-
.../{Deployment-Guide.md => Cluster-Deployment.md} | 61 +-------
...de_timecho.md => Cluster-Deployment_timecho.md} | 57 +------
.../Stand-Alone-Deployment.md | 121 +++++++++++++++
.../Stand-Alone-Deployment_timecho.md | 165 +++++++++++++++++++++
.../{Deployment-Guide.md => Cluster-Deployment.md} | 57 +------
...de_timecho.md => Cluster-Deployment_timecho.md} | 57 +------
.../Stand-Alone-Deployment.md | 121 +++++++++++++++
.../Stand-Alone-Deployment_timecho.md | 165 +++++++++++++++++++++
.../{Deployment-Guide.md => Cluster-Deployment.md} | 52 +------
...de_timecho.md => Cluster-Deployment_timecho.md} | 51 +------
.../Stand-Alone-Deployment.md | 121 +++++++++++++++
.../Stand-Alone-Deployment_timecho.md | 165 +++++++++++++++++++++
.../{Deployment-Guide.md => Cluster-Deployment.md} | 52 +------
...de_timecho.md => Cluster-Deployment_timecho.md} | 52 +------
.../Stand-Alone-Deployment.md | 121 +++++++++++++++
.../Stand-Alone-Deployment_timecho.md | 165 +++++++++++++++++++++
20 files changed, 1160 insertions(+), 435 deletions(-)
diff --git a/src/.vuepress/sidebar/V1.3.x/en.ts
b/src/.vuepress/sidebar/V1.3.x/en.ts
index ed41ec7..5dfd779 100644
--- a/src/.vuepress/sidebar/V1.3.x/en.ts
+++ b/src/.vuepress/sidebar/V1.3.x/en.ts
@@ -69,7 +69,8 @@ export const enSidebar = {
{ text: 'Package Acquisition', link: 'IoTDB-Package' },
{ text: 'Database Resources', link: 'Database-Resources' },
{ text: 'Environment Requirements', link: 'Environment-Requirements' },
- { text: 'Deployment Guide', link: 'Deployment-Guide' },
+ { text: 'Stand-Alone Deployment', link: 'Stand-Alone-Deployment' },
+ { text: 'Cluster Deployment', link: 'Cluster-Deployment' },
{ text: 'Docker Install', link: 'Docker-Install' },
],
},
diff --git a/src/.vuepress/sidebar/V1.3.x/zh.ts
b/src/.vuepress/sidebar/V1.3.x/zh.ts
index 5611284..ac51d8d 100644
--- a/src/.vuepress/sidebar/V1.3.x/zh.ts
+++ b/src/.vuepress/sidebar/V1.3.x/zh.ts
@@ -69,7 +69,8 @@ export const zhSidebar = {
{ text: '安装包获取', link: 'IoTDB-Package' },
{ text: '资源规划', link: 'Database-Resources' },
{ text: '环境要求', link: 'Environment-Requirements' },
- { text: '部署指导', link: 'Deployment-Guide' },
+ { text: '单机版部署', link: 'Stand-Alone-Deployment' },
+ { text: '集群版部署', link: 'Cluster-Deployment' },
{ text: 'docker部署', link: 'Docker-Install' },
],
},
diff --git a/src/.vuepress/sidebar_timecho/V1.3.x/en.ts
b/src/.vuepress/sidebar_timecho/V1.3.x/en.ts
index 20ee437..04fa7d3 100644
--- a/src/.vuepress/sidebar_timecho/V1.3.x/en.ts
+++ b/src/.vuepress/sidebar_timecho/V1.3.x/en.ts
@@ -69,7 +69,8 @@ export const enSidebar = {
{ text: 'Package Acquisition', link: 'IoTDB-Package_timecho' },
{ text: 'Database Resources', link: 'Database-Resources' },
{ text: 'Environment Requirements', link: 'Environment-Requirements' },
- { text: 'Deployment Guide', link: 'Deployment-Guide_timecho' },
+ { text: 'Stand-Alone Deployment', link:
'Stand-Alone-Deployment_timecho' },
+ { text: 'Cluster Deployment', link: 'Cluster-Deployment_timecho' },
{ text: 'Docker Install', link: 'Docker-Install' },
{ text: 'Monitoring-Board-Install-and-Deploy', link:
'Monitoring-Board-Install-and-Deploy' },
],
diff --git a/src/.vuepress/sidebar_timecho/V1.3.x/zh.ts
b/src/.vuepress/sidebar_timecho/V1.3.x/zh.ts
index 487c01a..153f819 100644
--- a/src/.vuepress/sidebar_timecho/V1.3.x/zh.ts
+++ b/src/.vuepress/sidebar_timecho/V1.3.x/zh.ts
@@ -69,7 +69,8 @@ export const zhSidebar = {
{ text: '安装包获取', link: 'IoTDB-Package_timecho' },
{ text: '资源规划', link: 'Database-Resources' },
{ text: '环境要求', link: 'Environment-Requirements' },
- { text: '部署指导', link: 'Deployment-Guide_timecho' },
+ { text: '单机版部署', link: 'Stand-Alone-Deployment_timecho' },
+ { text: '集群版部署', link: 'Cluster-Deployment_timecho' },
{ text: 'docker部署', link: 'Docker-Install' },
{ text: '监控面板安装部署', link: 'Monitoring-Board-Install-and-Deploy' },
],
diff --git
a/src/UserGuide/Master/Deployment-and-Maintenance/Deployment-Guide.md
b/src/UserGuide/Master/Deployment-and-Maintenance/Cluster-Deployment.md
similarity index 92%
rename from src/UserGuide/Master/Deployment-and-Maintenance/Deployment-Guide.md
rename to src/UserGuide/Master/Deployment-and-Maintenance/Cluster-Deployment.md
index 89c95a4..7d81282 100644
--- a/src/UserGuide/Master/Deployment-and-Maintenance/Deployment-Guide.md
+++ b/src/UserGuide/Master/Deployment-and-Maintenance/Cluster-Deployment.md
@@ -19,66 +19,7 @@
-->
-# Deployment Guide
-
-## Stand-Alone Deployment
-
-This short guide will walk you through the basic process of using IoTDB. For a
more-complete guide, please visit our website's [User
Guide](../IoTDB-Introduction/What-is-IoTDB.md).
-
-### Prerequisites
-
-To use IoTDB, you need to have:
-
-1. Java >= 1.8 (Please make sure the environment path has been set)
-2. Set the max open files num as 65535 to avoid "too many open files" problem.
-
-### Installation
-
-IoTDB provides you three installation methods, you can refer to the following
suggestions, choose one of them:
-
-* Installation from source code. If you need to modify the code yourself, you
can use this method.
-* Installation from binary files. Download the binary files from the official
website. This is the recommended method, in which you will get a binary
released package which is out-of-the-box.
-* Using Docker:The path to the dockerfile is
[github](https://github.com/apache/iotdb/blob/master/docker/src/main)
-
-
-### Download
-
-You can download the binary file from:
-[Download Page](https://iotdb.apache.org/Download/)
-
-### Configurations
-
-Configuration files are under "conf" folder
-
-* environment config module (`datanode-env.bat`, `datanode-env.sh`),
-* system config module (`iotdb-datanode.properties`)
-* log config module (`logback.xml`).
-
-For more, see [Config](../Reference/DataNode-Config-Manual.md) in detail.
-
-### Start
-
-You can go through the following step to test the installation, if there is no
error after execution, the installation is completed.
-
-#### Start IoTDB
-
-IoTDB is a database based on distributed system. To launch IoTDB, you can
first start standalone mode (i.e. 1 ConfigNode and 1 DataNode) to check.
-
-Users can start IoTDB standalone mode by the start-standalone script under the
sbin folder.
-
-```
-# Unix/OS X
-> bash sbin/start-standalone.sh
-```
-
-```
-# Windows
-> sbin\start-standalone.bat
-```
-
-Note: Currently, To run standalone mode, you need to ensure that all addresses
are set to 127.0.0.1, If you need to access the IoTDB from a machine different
from the one where the IoTDB is located, please change the configuration item
`dn_rpc_address` to the IP of the machine where the IoTDB lives. And
replication factors set to 1, which is by now the default setting.
-Besides, it's recommended to use SimpleConsensus in this mode, since it brings
additional efficiency.
-
+# Cluster Deployment
## Cluster Deployment
This article uses a local environment as an example to
illustrate how to start, expand, and shrink an IoTDB Cluster.
diff --git
a/src/UserGuide/Master/Deployment-and-Maintenance/Deployment-Guide_timecho.md
b/src/UserGuide/Master/Deployment-and-Maintenance/Cluster-Deployment_timecho.md
similarity index 97%
rename from
src/UserGuide/Master/Deployment-and-Maintenance/Deployment-Guide_timecho.md
rename to
src/UserGuide/Master/Deployment-and-Maintenance/Cluster-Deployment_timecho.md
index 3bfc0cf..aeff288 100644
---
a/src/UserGuide/Master/Deployment-and-Maintenance/Deployment-Guide_timecho.md
+++
b/src/UserGuide/Master/Deployment-and-Maintenance/Cluster-Deployment_timecho.md
@@ -19,62 +19,7 @@
-->
-# Deployment Guide
-
-## Stand-Alone Deployment
-
-This short guide will walk you through the basic process of using IoTDB. For a
more-complete guide, please visit our website's [User
Guide](../IoTDB-Introduction/What-is-IoTDB.md).
-
-### Prerequisites
-
-To use IoTDB, you need to have:
-
-1. Java >= 1.8 (Please make sure the environment path has been set)
-2. Set the max open files num as 65535 to avoid "too many open files" problem.
-
-### Installation
-
-IoTDB provides you three installation methods, you can refer to the following
suggestions, choose one of them:
-
-* Installation from source code. If you need to modify the code yourself, you
can use this method.
-* Installation from binary files. Download the binary files from the official
website. This is the recommended method, in which you will get a binary
released package which is out-of-the-box.
-* Using Docker:The path to the dockerfile is
[github](https://github.com/apache/iotdb/blob/master/docker/src/main)
-
-
-### Download
-
-You can download the binary file from:
-[Download Page](https://iotdb.apache.org/Download/)
-
-### Configurations
-
-Configuration files are under "conf" folder
-
-* environment config module (`datanode-env.bat`, `datanode-env.sh`),
-* system config module (`iotdb-datanode.properties`)
-* log config module (`logback.xml`).
-
-For more, see [Config](../Reference/DataNode-Config-Manual.md) in detail.
-
-### Start
-
-You can go through the following step to test the installation, if there is no
error after execution, the installation is completed.
-
-#### Start IoTDB
-
-IoTDB is a database based on distributed system. To launch IoTDB, you can
first start standalone mode (i.e. 1 ConfigNode and 1 DataNode) to check.
-
-Users can start IoTDB standalone mode by the start-standalone script under the
sbin folder.
-
-```
-# Unix/OS X
-> bash sbin/start-standalone.sh
-```
-
-```
-# Windows
-> sbin\start-standalone.bat
-```
+# Cluster Deployment
## Cluster deployment(Cluster management tool)
diff --git
a/src/UserGuide/Master/Deployment-and-Maintenance/Stand-Alone-Deployment.md
b/src/UserGuide/Master/Deployment-and-Maintenance/Stand-Alone-Deployment.md
new file mode 100644
index 0000000..7da63d3
--- /dev/null
+++ b/src/UserGuide/Master/Deployment-and-Maintenance/Stand-Alone-Deployment.md
@@ -0,0 +1,121 @@
+<!--
+
+ Licensed to the Apache Software Foundation (ASF) under one
+ or more contributor license agreements. See the NOTICE file
+ distributed with this work for additional information
+ regarding copyright ownership. The ASF licenses this file
+ to you under the Apache License, Version 2.0 (the
+ "License"); you may not use this file except in compliance
+ with the License. You may obtain a copy of the License at
+
+ http://www.apache.org/licenses/LICENSE-2.0
+
+ Unless required by applicable law or agreed to in writing,
+ software distributed under the License is distributed on an
+ "AS IS" BASIS, WITHOUT WARRANTIES OR CONDITIONS OF ANY
+ KIND, either express or implied. See the License for the
+ specific language governing permissions and limitations
+ under the License.
+
+-->
+# Stand-Alone Deployment
+
+## Matters Needing Attention
+
+1. It is recommended to prioritize using 'hostname' for IP configuration
during deployment, which can avoid the problem of modifying the host IP in the
later stage and causing the database to fail to start. To set the host name,
you need to configure/etc/hosts on the target server. For example, if the local
IP is 192.168.1.3 and the host name is iotdb-1, you can use the following
command to set the server's host name and configure IoTDB's'
cn_internal-address' using the host name dn_inte [...]
+
+ ``` Shell
+ echo "192.168.1.3 iotdb-1" >> /etc/hosts
+ ```
+
+2. Some parameters cannot be modified after the first startup. Please refer to
the "Parameter Configuration" section below for settings
+
+## Installation Steps
+
+### 1、Unzip the installation package and enter the installation directory
+
+```Shell
+unzip apache-iotdb-{version}-all-bin.zip
+cd apache-iotdb-{version}-all-bin
+```
+
+### 2、Parameter Configuration
+
+#### Environment Script Configuration
+
+- ./conf/confignode env.sh (./conf/confignode env.bat) configuration
+
+| **Configuration** | **Description**
| **Default** | **Recommended value**
| Note |
+| :---------------: |
:----------------------------------------------------------: | :---------: |
:----------------------------------------------------------: |
:---------------------------------: |
+| MEMORY_SIZE | The total amount of memory that IoTDB ConfigNode nodes
can use | empty | Can be filled in as needed, and the system will
allocate memory based on the filled in values | Restarting the service takes
effect |
+
+- ./conf/datanode-env.sh(./conf/datanode-env.bat)configuration
+
+| **Configuration** | **Description**
| **Default** | **Recommended value**
| Note |
+| :---------------: |
:----------------------------------------------------------: | :---------: |
:----------------------------------------------------------: |
:---------------------------------: |
+| MEMORY_SIZE | The total amount of memory that IoTDB DataNode nodes can
use | empty | Can be filled in as needed, and the system will allocate
memory based on the filled in values | Restarting the service takes effect |
+
+#### System General Configuration
+
+Open the general configuration file (./conf/iotdb common. properties file) and
set the following parameters:
+
+| **Configuration** | **Description**
| **Default** | **Recommended value**
| Note |
+| :-----------------------: |
:----------------------------------------------------------: | :------------: |
:----------------------------------------------------------: |
:---------------------------------------------------: |
+| cluster_name | Cluster Name
| defaultCluster | The cluster name can be set as needed, and if
there are no special needs, the default can be kept | Cannot be modified
after initial startup |
+| schema_replication_factor | Number of metadata replicas, set to 1 for the
standalone version here | 1 | 1
| Default 1, cannot be modified after the first startup
|
+| data_replication_factor | Number of data replicas, set to 1 for the
standalone version here | 1 | 1
| Default 1, cannot be modified after the first startup
|
+
+#### ConfigNode Configuration
+
+Open the ConfigNode configuration file (./conf/iotdb configure. properties
file) and set the following parameters:
+
+| **Configuration** | **Description**
| **Default** | **Recommended value**
| Note |
+| :-----------------: |
:----------------------------------------------------------: | :-------------:
| :----------------------------------------------------------: |
:--------------------------------------: |
+| cn_internal_address | The address used by ConfigNode for communication
within the cluster | 127.0.0.1 | The IPV4 address or host name of the
server where it is located, and it is recommended to use host name | Cannot be
modified after initial startup |
+| cn_internal_port | The port used by ConfigNode for communication within
the cluster | 10710 | 10710
| Cannot be modified after initial startup |
+| cn_consensus_port | The port used for ConfigNode replica group consensus
protocol communication | 10720 | 10720
| Cannot be modified after initial startup |
+| cn_seed_config_node | The address of the ConfigNode that the node connects
to when registering to join the cluster, cn_internal_address:cn_internal_port |
127.0.0.1:10710 | cn_internal_address:cn_internal_port
| Cannot be modified after initial startup |
+
+#### DataNode Configuration
+
+Open the DataNode configuration file/ conf/iotdb-datanode.properties,Set the
following parameters:
+
+| **Configuration** | **Description**
| **Default** | **Recommended value**
| **Note** |
+| :-----------------------------: |
:----------------------------------------------------------: | :-------------:
| :----------------------------------------------------------: |
:--------------------------------------- |
+| dn_rpc_address | The address of the client RPC
service | 0.0.0.0 | The IPV4 address or host name of the
server where it is located, and it is recommended to use host name | Restarting
the service takes effect |
+| dn_rpc_port | The port of the client RPC
service | 6667 | 6667
| Restarting the service takes effect |
+| dn_internal_address | The address used by DataNode for
communication within the cluster | 127.0.0.1 | The IPV4 address or host
name of the server where it is located, and it is recommended to use host name
| Cannot be modified after initial startup |
+| dn_internal_port | The port used by DataNode for
communication within the cluster | 10730 |
10730 | Cannot be modified after initial startup |
+| dn_mpp_data_exchange_port | The port used by DataNode to receive
data streams | 10740 | 10740
| Cannot be modified after initial startup |
+| dn_data_region_consensus_port | The port used by DataNode for data replica
consensus protocol communication | 10750 |
10750 | Cannot be modified after initial startup |
+| dn_schema_region_consensus_port | The port used by DataNode for metadata
replica consensus protocol communication | 10760 |
10760 | Cannot be modified after initial
startup |
+| dn_seed_config_node | The ConfigNode address that the node
connects to when registering to join the cluster, i.e. cn_internal-address:
cn_internal_port | 127.0.0.1:10710 |
cn_internal_address:cn_internal_port | Cannot be modified after
initial startup |
+
+### 3、Start ConfigNode
+
+Enter the sbin directory of iotdb and start confignode
+
+```Shell
+./start-confignode.sh -d #The "- d" parameter will start in the
background
+```
+
+### 4、Start DataNode
+
+Enter the sbin directory of iotdb and start datanode:
+
+```Shell
+cd sbin
+./start-datanode.sh -d #The "- d" parameter will start in the background
+```
+
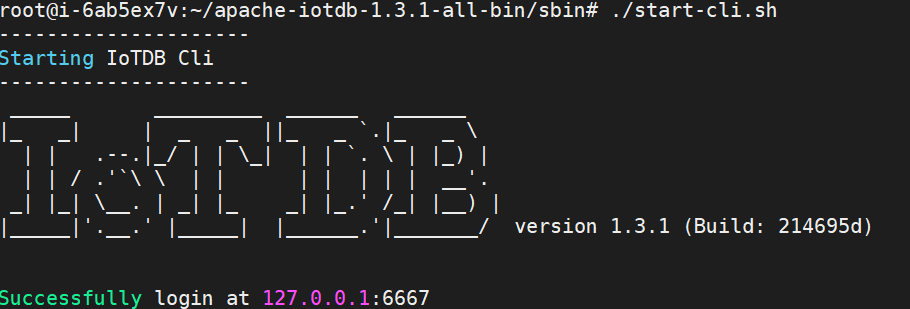
+### 5、Verify Deployment
+
+Can be executed directly/ Cli startup script in sbin directory:
+
+```Shell
+./start-cli.sh -h ip(local IP or domain name) -p port(6667)
+```
+
+After successful startup, the following interface will appear displaying
successful installation of IOTDB.
+
+
\ No newline at end of file
diff --git
a/src/UserGuide/Master/Deployment-and-Maintenance/Stand-Alone-Deployment_timecho.md
b/src/UserGuide/Master/Deployment-and-Maintenance/Stand-Alone-Deployment_timecho.md
new file mode 100644
index 0000000..d0e01c0
--- /dev/null
+++
b/src/UserGuide/Master/Deployment-and-Maintenance/Stand-Alone-Deployment_timecho.md
@@ -0,0 +1,165 @@
+<!--
+
+ Licensed to the Apache Software Foundation (ASF) under one
+ or more contributor license agreements. See the NOTICE file
+ distributed with this work for additional information
+ regarding copyright ownership. The ASF licenses this file
+ to you under the Apache License, Version 2.0 (the
+ "License"); you may not use this file except in compliance
+ with the License. You may obtain a copy of the License at
+
+ http://www.apache.org/licenses/LICENSE-2.0
+
+ Unless required by applicable law or agreed to in writing,
+ software distributed under the License is distributed on an
+ "AS IS" BASIS, WITHOUT WARRANTIES OR CONDITIONS OF ANY
+ KIND, either express or implied. See the License for the
+ specific language governing permissions and limitations
+ under the License.
+
+-->
+# Stand-Alone Deployment
+
+This chapter will introduce how to start an IoTDB standalone instance, which
includes 1 ConfigNode and 1 DataNode (commonly known as 1C1D).
+
+## Matters Needing Attention
+
+1. It is recommended to prioritize using 'hostname' for IP configuration
during deployment, which can avoid the problem of modifying the host IP in the
later stage and causing the database to fail to start. To set the host name,
you need to configure/etc/hosts on the target server. For example, if the local
IP is 192.168.1.3 and the host name is iotdb-1, you can use the following
command to set the server's host name and configure IoTDB's'
cn_internal-address' using the host name dn_inte [...]
+
+ ```shell
+ echo "192.168.1.3 iotdb-1" >> /etc/hosts
+ ```
+
+2. Some parameters cannot be modified after the first startup. Please refer to
the "Parameter Configuration" section below for settings
+
+3. It is recommended to deploy a monitoring panel, which can monitor important
operational indicators and keep track of database operation status at any time.
The monitoring panel can be obtained by contacting the business department, and
the steps for deploying the monitoring panel can be referred to:[Monitoring
Board Install and
Deploy](https://timecho.com/docs/UserGuide/latest/Deployment-and-Maintenance/Monitoring-Board-Install-and-Deploy.html)。
+
+## Installation Steps
+
+### 1、Unzip the installation package and enter the installation directory
+
+```shell
+unzip iotdb-enterprise-{version}-bin.zip
+cd iotdb-enterprise-{version}-bin
+```
+
+### 2、Parameter Configuration
+
+#### Environment Script Configuration
+
+- ./conf/confignode env.sh (./conf/confignode env.bat) configuration
+
+| **Configuration** | **Description**
| **Default** | **Recommended value**
| Note |
+| :---------------: |
:----------------------------------------------------------: | :---------: |
:----------------------------------------------------------: |
:---------------------------------: |
+| MEMORY_SIZE | The total amount of memory that IoTDB ConfigNode nodes
can use | empty | Can be filled in as needed, and the system will
allocate memory based on the filled in values | Restarting the service takes
effect |
+
+- ./conf/datanode-env.sh(./conf/datanode-env.bat)configuration
+
+| **Configuration** | **Description**
| **Default** | **Recommended value**
| Note |
+| :---------------: |
:----------------------------------------------------------: | :---------: |
:----------------------------------------------------------: |
:---------------------------------: |
+| MEMORY_SIZE | The total amount of memory that IoTDB DataNode nodes can
use | empty | Can be filled in as needed, and the system will allocate
memory based on the filled in values | Restarting the service takes effect |
+
+#### System General Configuration
+
+Open the general configuration file (./conf/iotdb common.properties file) and
set the following parameters:
+
+| **Configuration** | **Description**
| **Default** | **Recommended value**
| Note |
+| :-----------------------: |
:----------------------------------------------------------: | :------------: |
:----------------------------------------------------------: |
:---------------------------------------------------: |
+| cluster_name | Cluster Name
| defaultCluster | The cluster name can be set as needed, and if
there are no special needs, the default can be kept | Cannot be modified
after initial startup |
+| schema_replication_factor | Number of metadata replicas, set to 1 for the
standalone version here | 1 | 1
| Default 1, cannot be modified after the first startup
|
+| data_replication_factor | Number of data replicas, set to 1 for the
standalone version here | 1 | 1
| Default 1, cannot be modified after the first startup
|
+
+#### ConfigNode Configuration
+
+Open the ConfigNode configuration file (./conf/iotdb configure.properties
file) and set the following parameters:
+
+| **Configuration** | **Description**
| **Default** | **Recommended value**
| Note |
+| :-----------------: |
:----------------------------------------------------------: | :-------------:
| :----------------------------------------------------------: |
:--------------------------------------: |
+| cn_internal_address | The address used by ConfigNode for communication
within the cluster | 127.0.0.1 | The IPV4 address or host name of the
server where it is located, and it is recommended to use host name | Cannot be
modified after initial startup |
+| cn_internal_port | The port used by ConfigNode for communication within
the cluster | 10710 | 10710
| Cannot be modified after initial startup |
+| cn_consensus_port | The port used for ConfigNode replica group consensus
protocol communication | 10720 | 10720
| Cannot be modified after initial startup |
+| cn_seed_config_node | The address of the ConfigNode that the node connects
to when registering to join the cluster, cn_internal_address:cn_internal_port |
127.0.0.1:10710 | cn_internal_address:cn_internal_port
| Cannot be modified after initial startup |
+
+#### DataNode Configuration
+
+Open the DataNode configuration file/ conf/iotdb-datanode.properties, Set the
following parameters:
+
+| **Configuration** | **Description**
| **Default** | **Recommended value**
| **Note** |
+| :------------------------------ |
:----------------------------------------------------------- | :--------------
| :----------------------------------------------------------- |
:--------------------------------------- |
+| dn_rpc_address | The address of the client RPC service
| 0.0.0.0 | The IPV4 address or host name of the
server where it is located, and it is recommended to use host name | Restarting
the service takes effect |
+| dn_rpc_port | The port of the client RPC service
| 6667 | 6667
| Restarting the service takes effect |
+| dn_internal_address | The address used by DataNode for
communication within the cluster | 127.0.0.1 | The IPV4 address or host
name of the server where it is located, and it is recommended to use host name
| Cannot be modified after initial startup |
+| dn_internal_port | The port used by DataNode for
communication within the cluster | 10730 | 10730
| Cannot be modified after initial startup |
+| dn_mpp_data_exchange_port | The port used by DataNode to receive data
streams | 10740 | 10740
| Cannot be modified after initial startup |
+| dn_data_region_consensus_port | The port used by DataNode for data replica
consensus protocol communication | 10750 | 10750
| Cannot be modified after initial startup |
+| dn_schema_region_consensus_port | The port used by DataNode for metadata
replica consensus protocol communication | 10760 | 10760
| Cannot be modified after initial
startup |
+| dn_seed_config_node | The ConfigNode address that the node
connects to when registering to join the cluster, i.e. cn_internal-address:
cn_internal_port | 127.0.0.1:10710 | cn_internal_address:cn_internal_port
| Cannot be modified after initial startup |
+
+### 3、Start ConfigNode
+
+Enter the sbin directory of iotdb and start confignode
+
+```shell
+./start-confignode.sh -d #The "- d" parameter will start in the
background
+```
+
+### 4、Activate Database
+
+#### Method 1: Activate file copy activation
+
+- After starting the confignode node, enter the activation folder and copy the
systeminfo file to the Timecho staff
+- Received the license file returned by the staff
+- Place the license file in the activation folder of the corresponding node;
+
+#### Method 2: Activate Script Activation
+
+- Obtain the required machine code for activation, enter the sbin directory of
the installation directory, and execute the activation script:
+
+```shell
+ cd sbin
+./start-activate.sh
+```
+
+- The following information is displayed. Please copy the machine code (i.e.
the string of characters) to the Timecho staff:
+
+```shell
+Please copy the system_info's content and send it to Timecho:
+Y17hFA0xRCE1TmkVxILuCIEPc7uJcr5bzlXWiptw8uZTmTX5aThfypQdLUIhMljw075hNRSicyvyJR9JM7QaNm1gcFZPHVRWVXIiY5IlZkXdxCVc1erXMsbCqUYsR2R2Mw4PSpFJsUF5jHWSoFIIjQ2bmJFW5P52KCccFMVeHTc=
+Please enter license:
+```
+
+- Enter the activation code returned by the staff into the previous command
line prompt 'Please enter license:', as shown below:
+
+```shell
+Please enter license:
+JJw+MmF+AtexsfgNGOFgTm83Bxxxxxxxxxxxxxxxxxxxxxxxxxxxxxxxxxxxxxxxxm6pF+APW1CiXLTSijK9Qh3nsLgzrW8OJPh26Vl6ljKUpCvpTiw==
+License has been stored to sbin/../activation/license
+Import completed. Please start cluster and excute 'show cluster' to verify
activation status
+```
+
+### 5、Start DataNode
+
+Enter the sbin directory of iotdb and start datanode:
+
+```shell
+cd sbin
+./start-datanode.sh -d # The "- d" parameter will start in the background
+```
+
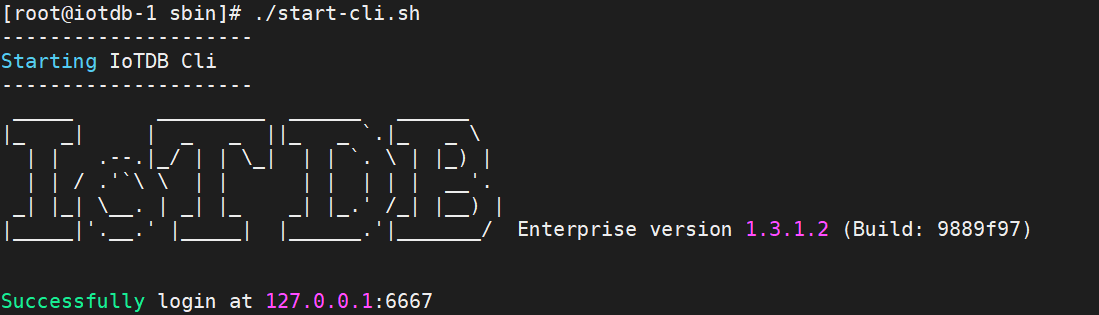
+### 6、Verify Deployment
+
+Can be executed directly/ Cli startup script in sbin directory:
+
+```shell
+./start-cli.sh -h ip(local IP or domain name) -p port(6667)
+```
+
+After successful startup, the following interface will appear displaying
successful installation of IOTDB.
+
+
+
+After the installation success interface appears, continue to check if the
activation is successful and use the `show cluster`command
+
+When you see the display "Activated" on the far right, it indicates successful
activation
+
+
\ No newline at end of file
diff --git
a/src/UserGuide/latest/Deployment-and-Maintenance/Deployment-Guide.md
b/src/UserGuide/latest/Deployment-and-Maintenance/Cluster-Deployment.md
similarity index 93%
rename from src/UserGuide/latest/Deployment-and-Maintenance/Deployment-Guide.md
rename to src/UserGuide/latest/Deployment-and-Maintenance/Cluster-Deployment.md
index 2d00df9..6aaa032 100644
--- a/src/UserGuide/latest/Deployment-and-Maintenance/Deployment-Guide.md
+++ b/src/UserGuide/latest/Deployment-and-Maintenance/Cluster-Deployment.md
@@ -19,62 +19,7 @@
-->
-# Deployment Guide
-
-## Stand-Alone Deployment
-
-This short guide will walk you through the basic process of using IoTDB. For a
more-complete guide, please visit our website's [User
Guide](../IoTDB-Introduction/What-is-IoTDB.md).
-
-### Prerequisites
-
-To use IoTDB, you need to have:
-
-1. Java >= 1.8 (Please make sure the environment path has been set)
-2. Set the max open files num as 65535 to avoid "too many open files" problem.
-
-### Installation
-
-IoTDB provides you three installation methods, you can refer to the following
suggestions, choose one of them:
-
-* Installation from source code. If you need to modify the code yourself, you
can use this method.
-* Installation from binary files. Download the binary files from the official
website. This is the recommended method, in which you will get a binary
released package which is out-of-the-box.
-* Using Docker:The path to the dockerfile is
[github](https://github.com/apache/iotdb/blob/master/docker/src/main)
-
-
-### Download
-
-You can download the binary file from:
-[Download Page](https://iotdb.apache.org/Download/)
-
-### Configurations
-
-Configuration files are under "conf" folder
-
-* environment config module (`datanode-env.bat`, `datanode-env.sh`),
-* system config module (`iotdb-datanode.properties`)
-* log config module (`logback.xml`).
-
-For more, see [Config](../Reference/DataNode-Config-Manual.md) in detail.
-
-### Start
-
-You can go through the following step to test the installation, if there is no
error after execution, the installation is completed.
-
-#### Start IoTDB
-
-IoTDB is a database based on distributed system. To launch IoTDB, you can
first start standalone mode (i.e. 1 ConfigNode and 1 DataNode) to check.
-
-Users can start IoTDB standalone mode by the start-standalone script under the
sbin folder.
-
-```
-# Unix/OS X
-> bash sbin/start-standalone.sh
-```
-
-```
-# Windows
-> sbin\start-standalone.bat
-```
+# Cluster Deployment
## Cluster Deployment
This article uses a local environment as an example to
diff --git
a/src/UserGuide/latest/Deployment-and-Maintenance/Deployment-Guide_timecho.md
b/src/UserGuide/latest/Deployment-and-Maintenance/Cluster-Deployment_timecho.md
similarity index 97%
rename from
src/UserGuide/latest/Deployment-and-Maintenance/Deployment-Guide_timecho.md
rename to
src/UserGuide/latest/Deployment-and-Maintenance/Cluster-Deployment_timecho.md
index b4e49b7..6379e78 100644
---
a/src/UserGuide/latest/Deployment-and-Maintenance/Deployment-Guide_timecho.md
+++
b/src/UserGuide/latest/Deployment-and-Maintenance/Cluster-Deployment_timecho.md
@@ -19,62 +19,7 @@
-->
-# Deployment Guide
-
-## Stand-Alone Deployment
-
-This short guide will walk you through the basic process of using IoTDB. For a
more-complete guide, please visit our website's [User
Guide](../IoTDB-Introduction/What-is-IoTDB.md).
-
-### Prerequisites
-
-To use IoTDB, you need to have:
-
-1. Java >= 1.8 (Please make sure the environment path has been set)
-2. Set the max open files num as 65535 to avoid "too many open files" problem.
-
-### Installation
-
-IoTDB provides you three installation methods, you can refer to the following
suggestions, choose one of them:
-
-* Installation from source code. If you need to modify the code yourself, you
can use this method.
-* Installation from binary files. Download the binary files from the official
website. This is the recommended method, in which you will get a binary
released package which is out-of-the-box.
-* Using Docker:The path to the dockerfile is
[github](https://github.com/apache/iotdb/blob/master/docker/src/main)
-
-
-### Download
-
-You can download the binary file from:
-[Download Page](https://iotdb.apache.org/Download/)
-
-### Configurations
-
-Configuration files are under "conf" folder
-
-* environment config module (`datanode-env.bat`, `datanode-env.sh`),
-* system config module (`iotdb-datanode.properties`)
-* log config module (`logback.xml`).
-
-For more, see [Config](../Reference/DataNode-Config-Manual.md) in detail.
-
-### Start
-
-You can go through the following step to test the installation, if there is no
error after execution, the installation is completed.
-
-#### Start IoTDB
-
-IoTDB is a database based on distributed system. To launch IoTDB, you can
first start standalone mode (i.e. 1 ConfigNode and 1 DataNode) to check.
-
-Users can start IoTDB standalone mode by the start-standalone script under the
sbin folder.
-
-```
-# Unix/OS X
-> bash sbin/start-standalone.sh
-```
-
-```
-# Windows
-> sbin\start-standalone.bat
-```
+# Cluster Deployment
## Cluster deployment(Cluster management tool)
diff --git
a/src/UserGuide/latest/Deployment-and-Maintenance/Stand-Alone-Deployment.md
b/src/UserGuide/latest/Deployment-and-Maintenance/Stand-Alone-Deployment.md
new file mode 100644
index 0000000..7da63d3
--- /dev/null
+++ b/src/UserGuide/latest/Deployment-and-Maintenance/Stand-Alone-Deployment.md
@@ -0,0 +1,121 @@
+<!--
+
+ Licensed to the Apache Software Foundation (ASF) under one
+ or more contributor license agreements. See the NOTICE file
+ distributed with this work for additional information
+ regarding copyright ownership. The ASF licenses this file
+ to you under the Apache License, Version 2.0 (the
+ "License"); you may not use this file except in compliance
+ with the License. You may obtain a copy of the License at
+
+ http://www.apache.org/licenses/LICENSE-2.0
+
+ Unless required by applicable law or agreed to in writing,
+ software distributed under the License is distributed on an
+ "AS IS" BASIS, WITHOUT WARRANTIES OR CONDITIONS OF ANY
+ KIND, either express or implied. See the License for the
+ specific language governing permissions and limitations
+ under the License.
+
+-->
+# Stand-Alone Deployment
+
+## Matters Needing Attention
+
+1. It is recommended to prioritize using 'hostname' for IP configuration
during deployment, which can avoid the problem of modifying the host IP in the
later stage and causing the database to fail to start. To set the host name,
you need to configure/etc/hosts on the target server. For example, if the local
IP is 192.168.1.3 and the host name is iotdb-1, you can use the following
command to set the server's host name and configure IoTDB's'
cn_internal-address' using the host name dn_inte [...]
+
+ ``` Shell
+ echo "192.168.1.3 iotdb-1" >> /etc/hosts
+ ```
+
+2. Some parameters cannot be modified after the first startup. Please refer to
the "Parameter Configuration" section below for settings
+
+## Installation Steps
+
+### 1、Unzip the installation package and enter the installation directory
+
+```Shell
+unzip apache-iotdb-{version}-all-bin.zip
+cd apache-iotdb-{version}-all-bin
+```
+
+### 2、Parameter Configuration
+
+#### Environment Script Configuration
+
+- ./conf/confignode env.sh (./conf/confignode env.bat) configuration
+
+| **Configuration** | **Description**
| **Default** | **Recommended value**
| Note |
+| :---------------: |
:----------------------------------------------------------: | :---------: |
:----------------------------------------------------------: |
:---------------------------------: |
+| MEMORY_SIZE | The total amount of memory that IoTDB ConfigNode nodes
can use | empty | Can be filled in as needed, and the system will
allocate memory based on the filled in values | Restarting the service takes
effect |
+
+- ./conf/datanode-env.sh(./conf/datanode-env.bat)configuration
+
+| **Configuration** | **Description**
| **Default** | **Recommended value**
| Note |
+| :---------------: |
:----------------------------------------------------------: | :---------: |
:----------------------------------------------------------: |
:---------------------------------: |
+| MEMORY_SIZE | The total amount of memory that IoTDB DataNode nodes can
use | empty | Can be filled in as needed, and the system will allocate
memory based on the filled in values | Restarting the service takes effect |
+
+#### System General Configuration
+
+Open the general configuration file (./conf/iotdb common. properties file) and
set the following parameters:
+
+| **Configuration** | **Description**
| **Default** | **Recommended value**
| Note |
+| :-----------------------: |
:----------------------------------------------------------: | :------------: |
:----------------------------------------------------------: |
:---------------------------------------------------: |
+| cluster_name | Cluster Name
| defaultCluster | The cluster name can be set as needed, and if
there are no special needs, the default can be kept | Cannot be modified
after initial startup |
+| schema_replication_factor | Number of metadata replicas, set to 1 for the
standalone version here | 1 | 1
| Default 1, cannot be modified after the first startup
|
+| data_replication_factor | Number of data replicas, set to 1 for the
standalone version here | 1 | 1
| Default 1, cannot be modified after the first startup
|
+
+#### ConfigNode Configuration
+
+Open the ConfigNode configuration file (./conf/iotdb configure. properties
file) and set the following parameters:
+
+| **Configuration** | **Description**
| **Default** | **Recommended value**
| Note |
+| :-----------------: |
:----------------------------------------------------------: | :-------------:
| :----------------------------------------------------------: |
:--------------------------------------: |
+| cn_internal_address | The address used by ConfigNode for communication
within the cluster | 127.0.0.1 | The IPV4 address or host name of the
server where it is located, and it is recommended to use host name | Cannot be
modified after initial startup |
+| cn_internal_port | The port used by ConfigNode for communication within
the cluster | 10710 | 10710
| Cannot be modified after initial startup |
+| cn_consensus_port | The port used for ConfigNode replica group consensus
protocol communication | 10720 | 10720
| Cannot be modified after initial startup |
+| cn_seed_config_node | The address of the ConfigNode that the node connects
to when registering to join the cluster, cn_internal_address:cn_internal_port |
127.0.0.1:10710 | cn_internal_address:cn_internal_port
| Cannot be modified after initial startup |
+
+#### DataNode Configuration
+
+Open the DataNode configuration file/ conf/iotdb-datanode.properties,Set the
following parameters:
+
+| **Configuration** | **Description**
| **Default** | **Recommended value**
| **Note** |
+| :-----------------------------: |
:----------------------------------------------------------: | :-------------:
| :----------------------------------------------------------: |
:--------------------------------------- |
+| dn_rpc_address | The address of the client RPC
service | 0.0.0.0 | The IPV4 address or host name of the
server where it is located, and it is recommended to use host name | Restarting
the service takes effect |
+| dn_rpc_port | The port of the client RPC
service | 6667 | 6667
| Restarting the service takes effect |
+| dn_internal_address | The address used by DataNode for
communication within the cluster | 127.0.0.1 | The IPV4 address or host
name of the server where it is located, and it is recommended to use host name
| Cannot be modified after initial startup |
+| dn_internal_port | The port used by DataNode for
communication within the cluster | 10730 |
10730 | Cannot be modified after initial startup |
+| dn_mpp_data_exchange_port | The port used by DataNode to receive
data streams | 10740 | 10740
| Cannot be modified after initial startup |
+| dn_data_region_consensus_port | The port used by DataNode for data replica
consensus protocol communication | 10750 |
10750 | Cannot be modified after initial startup |
+| dn_schema_region_consensus_port | The port used by DataNode for metadata
replica consensus protocol communication | 10760 |
10760 | Cannot be modified after initial
startup |
+| dn_seed_config_node | The ConfigNode address that the node
connects to when registering to join the cluster, i.e. cn_internal-address:
cn_internal_port | 127.0.0.1:10710 |
cn_internal_address:cn_internal_port | Cannot be modified after
initial startup |
+
+### 3、Start ConfigNode
+
+Enter the sbin directory of iotdb and start confignode
+
+```Shell
+./start-confignode.sh -d #The "- d" parameter will start in the
background
+```
+
+### 4、Start DataNode
+
+Enter the sbin directory of iotdb and start datanode:
+
+```Shell
+cd sbin
+./start-datanode.sh -d #The "- d" parameter will start in the background
+```
+
+### 5、Verify Deployment
+
+Can be executed directly/ Cli startup script in sbin directory:
+
+```Shell
+./start-cli.sh -h ip(local IP or domain name) -p port(6667)
+```
+
+After successful startup, the following interface will appear displaying
successful installation of IOTDB.
+
+
\ No newline at end of file
diff --git
a/src/UserGuide/latest/Deployment-and-Maintenance/Stand-Alone-Deployment_timecho.md
b/src/UserGuide/latest/Deployment-and-Maintenance/Stand-Alone-Deployment_timecho.md
new file mode 100644
index 0000000..863de75
--- /dev/null
+++
b/src/UserGuide/latest/Deployment-and-Maintenance/Stand-Alone-Deployment_timecho.md
@@ -0,0 +1,165 @@
+<!--
+
+ Licensed to the Apache Software Foundation (ASF) under one
+ or more contributor license agreements. See the NOTICE file
+ distributed with this work for additional information
+ regarding copyright ownership. The ASF licenses this file
+ to you under the Apache License, Version 2.0 (the
+ "License"); you may not use this file except in compliance
+ with the License. You may obtain a copy of the License at
+
+ http://www.apache.org/licenses/LICENSE-2.0
+
+ Unless required by applicable law or agreed to in writing,
+ software distributed under the License is distributed on an
+ "AS IS" BASIS, WITHOUT WARRANTIES OR CONDITIONS OF ANY
+ KIND, either express or implied. See the License for the
+ specific language governing permissions and limitations
+ under the License.
+
+-->
+## Stand-Alone Deployment
+
+This chapter will introduce how to start an IoTDB standalone instance, which
includes 1 ConfigNode and 1 DataNode (commonly known as 1C1D).
+
+## Matters Needing Attention
+
+1. It is recommended to prioritize using 'hostname' for IP configuration
during deployment, which can avoid the problem of modifying the host IP in the
later stage and causing the database to fail to start. To set the host name,
you need to configure/etc/hosts on the target server. For example, if the local
IP is 192.168.1.3 and the host name is iotdb-1, you can use the following
command to set the server's host name and configure IoTDB's'
cn_internal-address' using the host name dn_inte [...]
+
+ ```shell
+ echo "192.168.1.3 iotdb-1" >> /etc/hosts
+ ```
+
+2. Some parameters cannot be modified after the first startup. Please refer to
the "Parameter Configuration" section below for settings
+
+3. It is recommended to deploy a monitoring panel, which can monitor important
operational indicators and keep track of database operation status at any time.
The monitoring panel can be obtained by contacting the business department, and
the steps for deploying the monitoring panel can be referred to:[Monitoring
Board Install and
Deploy](https://timecho.com/docs/UserGuide/latest/Deployment-and-Maintenance/Monitoring-Board-Install-and-Deploy.html)。
+
+## Installation Steps
+
+### 1、Unzip the installation package and enter the installation directory
+
+```shell
+unzip iotdb-enterprise-{version}-bin.zip
+cd iotdb-enterprise-{version}-bin
+```
+
+### 2、Parameter Configuration
+
+#### Environment Script Configuration
+
+- ./conf/confignode env.sh (./conf/confignode env.bat) configuration
+
+| **Configuration** | **Description**
| **Default** | **Recommended value**
| Note |
+| :---------------: |
:----------------------------------------------------------: | :---------: |
:----------------------------------------------------------: |
:---------------------------------: |
+| MEMORY_SIZE | The total amount of memory that IoTDB ConfigNode nodes
can use | empty | Can be filled in as needed, and the system will
allocate memory based on the filled in values | Restarting the service takes
effect |
+
+- ./conf/datanode-env.sh(./conf/datanode-env.bat)configuration
+env.sh
+| **Configuration** | **Description**
| **Default** | **Recommended value**
| Note |
+| :---------------: |
:----------------------------------------------------------: | :---------: |
:----------------------------------------------------------: |
:---------------------------------: |
+| MEMORY_SIZE | The total amount of memory that IoTDB DataNode nodes can
use | empty | Can be filled in as needed, and the system will allocate
memory based on the filled in values | Restarting the service takes effect |
+
+#### System General Configuration
+
+Open the general configuration file (./conf/iotdb common. properties file) and
set the following parameters:
+
+| **Configuration** | **Description**
| **Default** | **Recommended value**
| Note |
+| :-----------------------: |
:----------------------------------------------------------: | :------------: |
:----------------------------------------------------------: |
:---------------------------------------------------: |
+| cluster_name | Cluster Name
| defaultCluster | The cluster name can be set as needed, and if
there are no special needs, the default can be kept | Cannot be modified
after initial startup |
+| schema_replication_factor | Number of metadata replicas, set to 1 for the
standalone version here | 1 | 1
| Default 1, cannot be modified after the first startup
|
+| data_replication_factor | Number of data replicas, set to 1 for the
standalone version here | 1 | 1
| Default 1, cannot be modified after the first startup
|
+
+#### ConfigNode Configuration
+
+Open the ConfigNode configuration file (./conf/iotdb configure. properties
file) and set the following parameters:
+
+| **Configuration** | **Description**
| **Default** | **Recommended value**
| Note |
+| :-----------------: |
:----------------------------------------------------------: | :-------------:
| :----------------------------------------------------------: |
:--------------------------------------: |
+| cn_internal_address | The address used by ConfigNode for communication
within the cluster | 127.0.0.1 | The IPV4 address or host name of the
server where it is located, and it is recommended to use host name | Cannot be
modified after initial startup |
+| cn_internal_port | The port used by ConfigNode for communication within
the cluster | 10710 | 10710
| Cannot be modified after initial startup |
+| cn_consensus_port | The port used for ConfigNode replica group consensus
protocol communication | 10720 | 10720
| Cannot be modified after initial startup |
+| cn_seed_config_node | The address of the ConfigNode that the node connects
to when registering to join the cluster, cn_internal_address:cn_internal_port |
127.0.0.1:10710 | cn_internal_address:cn_internal_port
| Cannot be modified after initial startup |
+
+#### DataNode Configuration
+
+Open the DataNode configuration file/ conf/iotdb-datanode.properties, Set the
following parameters:
+
+| **Configuration** | **Description**
| **Default** | **Recommended value**
| **Note** |
+| :------------------------------ |
:----------------------------------------------------------- | :--------------
| :----------------------------------------------------------- |
:--------------------------------------- |
+| dn_rpc_address | The address of the client RPC service
| 0.0.0.0 | The IPV4 address or host name of the
server where it is located, and it is recommended to use host name | Restarting
the service takes effect |
+| dn_rpc_port | The port of the client RPC service
| 6667 | 6667
| Restarting the service takes effect |
+| dn_internal_address | The address used by DataNode for
communication within the cluster | 127.0.0.1 | The IPV4 address or host
name of the server where it is located, and it is recommended to use host name
| Cannot be modified after initial startup |
+| dn_internal_port | The port used by DataNode for
communication within the cluster | 10730 | 10730
| Cannot be modified after initial startup |
+| dn_mpp_data_exchange_port | The port used by DataNode to receive data
streams | 10740 | 10740
| Cannot be modified after initial startup |
+| dn_data_region_consensus_port | The port used by DataNode for data replica
consensus protocol communication | 10750 | 10750
| Cannot be modified after initial startup |
+| dn_schema_region_consensus_port | The port used by DataNode for metadata
replica consensus protocol communication | 10760 | 10760
| Cannot be modified after initial
startup |
+| dn_seed_config_node | The ConfigNode address that the node
connects to when registering to join the cluster, i.e. cn_internal-address:
cn_internal_port | 127.0.0.1:10710 | cn_internal_address:cn_internal_port
| Cannot be modified after initial startup |
+
+### 3、Start ConfigNode
+
+Enter the sbin directory of iotdb and start confignode
+
+```shell
+./start-confignode.sh -d #The "- d" parameter will start in the
background
+```
+
+### 4、Activate Database
+
+#### Method 1: Activate file copy activation
+
+- After starting the confignode node, enter the activation folder and copy the
systeminfo file to the Timecho staff
+- Received the license file returned by the staff
+- Place the license file in the activation folder of the corresponding node;
+
+#### Method 2: Activate Script Activation
+
+- Obtain the required machine code for activation, enter the sbin directory of
the installation directory, and execute the activation script:
+
+```shell
+ cd sbin
+./start-activate.sh
+```
+
+- The following information is displayed. Please copy the machine code (i.e.
the string of characters) to the Timecho staff:
+
+```shell
+Please copy the system_info's content and send it to Timecho:
+Y17hFA0xRCE1TmkVxILuCIEPc7uJcr5bzlXWiptw8uZTmTX5aThfypQdLUIhMljw075hNRSicyvyJR9JM7QaNm1gcFZPHVRWVXIiY5IlZkXdxCVc1erXMsbCqUYsR2R2Mw4PSpFJsUF5jHWSoFIIjQ2bmJFW5P52KCccFMVeHTc=
+Please enter license:
+```
+
+- Enter the activation code returned by the staff into the previous command
line prompt 'Please enter license:', as shown below:
+
+```shell
+Please enter license:
+Jw+MmF+AtexsfgNGOFgTm83Bxxxxxxxxxxxxxxxxxxxxxxxxxxxxxxxxxxxxxxxxm6pF+APW1CiXLTSijK9Qh3nsLgzrW8OJPh26Vl6ljKUpCvpTiw==
+License has been stored to sbin/../activation/license
+Import completed. Please start cluster and excute 'show cluster' to verify
activation status
+```
+
+### 5、Start DataNode
+
+Enter the sbin directory of iotdb and start datanode:
+
+```shell
+cd sbin
+./start-datanode.sh -d # The "- d" parameter will start in the background
+```
+
+### 6、Verify Deployment
+
+Can be executed directly/ Cli startup script in sbin directory:
+
+```shell
+./start-cli.sh -h ip(local IP or domain name) -p port(6667)
+```
+
+After successful startup, the following interface will appear displaying
successful installation of IOTDB.
+
+
+
+After the installation success interface appears, continue to check if the
activation is successful and use the `show cluster`command
+
+When you see the display "Activated" on the far right, it indicates successful
activation
+
+
\ No newline at end of file
diff --git
a/src/zh/UserGuide/Master/Deployment-and-Maintenance/Deployment-Guide.md
b/src/zh/UserGuide/Master/Deployment-and-Maintenance/Cluster-Deployment.md
similarity index 94%
rename from
src/zh/UserGuide/Master/Deployment-and-Maintenance/Deployment-Guide.md
rename to
src/zh/UserGuide/Master/Deployment-and-Maintenance/Cluster-Deployment.md
index c715737..a1ddf34 100644
--- a/src/zh/UserGuide/Master/Deployment-and-Maintenance/Deployment-Guide.md
+++ b/src/zh/UserGuide/Master/Deployment-and-Maintenance/Cluster-Deployment.md
@@ -19,57 +19,7 @@
-->
-# 部署指导
-
-## 单机版部署
-
-本文将介绍关于 IoTDB 使用的基本流程,如果需要更多信息,请浏览我们官网的
[指引](../IoTDB-Introduction/What-is-IoTDB.md).
-
-### 安装环境
-
-安装前需要保证设备上配有 JDK>=1.8 的运行环境,并配置好 JAVA_HOME 环境变量。
-
-设置最大文件打开数为 65535。
-
-### 安装步骤
-
-IoTDB 支持多种安装途径。用户可以使用三种方式对 IoTDB 进行安装——下载二进制可运行程序、使用源码、使用 docker 镜像。
-
-* 使用源码:您可以从代码仓库下载源码并编译,具体编译方法见下方。
-
-* 二进制可运行程序:请从 [下载](https://iotdb.apache.org/Download/) 页面下载最新的安装包,解压后即完成安装。
-
-* 使用 Docker 镜像:dockerfile
文件位于[github](https://github.com/apache/iotdb/blob/master/docker/src/main)
-
-### 软件目录结构
-
-* sbin 启动和停止脚本目录
-* conf 配置文件目录
-* tools 系统工具目录
-* lib 依赖包目录
-
-### IoTDB 试用
-
-用户可以根据以下操作对 IoTDB 进行简单的试用,若以下操作均无误,则说明 IoTDB 安装成功。
-
-#### 启动 IoTDB
-
-IoTDB 是一个基于分布式系统的数据库。要启动 IoTDB ,你可以先启动单机版(一个 ConfigNode 和一个 DataNode)来检查安装。
-
-用户可以使用 sbin 文件夹下的 start-standalone 脚本启动 IoTDB。
-
-Linux 系统与 MacOS 系统启动命令如下:
-
-```
-> bash sbin/start-standalone.sh
-```
-
-Windows 系统启动命令如下:
-
-```
-> sbin\start-standalone.bat
-```
-
+# 集群版部署
## 集群版部署
以本地环境为例,演示 IoTDB 集群的启动、扩容与缩容。
diff --git
a/src/zh/UserGuide/Master/Deployment-and-Maintenance/Deployment-Guide_timecho.md
b/src/zh/UserGuide/Master/Deployment-and-Maintenance/Cluster-Deployment_timecho.md
similarity index 97%
rename from
src/zh/UserGuide/Master/Deployment-and-Maintenance/Deployment-Guide_timecho.md
rename to
src/zh/UserGuide/Master/Deployment-and-Maintenance/Cluster-Deployment_timecho.md
index 9836e48..57f63a4 100644
---
a/src/zh/UserGuide/Master/Deployment-and-Maintenance/Deployment-Guide_timecho.md
+++
b/src/zh/UserGuide/Master/Deployment-and-Maintenance/Cluster-Deployment_timecho.md
@@ -19,56 +19,7 @@
-->
-# 部署指导
-
-## 单机版部署
-
-本文将介绍关于 IoTDB 使用的基本流程,如果需要更多信息,请浏览我们官网的
[指引](../IoTDB-Introduction/What-is-IoTDB.md).
-
-### 安装环境
-
-安装前需要保证设备上配有 JDK>=1.8 的运行环境,并配置好 JAVA_HOME 环境变量。
-
-设置最大文件打开数为 65535。
-
-### 安装步骤
-
-IoTDB 支持多种安装途径。用户可以使用三种方式对 IoTDB 进行安装——下载二进制可运行程序、使用源码、使用 docker 镜像。
-
-* 使用源码:您可以从代码仓库下载源码并编译,具体编译方法见下方。
-
-* 二进制可运行程序:请从 [下载](https://iotdb.apache.org/Download/) 页面下载最新的安装包,解压后即完成安装。
-
-* 使用 Docker 镜像:dockerfile
文件位于[github](https://github.com/apache/iotdb/blob/master/docker/src/main)
-
-### 软件目录结构
-
-* sbin 启动和停止脚本目录
-* conf 配置文件目录
-* tools 系统工具目录
-* lib 依赖包目录
-
-### IoTDB 试用
-
-用户可以根据以下操作对 IoTDB 进行简单的试用,若以下操作均无误,则说明 IoTDB 安装成功。
-
-#### 启动 IoTDB
-
-IoTDB 是一个基于分布式系统的数据库。要启动 IoTDB ,你可以先启动单机版(一个 ConfigNode 和一个 DataNode)来检查安装。
-
-用户可以使用 sbin 文件夹下的 start-standalone 脚本启动 IoTDB。
-
-Linux 系统与 MacOS 系统启动命令如下:
-
-```
-> bash sbin/start-standalone.sh
-```
-
-Windows 系统启动命令如下:
-
-```
-> sbin\start-standalone.bat
-```
+# 集群版部署
## 集群版部署(使用集群管理工具)
diff --git
a/src/zh/UserGuide/Master/Deployment-and-Maintenance/Stand-Alone-Deployment.md
b/src/zh/UserGuide/Master/Deployment-and-Maintenance/Stand-Alone-Deployment.md
new file mode 100644
index 0000000..935f6de
--- /dev/null
+++
b/src/zh/UserGuide/Master/Deployment-and-Maintenance/Stand-Alone-Deployment.md
@@ -0,0 +1,121 @@
+<!--
+
+ Licensed to the Apache Software Foundation (ASF) under one
+ or more contributor license agreements. See the NOTICE file
+ distributed with this work for additional information
+ regarding copyright ownership. The ASF licenses this file
+ to you under the Apache License, Version 2.0 (the
+ "License"); you may not use this file except in compliance
+ with the License. You may obtain a copy of the License at
+
+ http://www.apache.org/licenses/LICENSE-2.0
+
+ Unless required by applicable law or agreed to in writing,
+ software distributed under the License is distributed on an
+ "AS IS" BASIS, WITHOUT WARRANTIES OR CONDITIONS OF ANY
+ KIND, either express or implied. See the License for the
+ specific language governing permissions and limitations
+ under the License.
+
+-->
+# 单机版部署
+
+## 注意事项
+
+1.
部署时推荐优先使用`hostname`进行IP配置,可避免后期修改主机ip导致数据库无法启动的问题。设置hostname需要在目标服务器上配置/etc/hosts,如本机ip是192.168.1.3,hostname是iotdb-1,则可以使用以下命令设置服务器的
hostname,并使用hostname配置IoTDB的`cn_internal_address`、dn_internal_address、dn_rpc_address。
+
+ ```shell
+ echo "192.168.1.3 iotdb-1" >> /etc/hosts
+ ```
+
+2. 部分参数首次启动后不能修改,请参考下方的【参数配置】章节进行设置。
+
+## 安装步骤
+
+### 1、解压安装包并进入安装目录
+
+```shell
+unzip apache-iotdb-{version}-all-bin.zip
+cd apache-iotdb-{version}-all-bin
+```
+
+### 2、参数配置
+
+#### 环境脚本配置
+
+- ./conf/confignode-env.sh(./conf/confignode-env.bat)配置
+
+| **配置项** | **说明** | **默认值** |
**推荐值** | 备注 |
+| ----------- | :------------------------------------: | :--------: |
:----------------------------------------------: | :----------: |
+| MEMORY_SIZE | IoTDB ConfigNode节点可以使用的内存总量 | 空 |
可按需填写,填写后系统会根据填写的数值来分配内存 | 重启服务生效 |
+
+- ./conf/datanode-env.sh(./conf/datanode-env.bat)配置
+
+| **配置项** | **说明** | **默认值** |
**推荐值** | 备注 |
+| :---------: | :----------------------------------: | :--------: |
:----------------------------------------------: | :----------: |
+| MEMORY_SIZE | IoTDB DataNode节点可以使用的内存总量 | 空 |
可按需填写,填写后系统会根据填写的数值来分配内存 | 重启服务生效 |
+
+#### 系统通用配置
+
+打开通用配置文件(./conf/iotdb-common.properties 文件),设置以下参数:
+
+| **配置项** | **说明** | **默认值** |
**推荐值** | 备注 |
+| :-----------------------: | :------------------------------: |
:------------: | :----------------------------------------------: |
:-----------------------: |
+| cluster_name | 集群名称 | defaultCluster |
可根据需要设置集群名称,如无特殊需要保持默认即可 | 首次启动后不可修改 |
+| schema_replication_factor | 元数据副本数,单机版此处设置为 1 | 1 |
1 | 默认1,首次启动后不可修改 |
+| data_replication_factor | 数据副本数,单机版此处设置为 1 | 1 |
1 | 默认1,首次启动后不可修改 |
+
+#### ConfigNode 配置
+
+打开ConfigNode配置文件(./conf/iotdb-confignode.properties文件),设置以下参数:
+
+| **配置项** | **说明**
| **默认** | 推荐值 | **备注**
|
+| :-----------------: |
:----------------------------------------------------------: | :-------------:
| :----------------------------------------------: | :----------------: |
+| cn_internal_address | ConfigNode在集群内部通讯使用的地址 |
127.0.0.1 | 所在服务器的IPV4地址或hostname,推荐使用hostname | 首次启动后不能修改 |
+| cn_internal_port | ConfigNode在集群内部通讯使用的端口 |
10710 | 10710 | 首次启动后不能修改 |
+| cn_consensus_port | ConfigNode副本组共识协议通信使用的端口 |
10720 | 10720 | 首次启动后不能修改 |
+| cn_seed_config_node | 节点注册加入集群时连接的ConfigNode
的地址,cn_internal_address:cn_internal_port | 127.0.0.1:10710 |
cn_internal_address:cn_internal_port | 首次启动后不能修改 |
+
+#### DataNode 配置
+
+打开DataNode配置文件 ./conf/iotdb-datanode.properties,设置以下参数:
+
+| **配置项** | **说明**
| **默认** | 推荐值 |
**备注** |
+| :-----------------------------: |
:----------------------------------------------------------: | :-------------:
| :----------------------------------------------: | :----------------- |
+| dn_rpc_address | 客户端 RPC 服务的地址
| 0.0.0.0 | 所在服务器的IPV4地址或hostname,推荐使用hostname | 重启服务生效
|
+| dn_rpc_port | 客户端 RPC 服务的端口
| 6667 | 6667
| 重启服务生效 |
+| dn_internal_address | DataNode在集群内部通讯使用的地址
| 127.0.0.1 | 所在服务器的IPV4地址或hostname,推荐使用hostname | 首次启动后不能修改 |
+| dn_internal_port | DataNode在集群内部通信使用的端口
| 10730 | 10730 |
首次启动后不能修改 |
+| dn_mpp_data_exchange_port | DataNode用于接收数据流使用的端口
| 10740 | 10740 |
首次启动后不能修改 |
+| dn_data_region_consensus_port | DataNode用于数据副本共识协议通信使用的端口
| 10750 | 10750 |
首次启动后不能修改 |
+| dn_schema_region_consensus_port | DataNode用于元数据副本共识协议通信使用的端口
| 10760 | 10760 |
首次启动后不能修改 |
+| dn_seed_config_node |
节点注册加入集群时连接的ConfigNode地址,即cn_internal_address:cn_internal_port |
127.0.0.1:10710 | cn_internal_address:cn_internal_port | 首次启动后不能修改 |
+
+### 3、启动ConfigNode 节点
+
+进入iotdb的sbin目录下,启动confignode
+
+```shell
+./start-confignode.sh -d #“-d”参数将在后台进行启动
+```
+
+### 4、启动DataNode 节点
+
+ 进入iotdb的sbin目录下,启动datanode:
+
+```shell
+cd sbin
+./start-datanode.sh -d #-d参数将在后台进行启动
+```
+
+### 5、验证部署
+
+可直接执行 ./sbin 目录下的 Cli 启动脚本:
+
+```shell
+./start-cli.sh -h ip(本机ip或域名) -p 端口号(6667)
+```
+
+ 成功启动后,出现如下界面显示IoTDB安装成功。
+
+
\ No newline at end of file
diff --git
a/src/zh/UserGuide/Master/Deployment-and-Maintenance/Stand-Alone-Deployment_timecho.md
b/src/zh/UserGuide/Master/Deployment-and-Maintenance/Stand-Alone-Deployment_timecho.md
new file mode 100644
index 0000000..d8ef6c1
--- /dev/null
+++
b/src/zh/UserGuide/Master/Deployment-and-Maintenance/Stand-Alone-Deployment_timecho.md
@@ -0,0 +1,165 @@
+<!--
+
+ Licensed to the Apache Software Foundation (ASF) under one
+ or more contributor license agreements. See the NOTICE file
+ distributed with this work for additional information
+ regarding copyright ownership. The ASF licenses this file
+ to you under the Apache License, Version 2.0 (the
+ "License"); you may not use this file except in compliance
+ with the License. You may obtain a copy of the License at
+
+ http://www.apache.org/licenses/LICENSE-2.0
+
+ Unless required by applicable law or agreed to in writing,
+ software distributed under the License is distributed on an
+ "AS IS" BASIS, WITHOUT WARRANTIES OR CONDITIONS OF ANY
+ KIND, either express or implied. See the License for the
+ specific language governing permissions and limitations
+ under the License.
+
+-->
+# 单机版部署
+
+本章将介绍如何启动IoTDB单机实例,IoTDB单机实例包括 1 个ConfigNode 和1个DataNode(即通常所说的1C1D)。
+
+## 注意事项
+
+1.
部署时推荐优先使用`hostname`进行IP配置,可避免后期修改主机ip导致数据库无法启动的问题。设置hostname需要在目标服务器上配置/etc/hosts,如本机ip是192.168.1.3,hostname是iotdb-1,则可以使用以下命令设置服务器的
hostname,并使用hostname配置IoTDB的`cn_internal_address`、dn_internal_address、dn_rpc_address。
+
+ ```shell
+ echo "192.168.1.3 iotdb-1" >> /etc/hosts
+ ```
+
+2. 部分参数首次启动后不能修改,请参考下方的【参数配置】章节进行设置
+
+3.
推荐部署监控面板,可以对重要运行指标进行监控,随时掌握数据库运行状态,监控面板可以联系商务获取,部署监控面板步骤可以参考:[监控面板部署](https://timecho.com/docs/zh/UserGuide/latest/Deployment-and-Maintenance/Monitoring-Board-Install-and-Deploy.html)。
+
+## 安装步骤
+
+### 1、解压安装包并进入安装目录
+
+```shell
+unzip iotdb-enterprise-{version}-bin.zip
+cd iotdb-enterprise-{version}-bin
+```
+
+### 2、参数配置
+
+#### 环境脚本配置
+
+- ./conf/confignode-env.sh(./conf/confignode-env.bat)配置
+
+| **配置项** | **说明** | **默认值** |
**推荐值** | 备注 |
+| :---------: | :------------------------------------: | :--------: |
:----------------------------------------------: | :----------: |
+| MEMORY_SIZE | IoTDB ConfigNode节点可以使用的内存总量 | 空 |
可按需填写,填写后系统会根据填写的数值来分配内存 | 重启服务生效 |
+
+- ./conf/datanode-env.sh(./conf/datanode-env.bat)配置
+
+| **配置项** | **说明** | **默认值** |
**推荐值** | 备注 |
+| :---------: | :----------------------------------: | :--------: |
:----------------------------------------------: | :----------: |
+| MEMORY_SIZE | IoTDB DataNode节点可以使用的内存总量 | 空 |
可按需填写,填写后系统会根据填写的数值来分配内存 | 重启服务生效 |
+
+#### 系统通用配置
+
+打开通用配置文件(./conf/iotdb-common.properties 文件),设置以下参数:
+
+| **配置项** | **说明** | **默认值** |
**推荐值** | 备注 |
+| :-----------------------: | :------------------------------: |
:------------: | :----------------------------------------------: |
:-----------------------: |
+| cluster_name | 集群名称 | defaultCluster |
可根据需要设置集群名称,如无特殊需要保持默认即可 | 首次启动后不可修改 |
+| schema_replication_factor | 元数据副本数,单机版此处设置为 1 | 1 |
1 | 默认1,首次启动后不可修改 |
+| data_replication_factor | 数据副本数,单机版此处设置为 1 | 1 |
1 | 默认1,首次启动后不可修改 |
+
+#### ConfigNode配置
+
+打开ConfigNode配置文件(./conf/iotdb-confignode.properties文件),设置以下参数:
+
+| **配置项** | **说明**
| **默认** | 推荐值 | **备注**
|
+| :-----------------: |
:----------------------------------------------------------: | :-------------:
| :----------------------------------------------: | :----------------: |
+| cn_internal_address | ConfigNode在集群内部通讯使用的地址 |
127.0.0.1 | 所在服务器的IPV4地址或hostname,推荐使用hostname | 首次启动后不能修改 |
+| cn_internal_port | ConfigNode在集群内部通讯使用的端口 |
10710 | 10710 | 首次启动后不能修改 |
+| cn_consensus_port | ConfigNode副本组共识协议通信使用的端口 |
10720 | 10720 | 首次启动后不能修改 |
+| cn_seed_config_node | 节点注册加入集群时连接的ConfigNode
的地址,cn_internal_address:cn_internal_port | 127.0.0.1:10710 |
cn_internal_address:cn_internal_port | 首次启动后不能修改 |
+
+#### DataNode 配置
+
+打开DataNode配置文件 ./conf/iotdb-datanode.properties,设置以下参数:
+
+| **配置项** | **说明**
| **默认** | 推荐值 |
**备注** |
+| :------------------------------ |
:----------------------------------------------------------- | :--------------
| :----------------------------------------------- | :----------------- |
+| dn_rpc_address | 客户端 RPC 服务的地址
| 0.0.0.0 | 所在服务器的IPV4地址或hostname,推荐使用hostname | 重启服务生效
|
+| dn_rpc_port | 客户端 RPC 服务的端口
| 6667 | 6667
| 重启服务生效 |
+| dn_internal_address | DataNode在集群内部通讯使用的地址
| 127.0.0.1 | 所在服务器的IPV4地址或hostname,推荐使用hostname | 首次启动后不能修改 |
+| dn_internal_port | DataNode在集群内部通信使用的端口
| 10730 | 10730 |
首次启动后不能修改 |
+| dn_mpp_data_exchange_port | DataNode用于接收数据流使用的端口
| 10740 | 10740 |
首次启动后不能修改 |
+| dn_data_region_consensus_port | DataNode用于数据副本共识协议通信使用的端口
| 10750 | 10750 |
首次启动后不能修改 |
+| dn_schema_region_consensus_port | DataNode用于元数据副本共识协议通信使用的端口
| 10760 | 10760 |
首次启动后不能修改 |
+| dn_seed_config_node |
节点注册加入集群时连接的ConfigNode地址,即cn_internal_address:cn_internal_port |
127.0.0.1:10710 | cn_internal_address:cn_internal_port | 首次启动后不能修改 |
+
+### 3、启动 ConfigNode 节点
+
+进入iotdb的sbin目录下,启动confignode
+
+```shell
+./start-confignode.sh -d #“-d”参数将在后台进行启动
+```
+
+### 4、激活数据库
+
+#### 方式一:激活文件拷贝激活
+
+- 启动confignode节点后,进入activation文件夹, 将 system_info文件复制给天谋工作人员
+- 收到工作人员返回的 license文件
+- 将license文件放入对应节点的activation文件夹下;
+
+#### 方式二:激活脚本激活
+
+- 获取激活所需机器码,进入安装目录的sbin目录,执行激活脚本:
+
+```shell
+ cd sbin
+./start-activate.sh
+```
+
+- 显示如下信息,请将机器码(即该串字符)复制给天谋工作人员:
+
+```shell
+Please copy the system_info's content and send it to Timecho:
+Y17hFA0xRCE1TmkVxILuCIEPc7uJcr5bzlXWiptw8uZTmTX5aThfypQdLUIhMljw075hNRSicyvyJR9JM7QaNm1gcFZPHVRWVXIiY5IlZkXdxCVc1erXMsbCqUYsR2R2Mw4PSpFJsUF5jHWSoFIIjQ2bmJFW5P52KCccFMVeHTc=
+Please enter license:
+```
+
+- 将工作人员返回的激活码输入上一步的命令行提示处 `Please enter license:`,如下提示:
+
+```shell
+Please enter license:
+Jw+MmF+AtexsfgNGOFgTm83BgXbq0zT1+fOfPvQsLlj6ZsooHFU6HycUSEGC78eT1g67KPvkcLCUIsz2QpbyVmPLr9x1+kVjBubZPYlVpsGYLqLFc8kgpb5vIrPLd3hGLbJ5Ks8fV1WOVrDDVQq89YF2atQa2EaB9EAeTWd0bRMZ+s9ffjc/1Zmh9NSP/T3VCfJcJQyi7YpXWy5nMtcW0gSV+S6fS5r7a96PjbtE0zXNjnEhqgRzdU+mfO8gVuUNaIy9l375cp1GLpeCh6m6pF+APW1CiXLTSijK9Qh3nsL5bAOXNeob5l+HO5fEMgzrW8OJPh26Vl6ljKUpCvpTiw==
+License has been stored to sbin/../activation/license
+Import completed. Please start cluster and excute 'show cluster' to verify
activation status
+```
+
+### 5、启动DataNode 节点
+
+进入iotdb的sbin目录下,启动datanode:
+
+```shell
+cd sbin
+./start-datanode.sh -d #-d参数将在后台进行启动
+```
+
+### 6、验证部署
+
+可直接执行 ./sbin 目录下的 Cli 启动脚本:
+
+```shell
+./start-cli.sh -h ip(本机ip或域名) -p 端口号(6667)
+```
+
+成功启动后,出现如下界面显示IOTDB安装成功。
+
+
+
+出现安装成功界面后,继续看下是否激活成功,使用`show cluster`命令
+
+当看到最右侧显示ACTIVATED表示激活成功
+
+
\ No newline at end of file
diff --git
a/src/zh/UserGuide/latest/Deployment-and-Maintenance/Deployment-Guide.md
b/src/zh/UserGuide/latest/Deployment-and-Maintenance/Cluster-Deployment.md
similarity index 94%
rename from
src/zh/UserGuide/latest/Deployment-and-Maintenance/Deployment-Guide.md
rename to
src/zh/UserGuide/latest/Deployment-and-Maintenance/Cluster-Deployment.md
index c715737..a1ddf34 100644
--- a/src/zh/UserGuide/latest/Deployment-and-Maintenance/Deployment-Guide.md
+++ b/src/zh/UserGuide/latest/Deployment-and-Maintenance/Cluster-Deployment.md
@@ -19,57 +19,7 @@
-->
-# 部署指导
-
-## 单机版部署
-
-本文将介绍关于 IoTDB 使用的基本流程,如果需要更多信息,请浏览我们官网的
[指引](../IoTDB-Introduction/What-is-IoTDB.md).
-
-### 安装环境
-
-安装前需要保证设备上配有 JDK>=1.8 的运行环境,并配置好 JAVA_HOME 环境变量。
-
-设置最大文件打开数为 65535。
-
-### 安装步骤
-
-IoTDB 支持多种安装途径。用户可以使用三种方式对 IoTDB 进行安装——下载二进制可运行程序、使用源码、使用 docker 镜像。
-
-* 使用源码:您可以从代码仓库下载源码并编译,具体编译方法见下方。
-
-* 二进制可运行程序:请从 [下载](https://iotdb.apache.org/Download/) 页面下载最新的安装包,解压后即完成安装。
-
-* 使用 Docker 镜像:dockerfile
文件位于[github](https://github.com/apache/iotdb/blob/master/docker/src/main)
-
-### 软件目录结构
-
-* sbin 启动和停止脚本目录
-* conf 配置文件目录
-* tools 系统工具目录
-* lib 依赖包目录
-
-### IoTDB 试用
-
-用户可以根据以下操作对 IoTDB 进行简单的试用,若以下操作均无误,则说明 IoTDB 安装成功。
-
-#### 启动 IoTDB
-
-IoTDB 是一个基于分布式系统的数据库。要启动 IoTDB ,你可以先启动单机版(一个 ConfigNode 和一个 DataNode)来检查安装。
-
-用户可以使用 sbin 文件夹下的 start-standalone 脚本启动 IoTDB。
-
-Linux 系统与 MacOS 系统启动命令如下:
-
-```
-> bash sbin/start-standalone.sh
-```
-
-Windows 系统启动命令如下:
-
-```
-> sbin\start-standalone.bat
-```
-
+# 集群版部署
## 集群版部署
以本地环境为例,演示 IoTDB 集群的启动、扩容与缩容。
diff --git
a/src/zh/UserGuide/latest/Deployment-and-Maintenance/Deployment-Guide_timecho.md
b/src/zh/UserGuide/latest/Deployment-and-Maintenance/Cluster-Deployment_timecho.md
similarity index 97%
rename from
src/zh/UserGuide/latest/Deployment-and-Maintenance/Deployment-Guide_timecho.md
rename to
src/zh/UserGuide/latest/Deployment-and-Maintenance/Cluster-Deployment_timecho.md
index 9836e48..56b88f5 100644
---
a/src/zh/UserGuide/latest/Deployment-and-Maintenance/Deployment-Guide_timecho.md
+++
b/src/zh/UserGuide/latest/Deployment-and-Maintenance/Cluster-Deployment_timecho.md
@@ -19,57 +19,7 @@
-->
-# 部署指导
-
-## 单机版部署
-
-本文将介绍关于 IoTDB 使用的基本流程,如果需要更多信息,请浏览我们官网的
[指引](../IoTDB-Introduction/What-is-IoTDB.md).
-
-### 安装环境
-
-安装前需要保证设备上配有 JDK>=1.8 的运行环境,并配置好 JAVA_HOME 环境变量。
-
-设置最大文件打开数为 65535。
-
-### 安装步骤
-
-IoTDB 支持多种安装途径。用户可以使用三种方式对 IoTDB 进行安装——下载二进制可运行程序、使用源码、使用 docker 镜像。
-
-* 使用源码:您可以从代码仓库下载源码并编译,具体编译方法见下方。
-
-* 二进制可运行程序:请从 [下载](https://iotdb.apache.org/Download/) 页面下载最新的安装包,解压后即完成安装。
-
-* 使用 Docker 镜像:dockerfile
文件位于[github](https://github.com/apache/iotdb/blob/master/docker/src/main)
-
-### 软件目录结构
-
-* sbin 启动和停止脚本目录
-* conf 配置文件目录
-* tools 系统工具目录
-* lib 依赖包目录
-
-### IoTDB 试用
-
-用户可以根据以下操作对 IoTDB 进行简单的试用,若以下操作均无误,则说明 IoTDB 安装成功。
-
-#### 启动 IoTDB
-
-IoTDB 是一个基于分布式系统的数据库。要启动 IoTDB ,你可以先启动单机版(一个 ConfigNode 和一个 DataNode)来检查安装。
-
-用户可以使用 sbin 文件夹下的 start-standalone 脚本启动 IoTDB。
-
-Linux 系统与 MacOS 系统启动命令如下:
-
-```
-> bash sbin/start-standalone.sh
-```
-
-Windows 系统启动命令如下:
-
-```
-> sbin\start-standalone.bat
-```
-
+# 集群版部署
## 集群版部署(使用集群管理工具)
IoTDB 集群管理工具是一款易用的运维工具(企业版工具)。旨在解决 IoTDB
分布式系统多节点的运维难题,主要包括集群部署、集群启停、弹性扩容、配置更新、数据导出等功能,从而实现对复杂数据库集群的一键式指令下发,
diff --git
a/src/zh/UserGuide/latest/Deployment-and-Maintenance/Stand-Alone-Deployment.md
b/src/zh/UserGuide/latest/Deployment-and-Maintenance/Stand-Alone-Deployment.md
new file mode 100644
index 0000000..935f6de
--- /dev/null
+++
b/src/zh/UserGuide/latest/Deployment-and-Maintenance/Stand-Alone-Deployment.md
@@ -0,0 +1,121 @@
+<!--
+
+ Licensed to the Apache Software Foundation (ASF) under one
+ or more contributor license agreements. See the NOTICE file
+ distributed with this work for additional information
+ regarding copyright ownership. The ASF licenses this file
+ to you under the Apache License, Version 2.0 (the
+ "License"); you may not use this file except in compliance
+ with the License. You may obtain a copy of the License at
+
+ http://www.apache.org/licenses/LICENSE-2.0
+
+ Unless required by applicable law or agreed to in writing,
+ software distributed under the License is distributed on an
+ "AS IS" BASIS, WITHOUT WARRANTIES OR CONDITIONS OF ANY
+ KIND, either express or implied. See the License for the
+ specific language governing permissions and limitations
+ under the License.
+
+-->
+# 单机版部署
+
+## 注意事项
+
+1.
部署时推荐优先使用`hostname`进行IP配置,可避免后期修改主机ip导致数据库无法启动的问题。设置hostname需要在目标服务器上配置/etc/hosts,如本机ip是192.168.1.3,hostname是iotdb-1,则可以使用以下命令设置服务器的
hostname,并使用hostname配置IoTDB的`cn_internal_address`、dn_internal_address、dn_rpc_address。
+
+ ```shell
+ echo "192.168.1.3 iotdb-1" >> /etc/hosts
+ ```
+
+2. 部分参数首次启动后不能修改,请参考下方的【参数配置】章节进行设置。
+
+## 安装步骤
+
+### 1、解压安装包并进入安装目录
+
+```shell
+unzip apache-iotdb-{version}-all-bin.zip
+cd apache-iotdb-{version}-all-bin
+```
+
+### 2、参数配置
+
+#### 环境脚本配置
+
+- ./conf/confignode-env.sh(./conf/confignode-env.bat)配置
+
+| **配置项** | **说明** | **默认值** |
**推荐值** | 备注 |
+| ----------- | :------------------------------------: | :--------: |
:----------------------------------------------: | :----------: |
+| MEMORY_SIZE | IoTDB ConfigNode节点可以使用的内存总量 | 空 |
可按需填写,填写后系统会根据填写的数值来分配内存 | 重启服务生效 |
+
+- ./conf/datanode-env.sh(./conf/datanode-env.bat)配置
+
+| **配置项** | **说明** | **默认值** |
**推荐值** | 备注 |
+| :---------: | :----------------------------------: | :--------: |
:----------------------------------------------: | :----------: |
+| MEMORY_SIZE | IoTDB DataNode节点可以使用的内存总量 | 空 |
可按需填写,填写后系统会根据填写的数值来分配内存 | 重启服务生效 |
+
+#### 系统通用配置
+
+打开通用配置文件(./conf/iotdb-common.properties 文件),设置以下参数:
+
+| **配置项** | **说明** | **默认值** |
**推荐值** | 备注 |
+| :-----------------------: | :------------------------------: |
:------------: | :----------------------------------------------: |
:-----------------------: |
+| cluster_name | 集群名称 | defaultCluster |
可根据需要设置集群名称,如无特殊需要保持默认即可 | 首次启动后不可修改 |
+| schema_replication_factor | 元数据副本数,单机版此处设置为 1 | 1 |
1 | 默认1,首次启动后不可修改 |
+| data_replication_factor | 数据副本数,单机版此处设置为 1 | 1 |
1 | 默认1,首次启动后不可修改 |
+
+#### ConfigNode 配置
+
+打开ConfigNode配置文件(./conf/iotdb-confignode.properties文件),设置以下参数:
+
+| **配置项** | **说明**
| **默认** | 推荐值 | **备注**
|
+| :-----------------: |
:----------------------------------------------------------: | :-------------:
| :----------------------------------------------: | :----------------: |
+| cn_internal_address | ConfigNode在集群内部通讯使用的地址 |
127.0.0.1 | 所在服务器的IPV4地址或hostname,推荐使用hostname | 首次启动后不能修改 |
+| cn_internal_port | ConfigNode在集群内部通讯使用的端口 |
10710 | 10710 | 首次启动后不能修改 |
+| cn_consensus_port | ConfigNode副本组共识协议通信使用的端口 |
10720 | 10720 | 首次启动后不能修改 |
+| cn_seed_config_node | 节点注册加入集群时连接的ConfigNode
的地址,cn_internal_address:cn_internal_port | 127.0.0.1:10710 |
cn_internal_address:cn_internal_port | 首次启动后不能修改 |
+
+#### DataNode 配置
+
+打开DataNode配置文件 ./conf/iotdb-datanode.properties,设置以下参数:
+
+| **配置项** | **说明**
| **默认** | 推荐值 |
**备注** |
+| :-----------------------------: |
:----------------------------------------------------------: | :-------------:
| :----------------------------------------------: | :----------------- |
+| dn_rpc_address | 客户端 RPC 服务的地址
| 0.0.0.0 | 所在服务器的IPV4地址或hostname,推荐使用hostname | 重启服务生效
|
+| dn_rpc_port | 客户端 RPC 服务的端口
| 6667 | 6667
| 重启服务生效 |
+| dn_internal_address | DataNode在集群内部通讯使用的地址
| 127.0.0.1 | 所在服务器的IPV4地址或hostname,推荐使用hostname | 首次启动后不能修改 |
+| dn_internal_port | DataNode在集群内部通信使用的端口
| 10730 | 10730 |
首次启动后不能修改 |
+| dn_mpp_data_exchange_port | DataNode用于接收数据流使用的端口
| 10740 | 10740 |
首次启动后不能修改 |
+| dn_data_region_consensus_port | DataNode用于数据副本共识协议通信使用的端口
| 10750 | 10750 |
首次启动后不能修改 |
+| dn_schema_region_consensus_port | DataNode用于元数据副本共识协议通信使用的端口
| 10760 | 10760 |
首次启动后不能修改 |
+| dn_seed_config_node |
节点注册加入集群时连接的ConfigNode地址,即cn_internal_address:cn_internal_port |
127.0.0.1:10710 | cn_internal_address:cn_internal_port | 首次启动后不能修改 |
+
+### 3、启动ConfigNode 节点
+
+进入iotdb的sbin目录下,启动confignode
+
+```shell
+./start-confignode.sh -d #“-d”参数将在后台进行启动
+```
+
+### 4、启动DataNode 节点
+
+ 进入iotdb的sbin目录下,启动datanode:
+
+```shell
+cd sbin
+./start-datanode.sh -d #-d参数将在后台进行启动
+```
+
+### 5、验证部署
+
+可直接执行 ./sbin 目录下的 Cli 启动脚本:
+
+```shell
+./start-cli.sh -h ip(本机ip或域名) -p 端口号(6667)
+```
+
+ 成功启动后,出现如下界面显示IoTDB安装成功。
+
+
\ No newline at end of file
diff --git
a/src/zh/UserGuide/latest/Deployment-and-Maintenance/Stand-Alone-Deployment_timecho.md
b/src/zh/UserGuide/latest/Deployment-and-Maintenance/Stand-Alone-Deployment_timecho.md
new file mode 100644
index 0000000..d8ef6c1
--- /dev/null
+++
b/src/zh/UserGuide/latest/Deployment-and-Maintenance/Stand-Alone-Deployment_timecho.md
@@ -0,0 +1,165 @@
+<!--
+
+ Licensed to the Apache Software Foundation (ASF) under one
+ or more contributor license agreements. See the NOTICE file
+ distributed with this work for additional information
+ regarding copyright ownership. The ASF licenses this file
+ to you under the Apache License, Version 2.0 (the
+ "License"); you may not use this file except in compliance
+ with the License. You may obtain a copy of the License at
+
+ http://www.apache.org/licenses/LICENSE-2.0
+
+ Unless required by applicable law or agreed to in writing,
+ software distributed under the License is distributed on an
+ "AS IS" BASIS, WITHOUT WARRANTIES OR CONDITIONS OF ANY
+ KIND, either express or implied. See the License for the
+ specific language governing permissions and limitations
+ under the License.
+
+-->
+# 单机版部署
+
+本章将介绍如何启动IoTDB单机实例,IoTDB单机实例包括 1 个ConfigNode 和1个DataNode(即通常所说的1C1D)。
+
+## 注意事项
+
+1.
部署时推荐优先使用`hostname`进行IP配置,可避免后期修改主机ip导致数据库无法启动的问题。设置hostname需要在目标服务器上配置/etc/hosts,如本机ip是192.168.1.3,hostname是iotdb-1,则可以使用以下命令设置服务器的
hostname,并使用hostname配置IoTDB的`cn_internal_address`、dn_internal_address、dn_rpc_address。
+
+ ```shell
+ echo "192.168.1.3 iotdb-1" >> /etc/hosts
+ ```
+
+2. 部分参数首次启动后不能修改,请参考下方的【参数配置】章节进行设置
+
+3.
推荐部署监控面板,可以对重要运行指标进行监控,随时掌握数据库运行状态,监控面板可以联系商务获取,部署监控面板步骤可以参考:[监控面板部署](https://timecho.com/docs/zh/UserGuide/latest/Deployment-and-Maintenance/Monitoring-Board-Install-and-Deploy.html)。
+
+## 安装步骤
+
+### 1、解压安装包并进入安装目录
+
+```shell
+unzip iotdb-enterprise-{version}-bin.zip
+cd iotdb-enterprise-{version}-bin
+```
+
+### 2、参数配置
+
+#### 环境脚本配置
+
+- ./conf/confignode-env.sh(./conf/confignode-env.bat)配置
+
+| **配置项** | **说明** | **默认值** |
**推荐值** | 备注 |
+| :---------: | :------------------------------------: | :--------: |
:----------------------------------------------: | :----------: |
+| MEMORY_SIZE | IoTDB ConfigNode节点可以使用的内存总量 | 空 |
可按需填写,填写后系统会根据填写的数值来分配内存 | 重启服务生效 |
+
+- ./conf/datanode-env.sh(./conf/datanode-env.bat)配置
+
+| **配置项** | **说明** | **默认值** |
**推荐值** | 备注 |
+| :---------: | :----------------------------------: | :--------: |
:----------------------------------------------: | :----------: |
+| MEMORY_SIZE | IoTDB DataNode节点可以使用的内存总量 | 空 |
可按需填写,填写后系统会根据填写的数值来分配内存 | 重启服务生效 |
+
+#### 系统通用配置
+
+打开通用配置文件(./conf/iotdb-common.properties 文件),设置以下参数:
+
+| **配置项** | **说明** | **默认值** |
**推荐值** | 备注 |
+| :-----------------------: | :------------------------------: |
:------------: | :----------------------------------------------: |
:-----------------------: |
+| cluster_name | 集群名称 | defaultCluster |
可根据需要设置集群名称,如无特殊需要保持默认即可 | 首次启动后不可修改 |
+| schema_replication_factor | 元数据副本数,单机版此处设置为 1 | 1 |
1 | 默认1,首次启动后不可修改 |
+| data_replication_factor | 数据副本数,单机版此处设置为 1 | 1 |
1 | 默认1,首次启动后不可修改 |
+
+#### ConfigNode配置
+
+打开ConfigNode配置文件(./conf/iotdb-confignode.properties文件),设置以下参数:
+
+| **配置项** | **说明**
| **默认** | 推荐值 | **备注**
|
+| :-----------------: |
:----------------------------------------------------------: | :-------------:
| :----------------------------------------------: | :----------------: |
+| cn_internal_address | ConfigNode在集群内部通讯使用的地址 |
127.0.0.1 | 所在服务器的IPV4地址或hostname,推荐使用hostname | 首次启动后不能修改 |
+| cn_internal_port | ConfigNode在集群内部通讯使用的端口 |
10710 | 10710 | 首次启动后不能修改 |
+| cn_consensus_port | ConfigNode副本组共识协议通信使用的端口 |
10720 | 10720 | 首次启动后不能修改 |
+| cn_seed_config_node | 节点注册加入集群时连接的ConfigNode
的地址,cn_internal_address:cn_internal_port | 127.0.0.1:10710 |
cn_internal_address:cn_internal_port | 首次启动后不能修改 |
+
+#### DataNode 配置
+
+打开DataNode配置文件 ./conf/iotdb-datanode.properties,设置以下参数:
+
+| **配置项** | **说明**
| **默认** | 推荐值 |
**备注** |
+| :------------------------------ |
:----------------------------------------------------------- | :--------------
| :----------------------------------------------- | :----------------- |
+| dn_rpc_address | 客户端 RPC 服务的地址
| 0.0.0.0 | 所在服务器的IPV4地址或hostname,推荐使用hostname | 重启服务生效
|
+| dn_rpc_port | 客户端 RPC 服务的端口
| 6667 | 6667
| 重启服务生效 |
+| dn_internal_address | DataNode在集群内部通讯使用的地址
| 127.0.0.1 | 所在服务器的IPV4地址或hostname,推荐使用hostname | 首次启动后不能修改 |
+| dn_internal_port | DataNode在集群内部通信使用的端口
| 10730 | 10730 |
首次启动后不能修改 |
+| dn_mpp_data_exchange_port | DataNode用于接收数据流使用的端口
| 10740 | 10740 |
首次启动后不能修改 |
+| dn_data_region_consensus_port | DataNode用于数据副本共识协议通信使用的端口
| 10750 | 10750 |
首次启动后不能修改 |
+| dn_schema_region_consensus_port | DataNode用于元数据副本共识协议通信使用的端口
| 10760 | 10760 |
首次启动后不能修改 |
+| dn_seed_config_node |
节点注册加入集群时连接的ConfigNode地址,即cn_internal_address:cn_internal_port |
127.0.0.1:10710 | cn_internal_address:cn_internal_port | 首次启动后不能修改 |
+
+### 3、启动 ConfigNode 节点
+
+进入iotdb的sbin目录下,启动confignode
+
+```shell
+./start-confignode.sh -d #“-d”参数将在后台进行启动
+```
+
+### 4、激活数据库
+
+#### 方式一:激活文件拷贝激活
+
+- 启动confignode节点后,进入activation文件夹, 将 system_info文件复制给天谋工作人员
+- 收到工作人员返回的 license文件
+- 将license文件放入对应节点的activation文件夹下;
+
+#### 方式二:激活脚本激活
+
+- 获取激活所需机器码,进入安装目录的sbin目录,执行激活脚本:
+
+```shell
+ cd sbin
+./start-activate.sh
+```
+
+- 显示如下信息,请将机器码(即该串字符)复制给天谋工作人员:
+
+```shell
+Please copy the system_info's content and send it to Timecho:
+Y17hFA0xRCE1TmkVxILuCIEPc7uJcr5bzlXWiptw8uZTmTX5aThfypQdLUIhMljw075hNRSicyvyJR9JM7QaNm1gcFZPHVRWVXIiY5IlZkXdxCVc1erXMsbCqUYsR2R2Mw4PSpFJsUF5jHWSoFIIjQ2bmJFW5P52KCccFMVeHTc=
+Please enter license:
+```
+
+- 将工作人员返回的激活码输入上一步的命令行提示处 `Please enter license:`,如下提示:
+
+```shell
+Please enter license:
+Jw+MmF+AtexsfgNGOFgTm83BgXbq0zT1+fOfPvQsLlj6ZsooHFU6HycUSEGC78eT1g67KPvkcLCUIsz2QpbyVmPLr9x1+kVjBubZPYlVpsGYLqLFc8kgpb5vIrPLd3hGLbJ5Ks8fV1WOVrDDVQq89YF2atQa2EaB9EAeTWd0bRMZ+s9ffjc/1Zmh9NSP/T3VCfJcJQyi7YpXWy5nMtcW0gSV+S6fS5r7a96PjbtE0zXNjnEhqgRzdU+mfO8gVuUNaIy9l375cp1GLpeCh6m6pF+APW1CiXLTSijK9Qh3nsL5bAOXNeob5l+HO5fEMgzrW8OJPh26Vl6ljKUpCvpTiw==
+License has been stored to sbin/../activation/license
+Import completed. Please start cluster and excute 'show cluster' to verify
activation status
+```
+
+### 5、启动DataNode 节点
+
+进入iotdb的sbin目录下,启动datanode:
+
+```shell
+cd sbin
+./start-datanode.sh -d #-d参数将在后台进行启动
+```
+
+### 6、验证部署
+
+可直接执行 ./sbin 目录下的 Cli 启动脚本:
+
+```shell
+./start-cli.sh -h ip(本机ip或域名) -p 端口号(6667)
+```
+
+成功启动后,出现如下界面显示IOTDB安装成功。
+
+
+
+出现安装成功界面后,继续看下是否激活成功,使用`show cluster`命令
+
+当看到最右侧显示ACTIVATED表示激活成功
+
+
\ No newline at end of file