This is an automated email from the ASF dual-hosted git repository.

caogaofei pushed a commit to branch main
in repository https://gitbox.apache.org/repos/asf/iotdb-docs.git
The following commit(s) were added to refs/heads/main by this push:
new 7eea647 New document for "Identification IoTDB plugin" added
7eea647 is described below
commit 7eea647694b0bcc399ef3aa62e64a2e7e5d63907
Author: majialin <[email protected]>
AuthorDate: Wed Jul 3 16:04:06 2024 +0800
New document for "Identification IoTDB plugin" added
---
src/.vuepress/sidebar_timecho/V1.3.x/en.ts | 1 +
src/.vuepress/sidebar_timecho/V1.3.x/zh.ts | 1 +
.../Ecosystem-Integration/Ignition-IoTDB-plugin.md | 270 ++++++++++++++++++++
.../Ecosystem-Integration/Ignition-IoTDB-plugin.md | 270 ++++++++++++++++++++
.../Ecosystem-Integration/Ignition-IoTDB-plugin.md | 272 +++++++++++++++++++++
.../Ecosystem-Integration/Ignition-IoTDB-plugin.md | 272 +++++++++++++++++++++
6 files changed, 1086 insertions(+)
diff --git a/src/.vuepress/sidebar_timecho/V1.3.x/en.ts
b/src/.vuepress/sidebar_timecho/V1.3.x/en.ts
index 2b64c1c..0bc4bec 100644
--- a/src/.vuepress/sidebar_timecho/V1.3.x/en.ts
+++ b/src/.vuepress/sidebar_timecho/V1.3.x/en.ts
@@ -150,6 +150,7 @@ export const enSidebar = {
{ text: 'Flink IoTDB Connector', link: 'Flink-IoTDB' },
// { text: 'Flink SQL IoTDB Connector', link: 'Flink-SQL-IoTDB'
},
{ text: 'Flink TsFile Connector', link: 'Flink-TsFile' },
+ { text: 'Ignition-IoTDB Plugin', link: 'Ignition-IoTDB-plugin' },
{ text: 'NiFi IoTDB Connector', link: 'NiFi-IoTDB' },
{ text: 'DBeaver-IoTDB', link: 'DBeaver' },
],
diff --git a/src/.vuepress/sidebar_timecho/V1.3.x/zh.ts
b/src/.vuepress/sidebar_timecho/V1.3.x/zh.ts
index 6ba8aee..4fa94c7 100644
--- a/src/.vuepress/sidebar_timecho/V1.3.x/zh.ts
+++ b/src/.vuepress/sidebar_timecho/V1.3.x/zh.ts
@@ -150,6 +150,7 @@ export const zhSidebar = {
{ text: 'Flink-IoTDB-Connector', link: 'Flink-IoTDB' },
// { text: 'Flink-SQL-IoTDB-Connector', link: 'Flink-SQL-IoTDB'
},
{ text: 'Flink-TsFile-Connector', link: 'Flink-TsFile' },
+ { text: 'Ignition-IoTDB 插件', link: 'Ignition-IoTDB-plugin' },
{ text: 'NiFi-IoTDB-Connector', link: 'NiFi-IoTDB' },
{ text: 'DBeaver-IoTDB 集成方案', link: 'DBeaver' },
],
diff --git
a/src/UserGuide/Master/Ecosystem-Integration/Ignition-IoTDB-plugin.md
b/src/UserGuide/Master/Ecosystem-Integration/Ignition-IoTDB-plugin.md
new file mode 100644
index 0000000..a64e0a6
--- /dev/null
+++ b/src/UserGuide/Master/Ecosystem-Integration/Ignition-IoTDB-plugin.md
@@ -0,0 +1,270 @@
+<!--
+
+ Licensed to the Apache Software Foundation (ASF) under one
+ or more contributor license agreements. See the NOTICE file
+ distributed with this work for additional information
+ regarding copyright ownership. The ASF licenses this file
+ to you under the Apache License, Version 2.0 (the
+ "License"); you may not use this file except in compliance
+ with the License. You may obtain a copy of the License at
+
+ http://www.apache.org/licenses/LICENSE-2.0
+
+ Unless required by applicable law or agreed to in writing,
+ software distributed under the License is distributed on an
+ "AS IS" BASIS, WITHOUT WARRANTIES OR CONDITIONS OF ANY
+ KIND, either express or implied. See the License for the
+ specific language governing permissions and limitations
+ under the License.
+
+-->
+# Ignition-IoTDB Plugin
+
+## 1、Product Overview
+
+1. Introduction to Ignition
+
+Ignition is a web-based monitoring and data acquisition tool (SCADA) - an open
and scalable universal platform. Ignition allows you to more easily control,
track, display, and analyze all data of your enterprise, enhancing business
capabilities. For more introduction details, please refer to
[Ignition官网](https://docs.inductiveautomation.com/docs/8.1/getting-started/introducing-ignition)
+
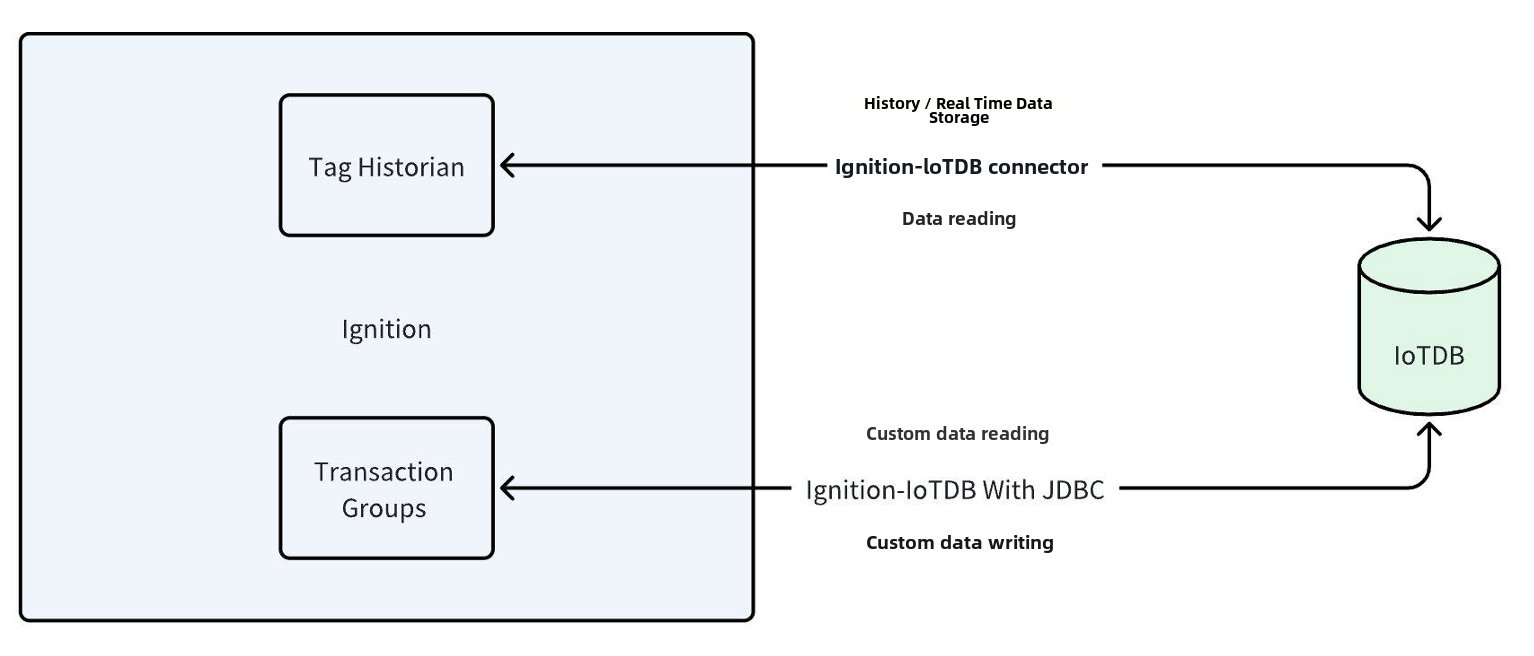
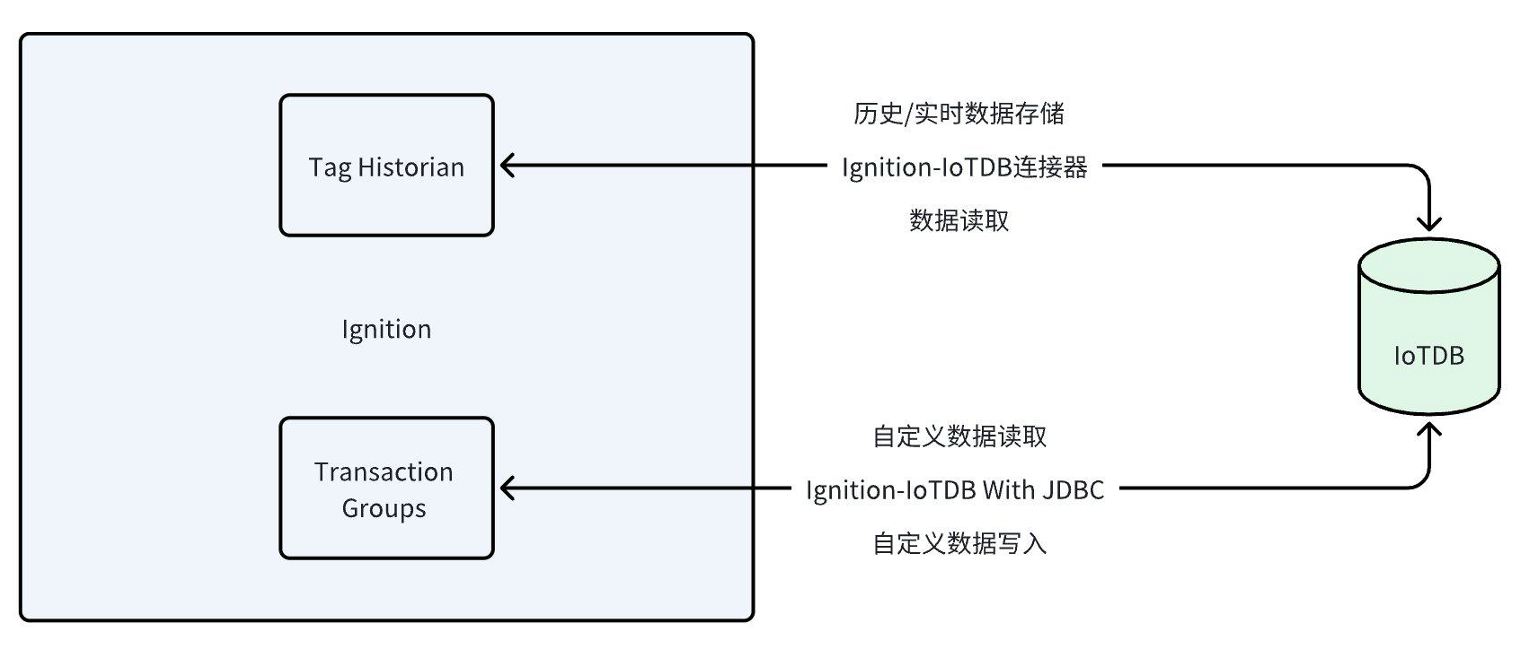
+2. Introduction to the Ignition-IoTDB plugin
+
+ The ignition-IoTDB connector is divided into two modules: the
ignition-IoTDB connector,Ignition-IoTDB With JDBC。 Among them:
+
+ - Ignition-IoTDB connector: Provides the ability to store data collected by
Ignition into IoTDB, and also supports data reading in Components. It injects
script interfaces such as `system. iotdb. insert`and`system. iotdb. query`to
facilitate programming in Ignition
+ - Ignition-IoTDB With JDBC: Ignition-IoTDB With JDBC can be used in
the`Transaction Groups`module and is not applicable to the`Tag
Historian`module. It can be used for custom writing and querying.
+
+ The specific relationship and content between the two modules and ignition
are shown in the following figure.
+
+ 
+
+## 2、Installation Requirements
+
+| **Preparation Content** | Version Requirements
|
+| ------------------------------- |
------------------------------------------------------------ |
+| IoTDB | Version 1.3.1 and above are required to be
installed, please refer to IoTDB for installation [Deployment
Guidance](https://www.timecho.com/docs/UserGuide/latest/Deployment-and-Maintenance/IoTDB-Package_timecho.html)
|
+| Ignition | Requirement: 8.1 version (8.1.37 and
above) of version 8.1 must be installed. Please refer to the Ignition official
website for installation [Installation
Guidance](https://docs.inductiveautomation.com/docs/8.1/getting-started/installing-and-upgrading)(Other
versions are compatible, please contact the business department for more
information) |
+| Ignition-IoTDB Connector module | Please contact Business to obtain
|
+| Ignition-IoTDB With JDBC | Download
address:https://repo1.maven.org/maven2/org/apache/iotdb/iotdb-jdbc/ |
+
+## 3、Instruction Manual For Ignition-IoTDB Connector
+
+### 1、Introduce
+
+The Ignition-IoTDB connector module can store data in a database connection
associated with the historical database provider. The data is directly stored
in a table in the SQL database based on its data type, as well as a millisecond
timestamp. Store data only when making changes based on the value pattern and
dead zone settings on each label, thus avoiding duplicate and unnecessary data
storage.
+
+The Ignition-IoTDB connector provides the ability to store the data collected
by Ignition into IoTDB.
+
+### 2、Installation Steps
+
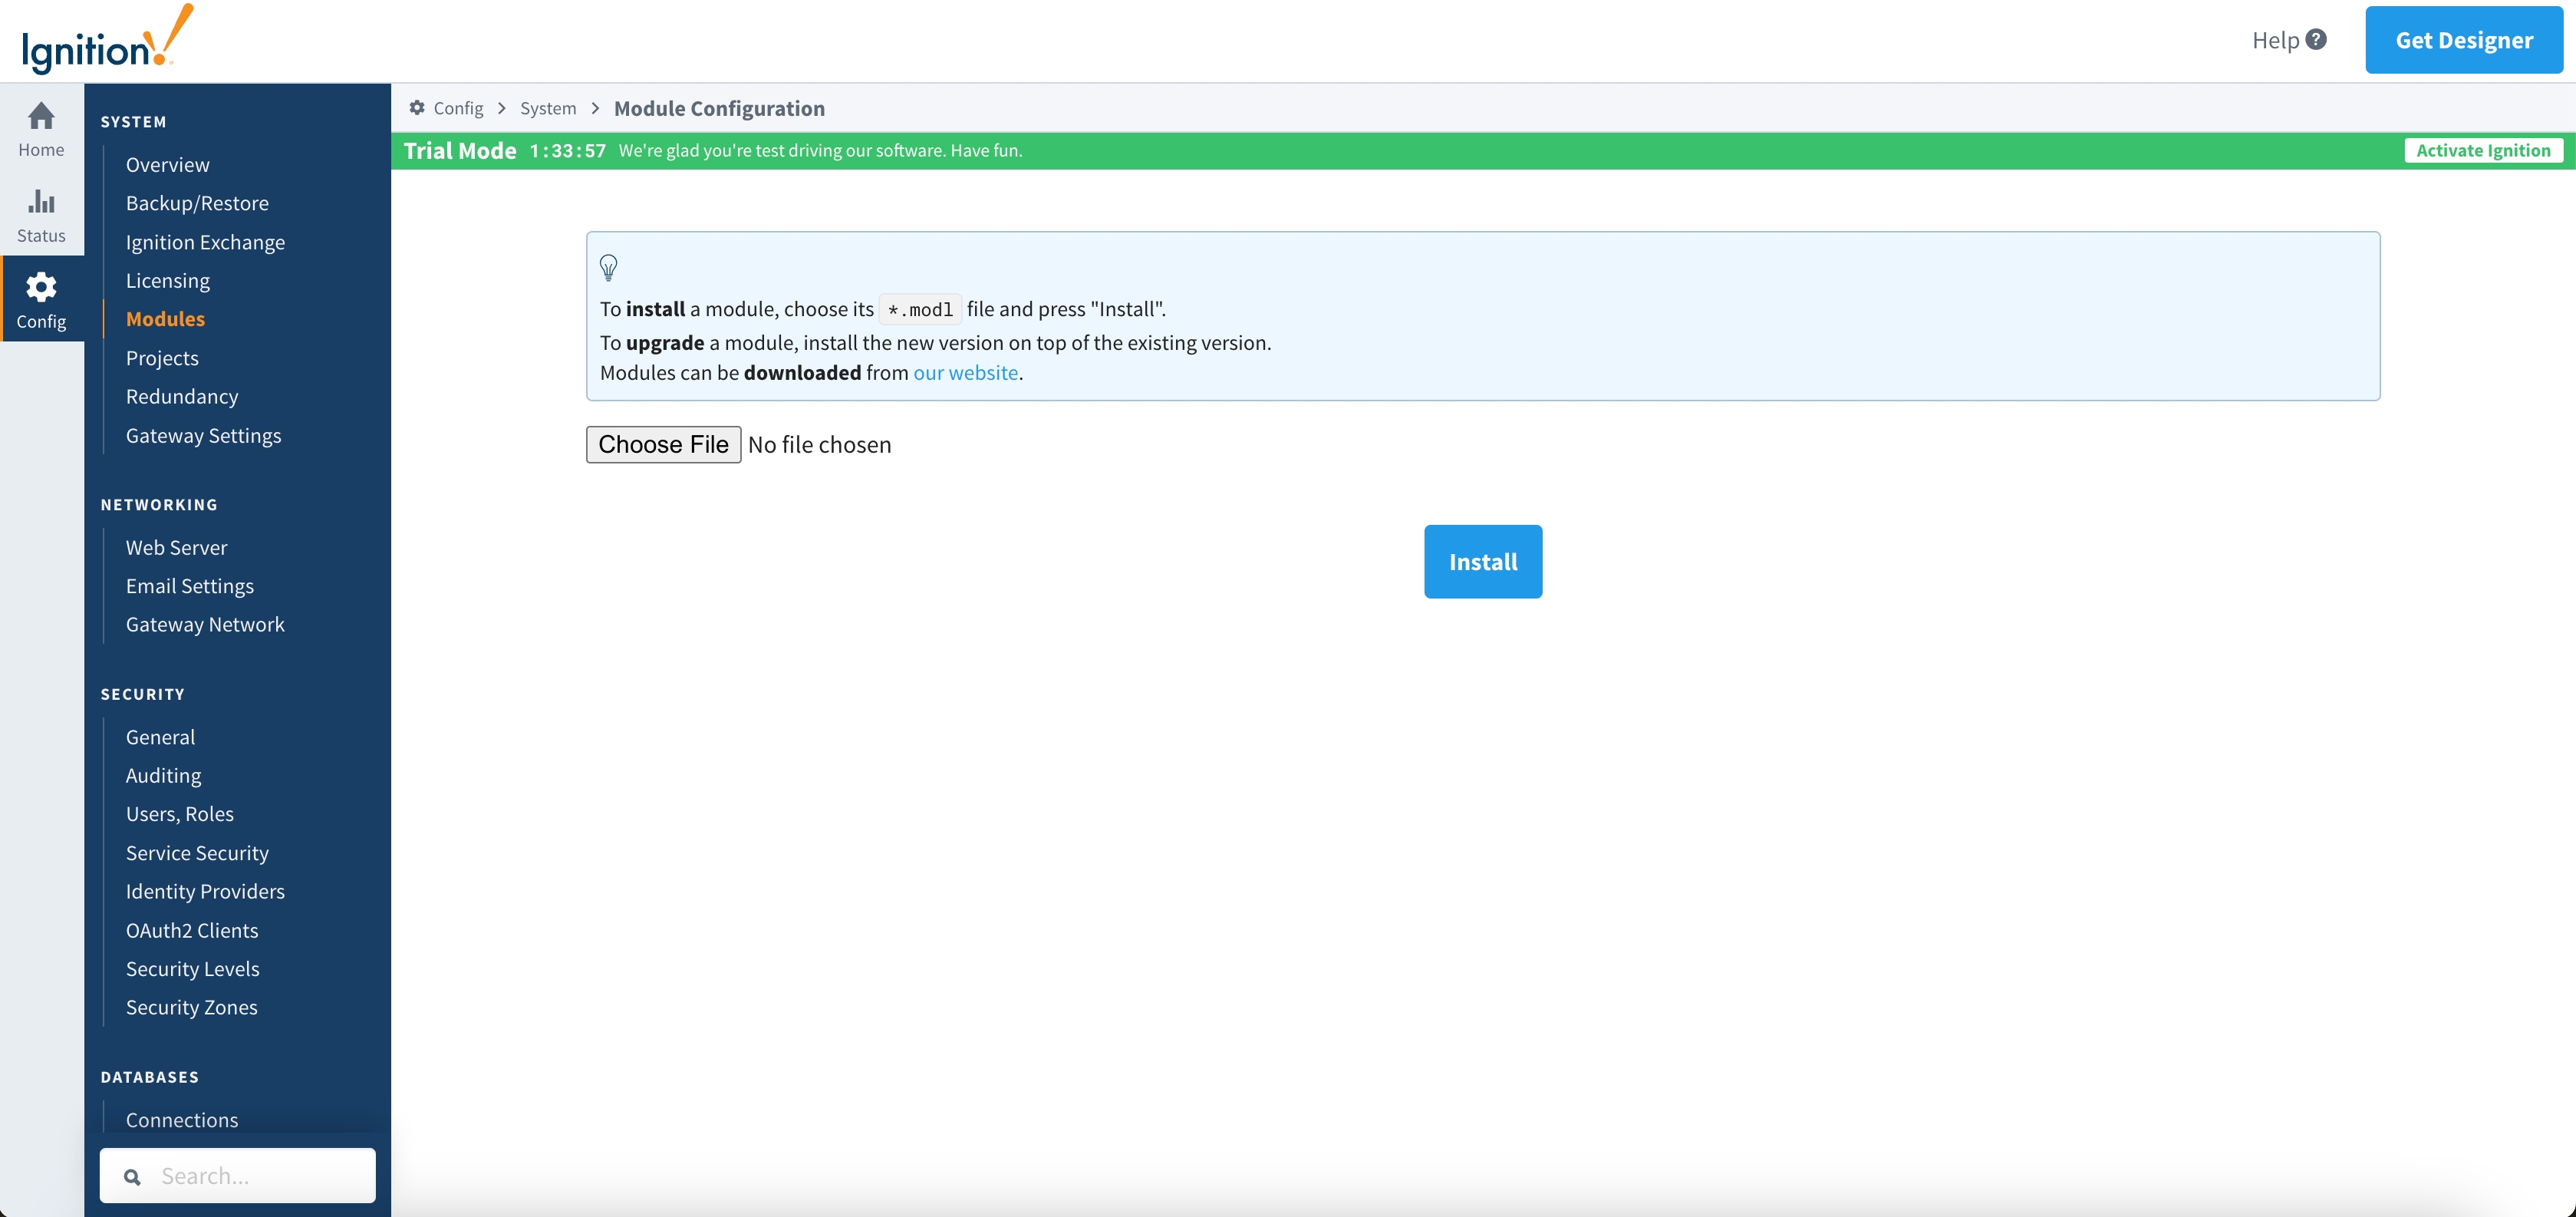
+Step 1: Enter the `Configuration` - `System` - `Modules` module and click on
the `Install or Upgrade a Module` button at the bottom
+
+
+
+Step 2: Select the obtained `modl`, select the file and upload it, click
`Install`, and trust the relevant certificate.
+
+
+
+Step 3: After installation is completed, you can see the following content
+
+
+
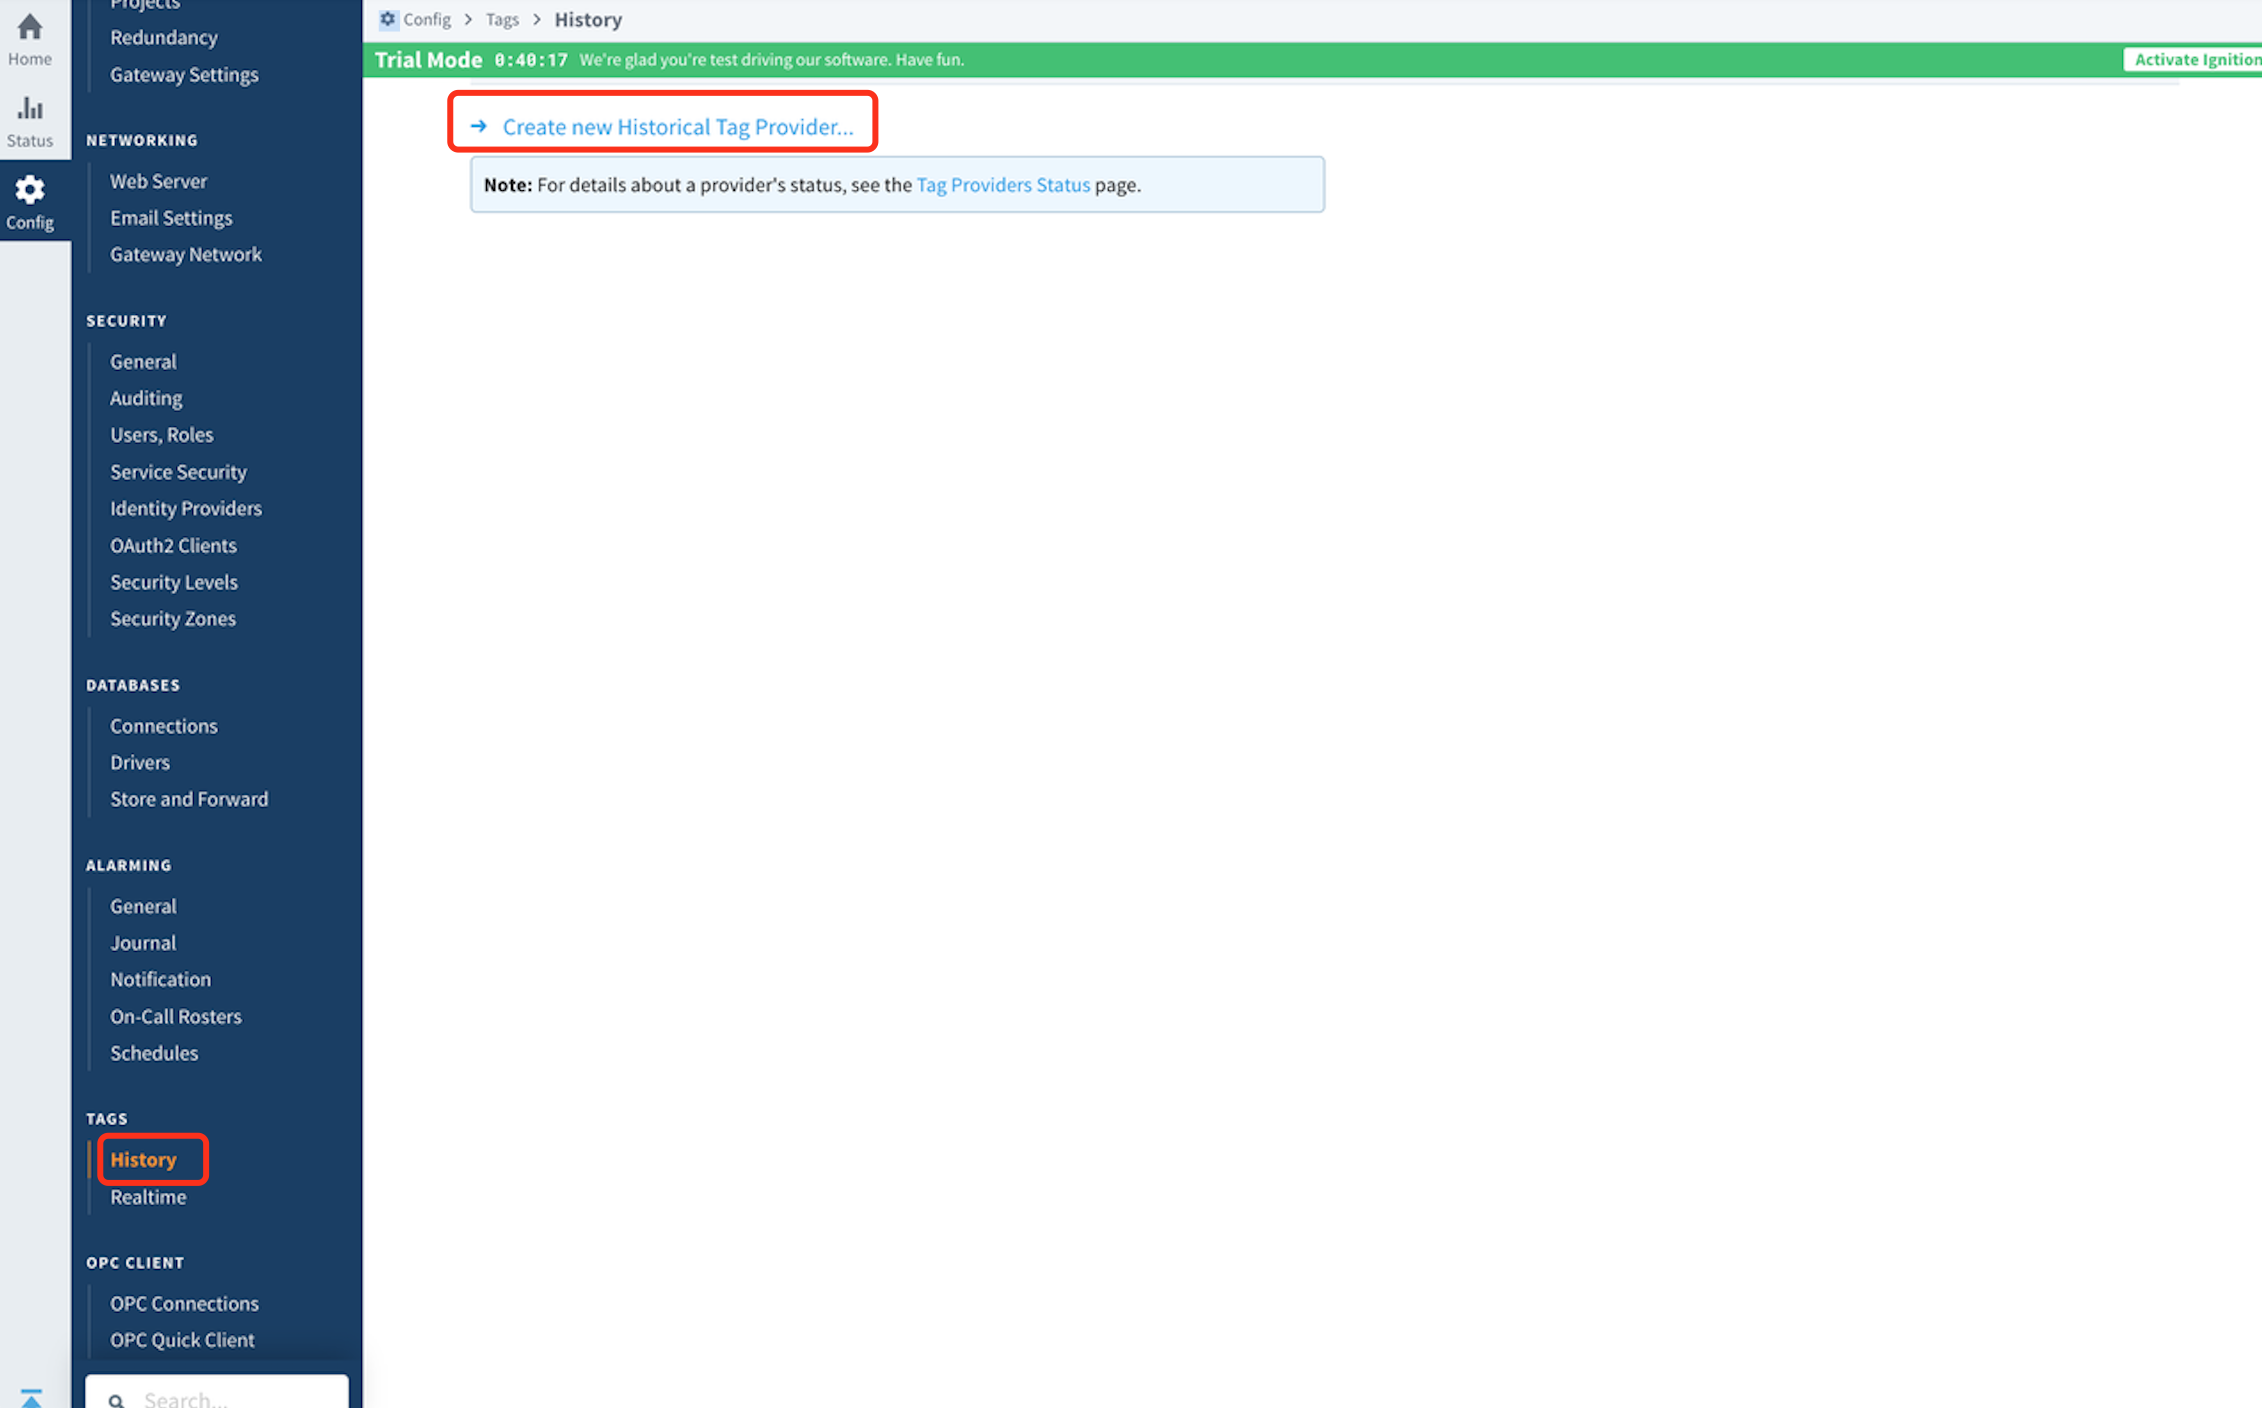
+Step 4: Enter the `Configuration` - `Tags` - `History` module and click on
`Create new Historical Tag Provider` below
+
+
+
+Step 5: Select `IoTDB` and fill in the configuration information
+
+
+
+The configuration content is as follows:
+
+<table>
+ <tr>
+ <th>Name</th>
+ <th>Description</th>
+ <th>Default Value</th>
+ <th>Notes</th>
+ </tr>
+ <tr>
+ <th colspan="4">Main</th>
+ </tr>
+ <tr>
+ <td>Provider Name</td>
+ <td>Provider Name</td>
+ <td>-</td>
+ <td> </td>
+ </tr>
+ <tr>
+ <td>Enabled</td>
+ <td> </td>
+ <td>true</td>
+ <td>The provider can only be used when it is true</td>
+ </tr>
+ <tr>
+ <td>Description</td>
+ <td>Description</td>
+ <td>-</td>
+ <td> </td>
+ </tr>
+ <tr>
+ <th colspan="4">IoTDB Settings</th>
+ </tr>
+ <tr>
+ <td>Host Name</td>
+ <td>The address of the target IoTDB instance</td>
+ <td>-</td>
+ <td> </td>
+ </tr>
+ <tr>
+ <td>Port Number</td>
+ <td>The port of the target IoTDB instance</td>
+ <td>6667</td>
+ <td> </td>
+ </tr>
+ <tr>
+ <td>Username</td>
+ <td>The username of the target IoTDB</td>
+ <td>-</td>
+ <td> </td>
+ </tr>
+ <tr>
+ <td>Password</td>
+ <td>Password for target IoTDB</td>
+ <td>-</td>
+ <td> </td>
+ </tr>
+ <tr>
+ <td>Database Name</td>
+ <td>The database name to be stored, starting with root, such as root
db</td>
+ <td>-</td>
+ <td> </td>
+ </tr>
+ <tr>
+ <td>Pool Size</td>
+ <td>Size of SessionPool</td>
+ <td>50</td>
+ <td>Can be configured as needed</td>
+ </tr>
+ <tr>
+ <th colspan="2">Store and Forward Settings</th>
+ <td>Just keep it as default</td>
+ <td> </td>
+ </tr>
+</table>
+
+
+### 3、Instructions
+
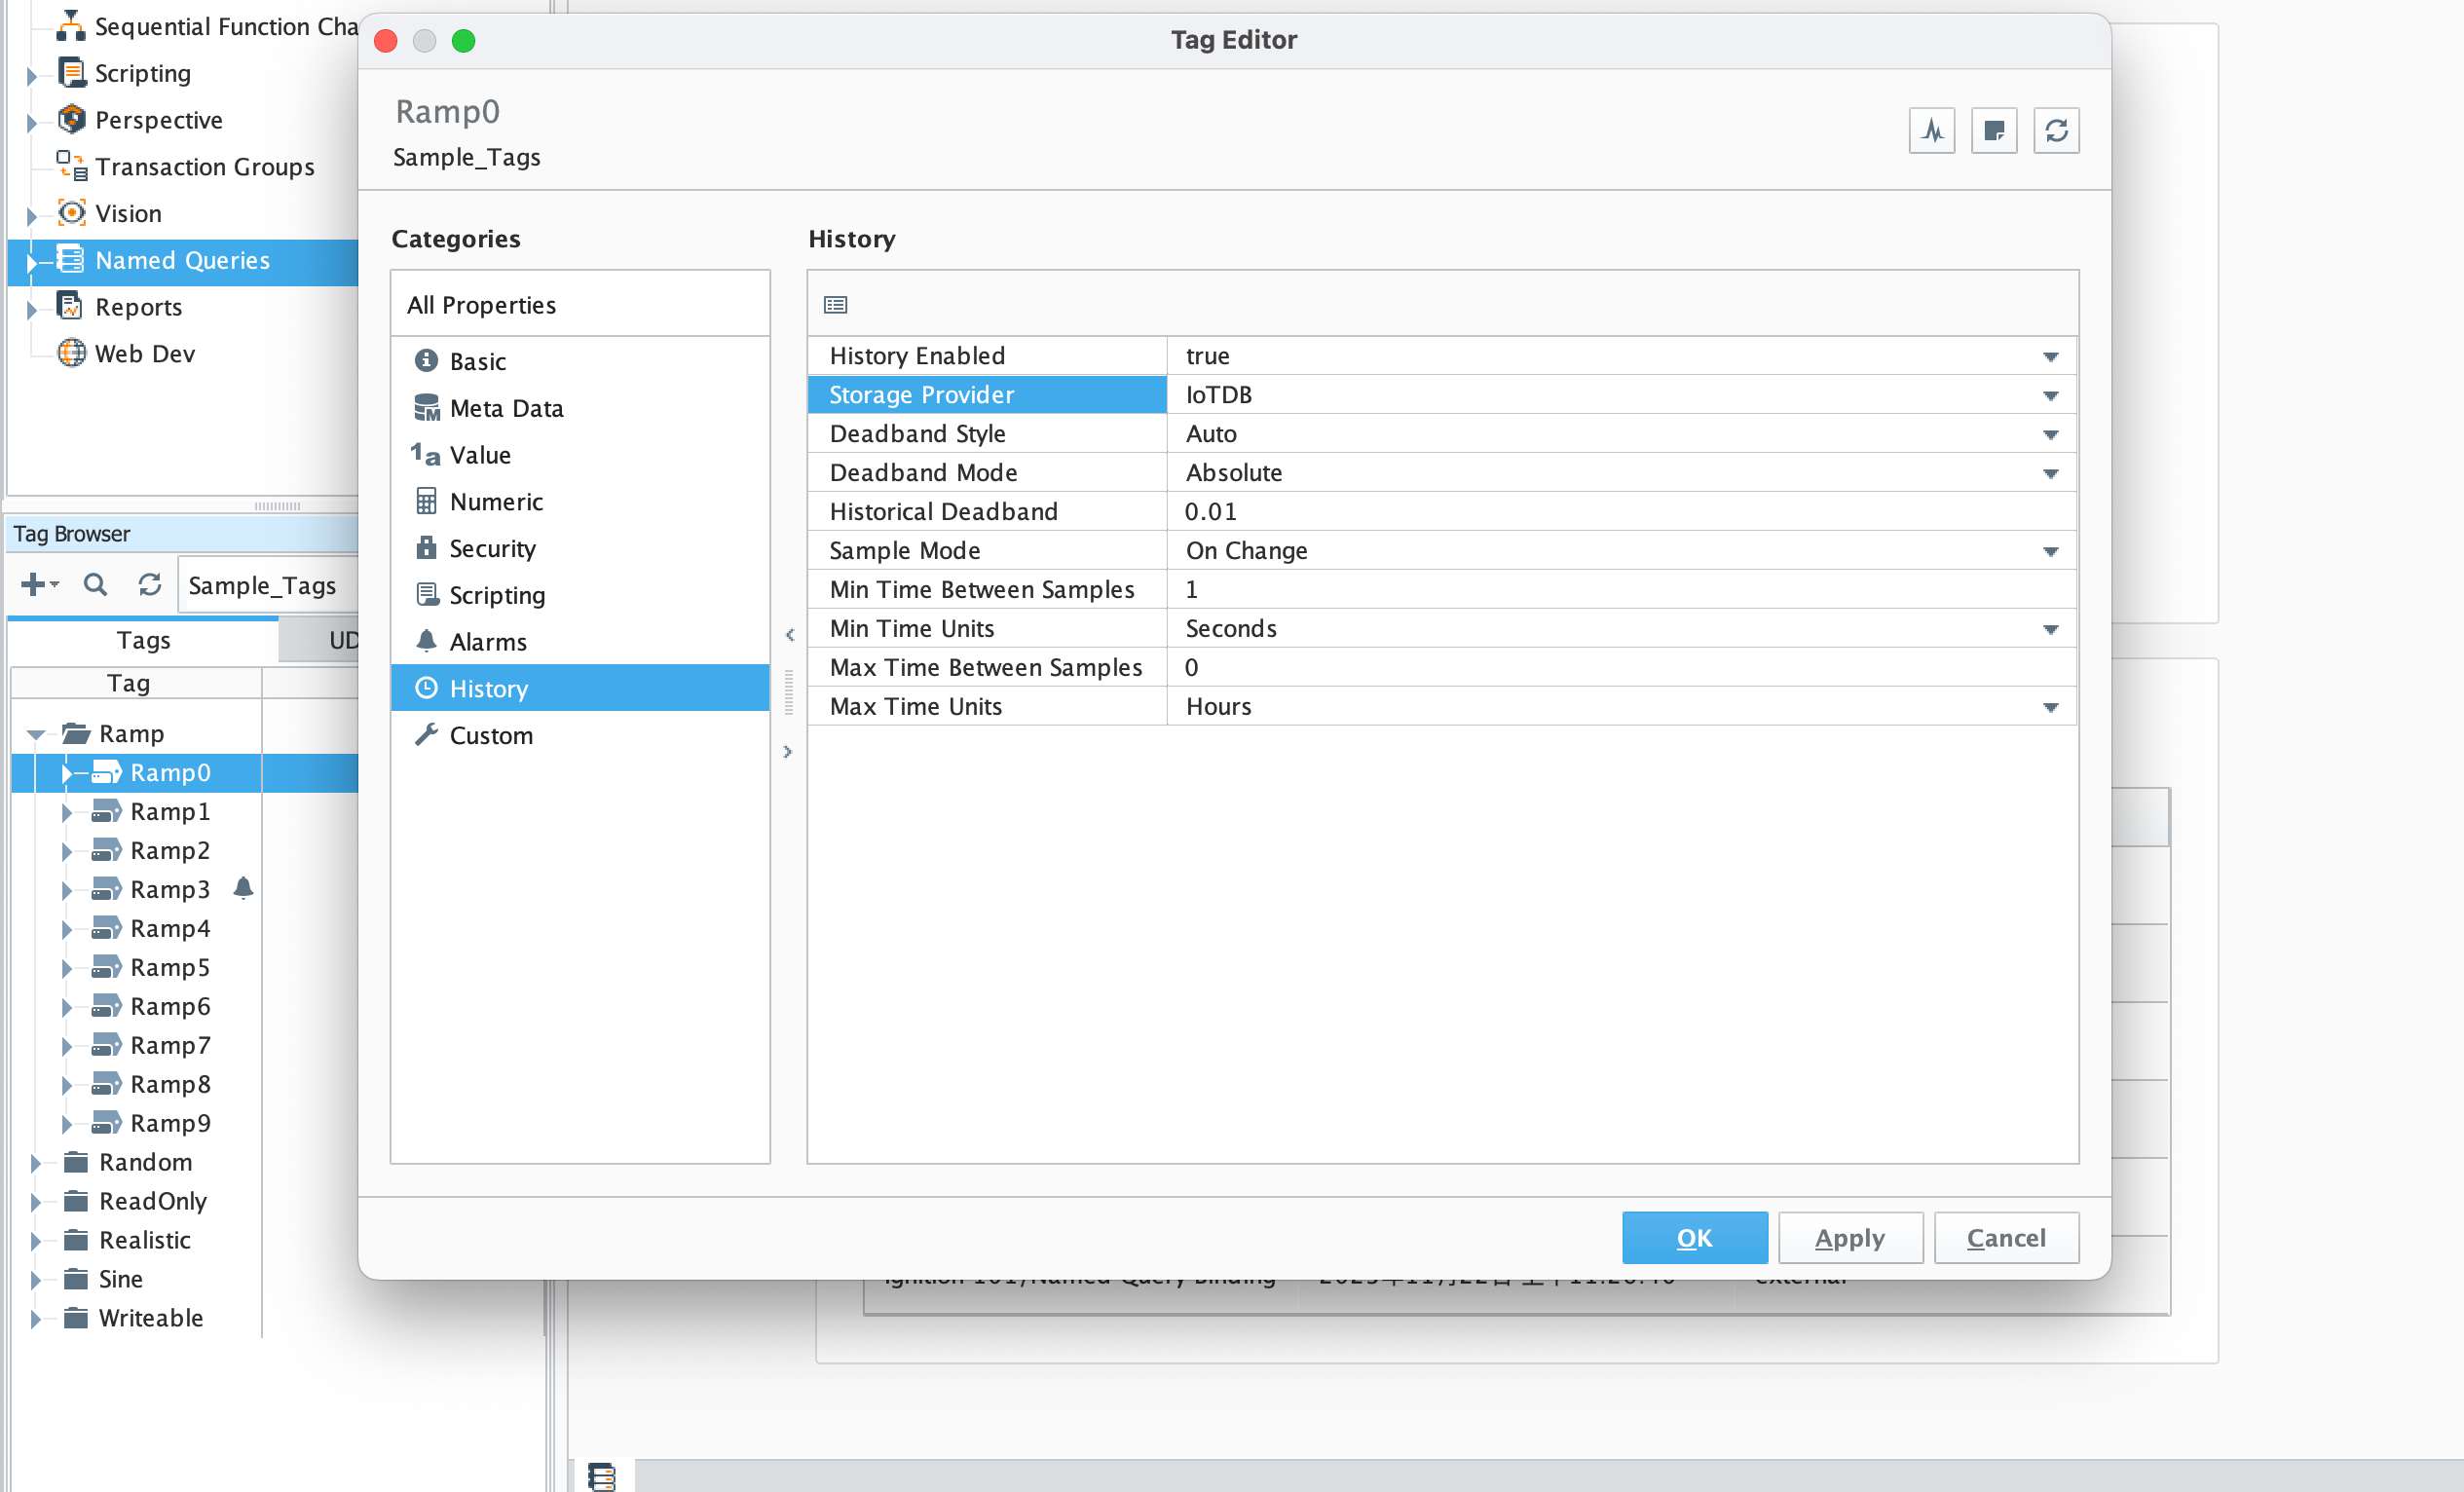
+#### Configure Historical Data Storage
+
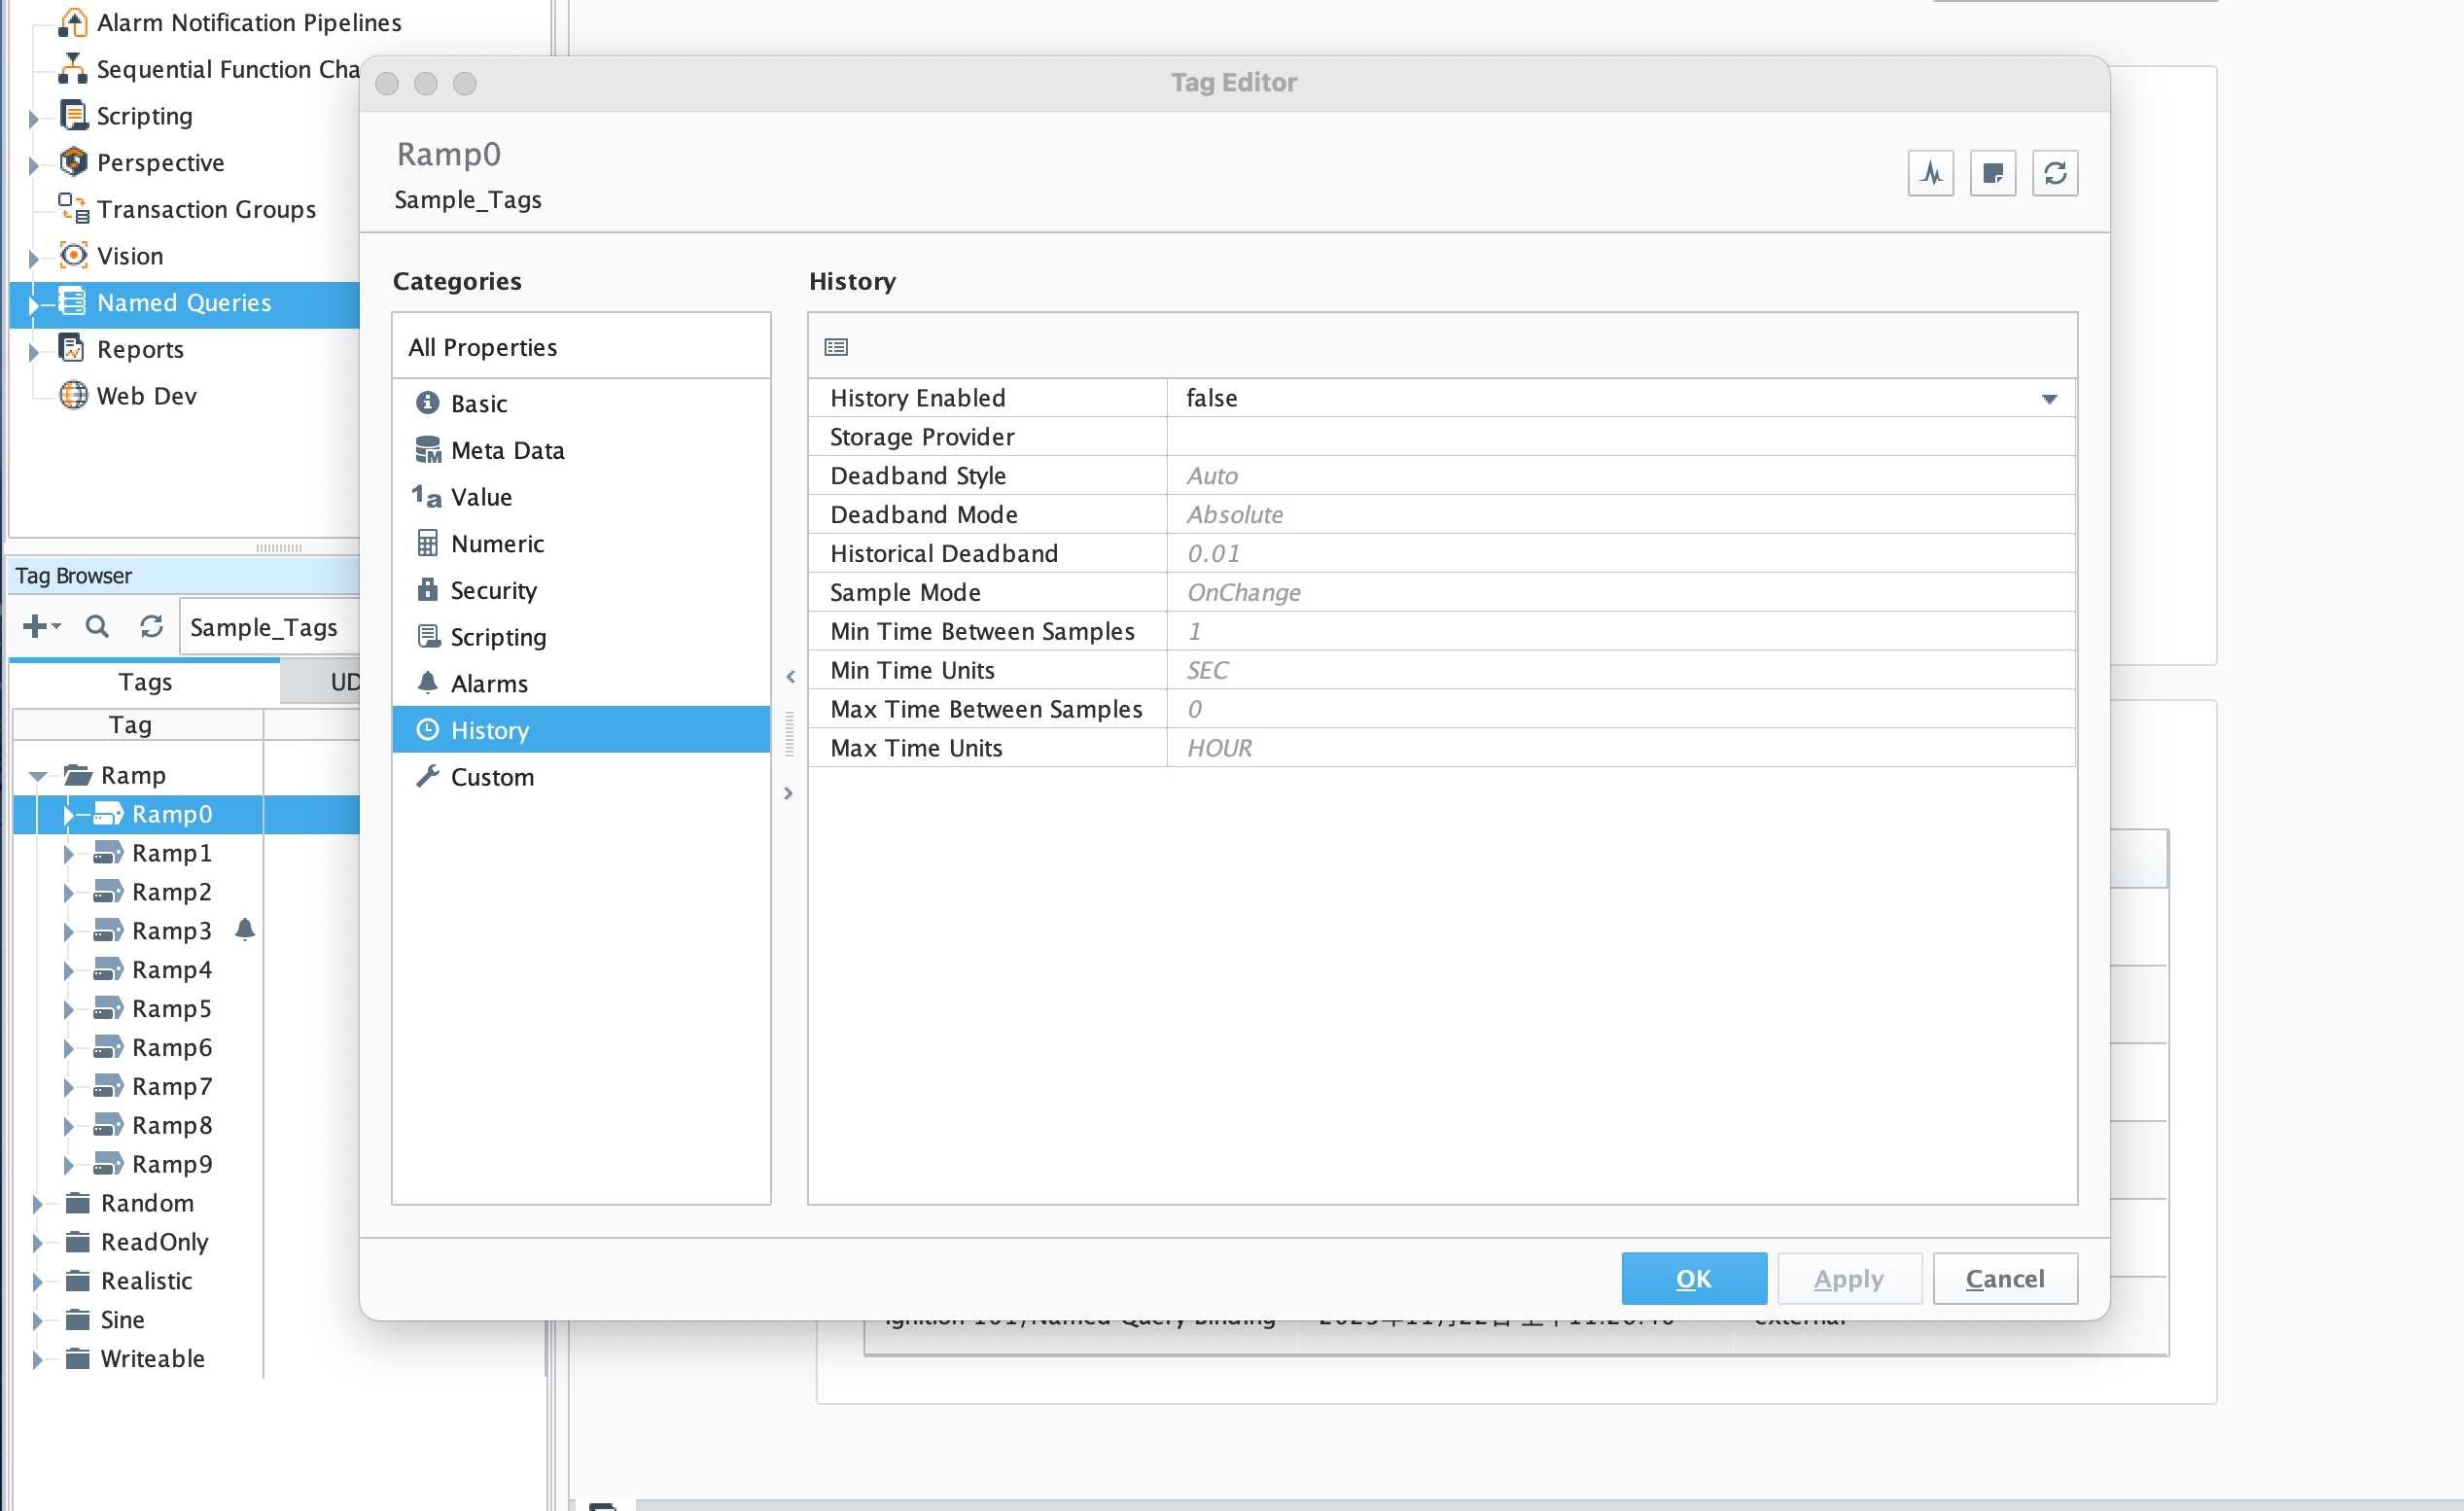
+- After configuring the `Provider`, you can use the `IoTDB Tag Historian` in
the `Designer`, just like using other `Providers`. Right click on the
corresponding `Tag` and select `Edit Tag (s) `, then select the History
category in the Tag Editor
+
+ 
+
+- Set `History Disabled` to `true`, select `Storage Provider` as the
`Provider` created in the previous step, configure other parameters as needed,
click `OK`, and then save the project. At this point, the data will be
continuously stored in the 'IoTDB' instance according to the set content.
+
+ 
+
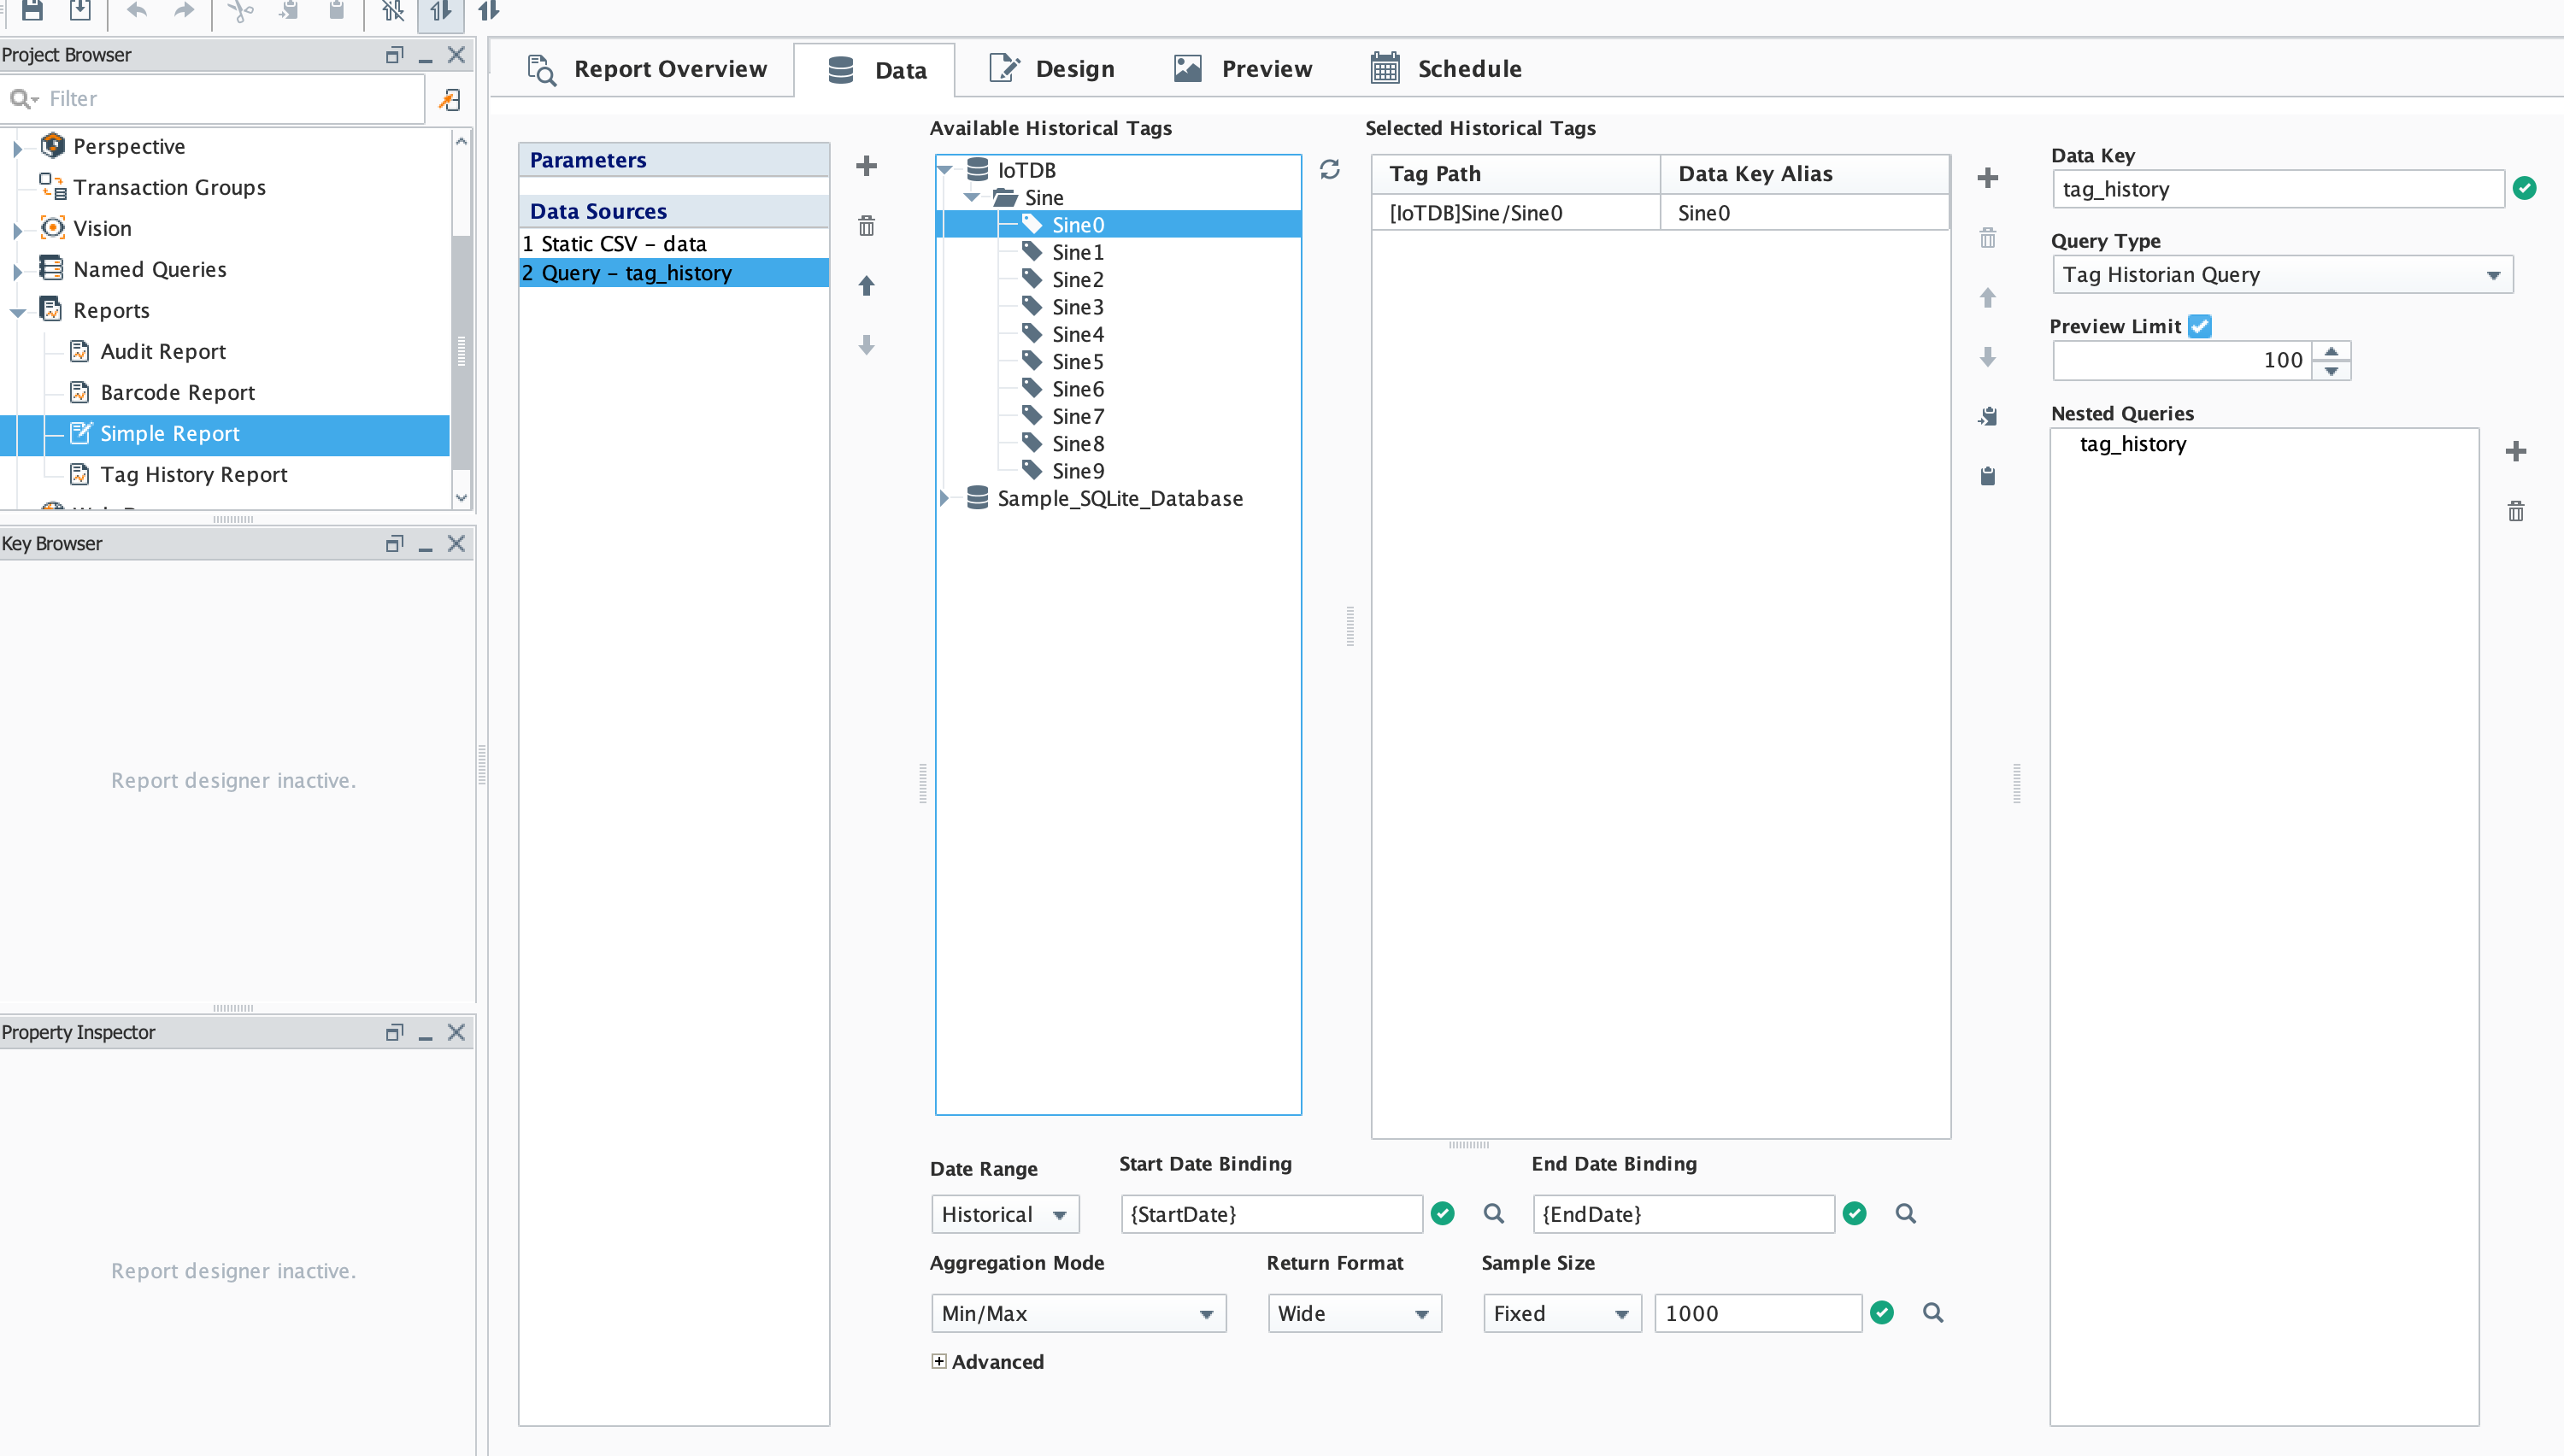
+#### Read Data
+
+- You can also directly select the tags stored in IoTDB under the Data tab of
the Report
+
+ 
+
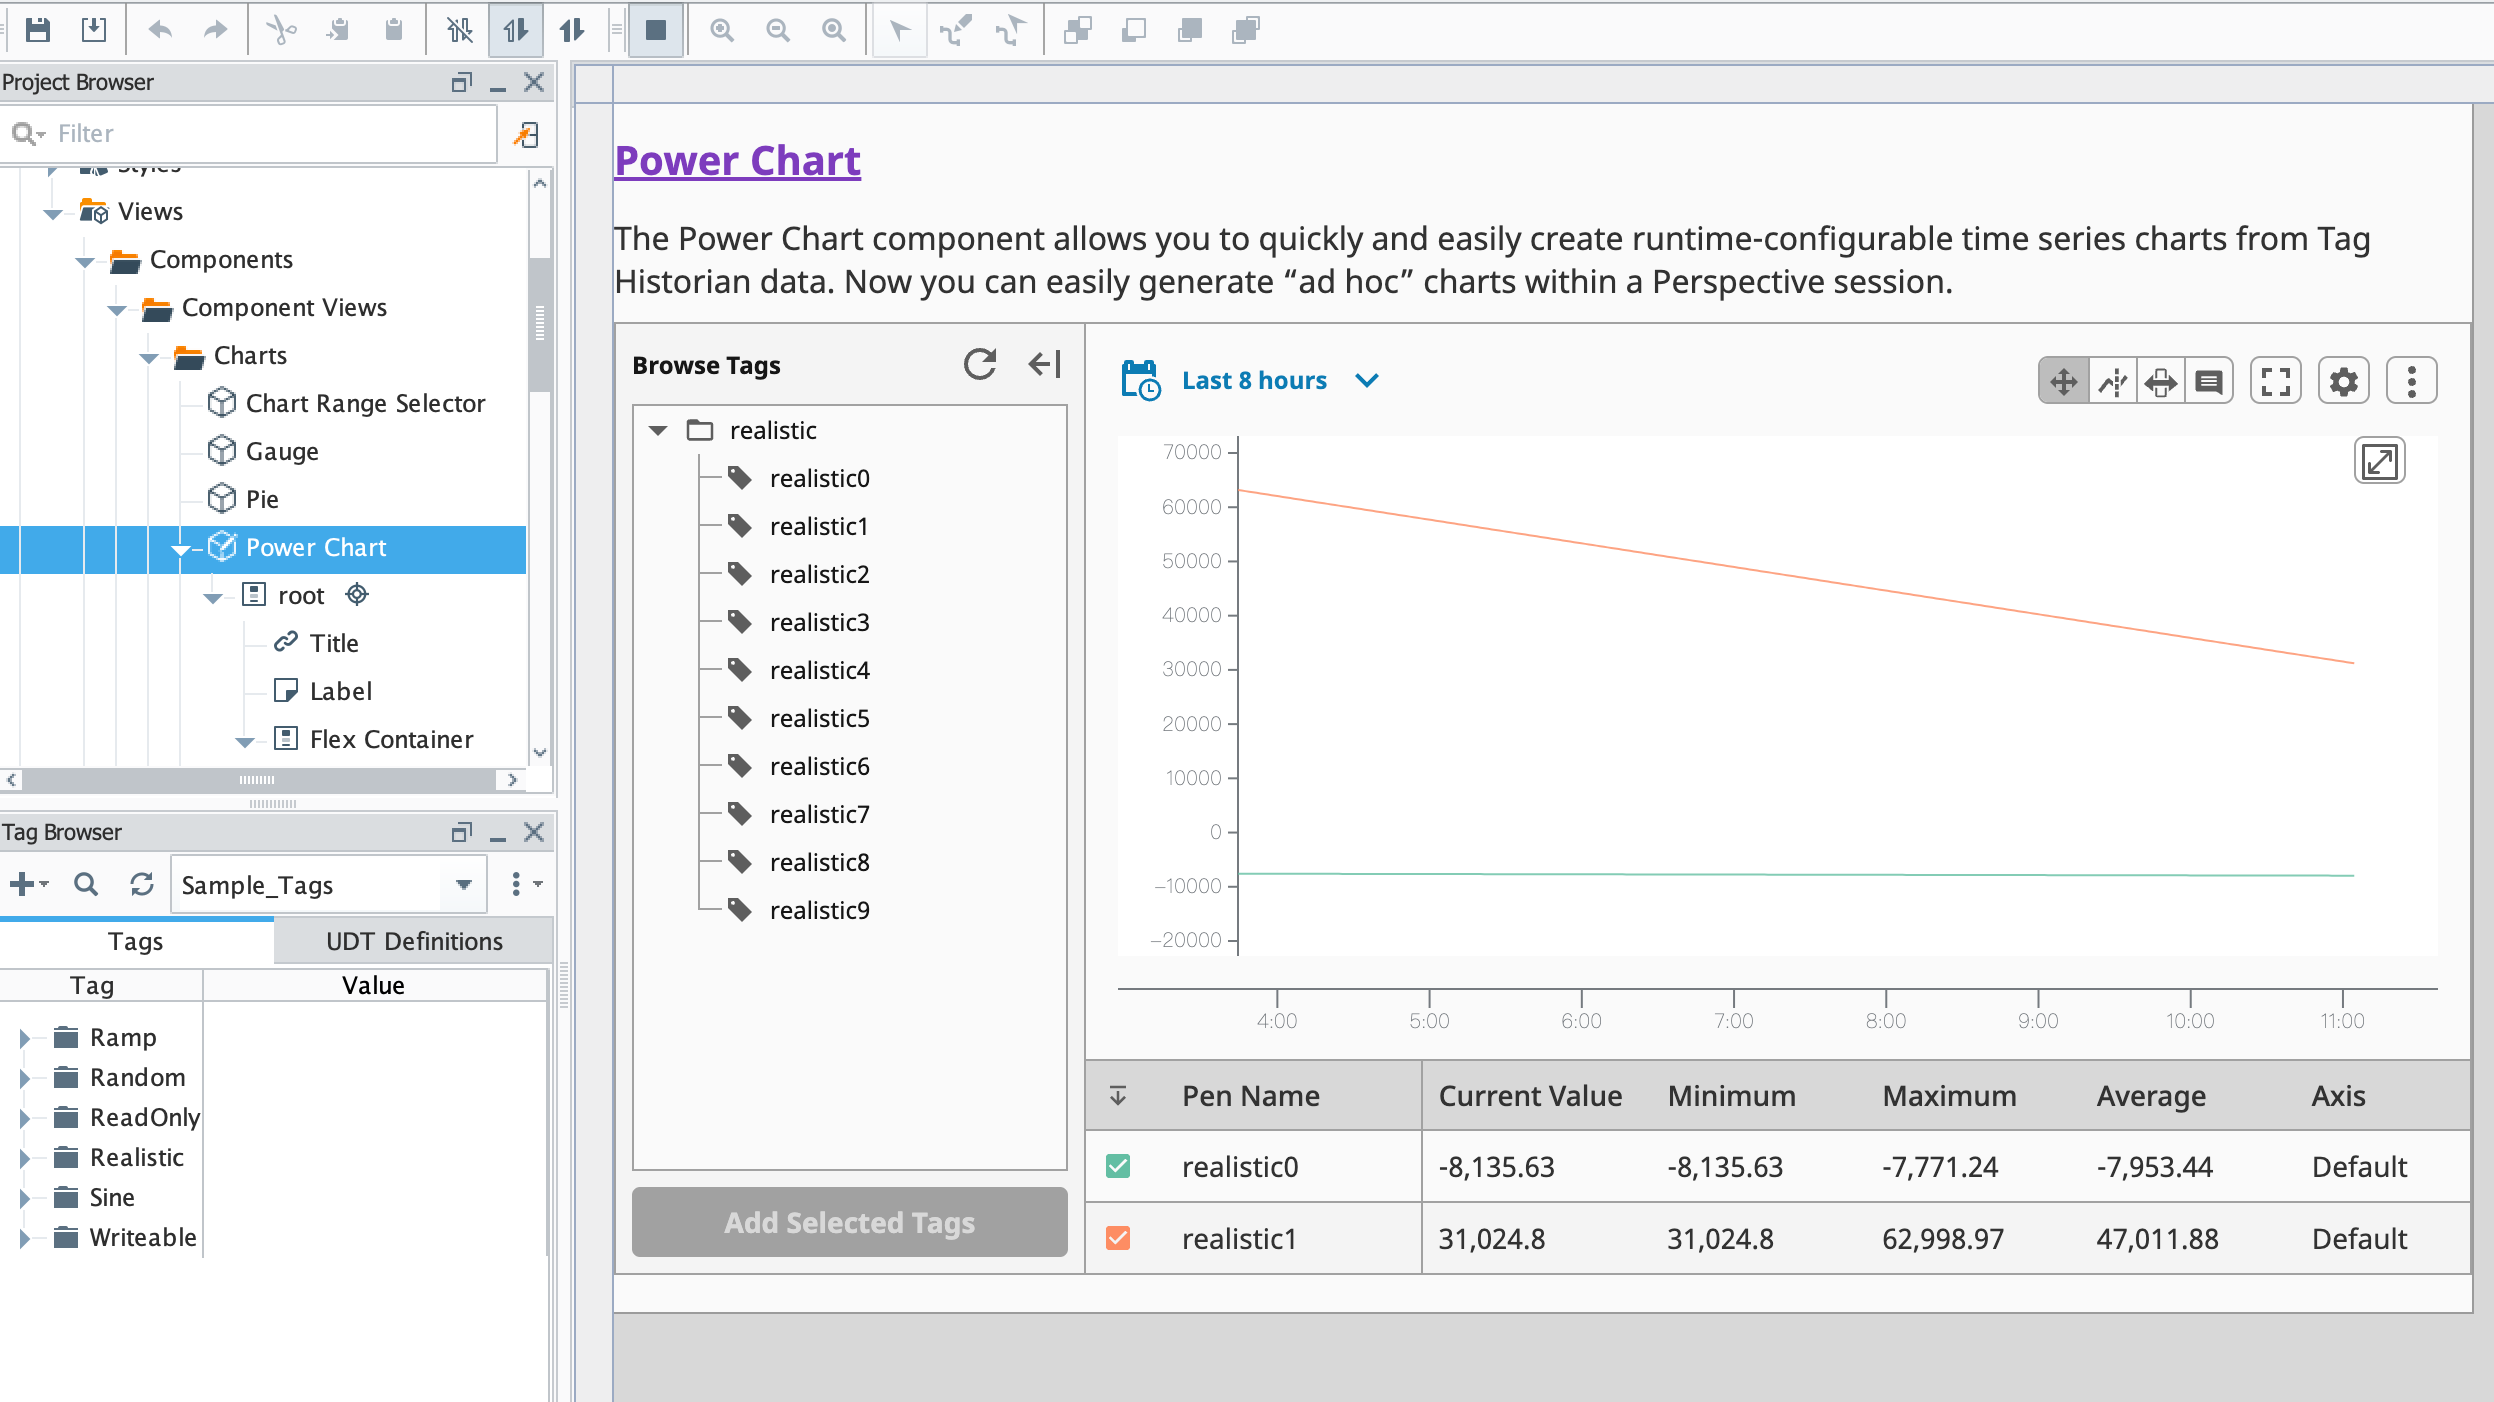
+- You can also directly browse relevant data in Components
+
+ 
+
+#### Script module: This function can interact with IoTDB
+
+1. system.iotdb.insert:
+
+
+- Script Description: Write data to an IoTDB instance
+
+- Script Definition:
+
+ `system.iotdb.insert(historian, deviceId, timestamps, measurementNames,
measurementValues)`
+
+- Parameter:
+
+ - `str historian`:The name of the corresponding IoTDB Tag Historian Provider
+ - `str deviceId`:The deviceId written, excluding the configured database,
such as Sine
+ - `long[] timestamps`:List of timestamps for written data points
+ - `str[] measurementNames`:List of names for written physical quantities
+ - `str[][] measurementValues`:The written data point data corresponds to the
timestamp list and physical quantity name list
+
+- Return Value: None
+
+- Available Range:Client, Designer, Gateway
+
+- Usage example:
+
+ ```shell
+ system.iotdb.insert("IoTDB", "Sine",
[system.date.now()],["measure1","measure2"],[["val1","val2"]])
+ ```
+
+2. system.iotdb.query:
+
+
+- Script Description:Query the data written to the IoTDB instance
+
+- Script Definition:
+
+ `system.iotdb.query(historian, sql)`
+
+- Parameter:
+
+ - `str historian`:The name of the corresponding IoTDB Tag Historian Provider
+ - `str sql`:SQL statement to be queried
+
+- Return Value:
+Query Results:`List<Map<String, Object>>`
+
+- Available Range:Client, Designer, Gateway
+- Usage example:
+
+```Python
+system.iotdb.query("IoTDB", "select * from root.db.Sine where time >
1709563427247")
+```
+
+## 4、Ignition-IoTDB With JDBC
+
+### 1、Introduce
+
+ Ignition-IoTDB With JDBC provides a JDBC driver that allows users to connect
and query the Ignition IoTDB database using standard JDBC APIs
+
+### 2、Installation Steps
+
+Step 1: Enter the `Configuration` - `Databases` -`Drivers` module and create
the `Translator`
+
+
+
+Step 2: Enter the `Configuration` - `Databases` - `Drivers` module, create a
`JDBC Driver` , select the `Translator` configured in the previous step, and
upload the downloaded `IoTDB JDBC`. Set the Classname to `org. apache. iotdb.
jdbc.IoTDBDriver`
+
+
+
+Step 3: Enter the `Configuration` - `Databases` - `Connections` module, create
a new `Connections` , select the`IoTDB Driver` created in the previous step for
`JDBC Driver`, configure the relevant information, and save it to use
+
+
+
+### 3、Instructions
+
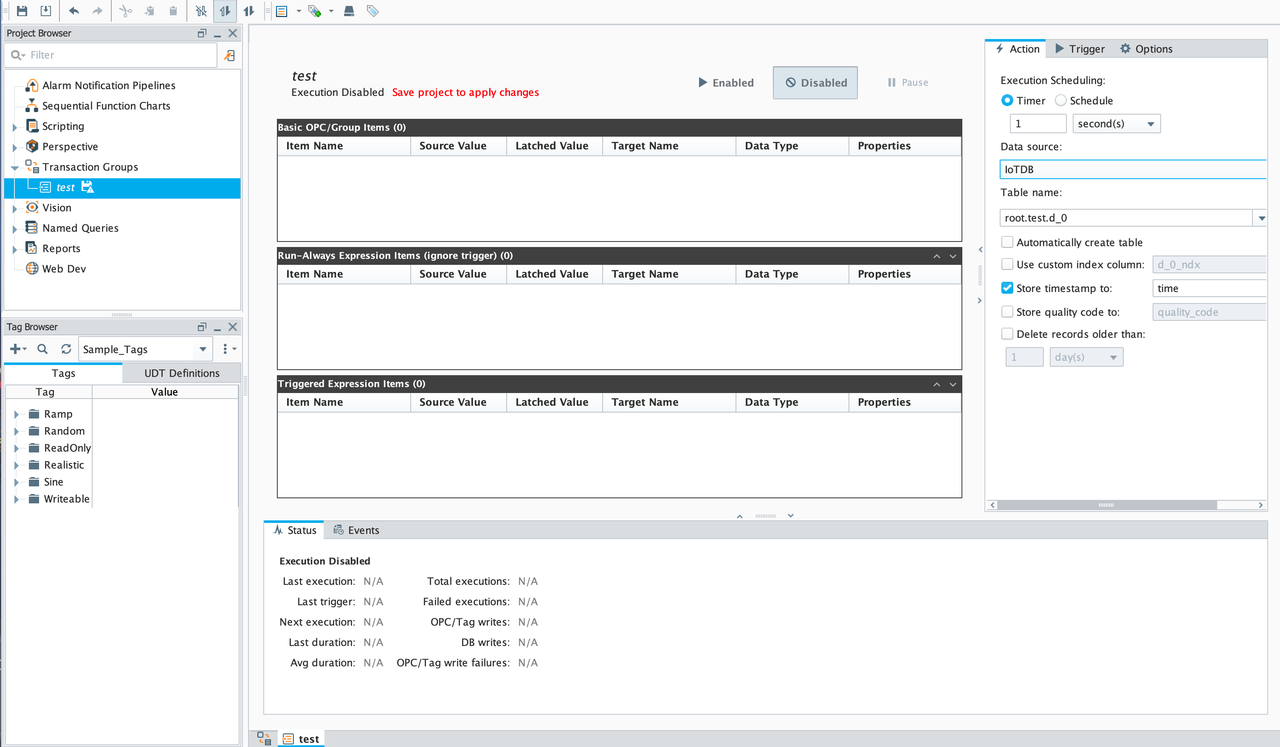
+#### Data Writing
+
+Select the previously created `Connection` from the `Data Source` in the
`Transaction Groups`
+
+- `Table name`needs to be set as the complete device path starting from root
+- Uncheck `Automatically create table`
+- `Store timestame to` configure as time
+
+Do not select other options, set the fields, and after `enabled` , the data
will be installed and stored in the corresponding IoTDB
+
+
+
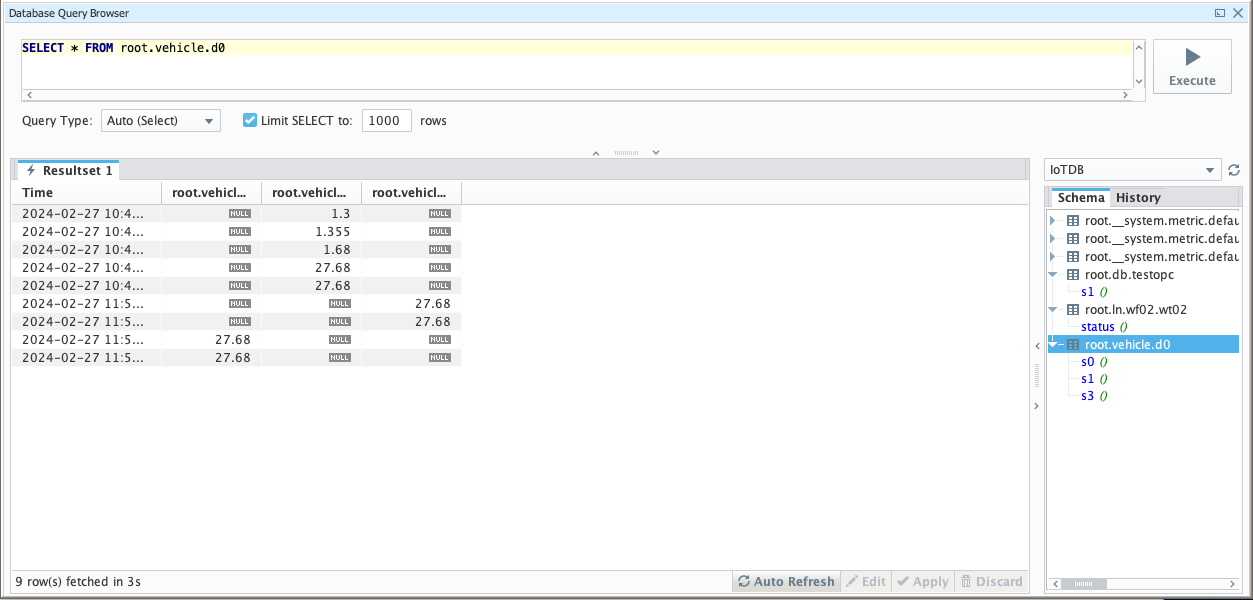
+#### Query
+
+- Select `Data Source` in the `Database Query Browser` and select the
previously created `Connection` to write an SQL statement to query the data in
IoTDB
+
+
+
diff --git
a/src/UserGuide/latest/Ecosystem-Integration/Ignition-IoTDB-plugin.md
b/src/UserGuide/latest/Ecosystem-Integration/Ignition-IoTDB-plugin.md
new file mode 100644
index 0000000..2430de8
--- /dev/null
+++ b/src/UserGuide/latest/Ecosystem-Integration/Ignition-IoTDB-plugin.md
@@ -0,0 +1,270 @@
+<!--
+
+ Licensed to the Apache Software Foundation (ASF) under one
+ or more contributor license agreements. See the NOTICE file
+ distributed with this work for additional information
+ regarding copyright ownership. The ASF licenses this file
+ to you under the Apache License, Version 2.0 (the
+ "License"); you may not use this file except in compliance
+ with the License. You may obtain a copy of the License at
+
+ http://www.apache.org/licenses/LICENSE-2.0
+
+ Unless required by applicable law or agreed to in writing,
+ software distributed under the License is distributed on an
+ "AS IS" BASIS, WITHOUT WARRANTIES OR CONDITIONS OF ANY
+ KIND, either express or implied. See the License for the
+ specific language governing permissions and limitations
+ under the License.
+
+-->
+# Ignition-IoTDB Plugin
+
+## 1、Product Overview
+
+1. Introduction to Ignition
+
+Ignition is a web-based monitoring and data acquisition tool (SCADA) - an open
and scalable universal platform. Ignition allows you to more easily control,
track, display, and analyze all data of your enterprise, enhancing business
capabilities. For more introduction details, please refer to
[Ignition官网](https://docs.inductiveautomation.com/docs/8.1/getting-started/introducing-ignition)
+
+2. Introduction to the Ignition-IoTDB plugin
+
+ The ignition-IoTDB connector is divided into two modules: the
ignition-IoTDB connector,Ignition-IoTDB With JDBC。 Among them:
+
+ - Ignition-IoTDB connector: Provides the ability to store data collected by
Ignition into IoTDB, and also supports data reading in Components. It injects
script interfaces such as `system. iotdb. insert`and`system. iotdb. query`to
facilitate programming in Ignition
+ - Ignition-IoTDB With JDBC: Ignition-IoTDB With JDBC can be used in
the`Transaction Groups`module and is not applicable to the`Tag
Historian`module. It can be used for custom writing and querying.
+
+ The specific relationship and content between the two modules and ignition
are shown in the following figure.
+
+ 
+
+## 2、Installation Requirements
+
+| **Preparation Content** | Version Requirements
|
+| ------------------------------- |
------------------------------------------------------------ |
+| IoTDB | Version 1.3.1 and above are required to be
installed, please refer to IoTDB for installation [Deployment
Guidance](https://www.timecho.com/docs/UserGuide/latest/Deployment-and-Maintenance/IoTDB-Package_timecho.html)
|
+| Ignition | Requirement: 8.1 version (8.1.37 and
above) of version 8.1 must be installed. Please refer to the Ignition official
website for installation [Installation
Guidance](https://docs.inductiveautomation.com/docs/8.1/getting-started/installing-and-upgrading)(Other
versions are compatible, please contact the business department for more
information) |
+| Ignition-IoTDB Connector module | Please contact Business to obtain
|
+| Ignition-IoTDB With JDBC | Download
address:https://repo1.maven.org/maven2/org/apache/iotdb/iotdb-jdbc/ |
+
+## 3、Instruction Manual For Ignition-IoTDB Connector
+
+### 1、Introduce
+
+The Ignition-IoTDB connector module can store data in a database connection
associated with the historical database provider. The data is directly stored
in a table in the SQL database based on its data type, as well as a millisecond
timestamp. Store data only when making changes based on the value pattern and
dead zone settings on each label, thus avoiding duplicate and unnecessary data
storage.
+
+The Ignition-IoTDB connector provides the ability to store the data collected
by Ignition into IoTDB.
+
+### 2、Installation Steps
+
+Step 1: Enter the `Configuration` - `System` - `Modules` module and click on
the `Install or Upgrade a Module` button at the bottom
+
+
+
+Step 2: Select the obtained `modl`, select the file and upload it, click
`Install`, and trust the relevant certificate.
+
+
+
+Step 3: After installation is completed, you can see the following content
+
+
+
+Step 4: Enter the `Configuration` - `Tags` - `History` module and click on
`Create new Historical Tag Provider` below
+
+
+
+Step 5: Select `IoTDB` and fill in the configuration information
+
+
+
+The configuration content is as follows:
+
+<table>
+ <tr>
+ <th>Name</th>
+ <th>Description</th>
+ <th>Default Value</th>
+ <th>Notes</th>
+ </tr>
+ <tr>
+ <th colspan="4">Main</th>
+ </tr>
+ <tr>
+ <td>Provider Name</td>
+ <td>Provider Name</td>
+ <td>-</td>
+ <td> </td>
+ </tr>
+ <tr>
+ <td>Enabled</td>
+ <td> </td>
+ <td>true</td>
+ <td>The provider can only be used when it is true</td>
+ </tr>
+ <tr>
+ <td>Description</td>
+ <td>Description</td>
+ <td>-</td>
+ <td> </td>
+ </tr>
+ <tr>
+ <th colspan="4">IoTDB Settings</th>
+ </tr>
+ <tr>
+ <td>Host Name</td>
+ <td>The address of the target IoTDB instance</td>
+ <td>-</td>
+ <td> </td>
+ </tr>
+ <tr>
+ <td>Port Number</td>
+ <td>The port of the target IoTDB instance</td>
+ <td>6667</td>
+ <td> </td>
+ </tr>
+ <tr>
+ <td>Username</td>
+ <td>The username of the target IoTDB</td>
+ <td>-</td>
+ <td> </td>
+ </tr>
+ <tr>
+ <td>Password</td>
+ <td>Password for target IoTDB</td>
+ <td>-</td>
+ <td> </td>
+ </tr>
+ <tr>
+ <td>Database Name</td>
+ <td>The database name to be stored, starting with root, such as root
db</td>
+ <td>-</td>
+ <td> </td>
+ </tr>
+ <tr>
+ <td>Pool Size</td>
+ <td>Size of SessionPool</td>
+ <td>50</td>
+ <td>Can be configured as needed</td>
+ </tr>
+ <tr>
+ <th colspan="2">Store and Forward Settings</th>
+ <td>Just keep it as default</td>
+ <td> </td>
+ </tr>
+</table>
+
+
+### 3、Instructions
+
+#### Configure Historical Data Storage
+
+- After configuring the `Provider`, you can use the `IoTDB Tag Historian` in
the `Designer`, just like using other `Providers`. Right click on the
corresponding `Tag` and select `Edit Tag (s) `, then select the History
category in the Tag Editor
+
+ 
+
+- Set `History Disabled` to `true`, select `Storage Provider` as the
`Provider` created in the previous step, configure other parameters as needed,
click `OK`, and then save the project. At this point, the data will be
continuously stored in the 'IoTDB' instance according to the set content.
+
+ 
+
+#### Read Data
+
+- You can also directly select the tags stored in IoTDB under the Data tab of
the Report
+
+ 
+
+- You can also directly browse relevant data in Components
+
+ 
+
+#### Script module: This function can interact with IoTDB
+
+1. system.iotdb.insert:
+
+
+- Script Description: Write data to an IoTDB instance
+
+- Script Definition:
+
+ `system.iotdb.insert(historian, deviceId, timestamps, measurementNames,
measurementValues)`
+
+- Parameter:
+
+ - `str historian`:The name of the corresponding IoTDB Tag Historian Provider
+ - `str deviceId`:The deviceId written, excluding the configured database,
such as Sine
+ - `long[] timestamps`:List of timestamps for written data points
+ - `str[] measurementNames`:List of names for written physical quantities
+ - `str[][] measurementValues`:The written data point data corresponds to the
timestamp list and physical quantity name list
+
+- Return Value: None
+
+- Available Range:Client, Designer, Gateway
+
+- Usage example:
+
+ ```shell
+ system.iotdb.insert("IoTDB", "Sine",
[system.date.now()],["measure1","measure2"],[["val1","val2"]])
+ ```
+
+2. system.iotdb.query:
+
+
+- Script Description:Query the data written to the IoTDB instance
+
+- Script Definition:
+
+ `system.iotdb.query(historian, sql)`
+
+- Parameter:
+
+ - `str historian`:The name of the corresponding IoTDB Tag Historian Provider
+ - `str sql`:SQL statement to be queried
+
+- Return Value:
+Query Results:`List<Map<String, Object>>`
+
+- Available Range:Client, Designer, Gateway
+- Usage example:
+
+```Python
+system.iotdb.query("IoTDB", "select * from root.db.Sine where time >
1709563427247")
+```
+
+## 4、Ignition-IoTDB With JDBC
+
+### 1、Introduce
+
+ Ignition-IoTDB With JDBC provides a JDBC driver that allows users to connect
and query the Ignition IoTDB database using standard JDBC APIs
+
+### 2、Installation Steps
+
+Step 1: Enter the `Configuration` - `Databases` -`Drivers` module and create
the `Translator`
+
+
+
+Step 2: Enter the `Configuration` - `Databases` - `Drivers` module, create a
`JDBC Driver` , select the `Translator` configured in the previous step, and
upload the downloaded `IoTDB JDBC`. Set the Classname to `org. apache. iotdb.
jdbc.IoTDBDriver`
+
+
+
+Step 3: Enter the `Configuration` - `Databases` - `Connections` module, create
a new `Connections` , select the`IoTDB Driver` created in the previous step for
`JDBC Driver`, configure the relevant information, and save it to use
+
+
+
+### 3、Instructions
+
+#### Data Writing
+
+Select the previously created `Connection` from the `Data Source` in the
`Transaction Groups`
+
+- `Table name `needs to be set as the complete device path starting from root
+- Uncheck `Automatically create table`
+- `Store timestame to` configure as time
+
+Do not select other options, set the fields, and after `enabled` , the data
will be installed and stored in the corresponding IoTDB
+
+
+
+#### Query
+
+- Select `Data Source` in the `Database Query Browser` and select the
previously created `Connection` to write an SQL statement to query the data in
IoTDB
+
+
+
diff --git
a/src/zh/UserGuide/Master/Ecosystem-Integration/Ignition-IoTDB-plugin.md
b/src/zh/UserGuide/Master/Ecosystem-Integration/Ignition-IoTDB-plugin.md
new file mode 100644
index 0000000..a6c36d5
--- /dev/null
+++ b/src/zh/UserGuide/Master/Ecosystem-Integration/Ignition-IoTDB-plugin.md
@@ -0,0 +1,272 @@
+<!--
+
+ Licensed to the Apache Software Foundation (ASF) under one
+ or more contributor license agreements. See the NOTICE file
+ distributed with this work for additional information
+ regarding copyright ownership. The ASF licenses this file
+ to you under the Apache License, Version 2.0 (the
+ "License"); you may not use this file except in compliance
+ with the License. You may obtain a copy of the License at
+
+ http://www.apache.org/licenses/LICENSE-2.0
+
+ Unless required by applicable law or agreed to in writing,
+ software distributed under the License is distributed on an
+ "AS IS" BASIS, WITHOUT WARRANTIES OR CONDITIONS OF ANY
+ KIND, either express or implied. See the License for the
+ specific language governing permissions and limitations
+ under the License.
+
+-->
+# Ignition-IoTDB 插件
+
+## 一、产品概述
+
+1. Ignition简介
+
+Ignition 是一个基于WEB的监控和数据采集工具(SCADA)-
一个开放且可扩展的通用平台。Ignition可以让你更轻松地控制、跟踪、显示和分析企业的所有数据,提升业务能力。更多介绍详情请参考[Ignition官网](https://docs.inductiveautomation.com/docs/8.1/getting-started/introducing-ignition)
+
+2. Ignition-IoTDB 插件介绍
+
+ Ignition-IoTDB连接器分为两个模块:Ignition-IoTDB连接器、Ignition-IoTDB With JDBC。其中:
+
+ - Ignition-IoTDB 连接器:提供了将 Ignition 采集到的数据存入 IoTDB
的能力,也支持在Components中进行数据读取,同时注入了
`system.iotdb.insert`和`system.iotdb.query`脚本接口用于方便在Ignition编程使用
+ - Ignition-IoTDB With JDBC:Ignition-IoTDB With JDBC 可以在 `Transaction
Groups` 模块中使用,不适用于 `Tag Historian`模块,可以用于自定义写入和查询。
+
+ 两个模块与Ignition的具体关系与内容如下图所示。
+
+ 
+
+## 二、安装要求
+
+| **准备内容** | **版本要求**
|
+| ------------------------ |
------------------------------------------------------------ |
+| IoTDB | 要求已安装V1.3.1及以上版本,安装请参考 IoTDB
[部署指导](https://www.timecho.com/docs/zh/UserGuide/latest/Deployment-and-Maintenance/IoTDB-Package_timecho.html)
|
+| Ignition | 要求已安装 8.1.x版本(8.1.37及以上)的 8.1 版本,安装请参考 Ignition
官网[安装指导](https://docs.inductiveautomation.com/docs/8.1/getting-started/installing-and-upgrading)(其他版本适配请联系商务了解)
|
+| Ignition-IoTDB连接器模块 | 请联系商务获取 |
+| Ignition-IoTDB With JDBC |
下载地址:https://repo1.maven.org/maven2/org/apache/iotdb/iotdb-jdbc/ |
+
+## 三、Ignition-IoTDB连接器使用说明
+
+### 1、简介
+
+Ignition-IoTDB连接器模块可以将数据存入与历史数据库提供程序关联的数据库连接中。数据根据其数据类型直接存储到 SQL
数据库中的表中,以及毫秒时间戳。根据每个标签上的值模式和死区设置,仅在更改时存储数据,从而避免重复和不必要的数据存储。
+
+Ignition-IoTDB连接器提供了将 Ignition 采集到的数据存入 IoTDB 的能力。
+
+### 2、安装步骤
+
+步骤一:进入 `Config` - `System`- `Modules` 模块,点击最下方的`Install or Upgrade a Module...`
+
+
+
+步骤二:选择获取到的 `modl`,选择文件并上传,点击 `Install`,信任相关证书。
+
+
+
+步骤三:安装完成后可以看到如下内容
+
+
+
+步骤四:进入 `Config` - `Tags`- `History` 模块,点击下方的`Create new Historical Tag
Provider...`
+
+
+
+步骤五:选择 `IoTDB`并填写配置信息
+
+
+
+配置内容如下:
+
+<table>
+ <tr>
+ <th>名称</th>
+ <th>含义</th>
+ <th>默认值</th>
+ <th>备注</th>
+ </tr>
+ <tr>
+ <th colspan="4">Main</th>
+ </tr>
+ <tr>
+ <td>Provider Name</td>
+ <td>Provider 名称</td>
+ <td>-</td>
+ <td> </td>
+ </tr>
+ <tr>
+ <td>Enabled</td>
+ <td> </td>
+ <td>true</td>
+ <td>为 true 时才能使用该 Provider</td>
+ </tr>
+ <tr>
+ <td>Description</td>
+ <td>备注</td>
+ <td>-</td>
+ <td> </td>
+ </tr>
+ <tr>
+ <th colspan="4">IoTDB Settings</th>
+ </tr>
+ <tr>
+ <td>Host Name</td>
+ <td>目标IoTDB实例的地址</td>
+ <td>-</td>
+ <td> </td>
+ </tr>
+ <tr>
+ <td>Port Number</td>
+ <td>目标IoTDB实例的端口</td>
+ <td>6667</td>
+ <td> </td>
+ </tr>
+ <tr>
+ <td>Username</td>
+ <td>目标IoTDB的用户名</td>
+ <td>-</td>
+ <td> </td>
+ </tr>
+ <tr>
+ <td>Password</td>
+ <td>目标IoTDB的密码</td>
+ <td>-</td>
+ <td> </td>
+ </tr>
+ <tr>
+ <td>Database Name</td>
+ <td>要存储的数据库名称,以 root 开头,如 root.db</td>
+ <td>-</td>
+ <td> </td>
+ </tr>
+ <tr>
+ <td>Pool Size</td>
+ <td>SessionPool 的 Size</td>
+ <td>50</td>
+ <td>可以按需进行配置</td>
+ </tr>
+ <tr>
+ <th colspan="2">Store and Forward Settings</th>
+ <td>保持默认即可</td>
+ <td> </td>
+ </tr>
+</table>
+
+
+### 3、使用说明
+
+#### 配置历史数据存储
+
+- 配置好 `Provider` 后就可以在 `Designer` 中使用 `IoTDB Tag Historian` 了,就跟使用其他的
`Provider` 一样,右键点击对应 `Tag` 选择 `Edit tag(s)`,在 Tag Editor 中选择 History 分类
+
+ 
+
+- 设置 `History Enabled` 为 `true`,并选择 `Storage Provider` 为上一步创建的
`Provider`,按需要配置其它参数,并点击 `OK`,然后保存项目。此时数据将会按照设置的内容持续的存入 `IoTDB` 实例中。
+
+ 
+
+#### 读取数据
+
+- 也可以在 Report 的 Data 标签下面直接选择存入 IoTDB 的 Tags
+
+ 
+
+- 在 Components 中也可以直接浏览相关数据
+
+ 
+
+#### 脚本模块:该功能能够与 IoTDB 进行交互
+
+1. system.iotdb.insert:
+
+
+- 脚本说明:将数据写入到 IoTDB 实例中
+
+- 脚本定义:
+ ``` shell
+ system.iotdb.insert(historian, deviceId, timestamps, measurementNames,
measurementValues)
+ ```
+
+- 参数:
+
+ - `str historian`:对应的 IoTDB Tag Historian Provider 的名称
+ - `str deviceId`:写入的 deviceId,不含配置的 database,如 Sine
+ - `long[] timestamps`:写入的数据点对于的时间戳列表
+ - `str[] measurementNames`:写入的物理量的名称列表
+ - `str[][] measurementValues`:写入的数据点数据,与时间戳列表和物理量名称列表对应
+
+- 返回值:无
+
+- 可用范围:Client, Designer, Gateway
+
+- 使用示例:
+
+ ```shell
+ system.iotdb.insert("IoTDB", "Sine",
[system.date.now()],["measure1","measure2"],[["val1","val2"]])
+ ```
+
+2. system.iotdb.query:
+
+
+- 脚本说明:查询写到 IoTDB 实例中的数据
+
+- 脚本定义:
+ ```shell
+ system.iotdb.query(historian, sql)
+ ```
+
+- 参数:
+
+ - `str historian`:对应的 IoTDB Tag Historian Provider 的名称
+ - `str sql`:待查询的 sql 语句
+
+- 返回值:
+ 查询的结果:`List<Map<String, Object>>`
+
+- 可用范围:Client, Designer, Gateway
+- 使用示例:
+
+```shell
+system.iotdb.query("IoTDB", "select * from root.db.Sine where time >
1709563427247")
+```
+
+## 四、Ignition-IoTDB With JDBC
+
+### 1、简介
+
+ Ignition-IoTDB With JDBC提供了一个 JDBC 驱动,允许用户使用标准的JDBC API 连接和查询 lgnition-loTDB
数据库
+
+### 2、安装步骤
+
+ 步骤一:进入 `Config` - `Databases` -`Drivers` 模块,创建 `Translator`
+
+
+
+ 步骤二:进入 `Config` - `Databases` -`Drivers` 模块,创建 `JDBC Driver`,选择上一步配置的
`Translator`并上传下载的 `IoTDB-JDBC`,Classname 配置为
`org.apache.iotdb.jdbc.IoTDBDriver`
+
+
+
+步骤三:进入 `Config` - `Databases` -`Connections` 模块,创建新的 `Connections`,`JDBC
Driver` 选择上一步创建的 `IoTDB Driver`,配置相关信息后保存即可使用
+
+
+
+### 3、使用说明
+
+#### 数据写入
+
+ 在`Transaction Groups`中的 `Data Source`选择之前创建的 `Connection`
+
+- `Table name` 需设置为 root 开始的完整的设备路径
+- 取消勾选 `Automatically create table`
+- `Store timestame to` 配置为 time
+
+不选择其他项,设置好字段,并 `Enabled` 后 数据会安装设置存入对应的 IoTDB
+
+
+
+#### 数据查询
+
+- 在 `Database Query Browser` 中选择`Data Source`选择之前创建的 `Connection`,即可编写 SQL
语句查询 IoTDB 中的数据
+
+
+
diff --git
a/src/zh/UserGuide/latest/Ecosystem-Integration/Ignition-IoTDB-plugin.md
b/src/zh/UserGuide/latest/Ecosystem-Integration/Ignition-IoTDB-plugin.md
new file mode 100644
index 0000000..3935185
--- /dev/null
+++ b/src/zh/UserGuide/latest/Ecosystem-Integration/Ignition-IoTDB-plugin.md
@@ -0,0 +1,272 @@
+<!--
+
+ Licensed to the Apache Software Foundation (ASF) under one
+ or more contributor license agreements. See the NOTICE file
+ distributed with this work for additional information
+ regarding copyright ownership. The ASF licenses this file
+ to you under the Apache License, Version 2.0 (the
+ "License"); you may not use this file except in compliance
+ with the License. You may obtain a copy of the License at
+
+ http://www.apache.org/licenses/LICENSE-2.0
+
+ Unless required by applicable law or agreed to in writing,
+ software distributed under the License is distributed on an
+ "AS IS" BASIS, WITHOUT WARRANTIES OR CONDITIONS OF ANY
+ KIND, either express or implied. See the License for the
+ specific language governing permissions and limitations
+ under the License.
+
+-->
+# Ignition-IoTDB 插件
+
+## 一、产品概述
+
+1. Ignition简介
+
+ Ignition 是一个基于WEB的监控和数据采集工具(SCADA)-
一个开放且可扩展的通用平台。Ignition可以让你更轻松地控制、跟踪、显示和分析企业的所有数据,提升业务能力。更多介绍详情请参考[Ignition官网](https://docs.inductiveautomation.com/docs/8.1/getting-started/introducing-ignition)
+
+2. Ignition-IoTDB 插件介绍
+
+ Ignition-IoTDB连接器分为两个模块:Ignition-IoTDB连接器、Ignition-IoTDB With JDBC。其中:
+
+ - Ignition-IoTDB 连接器:提供了将 Ignition 采集到的数据存入 IoTDB
的能力,也支持在Components中进行数据读取,同时注入了
`system.iotdb.insert`和`system.iotdb.query`脚本接口用于方便在Ignition编程使用
+ - Ignition-IoTDB With JDBC:Ignition-IoTDB With JDBC 可以在 `Transaction
Groups` 模块中使用,不适用于 `Tag Historian`模块,可以用于自定义写入和查询。
+
+ 两个模块与Ignition的具体关系与内容如下图所示。
+
+ 
+
+## 二、安装要求
+
+| **准备内容** | **版本要求**
|
+| ------------------------ |
------------------------------------------------------------ |
+| IoTDB | 要求已安装V1.3.1及以上版本,安装请参考 IoTDB
[部署指导](https://www.timecho.com/docs/zh/UserGuide/latest/Deployment-and-Maintenance/IoTDB-Package_timecho.html)
|
+| Ignition | 要求已安装 8.1.x版本(8.1.37及以上)的 8.1 版本,安装请参考 Ignition
官网[安装指导](https://docs.inductiveautomation.com/docs/8.1/getting-started/installing-and-upgrading)(其他版本适配请联系商务了解)
|
+| Ignition-IoTDB连接器模块 | 请联系商务获取 |
+| Ignition-IoTDB With JDBC |
下载地址:https://repo1.maven.org/maven2/org/apache/iotdb/iotdb-jdbc/ |
+
+## 三、Ignition-IoTDB连接器使用说明
+
+### 1、简介
+
+Ignition-IoTDB连接器模块可以将数据存入与历史数据库提供程序关联的数据库连接中。数据根据其数据类型直接存储到 SQL
数据库中的表中,以及毫秒时间戳。根据每个标签上的值模式和死区设置,仅在更改时存储数据,从而避免重复和不必要的数据存储。
+
+Ignition-IoTDB连接器提供了将 Ignition 采集到的数据存入 IoTDB 的能力。
+
+### 2、安装步骤
+
+步骤一:进入 `Config` - `System`- `Modules` 模块,点击最下方的`Install or Upgrade a Module...`
+
+
+
+步骤二:选择获取到的 `modl`,选择文件并上传,点击 `Install`,信任相关证书。
+
+
+
+步骤三:安装完成后可以看到如下内容
+
+
+
+步骤四:进入 `Config` - `Tags`- `History` 模块,点击下方的`Create new Historical Tag
Provider...`
+
+
+
+步骤五:选择 `IoTDB`并填写配置信息
+
+
+
+配置内容如下:
+
+<table>
+ <tr>
+ <th>名称</th>
+ <th>含义</th>
+ <th>默认值</th>
+ <th>备注</th>
+ </tr>
+ <tr>
+ <th colspan="4">Main</th>
+ </tr>
+ <tr>
+ <td>Provider Name</td>
+ <td>Provider 名称</td>
+ <td>-</td>
+ <td> </td>
+ </tr>
+ <tr>
+ <td>Enabled</td>
+ <td> </td>
+ <td>true</td>
+ <td>为 true 时才能使用该 Provider</td>
+ </tr>
+ <tr>
+ <td>Description</td>
+ <td>备注</td>
+ <td>-</td>
+ <td> </td>
+ </tr>
+ <tr>
+ <th colspan="4">IoTDB Settings</th>
+ </tr>
+ <tr>
+ <td>Host Name</td>
+ <td>目标IoTDB实例的地址</td>
+ <td>-</td>
+ <td> </td>
+ </tr>
+ <tr>
+ <td>Port Number</td>
+ <td>目标IoTDB实例的端口</td>
+ <td>6667</td>
+ <td> </td>
+ </tr>
+ <tr>
+ <td>Username</td>
+ <td>目标IoTDB的用户名</td>
+ <td>-</td>
+ <td> </td>
+ </tr>
+ <tr>
+ <td>Password</td>
+ <td>目标IoTDB的密码</td>
+ <td>-</td>
+ <td> </td>
+ </tr>
+ <tr>
+ <td>Database Name</td>
+ <td>要存储的数据库名称,以 root 开头,如 root.db</td>
+ <td>-</td>
+ <td> </td>
+ </tr>
+ <tr>
+ <td>Pool Size</td>
+ <td>SessionPool 的 Size</td>
+ <td>50</td>
+ <td>可以按需进行配置</td>
+ </tr>
+ <tr>
+ <th colspan="2">Store and Forward Settings</th>
+ <td>保持默认即可</td>
+ <td> </td>
+ </tr>
+</table>
+
+
+### 3、使用说明
+
+#### 配置历史数据存储
+
+- 配置好 `Provider` 后就可以在 `Designer` 中使用 `IoTDB Tag Historian` 了,就跟使用其他的
`Provider` 一样,右键点击对应 `Tag` 选择 `Edit tag(s)`,在 Tag Editor 中选择 History 分类
+
+ 
+
+- 设置 `History Enabled` 为 `true`,并选择 `Storage Provider` 为上一步创建的
`Provider`,按需要配置其它参数,并点击 `OK`,然后保存项目。此时数据将会按照设置的内容持续的存入 `IoTDB` 实例中。
+
+ 
+
+#### 读取数据
+
+- 也可以在 Report 的 Data 标签下面直接选择存入 IoTDB 的 Tags
+
+ 
+
+- 在 Components 中也可以直接浏览相关数据
+
+ 
+
+#### 脚本模块:该功能能够与 IoTDB 进行交互
+
+1. system.iotdb.insert:
+
+
+- 脚本说明:将数据写入到 IoTDB 实例中
+
+- 脚本定义:
+ ``` shell
+ system.iotdb.insert(historian, deviceId, timestamps, measurementNames,
measurementValues)
+ ```
+
+- 参数:
+
+ - `str historian`:对应的 IoTDB Tag Historian Provider 的名称
+ - `str deviceId`:写入的 deviceId,不含配置的 database,如 Sine
+ - `long[] timestamps`:写入的数据点对于的时间戳列表
+ - `str[] measurementNames`:写入的物理量的名称列表
+ - `str[][] measurementValues`:写入的数据点数据,与时间戳列表和物理量名称列表对应
+
+- 返回值:无
+
+- 可用范围:Client, Designer, Gateway
+
+- 使用示例:
+
+ ```shell
+ system.iotdb.insert("IoTDB", "Sine",
[system.date.now()],["measure1","measure2"],[["val1","val2"]])
+ ```
+
+2. system.iotdb.query:
+
+
+- 脚本说明:查询写到 IoTDB 实例中的数据
+
+- 脚本定义:
+ ```shell
+ system.iotdb.query(historian, sql)
+ ```
+
+- 参数:
+
+ - `str historian`:对应的 IoTDB Tag Historian Provider 的名称
+ - `str sql`:待查询的 sql 语句
+
+- 返回值:
+ 查询的结果:`List<Map<String, Object>>`
+
+- 可用范围:Client, Designer, Gateway
+- 使用示例:
+
+```shell
+system.iotdb.query("IoTDB", "select * from root.db.Sine where time >
1709563427247")
+```
+
+## 四、Ignition-IoTDB With JDBC
+
+### 1、简介
+
+ Ignition-IoTDB With JDBC提供了一个 JDBC 驱动,允许用户使用标准的JDBC API 连接和查询 lgnition-loTDB
数据库
+
+### 2、安装步骤
+
+ 步骤一:进入 `Config` - `Databases` -`Drivers` 模块,创建 `Translator`
+
+
+
+ 步骤二:进入 `Config` - `Databases` -`Drivers` 模块,创建 `JDBC Driver`,选择上一步配置的
`Translator`并上传下载的 `IoTDB-JDBC`,Classname 配置为
`org.apache.iotdb.jdbc.IoTDBDriver`
+
+
+
+步骤三:进入 `Config` - `Databases` -`Connections` 模块,创建新的 `Connections`,`JDBC
Driver` 选择上一步创建的 `IoTDB Driver`,配置相关信息后保存即可使用
+
+
+
+### 3、使用说明
+
+#### 数据写入
+
+ 在`Transaction Groups`中的 `Data Source`选择之前创建的 `Connection`
+
+- `Table name` 需设置为 root 开始的完整的设备路径
+- 取消勾选 `Automatically create table`
+- `Store timestame to` 配置为 time
+
+不选择其他项,设置好字段,并 `Enabled` 后 数据会安装设置存入对应的 IoTDB
+
+
+
+#### 数据查询
+
+- 在 `Database Query Browser` 中选择`Data Source`选择之前创建的 `Connection`,即可编写 SQL
语句查询 IoTDB 中的数据
+
+
+