thomelane commented on a change in pull request #15197: Updated Image
Augmentation tutorial to use Gluon Transforms.
URL: https://github.com/apache/incubator-mxnet/pull/15197#discussion_r293510560
########## File path: docs/tutorials/gluon/data_augmentation.md ########## @@ -15,102 +15,220 @@ <!--- specific language governing permissions and limitations --> <!--- under the License. --> -# Methods of applying data augmentation (Gluon API) +# Image Augmentation -Data Augmentation is a regularization technique that's used to avoid overfitting when training Machine Learning models. Although the technique can be applied in a variety of domains, it's very common in Computer Vision. Adjustments are made to the original images in the training dataset before being used in training. Some example adjustments include translating, cropping, scaling, rotating, changing brightness and contrast. We do this to reduce the dependence of the model on spurious characteristics; e.g. training data may only contain faces that fill 1/4 of the image, so the model trained without data augmentation might unhelpfully learn that faces can only be of this size. +Augmentation is the process of randomly adjusting samples of your dataset to create new samples that can also be used for neural network training. It increases the variety of samples seen during training and this helps the network avoid overfitting and using spurious characteristics of the dataset. + +Although the technique can be applied in a variety of domains, it's very common in Computer Vision, and we will focus on image augmentations in this tutorial. Some example image augmentations include random crops and flips, and adjustments to the brightness and contrast. + +#### What are the prerequisites? + +You should be familiar with the concept of a transform and how to apply it to a dataset before reading this tutorial. Check out the [Data Transforms tutorial]() if this is new to you or you need a quick refresher. + +#### Where can I find the augmentation transforms? + +You can find them in the `mxnet.gluon.data.vision.transforms` module, alongside the deterministic transforms we've seen previously, such as `ToTensor`, `Normalize`, `CenterCrop` and `Resize`. Augmentations involve an element of randomness and all the augmentation transforms are prefixed with `Random`, such as `RandomResizedCrop` and `RandomBrightness`. We'll start by importing MXNet and the `transforms`. -In this tutorial we demonstrate a method of applying data augmentation with Gluon [`mxnet.gluon.data.Dataset`](https://mxnet.incubator.apache.org/api/python/gluon/data.html#mxnet.gluon.data.Dataset)s, specifically the [`ImageFolderDataset`](https://mxnet.incubator.apache.org/api/python/gluon/data.html#mxnet.gluon.data.vision.datasets.ImageFolderDataset). ```python -%matplotlib inline -import mxnet as mx # used version '1.0.0' at time of writing -import numpy as np -from matplotlib.pyplot import imshow -import multiprocessing -import os +import matplotlib.pyplot as plt +import mxnet as mx +from mxnet.gluon.data.vision import transforms +``` + +#### Sample Image + +So that we can see the effects of all the vision augmentations, we'll take a sample image of a giraffe and apply various augmentations to it. We can see what it looks like to begin with. + -mx.random.seed(42) # set seed for repeatability +```python +image_url = 'https://raw.githubusercontent.com/dmlc/web-data/master/mxnet/doc/tutorials/data_aug/inputs/0.jpg' +mx.test_utils.download(image_url, "giraffe.jpg") +example_image = mx.image.imread("giraffe.jpg") +plt.imshow(example_image.asnumpy()) +``` + +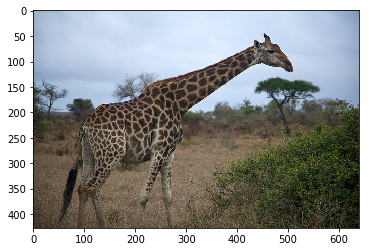 + + +Since these augmentations are random, we'll apply the same augmentation a few times and plot all of the outputs. We define a few utility functions to help with this. + + +```python +def show_images(imgs, num_rows, num_cols, scale=2): + aspect_ratio = imgs[0].shape[0]/imgs[0].shape[1] + figsize = (num_cols * scale, num_rows * scale * aspect_ratio) + _, axes = plt.subplots(num_rows, num_cols, figsize=figsize) + for i in range(num_rows): + for j in range(num_cols): + axes[i][j].imshow(imgs[i * num_cols + j].asnumpy()) + axes[i][j].axes.get_xaxis().set_visible(False) + axes[i][j].axes.get_yaxis().set_visible(False) + plt.subplots_adjust(hspace=0.1, wspace=0) + #print(aspect_ratio) + return axes + +def apply(img, aug, num_rows=2, num_cols=4, scale=3): + Y = [aug(img) for _ in range(num_rows * num_cols)] Review comment: done. ---------------------------------------------------------------- This is an automated message from the Apache Git Service. To respond to the message, please log on to GitHub and use the URL above to go to the specific comment. For queries about this service, please contact Infrastructure at: [email protected] With regards, Apache Git Services