This is an automated email from the ASF dual-hosted git repository.

echuraev pushed a commit to branch main
in repository https://gitbox.apache.org/repos/asf/tvm.git
The following commit(s) were added to refs/heads/main by this push:
new c38a0c50a7 [Adreno] Add documentation for Adreno deployment (#13393)
c38a0c50a7 is described below
commit c38a0c50a7cde09d548f570f7aafa8e293ef1485
Author: dsbarinov1 <[email protected]>
AuthorDate: Mon Nov 28 11:25:55 2022 +0300
[Adreno] Add documentation for Adreno deployment (#13393)
* [Adreno] Add documentation for Adreno deployment
Purpose:
assist TVM users compile and deploy on Adreno by expanding our
documentation and providing sample scripts in TVM.
Information about PR:
The present PR consists globally of 3 parts.
The first part is an introductory article on compilation and deployment of
neural networks on Adreno, covering such topics as: «Build TVM for
Android/Adreno», «Advantages of textures» and «Differences in compilation and
deployment of models for Adreno devices».
The second part is a straightforward example script for compiling and
inferring models at different precisions for Adreno devices.
The third part is auxiliary files, images, etc.
* Add correct links to images + small fixes
* Remove images (.png)
* Add request_hook in deploy_model_on_adreno.py
* Fix trailing newline + add license
* No newline at the EOF + blanks
* Fix request hook placing
* Fix style
* Fix trailing
* Fix whitespaces
* Fix whitespaces v2
* Add newline at adreno.rst EOF
* Add license to adreno.rst
* Remove sphinx 'autosectionlabel' extension + modify cross-references in
docs to work without this extension
* Set default values to tracker_host and tracker_port
* Add local_demo to be able to autogenerate docs
* Fix quotes
* Fix benchmark
* .
---
docs/how_to/deploy/adreno.rst | 336 ++++++++++++++++++++
docs/how_to/deploy/index.rst | 1 +
.../how_to/deploy_models/deploy_model_on_adreno.py | 351 +++++++++++++++++++++
3 files changed, 688 insertions(+)
diff --git a/docs/how_to/deploy/adreno.rst b/docs/how_to/deploy/adreno.rst
new file mode 100644
index 0000000000..af613aa5cb
--- /dev/null
+++ b/docs/how_to/deploy/adreno.rst
@@ -0,0 +1,336 @@
+.. Licensed to the Apache Software Foundation (ASF) under one
+ or more contributor license agreements. See the NOTICE file
+ distributed with this work for additional information
+ regarding copyright ownership. The ASF licenses this file
+ to you under the Apache License, Version 2.0 (the
+ "License"); you may not use this file except in compliance
+ with the License. You may obtain a copy of the License at
+
+.. http://www.apache.org/licenses/LICENSE-2.0
+
+.. Unless required by applicable law or agreed to in writing,
+ software distributed under the License is distributed on an
+ "AS IS" BASIS, WITHOUT WARRANTIES OR CONDITIONS OF ANY
+ KIND, either express or implied. See the License for the
+ specific language governing permissions and limitations
+ under the License.
+
+Deploy to Adreno GPU
+=======================================
+
+**Authors**: Daniil Barinov, Egor Churaev, Andrey Malyshev
+
+Introduction
+------------
+
+Adreno is a series of graphics processing unit (GPU) semiconductor
+intellectual property cores developed by Qualcomm and used in many of
+their SoCs.
+
+The Adreno GPU accelerates the rendering of complex geometries to
+deliver high-performance graphics and a rich user experience with low
+power consumption.
+
+This guide will demonstrate :ref:`the benefits of using textures with
Adreno<advantages_of_the_textures>`,
+how to :ref:`build TVM with OpenCL<building_tvm_for_adreno>` (needed by Adreno
devices) and TVM RPC
+enabled. It will also provide :ref:`example
code<build_and_deploy_model_for_adreno>` to better understand the differences
in compiling and deploying models
+for Adreno devices.
+
+.. _advantages_of_the_textures:
+
+Advantages of the Textures
+--------------------------
+
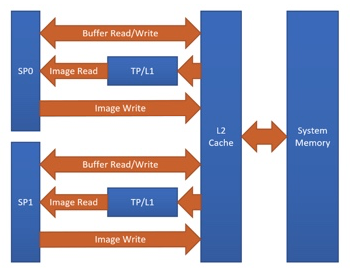
+One of the Adreno's advantages is the clever handling of textures. At
+the moment, TVM is able to benefit from this by having texture support
+for Adreno. The graph below shows the Adreno A5x architecture.
+
+|High-level overview of the Adreno A5x architecture for OpenCL|
+
+*Fig. 1 High-level overview of the Adreno A5x architecture for OpenCL*
+
+*source:* `OpenCL Optimization and Best Practices for Qualcomm Adreno GPUs
<https://dl.acm.org/doi/10.1145/3204919.3204935>`_
+
+Reasons of using textures:
+
+- Texture processor (TP) has a dedicated L1 cache, which is read-only cache
and stores data
+ fetched from level-2 (L2) cache for texture operations (primary
+ reason)
+
+- The handling of image boundaries is built-in.
+
+- Supports numerous image format and data type combinations with
+ support for automatic format conversions
+
+Overall, with textures, it is possible to achieve a significant performance
boost
+compared to OpenCL buffer based solutions.
+
+.. _building_tvm_for_adreno:
+
+Building TVM for Adreno
+-----------------------
+
+This section gives instructions on how to build the Android part of TVM
+with OpenCL and TVM RPC Server in order to deploy models on Adreno.
+
+Since the process of building TVM for Adreno is exactly the same as the
+process of building TVM for Android, please refer to these instructions:
+`TVM RPC
+Server <https://github.com/apache/tvm/tree/main/apps/cpp_rpc>`_.
+
+Since there are many required packages for Android, you can use the official
Docker Image to build TVM.
+For more information refer to this guide: `Deploy the Pretrained Model on
Android
<https://tvm.apache.org/docs/how_to/deploy_models/deploy_model_on_android.html>`_.
+
+**Prerequisites**: Android NDK and Android Debug Bridge must
+be installed, the desired device must have OpenCL support and Android part of
TVM must be built:
+
+- Read documentation about *Android NDK installation* here:
https://developer.android.com/ndk
+- To get access to adb tools you can see *Android Debug Bridge installation*
here: https://developer.android.com/studio/command-line/adb
+
+You can also build the android part of TVM locally. From the root
+folder of TVM:
+
+::
+
+ mkdir build_android
+ cd build_android
+ cmake .. -DUSE_OPENCL=ON -DUSE_MICRO=OFF
-DCMAKE_TOOLCHAIN_FILE=${ANDROID_NDK_HOME}/build/cmake/android.toolchain.cmake
-DANDROID_ABI=arm64-v8a -DANDROID_NATIVE_API_LEVEL=android-28
-DCMAKE_FIND_ROOT_PATH_MODE_PACKAGE=ON -DANDROID_STL=c++_static -DUSE_CPP_RPC=ON
+ make -jN tvm_runtime tvm_rpc
+
+where **N** is the number of cores available on your *CPU*.
+
+At this stage you have built TVM for Adreno.
+
+.. _build_and_deploy_model_for_adreno:
+
+Build and deploy model for Adreno
+---------------------------------
+
+In this section we will focus on target, needed to compile and deploy models
for Adreno, demonstrate
+the differences in generated kernels with and without textures and, in
addition, the
+possibility of choosing a different precision for model compilation will
+be considered.
+
+For the complete step-py-step process of compiling and deploying models on
+Adreno, including selection of precision, running the inference of the
+model, getting the predictions, and measuring the performance please refer to
this tutorial: `How To Deploy model on Adreno
<https://tvm.apache.org/docs/how_to/deploy_models/deploy_model_on_adreno.html>`_
+
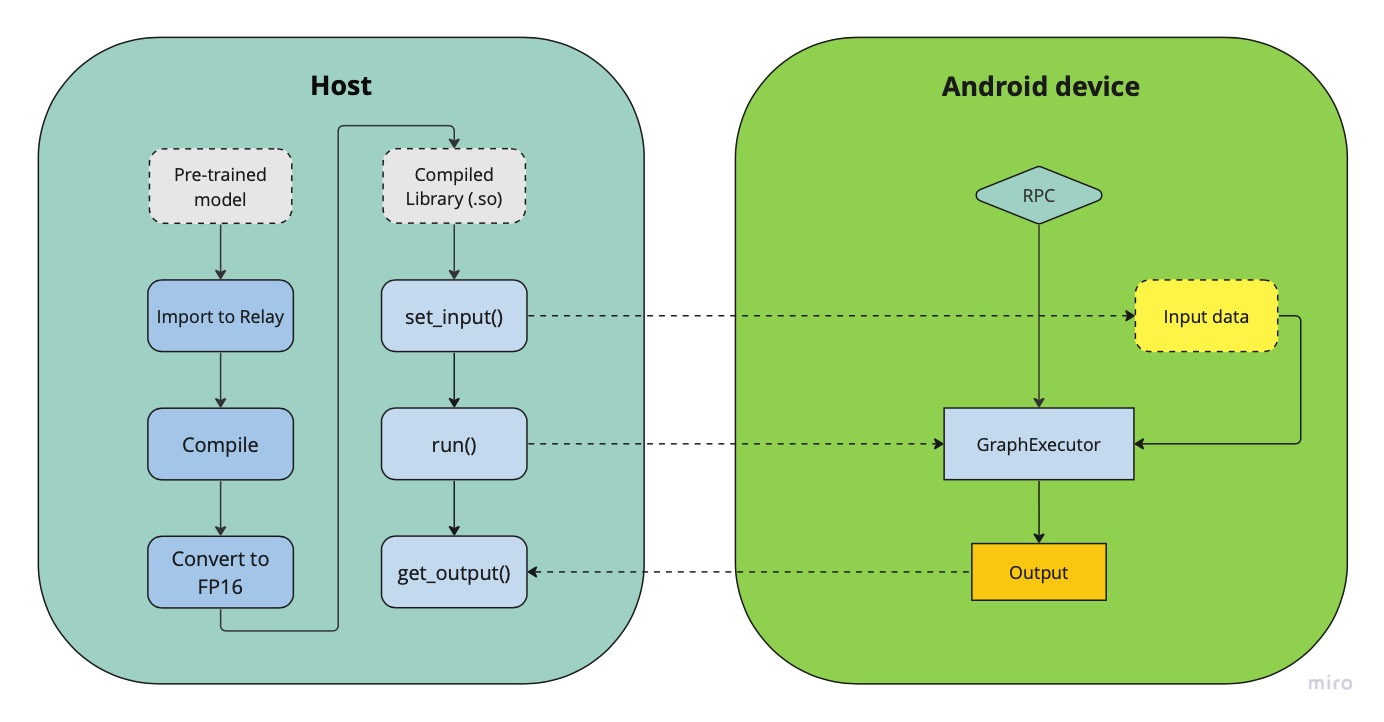
+|Android deployment pipeline|
+
+*Fig.2 Deployment pipeline on Adreno devices*
+
+The figure above demonstrates a generalized pipeline for deploying and running
neural network models on android devices.
+As can be seen from the figure, the compiled model has a set_input() and a
run() methods,
+which *prepare the inputs* for inference and *execute the inference* on the
remote device using the Graph Executor runtime module.
+
+Adreno target
+~~~~~~~~~~~~~
+
+Normally, when compiling models for Android using OpenCL, the
+corresponding target is used
+
+.. code:: python
+
+ target="opencl"
+
+Using Adreno, we want to get all the benefits of textures, so we have to
+use the following target to generate texture leveraging kernels
+
+.. code:: python
+
+ target="opencl -device=adreno"
+
+Let's write a simple model with one convolutional (conv2d) layer and take a
look at generated kernels for these
+two targets
+
+.. code:: python
+
+ import tvm
+ from tvm import relay
+ import numpy as np
+
+ input_shape=(1, 56, 56, 32)
+ filter_shape=(3, 3, 32, 64)
+ filter = np.random.rand(*filter_shape)
+
+ dtype="float32"
+ input = tvm.relay.var("input", shape=input_shape, dtype=dtype)
+ weight = tvm.relay.var("weight", shape=filter_shape, dtype=dtype)
+ D = relay.nn.conv2d(input, weight, padding=(1, 1), data_layout="NHWC",
kernel_layout="HWIO", out_dtype=dtype)
+
+ mod = relay.Function([input, weight], D)
+ params = {
+ "weight": tvm.nd.array(filter)
+ }
+
+Now compile our model with the classic OpenCL target and print its modules:
+
+.. code:: python
+
+ target="opencl"
+
+ with tvm.transform.PassContext(opt_level=3):
+ graph, lib, params = relay.build_module.build(mod, target, params=params)
+ print(lib.imported_modules[0].get_source())
+
+Notice that the generated convolution kernel has pointers in
+the initialization of the function. The kernels generated with the above
target are buffer-based.
+
+.. code:: c
+
+ __kernel void tvmgen_default_fused_nn_conv2d_kernel0(__global float*
restrict p0, __global double* restrict p1, __global float* restrict
conv2d_nhwc) {
+ // body..
+
+
+Now take a look at “opencl -device=adreno” target:
+
+.. code:: python
+
+ target="opencl -device=adreno"
+
+ with tvm.transform.PassContext(opt_level=3):
+ graph, lib, params = relay.build_module.build(mod, target, params=params)
+ print(lib.imported_modules[0].get_source())
+
+The kernels generated this way is actually working with 2d arrays, leveraging
textures
+
+.. code:: c
+
+ __kernel void tvmgen_default_fused_nn_conv2d_kernel0(__write_only image2d_t
pad_temp_global_texture, __read_only image2d_t p0) {
+ // body..
+
+*image2d_t* is a built-in OpenCL types that represents two-dimensional image
object and provides several additional functions.
+When we use *image2d_t* we read *4 elements at one time*, and it helps to
utilize hardware in a more efficient way.
+
+Precisions
+~~~~~~~~~~
+The right choice of precision for a specific workload can greatly increase the
efficiency of the solution,
+shifting the initial balance of precision and speed to the side that is a
priority for the problem.
+
+We can choose from *float16*, *float16_acc32* (Mixed Precision), *float32*
(standard).
+
+**Float16**
+
+To leverage the GPU hardware capabilities and utilize the benefits of half
precision computation and memory management,
+we can convert an original model having floating points operation to a model
operating with half precision.
+Choosing lower precision will positively affect the performance of the model,
but it may also have a decrease in the accuracy of the model.
+To do the conversion you need to write a simple conversion function and
specify the *dtype* value of "float16" before calling the function:
+
+.. code:: python
+
+ def convert_to_dtype(mod, dtype):
+ # downcast to float16
+ if dtype == "float16":
+ global conv2d_acc = "float16"
+ from tvm.ir import IRModule
+ mod = IRModule.from_expr(mod)
+ seq = tvm.transform.Sequential(
+ [
+ relay.transform.InferType(),
+ relay.transform.ToMixedPrecision()
+ ]
+ )
+ with tvm.transform.PassContext(opt_level=3):
+ mod = seq(mod)
+ return mod
+
+ dtype="float16"
+ mod = convert_to_dtype(mod["main"], dtype)
+
+We then can compile our model in any convinient way
+
+.. code:: python
+
+ with tvm.transform.PassContext(opt_level=3):
+ lib = relay.build(
+ mod, target_host=target_host, target=target, params=params
+ )
+
+**float16_acc32 (Mixed Precision)**
+
+ToMixedPrecision pass traverse over the network and split network to clusters
of ops dealing with float or float16 data types.
+The clusters are defined by three types of operations:
+- Operations always be converted into float16 data type
+- Operations which can be converted if they follow by converted cluster
+- Operations never be converted to the float16 data type
+This list is defined in the ToMixedPrecision implementation here
+`relay/transform/mixed_precision.py
<https://github.com/apache/tvm/blob/main/python/tvm/relay/transform/mixed_precision.py#L34>`_
+and can be overridden by user
+
+In some cases, we want higher precision in accumulation than the input data.
+This is supported, for example, for conv2d and dense operations. To override
accumulation type you need to register
+function with ``@register_mixed_precision_conversion`` decorator to modify
parameters of ``ToMixedPrecision`` conversion
+
+.. code:: python
+
+ from tvm.relay.op import register_mixed_precision_conversion
+
+ conv2d_acc = "float32"
+
+ # Pick a priority > 10 to overwrite defaults, higher priorities take
precedence
+ @register_mixed_precision_conversion("nn.conv2d", level=11)
+ def conv2d_mixed_precision_rule(call_node: "relay.Call",
mixed_precision_type: str):
+ global conv2d_acc
+ return [
+ # always do main calculation in mixed_precision_type
+ relay.transform.mixed_precision.MIXED_PRECISION_ALWAYS,
+ # the dtype for the accumulator
+ conv2d_acc,
+ # the output dtype for the operation (usually fp16)
+ mixed_precision_type,
+ ]
+
+ # Same for dense
+ @register_mixed_precision_conversion("nn.dense", level=11)
+ def conv2d_mixed_precision_rule(call_node: "relay.Call",
mixed_precision_type: str):
+ global conv2d_acc
+ return [
+ relay.transform.mixed_precision.MIXED_PRECISION_ALWAYS,
+ conv2d_acc,
+ mixed_precision_type,
+ ]
+
+Now we need to modify the conversion function by adding some logical "forks"
and ToMixedPrecision() call,
+then create a Relay graph from desired model in any convinient way and obtain
**mod** (which is IR representation of the model),
+after which we can convert it to the required **dtype** and then assemble our
model sequentialy
+
+.. code:: python
+
+ def convert_to_dtype(mod, dtype):
+ # downcast to float16
+ if dtype == "float16" or dtype == "float16_acc32":
+ global conv2d_acc
+ conv2d_acc = "float16" if dtype == "float16" else "float32"
+ from tvm.ir import IRModule
+ mod = IRModule.from_expr(mod)
+ seq = tvm.transform.Sequential(
+ [
+ relay.transform.InferType(),
+ relay.transform.ToMixedPrecision()
+ ]
+ )
+ with tvm.transform.PassContext(
+ config={"relay.ToMixedPrecision.keep_orig_output_dtype": True},
+ opt_level=3):
+ mod = seq(mod)
+ return mod
+
+ dtype="float16_acc32"
+ mod = convert_to_dtype(mod["main"], dtype)
+ dtype = "float32" if dtype == "float32" else "float16"
+
+The ``ToMixedPrecision`` method is a pass to convert an FP32 relay graph into
an FP16 version (with
+FP16 or FP32 accumulation dtypes). Doing this transformation is useful for
reducing model size
+as it halves the expected size of the weights (FP16_acc16 case).
+
+From this point onwards, we can compile our model as normal
+
+.. code:: python
+
+ with tvm.transform.PassContext(opt_level=3):
+ lib = relay.build(
+ mod, target_host=target_host, target=target, params=params
+ )
+
+.. |High-level overview of the Adreno A5x architecture for OpenCL| image::
https://raw.githubusercontent.com/tlc-pack/web-data/main/images/how-to/adreno_architecture.png
+.. |Android deployment pipeline| image::
https://raw.githubusercontent.com/tlc-pack/web-data/main/images/how-to/android_deployment_pipeline.jpg
diff --git a/docs/how_to/deploy/index.rst b/docs/how_to/deploy/index.rst
index 74bae0f923..ac1e2a1276 100644
--- a/docs/how_to/deploy/index.rst
+++ b/docs/how_to/deploy/index.rst
@@ -169,6 +169,7 @@ target device without relying on RPC. See the following
resources on how to do s
cpp_deploy
android
+ adreno
integrate
hls
arm_compute_lib
diff --git a/gallery/how_to/deploy_models/deploy_model_on_adreno.py
b/gallery/how_to/deploy_models/deploy_model_on_adreno.py
new file mode 100644
index 0000000000..d6ed1f1f99
--- /dev/null
+++ b/gallery/how_to/deploy_models/deploy_model_on_adreno.py
@@ -0,0 +1,351 @@
+# Licensed to the Apache Software Foundation (ASF) under one
+# or more contributor license agreements. See the NOTICE file
+# distributed with this work for additional information
+# regarding copyright ownership. The ASF licenses this file
+# to you under the Apache License, Version 2.0 (the
+# "License"); you may not use this file except in compliance
+# with the License. You may obtain a copy of the License at
+#
+# http://www.apache.org/licenses/LICENSE-2.0
+#
+# Unless required by applicable law or agreed to in writing,
+# software distributed under the License is distributed on an
+# "AS IS" BASIS, WITHOUT WARRANTIES OR CONDITIONS OF ANY
+# KIND, either express or implied. See the License for the
+# specific language governing permissions and limitations
+# under the License.
+
+"""
+.. _tutorial-deploy-model-on-adreno:
+
+Deploy the Pretrained Model on Adreno
+=======================================
+**Author**: Daniil Barinov
+
+This article is a step-by-step tutorial to deploy pretrained Pytorch ResNet-18
model on Adreno (on different precisions).
+
+For us to begin with, PyTorch must be installed.
+TorchVision is also required since we will be using it as our model zoo.
+
+A quick solution is to install it via pip:
+
+.. code-block:: bash
+
+ pip install torch
+ pip install torchvision
+
+Besides that, you should have TVM builded for Android.
+See the following instructions on how to build it.
+
+`Deploy to Adreno GPU <https://tvm.apache.org/docs/how_to/deploy/adreno.html>`_
+
+After the build section there should be two files in *build* directory
«libtvm_runtime.so» and «tvm_rpc».
+Let's push them to the device and run TVM RPC Server.
+"""
+
+######################################################################
+# TVM RPC Server
+# --------------
+# To get the hash of the device use:
+#
+# .. code-block:: bash
+#
+# adb devices
+#
+# Then to upload these two files to the device you should use:
+#
+# .. code-block:: bash
+#
+# adb -s <device_hash> push {libtvm_runtime.so,tvm_rpc} /data/local/tmp
+#
+# At this moment you will have «libtvm_runtime.so» and «tvm_rpc» on path
/data/local/tmp on your device.
+# Sometimes cmake can’t find «libc++_shared.so». Use:
+#
+# .. code-block:: bash
+#
+# find ${ANDROID_NDK_HOME} -name libc++_shared.so
+#
+# to find it and also push it with adb on the desired device:
+#
+# .. code-block:: bash
+#
+# adb -s <device_hash> push libc++_shared.so /data/local/tmp
+#
+# We are now ready to run the TVM RPC Server.
+# Launch rpc_tracker with following line in 1st console:
+#
+# .. code-block:: bash
+#
+# python3 -m tvm.exec.rpc_tracker --port 9190
+#
+# Then we need to run tvm_rpc server from under the desired device in 2nd
console:
+#
+# .. code-block:: bash
+#
+# adb -s <device_hash> reverse tcp:9190 tcp:9190
+# adb -s <device_hash> forward tcp:9090 tcp:9090
+# adb -s <device_hash> forward tcp:9091 tcp:9091
+# adb -s <device_hash> forward tcp:9092 tcp:9092
+# adb -s <device_hash> forward tcp:9093 tcp:9093
+# adb -s <device_hash> shell LD_LIBRARY_PATH=/data/local/tmp
/data/local/tmp/tvm_rpc server --host=0.0.0.0 --port=9090
--tracker=127.0.0.1:9190 --key=android --port-end=9190
+#
+# Before proceeding to compile and infer model, specify TVM_TRACKER_HOST and
TVM_TRACKER_PORT
+#
+# .. code-block:: bash
+#
+# export TVM_TRACKER_HOST=0.0.0.0
+# export TVM_TRACKER_PORT=9190
+#
+# check that the tracker is running and the device is available
+#
+# .. code-block:: bash
+#
+# python -m tvm.exec.query_rpc_tracker --port 9190
+#
+# For example, if we have 1 Android device,
+# the output can be:
+#
+# .. code-block:: bash
+#
+# Queue Status
+# ----------------------------------
+# key total free pending
+# ----------------------------------
+# android 1 1 0
+# ----------------------------------
+
+#################################################################
+# Load a test image
+# -----------------
+# As an example we would use classical cat image from ImageNet
+
+# sphinx_gallery_start_ignore
+from tvm import testing
+
+testing.utils.install_request_hook(depth=3)
+# sphinx_gallery_end_ignore
+
+from PIL import Image
+from tvm.contrib.download import download_testdata
+from matplotlib import pyplot as plt
+import numpy as np
+
+img_url = "https://github.com/dmlc/mxnet.js/blob/main/data/cat.png?raw=true";
+img_path = download_testdata(img_url, "cat.png", module="data")
+img = Image.open(img_path).resize((224, 224))
+plt.imshow(img)
+plt.show()
+
+# Preprocess the image and convert to tensor
+from torchvision import transforms
+
+my_preprocess = transforms.Compose(
+ [
+ transforms.Resize(256),
+ transforms.CenterCrop(224),
+ transforms.ToTensor(),
+ transforms.Normalize(mean=[0.485, 0.456, 0.406], std=[0.229, 0.224,
0.225]),
+ ]
+)
+img = my_preprocess(img)
+img = np.expand_dims(img, 0)
+
+#################################################################
+# Load pretrained Pytorch model
+# -----------------------------
+# Create a Relay graph from a Pytorch ResNet-18 model
+import os
+import torch
+import torchvision
+import tvm
+from tvm import te
+from tvm import relay, rpc
+from tvm.contrib import utils, ndk
+from tvm.contrib import graph_executor
+
+model_name = "resnet18"
+model = getattr(torchvision.models, model_name)(pretrained=True)
+model = model.eval()
+
+# We grab the TorchScripted model via tracing
+input_shape = [1, 3, 224, 224]
+input_data = torch.randn(input_shape)
+scripted_model = torch.jit.trace(model, input_data).eval()
+
+# Input name can be arbitrary
+input_name = "input0"
+shape_list = [(input_name, img.shape)]
+mod, params = relay.frontend.from_pytorch(scripted_model, shape_list)
+
+#################################################################
+# Precisions
+# ----------
+# Since TVM support Mixed Precision, we need to register
mixed_precision_conversion:
+from tvm.relay.op import register_mixed_precision_conversion
+
+conv2d_acc = "float32"
+
+
+@register_mixed_precision_conversion("nn.conv2d", level=11)
+def conv2d_mixed_precision_rule(call_node: "relay.Call", mixed_precision_type:
str):
+ global conv2d_acc
+ return [
+ relay.transform.mixed_precision.MIXED_PRECISION_ALWAYS,
+ conv2d_acc,
+ mixed_precision_type,
+ ]
+
+
+@register_mixed_precision_conversion("nn.dense", level=11)
+def conv2d_mixed_precision_rule(call_node: "relay.Call", mixed_precision_type:
str):
+ global conv2d_acc
+ return [
+ relay.transform.mixed_precision.MIXED_PRECISION_ALWAYS,
+ conv2d_acc,
+ mixed_precision_type,
+ ]
+
+
+#################################################################
+# and also define the conversion function itself
+def convert_to_dtype(mod, dtype):
+ # downcast to float16
+ if dtype == "float16" or dtype == "float16_acc32":
+ global conv2d_acc
+ conv2d_acc = "float16" if dtype == "float16" else "float32"
+ from tvm.ir import IRModule
+
+ mod = IRModule.from_expr(mod)
+ seq = tvm.transform.Sequential(
+ [relay.transform.InferType(), relay.transform.ToMixedPrecision()]
+ )
+ with tvm.transform.PassContext(opt_level=3):
+ mod = seq(mod)
+ return mod
+
+
+#################################################################
+# Let's choose "float16_acc32" for example.
+dtype = "float16_acc32"
+mod = convert_to_dtype(mod["main"], dtype)
+dtype = "float32" if dtype == "float32" else "float16"
+
+print(mod)
+
+#################################################################
+# As you can see in the IR, the architecture now contains cast operations,
which are
+# needed to convert to FP16 precision.
+# You can also use "float16" or "float32" precisions as other dtype options.
+
+#################################################################
+# Compile the model with relay
+# ----------------------------
+# Specify Adreno target before compiling to generate texture
+# leveraging kernels and get all the benefits of textures
+# Note: This generated example running on our x86 server for demonstration.
+# If running it on the Android device, we need to
+# specify its instruction set. Set :code:`local_demo` to False if you want
+# to run this tutorial with a real device.
+
+local_demo = True
+
+# by default on CPU target will execute.
+# select 'cpu', 'opencl' and 'vulkan'
+test_target = "cpu"
+
+# Change target configuration.
+# Run `adb shell cat /proc/cpuinfo` to find the arch.
+arch = "arm64"
+target = tvm.target.Target("llvm -mtriple=%s-linux-android" % arch)
+
+if local_demo:
+ target = tvm.target.Target("llvm")
+elif test_target == "opencl":
+ target = tvm.target.Target("opencl", host=target)
+elif test_target == "vulkan":
+ target = tvm.target.Target("vulkan", host=target)
+
+with tvm.transform.PassContext(opt_level=3):
+ lib = relay.build(mod, target=target, params=params)
+
+#################################################################
+# Deploy the Model Remotely by RPC
+# --------------------------------
+# Using RPC you can deploy the model from host
+# machine to the remote Adreno device
+
+rpc_tracker_host = os.environ.get("TVM_TRACKER_HOST", "127.0.0.1")
+rpc_tracker_port = int(os.environ.get("TVM_TRACKER_PORT", 9190))
+key = "android"
+
+if local_demo:
+ remote = rpc.LocalSession()
+else:
+ tracker = rpc.connect_tracker(rpc_tracker_host, rpc_tracker_port)
+ # When running a heavy model, we should increase the `session_timeout`
+ remote = tracker.request(key, priority=0, session_timeout=60)
+
+if local_demo:
+ dev = remote.cpu(0)
+elif test_target == "opencl":
+ dev = remote.cl(0)
+elif test_target == "vulkan":
+ dev = remote.vulkan(0)
+else:
+ dev = remote.cpu(0)
+
+temp = utils.tempdir()
+dso_binary = "dev_lib_cl.so"
+dso_binary_path = temp.relpath(dso_binary)
+fcompile = ndk.create_shared if not local_demo else None
+lib.export_library(dso_binary_path, fcompile)
+remote_path = "/data/local/tmp/" + dso_binary
+remote.upload(dso_binary_path)
+rlib = remote.load_module(dso_binary)
+m = graph_executor.GraphModule(rlib["default"](dev))
+
+#################################################################
+# Run inference
+# -------------
+# We now can set inputs, infer our model and get predictions as output
+m.set_input(input_name, tvm.nd.array(img.astype("float32")))
+m.run()
+tvm_output = m.get_output(0)
+
+#################################################################
+# Get predictions and performance statistic
+# -----------------------------------------
+# This piece of code displays the top-1 and top-5 predictions, as
+# well as provides information about the model's performance
+from os.path import join, isfile
+from matplotlib import pyplot as plt
+from tvm.contrib import download
+
+# Download ImageNet categories
+categ_url = "https://github.com/uwsampl/web-data/raw/main/vta/models/";
+categ_fn = "synset.txt"
+download.download(join(categ_url, categ_fn), categ_fn)
+synset = eval(open(categ_fn).read())
+
+top_categories = np.argsort(tvm_output.asnumpy()[0])
+top5 = np.flip(top_categories, axis=0)[:5]
+
+# Report top-1 classification result
+print("Top-1 id: {}, class name: {}".format(top5[1 - 1], synset[top5[1 - 1]]))
+
+# Report top-5 classification results
+print("\nTop5 predictions: \n")
+print("\t#1:", synset[top5[1 - 1]])
+print("\t#2:", synset[top5[2 - 1]])
+print("\t#3:", synset[top5[3 - 1]])
+print("\t#4:", synset[top5[4 - 1]])
+print("\t#5:", synset[top5[5 - 1]])
+print("\t", top5)
+ImageNetClassifier = False
+for k in top_categories[-5:]:
+ if "cat" in synset[k]:
+ ImageNetClassifier = True
+assert ImageNetClassifier, "Failed ImageNet classifier validation check"
+
+print("Evaluate inference time cost...")
+print(m.benchmark(dev, number=1, repeat=10))