* [doc] Change the guide directory structure: Add a new type 'tools'.
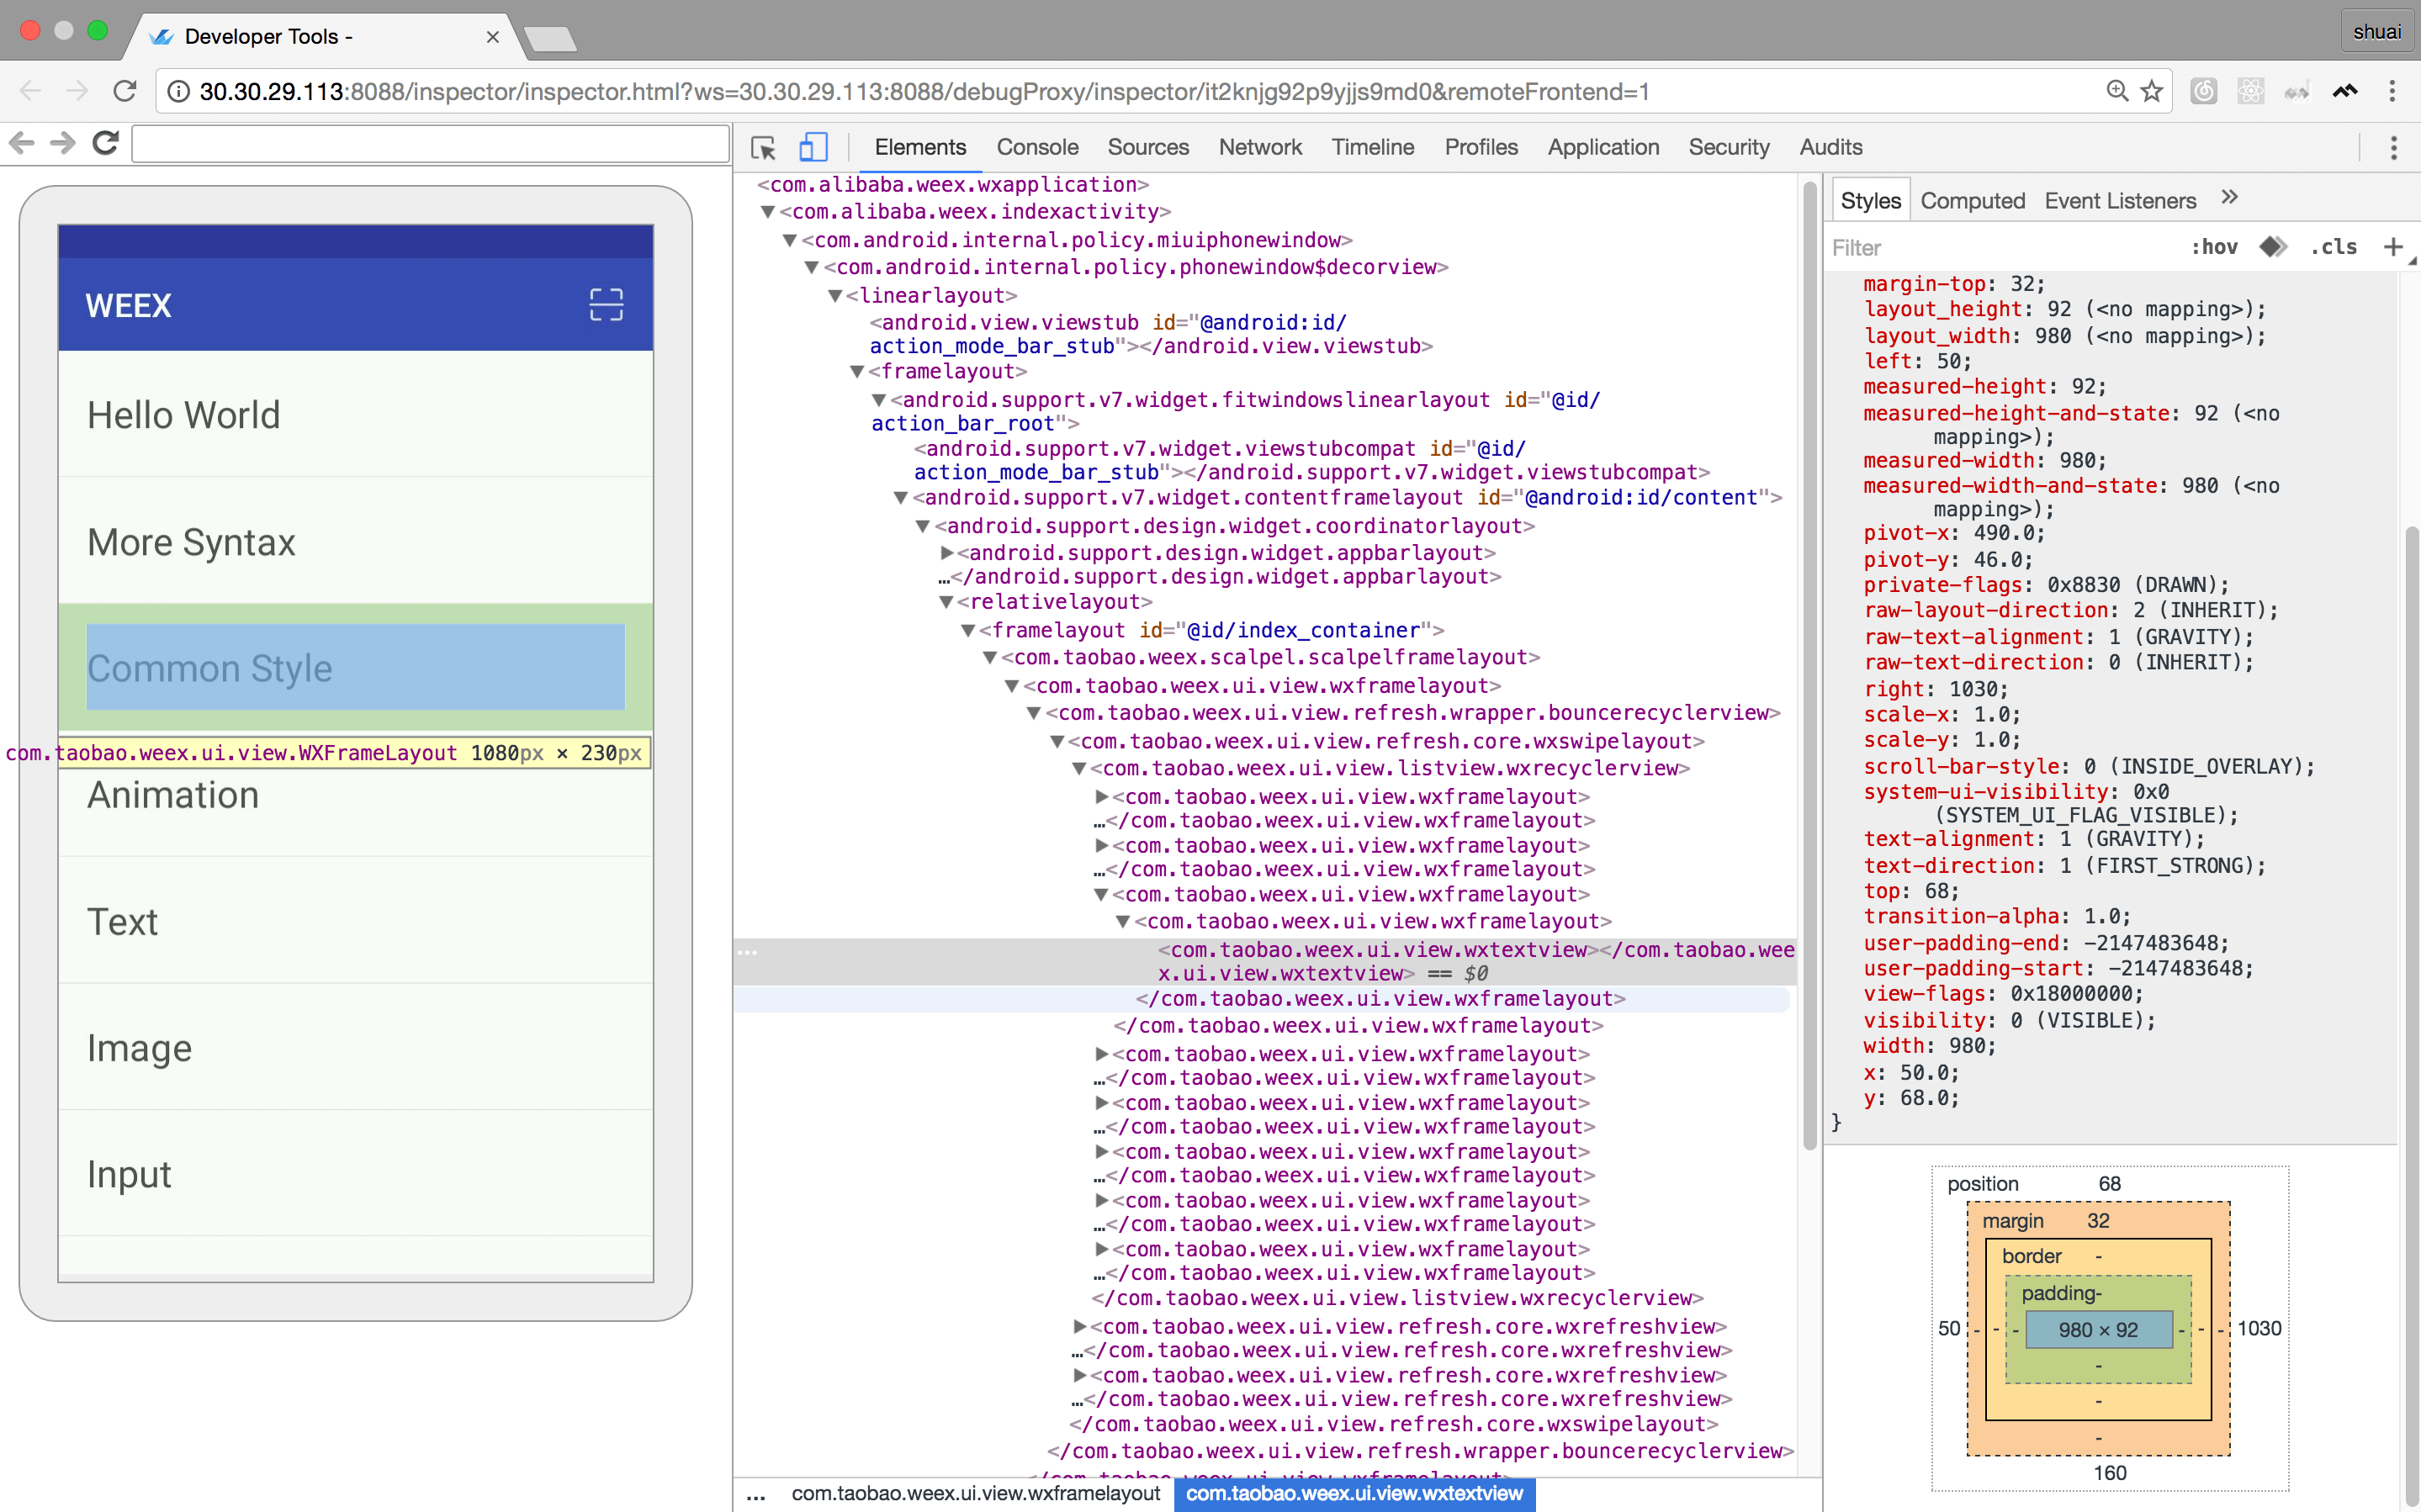
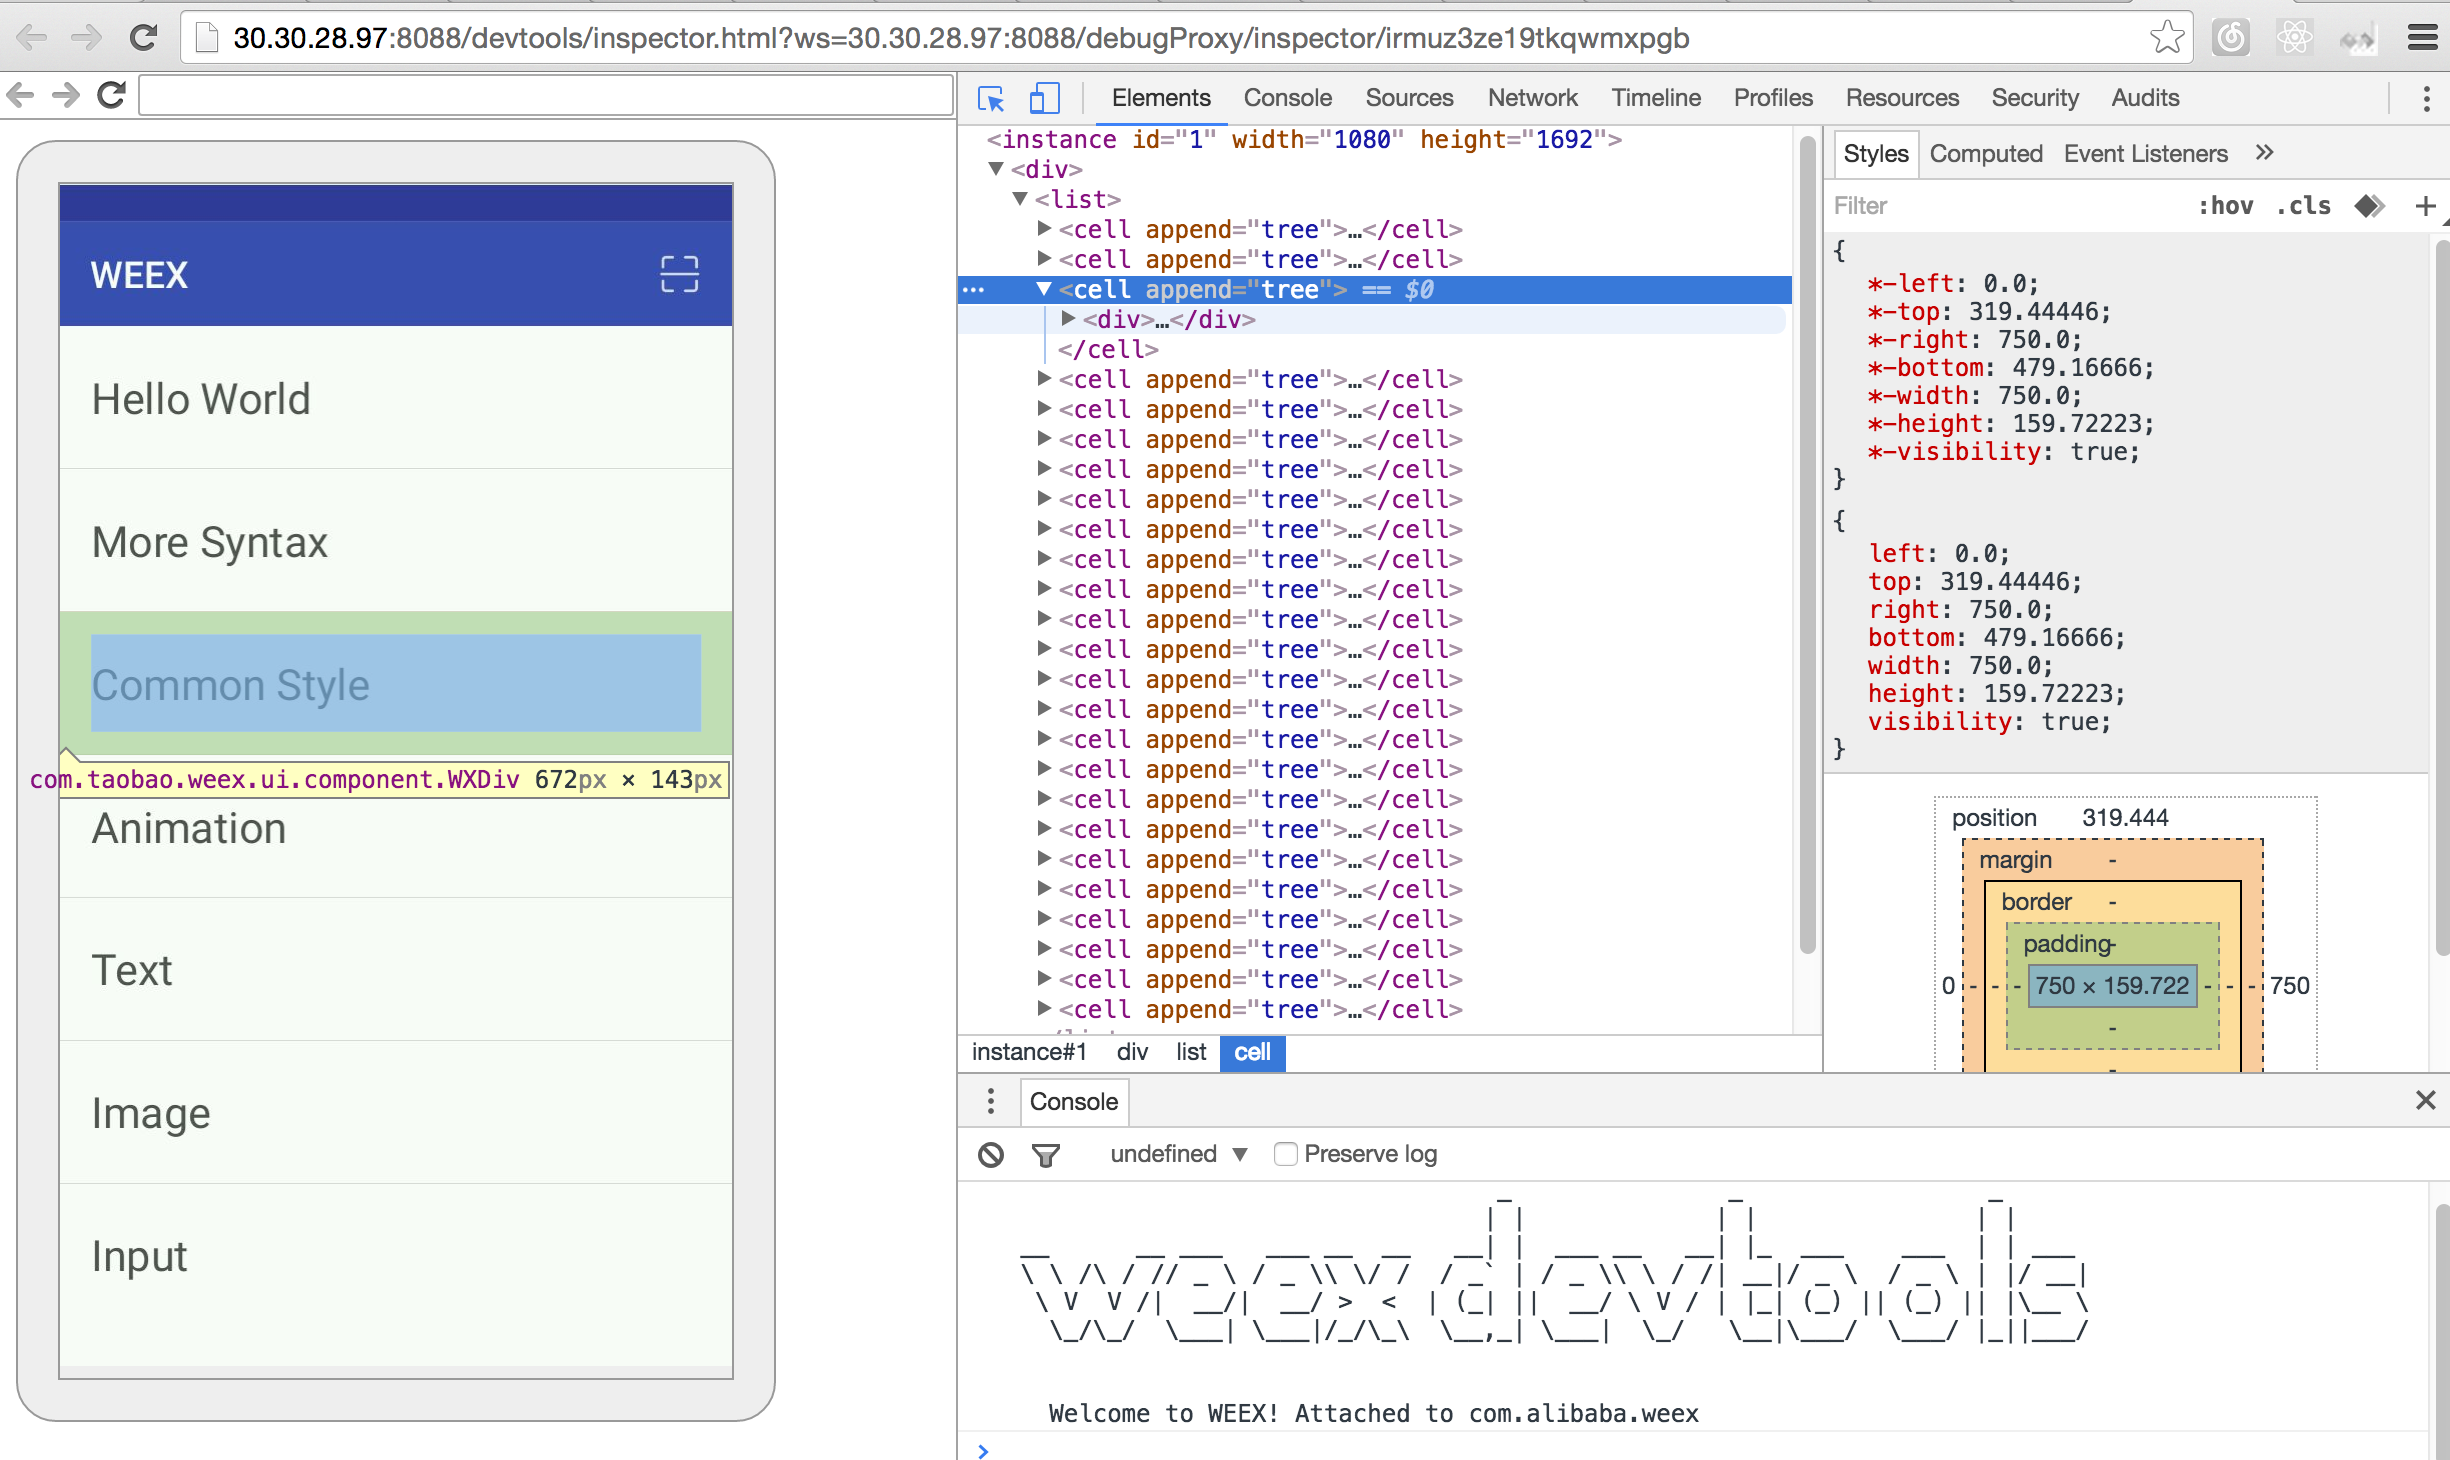
Project: http://git-wip-us.apache.org/repos/asf/incubator-weex/repo Commit: http://git-wip-us.apache.org/repos/asf/incubator-weex/commit/9dd6bdd4 Tree: http://git-wip-us.apache.org/repos/asf/incubator-weex/tree/9dd6bdd4 Diff: http://git-wip-us.apache.org/repos/asf/incubator-weex/diff/9dd6bdd4 Branch: refs/heads/master Commit: 9dd6bdd42130d12a7e9f3201d38c079914175381 Parents: 6dc87a7 Author: Yun Dong <[email protected]> Authored: Mon Mar 6 15:47:27 2017 +0800 Committer: Yun Dong <[email protected]> Committed: Mon Mar 6 15:47:27 2017 +0800 ---------------------------------------------------------------------- doc/source/cn/guide/dev-with-weexpack.md | 11 - doc/source/cn/guide/index.md | 114 ------ doc/source/cn/guide/intro/app-architecture.md | 2 +- doc/source/cn/guide/intro/devtools.md | 99 ----- doc/source/cn/guide/intro/how-it-works.md | 2 +- doc/source/cn/guide/intro/index.md | 2 +- doc/source/cn/guide/intro/page-architecture.md | 2 +- doc/source/cn/guide/intro/using-vue.md | 2 +- doc/source/cn/guide/intro/web-dev-experience.md | 2 +- doc/source/cn/guide/intro/write-once.md | 2 +- doc/source/cn/guide/set-up-env.md | 126 ++++++ doc/source/cn/guide/tools/devtools.md | 111 ++++++ doc/source/cn/guide/tools/index.md | 11 + doc/source/cn/guide/tools/weexpack.md | 388 +++++++++++++++++++ doc/source/cn/references/common-style.md | 11 +- doc/source/cn/references/components/scroller.md | 8 +- doc/source/guide/dev-with-weexpack.md | 12 - doc/source/guide/index.md | 52 --- doc/source/guide/intro/app-architecture.md | 2 +- doc/source/guide/intro/devtools.md | 2 +- doc/source/guide/intro/how-it-works.md | 2 +- doc/source/guide/intro/index.md | 2 +- doc/source/guide/intro/page-architecture.md | 2 +- doc/source/guide/intro/using-vue.md | 2 +- doc/source/guide/intro/web-dev-experience.md | 2 +- doc/source/guide/intro/write-once.md | 2 +- doc/source/guide/set-up-env.md | 93 +++++ doc/source/guide/tools/devtools.md | 100 +++++ doc/source/guide/tools/index.md | 11 + doc/source/guide/tools/weexpack.md | 298 ++++++++++++++ 30 files changed, 1163 insertions(+), 312 deletions(-) ---------------------------------------------------------------------- http://git-wip-us.apache.org/repos/asf/incubator-weex/blob/9dd6bdd4/doc/source/cn/guide/dev-with-weexpack.md ---------------------------------------------------------------------- diff --git a/doc/source/cn/guide/dev-with-weexpack.md b/doc/source/cn/guide/dev-with-weexpack.md deleted file mode 100644 index 2f39204..0000000 --- a/doc/source/cn/guide/dev-with-weexpack.md +++ /dev/null @@ -1,11 +0,0 @@ ---- -title: æå»ºå ¨æ°åºç¨ -type: guide -order: 2 -version: 2.1 -has_chapter_content: true ---- - -# æå»ºå ¨æ°åºç¨ - -Work in process. \ No newline at end of file http://git-wip-us.apache.org/repos/asf/incubator-weex/blob/9dd6bdd4/doc/source/cn/guide/index.md ---------------------------------------------------------------------- diff --git a/doc/source/cn/guide/index.md b/doc/source/cn/guide/index.md index e2d43e4..22670ed 100644 --- a/doc/source/cn/guide/index.md +++ b/doc/source/cn/guide/index.md @@ -54,117 +54,3 @@ Vue.js æ¯ Evan You å¼åçæ¸è¿å¼ JavaScript æ¡æ¶ãå¼åè è½å¤éè¿ ``` æ们ææ¶ä¸å»å ³å¿ Weex çææ¯ç»èï¼ä» ç大è´ç代ç ç»æï¼æ们å¯ä»¥çå°è¯æ³å°±æ¯æ们çæç Vueãä½ å¯ä»¥ä¿®æ¹è¿ä¸ªä¾åï¼å次æ«ç å°è¯ã - -## æ建å¼åç¯å¢ - -ä½¿ç¨ dotWe 对 Weex å°é²æ¯ä¸ä¸ªä¸éçéæ©ï¼ä½å¦æä½ æ³æ´ä¸ä¸çå¼å Weexï¼ dotWe å°±ä¸æä¹å¤ç¨äºãæ¬èä¼æä½ å¦ä½æ建æ¬å°å¼åç¯å¢è¿è¡ Weex å¼åã - -### 第ä¸æ¥ï¼å®è£ ä¾èµ - -Weex å®æ¹æä¾äº weex-toolkit çèææ¶å·¥å ·æ¥è¾ å©å¼ååè°è¯ãé¦å ï¼ä½ éè¦ Node.js å weex-toolkitã - -å®è£ Node.js æ¹å¼å¤ç§å¤æ ·ï¼æç®åçæ¹å¼æ¯å¨ [Node.js å®ç½](https://nodejs.org/en/) ä¸è½½å¯æ§è¡ç¨åºç´æ¥å®è£ å³å¯ã - -å¯¹äº Macï¼å¯ä»¥ä½¿ç¨ [Homebrew](http://brew.sh/) è¿è¡å®è£ ï¼ - -```bash -brew install node -``` - -> æ´å¤å®è£ æ¹å¼å¯åè [Node.js å®æ¹ä¿¡æ¯](https://nodejs.org/en/download/) - -å®è£ å®æåï¼å¯ä»¥ä½¿ç¨ä»¥ä¸å½ä»¤æ£æµæ¯å¦å®è£ æåï¼ - -```bash -$ node -v -v6.3.1 -$ npm -v -3.10.3 -``` - -é常ï¼å®è£ äº Node.js ç¯å¢ï¼npm å 管çå·¥å ·ä¹éä¹å®è£ äºãå æ¤ï¼ç´æ¥ä½¿ç¨ npm æ¥å®è£ weex-toolkitã - -> npm æ¯ä¸ä¸ª JavaScript å 管çå·¥å ·ï¼å®å¯ä»¥è®©å¼åè è½»æ¾å ±äº«åéç¨ä»£ç ãWeex å¾å¤ä¾èµæ¥èªç¤¾åºï¼åæ ·ï¼Weex ä¹å°å¾å¤å·¥å ·åå¸å°ç¤¾åºæ¹ä¾¿å¼åè 使ç¨ã - -**注æ: ** weex-toolkit ç®åä» æææ°ç beta çæ¬å¼å§ææ¯æåå§å Vue 项ç®ï¼ä½¿ç¨å请确认çæ¬æ¯å¦æ£ç¡®ã - -```bash -$ npm install -g weex-toolkit@beta -``` - -å½å å¼åè å¯ä»¥èè使ç¨æ·å®ç npm éå ââ [cnpm](https://npm.taobao.org/) å®è£ weex-toolkit - -```bash -$ npm install -g cnpm -$ cnpm install -g weex-toolkit@beta -``` - -*æ示ï¼* - -å¦ææ示æéé误ï¼*permission error*ï¼ï¼ä½¿ç¨ `sudo` å ³é®åè¿è¡å®è£ - -```bash -$ sudo cnpm install -g weex-toolkit@beta -``` - -å®è£ ç»æåä½ å¯ä»¥ç´æ¥ä½¿ç¨ `weex` å½ä»¤éªè¯æ¯å¦å®è£ æåï¼å®ä¼æ¾ç¤º `weex` å½ä»¤è¡å·¥å ·ååæ°ï¼ - -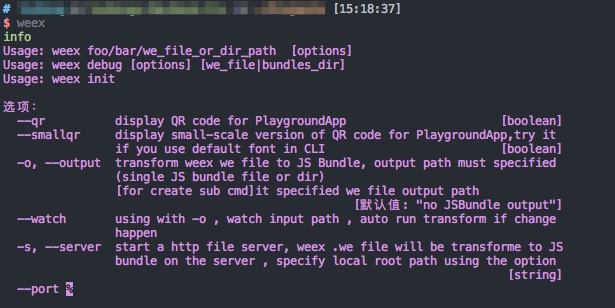 - -### 第äºæ¥ï¼åå§å - -ç¶ååå§å Weex 项ç®ï¼ - -```bash -$ weex init awesome-project -``` - -æ§è¡å®å½ä»¤åï¼å¨ `awesome-project` ç®å½ä¸å°±å建äºä¸ä¸ªä½¿ç¨ Weex å Vue ç模æ¿é¡¹ç®ã - -### 第ä¸æ¥ï¼å¼å - -ä¹åæ们è¿å ¥é¡¹ç®æå¨è·¯å¾ï¼weex-toolkit å·²ç»ä¸ºæ们çæäºæ å项ç®ç»æã - -å¨ `package.json` ä¸ï¼å·²ç»é 置好äºå 个常ç¨ç npm scriptï¼åå«æ¯ï¼ - -- `build`: æºç æå ï¼çæ JS Bundle -- `dev`: webpack watch 模å¼ï¼æ¹ä¾¿å¼å -- `serve`: å¼å¯éææå¡å¨ -- `debug`: è°è¯æ¨¡å¼ - -æ们å éè¿ `npm install` å®è£ 项ç®ä¾èµãä¹åè¿è¡ `npm run dev` å `npm run serve` å¼å¯watch 模å¼åéææå¡å¨ã - -ç¶åæ们æå¼æµè§å¨ï¼è¿å ¥ `http://localhost:8080/index.html` å³å¯çå° weex h5 页é¢ã - -åå§åæ¶å·²ç»ä¸ºæ们å建äºåºæ¬ç示ä¾ï¼æ们å¯ä»¥å¨ `src/foo.vue` ä¸æ¥çã - -代ç å¦ä¸æç¤ºï¼ - -```html -<template> - <div class="wrapper"> - <text class="weex">Hello Weex !</text> - <text class="vue">Hello Vue !</text> - </div> -</template> - -<style scoped> - .wrapper { - flex-direction: column; - justify-content: center; - } - .weex { - font-size: 60px; - text-align: center; - color: #1B90F7; - } - .vue { - font-size: 60px; - text-align: center; - margin-top: 30px; - color: #41B883; - } -</style> -``` - -å ³äº Weex è¯æ³é¨åï¼ä½ å¯ä»¥ç´æ¥åè [Vue Guide](https://vuejs.org/v2/guide/)ï¼è¿éä¸åéå¤ä»ç»ãå¦ææ¨æ³äºè§£æå ³ææ¯è¯¦æ çæ´å¤ä¿¡æ¯ï¼è¯·ç»§ç»é 读ä¸ä¸èã并ä¸ä¸è¦å¿è®°å¨ dotWe å代ç 并éæ¶é¢è§ã \ No newline at end of file http://git-wip-us.apache.org/repos/asf/incubator-weex/blob/9dd6bdd4/doc/source/cn/guide/intro/app-architecture.md ---------------------------------------------------------------------- diff --git a/doc/source/cn/guide/intro/app-architecture.md b/doc/source/cn/guide/intro/app-architecture.md index a3f39ce..22fc35c 100644 --- a/doc/source/cn/guide/intro/app-architecture.md +++ b/doc/source/cn/guide/intro/app-architecture.md @@ -1,7 +1,7 @@ --- title: ç¨ Weex æ建移å¨åºç¨ type: guide -order: 4.5 +order: 5.5 version: 2.1 --- http://git-wip-us.apache.org/repos/asf/incubator-weex/blob/9dd6bdd4/doc/source/cn/guide/intro/devtools.md ---------------------------------------------------------------------- diff --git a/doc/source/cn/guide/intro/devtools.md b/doc/source/cn/guide/intro/devtools.md deleted file mode 100644 index 4935e13..0000000 --- a/doc/source/cn/guide/intro/devtools.md +++ /dev/null @@ -1,99 +0,0 @@ ---- -title: ä½¿ç¨ Devtools -type: guide -order: 4.7 -version: 2.1 ---- - -# Devtools - -**weex devtools**æ¯ä¸é¨ä¸ºweexå®å¶çä¸æ¬¾å®ç°äº[**Chrome Debugging Protocol**](https://developer.chrome.com/devtools/docs/debugger-protocol)çinspect/debugå·¥å ·ï¼è½å¤å¸®å©ä½ å¿«éæ¥çappè¿è¡ç¶æåè°è¯weexä¸çJavascript代ç ï¼å½åæ¯æ**IOS**å**Android**两个平å°ã -## å®è£ - -``` -$ npm install -g weex-toolkit -``` - -## ç¨æ³ - - weex debug [options] [we_file|bundles_dir] - - é项: - -``` --h, --help æ¾ç¤ºå¸®å© --V, --verbose æ¾ç¤ºdebugæå¡å¨è¿è¡æ¶çåç§log --v, --version æ¾ç¤ºçæ¬ --p, --port [port] 设置debugæå¡å¨ç«¯å£å· é»è®¤ä¸º8088 --e, --entry [entry] debugä¸ä¸ªç®å½æ¶,è¿ä¸ªåæ°æå®æ´ä¸ªç®å½çå ¥å£bundleæ件,è¿ä¸ªbundleæ件çå°åä¼æ¾ç¤ºå¨debug主页ä¸(ä½ä¸ºäºç»´ç ) --m, --mode [mode] 设置æ建weæ件çæ¹å¼,transformer æåºç¡çé£æ ¼éååæ件,loader:wepacké£æ ¼ éå模ååçå¤æ件.é»è®¤ä¸ºtransformer -``` -#### å¼å¯è°è¯ - -``` -$weex debug -``` - -å纯å¯å¨ä¸ä¸ªè°è¯æå¡å¨,并åæ¶å¤èµ·chromeæµè§å¨æå¼`è°è¯ä¸»é¡µ`. -è¿ä¸ª`è°è¯ä¸»é¡µ`ä¸ä¼æä¸ä¸ªäºç»´ç ,使ç¨Playground Appæ«è¿ä¸ªäºç»´ç å¯ä»¥å¼å¯Playgroundè°è¯. -å¼å¯è°è¯å,设å¤å表ä¸ä¼åºç°æ¨ç设å¤,æ ¹æ®æ示è¿è¡åç»çè°è¯æä½ -#### è°è¯ weæ件 - -``` -$weex debug your_weex.we -``` - -è¿ä¸ªå½ä»¤ä¼å°your_weex.weç¼è¯æbundlejsæ件 é¨ç½²å°debugæå¡å¨ -并å¯å¨debugæå¡å¨å¦ä¸è¿°å½ä»¤é£æ ·.æå¼ç`è°è¯ä¸»é¡µ`ä¼å¤æ¾ç¤ºä¸ä¸ªäºç»´ç ,使ç¨playground app -æ«è¿ä¸ªç å¯ä»¥å è½½your_weex.we.(注æè¦å æ«æå¼å¯è°è¯çé£ä¸ªç ) -è¿ä¸ªå½ä»¤ä¼èªå¨æ£æµyour_weex.weæ件åå¨,å¦æåç°å 容被修æ¹åç«å³éæ°ç¼è¯é¨ç½²,并å·æ°debuggeré¡µé¢ -. -#### è°è¯æ´ä¸ªbundle/weæ件夹 - -``` -$weex debug your/we/path -e index.we -``` - -è¿ä¸ªå½ä»¤ä¼ç¼è¯ä½ æå®ç®å½ä¸çææçweæ件,并æç¼è¯å¥½çbundlejsé¨ç½²å°debugæå¡å¨,ä»ä»¬çå°åä¼æ å°å° http://lcoalhost:8088/weex/ ä¸ -æ¯å¦ your/we/path/`index.we` å¯ä»¥éè¿http://lcoalhost:8088/weex/index.jsè®¿é® -your/we/path/`demo/test.we` å¯ä»¥éè¿http://lcoalhost:8088/weex/demo/index.js - --eåæ°å¯ä»¥æå®ä¸ä¸ªå ¥å£çweæ件,è¿ä¸ªæ件çå°åä¼æ¾ç¤ºå¨`è°è¯ä¸»é¡µ`ä¸(ä½ä¸ºäºç»´ç ) -## ç¹æ§ -### è¿æ¥è®¾å¤ - -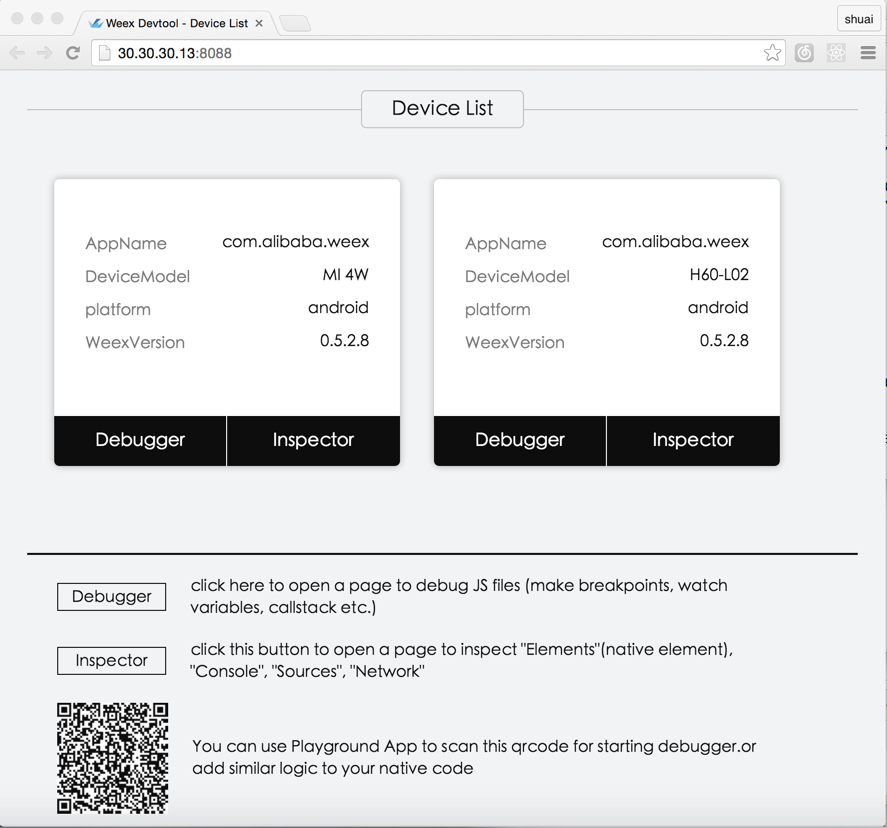 -### Inspector - - Inspector è½å¤ç¨æ¥æ¥ç `Element` \ `NetWork` \ `Console log` \ `ScreenCast` \ `BoxModel` \ `Native View` çã - -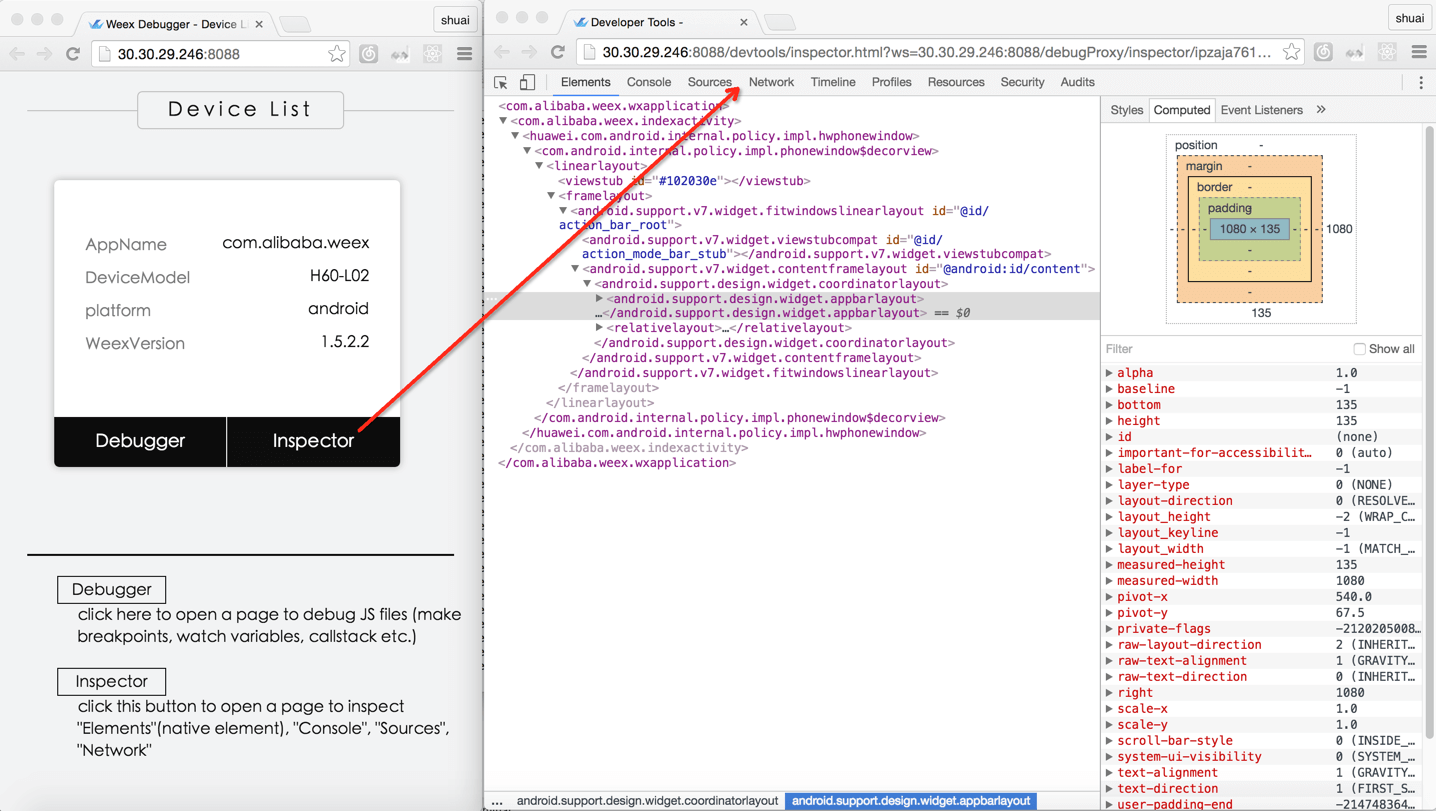 -#### Element - -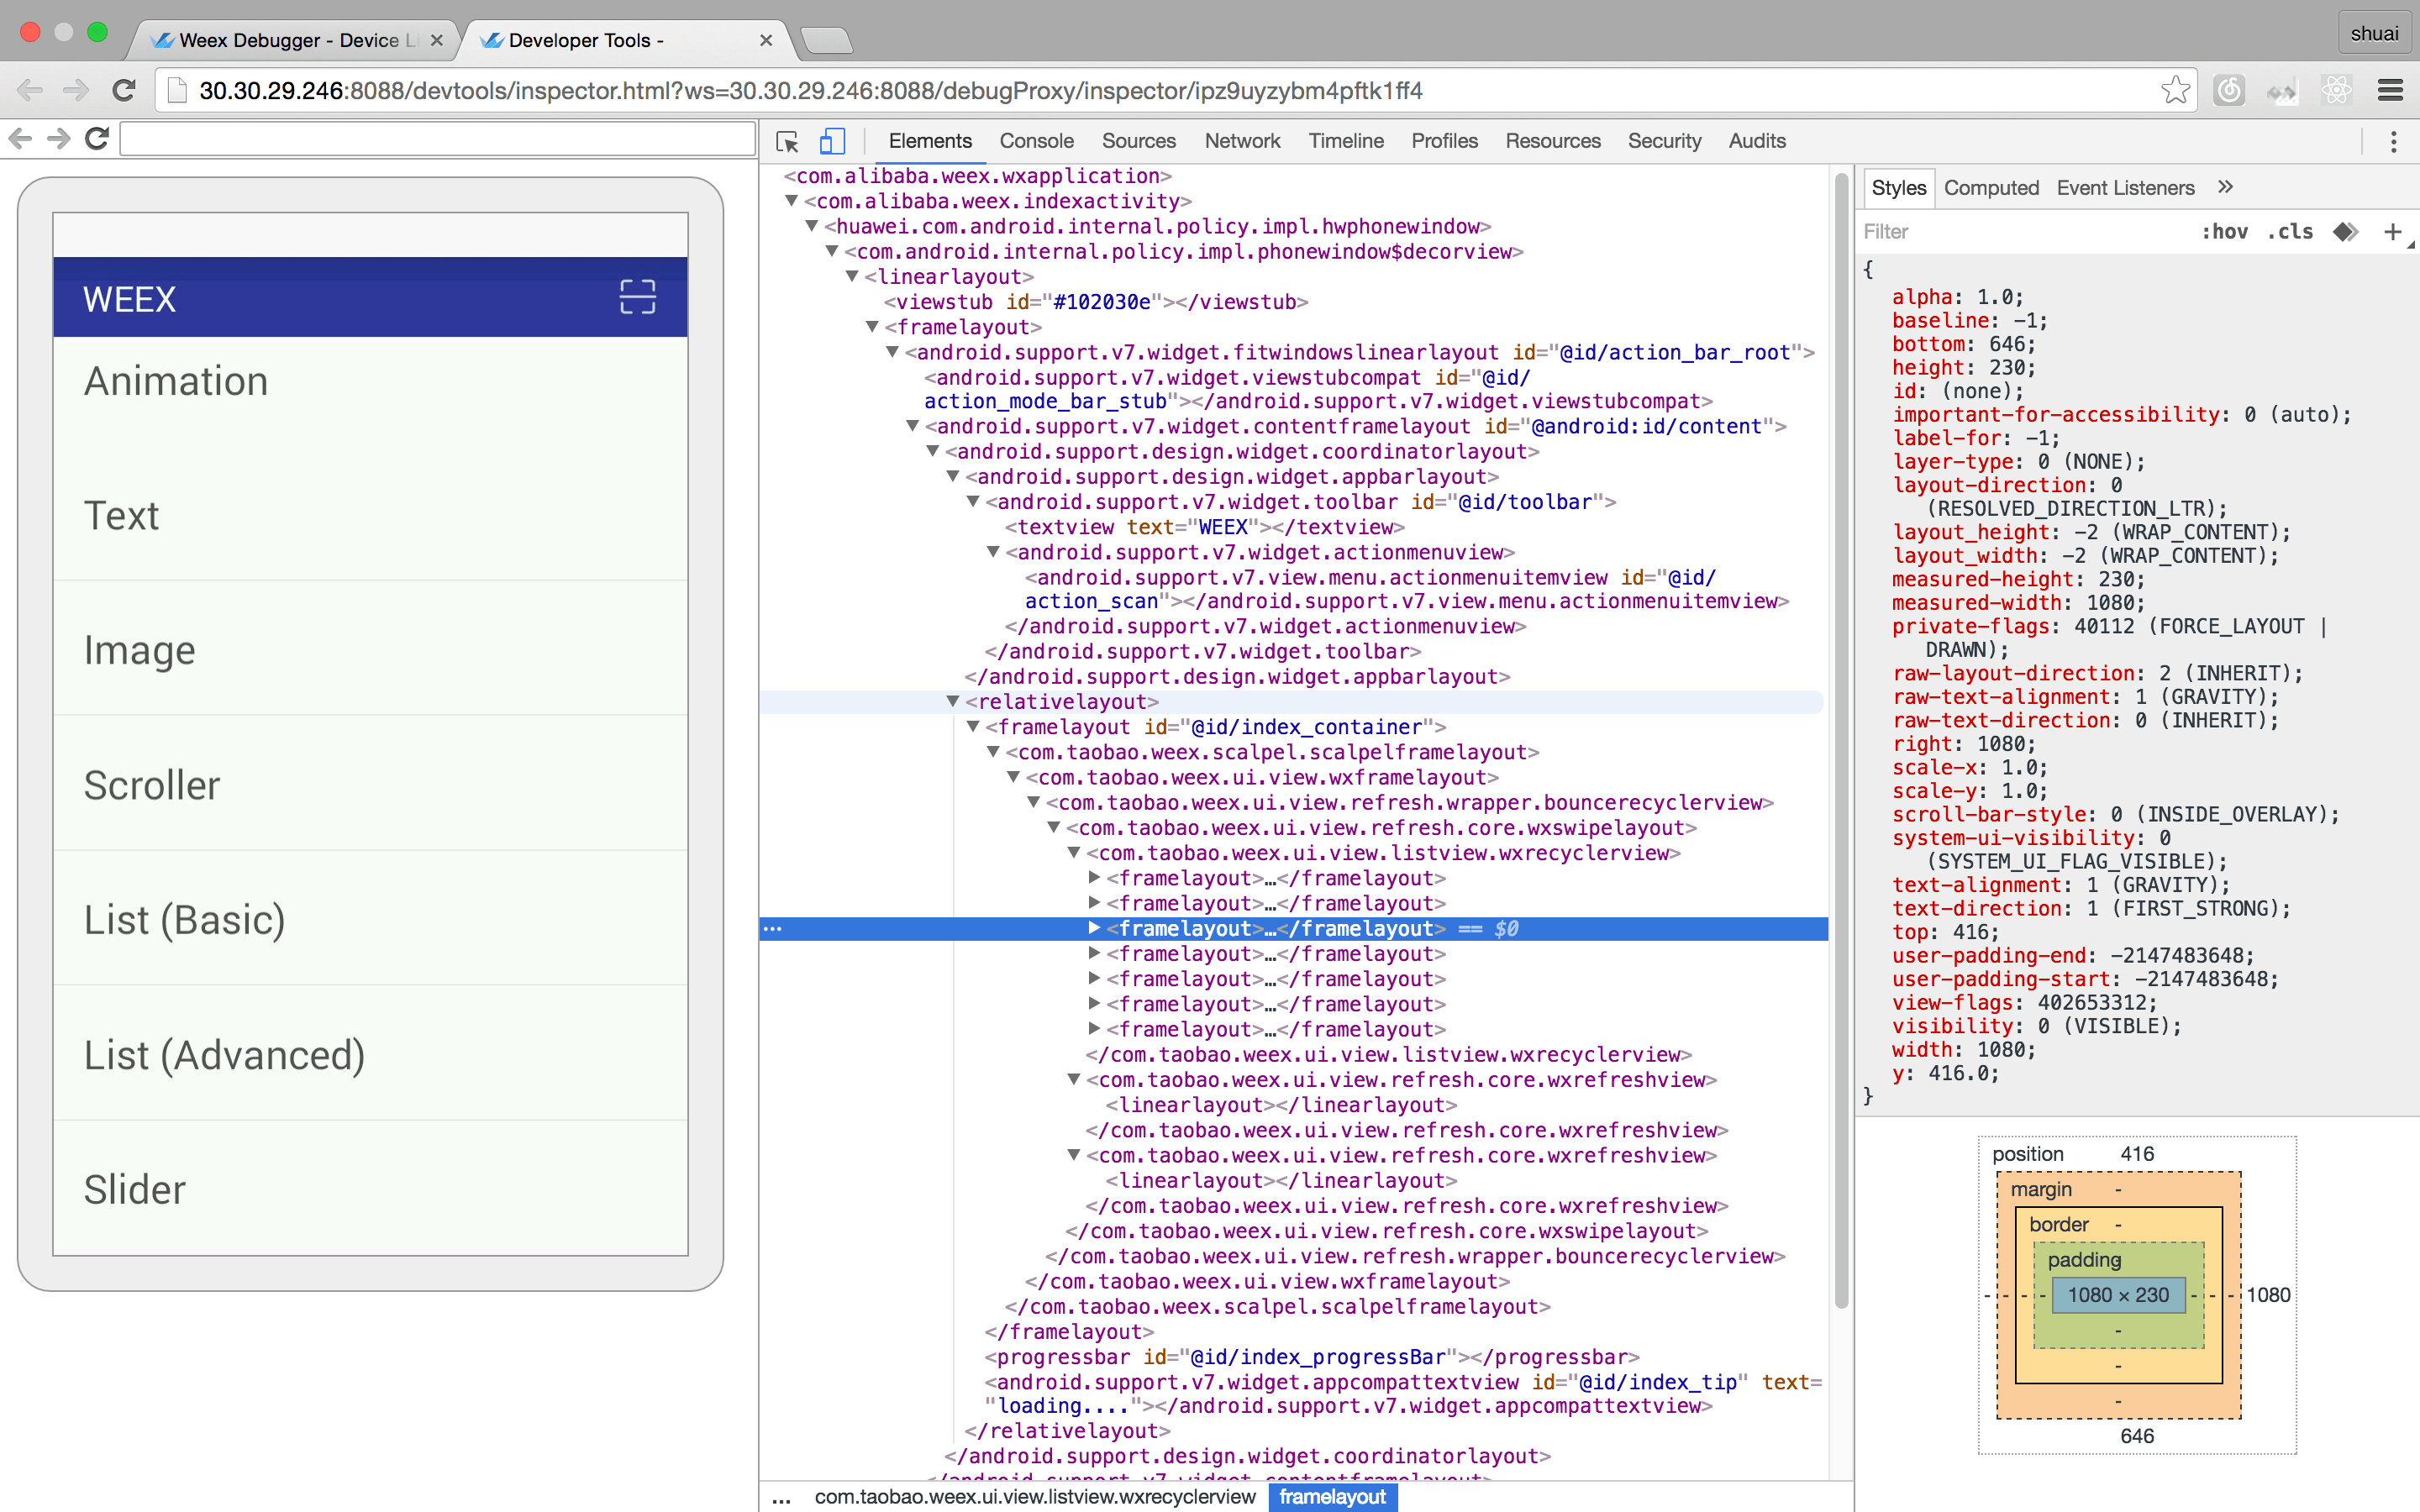 -#### NetWork -##### æ¥çç½ç»è¯·æ±çæ»èæ¶åå»¶æ¶ - -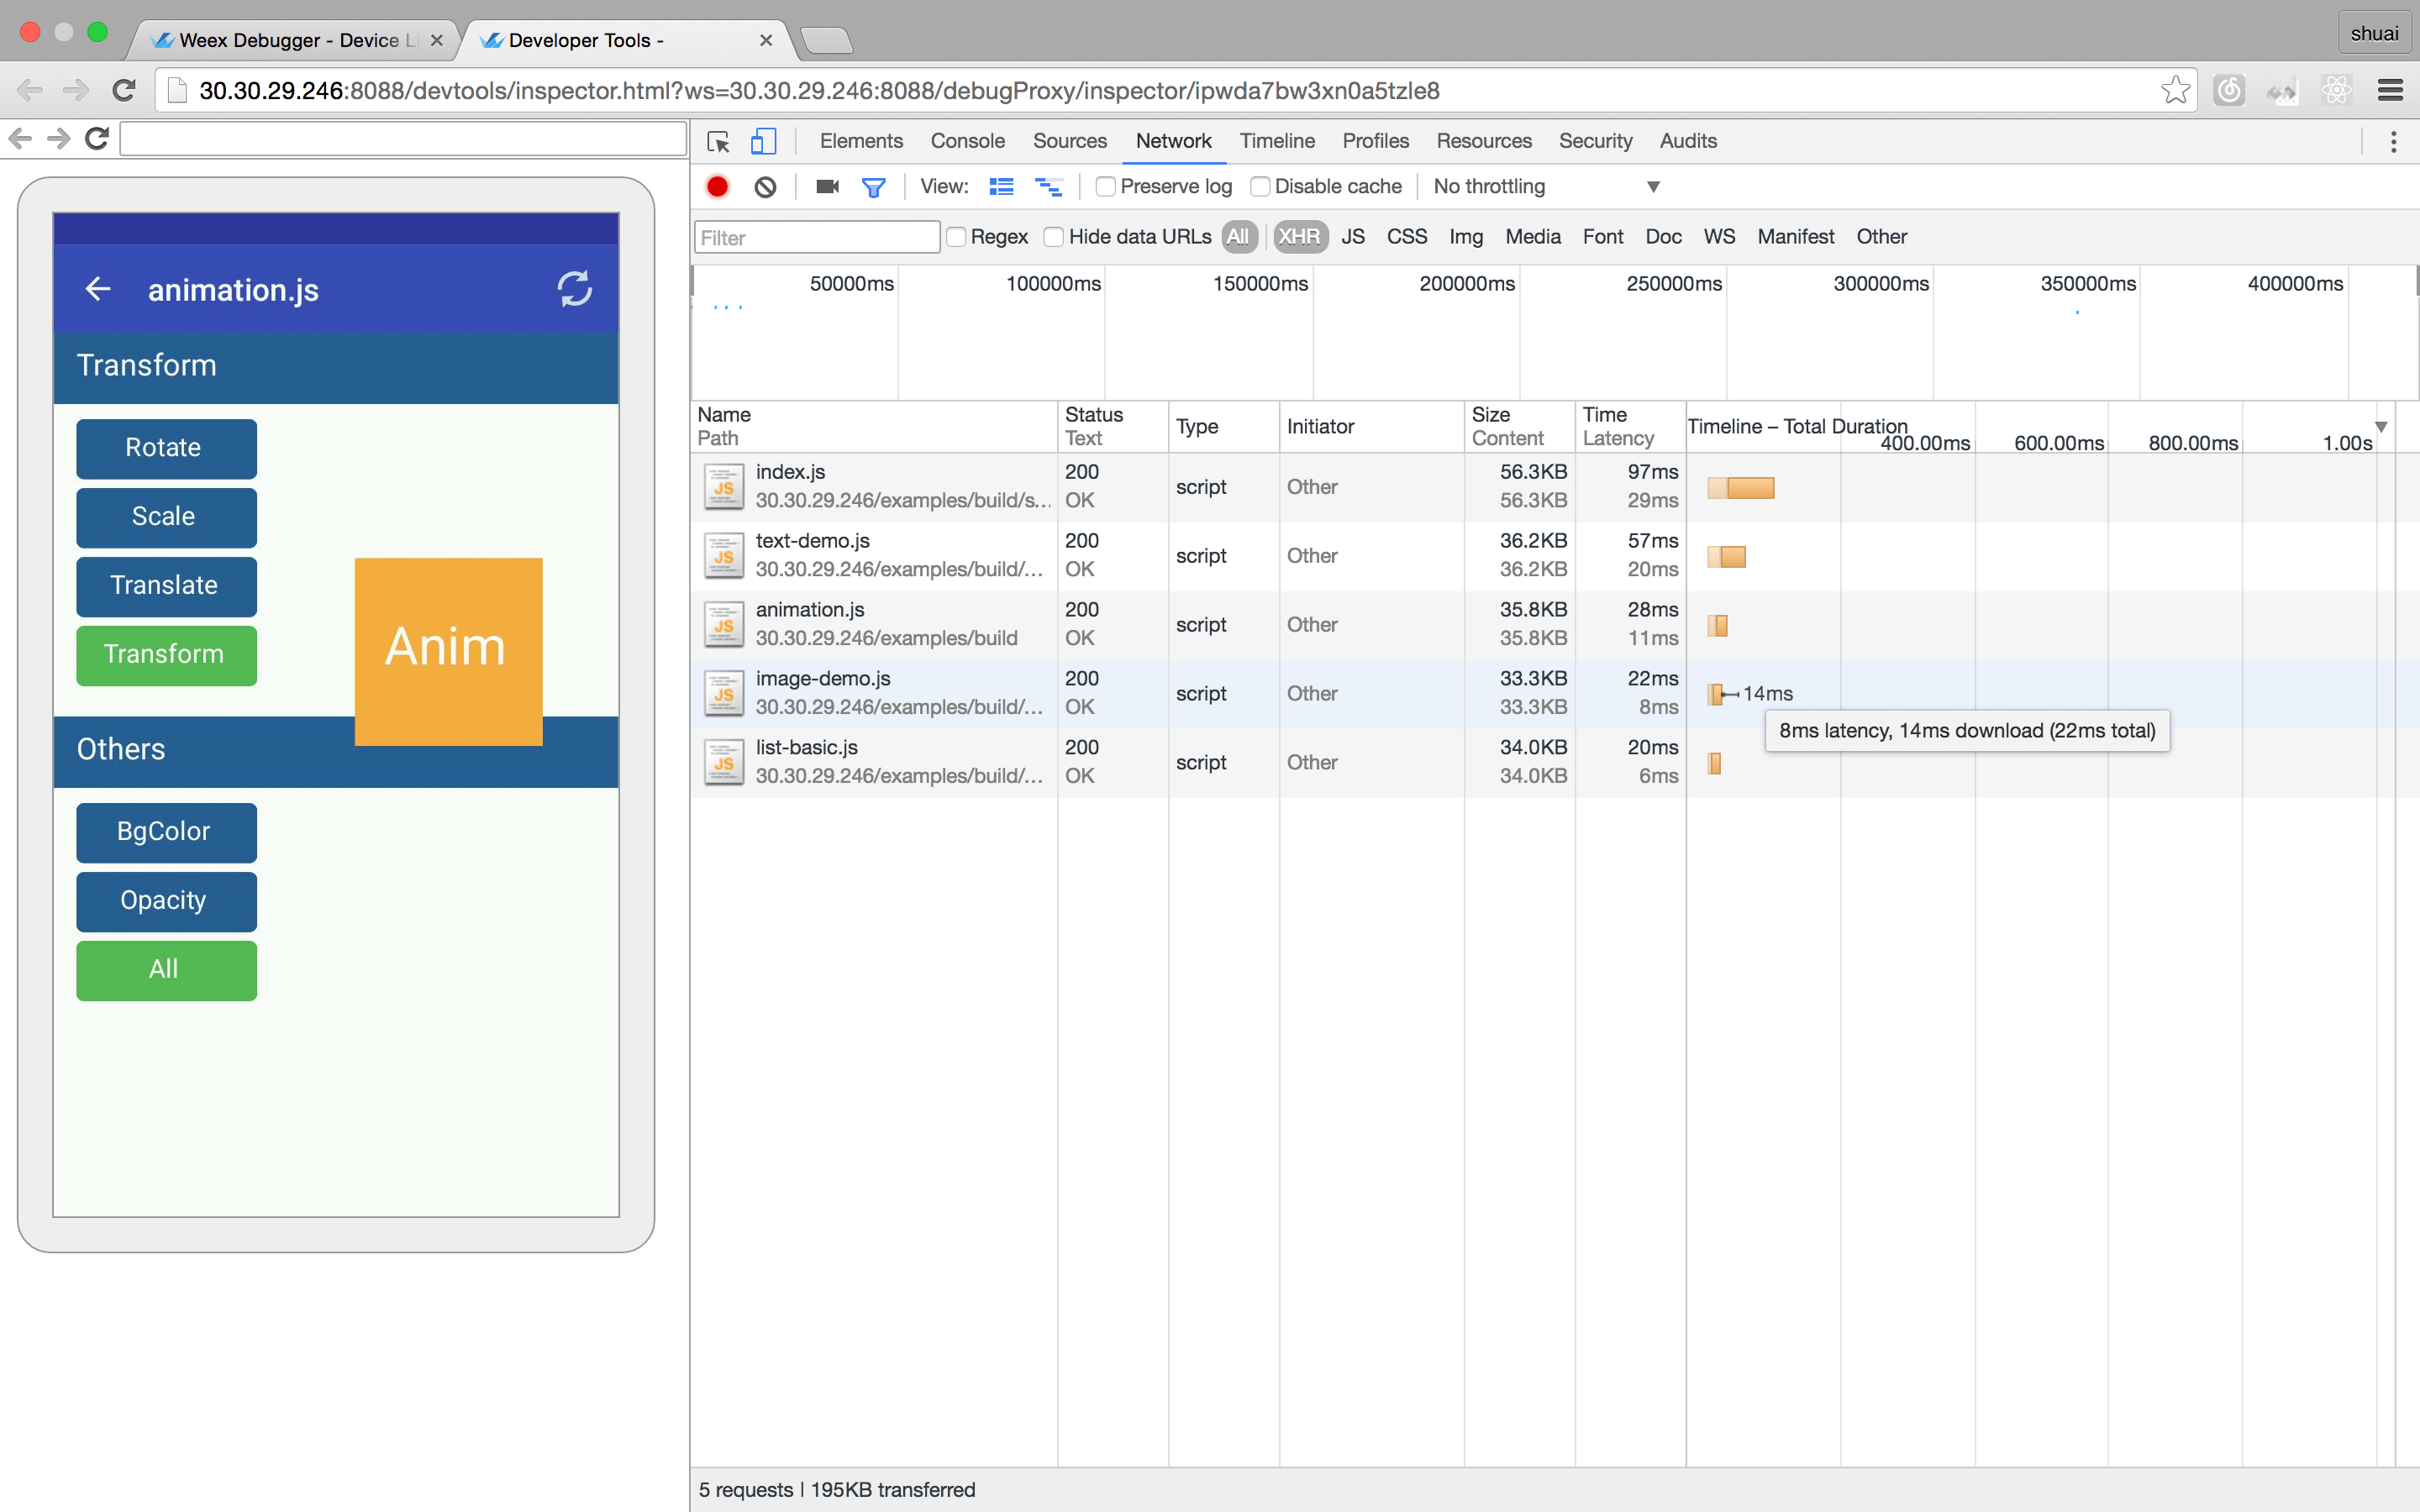 -##### æ¥çç½ç»è¯·æ±çheaderåresponse - -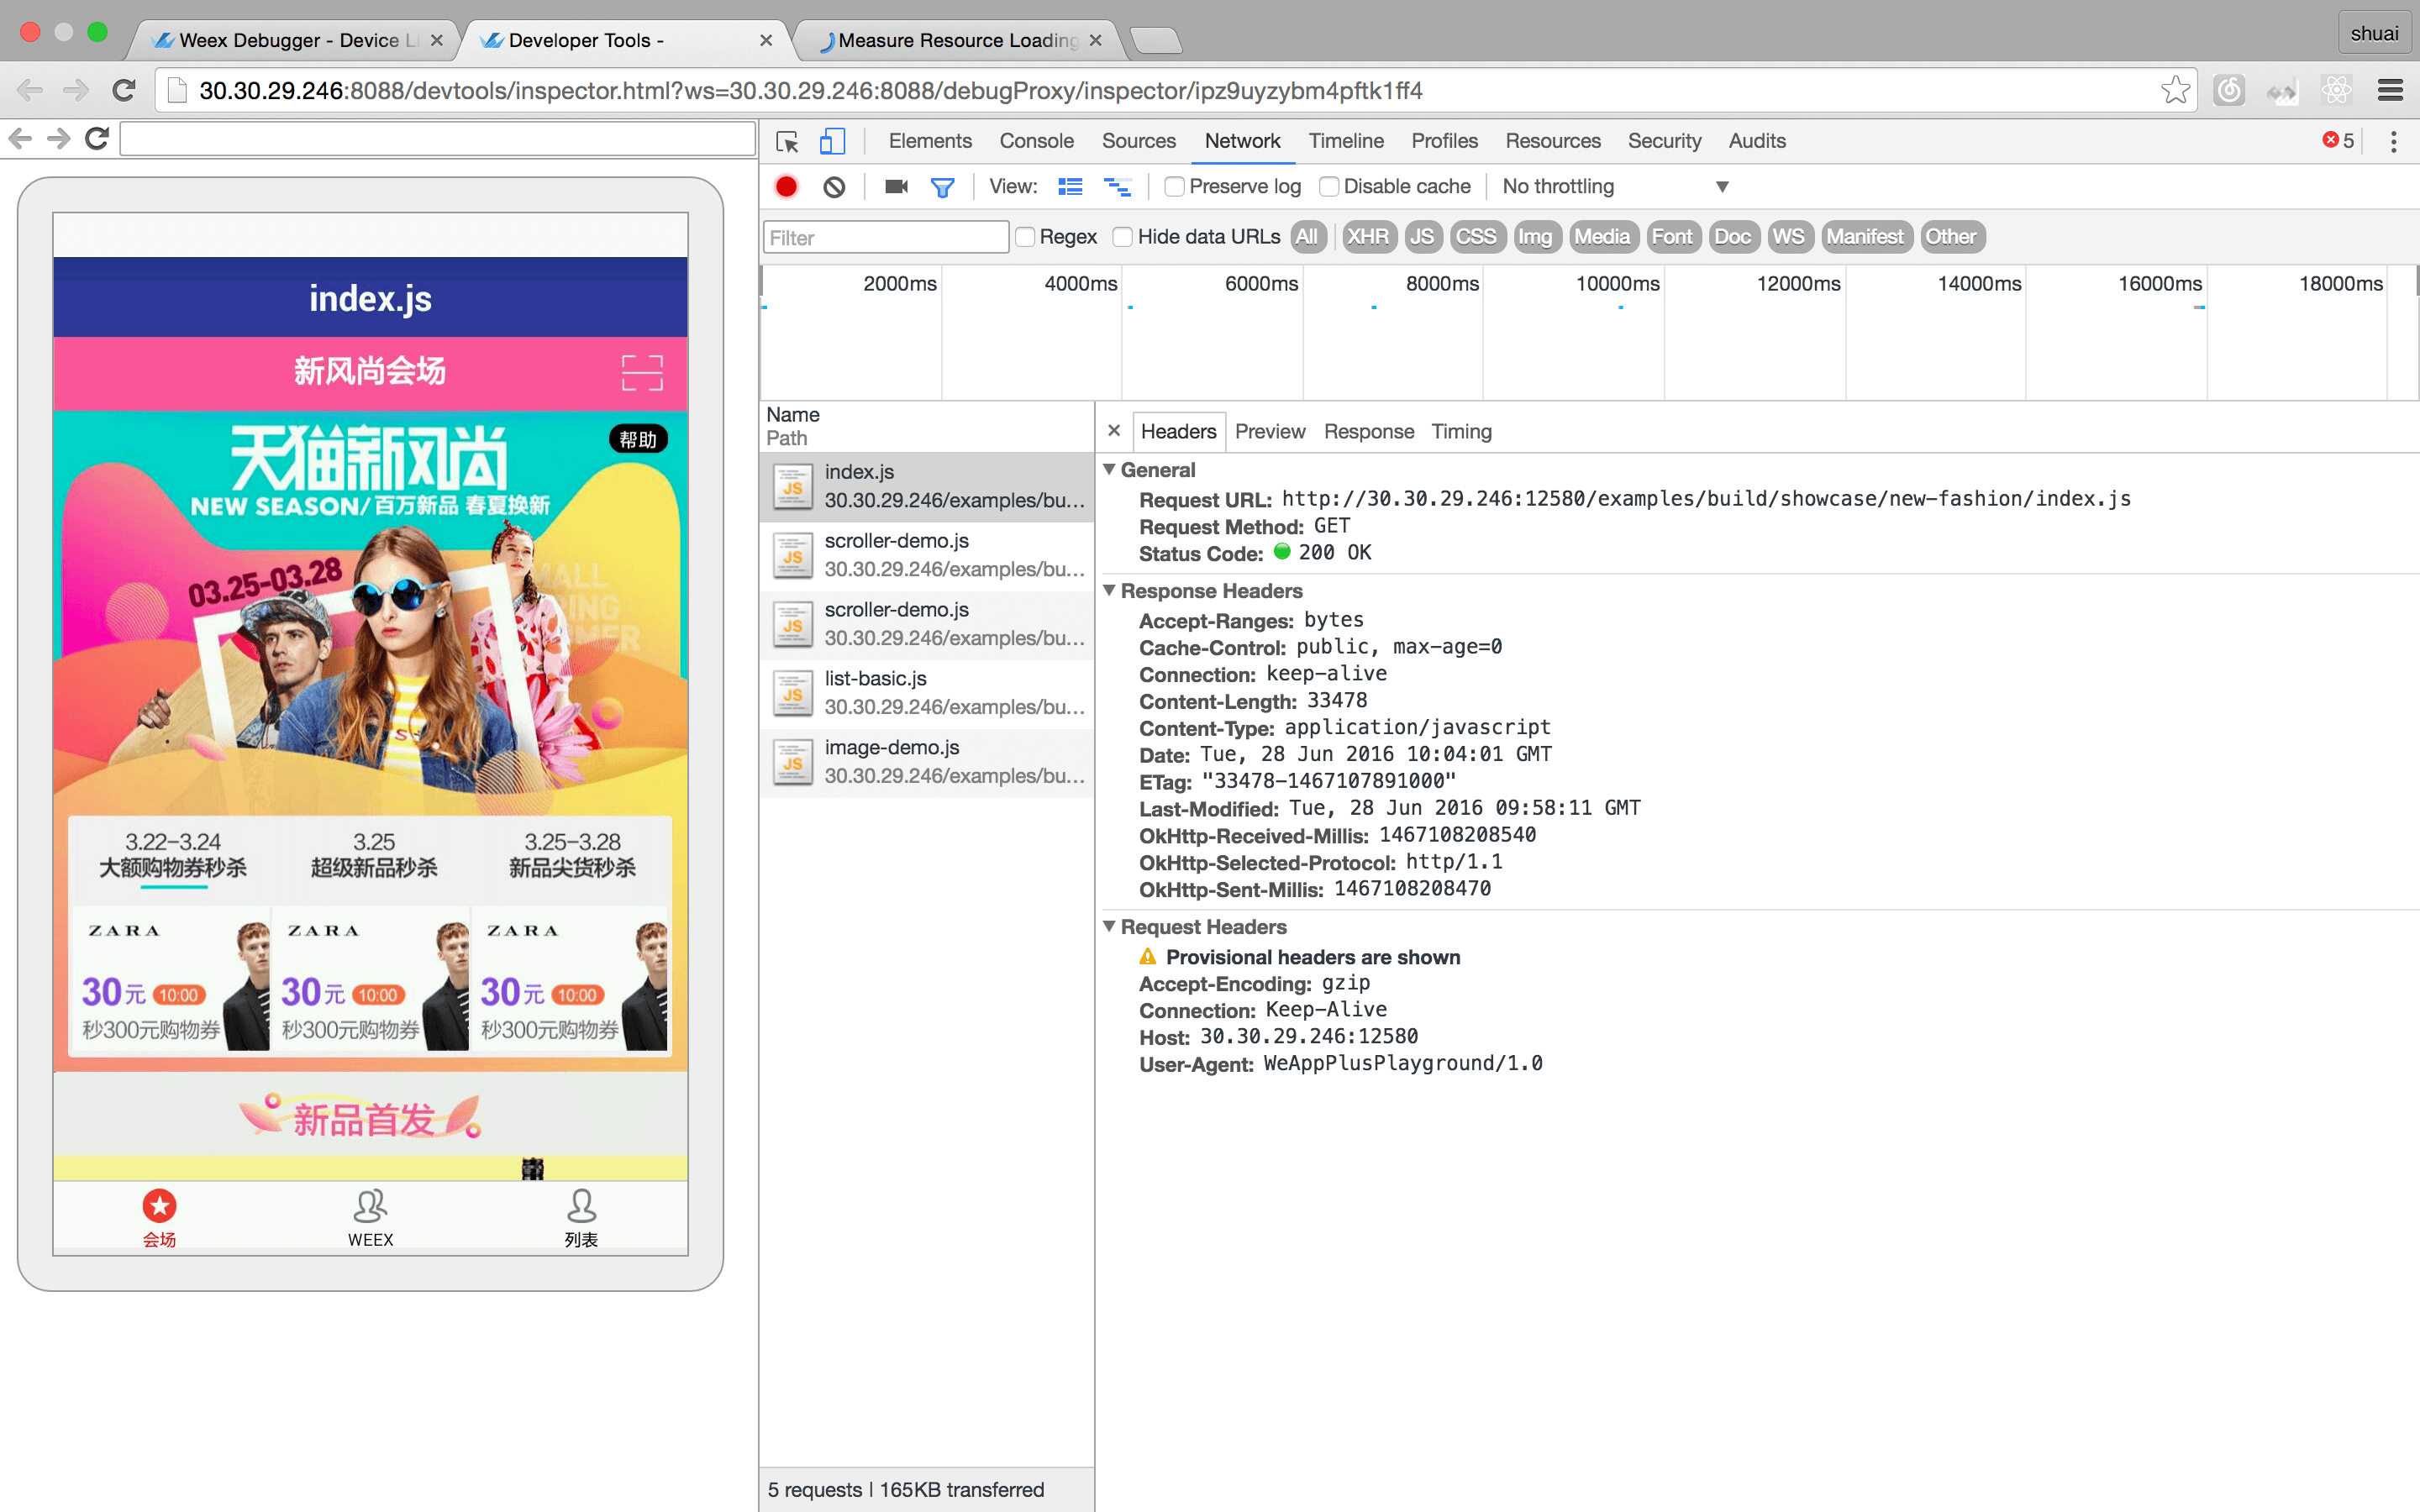 -#### æ§å¶å° - -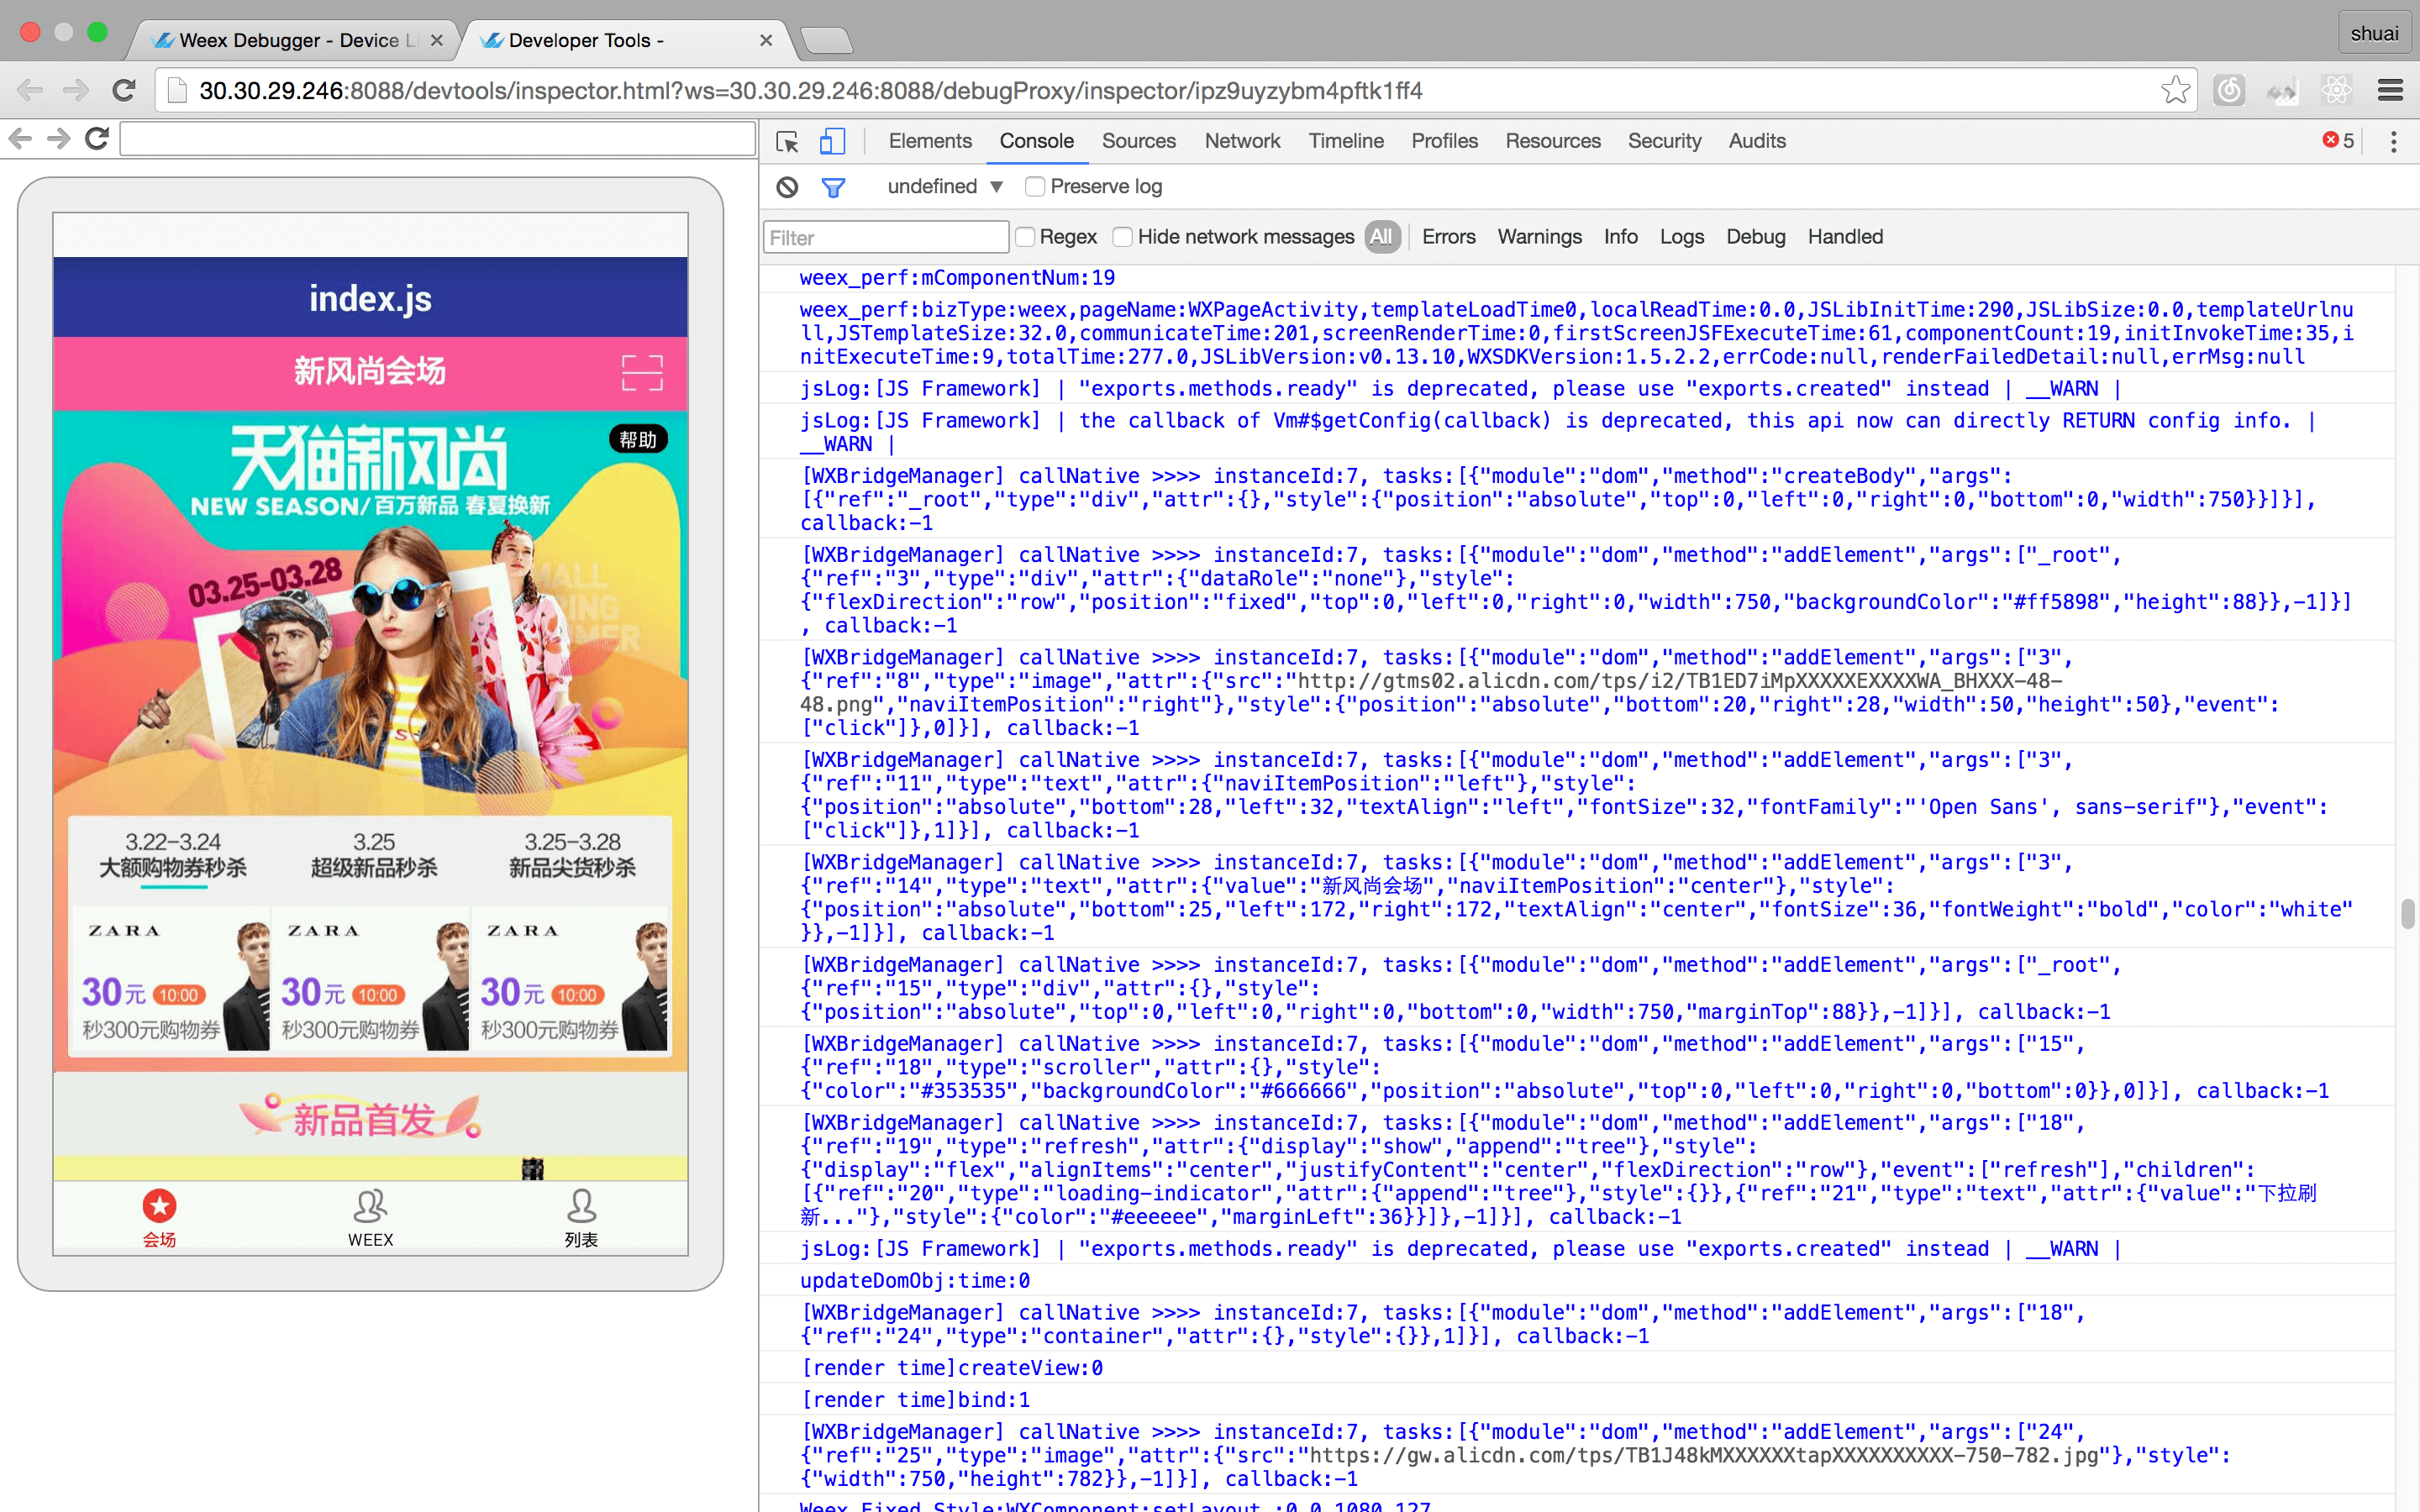 -#### èµæº - -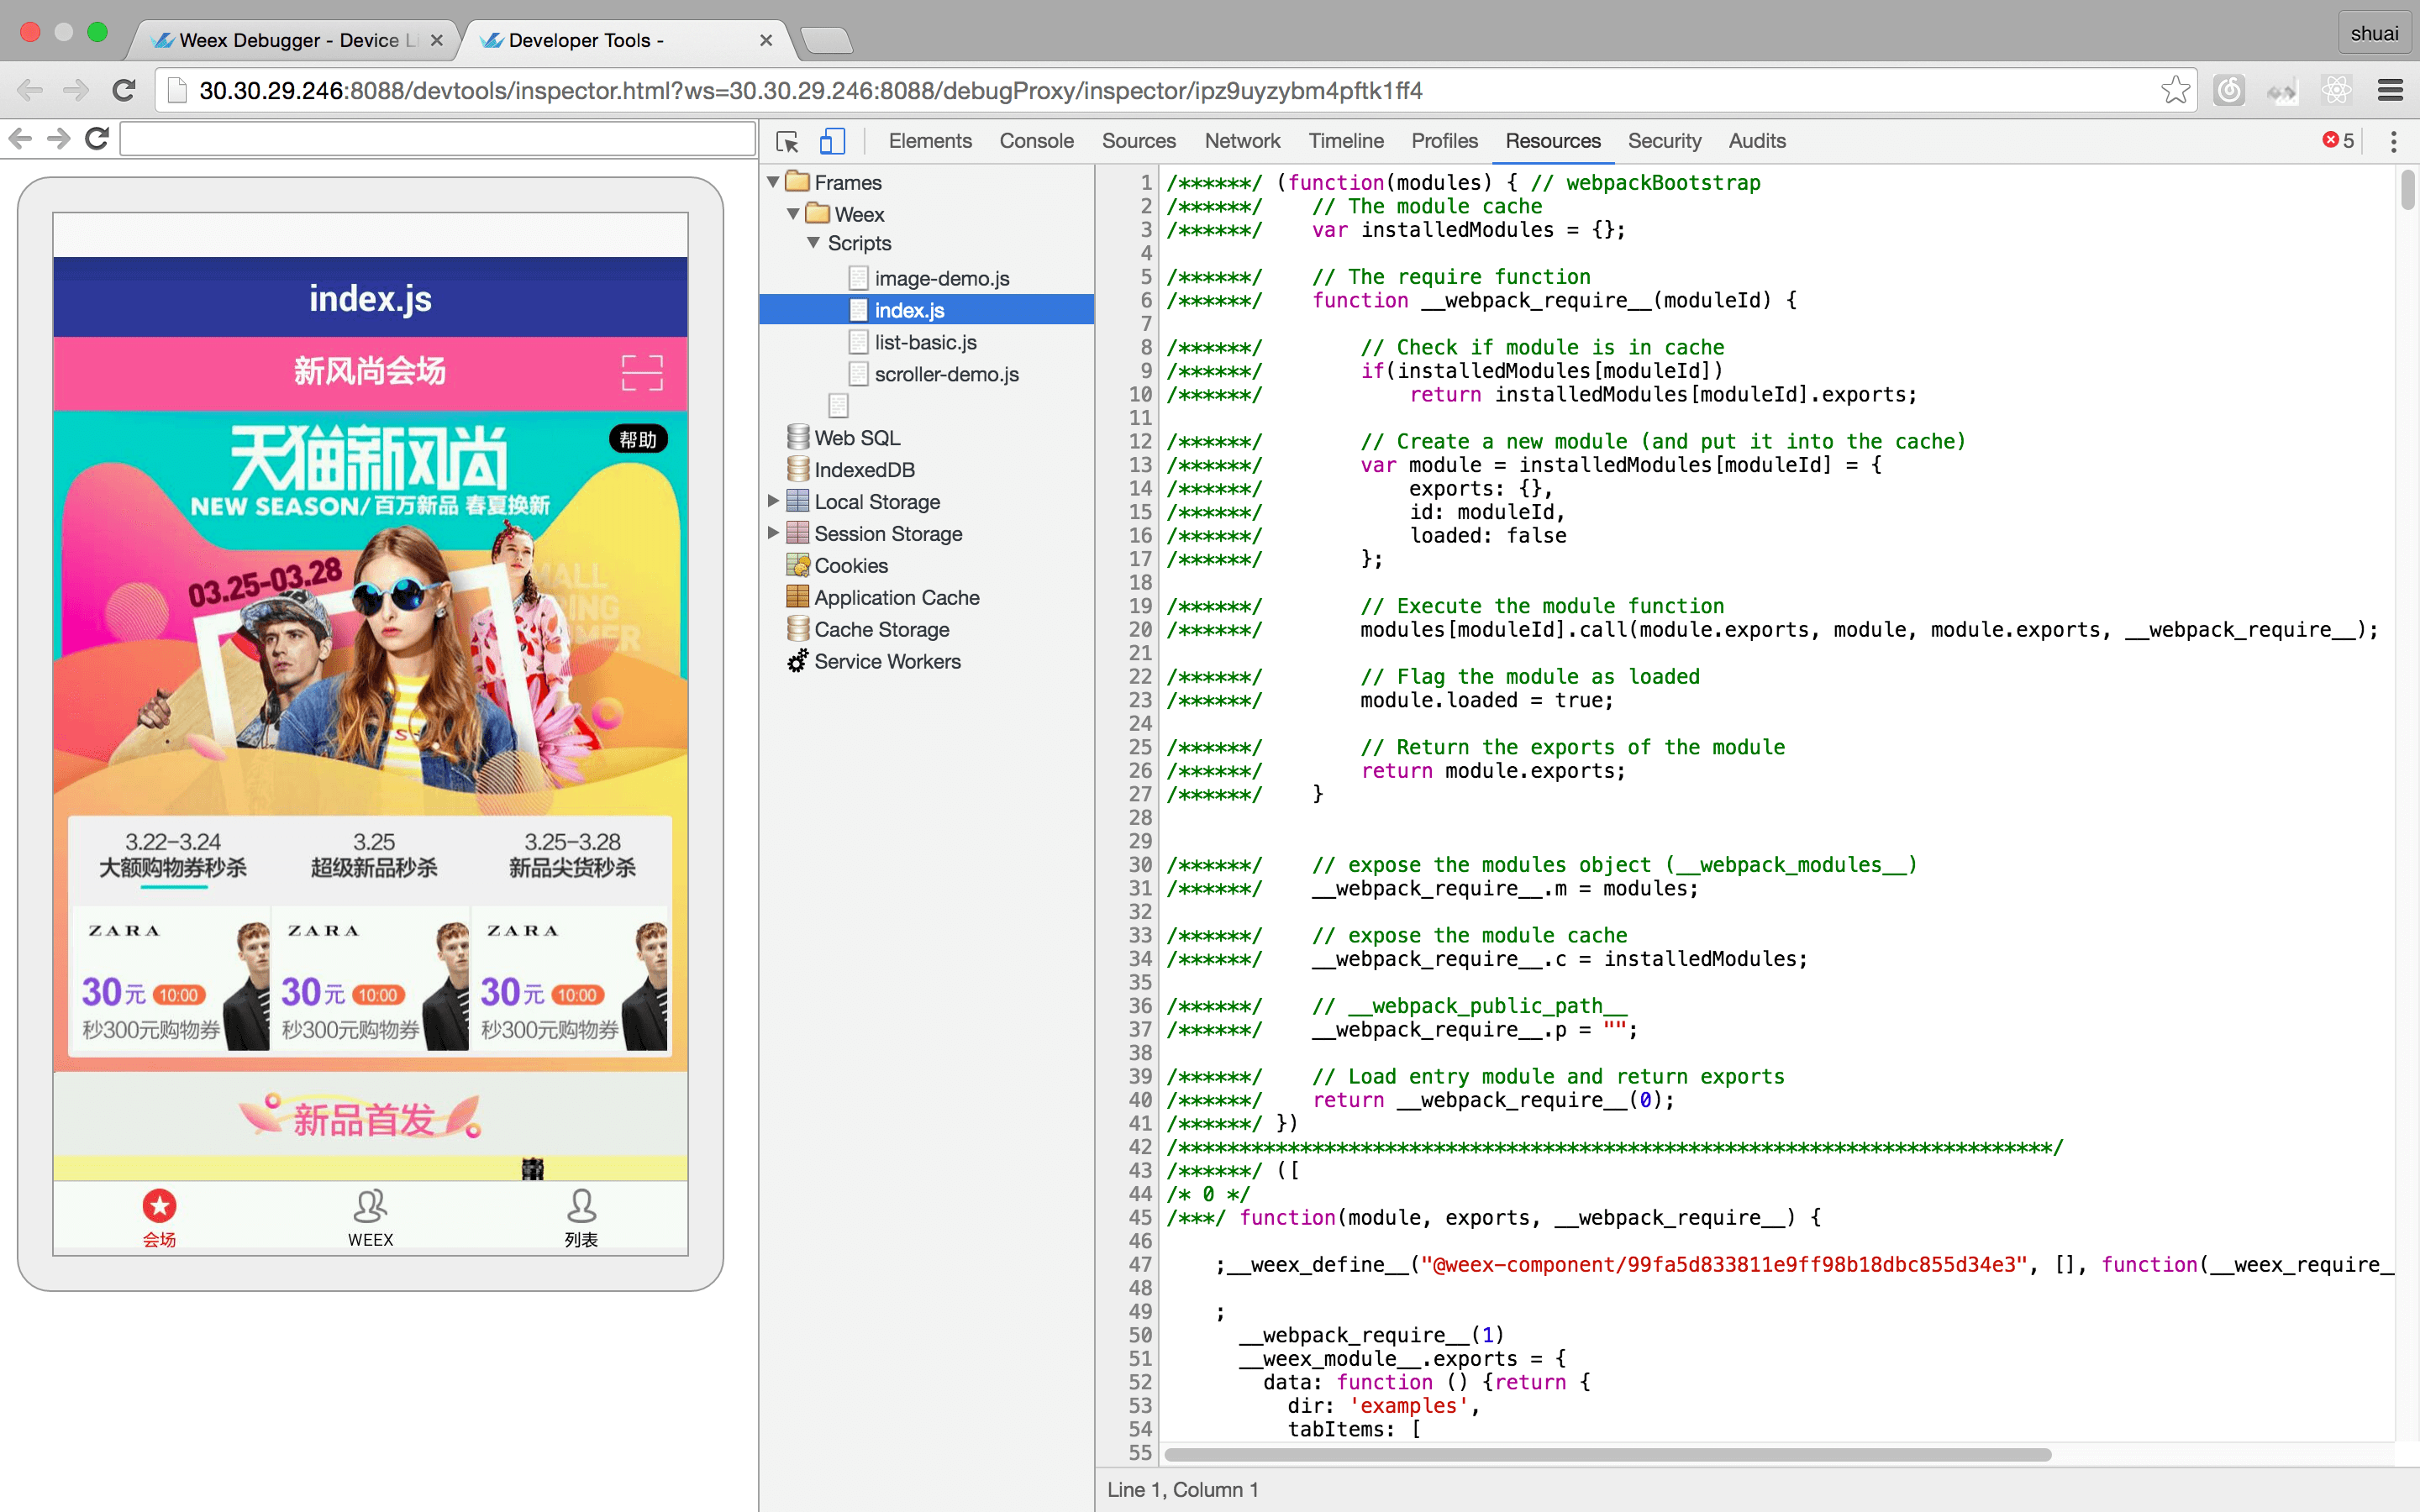 -### Debugger - - è°è¯å¨ç¨æ¥è°è¯weexä¸çjs代ç ï¼è½å¤è®¾ç½®æç¹ãæ¥çè°ç¨æ ã - -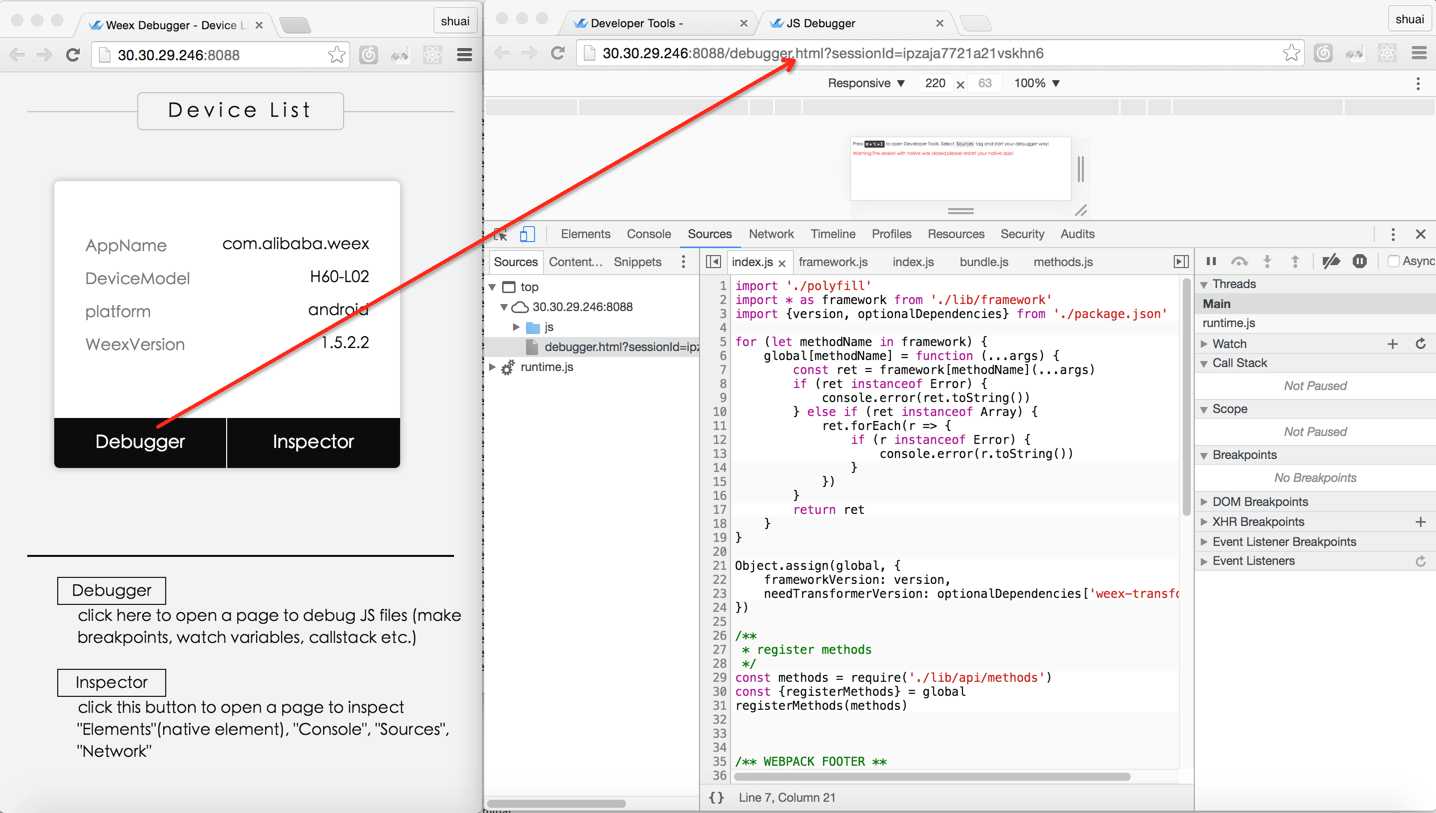 -##### Breakpoint and CallStack - -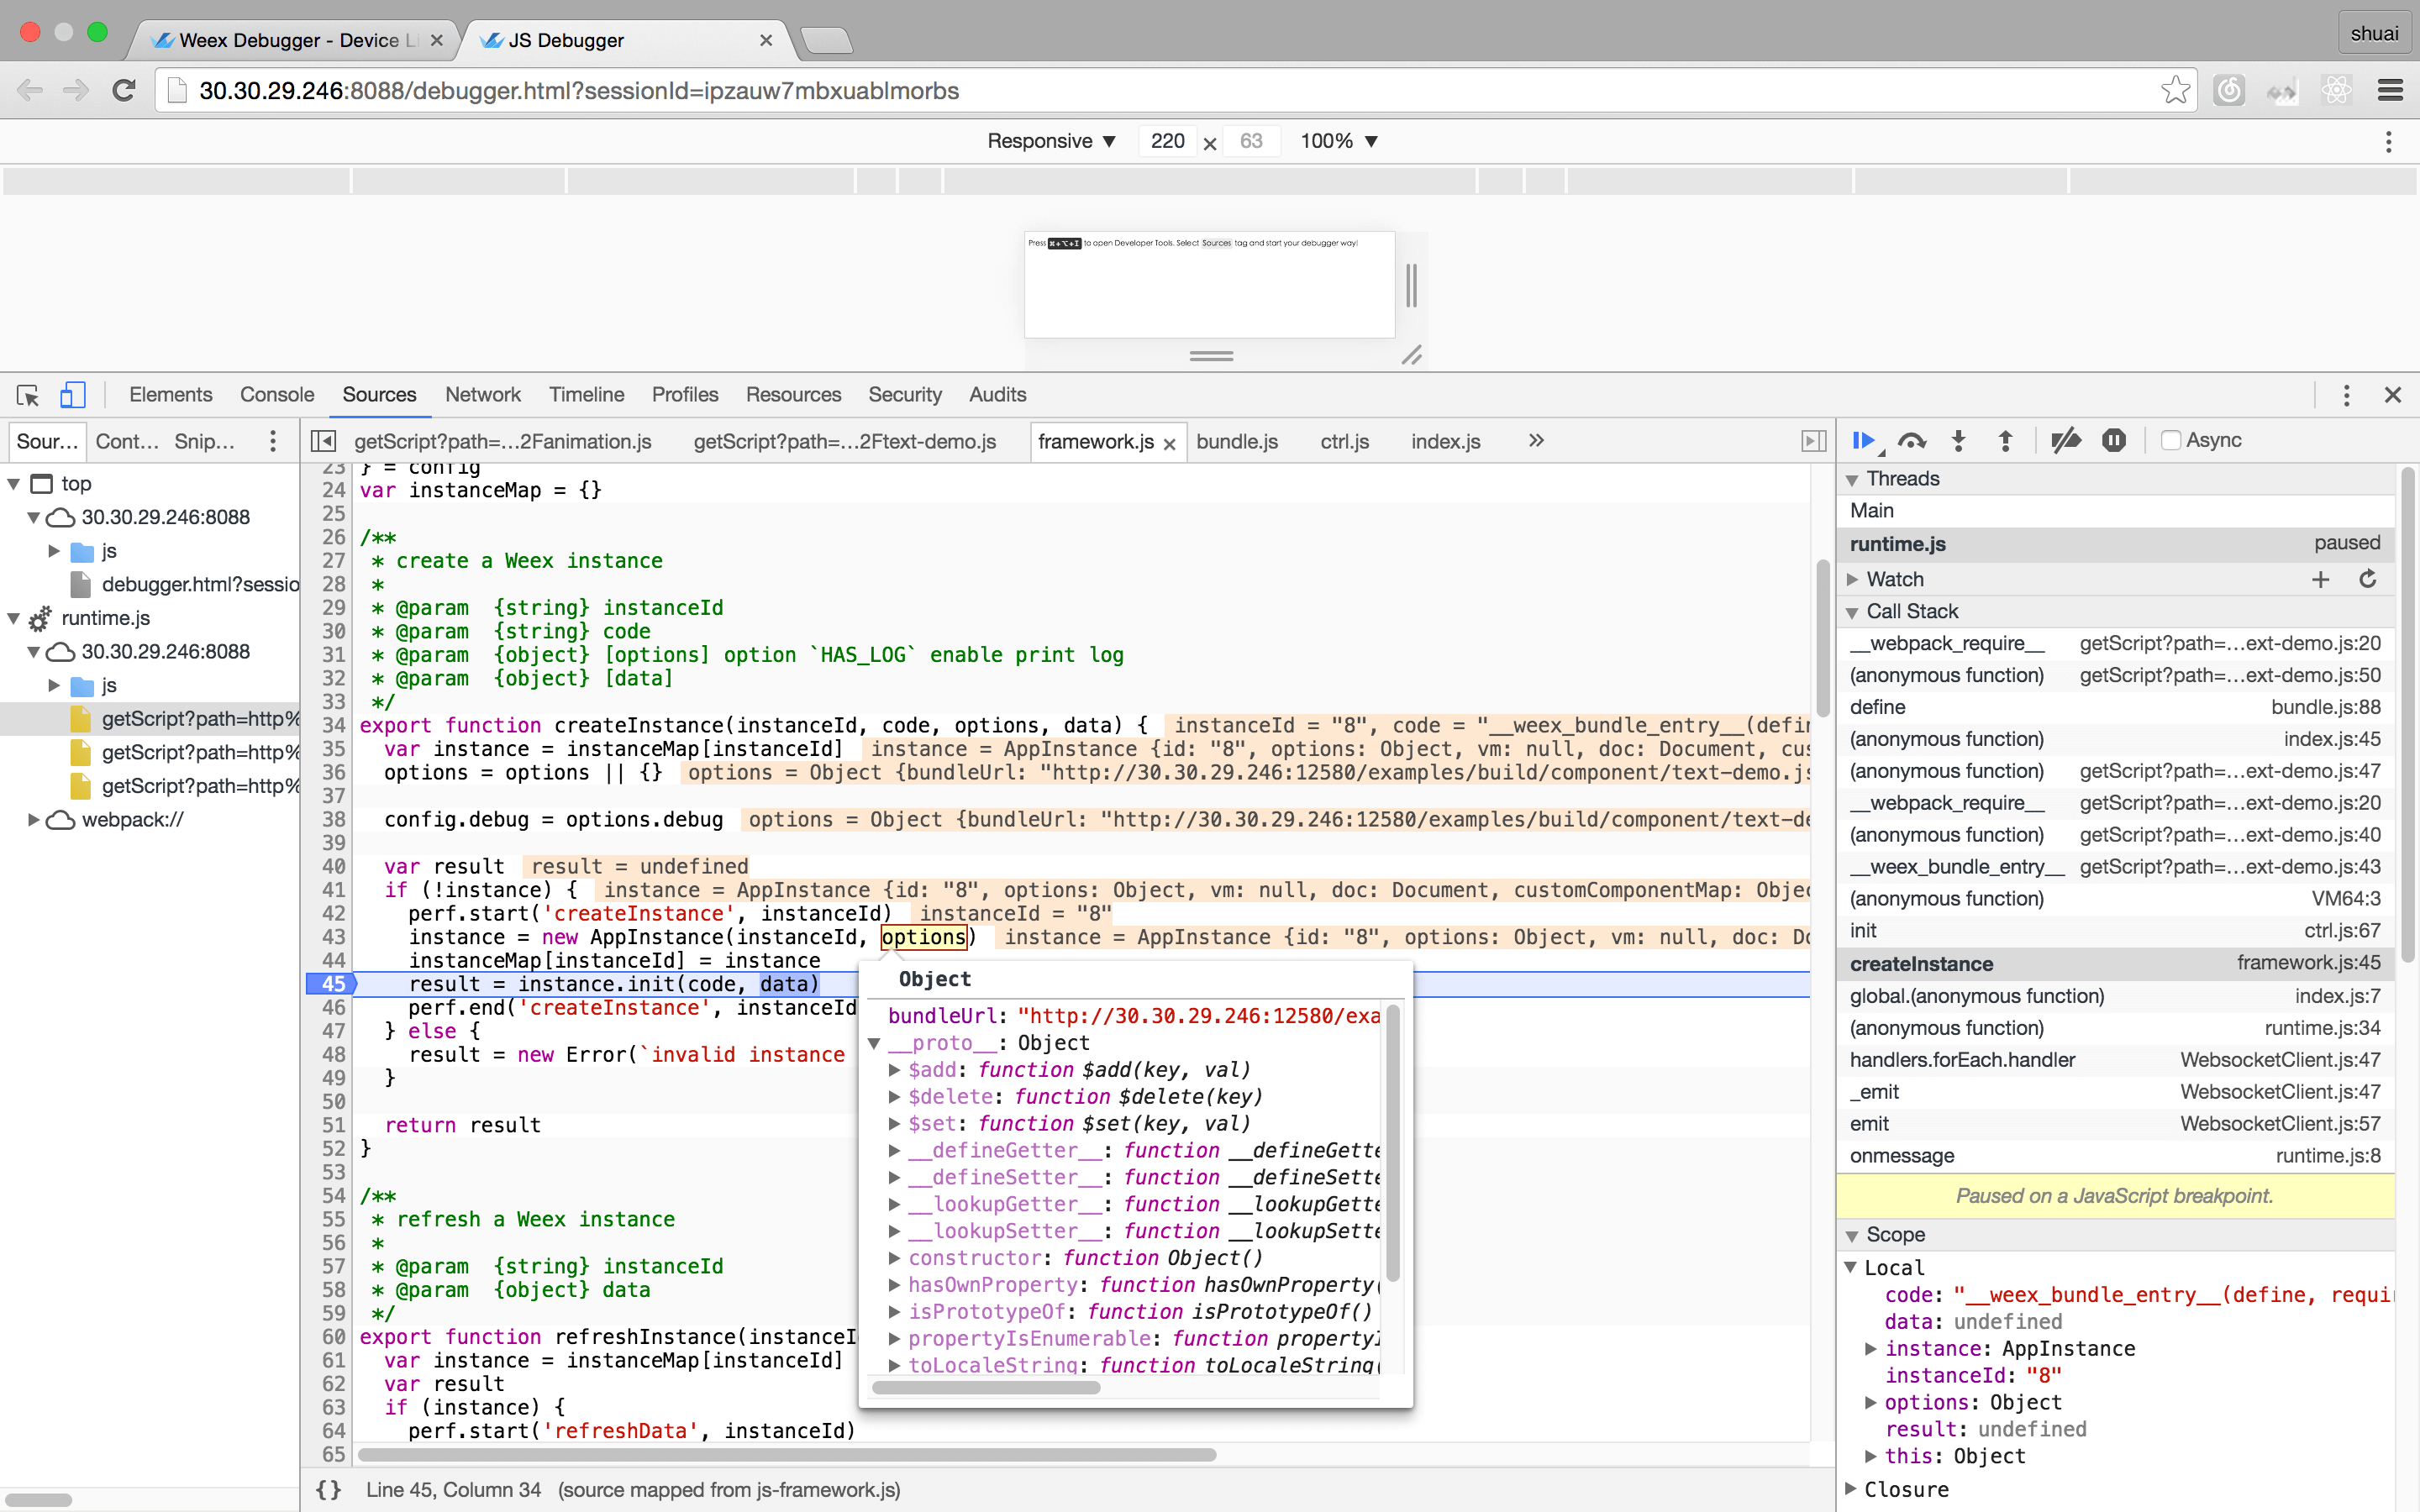 -#### éædevtools -- Android - - 请åèææ¡£ [Weex devtools (Android)](../../references/advanced/integrate-devtool-to-android.html), å ¶ä¸æ详ç»è¯´æã -- IOS - - 请åèææ¡£ [Weex devtools (iOS)](../../references/advanced/integrate-devtool-to-ios.html), å ¶ä¸æ详ç»è¯´æã http://git-wip-us.apache.org/repos/asf/incubator-weex/blob/9dd6bdd4/doc/source/cn/guide/intro/how-it-works.md ---------------------------------------------------------------------- diff --git a/doc/source/cn/guide/intro/how-it-works.md b/doc/source/cn/guide/intro/how-it-works.md index 4480005..51319e1 100644 --- a/doc/source/cn/guide/intro/how-it-works.md +++ b/doc/source/cn/guide/intro/how-it-works.md @@ -1,7 +1,7 @@ --- title: å·¥ä½åç type: guide -order: 4.1 +order: 5.1 has_chapter_content: false chapter_title: ä¼å¿ä»ç» version: 2.1 http://git-wip-us.apache.org/repos/asf/incubator-weex/blob/9dd6bdd4/doc/source/cn/guide/intro/index.md ---------------------------------------------------------------------- diff --git a/doc/source/cn/guide/intro/index.md b/doc/source/cn/guide/intro/index.md index 1ebcb4b..90e01a4 100644 --- a/doc/source/cn/guide/intro/index.md +++ b/doc/source/cn/guide/intro/index.md @@ -1,7 +1,7 @@ --- title: ä»ç» type: guide -order: 4 +order: 5 version: 2.1 --- http://git-wip-us.apache.org/repos/asf/incubator-weex/blob/9dd6bdd4/doc/source/cn/guide/intro/page-architecture.md ---------------------------------------------------------------------- diff --git a/doc/source/cn/guide/intro/page-architecture.md b/doc/source/cn/guide/intro/page-architecture.md index 296ee98..17b7d16 100644 --- a/doc/source/cn/guide/intro/page-architecture.md +++ b/doc/source/cn/guide/intro/page-architecture.md @@ -1,7 +1,7 @@ --- title: Weex 页é¢ç»æ type: guide -order: 4.6 +order: 5.6 version: 2.1 --- http://git-wip-us.apache.org/repos/asf/incubator-weex/blob/9dd6bdd4/doc/source/cn/guide/intro/using-vue.md ---------------------------------------------------------------------- diff --git a/doc/source/cn/guide/intro/using-vue.md b/doc/source/cn/guide/intro/using-vue.md index 3083340..42ad984 100644 --- a/doc/source/cn/guide/intro/using-vue.md +++ b/doc/source/cn/guide/intro/using-vue.md @@ -1,7 +1,7 @@ --- title: ä½¿ç¨ Vue å¼å Weex é¡µé¢ type: guide -order: 4.3 +order: 5.3 version: 2.1 --- http://git-wip-us.apache.org/repos/asf/incubator-weex/blob/9dd6bdd4/doc/source/cn/guide/intro/web-dev-experience.md ---------------------------------------------------------------------- diff --git a/doc/source/cn/guide/intro/web-dev-experience.md b/doc/source/cn/guide/intro/web-dev-experience.md index 03d33e4..d7f6163 100644 --- a/doc/source/cn/guide/intro/web-dev-experience.md +++ b/doc/source/cn/guide/intro/web-dev-experience.md @@ -1,7 +1,7 @@ --- title: Web å¼åä½éª type: guide -order: 4.2 +order: 5.2 version: 2.1 --- http://git-wip-us.apache.org/repos/asf/incubator-weex/blob/9dd6bdd4/doc/source/cn/guide/intro/write-once.md ---------------------------------------------------------------------- diff --git a/doc/source/cn/guide/intro/write-once.md b/doc/source/cn/guide/intro/write-once.md index b5ecf07..e880f48 100644 --- a/doc/source/cn/guide/intro/write-once.md +++ b/doc/source/cn/guide/intro/write-once.md @@ -1,7 +1,7 @@ --- title: ä¸æ¬¡æ°åï¼å¤ç«¯è¿è¡ type: guide -order: 4.4 +order: 5.4 version: 2.1 --- http://git-wip-us.apache.org/repos/asf/incubator-weex/blob/9dd6bdd4/doc/source/cn/guide/set-up-env.md ---------------------------------------------------------------------- diff --git a/doc/source/cn/guide/set-up-env.md b/doc/source/cn/guide/set-up-env.md new file mode 100644 index 0000000..79ff249 --- /dev/null +++ b/doc/source/cn/guide/set-up-env.md @@ -0,0 +1,126 @@ +--- +title: æ建å¼åç¯å¢ +type: guide +order: 2 +version: 2.1 +has_chapter_content: true +--- + +# æ建å¼åç¯å¢ + +ä½¿ç¨ dotWe 对 Weex å°é²æ¯ä¸ä¸ªä¸éçéæ©ï¼ä½å¦æä½ æ³æ´ä¸ä¸çå¼å Weexï¼ dotWe å°±ä¸æä¹å¤ç¨äºãæ¬èä¼æä½ å¦ä½æ建æ¬å°å¼åç¯å¢è¿è¡ Weex å¼åã + +## 第ä¸æ¥ï¼å®è£ ä¾èµ + +Weex å®æ¹æä¾äº weex-toolkit çèææ¶å·¥å ·æ¥è¾ å©å¼ååè°è¯ãé¦å ï¼ä½ éè¦ Node.js å weex-toolkitã + +å®è£ Node.js æ¹å¼å¤ç§å¤æ ·ï¼æç®åçæ¹å¼æ¯å¨ [Node.js å®ç½](https://nodejs.org/en/) ä¸è½½å¯æ§è¡ç¨åºç´æ¥å®è£ å³å¯ã + +å¯¹äº Macï¼å¯ä»¥ä½¿ç¨ [Homebrew](http://brew.sh/) è¿è¡å®è£ ï¼ + +```bash +brew install node +``` + +> æ´å¤å®è£ æ¹å¼å¯åè [Node.js å®æ¹ä¿¡æ¯](https://nodejs.org/en/download/) + +å®è£ å®æåï¼å¯ä»¥ä½¿ç¨ä»¥ä¸å½ä»¤æ£æµæ¯å¦å®è£ æåï¼ + +```bash +$ node -v +v6.3.1 +$ npm -v +3.10.3 +``` + +é常ï¼å®è£ äº Node.js ç¯å¢ï¼npm å 管çå·¥å ·ä¹éä¹å®è£ äºãå æ¤ï¼ç´æ¥ä½¿ç¨ npm æ¥å®è£ weex-toolkitã + +> npm æ¯ä¸ä¸ª JavaScript å 管çå·¥å ·ï¼å®å¯ä»¥è®©å¼åè è½»æ¾å ±äº«åéç¨ä»£ç ãWeex å¾å¤ä¾èµæ¥èªç¤¾åºï¼åæ ·ï¼Weex ä¹å°å¾å¤å·¥å ·åå¸å°ç¤¾åºæ¹ä¾¿å¼åè 使ç¨ã + +**注æ: ** weex-toolkit å¨ 1.0.1 ä¹åææ¯æåå§å Vue 项ç®ï¼ä½¿ç¨å请确认çæ¬æ¯å¦æ£ç¡®ã + +```bash +$ npm install -g weex-toolkit +$ weex -v + +v1.0.3 +weex-builder : v0.2.4 +weex-previewer : v1.3.4 +``` + +å½å å¼åè å¯ä»¥èè使ç¨æ·å®ç npm éå ââ [cnpm](https://npm.taobao.org/) å®è£ weex-toolkit + +```bash +$ npm install -g cnpm +$ cnpm install -g weex-toolkit +``` + +*æ示ï¼* + +å¦ææ示æéé误ï¼*permission error*ï¼ï¼ä½¿ç¨ `sudo` å ³é®åè¿è¡å®è£ + +```bash +$ sudo cnpm install -g weex-toolkit +``` + +å®è£ ç»æåä½ å¯ä»¥ç´æ¥ä½¿ç¨ `weex` å½ä»¤éªè¯æ¯å¦å®è£ æåï¼å®ä¼æ¾ç¤º `weex` å½ä»¤è¡å·¥å ·ååæ°ï¼ + + + +## 第äºæ¥ï¼åå§å + +ç¶ååå§å Weex 项ç®ï¼ + +```bash +$ weex init awesome-project +``` + +æ§è¡å®å½ä»¤åï¼å¨ `awesome-project` ç®å½ä¸å°±å建äºä¸ä¸ªä½¿ç¨ Weex å Vue ç模æ¿é¡¹ç®ã + +## 第ä¸æ¥ï¼å¼å + +ä¹åæ们è¿å ¥é¡¹ç®æå¨è·¯å¾ï¼weex-toolkit å·²ç»ä¸ºæ们çæäºæ å项ç®ç»æã + +å¨ `package.json` ä¸ï¼å·²ç»é 置好äºå 个常ç¨ç npm scriptï¼åå«æ¯ï¼ + +- `build`: æºç æå ï¼çæ JS Bundle +- `dev`: webpack watch 模å¼ï¼æ¹ä¾¿å¼å +- `serve`: å¼å¯éææå¡å¨ +- `debug`: è°è¯æ¨¡å¼ + +æ们å éè¿ `npm install` å®è£ 项ç®ä¾èµãä¹åè¿è¡ `npm run dev` å `npm run serve` å¼å¯watch 模å¼åéææå¡å¨ã + +ç¶åæ们æå¼æµè§å¨ï¼è¿å ¥ `http://localhost:8080/index.html` å³å¯çå° weex h5 页é¢ã + +åå§åæ¶å·²ç»ä¸ºæ们å建äºåºæ¬ç示ä¾ï¼æ们å¯ä»¥å¨ `src/foo.vue` ä¸æ¥çã + +代ç å¦ä¸æç¤ºï¼ + +```html +<template> + <div class="wrapper"> + <text class="weex">Hello Weex !</text> + <text class="vue">Hello Vue !</text> + </div> +</template> + +<style scoped> + .wrapper { + flex-direction: column; + justify-content: center; + } + .weex { + font-size: 60px; + text-align: center; + color: #1B90F7; + } + .vue { + font-size: 60px; + text-align: center; + margin-top: 30px; + color: #41B883; + } +</style> +``` + +å ³äº Weex è¯æ³é¨åï¼ä½ å¯ä»¥ç´æ¥åè [Vue Guide](https://vuejs.org/v2/guide/)ï¼è¿éä¸åéå¤ä»ç»ãå¦ææ¨æ³äºè§£æå ³ææ¯è¯¦æ çæ´å¤ä¿¡æ¯ï¼è¯·ç»§ç»é 读ä¸ä¸èã并ä¸ä¸è¦å¿è®°å¨ dotWe å代ç 并éæ¶é¢è§ã http://git-wip-us.apache.org/repos/asf/incubator-weex/blob/9dd6bdd4/doc/source/cn/guide/tools/devtools.md ---------------------------------------------------------------------- diff --git a/doc/source/cn/guide/tools/devtools.md b/doc/source/cn/guide/tools/devtools.md new file mode 100644 index 0000000..f1c4dbc --- /dev/null +++ b/doc/source/cn/guide/tools/devtools.md @@ -0,0 +1,111 @@ +--- +title: ä½¿ç¨ Devtools +type: guide +order: 4.1 +version: 2.1 +has_chapter_content: true +--- + +# Devtools + +**weex devtools** æ¯ä¸é¨ä¸º Weex å®å¶çä¸æ¬¾å®ç°äº [**Chrome Debugging Protocol**](https://developer.chrome.com/devtools/docs/debugger-protocol) ç inspect/debug å·¥å ·ï¼è½å¤å¸®å©ä½ å¿«éæ¥ç app è¿è¡ç¶æåè°è¯ weex ä¸ç Javascript 代ç ï¼å½åæ¯æ **iOS** å **Android** 两个平å°ã + +1. æ¯æ Android å iOS è°è¯ +2. æ¯æçæºå模æå¨ +3. å¯ä»¥æ£æ¥ native Elements, vdom, network, Console, Resource +4. å¯ä»¥è°è¯ js/wx/Rx çå端æºç æ件 +5. æ¯æåæ¶å¨å端æ件å native (Androidï¼iOS) æ件ä¸æç¹è°è¯ +6. æ¯æè¿ç¨è°è¯ï¼ä¸éè¦çæº USB è¿æ¥çµè +7. æ¯æ screencast å select element åè½ +8. æ¯æåæ¶è°è¯å¤ä¸ªåºç¨å客æ·ç«¯ + +## å®è£ + +``` +$ npm install -g weex-toolkit +``` + +## ç¨æ³ + + weex debug [options] [we_file|bundles_dir] + + é项: + +``` +-h, --help æ¾ç¤ºå¸®å© +-V, --verbose æ¾ç¤º debug æå¡å¨è¿è¡æ¶çåç§ log +-v, --version æ¾ç¤ºçæ¬ +-p, --port [port] 设置 debug æå¡å¨ç«¯å£å· é»è®¤ä¸º 8088 +-e, --entry [entry] debug ä¸ä¸ªç®å½æ¶,è¿ä¸ªåæ°æå®æ´ä¸ªç®å½çå ¥å£ bundle æ件,è¿ä¸ª bundle æ件çå°åä¼æ¾ç¤ºå¨debug主页ä¸(ä½ä¸ºäºç»´ç ) +-m, --mode [mode] 设置æ建weæ件çæ¹å¼, transformer æåºç¡çé£æ ¼éååæ件, loader:wepack é£æ ¼ éå模ååçå¤æ件ãé»è®¤ä¸º transformer +``` + +#### å¼å¯è°è¯ + +``` +$ weex debug +``` + +å纯å¯å¨ä¸ä¸ªè°è¯æå¡å¨,并åæ¶å¤èµ·chromeæµè§å¨æå¼`è°è¯ä¸»é¡µ`. +è¿ä¸ª`è°è¯ä¸»é¡µ`ä¸ä¼æä¸ä¸ªäºç»´ç ,使ç¨Playground Appæ«è¿ä¸ªäºç»´ç å¯ä»¥å¼å¯Playgroundè°è¯. +å¼å¯è°è¯å,设å¤å表ä¸ä¼åºç°æ¨ç设å¤,æ ¹æ®æ示è¿è¡åç»çè°è¯æä½ +#### è°è¯ weæ件 + +``` +$weex debug your_weex.we +``` + +è¿ä¸ªå½ä»¤ä¼å°your_weex.weç¼è¯æbundlejsæ件 é¨ç½²å°debugæå¡å¨ +并å¯å¨debugæå¡å¨å¦ä¸è¿°å½ä»¤é£æ ·.æå¼ç`è°è¯ä¸»é¡µ`ä¼å¤æ¾ç¤ºä¸ä¸ªäºç»´ç ,使ç¨playground app +æ«è¿ä¸ªç å¯ä»¥å è½½your_weex.we.(注æè¦å æ«æå¼å¯è°è¯çé£ä¸ªç ) +è¿ä¸ªå½ä»¤ä¼èªå¨æ£æµyour_weex.weæ件åå¨,å¦æåç°å 容被修æ¹åç«å³éæ°ç¼è¯é¨ç½²,并å·æ°debuggeré¡µé¢ +. +#### è°è¯æ´ä¸ªbundle/weæ件夹 + +``` +$weex debug your/we/path -e index.we +``` + +è¿ä¸ªå½ä»¤ä¼ç¼è¯ä½ æå®ç®å½ä¸çææçweæ件,并æç¼è¯å¥½çbundlejsé¨ç½²å°debugæå¡å¨,ä»ä»¬çå°åä¼æ å°å° http://lcoalhost:8088/weex/ ä¸ +æ¯å¦ your/we/path/`index.we` å¯ä»¥éè¿http://lcoalhost:8088/weex/index.jsè®¿é® +your/we/path/`demo/test.we` å¯ä»¥éè¿http://lcoalhost:8088/weex/demo/index.js + +-eåæ°å¯ä»¥æå®ä¸ä¸ªå ¥å£çweæ件,è¿ä¸ªæ件çå°åä¼æ¾ç¤ºå¨`è°è¯ä¸»é¡µ`ä¸(ä½ä¸ºäºç»´ç ) +## ç¹æ§ +### è¿æ¥è®¾å¤ + + +### Inspector + + Inspector è½å¤ç¨æ¥æ¥ç `Element` \ `NetWork` \ `Console log` \ `ScreenCast` \ `BoxModel` \ `Native View` çã + + +#### Element + + +#### NetWork +##### æ¥çç½ç»è¯·æ±çæ»èæ¶åå»¶æ¶ + + +##### æ¥çç½ç»è¯·æ±çheaderåresponse + + +#### æ§å¶å° + + +#### èµæº + + +### Debugger + + è°è¯å¨ç¨æ¥è°è¯weexä¸çjs代ç ï¼è½å¤è®¾ç½®æç¹ãæ¥çè°ç¨æ ã + + +##### Breakpoint and CallStack + + +#### éædevtools +- Android + - 请åèææ¡£ [Weex devtools (Android)](../../references/advanced/integrate-devtool-to-android.html), å ¶ä¸æ详ç»è¯´æã +- IOS + - 请åèææ¡£ [Weex devtools (iOS)](../../references/advanced/integrate-devtool-to-ios.html), å ¶ä¸æ详ç»è¯´æã http://git-wip-us.apache.org/repos/asf/incubator-weex/blob/9dd6bdd4/doc/source/cn/guide/tools/index.md ---------------------------------------------------------------------- diff --git a/doc/source/cn/guide/tools/index.md b/doc/source/cn/guide/tools/index.md new file mode 100644 index 0000000..a9c5a26 --- /dev/null +++ b/doc/source/cn/guide/tools/index.md @@ -0,0 +1,11 @@ +--- +title: å¨è¾¹å·¥å · +type: guide +order: 4 +version: 2.1 +--- + +# å¨è¾¹å·¥å · + +- [Devtools](./devtools.html) +- [Weexpack](./weexpack.html) \ No newline at end of file http://git-wip-us.apache.org/repos/asf/incubator-weex/blob/9dd6bdd4/doc/source/cn/guide/tools/weexpack.md ---------------------------------------------------------------------- diff --git a/doc/source/cn/guide/tools/weexpack.md b/doc/source/cn/guide/tools/weexpack.md new file mode 100644 index 0000000..ac64dd7 --- /dev/null +++ b/doc/source/cn/guide/tools/weexpack.md @@ -0,0 +1,388 @@ +--- +title: ä½¿ç¨ Weexpack +type: guide +order: 4.2 +version: 2.1 +--- + +# ä½¿ç¨ Weexpack + +## weexpack ä»ç» + +weexpack æ¯ weex æ°ä¸ä»£çå·¥ç¨å¼åå¥ä»¶ï¼æ¯åºäº weex å¿«éæ建åºç¨ååçå©å¨ãå®è½å¤å¸®å©å¼åè éè¿å½ä»¤è¡å建 Weex å·¥ç¨ï¼æ·»å ç¸åºå¹³å°ç Weex app 模çï¼å¹¶åºäºæ¨¡çä»æ¬å°ãGitHub æè Weex åºç¨å¸åºå®è£ æ件ï¼å¿«éæå Weex åºç¨å¹¶å®è£ å°ææºè¿è¡ï¼å¯¹äºå ·æå享精ç¥çå¼åè èè¨è¿è½å¤å建 Weex æ件模ç并åå¸æä»¶å° Weex åºç¨å¸åºã + +**注æï¼** weexpack ç®åæä¸æ¯ææ建 Vue 2.0 çæ¬ç Weexã + +weexpack ææä¾çå½ä»¤å¤§è´å¯å为ä¸ç»ï¼åå«æ¯ï¼ + +* æå å½ä»¤ + * **weexpack create** â å建 Weex å·¥ç¨é¡¹ç®ã + * **weexpack platform add/remove** â å®è£ ï¼ç§»é¤ Weex åºç¨æ¨¡çï¼é»è®¤æ¨¡çæ¯æ Weex bundle è°è¯åæ件æºå¶ã + * **weexpack platform list** â æ¥çå·²å®è£ çå¹³å°æ¨¡çåçæ¬ã + * **weexpack platform run** - æå åºç¨å¹¶å®è£ å°è®¾å¤è¿è¡ã + + +* æ件使ç¨è å½ä»¤ + * **weexpack plugin add/remove** â å®è£ ï¼ç§»é¤ Weex æ件ï¼æ¯æä»æ¬å°ãGitHub æè Weex åºç¨å¸åºå®è£ æ件ã + + * **weexpack plugin list** â æ¥çå·²å®è£ çæ件åçæ¬ã + + +* æ件å¼åè å½ä»¤ + + * **weexpack plugin create** - çæ Weex æ件模çï¼ä¸»è¦æ¯é ç½®æ件åå¿ éçç®å½ã + * **weexpack plugin publish** - åå¸æä»¶å° Weex æ件å¸åºã + + +## å®è£ + +### ç¯å¢è¦æ± + + - ç®åæ¯æ Macãwindowsãlinux å¹³å° ( windows ä¸ä» è½æå android )ã + - é ç½® [Node.js][1] ç¯å¢ï¼å¹¶ä¸å®è£ [npm][2] å 管çå¨ (`éè¦ node6.0+`)ã + - å¦æè¦æ¯æ iOS å¹³å°åéè¦é ç½® iOS å¼åç¯å¢ï¼ + - å®è£ [Xcode IDE][3] ï¼å¯å¨ä¸æ¬¡ Xcode ï¼ä½¿ Xcode èªå¨å®è£ å¼åè å·¥å ·å确认使ç¨åè®®ã + - å®è£ cocoaPodsã + - å¦æè¦æ¯æ Android å¹³å°åéè¦é ç½® Android å¼åç¯å¢ï¼ + - å®è£ [Android Studio][4]ï¼æ¨èï¼æè [Android SDK][7]ãæå¼ [AVD Manager][5] ï¼æ°å»º Android 模æå¨å¹¶å¯å¨ï¼å¦ææå®è£ [Docker][6] ï¼è¯·å ³é Docker Server ï¼ã + - ä¿è¯ Android build-tool ççæ¬ä¸º 23.0.2ã + +#### å®è£ å½ä»¤ + +é¦å ï¼å ¨å±å®è£ weex-pack å½ä»¤ï¼ + +```bash +$ npm install -g weexpack +``` + +æè å¨ clone ç weexpack æ ¹ç®å½ä¸æ§è¡ + +```bash +$ npm install +``` + +## æå åæä»¶ä½¿ç¨ + +æå 主è¦è¿ç¨å¦ä¸å¾æ示ï¼å ¶ä¸æ件æä½æ¯æå è¿ç¨çå¯é项ï¼ä¸æ¯å¿ é¡»çã + +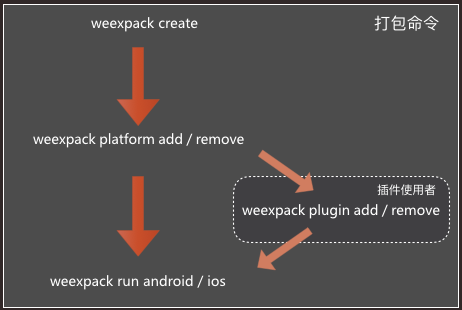 + +### 详ç»æ¥éª¤ + +#### 1. å建 weexpack å·¥ç¨ + +```bash +$ weexpack create appName +``` + +çæå·¥ç¨çç®å½å¦ä¸ï¼ + +``` +WeexProject +âââ README.md +âââ android.config.json +âââ config.xml +âââ hooks +â  âââ README.md +âââ ios.config.json +âââ package.json +âââ platforms // å¹³å°æ¨¡çç®å½ +âââ plugins // æ件ä¸è½½ç®å½ +â  âââ README.md +âââ src // ä¸å¡ä»£ç ï¼weæ件ï¼ç®å½ +â  âââ index.we +âââ start +âââ start.bat +âââ tools +â  âââ webpack.config.plugin.js +âââ web +â  âââ index.html +â  âââ index.js +â  âââ js +â  âââ init.js +âââ webpack.config.js +``` + +éè¿ create å½ä»¤å建çå·¥ç¨é»è®¤ä¸å å« iOS å Android å·¥ç¨æ¨¡çï¼å建å®æä¹åå°±å¯ä»¥åæ¢å° appName ç®å½ä¸å¹¶å®è£ ä¾èµã + +```bash +$ cd appName && npm install +``` + +#### 2. å®è£ Weex åºç¨æ¨¡ç + +æ·»å åºç¨æ¨¡çï¼å®æ¹æä¾ç模çé»è®¤æ¯æ Weex bundle è°è¯åæ件æºå¶ï¼æ³¨æ模çå称å为å°åï¼æ¨¡ç被å®è£ å° platforms ç®å½ä¸ã + +* android 模ç + + ```bash + $ weexpack platform add android + ``` + +* iOS 模ç + + ```bash + $ weexpack platform add ios + ``` + +android å¹³å°ï¼å®è£ å platforms ç®å½å¦ä¸ + +``` +platforms +âââ android + âââ LICENSE + âââ NOTICE + âââ README.md + âââ app + â  âââ build + â  âââ build.gradle + â  âââ proguard-rules.pro + â  âââ src + âââ appframework + â  âââ build + â  âââ build.gradle + â  âââ proguard-rules.pro + â  âââ src + âââ build + â  âââ generated + âââ build.gradle + âââ codeStyleSettings.xml + âââ gradle + â  âââ wrapper + âââ gradle.properties + âââ gradlew + âââ gradlew.bat + âââ settings.gradle + âââ weexplugin + âââ build.gradle + âââ proguard-rules.pro + âââ src + +``` + +ioså¹³å°ï¼å®è£ å platforms ç®å½å¦ä¸ + +``` +platforms +  âââ ios +  âââ LICENSE +  âââ Podfile +  âââ README.md +  âââ WeexDemo +  â  âââ AppDelegate.h +  â  âââ AppDelegate.m +  â  âââ Assets.xcassets +  â  âââ DemoDefine.h +  â  âââ Images.xcassets +  â  âââ WeexConfig +  â  âââ WeexDemo-Info.plist +  â  âââ WeexScanner +  â  âââ config.xml +  â  âââ main.m +  â  âââ weex-icon.png +  âââ WeexDemo.xcodeproj +  â  âââ project.pbxproj +  â  âââ project.xcworkspace +  â  âââ xcshareddata +  â  âââ xcuserdata +  âââ WeexDemo.xcworkspace +  â  âââ contents.xcworkspacedata +  â  âââ xcshareddata +  â  âââ xcuserdata +  âââ WeexDemoTests +  â  âââ Info.plist +  â  âââ WeexDemoTests.m +  âââ WeexUITestDemo-Info.plist +  âââ WeexUITestDemoUITests +  â  âââ Info.plist +  â  âââ WeexUITestDemoUITests.m +  âââ Weexplugin +  â  âââ Podfile +  â  âââ Weexplugin +  â  âââ Weexplugin.podspec +  â  âââ Weexplugin.xcodeproj +  â  âââ WeexpluginTests +  âââ bundlejs + + ``` + +对äºå·²å®è£ ç模çå¯ä»¥ä½¿ç¨ weexpack platform list å½ä»¤æ¥çã + +* æ¥çå·²å®è£ 模ç + + ```bash + $ weexpack platform list + ``` + + 示ä¾ç»æï¼ + + ``` + Installed platforms: + android + Available platforms: + android ^6.2.1 + ``` + +å¦ææ³è¦å é¤æ个ä¸éè¦çå¹³å°å¯ä»¥ä½¿ç¨ weexpack platform remove 移é¤ï¼æ¯å¦ Windows å¹³å°ç¨æ·æ¯ä¸éè¦ iOS 模ççï¼å¯ç¨å¦ä¸å½ä»¤ç§»é¤ã + + +* 移é¤ç¸åºå¹³å°æ¨¡ç + + ```bash + $ weexpack platform remove ios + ``` + +#### 3. å®è£ Weex æ件ï¼å¯éé¡¹ï¼ + +æ·»å æ³è¦ä½¿ç¨çæ件ï¼æ¯æä»æ¬å°æè Weex åºç¨å¸åºå®è£ æ件ã + +* ä»æ¬å°æ·»å æ件ï¼å¨å¼åæ件æ¶ä¼ç»å¸¸ç¨å° + + ```bash + $ weexpack plugin add path/to/plugin + ``` + +* ä»æ件å¸åºæ·»å æ件ï¼ä¾å¦ weex-chartã + + ```bash + $ weexpack plugin add weex-chart + ``` + +模çç weexplugin æ¯æ件å®è£ çç®æ å·¥ç¨ã以 Android 为ä¾ï¼å ¶ç®å½å¦ä¸ï¼ + +``` +weexplugin +âââ build.gradle // æ件ç¼è¯èæ¬ï¼å·¥å ·èªå¨ç»´æ¤ +âââ libs +âââ proguard-rules.pro +âââ src +â âââ main +â âââ AndroidManifest.xml // æ件android manifesté ç½®æ件 +â âââ java +â â âââ // æ件srcå®è£ ç®å½ +â â âââ com +â â âââ alibaba +â â âââ weex +â â âââ plugin +â â âââ ConfigXmlParser.java // é ç½®æ件解æå¨ +â â âââ PluginConfig.java // å¤é¨æ¥å£ +â â âââ PluginEntry.java // æ件æè¿° +â â âââ PluginManager.java // æ件管çå¨ +â âââ res // æ件èµæºå®è£ ç®å½ +â âââ drawable +â âââ values +â â âââ strings.xml +â âââ xml +â âââ config.xml // æ件é ç½®æ件ï¼PluginManager 解æé ç½®æ件å è½½æ件 +``` + +对äºå·²å®è£ çæ件å¯ä»¥ä½¿ç¨ weexpack plugin list å½ä»¤æ¥çã + +* æ¥çå·²å®è£ æ件 + + ```bash + $ weexpack plugin list + ``` + +å¦ææ³è¦å é¤æ个ä¸éè¦çæ件å¯ä»¥ä½¿ç¨ weexpack plugin remove 移é¤ï¼æ¯å¦ weex-chart + +* 移é¤æ件ï¼ä¾å¦ weex-chart + + ```bash + $ weexpack plugin remove weex-chart + ``` + + + +#### 4. æå åºç¨å¹¶å®è£ è¿è¡ + +å®æ以ä¸æ¥éª¤å¹¶ Weex 代ç æ¾å¨ src ç®å½ä¸ï¼å°±å¯ä»¥æå è¿è¡äºï¼æå è¿ç¨ä¸å¯è½è¦ä¸è½½ä¾èµåç¼è¯å·¥å ·ï¼è¿ä¼æ¯ä¸ªè¾ä¸ºèæ¶çè¿ç¨ï¼å®è£ è¿è¡éè¦æå¼æ¨¡æå¨æè è¿æ¥è®¾å¤ã + +* æå è¿è¡ android åºç¨ + + ```bash + $ weexpack run android + ``` + + ä½ å¯ä»¥æ´æ¹é¡¹ç®ç®å½ä¸ç android.config.json + * AppName: åºç¨å + * AppId: application_id å å + * SplashText: 欢è¿é¡µä¸é¢çæå + * WeexBundle: æå®ç Weex bundle æ件ï¼æ¯ææ件åå url çå½¢å¼ï¼ + + æ件åå以æ¬å°æ件çæ¹å¼å è½½ bundle, url å以è¿ç¨çæ¹å¼å è½½ bundle + å¦æ以æ¬å°æ¹å¼æå® bundle, `.we` æ件请æ¾å° src ç®å½ã + +* æå è¿è¡ iOS åºç¨ + * 模æå¨è¿è¡ + + ```bash + $ weexpack run ios + ``` + + * æ建 ipa å + + ```bash + $ weexpack build ios + ``` + + æ建å çè¿ç¨ä¸ï¼å°ä¼æ示让æ¨è¾å ¥ `CodeSignï¼è¯ä¹¦ï¼`ï¼`Profile(provisioning profile)`,`AppId`ï¼åªæè¾å ¥çå®çè¿äºä¿¡æ¯æè½æåæå ã + å ¶ä½å¦ AppName , åå ¥å£ Weex bundle æ件å¯ä»¥ç¼è¾é¡¹ç®ç®å½ä¸ç ios.config.json é ç½®ã + æå®å æåä¹åï¼å¯ä»¥å¨ `/playground/build/ipa_build/` ç®å½ä¸è·å ipa æ件 + + **注ï¼è¯ä¹¦éè¦é¢å å®è£ å° keychain ä¸ï¼å¨ keychain ä¸ç¹å»å³é®è·åè¯ä¹¦ `id`ï¼è¯ä¹¦å称ï¼ï¼`provisioning profile` æ件ï¼*mobileprovisionï¼éè¦è·å UUIDï¼è¿å ¥[ç®å½](https://github.com/weexteam/weex-pack/tree/dev/generator/platforms/templates) å¯ä»¥çå° `mobileprovision_UUID.sh` æ件ï¼æ¤æ件å¯ä»¥è·åå° UUID** + + `mobileprovision_UUID.sh` ç¨æ³å¦ä¸ï¼ + + ```bash + $ ./mobileprovision_UUID.sh  \*mobileprovision + ``` + + åæ°ï¼\*mobileprovisionï¼ä¸º `provisioning profile` æä»¶è·¯å¾ + +* æå Web å¹³å°ï¼ + + ```bash + $ weexpack build web + ``` + + è¿æ ·ä½ å¯ä»¥ææå åçèµæºä¸ä¼ å° CDN æå¡å¨ï¼ç¶åä¸çº¿ä½ ç Web 项ç®ã + +* å¨ Web å¹³å°è¿è¡ï¼ + + ```bash + $ weexpack run web + ``` + +#### 5.ç°æåºç¨éææ件 ââ ç»ä»¶å®¹å¨ + +* ç»ä»¶å®¹å¨ä½ç¨ + +  æ件å¯ä»¥éè¿ç»ä»¶å®¹å¨çæ¹å¼éæå°å®¢æ·ç«¯ï¼appï¼ï¼ç»ä»¶å®¹å¨å¯ä»¥æ¹ä¾¿çæäºè¿å¶å ï¼ç°æåºç¨å¯ä»¥éè¿åç§å½¢å¼æäºè¿å¶å ææºç éæè¿å»ï¼æ¯å¦ iOS å¯ä»¥éè¿ pod ä¾èµ  çå½¢å¼çãå¨ weexpack å建çæ ¹ç®å½ä¸ï¼è¿è¡ weexpack plugin add/remove å½ä»¤ç´æ¥å®è£ /å é¤ Weex plugin å°ç»ä»¶å®¹å¨ä¸ã + +* ç»ä»¶å®¹å¨è·å + * æ¹å¼1ï¼éè¿ç¬¬äºæ¥<sup>[[link](#weex-plugin)]</sup>çæç Android/iOS ç®å½ä¸å å« Weexplugin ç®å½ï¼æ¤ç®å½æ¯ç»ä»¶å®¹å¨ + * æ¹å¼2ï¼éè¿ repo å°å clone 代ç [iOSå°å](https://github.com/weexteam/weexpluginContainer-iOS) [Android å°å](https://github.com/weexteam/weexplugin-android) + +## æ件åå¸ + +对äºæ件å¼åè æ¥è¯´ï¼ä¹æä¸ç»ç¨äºå建ååå¸æ件çå½ä»¤ï¼[åå¾](./README_plugin.md) æ¥ç详ç»ææ¡£ + +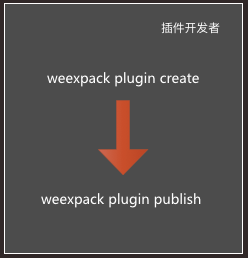 + +## æ件å¼åææ¡£ + ++ [å¼å web çæ件æç¨](./doc/plugin-devloping-web.md) + + +## ç¤ºä¾ +[ä½¿ç¨ Weexpack æå åºä¸ä¸ª Weex çç ãOne Appã](https://github.com/weexteam/weex-pack/wiki/Create-Weex-One-App-with-Weexpack) + +[1]: https://nodejs.org/ +[2]: https://www.npmjs.com/ +[3]: https://itunes.apple.com/us/app/xcode/id497799835?mt=12 +[4]: https://developer.android.com/studio/install.html +[5]: https://developer.android.com/studio/run/managing-avds.html +[6]: https://www.docker.com/ +[7]: https://developer.android.com/studio/releases/sdk-tools.html +[8]: https://developer.android.com/studio/run/managing-avds.html http://git-wip-us.apache.org/repos/asf/incubator-weex/blob/9dd6bdd4/doc/source/cn/references/common-style.md ---------------------------------------------------------------------- diff --git a/doc/source/cn/references/common-style.md b/doc/source/cn/references/common-style.md index 033a45c..4c12380 100644 --- a/doc/source/cn/references/common-style.md +++ b/doc/source/cn/references/common-style.md @@ -91,15 +91,16 @@ Weex 对äºé¿åº¦å¼ç®ååªæ¯æ*åç´ *å¼ï¼ä¸æ¯æç¸å¯¹åä½ï¼`em`ã ### 注æï¼ + Weex ç模åç `box-sizing` é»è®¤ä¸º `border-box`ï¼å³çåç宽é«å å«å 容ãå è¾¹è·åè¾¹æ¡ç宽度ï¼ä¸å å«å¤è¾¹è·ç宽度ã -ç®åå¨ `<image>` ç»ä»¶ä¸å°æ æ³åªå®ä¹ä¸ä¸ªæå 个è§ç `border-radius`ãæ¯å¦ä½ æ æ³å¨è¿ä¸¤ä¸ªç»ä»¶ä¸ä½¿ç¨ `border-top-left-radius`ã该约æåªå¯¹iOSçæï¼Android并ä¸åæ¤éå¶ã +ç®åå¨ `<image>` ç»ä»¶ä¸å°æ æ³åªå®ä¹ä¸ä¸ªæå 个è§ç `border-radius`ãæ¯å¦ä½ æ æ³å¨è¿ä¸¤ä¸ªç»ä»¶ä¸ä½¿ç¨ `border-top-left-radius`ã该约æåªå¯¹ iOS çæï¼Android 并ä¸åæ¤éå¶ã -尽管 `overflow:hidden` å¨androidä¸æ¯é»è®¤è¡ä¸ºï¼ä½åªæä¸åæ¡ä»¶é½æ»¡è¶³æ¶ï¼ä¸ä¸ªç¶viewæä¼å»clipå®çåviewãè¿ä¸ªéå¶åªå¯¹Androidçæï¼iOSä¸åå½±åã +尽管 `overflow:hidden` å¨ Android ä¸æ¯é»è®¤è¡ä¸ºï¼ä½åªæä¸åæ¡ä»¶é½æ»¡è¶³æ¶ï¼ä¸ä¸ªç¶ view æä¼å» clip å®çå viewãè¿ä¸ªéå¶åªå¯¹ Android çæï¼iOS ä¸åå½±åã * ç¶viewæ¯`div`, `a`, `cell`, `refresh` æ `loading`ã -* ç³»ç»çæ¬æ¯Android 4.3ææ´é«ã -* ç³»ç»çæ¬ä¸æ¯Andorid 7.0ã -* ç¶view没æ`background-image`å±æ§æç³»ç»çæ¬æ¯Android 5.0ææ´é«ã +* ç³»ç»çæ¬æ¯ Android 4.3 ææ´é«ã +* ç³»ç»çæ¬ä¸æ¯ Andorid 7.0ã +* ç¶ view 没æ `background-image` å±æ§æç³»ç»çæ¬æ¯ Android 5.0 ææ´é«ã ### 示ä¾ï¼ http://git-wip-us.apache.org/repos/asf/incubator-weex/blob/9dd6bdd4/doc/source/cn/references/components/scroller.md ---------------------------------------------------------------------- diff --git a/doc/source/cn/references/components/scroller.md b/doc/source/cn/references/components/scroller.md index 694ce87..297f712 100644 --- a/doc/source/cn/references/components/scroller.md +++ b/doc/source/cn/references/components/scroller.md @@ -33,10 +33,10 @@ version: 2.1 - `show-scrollbar {boolean}`ï¼å¯éå¼ä¸º `true`/ `false`ï¼é»è®¤å¼ä¸º `true`ãæ§å¶æ¯å¦åºç°æ»å¨æ¡ã - `scroll-direction {string}`ï¼å¯é为 `horizontal` æè `vertical`ï¼é»è®¤å¼ä¸º `vertical` ãå®ä¹æ»å¨çæ¹åã - - `scroll-direction`å®ä¹äºscrollerçæ»å¨æ¹åï¼`flex-direction`å®ä¹äºscrollerçå¸å±æ¹åï¼ä¸¤ä¸ªæ¹åå¿ é¡»ä¸è´ã - - `scroll-direction`çé»è®¤å¼æ¯`vertical`,`flex-direction`çé»è®¤å¼æ¯`row`ã - - å½éè¦ä¸ä¸ªæ°´å¹³æ¹åçscrolleræ¶ï¼ä½¿ç¨`scroll-direction:horizontal`å`flex-direction: row`ã - - å½éè¦ä¸ä¸ªç«ç´æ¹åçscrolleræ¶ï¼ä½¿ç¨`scroll-direction:vertical`å`flex-direction: column`ãç±äºè¿ä¸¤ä¸ªå¼åæ¯é»è®¤å¼ï¼å½éè¦ä¸ä¸ªç«ç´æ¹åçscrolleræ¶ï¼è¿ä¸¤ä¸ªå¼å¯ä»¥ä¸è®¾ç½®ã + - `scroll-direction`å®ä¹äº scroller çæ»å¨æ¹åï¼`flex-direction` å®ä¹äº scroller çå¸å±æ¹åï¼ä¸¤ä¸ªæ¹åå¿ é¡»ä¸è´ã + - `scroll-direction` çé»è®¤å¼æ¯ `vertical`, `flex-direction` çé»è®¤å¼æ¯ `row`ã + - å½éè¦ä¸ä¸ªæ°´å¹³æ¹åç scroller æ¶ï¼ä½¿ç¨ `scroll-direction:horizontal` å `flex-direction: row`ã + - å½éè¦ä¸ä¸ªç«ç´æ¹åç scroller æ¶ï¼ä½¿ç¨ `scroll-direction:vertical` å `flex-direction: column`ãç±äºè¿ä¸¤ä¸ªå¼åæ¯é»è®¤å¼ï¼å½éè¦ä¸ä¸ªç«ç´æ¹åç scroller æ¶ï¼è¿ä¸¤ä¸ªå¼å¯ä»¥ä¸è®¾ç½®ã - `loadmoreoffset {number}`ï¼é»è®¤å¼ä¸º 0ï¼è§¦å `loadmore` äºä»¶æéè¦çåç´å移è·ç¦»ï¼è®¾å¤å±å¹åºé¨ä¸é¡µé¢åºé¨ä¹é´çè·ç¦»ï¼ãå½é¡µé¢çæ»å¨æ¡æ»å¨å°è¶³å¤æ¥è¿é¡µé¢åºé¨æ¶å°ä¼è§¦å `loadmore` è¿ä¸ªäºä»¶ã  http://git-wip-us.apache.org/repos/asf/incubator-weex/blob/9dd6bdd4/doc/source/guide/dev-with-weexpack.md ---------------------------------------------------------------------- diff --git a/doc/source/guide/dev-with-weexpack.md b/doc/source/guide/dev-with-weexpack.md deleted file mode 100644 index 9dd9b42..0000000 --- a/doc/source/guide/dev-with-weexpack.md +++ /dev/null @@ -1,12 +0,0 @@ ---- -title: Build A New App -type: guide -order: 2 -version: 2.1 -has_chapter_content: true ---- - -# Build a New App - - -Work in progress. \ No newline at end of file http://git-wip-us.apache.org/repos/asf/incubator-weex/blob/9dd6bdd4/doc/source/guide/index.md ---------------------------------------------------------------------- diff --git a/doc/source/guide/index.md b/doc/source/guide/index.md index 6c11d54..c43176a 100644 --- a/doc/source/guide/index.md +++ b/doc/source/guide/index.md @@ -56,55 +56,3 @@ As shown in the following codeï¼ It's too easyï¼right? Let's focus on the syntax, obviously this is vue. You can try to modify the Hello World, then generate a new QR code to scan. - -## Set up development environment - -Use dotWe is a good choice, But if you want to develop locally on your own machine, you will set up your development environment. - -You will need Node.js and the Weex CLi. - -You can installing Node using [nvm](https://github.com/creationix/nvm) (Simple bash script to manage multiple active node.js versions). Run the following commands in a Terminal after installing nvm: - -```bash -$ nvm install 6.10.0 -$ nvm use 6.10.0 -``` - -Node.js comes with npm, which lets you install the Weex Cli. - -Run the following command in a Terminal: - -```bash -$ npm install -g weex-toolkit@beta -``` - -**NOTE: ** If you get an error like "permission error", try installing with `sudo`. - - -Then you can use the weex command to verify that the installation is successful: - - - -### Generate a new Weex project - -You can use CLi to generate a Weex project called "awesome-project". Run the following command in a Terminal: - -```bash -$ weex init awesome-project -``` - -Then we enter the awesome-project folder, the CLi has been for us to generate a standard project structure. - -### Usage - -We enter the awesome-project folder and install dependencies with the following commands: - -```bash -npm install -``` - -Then we run `npm run dev` and `npm run serve` to start watch mode and static server. - -Finally, we can see the Weex page in `http://localhost:8080/index.html`. - -If you're curious to learn more about technical details, continue on to the next. And don't forget to write code at [dotWe](https://dotwe.org) and preview at anytime. http://git-wip-us.apache.org/repos/asf/incubator-weex/blob/9dd6bdd4/doc/source/guide/intro/app-architecture.md ---------------------------------------------------------------------- diff --git a/doc/source/guide/intro/app-architecture.md b/doc/source/guide/intro/app-architecture.md index d7b3bc6..5dd1e1f 100644 --- a/doc/source/guide/intro/app-architecture.md +++ b/doc/source/guide/intro/app-architecture.md @@ -1,7 +1,7 @@ --- title: Mobile App Architecture type: guide -order: 4.5 +order: 5.5 version: 2.1 --- http://git-wip-us.apache.org/repos/asf/incubator-weex/blob/9dd6bdd4/doc/source/guide/intro/devtools.md ---------------------------------------------------------------------- diff --git a/doc/source/guide/intro/devtools.md b/doc/source/guide/intro/devtools.md index 3104e02..f9b32b4 100644 --- a/doc/source/guide/intro/devtools.md +++ b/doc/source/guide/intro/devtools.md @@ -1,7 +1,7 @@ --- title: Using Devtools type: guide -order: 4.7 +order: 5.7 version: 2.1 --- http://git-wip-us.apache.org/repos/asf/incubator-weex/blob/9dd6bdd4/doc/source/guide/intro/how-it-works.md ---------------------------------------------------------------------- diff --git a/doc/source/guide/intro/how-it-works.md b/doc/source/guide/intro/how-it-works.md index f67f8b4..e66ead8 100644 --- a/doc/source/guide/intro/how-it-works.md +++ b/doc/source/guide/intro/how-it-works.md @@ -1,7 +1,7 @@ --- title: How it works type: guide -order: 4.1 +order: 5.1 has_chapter_content: false chapter_title: Intro version: 2.1 http://git-wip-us.apache.org/repos/asf/incubator-weex/blob/9dd6bdd4/doc/source/guide/intro/index.md ---------------------------------------------------------------------- diff --git a/doc/source/guide/intro/index.md b/doc/source/guide/intro/index.md index 24c8236..54117fc 100644 --- a/doc/source/guide/intro/index.md +++ b/doc/source/guide/intro/index.md @@ -1,7 +1,7 @@ --- title: Intro type: guide -order: 4 +order: 5 has_chapter_content: false chapter_title: Intro version: 2.1 http://git-wip-us.apache.org/repos/asf/incubator-weex/blob/9dd6bdd4/doc/source/guide/intro/page-architecture.md ---------------------------------------------------------------------- diff --git a/doc/source/guide/intro/page-architecture.md b/doc/source/guide/intro/page-architecture.md index a9d8014..77085f9 100644 --- a/doc/source/guide/intro/page-architecture.md +++ b/doc/source/guide/intro/page-architecture.md @@ -1,7 +1,7 @@ --- title: Weex Page Architecture type: guide -order: 4.6 +order: 5.6 version: 2.1 --- http://git-wip-us.apache.org/repos/asf/incubator-weex/blob/9dd6bdd4/doc/source/guide/intro/using-vue.md ---------------------------------------------------------------------- diff --git a/doc/source/guide/intro/using-vue.md b/doc/source/guide/intro/using-vue.md index 9d981ee..0f08498 100644 --- a/doc/source/guide/intro/using-vue.md +++ b/doc/source/guide/intro/using-vue.md @@ -1,7 +1,7 @@ --- title: Using Vue type: guide -order: 4.3 +order: 5.3 version: 2.1 --- http://git-wip-us.apache.org/repos/asf/incubator-weex/blob/9dd6bdd4/doc/source/guide/intro/web-dev-experience.md ---------------------------------------------------------------------- diff --git a/doc/source/guide/intro/web-dev-experience.md b/doc/source/guide/intro/web-dev-experience.md index 81d0ff2..c24c8cc 100644 --- a/doc/source/guide/intro/web-dev-experience.md +++ b/doc/source/guide/intro/web-dev-experience.md @@ -1,7 +1,7 @@ --- title: Web Dev Experience type: guide -order: 4.2 +order: 5.2 version: 2.1 --- http://git-wip-us.apache.org/repos/asf/incubator-weex/blob/9dd6bdd4/doc/source/guide/intro/write-once.md ---------------------------------------------------------------------- diff --git a/doc/source/guide/intro/write-once.md b/doc/source/guide/intro/write-once.md index 382b7b4..9507d21 100644 --- a/doc/source/guide/intro/write-once.md +++ b/doc/source/guide/intro/write-once.md @@ -1,7 +1,7 @@ --- title: Write once, Run Everywhere type: guide -order: 4.4 +order: 5.4 version: 2.1 --- http://git-wip-us.apache.org/repos/asf/incubator-weex/blob/9dd6bdd4/doc/source/guide/set-up-env.md ---------------------------------------------------------------------- diff --git a/doc/source/guide/set-up-env.md b/doc/source/guide/set-up-env.md new file mode 100644 index 0000000..338502b --- /dev/null +++ b/doc/source/guide/set-up-env.md @@ -0,0 +1,93 @@ +--- +title: Set Up Development Environment +type: guide +order: 2 +version: 2.1 +has_chapter_content: true +--- + +# Set up development environment + +Use dotWe is a good choice, But if you want to develop locally on your own machine, you will set up your development environment. + +You will need Node.js and the Weex CLi. + +You can installing Node using [nvm](https://github.com/creationix/nvm) (Simple bash script to manage multiple active node.js versions). Run the following commands in a Terminal after installing nvm: + +```bash +$ nvm install 6.10.0 +$ nvm use 6.10.0 +``` + +Node.js comes with npm, which lets you install the Weex Cli. + +Run the following command in a Terminal: + +```bash +$ npm install -g weex-toolkit +$ weex -v + +v1.0.3 +weex-builder : v0.2.4 +weex-previewer : v1.3.4 +``` + +**NOTE: ** If you get an error like "permission error", try installing with `sudo`. + + +Then you can use the weex command to verify that the installation is successful: + + + +### Generate a new Weex project + +You can use CLi to generate a Weex project called "awesome-project". Run the following command in a Terminal: + +```bash +$ weex init awesome-project +``` + +Then we enter the awesome-project folder, the CLi has been for us to generate a standard project structure. + +### Usage + +We enter the awesome-project folder and install dependencies with the following commands: + +```bash +npm install +``` + +Then we run `npm run dev` and `npm run serve` to start watch mode and static server. + +Finally, we can see the Weex page in `http://localhost:8080/index.html`. + +You can modify this page in `src/foo.vue`. The code is shown below: + +```html +<template> + <div class="wrapper"> + <text class="weex">Hello Weex !</text> + <text class="vue">Hello Vue !</text> + </div> +</template> + +<style scoped> + .wrapper { + flex-direction: column; + justify-content: center; + } + .weex { + font-size: 60px; + text-align: center; + color: #1B90F7; + } + .vue { + font-size: 60px; + text-align: center; + margin-top: 30px; + color: #41B883; + } +</style> +``` + +If you're curious to learn more about technical details, continue on to the next. And don't forget to write code at [dotWe](https://dotwe.org) and preview at anytime. http://git-wip-us.apache.org/repos/asf/incubator-weex/blob/9dd6bdd4/doc/source/guide/tools/devtools.md ---------------------------------------------------------------------- diff --git a/doc/source/guide/tools/devtools.md b/doc/source/guide/tools/devtools.md new file mode 100644 index 0000000..9fd9de3 --- /dev/null +++ b/doc/source/guide/tools/devtools.md @@ -0,0 +1,100 @@ +--- +title: Using Devtools +type: guide +order: 4.1 +version: 2.1 +--- + +# Devtools + +Weex devtools is a custom devtools for weex that implements [Chrome Debugging Protocol](https://developer.chrome.com/devtools/docs/debugger-protocol), it is designed to help you quickly inspect your app and debug your JS bundle source in a chrome web page, both Android and IOS platform are supported. + +## Install + +``` + $ npm install -g weex-toolkit +``` +#### usage +``` +weex debug [options] [we_file|bundles_dir] + + Options: + + -h, --help output usage information + -V, --verbose display logs of debugger server + -v, --version display version + -p, --port [port] set debugger server port + -e, --entry [entry] set the entry bundlejs path when you specific the bundle server root path + -m, --mode [mode] set build mode [transformer|loader] + -w, --watch watch we file changes auto build them and refresh debugger page![default enabled] +``` + +#### start debugger +``` +$weex debug +``` +this command will start debug server and launch a chrome opening `DeviceList` page. +this page will display a qrcode ,you can use `Playground App` scan it for starting debug. + +#### start debugger with a we file +``` +$weex debug your_weex.we +``` +this command will compile `your_weex.we` to `your_weex.js` and start the debug server as upon command. +`your_weex.js` will deploy on the server and displayed in `DeviceList` page as another qrcode contain the url of your_weex.js + + +#### start debugger with a directory of we files +``` +$weex debug your/we/path -e index.we +``` +this command will build every file in your/we/path and deploy them on the bundle server. your directory will mapping to http://localhost:port/weex/ +use -e to set the entry of these bundles. and the url of "index.we" will display on device list page as another qrcode. + +## Features + +### Connect devices + devices") + +### Inspector + Inspector can be used to show your `Element` \ `Network` \ `Console log` \ `ScreenCast` \ `BoxModel` \ `Native View` and so on. + + + +#### Element +##### native view element + + +##### weex dom element + + +#### Network + +##### show the total time and latency + + +##### show the header and response + + +#### Console + + +#### Resource + + +### Debugger + + Debugger can be used to debug your bundle js source, you can set `Breakpoint` \ watch `CallStack`. + + + +#### Breakpoint and CallStack + + + +## Integrate devtools + +* Android + * See the doc [Weex devtools (Android)](../../references/advanced/integrate-devtool-to-android.html), it will lead you to config and use it step by step. +* IOS + * See the doc [Weex devtools (iOS)](../../references/advanced/integrate-devtool-to-ios.html), it will lead you to config and use it step by step. \ No newline at end of file http://git-wip-us.apache.org/repos/asf/incubator-weex/blob/9dd6bdd4/doc/source/guide/tools/index.md ---------------------------------------------------------------------- diff --git a/doc/source/guide/tools/index.md b/doc/source/guide/tools/index.md new file mode 100644 index 0000000..8a2de8e --- /dev/null +++ b/doc/source/guide/tools/index.md @@ -0,0 +1,11 @@ +--- +title: Tools +type: guide +order: 4 +version: 2.1 +--- + +# Tools + +- [Devtools](./devtools.html) +- [Weexpack](./weexpack.html) \ No newline at end of file http://git-wip-us.apache.org/repos/asf/incubator-weex/blob/9dd6bdd4/doc/source/guide/tools/weexpack.md ---------------------------------------------------------------------- diff --git a/doc/source/guide/tools/weexpack.md b/doc/source/guide/tools/weexpack.md new file mode 100644 index 0000000..699431f --- /dev/null +++ b/doc/source/guide/tools/weexpack.md @@ -0,0 +1,298 @@ +--- +title: Using Weexpack +type: guide +order: 4.2 +version: 2.1 +--- + +# Using Weexpack + +## Weexpack introduction + +Weexpack is our next generation of engineering development kits, it helps to setup wWex application from scratch quickly. With simple commands, developers could create a Weex project, add different platform template, could install plugins from local, GitHub or Weex market, could pack up his application project and run on mobile. For those who would like to share his own plugins, he could publish them to the Weex market. + +weexpack commands can be grouped to three parts: +* application package + * **weexpack create** â create Weex project. + * **weexpack platform add/remove** â addï¼remove Weex platform templateï¼it support plugins and Weex bundle debugging by default. + * **weexpack platform list** â query installed platforms and its version. + * **weexpack platform run** - pack/build/run application. + +* plugin usuage + * **weexpack plugin add/remove** â add/remove Weex plugin, support to install from local, Github or market. + * **weexpack plugin list** â query installed plugins and its version. + +* plugin development + * **weexpack plugin create** - create plugin template with necessary config file and directory. + * **weexpack plugin publish** - publish plugin to market. + + +## Installation +### pre-environmental requirements + +- Supported on Mac linux windows. +- Configure the [Node.js] [1] environment and install the [npm] [2] package manager.(need node 6.0+) +- Configure iOS development environment: + - Install [Xcode IDE] [3] to launch Xcode once so that Xcode automatically installs the Developer Tools and confirms the usage protocol. + - Install cocoaPods +- Configure the Android development environment: + - Install [Android Studio] [4] and open the new project. Open the menu bar, open the [AVD Manager] [5], the new Android emulator and start. (If you have installed [Docker] [6], close the Docker Server.) + - Or just download the [Android SDK] [7], run the command line [AVD Manager] [8], create a new Android emulator and launch it. + - Make sure that Android build-tool version is 23.0.2 + +### Instructions + +First, install the weex-pack command globally: + +```bash +$ npm install -g weexpack +``` + +or run the following command under the root path of your cloned weexpack repo + +```bash +$ npm install +``` + +## Pack application (and plugin usuage) + +Following graph shows how to pack a application, plugin related parts werenot a must. + + + +### Steps in detail + +#### 1. create a weexpack project + +```bash +$ weexpack create appName +``` + +will create directory as followsï¼ + +``` +WeexProject +âââ README.md +âââ android.config.json +âââ config.xml +âââ hooks +â  âââ README.md +âââ ios.config.json +âââ package.json +âââ platforms // platform template directory +âââ plugins // plugins download to here +â  âââ README.md +âââ src // applicationï¼we/vue fileï¼directory +â  âââ index.we +âââ start +âââ start.bat +âââ tools +â  âââ webpack.config.plugin.js +âââ web +â  âââ index.html +â  âââ index.js +â  âââ js +â  âââ init.js +âââ webpack.config.js +``` + +Above project template has no ios/android directory by default, you should change to appName path to install necessary dependency. + +```bash +$ cd appName && npm install +``` + +#### 2. install Weex application template + +Application template by default support Weex plugins and Weex bundle debugging. Please note template name are in lower-case, template was installed under platforms directory. + +* android template + +```bash +$ weexpack platform add android +``` + +* ios template + +```bash +$ weexpack platform add ios +``` + +Take android platform as exampleï¼the directory under platforms looks as following: + +``` +platforms +âââ android + âââ LICENSE + âââ NOTICE + âââ README.md + âââ app + â  âââ build + â  âââ build.gradle + â  âââ proguard-rules.pro + â  âââ src + âââ appframework + â  âââ build + â  âââ build.gradle + â  âââ proguard-rules.pro + â  âââ src + âââ build + â  âââ generated + âââ build.gradle + âââ codeStyleSettings.xml + âââ gradle + â  âââ wrapper + âââ gradle.properties + âââ gradlew + âââ gradlew.bat + âââ settings.gradle + âââ weexplugin + âââ build.gradle + âââ proguard-rules.pro + âââ src + +``` + +* query installed platforms + + ```bash + $ weexpack platform list + ``` + + you will get result likeï¼ + + ``` + Installed platforms: + android + Available platforms: + android ^6.2.1 + ``` + +* remove platform template + + Please use remove command to remove unnecessary platform, for example user want to remove ios template in windows platform. + + ```bash + $ weexpack platform remove ios + ``` + +#### 3. install Weex pluginï¼optionalï¼ + +* add plugins from local + + ```bash + $ weexpack plugin add path/to/plugin + ``` + +* add plugins from Weex marketï¼for example weex-chart + + ```bash + $ weexpack plugin add weex-chart + ``` + + weexplugin directory was the target directory where plugin was installed. Take android as an exampleï¼ + + ``` + weexplugin + âââ build.gradle // plugin build script, maintained by weexpack tool + âââ libs + âââ proguard-rules.pro + âââ src + â âââ main + â âââ AndroidManifest.xml // plugin android manifest file + â âââ java + â â âââ // æ件srcå®è£ ç®å½ + â â âââ com + â â âââ alibaba + â â âââ weex + â â âââ plugin + â â âââ ConfigXmlParser.java // config file parser + â â âââ PluginConfig.java // external interface + â â âââ PluginEntry.java // plugin description + â â âââ PluginManager.java // plugin manager + â âââ res // plugin resource path + â âââ drawable + â âââ values + â â âââ strings.xml + â âââ xml + â âââ config.xml // plugin config file, which used by PluginManager when install + ``` + +* query installed plugins + + ```bash + $ weexpack plugin list + ``` + +* remove installed pluginï¼for example weex-chart + + ```bash + $ weexpack plugin remove weex-chart + ``` + +#### 4. pack application and run + +After all above steps, you could modify your application we/vue files under src directory. And then, use run command to pack and run your application. Run command will download building tools and all dependencies which may take a while, and open monitor or connect to mobile device to execute your application afterwards. + +* for android application + + ```bash + $ weexpack run android + ``` + + You could modify your project information in android.config.json file: + + - AppName: the name of the project + - AppId: application_id the name of the package + - SplashText: the text in welcome page + - WeexBundle: the bundle file (could be local file or remote url). For Local file please put your we/vue files under the src directory + +* for ios platform + + * simulator + + ```bash + $ weexpack run ios + ``` + + * Build ipa + + ```bash + $ weexpack build ios + ``` + + this command will prompt for CodeSign, Profile(provisioning profile), AppId to build ipa. Other information like AppName, Weex bundle could be configured as you like in the file ios.config.json. After this command, ipa file could be created under the directory `/playground/build/ipa_build/`. + + Note: For details about various requirements to deploy to a device, refer to the Launch Your App On Devices section of Apple's [About App Distribution Workflows][9]. Briefly, you need to do the following before deploying: + + 1. CodeSign should be installed to keychain, click keychain to get the id; + 2. provisioning profile need UUID. you could use the file mobileprovision_UUID.sh to generate UUID as follows: + + ``` + $ ./mobileprovision_UUID.sh abcpath + ``` + abcpath is the path of provisioning profile file. + +* for Web platform + + ```bash + $ weexpack run web + ``` + +## Plugin development and publishment + + + +## Examples + + [Create Weex One App with Weexpack](https://github.com/weexteam/weex-pack/wiki/Create-Weex-One-App-with-Weexpack) + + [1]: https://nodejs.org/ + [2]: https://www.npmjs.com/ + [3]: https://itunes.apple.com/us/app/xcode/id497799835?mt=12 + [4]: https://developer.android.com/studio/install.html + [5]: https://developer.android.com/studio/run/managing-avds.html + [6]: https://www.docker.com/ + [7]: https://developer.android.com/studio/releases/sdk-tools.html + [8]: https://developer.android.com/studio/run/managing-avds.html + [9]: https://developer.apple.com/library/content/documentation/IDEs/Conceptual/AppDistributionGuide/Introduction/Introduction.html