Clone URL (Committers only):
https://cms.apache.org/redirect?new=anonymous;action=diff;uri=http://openejb.apache.org/tomee-and-netbeans.mdtext
Tiklu Ganguly
Index: trunk/content/tomee-and-netbeans.mdtext
===================================================================
--- trunk/content/tomee-and-netbeans.mdtext (revision 1415464)
+++ trunk/content/tomee-and-netbeans.mdtext (working copy)
@@ -16,3 +16,87 @@
specific language governing permissions and limitations
under the License.
+Netbeans and TomEE works great together. You can infact add TomEE as an Apache
Tomcat server in Netbeans
+by following the simple steps given below.
+
+Lets assume that you have already downloaded TomEE and you have NetBeans
already setup.So to begin
+lets just create a Java Web project in NetBeans (Assuming you have basic
working knowledge
+with NetBeans and you know how to create and run a web project in NetBeans).
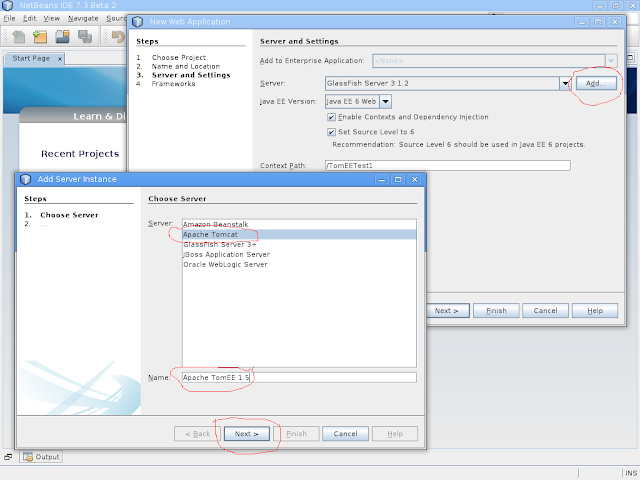
In the server screen
+we can add TomEE like the given screenshot below.
+
+![alt text][1]
+
+
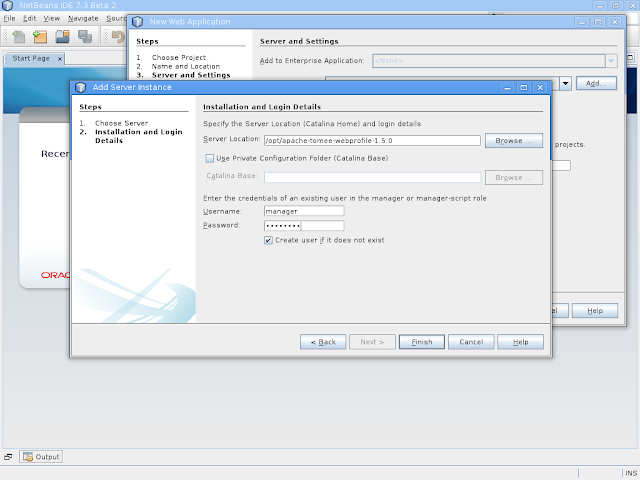
+Now hit next. In the next step you need to select the folder where the TomEE
server is present.
+
+![alt text][2]
+
+As soon as you hit finish your work is done. NetBeans would add the manager
user in the tomcat
+server and also you will get back to the project creation window. Continue to
the step for choosing
+your favorite web framework and complete the project creation process. Once
the project is created
+just run it once to see if everything is fine.
+
+**Working with OpenJPA in Netbeans**
+
+Let us move to the point where we will do the more interesting part. We will
configure
+OpenJPA in Netbeans so that the netbeans Entity generator can nicely work work
OpenJPA and TomEE.
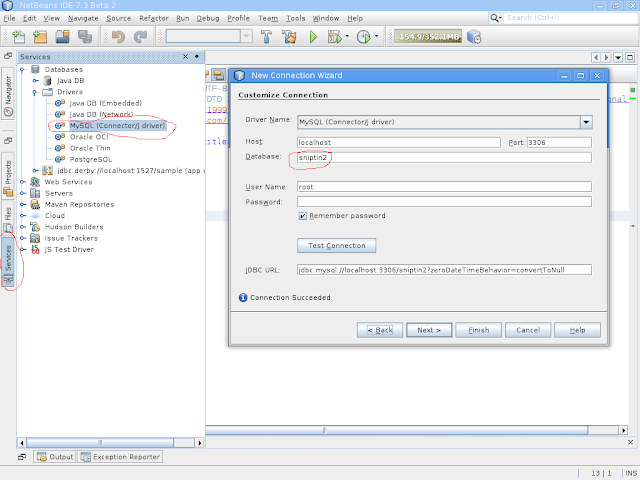
+So to do that you need to first create a connection to a database. Lets assume
that we create one
+for MySQL server as shown in the screenshot below.
+
+![alt text][3]
+
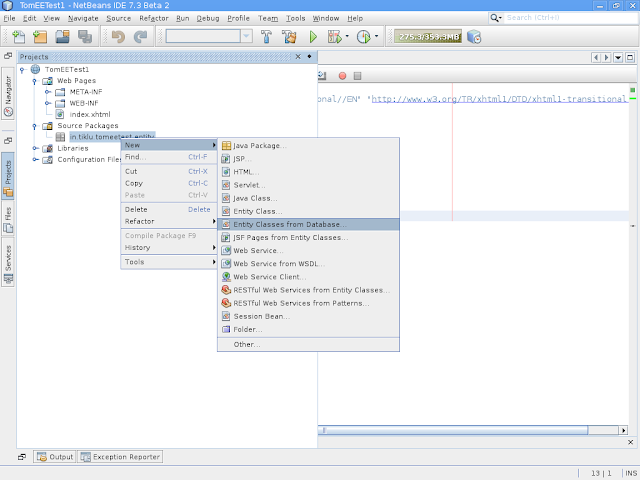
+So once this connection is there we are ready to create Entity classes from
the selected database.
+To do that follow the menu as shown in the screenshot below.
+![alt text][4]
+
+Once you select "Entity Classes from Database" You will be presented with the
follow dialog
+
+![alt text][5]
+
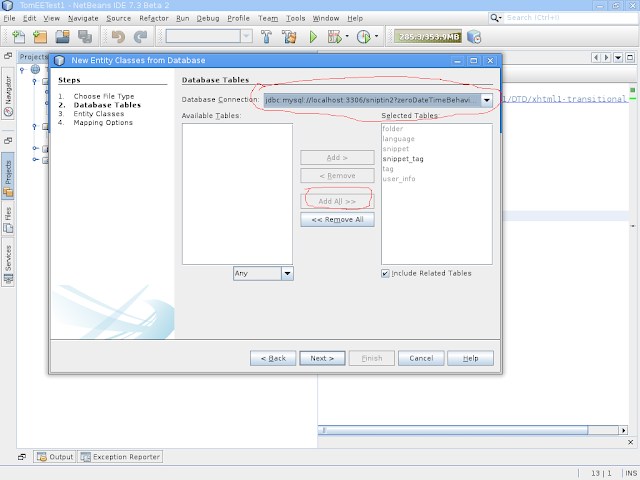
+In this dialog first of all we would select the connection that we created
before from the top
+dropdown. Once you select the connection Netbeans would bring all the tables
in
+"Available Tables" list. You can hit "Add All" to select all tables for
entity class generation.
+ Now lets hit "Next" and go to the next screen. And then again hit next and in
the next screen
+hit finish. You can accept all the defaults that are given by the system and
finish the Entity
+creation wizard. With this you are done creating the entities. But as soon as
you are done
+creating the entities You will get a failed message from TomEE server (In
case your TomEE server
+is running). This is because by default Netbeans generate Entity classes using
Eclipselink which
+ is not present in TomEE. So to make everybody happy. Next we will configure
OpenJPA. To do that
+you need to open the persistence.xml file from the project (Project explorer
-> double click on
+persistence.xml). This would open the persistence.xml editor window. As shown
below
+
+![alt text][6]
+
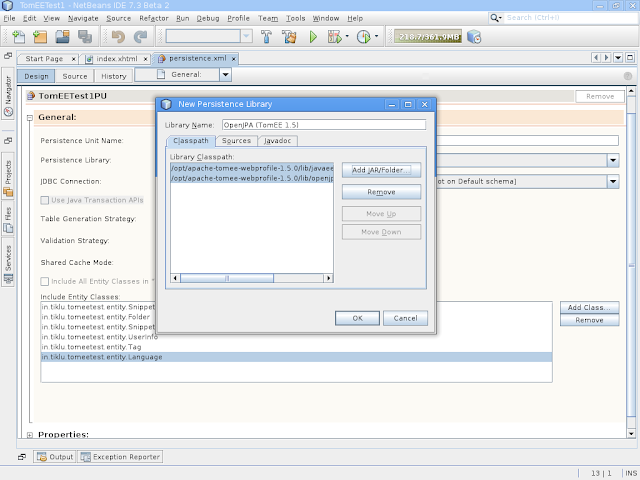
+Now in this window we will select "New Persistence Library" option from the
Persistence Library
+dropdown. This will open the following dialog box.
+
+![alt text][7]
+
+Here you need to choose the following two jar files from the TomEE
installation
+folder - javaee-api-6.0-4-tomcat.jar and openjpa-asm-shaded-2.2.0.jar. Do make
sure that you
+are choosing the jar files from the same location where your TomEE server is.
Once you choose
+the proper libraries hit Ok to close the dialog and go back to the
persistence.xml editor screen
+of netbeans.
+
+![alt text][8]
+
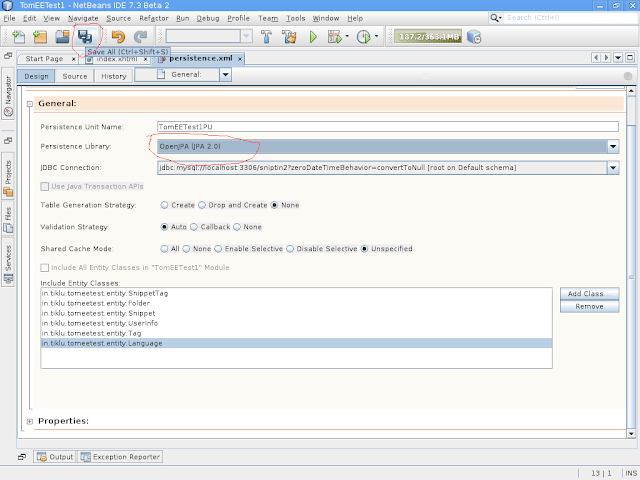
+Now here from the persistence library choose OpenJPA and save the file as
shown in the above
+screenshot. Now just restart the server once and you are all set to run TomEE
with JPA.
+
+Do remember you may need to set your tomcat server in development mode so that
your app gets
+deployed live. to do that you can follow the instructions given in the JSP hot
deployment
+section following link
+
+[link text][9]
+
+
+
+ [1]:
http://4.bp.blogspot.com/-FPdFJETt19o/ULfXFBECmII/AAAAAAAADBw/LYIimweZZZY/s640/serverCreate1.png
+ [2]:
http://3.bp.blogspot.com/-U1jdrYY96h0/ULfYln3tlQI/AAAAAAAADB4/IEDsDD1HkGk/s640/serverCreate2.png
+ [3]:
http://2.bp.blogspot.com/-iNSh2SpYrN0/ULfdtvxeBlI/AAAAAAAADCI/CdkB8dwhrss/s640/databaseConnection1.png
+ [4]:
http://3.bp.blogspot.com/-D9eCTw9SXRs/ULffqR9rX_I/AAAAAAAADCQ/XfW_25IoEaw/s640/entityCreationStep1.png
+ [5]:
http://4.bp.blogspot.com/-sUEiVFlvr-0/ULfgs3GbKeI/AAAAAAAADCY/-quDKywCBcY/s640/entityCreationStep2.png
+ [6]:
http://1.bp.blogspot.com/-8GBvElm7Fs4/ULfkn51KrnI/AAAAAAAADCo/P1JWSAtkoNU/s640/persistance1.png
+ [7]:
http://4.bp.blogspot.com/-FYC0mcs1d2Q/ULfnQ1TKaaI/AAAAAAAADC0/E4m5ZbOHrNU/s640/persistance2.png
+ [8]:
http://1.bp.blogspot.com/-E2Z3CCMJm1o/ULfoa5Ws3SI/AAAAAAAADDA/hoTooDnlT4Q/s640/persistance3.png
+ [9]: http://tomee.apache.org/tomee-and-eclipse.html
\ No newline at end of file