This is an automated email from the ASF dual-hosted git repository.

sylviasu pushed a commit to branch master
in repository https://gitbox.apache.org/repos/asf/apisix-website.git
The following commit(s) were added to refs/heads/master by this push:
new 684ee5b10f1 blog: Add A poor man API post (#1416)
684ee5b10f1 is described below
commit 684ee5b10f1a4c67423d42b59cdab4657ab9f085
Author: Nicolas Frankel <[email protected]>
AuthorDate: Tue Nov 22 02:06:14 2022 +0100
blog: Add A poor man API post (#1416)
* blog: Add A poor man API post
* Update according to review suggestion
Co-authored-by: Young <[email protected]>
Co-authored-by: Young <[email protected]>
---
blog/en/blog/2022/11/23/poor-man-api.md | 364 ++++++++++++++++++++++++++++++++
1 file changed, 364 insertions(+)
diff --git a/blog/en/blog/2022/11/23/poor-man-api.md
b/blog/en/blog/2022/11/23/poor-man-api.md
new file mode 100644
index 00000000000..71ef6e159bb
--- /dev/null
+++ b/blog/en/blog/2022/11/23/poor-man-api.md
@@ -0,0 +1,364 @@
+---
+title: A poor man's API
+authors:
+ - name: Nicolas Fränkel
+ title: Author
+ url: https://github.com/nfrankel
+ image_url: https://avatars.githubusercontent.com/u/752258
+keywords:
+ - API
+ - PostgreSQL
+ - PostgREST
+ - no code
+ - MVP
+description: "Creating a full-fledged API requires resources, both time and
money. You need to think about the model, the design, the REST principles,
etc., without writing a single line of code. Most of the time, you don't know
whether it's worth it: you'd like to offer a Minimum Viable Product and iterate
from there. I want to show how you can achieve it without writing a single line
of code."
+tags: [Case Studies]
+image: https://blog.frankel.ch/assets/resources/poor-man-api/jar-g19c1e6973.jpg
+---
+
+> Creating a full-fledged API requires resources, both time and money. You
need to think about the model, the design, the REST principles, etc., without
writing a single line of code. Most of the time, you don't know whether it's
worth it: you'd like to offer a Minimum Viable Product and iterate from there.
I want to show how you can achieve it without writing a single line of code.
+
+<!--truncate-->
+
+<head>
+ <link rel="canonical" href="https://blog.frankel.ch/poor-man-api/"; />
+</head>
+
+## The solution
+
+The main requirement of the solution is to use the [PostgreSQL
database](https://www.postgresql.org/). It's a well-established Open Source SQL
database.
+
+Instead of writing our REST API, we use the PostgREST component:
+
+>PostgREST is a standalone web server that turns your PostgreSQL database
directly into a RESTful API. The structural constraints and permissions in the
database determine the API endpoints and operations.
+>
+>-- [PostgREST](https://postgrest.org/)
+
+Let's apply it to a simple use case. Here's a `product` table that I want to
expose via a CRUD API:
+
+![Product table]https://blog.frankel.ch/assets/generated/poor-man-api/table.svg
+
+Note that you can find the whole source code on
[GitHub](https://github.com/ajavageek/poor-man-api) to follow along.
+
+PostgREST's [Getting Started
guide](https://postgrest.org/en/stable/tutorials/tut0.html) is pretty complete
and works out of the box. Yet, I didn't find any ready-made Docker image, so I
created my own:
+
+```dockerfile
+FROM debian:bookworm-slim #1
+
+ARG POSTGREST_VERSION=v10.1.1 #2
+ARG POSTGREST_FILE=postgrest-$POSTGREST_VERSION-linux-static-x64.tar.xz #2
+
+RUN mkdir postgrest
+
+WORKDIR postgrest
+
+ADD
https://github.com/PostgREST/postgrest/releases/download/$POSTGREST_VERSION/$POSTGREST_FILE
\
+ . #3
+
+RUN apt-get update && \
+ apt-get install -y libpq-dev xz-utils && \
+ tar xvf $POSTGREST_FILE && \
+ rm $POSTGREST_FILE #4
+```
+
+1. Start from the latest Debian
+2. Parameterize the build
+3. Get the archive
+4. Install dependencies and unarchive
+
+The Docker image contains a `postgrest` executable in the `/postgrest` folder.
We can "deploy" the architecture via Docker Compose:
+
+```yaml
+version: "3"
+services:
+ postgrest:
+ build: ./postgrest #1
+ volumes:
+ - ./postgrest/product.conf:/etc/product.conf:ro #2
+ ports:
+ - "3000:3000"
+ entrypoint: ["/postgrest/postgrest"] #3
+ command: ["/etc/product.conf"] #4
+ depends_on:
+ - postgres
+ postgres:
+ image: postgres:15-alpine
+ environment:
+ POSTGRES_PASSWORD: "root"
+ volumes:
+ - ./postgres:/docker-entrypoint-initdb.d:ro #5
+```
+
+1. Build the above `Dockerfile`
+2. Share the configuration file
+3. Run the `postgrest` executable
+4. With the configuration file
+5. Initialize the schema, the permissions, and the data
+
+At this point, we can query the `product` table:
+
+```bash
+curl localhost:3000/product
+```
+
+We immediately get the results:
+
+```json
+[{"id":1,"name":"Stickers pack","description":"A pack of rad stickers to
display on your laptop or wherever you feel like. Show your love for Apache
APISIX","price":0.49,"hero":false},
+ {"id":2,"name":"Lapel pin","description":"With this \"Powered by Apache
APISIX\" lapel pin, support your favorite API Gateway and let everybody know
about it.","price":1.49,"hero":false},
+ {"id":3,"name":"Tee-Shirt","description":"The classic geek product! At a
conference, at home, at work, this tee-shirt will be your best
friend.","price":9.99,"hero":true}]
+```
+
+That was a quick win!
+
+## Improving the solution
+
+Though the solution works, it has a lot of room for improvement. For example,
the database user cannot change the data, but everybody can actually access it.
It might not be a big issue for product-related data, but what about medical
data?
+
+The PostgREST documentation is aware of it and explicitly advises using a
reverse proxy:
+
+>PostgREST is a fast way to construct a RESTful API. Its default behavior is
great for scaffolding in development. When it’s time to go to production it
works great too, as long as you take precautions. PostgREST is a small sharp
tool that focuses on performing the API-to-database mapping. We rely on a
reverse proxy like Nginx for additional safeguards.
+>
+>-- [Hardening PostgREST](https://postgrest.org/en/stable/admin.html)
+
+Instead of nginx, we would benefit from a full-fledged API Gateway: enters
[Apache APISIX](https://apisix.apache.org/). We shall add it to our Docker
Compose:
+
+```yaml
+version: "3"
+services:
+ apisix:
+ image: apache/apisix:2.15.0-alpine #1
+ volumes:
+ - ./apisix/config.yml:/usr/local/apisix/conf/config.yaml:ro
+ ports:
+ - "9080:9080"
+ restart: always
+ depends_on:
+ - etcd
+ - postgrest
+ etcd:
+ image: bitnami/etcd:3.5.2 #2
+ environment:
+ ETCD_ENABLE_V2: "true"
+ ALLOW_NONE_AUTHENTICATION: "yes"
+ ETCD_ADVERTISE_CLIENT_URLS: "http://0.0.0.0:2397";
+ ETCD_LISTEN_CLIENT_URLS: "http://0.0.0.0:2397";
+```
+
+1. Use Apache APISIX
+2. APISIX stores its configuration in [etcd](https://etcd.io/)
+
+We shall first configure Apache APISIX to proxy calls to `postgrest`:
+
+```bash
+curl http://apisix:9080/apisix/admin/upstreams/1 -H 'X-API-KEY: 123xyz' -X PUT
-d ' #1-2
+{
+ "type": "roundrobin",
+ "nodes": {
+ "postgrest:3000": 1
#1-3
+ }
+}'
+
+curl http://apisix:9080/apisix/admin/routes/1 -H 'X-API-KEY: 123xyz' -X PUT -d
' #4
+{
+ "uri": "/*",
+ "upstream_id": 1
+}'
+```
+
+1. Should be run in one of the Docker nodes, so use the Docker image's name.
Alternatively, use `localhost` but be sure to expose the ports
+2. Create a reusable _upstream_
+3. Point to the PostgREST node
+4. Create a _route_ to the created _upstream_
+
+We can now query the endpoint via APISIX:
+
+```bash
+curl localhost:9080/product
+```
+
+It returns the same result as above.
+
+## DDoS protection
+
+We haven't added anything, but we're ready to start the work. Let's first
protect our API from <abbr title="Distributed Denial of Service">DDoS</abbr>
attacks. Apache APISIX is designed around a plugin architecture. To protect
from DDoS, we shall use a plugin. We can set plugins on a specific _route_ when
it's created or on every _route_; in the latter case, it's a _global rule_. We
want to protect every route by default, so we shall use one.
+
+```bash
+curl http://apisix:9080/apisix/admin/global_rules/1 -H 'X-API-KEY: 123xyz' -X
PUT -d '
+{
+ "plugins": {
+ "limit-count": { #1
+ "count": 1, #2
+ "time_window": 5, #2
+ "rejected_code": 429 #3
+ }
+ }
+}'
+```
+
+1. `limit-count` limits the number of calls in a time window
+2. Limit to 1 call per 5 seconds; it's for demo purposes
+3. Return `429 Too Many Requests`; the default is `503`
+
+Now, if we execute too many requests, Apache APISIX protects the upstream:
+
+```bash
+curl localhost:9080/product
+```
+
+```html
+<html>
+<head><title>429 Too Many Requests</title></head>
+<body>
+<center><h1>429 Too Many Requests</h1></center>
+<hr><center>openresty</center>
+</body>
+</html>
+```
+
+## Per-route authorization
+
+PostgREST also offers an Open API endpoint at the root. We thus have two
routes: `/` for the Open API spec and `/product` for the products. Suppose we
want to disallow unauthorized people to access our data: Regular users can
access products, while admin users can access both the Open API spec **and**
products.
+
+APISIX offers several [authentication
methods](https://apisix.apache.org/plugins/#authentication). We will use the
simplest one possible,
[key-auth](https://apisix.apache.org/docs/apisix/plugins/key-auth/). It relies
on the [Consumer](https://apisix.apache.org/docs/apisix/terminology/consumer/)
abstraction. `key-auth` requires a specific header: the plugin does a reverse
lookup on the value and finds the consumer whose key corresponds.
+
+Here's how to create a consumer:
+
+```bash
+curl http://apisix:9080/apisix/admin/consumers -H 'X-API-KEY: 123xyz' -X PUT
-d ' #1
+{
+ "username": "admin",
#2
+ "plugins": {
+ "key-auth": {
+ "key": "admin"
#3
+ }
+ }
+}'
+```
+
+1. Create a new consumer
+2. Consumer's name
+3. Consumer's key value
+
+We do the same with consumer `user` and key `user`. Now, we can create a
dedicated route and configure it so that only requests from `admin` pass
through:
+
+```bash
+curl http://apisix:9080/apisix/admin/routes -H 'X-API-KEY: 123xyz' -X POST -d
' #1
+{
+ "uri": "/",
+ "upstream_id": 1,
+ "plugins": {
+ "key-auth": {},
#2
+ "consumer-restriction": {
#2
+ "whitelist": [ "admin" ]
#3
+ }
+ }
+}'
+```
+
+1. Create a new route
+2. Use the `key-auth` and `consumer-restriction` plugins
+3. Only `admin`-authenticated requests can call the route
+
+Let's try the following:
+
+```bash
+curl localhost:9080
+```
+
+It doesn't work as we are not authenticated via an API key header.
+
+```json
+{"message":"Missing API key found in request"}
+```
+
+```bash
+curl -H "apikey: user" localhost:9080
+```
+
+It doesn't work as we are authenticated as `user`, but the route is not
authorized for `user` but for `admin`.
+
+```json
+{"message":"The consumer_name is forbidden."}
+```
+
+```bash
+curl -H "apikey: admin" localhost:9080
+```
+
+This time, it returns the Open API spec as expected.
+
+## Monitoring
+
+A much-undervalued feature of any software system is monitoring. As soon as
you deploy any component in production, you must monitor its health. Nowadays,
many services are available to monitor. We will use
[Prometheus](https://prometheus.io/) as it's Open Source, battle-proven, and
widespread. To display the data, we will rely on
[Grafana](https://grafana.com/) for the same reasons. Let's add the components
to the Docker Compose file:
+
+```yaml
+version: "3"
+services:
+ prometheus:
+ image: prom/prometheus:v2.40.1 #1
+ volumes:
+ - ./prometheus/prometheus.yml:/etc/prometheus/prometheus.yml #2
+ depends_on:
+ - apisix
+ grafana:
+ image: grafana/grafana:8.5.15 #3
+ volumes:
+ - ./grafana/provisioning:/etc/grafana/provisioning #4
+ - ./grafana/dashboards:/var/lib/grafana/dashboards #4
+ - ./grafana/config/grafana.ini:/etc/grafana/grafana.ini #4-5
+ ports:
+ - "3001:3001"
+ depends_on:
+ - prometheus
+```
+
+1. Prometheus image
+2. Prometheus configuration to scrape Apache APISIX. See the full file
[here](https://github.com/ajavageek/poor-man-api/blob/master/prometheus/prometheus.yml)
+3. Grafana image
+4. Grafana configuration. Most of it comes from the configuration
[provided](https://github.com/apache/apisix/blob/master/docs/assets/other/json/apisix-grafana-dashboard.json)
by APISIX.
+5. Change the default port from `3000` to `3001` to avoid conflict with the
PostgREST service
+
+Once the monitoring infrastructure is in place, we only need to instruct
APISIX to provide the data in a format that Prometheus expects. We can achieve
it through configuration and a new global rule:
+
+```yaml
+plugin_attr:
+ prometheus:
+ export_addr:
+ ip: "0.0.0.0" #1
+ port: 9091 #2
+```
+
+1. Bind to any address
+2. Bind to port `9091`. Prometheus metrics are available on
`http://apisix:9091/apisix/prometheus/metrics` on the Docker network
+
+We can create the global rule:
+
+```bash
+curl http://apisix:9080/apisix/admin/global_rules/2 -H 'X-API-KEY: 123xyz' -X
PUT -d '
+{
+ "plugins": {
+ "prometheus": {}
+ }
+}'
+```
+
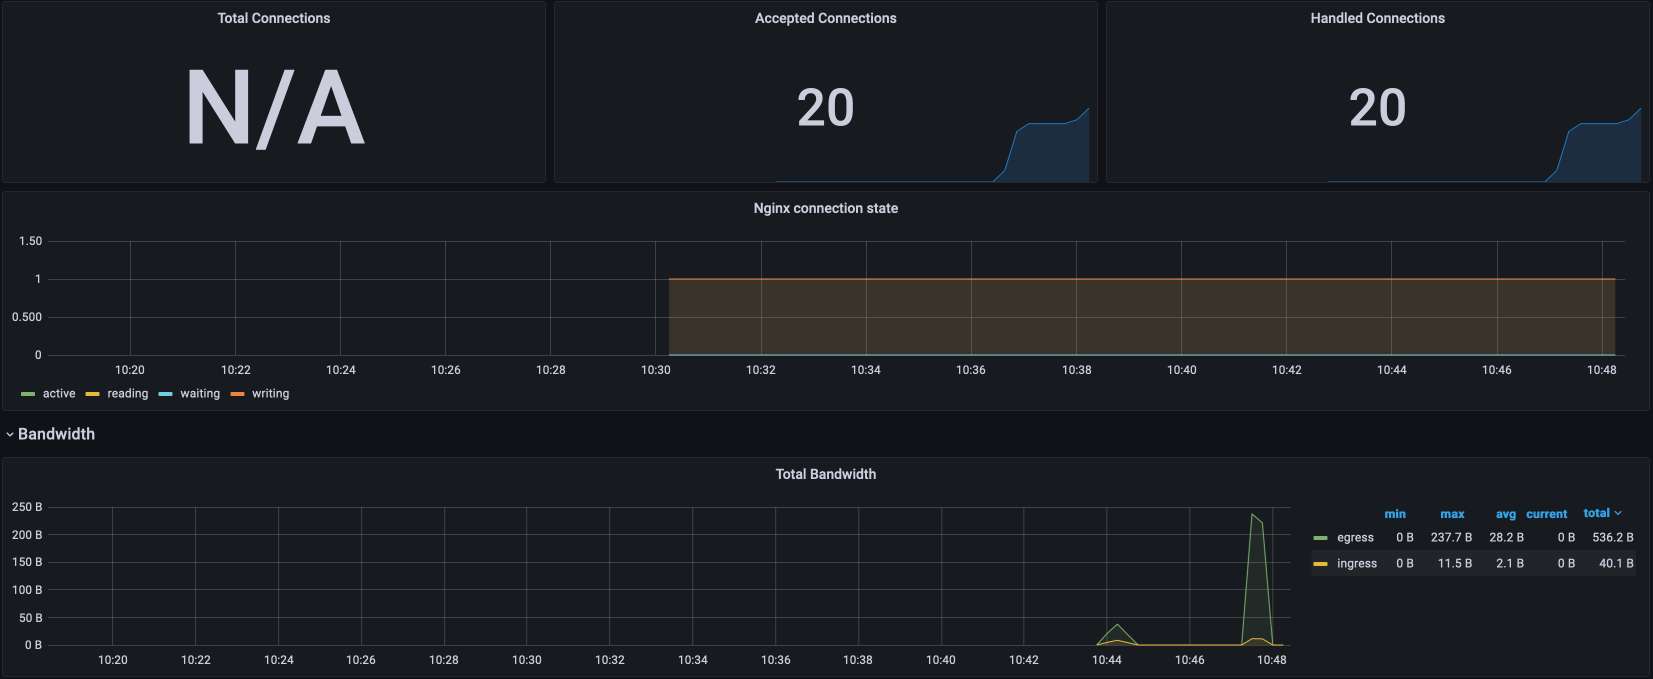
+Send a couple of queries and open the Grafana dashboard. It should look
similar to this:
+
+![Grafana
dashboard]https://blog.frankel.ch/assets/resources/poor-man-api/grafana.jpg
+
+## Conclusion
+
+Creating a full-fledged REST(ful) API is a huge investment. One can quickly
test a simple API by exposing one's database in a CRUD API via PostgREST.
However, such an architecture is not fit for production usage.
+
+To fix it, you need to set a façade in front of PostgREST, a reverse proxy, or
even better, an API Gateway. Apache APISIX offers a wide range of features,
from authorization to monitoring. With it, you can quickly validate your API
requirements at a low cost.
+
+The icing on the cake: when you've validated the requirements, you can keep
the existing façade and replace PostgREST with your custom-developed API.
+
+The source code is available on
[GitHub](https://github.com/ajavageek/poor-man-api).
+
+**To go further:**
+
+* [PostgREST](https://postgrest.org/)
+* [Getting started with Apache
APISIX](https://apisix.apache.org/docs/apisix/getting-started/)
+* [Apache APISIX plugins](https://apisix.apache.org/plugins/)