This is an automated email from the ASF dual-hosted git repository.

Yilialinn pushed a commit to branch master
in repository https://gitbox.apache.org/repos/asf/apisix.git
The following commit(s) were added to refs/heads/master by this push:
new 10e61e0fd docs: improve gateway operations guidance (#13900)
10e61e0fd is described below
commit 10e61e0fdad296fe89368e73e9b0dbdb452e6197
Author: Yilia Lin <[email protected]>
AuthorDate: Mon Aug 31 19:26:07 2026 +0800
docs: improve gateway operations guidance (#13900)
---
docs/en/latest/architecture-design/apisix.md | 31 +-
docs/en/latest/discovery/nacos.md | 171 +++--------
docs/en/latest/installation-guide.md | 315 +++++++++------------
docs/en/latest/terminology/api-gateway.md | 27 +-
docs/en/latest/tutorials/cache-api-responses.md | 239 +++++-----------
.../latest/tutorials/websocket-authentication.md | 170 ++++++-----
6 files changed, 374 insertions(+), 579 deletions(-)
diff --git a/docs/en/latest/architecture-design/apisix.md
b/docs/en/latest/architecture-design/apisix.md
index 0f6824cac..53f472a9d 100644
--- a/docs/en/latest/architecture-design/apisix.md
+++ b/docs/en/latest/architecture-design/apisix.md
@@ -4,7 +4,7 @@ keywords:
- API Gateway
- Apache APISIX
- APISIX architecture
-description: Architecture of Apache APISIX—the Cloud Native API Gateway.
+description: Learn how Apache APISIX processes requests, runs plugins, and
separates configuration and traffic responsibilities across deployment modes.
---
<!--
#
@@ -25,27 +25,38 @@ description: Architecture of Apache APISIX—the Cloud Native
API Gateway.
#
-->
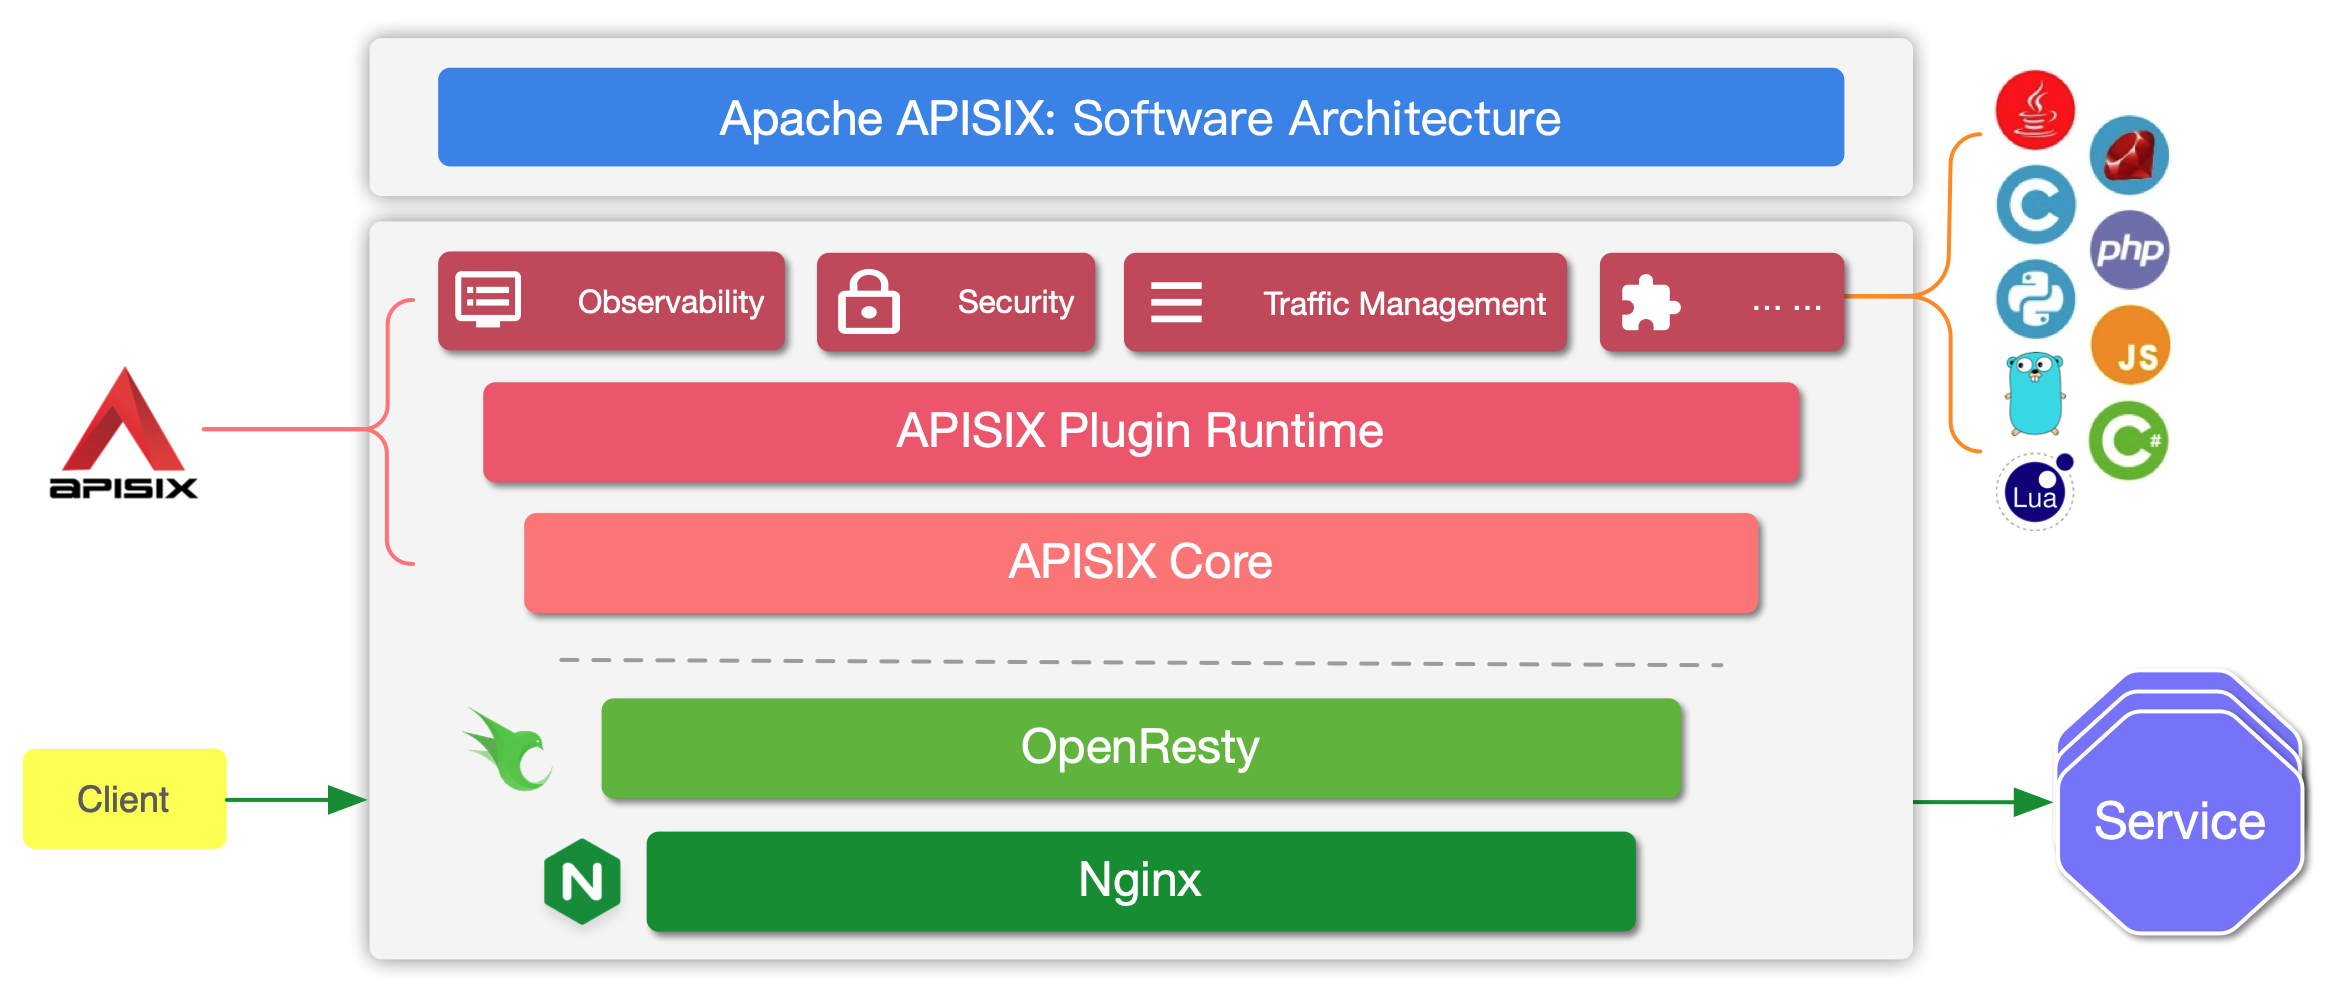
-APISIX is built on top of Nginx and
[ngx_lua](https://github.com/openresty/lua-nginx-module) leveraging the power
offered by LuaJIT. See [Why Apache APISIX chose Nginx and Lua to build API
Gateway?](https://apisix.apache.org/blog/2021/08/25/why-apache-apisix-chose-nginx-and-lua/).
+APISIX is built on NGINX and
[ngx_lua](https://github.com/openresty/lua-nginx-module), using LuaJIT for
request-time logic. See [Why Apache APISIX chose NGINX and Lua to build an API
gateway](https://apisix.apache.org/blog/2021/08/25/why-apache-apisix-chose-nginx-and-lua/).
-
+
-APISIX has two main parts:
+At runtime, APISIX has two main parts:
-1. APISIX core, Lua plugin, multi-language Plugin runtime, and the WASM plugin
runtime.
-2. Built-in Plugins that adds features for observability, security, traffic
control, etc.
+1. The APISIX core and plugin runtimes, which match requests, select
upstreams, and execute plugins.
+2. Built-in plugins for authentication, traffic control, observability,
transformations, and other opt-in policies.
-The APISIX core handles the important functions like matching Routes, load
balancing, service discovery, configuration management, and provides a
management API. It also includes APISIX Plugin runtime supporting Lua and
multilingual Plugins (Go, Java , Python, JavaScript, etc) including the
experimental WASM Plugin runtime.
+The APISIX core handles Route matching, load balancing, service discovery, and
configuration updates. Lua plugins run in the APISIX worker process. External
plugin runners support selected additional languages, while the WebAssembly
plugin runtime remains experimental.
-APISIX also has a set of [built-in
Plugins](https://apisix.apache.org/docs/apisix/plugins/batch-requests) that
adds features like authentication, security, observability, etc. They are
written in Lua.
+Built-in plugins are written in Lua and are opt-in: a plugin affects traffic
only when it is configured on a matching Route, Service, Consumer, or other
supported scope. Browse the [Plugin Hub](https://apisix.apache.org/plugins/)
for the available plugins and their configuration.
+
+## Configuration and deployment modes
+
+APISIX supports multiple control-plane and data-plane topologies:
+
+- **Traditional mode:** One APISIX role handles traffic and exposes the Admin
API, with configuration stored in etcd.
+- **Decoupled mode:** Separate control-plane and data-plane roles share
configuration through etcd. The data plane does not expose the Admin API.
+- **Standalone file-driven mode:** A data-plane role loads full configuration
from a local YAML or JSON file and does not use etcd as its configuration
center.
+- **Standalone API-driven mode:** A traditional role accepts full, in-memory
configuration through the dedicated Standalone Admin API. This path is designed
for integrations such as the APISIX Ingress Controller and ADC; do not use it
directly without understanding its full-replacement and versioning behavior.
+
+Choose the topology before designing network access, configuration delivery,
and failure handling. See [Deployment modes](../deployment-modes.md) for the
current role and configuration-provider settings.
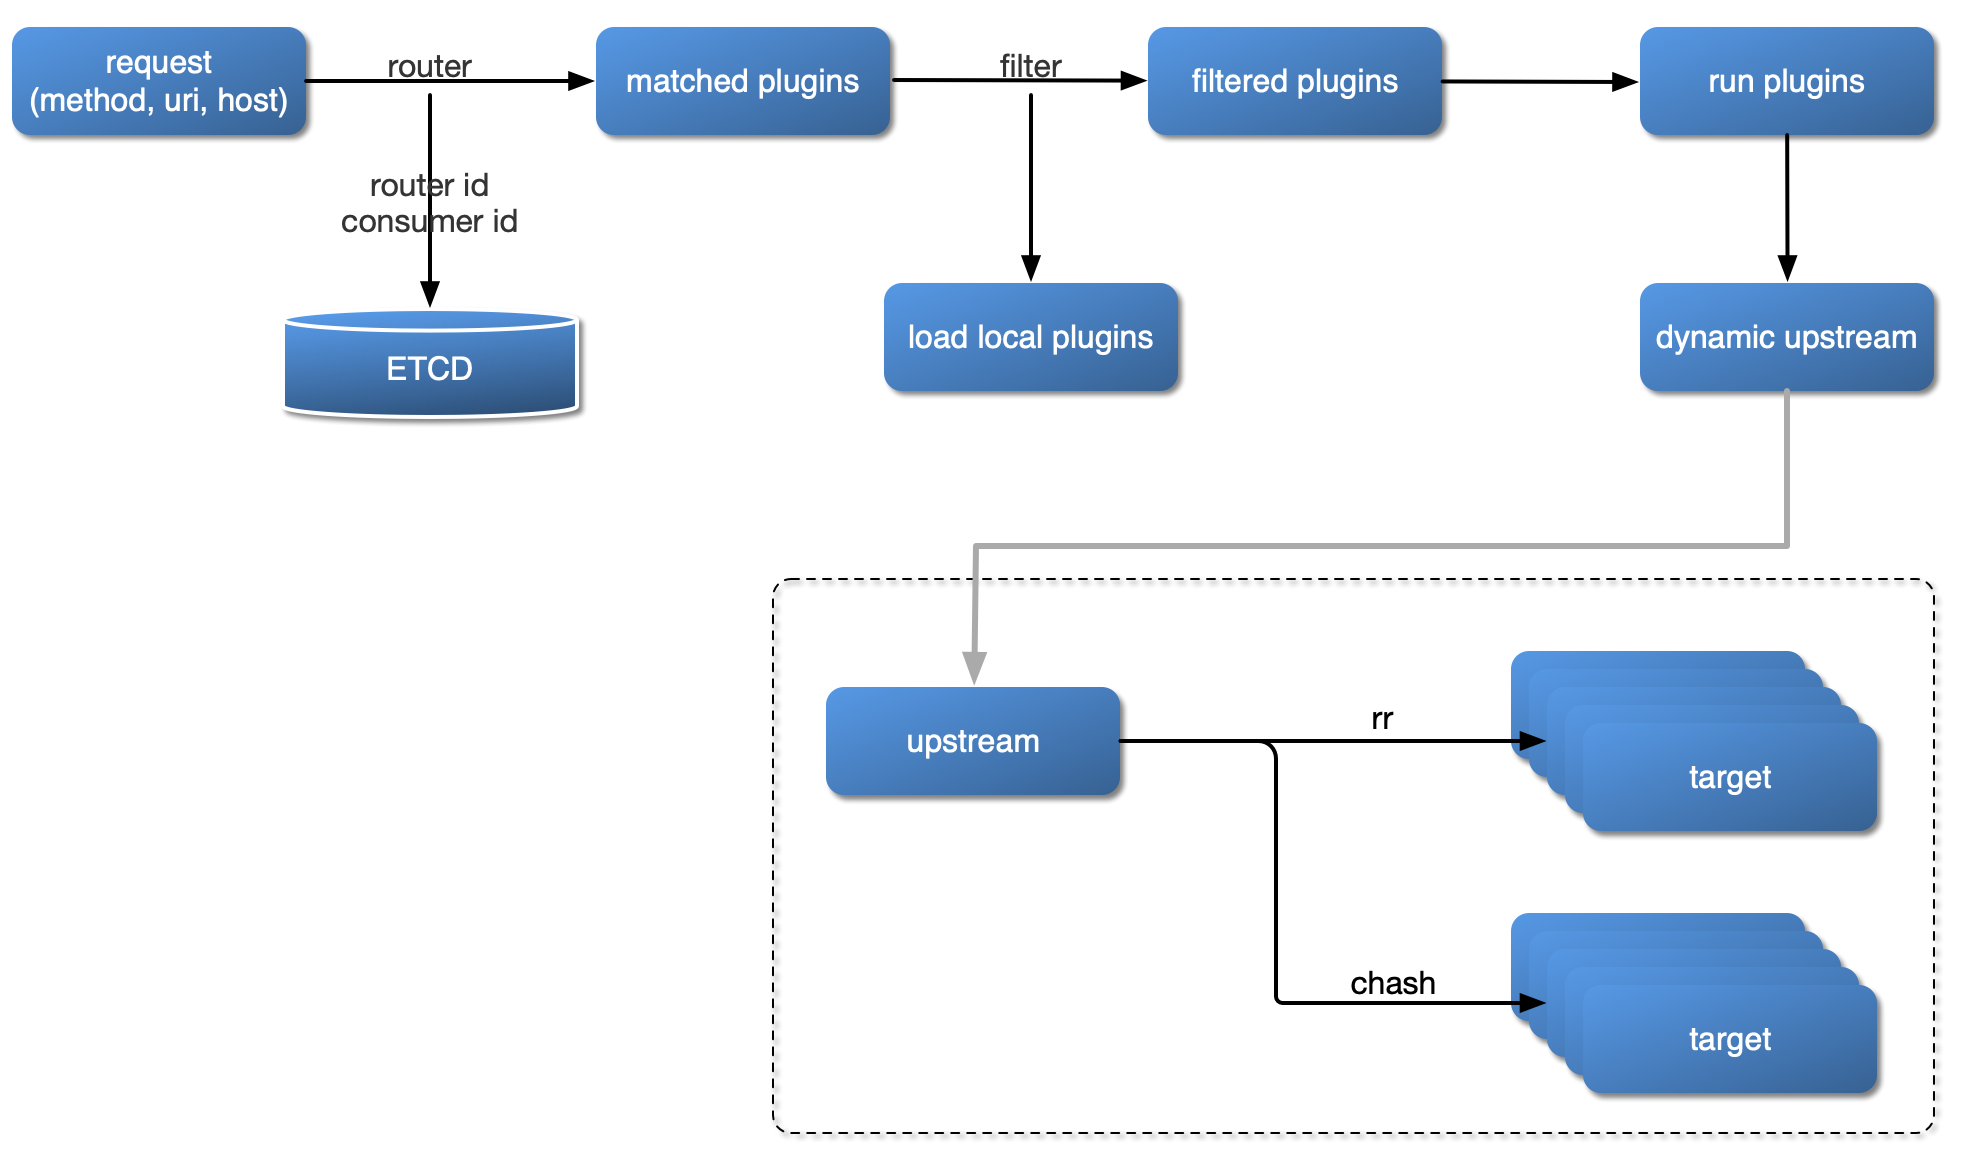
## Request handling process
The diagram below shows how APISIX handles an incoming request and applies
corresponding Plugins:
-
+
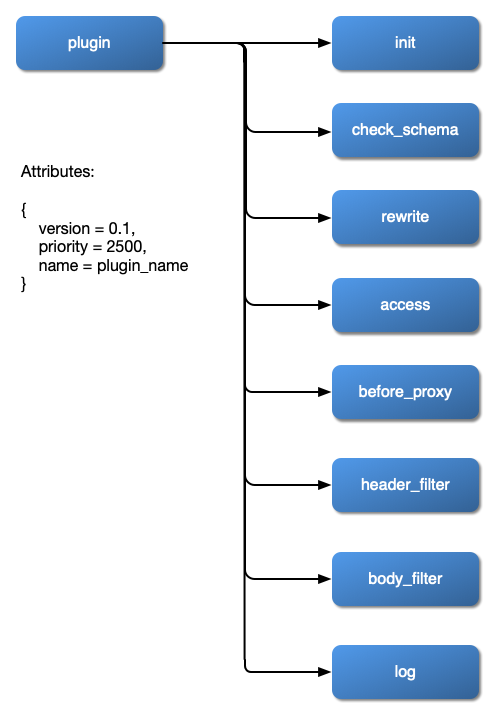
## Plugin hierarchy
The chart below shows the order in which different types of Plugin are applied
to a request:
-
+
diff --git a/docs/en/latest/discovery/nacos.md
b/docs/en/latest/discovery/nacos.md
index 5ebbcee46..c530d46a2 100644
--- a/docs/en/latest/discovery/nacos.md
+++ b/docs/en/latest/discovery/nacos.md
@@ -1,5 +1,10 @@
---
title: nacos
+keywords:
+ - Apache APISIX
+ - Nacos
+ - Service Discovery
+description: Configure Apache APISIX to discover healthy L7 or L4 upstream
nodes from Nacos, including namespace, group, refresh, and failover behavior.
---
<!--
@@ -23,19 +28,25 @@ title: nacos
## Service discovery via Nacos
-The performance of this module needs to be improved:
+The Nacos discovery client lets an APISIX Upstream reference a Nacos service
by name instead of listing nodes statically. APISIX queries Nacos for healthy
instances, converts the returned addresses and weights into upstream nodes, and
refreshes the cached node set at `fetch_interval`.
-1. send the request parallelly.
+Nacos discovery is available for HTTP and stream routes. Use `discovery_args`
to select a non-default namespace or group. For an overview of the discovery
interface and supported registries, see [Service Discovery](../discovery.md).
+
+:::note
+
+The client polls the referenced Nacos services sequentially. When multiple
`host` entries are configured, APISIX starts from a randomized host and tries
another host only if no referenced service was fetched successfully from the
selected host. A partial refresh is accepted: services that failed are not
retried against the next host, and their cached registry entries can be removed
during cleanup. If every host fails completely, APISIX logs the failure and
schedules the next refresh. Mon [...]
+
+:::
### Configuration for Nacos
-Add following configuration in `conf/config.yaml` :
+Add the following configuration in `conf/config.yaml`:
```yaml
discovery:
nacos:
host:
- - "http://${username}:${password}@${host1}:${port1}";
+ -
"https://${{NACOS_USERNAME}}:${{NACOS_PASSWORD}}@${{NACOS_HOST}}:${{NACOS_PORT}}";
prefix: "/nacos/v1/"
fetch_interval: 30 # default 30 sec
# `weight` is the `default_weight` that will be attached to each
discovered node that
@@ -47,7 +58,7 @@ discovery:
read: 5000 # default 5000 ms
```
-And you can config it in short by default value:
+The minimal configuration below is only for an isolated local Nacos instance
without authentication or TLS:
```yaml
discovery:
@@ -56,23 +67,27 @@ discovery:
- "http://192.168.33.1:8848";
```
+Use the APISIX `${{VARIABLE}}` syntax for environment interpolation; `${name}`
is only a literal string in this configuration. Supply the username and
password as their original values: the Nacos client encodes them when it builds
the login request, so pre-encoding the values can break authentication. For a
private CA, configure the CA bundle with `apisix.ssl.ssl_trusted_certificate`
and verify the effective TLS connection. Do not commit real usernames,
passwords, access keys, or secret [...]
+
### Upstream setting
#### L7
-Here is an example of routing a request with an URI of "/nacos/*" to a service
which named
"http://192.168.33.1:8848/nacos/v1/ns/instance/list?serviceName=APISIX-NACOS";
and use nacos discovery client in the registry:
+The following example routes requests matching `/nacos/*` to healthy instances
registered as `APISIX-NACOS` in the default Nacos namespace and group:
:::note
-You can fetch the `admin_key` from `config.yaml` and save to an environment
variable with the following command:
+Reuse the resolved Admin API secret from the environment that starts APISIX:
```bash
-admin_key=$(yq '.deployment.admin.admin_key[0].key' conf/config.yaml | sed
's/"//g')
+admin_key="${ADMIN_KEY:?ADMIN_KEY is not set}"
```
+If a local test configuration contains the actual key rather than an
environment or secret reference, you can read that literal value with
`admin_key="$(yq -r '.deployment.admin.admin_key[0].key' conf/config.yaml)"`.
`yq` does not resolve `${{VARIABLE}}` templates or external secrets.
+
:::
```shell
-$ curl http://127.0.0.1:9180/apisix/admin/routes/1 -H "X-API-KEY: $admin_key"
-X PUT -i -d '
+curl http://127.0.0.1:9180/apisix/admin/routes/1 -H "X-API-KEY: $admin_key" -X
PUT -i -d '
{
"uri": "/nacos/*",
"upstream": {
@@ -83,38 +98,14 @@ $ curl http://127.0.0.1:9180/apisix/admin/routes/1 -H
"X-API-KEY: $admin_key" -X
}'
```
-The formatted response as below:
-
-```json
-{
- "node": {
- "key": "\/apisix\/routes\/1",
- "value": {
- "id": "1",
- "create_time": 1615796097,
- "status": 1,
- "update_time": 1615799165,
- "upstream": {
- "hash_on": "vars",
- "pass_host": "pass",
- "scheme": "http",
- "service_name": "APISIX-NACOS",
- "type": "roundrobin",
- "discovery_type": "nacos"
- },
- "priority": 0,
- "uri": "\/nacos\/*"
- }
- }
-}
-```
+A successful response returns the saved Route in the current Admin API
response format.
#### L4
-Nacos service discovery also supports use in L4, the configuration method is
similar to L7.
+Nacos supports L4 service discovery; the configuration is similar to L7.
```shell
-$ curl http://127.0.0.1:9180/apisix/admin/stream_routes/1 -H "X-API-KEY:
$admin_key" -X PUT -i -d '
+curl http://127.0.0.1:9180/apisix/admin/stream_routes/1 -H "X-API-KEY:
$admin_key" -X PUT -i -d '
{
"remote_addr": "127.0.0.1",
"upstream": {
@@ -128,17 +119,17 @@ $ curl http://127.0.0.1:9180/apisix/admin/stream_routes/1
-H "X-API-KEY: $admin_
### discovery_args
-| Name | Type | Requirement | Default | Valid | Description
|
-| ------------ | ------ | ----------- | ------- | ----- |
------------------------------------------------------------ |
-| namespace_id | string | optional | public | | This parameter is
used to specify the namespace of the corresponding service |
-| group_name | string | optional | DEFAULT_GROUP | | This
parameter is used to specify the group of the corresponding service |
+| Name | Type | Required | Default | Description
|
+| -------------- | ------ | -------- | --------------- |
---------------------------------------------------- |
+| `namespace_id` | string | No | `public` | Nacos namespace
containing the service. |
+| `group_name` | string | No | `DEFAULT_GROUP` | Nacos group
containing the service in the namespace. |
#### Specify the namespace
-Example of routing a request with an URI of "/nacosWithNamespaceId/*" to a
service with name, namespaceId
"http://192.168.33.1:8848/nacos/v1/ns/instance/list?serviceName=APISIX-NACOS&namespaceId=test_ns";
and use nacos discovery client in the registry:
+The following Route selects service `APISIX-NACOS` in namespace `test_ns`:
```shell
-$ curl http://127.0.0.1:9180/apisix/admin/routes/2 -H "X-API-KEY: $admin_key"
-X PUT -i -d '
+curl http://127.0.0.1:9180/apisix/admin/routes/2 -H "X-API-KEY: $admin_key" -X
PUT -i -d '
{
"uri": "/nacosWithNamespaceId/*",
"upstream": {
@@ -152,41 +143,14 @@ $ curl http://127.0.0.1:9180/apisix/admin/routes/2 -H
"X-API-KEY: $admin_key" -X
}'
```
-The formatted response as below:
-
-```json
-{
- "node": {
- "key": "\/apisix\/routes\/2",
- "value": {
- "id": "2",
- "create_time": 1615796097,
- "status": 1,
- "update_time": 1615799165,
- "upstream": {
- "hash_on": "vars",
- "pass_host": "pass",
- "scheme": "http",
- "service_name": "APISIX-NACOS",
- "type": "roundrobin",
- "discovery_type": "nacos",
- "discovery_args": {
- "namespace_id": "test_ns"
- }
- },
- "priority": 0,
- "uri": "\/nacosWithNamespaceId\/*"
- }
- }
-}
-```
+A successful response returns the saved Route in the current Admin API
response format.
#### Specify the group
-Example of routing a request with an URI of "/nacosWithGroupName/*" to a
service with name, groupName
"http://192.168.33.1:8848/nacos/v1/ns/instance/list?serviceName=APISIX-NACOS&groupName=test_group";
and use nacos discovery client in the registry:
+The following Route selects service `APISIX-NACOS` in group `test_group`:
```shell
-$ curl http://127.0.0.1:9180/apisix/admin/routes/3 -H "X-API-KEY: $admin_key"
-X PUT -i -d '
+curl http://127.0.0.1:9180/apisix/admin/routes/3 -H "X-API-KEY: $admin_key" -X
PUT -i -d '
{
"uri": "/nacosWithGroupName/*",
"upstream": {
@@ -200,41 +164,14 @@ $ curl http://127.0.0.1:9180/apisix/admin/routes/3 -H
"X-API-KEY: $admin_key" -X
}'
```
-The formatted response as below:
-
-```json
-{
- "node": {
- "key": "\/apisix\/routes\/3",
- "value": {
- "id": "3",
- "create_time": 1615796097,
- "status": 1,
- "update_time": 1615799165,
- "upstream": {
- "hash_on": "vars",
- "pass_host": "pass",
- "scheme": "http",
- "service_name": "APISIX-NACOS",
- "type": "roundrobin",
- "discovery_type": "nacos",
- "discovery_args": {
- "group_name": "test_group"
- }
- },
- "priority": 0,
- "uri": "\/nacosWithGroupName\/*"
- }
- }
-}
-```
+A successful response returns the saved Route in the current Admin API
response format.
#### Specify the namespace and group
-Example of routing a request with an URI of
"/nacosWithNamespaceIdAndGroupName/*" to a service with name, namespaceId,
groupName
"http://192.168.33.1:8848/nacos/v1/ns/instance/list?serviceName=APISIX-NACOS&namespaceId=test_ns&groupName=test_group";
and use nacos discovery client in the registry:
+The following Route selects service `APISIX-NACOS` in namespace `test_ns` and
group `test_group`:
```shell
-$ curl http://127.0.0.1:9180/apisix/admin/routes/4 -H "X-API-KEY: $admin_key"
-X PUT -i -d '
+curl http://127.0.0.1:9180/apisix/admin/routes/4 -H "X-API-KEY: $admin_key" -X
PUT -i -d '
{
"uri": "/nacosWithNamespaceIdAndGroupName/*",
"upstream": {
@@ -249,32 +186,4 @@ $ curl http://127.0.0.1:9180/apisix/admin/routes/4 -H
"X-API-KEY: $admin_key" -X
}'
```
-The formatted response as below:
-
-```json
-{
- "node": {
- "key": "\/apisix\/routes\/4",
- "value": {
- "id": "4",
- "create_time": 1615796097,
- "status": 1,
- "update_time": 1615799165,
- "upstream": {
- "hash_on": "vars",
- "pass_host": "pass",
- "scheme": "http",
- "service_name": "APISIX-NACOS",
- "type": "roundrobin",
- "discovery_type": "nacos",
- "discovery_args": {
- "namespace_id": "test_ns",
- "group_name": "test_group"
- }
- },
- "priority": 0,
- "uri": "\/nacosWithNamespaceIdAndGroupName\/*"
- }
- }
-}
-```
+A successful response returns the saved Route in the current Admin API
response format.
diff --git a/docs/en/latest/installation-guide.md
b/docs/en/latest/installation-guide.md
index b77527725..28fdb8ac8 100644
--- a/docs/en/latest/installation-guide.md
+++ b/docs/en/latest/installation-guide.md
@@ -2,8 +2,9 @@
title: Installation
keywords:
- APISIX
- - Installation
-description: This document walks you through the different Apache APISIX
installation methods.
+ - APISIX Installation
+ - Install APISIX
+description: Choose and verify an Apache APISIX installation with Docker
Compose, Helm, Linux packages, or a source build, then configure its deployment
mode.
---
<!--
@@ -28,255 +29,175 @@ description: This document walks you through the
different Apache APISIX install
import Tabs from '@theme/Tabs';
import TabItem from '@theme/TabItem';
-This guide walks you through how you can install and run Apache APISIX in your
environment.
+This guide lists the supported installation paths for Apache APISIX and the
checks to run before you configure routes. For a short local walkthrough, start
with [Getting Started](./getting-started/README.md).
-Refer to the [Getting Started](./getting-started/README.md) guide for a quick
walk-through on running Apache APISIX.
+## Choose an installation method
-## Installing APISIX
+| Method | Appropriate starting point |
+| --- | --- |
+| Docker Compose | Local evaluation or a reproducible container-based
environment |
+| Helm | Kubernetes deployment managed with the official APISIX chart |
+| RPM or DEB | A supported Linux distribution managed by system packages |
+| Source build | Development or a build that requires reviewed compile-time
changes |
-APISIX can be installed by the different methods listed below:
+APISIX supports Linux for production. Confirm the supported architecture,
distribution, and component versions for the release you intend to deploy. Do
not copy a package filename or image tag from an older guide into production
without verifying that release.
+
+## Install APISIX
<Tabs
groupId="install-method"
defaultValue="docker"
values={[
- {label: 'Docker', value: 'docker'},
+ {label: 'Docker Compose', value: 'docker'},
{label: 'Helm', value: 'helm'},
{label: 'RPM', value: 'rpm'},
{label: 'DEB', value: 'deb'},
- {label: 'Source Code', value: 'source code'},
+ {label: 'Source Code', value: 'source'},
]}>
+
<TabItem value="docker">
-First clone the [apisix-docker](https://github.com/apache/apisix-docker)
repository:
+Clone the [apisix-docker](https://github.com/apache/apisix-docker) repository:
```shell
git clone https://github.com/apache/apisix-docker.git
cd apisix-docker/example
```
-Now, you can use `docker-compose` to start APISIX.
+:::warning Local example only
-<Tabs
- groupId="cpu-arch"
- defaultValue="x86"
- values={[
- {label: 'x86', value: 'x86'},
- {label: 'ARM/M1', value: 'arm'},
- ]}>
-<TabItem value="x86">
+The example configuration is not safe to expose on a shared or untrusted
network. Before starting it, bind the published Admin API (`9180`) and Control
API (`9092`) ports to `127.0.0.1` or remove those host-port mappings. Never
expose the [Control API](./control-api.md) to public traffic. Restrict the
metrics port (`9091`) to the intended monitoring path. If host access to etcd
is required, bind `2379` to `127.0.0.1`; otherwise remove its host-port
mapping. Also restrict `allow_admin` to [...]
-```shell
-docker-compose -p docker-apisix up -d
-```
+:::
-</TabItem>
+Start the Compose file that matches the host architecture:
-<TabItem value="arm">
+```shell title="x86_64"
+docker compose -p docker-apisix up -d
+```
-```shell
-docker-compose -p docker-apisix -f docker-compose-arm64.yml up -d
+```shell title="ARM64"
+docker compose -p docker-apisix -f docker-compose-arm64.yml up -d
```
-</TabItem>
-</Tabs>
+The example starts APISIX and its required configuration store. Review the
Compose file, image tags, exposed ports, credentials, volumes, and network
settings before every use and before adapting it to another environment.
</TabItem>
<TabItem value="helm">
-To install APISIX via Helm, run:
+Add the official chart repository and install APISIX in a dedicated namespace:
```shell
-helm repo add apisix https://charts.apiseven.com
+helm repo add apisix https://apache.github.io/apisix-helm-chart
helm repo update
-helm install apisix apisix/apisix --create-namespace --namespace apisix
-```
-
-You can find other Helm charts on the
[apisix-helm-chart](https://github.com/apache/apisix-helm-chart) repository.
-
-</TabItem>
-
-<TabItem value="rpm">
-
-This installation method is suitable for Redhat 8 and compatible systems. If
you choose this method to install APISIX, you need to install etcd first. For
the specific installation method, please refer to [Installing
etcd](#installing-etcd).
-
-### Installation via RPM repository
-
-```shell
-sudo yum-config-manager --add-repo
https://repos.apiseven.com/packages/redhat/apache-apisix.repo
-```
-
-Then, to install APISIX, run:
-
-```shell
-sudo yum install apisix
+helm install apisix apisix/apisix \
+ --namespace ingress-apisix \
+ --create-namespace
```
-:::tip
+:::warning Production configuration
-You can also install a specific version of APISIX by specifying it:
-
-```shell
-sudo yum install apisix-3.8.0
-```
+The chart's bundled etcd configuration is intended for development and testing,
+not as a production configuration store. For production, use a supported,
+version-pinned external etcd deployment with authentication, TLS, persistent
+storage, backup and recovery, and network isolation; configure the chart to use
+that deployment. Also review the rendered Services and network policies so the
+Admin API is reachable only from the intended operator path.
:::
-### Installation via RPM offline package
-
-First, download APISIX RPM offline package to an `apisix` folder:
-
-```shell
-sudo mkdir -p apisix
-sudo yum install -y
https://repos.apiseven.com/packages/redhat/8/x86_64/apisix-3.13.0-0.ubi8.6.x86_64.rpm
-sudo yum clean all && yum makecache
-sudo yum install -y --downloadonly --downloaddir=./apisix apisix
-```
-
-Then copy the `apisix` folder to the target host and run:
-
-```shell
-sudo yum install ./apisix/*.rpm
-```
-
-### Managing APISIX server
+See the [apisix-helm-chart
repository](https://github.com/apache/apisix-helm-chart) for current values,
supported Kubernetes versions, upgrade notes, and optional components. Pin the
chart and image versions used by your deployment.
-Once APISIX is installed, you can initialize the configuration file and etcd
by running:
+</TabItem>
-```shell
-apisix init
-```
+<TabItem value="rpm">
-To start APISIX server, run:
+For a distribution supported by the APISIX RPM repository, add the repository
and install the package:
```shell
-apisix start
+sudo dnf install -y dnf-plugins-core
+sudo dnf config-manager --add-repo \
+ https://repos.apiseven.com/packages/redhat/apache-apisix.repo
+sudo dnf install -y apisix
```
-:::tip
-
-Run `apisix help` to get a list of all available operations.
-
-:::
+On releases that use `yum` rather than `dnf`, install the
repository-management plugin supplied by that distribution before adding the
repository. Do not start APISIX until you complete the configuration-source and
Admin API steps below. Use `apisix help` to list the management commands
available in the installed release.
</TabItem>
<TabItem value="deb">
-### Installation via DEB repository
-
-Currently the only DEB repository supported by APISIX is Debian 12 and
supports both amd64 and arm64 architectures.
+The APISIX DEB repository supports selected Debian versions and architectures.
Verify the current repository support before installation. The following
example uses a dedicated keyring rather than the deprecated `apt-key` command:
```shell
-# amd64
-wget -O - http://repos.apiseven.com/pubkey.gpg | sudo apt-key add -
-echo "deb http://repos.apiseven.com/packages/debian debian12 main" | sudo tee
/etc/apt/sources.list.d/apisix.list
+sudo apt update
+sudo apt install -y ca-certificates curl gnupg
-# arm64
-wget -O - http://repos.apiseven.com/pubkey.gpg | sudo apt-key add -
-echo "deb http://repos.apiseven.com/packages/arm64/debian debian12 main" |
sudo tee /etc/apt/sources.list.d/apisix.list
-```
+curl -fsSL https://repos.apiseven.com/pubkey.gpg \
+ | sudo gpg --dearmor -o /usr/share/keyrings/apache-apisix.gpg
-Then, to install APISIX, run:
+case "$(dpkg --print-architecture)" in
+ amd64) repo_url="https://repos.apiseven.com/packages/debian"; ;;
+ arm64) repo_url="https://repos.apiseven.com/packages/arm64/debian"; ;;
+ *) echo "Unsupported architecture" >&2; exit 1 ;;
+esac
+
+echo "deb [signed-by=/usr/share/keyrings/apache-apisix.gpg] ${repo_url}
debian12 main" \
+ | sudo tee /etc/apt/sources.list.d/apache-apisix.list
-```shell
sudo apt update
sudo apt install -y apisix
```
-### Managing APISIX server
-
-Once APISIX is installed, you can initialize the configuration file and etcd
by running:
-
-```shell
-sudo apisix init
-```
-
-To start APISIX server, run:
-
-```shell
-sudo apisix start
-```
+Do not start APISIX until you complete the configuration-source and Admin API
steps below.
-:::tip
+</TabItem>
-Run `apisix help` to get a list of all available operations.
+<TabItem value="source">
-:::
+Follow [Building APISIX from source](./building-apisix.md). Record the source
commit, OpenResty version, dependencies, build options, and generated package
or image so the build can be reproduced.
</TabItem>
-<TabItem value="source code">
+</Tabs>
-If you want to build APISIX from source, please refer to [Building APISIX from
source](./building-apisix.md).
+## Select the configuration source
-</TabItem>
-</Tabs>
+Choose the [deployment mode](./deployment-modes.md) before starting a
production node:
-## Installing etcd
+- **Traditional and decoupled modes** use etcd as the configuration store.
Secure a networked etcd deployment with authentication, TLS, and network
isolation.
+- **Standalone file-driven mode** loads a full YAML or JSON configuration from
the local filesystem and does not use etcd as its configuration center.
+- **Standalone API-driven mode** stores full configuration in memory and is
intended for defined integrations such as the APISIX Ingress Controller and
ADC. Review its full-replacement and versioning behavior before use.
-APISIX uses [etcd](https://github.com/etcd-io/etcd) to save and synchronize
configuration. Before installing APISIX, you need to install etcd on your
machine.
+Docker Compose and Helm examples can provision an example etcd instance for
you;
+do not treat that as a production etcd design. For a production deployment or a
+package or source installation in an etcd-backed mode, install a supported etcd
+release by following the
+[official etcd installation documentation](https://etcd.io/docs/). Confirm
+connectivity and version compatibility before starting APISIX.
-It would be installed automatically if you choose the Docker or Helm install
method while installing APISIX. If you choose a different method or you need to
install it manually, follow the steps shown below:
+## Configure APISIX
-<Tabs
- groupId="os"
- defaultValue="linux"
- values={[
- {label: 'Linux', value: 'linux'},
- {label: 'macOS', value: 'mac'},
- ]}>
-<TabItem value="linux">
+APISIX reads `conf/config.yaml` by default. Edit that file before running the
configuration test:
```shell
-ETCD_VERSION='3.5.4'
-wget
https://github.com/etcd-io/etcd/releases/download/v${ETCD_VERSION}/etcd-v${ETCD_VERSION}-linux-amd64.tar.gz
-tar -xvf etcd-v${ETCD_VERSION}-linux-amd64.tar.gz && \
- cd etcd-v${ETCD_VERSION}-linux-amd64 && \
- sudo cp -a etcd etcdctl /usr/bin/
-nohup etcd >/tmp/etcd.log 2>&1 &
+apisix test
```
-</TabItem>
-
-<TabItem value="mac">
+To start APISIX with a different configuration file, pass `--config` or `-c`
to `apisix start`. The `apisix test` command does not accept this option:
```shell
-brew install etcd
-brew services start etcd
+apisix start -c /path/to/config.yaml
```
-</TabItem>
-</Tabs>
-
-## Next steps
+Only include values you need to override. APISIX uses its packaged defaults
for other settings. Do not edit the generated `conf/nginx.conf` directly.
-### Configuring APISIX
-
-You can configure your APISIX deployment in two ways:
-
-1. By directly changing your configuration file (`conf/config.yaml`).
-2. By using the `--config` or the `-c` flag to pass the path to your
configuration file while starting APISIX.
-
- ```shell
- apisix start -c <path to config file>
- ```
-
-APISIX will use the configurations added in this configuration file and will
fall back to the default configuration if anything is not configured. The
default configurations can be found in `apisix/cli/config.lua` and should not
be modified.
-
-For example, to configure the default listening port to be `8000` without
changing other configurations, your configuration file could look like this:
-
-```yaml title="conf/config.yaml"
-apisix:
- node_listen: 8000
-```
-
-Now, if you decide you want to change the etcd address to `http://foo:2379`,
you can add it to your configuration file. This will not change other
configurations.
+For example, an etcd-backed traditional node can set its listener and etcd
endpoint as follows:
```yaml title="conf/config.yaml"
apisix:
- node_listen: 8000
+ node_listen: 9080
deployment:
role: traditional
@@ -284,49 +205,71 @@ deployment:
config_provider: etcd
etcd:
host:
- - "http://foo:2379";
+ - "https://etcd.example:2379";
```
-:::warning
-
-The `conf/nginx.conf` file is automatically generated and should not be
modified.
+Configure etcd authentication and TLS fields for the selected environment. A
URL beginning with `https://` alone is not sufficient proof that peer
verification and credentials are correct.
-:::
+## Protect the Admin API
-### APISIX deployment modes
+Replace the documented development key, restrict `allow_admin` to operator
networks, and deliver the key through the secret mechanism used by your
deployment. The environment variable below must exist in the APISIX process
environment; defining it only in an interactive shell does not configure a
service managed by systemd or another supervisor.
-APISIX has three different deployment modes for different use cases. To learn
more and configure deployment modes, see the
[documentation](./deployment-modes.md).
+For a local package evaluation, generate a key before writing the
configuration:
-### Updating Admin API key
-
-It is recommended to modify the Admin API key to ensure security.
+```shell
+export ADMIN_KEY="$(openssl rand -hex 32)"
+```
-You can update your configuration file as shown below:
+Then reference that variable in `conf/config.yaml`:
```yaml title="conf/config.yaml"
deployment:
admin:
+ allow_admin:
+ - 127.0.0.0/24
admin_key:
- - name: "admin"
- key: newsupersecurekey
+ - name: admin
+ key: ${{ADMIN_KEY}}
role: admin
```
-Now, to access the Admin API, you can use the new key:
+The data-plane rate-limiting plugins do not protect the Admin API. Keep the
Admin API off untrusted networks and apply the operational controls described
in the [Admin API documentation](./admin-api.md).
+
+After configuring the selected mode and its actual configuration source,
preserve the key across the first privileged APISIX commands:
```shell
-curl http://127.0.0.1:9180/apisix/admin/routes?api_key=newsupersecurekey -i
+sudo --preserve-env=ADMIN_KEY apisix init
+sudo --preserve-env=ADMIN_KEY apisix test
+sudo --preserve-env=ADMIN_KEY apisix start
```
-### Adding APISIX systemd unit file
+For a managed installation, inject the same value through a restricted service
environment file or secret manager instead of relying on a shell export.
Configure and verify etcd first when using an etcd-backed mode. After any
configuration change, run `apisix test` and then reload or restart APISIX in
the same controlled environment.
-If you installed APISIX via RPM, the APISIX unit file will already be
configured and you can start APISIX by:
+Do not put an Admin API key in a URL. Once APISIX is running, send it in the
required header:
```shell
-systemctl start apisix
-systemctl stop apisix
+curl "http://127.0.0.1:9180/apisix/admin/routes"; \
+ -H "X-API-KEY: ${ADMIN_KEY}"
```
-If you installed APISIX through other methods, you can create
`/usr/lib/systemd/system/apisix.service` and add the [configuration from the
template](https://github.com/api7/apisix-build-tools/blob/master/usr/lib/systemd/system/apisix.service).
+## Verify the installation
+
+For a package or source installation, validate the generated NGINX
configuration before start or reload:
+
+```shell
+apisix version
+apisix test
+curl -i "http://127.0.0.1:9080/";
+```
+
+Before a Route is configured, the data-plane request can return `404`; the
purpose of this check is to confirm that the intended listener responds. Use
the Admin API check above to confirm control-plane access.
+
+For a container or Kubernetes installation, use the corresponding container
and workload status commands, then inspect the APISIX logs. Verify all of the
following before configuring production traffic:
+
+- the expected APISIX version and image or package digest are running;
+- the data-plane and Admin API ports are exposed only where intended;
+- the selected configuration source is reachable and updates are applied;
+- the Admin API rejects missing or invalid credentials; and
+- a test Route reaches its intended upstream and fails safely when that
upstream is unavailable.
-See the [Getting Started](./getting-started/README.md) guide for a quick
walk-through of using APISIX.
+Continue with [Getting Started](./getting-started/README.md) to create and
verify a Route.
diff --git a/docs/en/latest/terminology/api-gateway.md
b/docs/en/latest/terminology/api-gateway.md
index 7cbd2e4ac..b6b0b9c55 100644
--- a/docs/en/latest/terminology/api-gateway.md
+++ b/docs/en/latest/terminology/api-gateway.md
@@ -4,7 +4,7 @@ keywords:
- Apache APISIX
- API Gateway
- Gateway
-description: This article mainly introduces the role of the API gateway and
why it is needed.
+description: Learn what an API gateway does, where it fits in an API
architecture, and which responsibilities remain with services and other
infrastructure.
---
<!--
@@ -28,17 +28,24 @@ description: This article mainly introduces the role of the
API gateway and why
## Description
-An API gateway is a software pattern that sits in front of an application
programming interface (API) or group of microservices, to facilitate requests
and delivery of data and services. Its primary role is to act as a single entry
point and standardized process for interactions between an organization's apps,
data, and services and internal and external customers. The API gateway can
also perform various other functions to support and manage API usage, from
authentication to rate limiti [...]
+An API gateway is a reverse-proxy component placed between API clients and
upstream services. It matches incoming requests, selects an upstream, and
proxies the request and response across that boundary. A deployment can use one
public gateway, several gateways by region or environment, or a gateway
dedicated to a particular application audience.
-An API gateway also acts as a gateway between the API and the underlying
infrastructure. It can be used to route requests to different backends, such as
a load balancer, or route requests to different services based on the request
headers.
+Depending on the product and enabled policies, an API gateway can also perform
authentication, traffic limiting, request or response transformation,
observability, and other cross-cutting functions. These capabilities are not
enabled automatically and do not replace service-level authorization, data
validation, workflow state, or business logic.
## Why use an API gateway?
-An API gateway comes with a lot of benefits over a traditional API
microservice. The following are some of the benefits:
+An API gateway can provide:
-- It is a single entry point for all API requests.
-- It can be used to route requests to different backends, such as a load
balancer, or route requests to different services based on the request headers.
-- It can be used to perform authentication, authorization, and rate-limiting.
-- It can be used to support analytics, such as monitoring, logging, and
tracing.
-- It can protect the API from malicious attack vectors such as SQL injections,
DDOS attacks, and XSS.
-- It decreases the complexity of the API and microservices.
+- a controlled entry point for selected APIs;
+- routing and load balancing across upstream services;
+- consistent enforcement of configured authentication and traffic policies;
+- protocol- and request-level telemetry at the gateway boundary; and
+- a place to apply shared transformations when their ownership and failure
behavior are clear.
+
+The gateway is one component in the request path. A service must still
authorize access to its resources and enforce business invariants. Rate
limiting can reduce abusive traffic but does not, by itself, provide complete
denial-of-service protection. Request filtering also does not make an upstream
safe from every injection or application vulnerability.
+
+## API gateway in Apache APISIX
+
+Apache APISIX matches [Routes](./route.md), selects
[Upstreams](./upstream.md), and runs explicitly configured
[plugins](https://apisix.apache.org/plugins/) on the request path. Its topology
and configuration source depend on the selected [deployment
mode](../deployment-modes.md), including traditional, decoupled, and standalone
modes.
+
+For implementation details, see the [APISIX
architecture](../architecture-design/apisix.md) and [getting started
guide](../getting-started/README.md).
diff --git a/docs/en/latest/tutorials/cache-api-responses.md
b/docs/en/latest/tutorials/cache-api-responses.md
index 717d44512..1619f808b 100644
--- a/docs/en/latest/tutorials/cache-api-responses.md
+++ b/docs/en/latest/tutorials/cache-api-responses.md
@@ -3,9 +3,9 @@ title: Cache API responses
keywords:
- API Gateway
- Apache APISIX
- - Cache
- - Performance
-description: This tutorial will focus primarily on handling caching at the API
Gateway level by using Apache APISIX API Gateway and you will learn how to use
proxy-caching plugin to improve response efficiency for your Web or
Microservices API.
+ - API Response Cache
+ - Proxy Cache
+description: Configure and verify Apache APISIX proxy-cache for API responses,
including cache keys, TTL, identity isolation, sensitive data, and invalidation.
---
<!--
@@ -27,205 +27,116 @@ description: This tutorial will focus primarily on
handling caching at the API G
#
-->
-This tutorial will focus primarily on handling caching at the API Gateway
level by using Apache APISIX API Gateway and you will learn how to use the
proxy-cache plugin to improve response efficiency for your Web or Microservices
API.
+The [`proxy-cache` plugin](../plugins/proxy-cache.md) can serve a stored
upstream response when a later request produces the same effective cache key.
This can reduce upstream work and response latency for content that is safe to
reuse. It does not make every successful response cacheable, and it does not
replace an application-level freshness or invalidation design.
-**Here is an overview of what we cover in this walkthrough:**
+This tutorial configures a disk-backed cache for one public `GET` endpoint and
verifies `MISS`, `HIT`, and expiration behavior.
-- Caching in API Gateway
-- About [Apache APISIX API
Gateway](https://apisix.apache.org/docs/apisix/getting-started/)
-- Run the demo project
[apisix-dotnet-docker](https://github.com/Boburmirzo/apisix-dotnet-docker)
-- Configure the [Proxy
Cache](https://apisix.apache.org/docs/apisix/plugins/proxy-cache/) plugin
-- Validate Proxy Caching
+## Before you cache a response
-## Improve performance with caching
+Define these properties first:
-When you are building an API, you want to keep it simple and fast. Once the
concurrent need to read the same data increase, you'll face a few issues where
you might be considering introducing **caching**:
+- **Cacheable content:** Cache only responses whose reuse is valid. The plugin
does not cache upstream responses carrying `Cache-Control: private`,
`no-store`, or `no-cache`. It also avoids `Set-Cookie` responses by default.
+- **Cache key:** The default key is `[$host, $request_uri]`, so the query
string is included. The plugin also honors upstream `Vary`. Keep the default
unless another verified request dimension changes the response. `cache_key`
array values are concatenated without an automatic separator; if you build a
custom multidimensional key, insert an explicit constant delimiter that cannot
occur in the normalized inputs and test for collisions.
+- **Identity boundary:** `consumer_isolation` defaults to `true`, but it
partitions only when APISIX has resolved a Consumer or `remote_user`. Prefer
that built-in partitioning for authenticated Consumers. A bearer token or
arbitrary tenant header does not automatically create a safe per-user
namespace. If you include an identity variable in a custom `cache_key`,
built-in consumer isolation becomes a no-op, so the custom key must provide an
unambiguous, tested identity boundary. Otherwis [...]
+- **TTL and invalidation:** Choose a TTL from the data's freshness requirement
and define how an operator or publisher removes stale entries. Disk-cache TTL
comes from upstream cache headers or the static cache-zone configuration.
+- **Failure behavior:** A cached response can remain available while an
upstream is unhealthy. Decide whether that behavior is acceptable for the data
rather than treating it as automatic availability protection.
-- There is latency on some API requests which is noticeably affecting the
user's experience.
-- Fetching data from a database takes more time to respond.
-- Availability of your API is threatened by the API's high throughput.
-- There are some network failures in getting frequently accessed information
from your API.
+## Prerequisites
-## Caching in API Gateway
+Ensure that Apache APISIX is running and that you can reach its Admin API from
an operator environment. The default configuration includes the disk cache zone
`disk_cache_one`.
-[Caching](https://en.wikipedia.org/wiki/Cache_(computing)) is capable of
storing and retrieving network requests and their corresponding responses.
Caching happens at different levels in a web application:
-
-- Edge caching or CDN
-- Database caching
-- Server caching (API caching)
-- Browser caching
-
-**Reverse Proxy Caching** is yet another caching mechanism that is usually
implemented inside **API Gateway**. It can reduce the number of calls made to
your endpoint and also improve the latency of requests to your API by caching a
response from the upstream. If the API Gateway cache has a fresh copy of the
requested resource, it uses that copy to satisfy the request directly instead
of making a request to the endpoint. If the cached data is not found, the
request travels to the intende [...]
-
-## Apache APISIX API Gateway Proxy Caching
-
-With the help of Apache APISIX, you can enable API caching with
[proxy-cache](https://apisix.apache.org/docs/apisix/plugins/proxy-cache/)
plugin to cache your API endpoint's responses and enhance the performance. It
can be used together with other Plugins too and currently supports disk-based
caching. The data to be cached can be filtered with _responseCodes_,
_requestModes_, or more complex methods using the _noCache_ and _cacheByPass_
attributes. You can specify cache expiration time o [...]
-
-With all this in mind, we'll look next at an example of using `proxy-cache`
plugin offered by Apache APISIX and apply it for ASP.NET Core Web API with a
single endpoint.
-
-## Run the demo project
-
-Until now, I assume that you have the demo project
[apisix-dotnet-docker](https://github.com/Boburmirzo/apisix-dotnet-docker) is
up and running. You can see the complete source code on **Github** and the
instruction on how to build a multi-container **APISIX** via **Docker CLI**.
-
-In the **ASP.NET Core project**, there is a simple API to get all products
list from the service layer in
[ProductsController.cs](https://github.com/Boburmirzo/apisix-dotnet-docker/blob/main/ProductApi/Controllers/ProductsController.cs)
file.
-
-Let's assume that this product list is usually updated only once a day and the
endpoint receives repeated billions of requests every day to fetch the product
list partially or all of them. In this scenario, using API caching technique
with `proxy-cache` plugin might be really helpful. For the demo purpose, we
only enable caching for `GET` method.
-
-> Ideally, `GET` requests should be cacheable by default - until a special
condition arises.
-
-## Configure the Proxy Cache Plugin
-
-Now let's start with adding `proxy-cache` plugin to Apache APISIX declarative
configuration file `config.yaml` in the project. Because in the current
project, we have not registered yet the plugin we are going to use for this
demo. We appended `proxy-cache` plugin's name to the end of plugins list:
-
-``` yaml
-plugins:
- - http-logger
- - ip-restriction
- …
- - proxy-cache
-```
-
-You can add your cache configuration in the same file if you need to specify
values like _disk_size, memory_size_ as shown below:
-
-``` yaml
-proxy_cache:
- cache_ttl: 10s # default caching time if the upstream doesn't specify the
caching time
- zones:
- - name: disk_cache_one # name of the cache. Admin can specify which cache to
use in the Admin API by name
- memory_size: 50m # size of shared memory, used to store the cache index
- disk_size: 1G # size of disk, used to store the cache data
- disk_path: "/tmp/disk_cache_one" # path to store the cache data
- cache_levels: "1:2" # hierarchy levels of the cache
-```
-
-Next, we can directly run `apisix reload` command to reload the latest plugin
code without restarting Apache APISIX. See the command to reload the newly
added plugin:
-
-:::note
-You can fetch the `admin_key` from `config.yaml` and save to an environment
variable with the following command:
+For this local example, reuse the resolved Admin API secret from the
environment that starts APISIX:
```bash
-admin_key=$(yq '.deployment.admin.admin_key[0].key' conf/config.yaml | sed
's/"//g')
+admin_key="${ADMIN_KEY:?ADMIN_KEY is not set}"
```
-:::
-
-``` shell
-curl http://127.0.0.1:9180/apisix/admin/plugins/reload -H "X-API-KEY:
$admin_key" -X PUT
-```
+If a local test configuration contains the actual key rather than an
environment or secret reference, you can read that literal value with
`admin_key="$(yq -r '.deployment.admin.admin_key[0].key' conf/config.yaml)"`.
`yq` does not resolve `${{VARIABLE}}` templates or external secrets.
-Then, we run two more curl commands to configure an Upstream and Route for the
`/api/products` endpoint. The following command creates a sample upstream
(that's our API Server):
+## Configure a cached route
-``` shell
-curl "http://127.0.0.1:9180/apisix/admin/upstreams/1"; -H "X-API-KEY:
$admin_key" -X PUT -d '
-{
- "type": "roundrobin",
- "nodes": {
- "productapi:80": 1
- }
-}'
-```
+Create a Route that caches only successful `GET` responses:
-Next, we will add a new route with caching ability by setting `proxy-cache`
plugin in `plugins` property and giving a reference to the upstream service by
its unique id to forward requests to the API server:
-
-``` shell
-curl "http://127.0.0.1:9180/apisix/admin/routes/1"; -H "X-API-KEY: $admin_key"
-X PUT -d '{
- "name": "Route for API Caching",
- "methods": [
- "GET"
- ],
- "uri": "/api/products",
- "plugins": {
- "proxy-cache": {
- "cache_key": [
- "$uri",
- "-cache-id"
- ],
- "cache_bypass": [
- "$arg_bypass"
- ],
- "cache_method": [
- "GET"
- ],
- "cache_http_status": [
- 200
- ],
- "hide_cache_headers": true,
- "no_cache": [
- "$arg_test"
- ]
+```shell
+curl "http://127.0.0.1:9180/apisix/admin/routes/proxy-cache-demo"; -X PUT \
+ -H "X-API-KEY: ${admin_key}" \
+ -H "Content-Type: application/json" \
+ -d '{
+ "uri": "/anything",
+ "methods": ["GET"],
+ "plugins": {
+ "proxy-cache": {
+ "cache_strategy": "disk",
+ "cache_zone": "disk_cache_one",
+ "cache_key": ["$host", "$request_uri"],
+ "cache_method": ["GET"],
+ "cache_http_status": [200],
+ "consumer_isolation": true
+ }
+ },
+ "upstream": {
+ "type": "roundrobin",
+ "nodes": {
+ "httpbin.org:80": 1
+ }
}
- },
- "upstream_id": 1
-}'
+ }'
```
-As you can see in the above configuration, we defined some plugin attributes
that we want to cache only successful responses from the `GET` method of API.
-
-## Validate Proxy Caching
+The example deliberately limits `cache_http_status` to `200`; the plugin's
broader defaults also include `301` and `404`. Review status codes explicitly
for each route.
-Finally, we can test the proxy caching if it is working as it is expected.
+## Verify cache behavior
-We will send multiple requests to the `/api/products` path and we should
receive `HTTP 200 OK` response each time. However, the `Apisix-Cache-Status` in
the response shows _MISS_ meaning that the response has not cached yet when the
request hits the route for the first time. Now, if you make another request,
you will see that you get a cached response with the caching indicator as _HIT_.
+Send the first request:
-Now we can make an initial request:
-
-``` shell
-curl http://localhost:9080/api/products -i
+```shell
+curl -i "http://127.0.0.1:9080/anything?item=1";
```
-The response looks like as below:
+The first response should include:
-``` shell
-HTTP/1.1 200 OK
-…
+```text
Apisix-Cache-Status: MISS
```
-When you do the next call to the service, the route responds to the request
with a cached response since it has already cached in the previous request:
+Send the same request again before the entry expires. It should include:
-``` shell
-HTTP/1.1 200 OK
-…
+```text
Apisix-Cache-Status: HIT
```
-Or if you try again to hit the endpoint after the time-to-live (TTL) period
for the cache ends, you will get:
-
-``` shell
-HTTP/1.1 200 OK
-…
-Apisix-Cache-Status: EXPIRED
-```
+A request with a different query string, such as `?item=2`, has a different
default cache key and should initially return `MISS`. After the TTL expires,
the next request can report `EXPIRED` while APISIX refreshes the entry from the
upstream.
-Excellent! We enabled caching for our API endpoint.
+Verify the response body as well as the status header. A `HIT` only proves
that APISIX found a matching cache entry; it does not prove that the entry
contains the correct tenant, authorization, language, or current business state.
-### Additional test case
+## Configure a disk-cache TTL
-Optionally, you can also add some delay in the Product controller code and
measure response time properly with and without cache:
+For disk caching, set the fallback TTL in the static cache-zone configuration.
Upstream `Cache-Control` or `Expires` headers can determine the effective TTL;
the fallback applies when those headers do not provide one, and to the
documented unavailable-upstream error cases.
-``` c#
- [HttpGet]
- public IActionResult GetAll()
- {
- Console.Write("The delay starts.\n");
- System.Threading.Thread.Sleep(5000);
- Console.Write("The delay ends.");
- return Ok(_productsService.GetAll());
- }
+```yaml title="conf/config.yaml"
+apisix:
+ proxy_cache:
+ cache_ttl: 60s
+ zones:
+ - name: disk_cache_one
+ memory_size: 50m
+ disk_size: 1G
+ disk_path: /tmp/disk_cache_one
+ cache_levels: "1:2"
```
-The `curl` command to check response time would be:
-
-```shell
-curl -i 'http://localhost:9080/api/products' -s -o /dev/null -w "Response
time: %{time_starttransfer} seconds\n"
-```
+Reload APISIX after changing the static cache-zone configuration. Size the
memory index, disk capacity, and filesystem permissions for the expected key
count and response volume.
-## What's next
+## Invalidate and protect cached data
-As we learned, it is easy to configure and quick to set up API response
caching for our ASP.NET Core WEB API with the help of Apache APISIX. It can
reduce significantly the number of calls made to your endpoint and also improve
the latency of requests to your API. There are other numerous built-in plugins
available in Apache APISIX, you can check them on [Plugin Hub
page](https://apisix.apache.org/plugins) and use them per your need.
+Expiration is the simplest invalidation mechanism. The plugin also handles the
`PURGE` method for the effective cache key, but a public `GET` Route does not
need to accept `PURGE`. If you enable purge access, put it on a separately
authenticated and network-restricted operator path, verify the exact key and
identity namespace being purged, and audit the action. An unauthenticated purge
endpoint would allow clients to evict cached content.
-## Recommended content
+Before using the route in production, test the following:
-You can refer to [Expose API](./protect-api.md) to learn about how to expose
your first API.
+- authenticated and unauthenticated requests cannot share private data;
+- upstream `Cache-Control`, `Expires`, `Vary`, and `Set-Cookie` behavior
matches the intended policy;
+- key inputs are verified and contain no raw credentials;
+- TTL and purge remove the expected variants; and
+- cache storage limits, error paths, and upstream recovery are observable.
-You can refer to [Protect API](./protect-api.md) to protect your API.
+For all plugin attributes, memory-cache behavior, and additional configuration
interfaces, see the [`proxy-cache` plugin reference](../plugins/proxy-cache.md).
diff --git a/docs/en/latest/tutorials/websocket-authentication.md
b/docs/en/latest/tutorials/websocket-authentication.md
index 5b74891c4..06a6f1726 100644
--- a/docs/en/latest/tutorials/websocket-authentication.md
+++ b/docs/en/latest/tutorials/websocket-authentication.md
@@ -5,7 +5,7 @@ keywords:
- Apache APISIX
- WebSocket
- Authentication
-description: This article is a guide on how to configure authentication for
WebSocket connections.
+description: Configure Apache APISIX to authenticate a WebSocket HTTP upgrade
request and understand the browser, session, and upstream security boundaries.
---
<!--
@@ -27,112 +27,126 @@ description: This article is a guide on how to configure
authentication for WebS
#
-->
-Apache APISIX supports [WebSocket](https://en.wikipedia.org/wiki/WebSocket)
traffic, but the WebSocket protocol doesn't handle authentication. This article
guides you on how to configure authentication for WebSocket connections using
Apache APISIX.
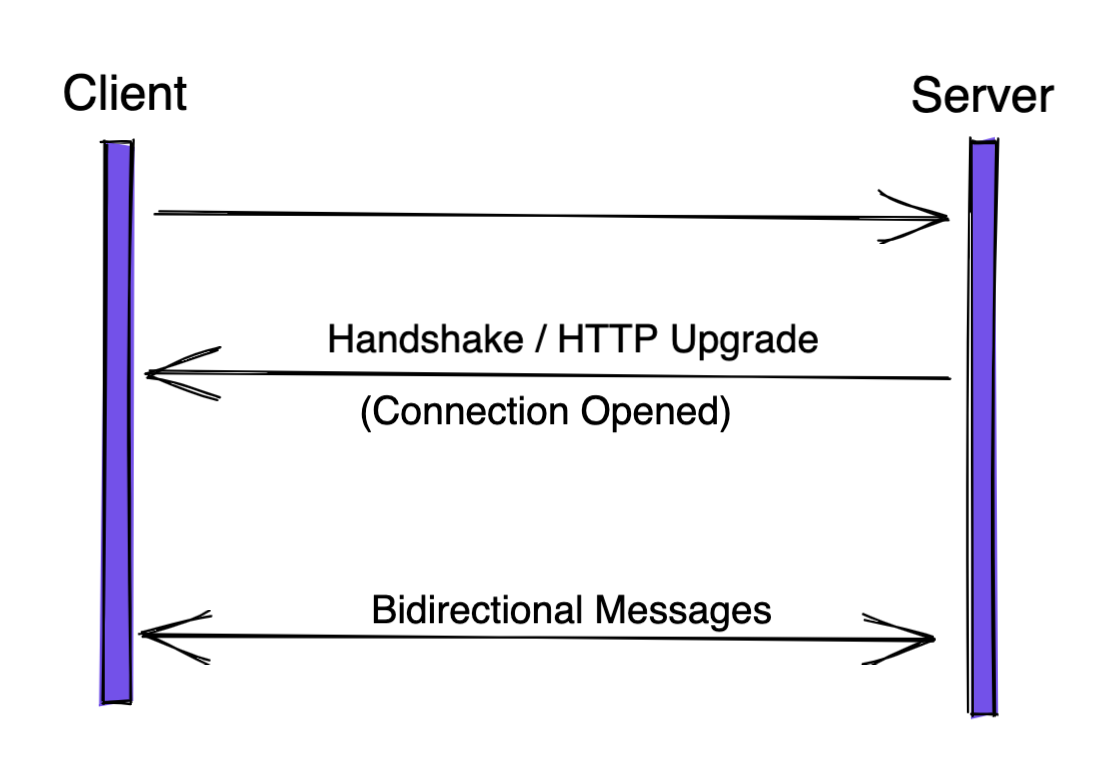
+A WebSocket connection begins as an HTTP upgrade request. Apache APISIX can
run an authentication plugin on that handshake and reject the request before
the upstream returns `101 Switching Protocols`. After the upgrade succeeds,
APISIX proxies WebSocket frames; HTTP authentication plugins are not re-run for
each frame.
-## WebSocket Protocol
+This tutorial uses [`key-auth`](../plugins/key-auth.md) to demonstrate
handshake authentication for a non-browser client that can set a custom header.
-To establish a WebSocket connection, the client sends a WebSocket handshake
request, for which the server returns a WebSocket handshake response as shown
below:
+## WebSocket authentication boundaries
-```text title="Client request"
-GET /chat HTTP/1.1
-Host: server.example.com
-Upgrade: websocket
-Connection: Upgrade
-Sec-WebSocket-Key: x3JJHMbDL1EzLkh9GBhXDw==
-Sec-WebSocket-Protocol: chat, superchat
-Sec-WebSocket-Version: 13
-Origin: http://example.com
-```
-
-```text title="Server response"
-HTTP/1.1 101 Switching Protocols
-Upgrade: websocket
-Connection: Upgrade
-Sec-WebSocket-Accept: HSmrc0sMlYUkAGmm5OPpG2HaGWk=
-Sec-WebSocket-Protocol: chat
-```
-
-The handshake workflow is shown below:
+Design the connection lifecycle before choosing a credential:
-
-
-## WebSocket Authentication
-
-APISIX supports several authentication methods like
[basic-auth](https://apisix.apache.org/docs/apisix/plugins/basic-auth/),
[key-auth](https://apisix.apache.org/docs/apisix/plugins/key-auth/), and
[jwt-auth](https://apisix.apache.org/docs/apisix/plugins/jwt-auth/).
-
-While establishing connections from the client to server in the _handshake_
phase, APISIX first checks its authentication information before choosing to
forward the request or deny it.
+- Standard browser WebSocket APIs cannot set an arbitrary `apikey` or
`Authorization` header. Do not put a long-lived secret in the URL to work
around that limitation. Use an application-specific short-lived ticket, a
protected session established over HTTPS, or another browser-compatible design
whose replay and authorization behavior you have defined.
+- Browser CORS policy does not automatically authorize a WebSocket connection.
Validate the `Origin` at a trusted component when your application relies on an
origin allowlist.
+- A successful handshake authenticates the connection at that moment. If a
credential expires or is revoked, the application must define whether to close,
reauthenticate, or otherwise reauthorize an existing long-lived connection.
+- The upstream service still owns per-message and resource-level
authorization. It must not trust identity headers supplied directly by the
client; the gateway should strip or overwrite them at the trust boundary.
## Prerequisites
-Before you move on, make sure you have:
-
-1. A WebSocket server as the Upstream. This article uses [Postman's public
echo
service](https://blog.postman.com/introducing-postman-websocket-echo-service/):
`wss://ws.postman-echo.com/raw`.
-2. APISIX 3.0 installed.
+Before you begin, ensure that you have:
-## Configuring Authentication
+1. Apache APISIX installed and the Admin API reachable from an operator
environment. The `tls.verify` setting used below requires an [APISIX-Runtime
build](../FAQ.md#how-do-i-build-the-apisix-runtime-environment).
+2. A WebSocket upstream. This example uses Postman's public echo service at
`wss://ws.postman-echo.com/raw`; use a controlled test server if an external
service is unsuitable for your environment.
+3. A WebSocket client that can set custom headers, such as `websocat`.
-### Create a Route
+## Create a WebSocket route
-First we will create a Route to the Upstream echo service.
-
-Since the Upstream uses wss protocol, the scheme is set to `https`. We should
also set `enable_websocket` to `true`.
-
-In this tutorial, we will use the
[key-auth](https://apisix.apache.org/docs/apisix/plugins/key-auth/) Plugin.
This would work similarly for other authentication methods:
-
-:::note
-You can fetch the `admin_key` from `config.yaml` and save it to an environment
variable with the following command:
+Reuse the resolved Admin API secret from the environment that starts APISIX:
```bash
-admin_key=$(yq '.deployment.admin.admin_key[0].key' conf/config.yaml | sed
's/"//g')
+admin_key="${ADMIN_KEY:?ADMIN_KEY is not set}"
```
-:::
+If a local test configuration contains the actual key rather than an
environment or secret reference, you can read that literal value with
`admin_key="$(yq -r '.deployment.admin.admin_key[0].key' conf/config.yaml)"`.
`yq` does not resolve `${{VARIABLE}}` templates or external secrets.
+
+Create a Route that enables WebSocket proxying and authenticates the upgrade
request:
```shell
-curl --location --request PUT 'http://127.0.0.1:9180/apisix/admin/routes/1' \
---header 'X-API-KEY: $admin_key' \
---header 'Content-Type: application/json' \
---data-raw '{
- "uri": "/*",
+curl "http://127.0.0.1:9180/apisix/admin/routes/websocket-auth"; -X PUT \
+ -H "X-API-KEY: ${admin_key}" \
+ -H "Content-Type: application/json" \
+ -d '{
+ "uri": "/raw",
"methods": ["GET"],
"enable_websocket": true,
- "upstream": {
- "type": "roundrobin",
- "nodes": {
- "ws.postman-echo.com:443": 1
- },
- "scheme": "https"
- },
"plugins": {
- "key-auth": {}
+ "key-auth": {
+ "hide_credentials": true
+ }
+ },
+ "upstream": {
+ "type": "roundrobin",
+ "scheme": "https",
+ "pass_host": "node",
+ "tls": {
+ "verify": true
+ },
+ "nodes": {
+ "ws.postman-echo.com:443": 1
+ }
}
-}'
+ }'
```
-### Create a Consumer
+`enable_websocket` enables the protocol upgrade on the Route. The upstream
+`scheme: https` corresponds to `wss://` for the proxied WebSocket connection.
+`pass_host: node` sends the node hostname as the upstream `Host` and TLS server
+name instead of forwarding the client's `127.0.0.1` host.
+
+On an APISIX-Runtime build, `tls.verify: true` verifies the upstream
certificate
+using the CA certificates in `upstream.tls.ca_certs`, or the
+`ssl_trusted_certificate` configured in `conf/config.yaml` when the Upstream
does
+not provide its own CA certificates. Keep verification enabled for
authenticated
+upstream TLS, and supply the appropriate private CA when the WebSocket service
+does not use a publicly trusted certificate. See the
+[Upstream section of the Admin API](../admin-api.md#upstream) for the current
TLS
+fields. A standard APISIX build without the required runtime modules cannot
apply
+these verification fields; use a controlled proxy or service-mesh hop that
+verifies the upstream identity instead of sending sensitive traffic over an
+unauthenticated upstream TLS connection.
-We will now create a
[Consumer](https://apisix.apache.org/docs/apisix/terminology/consumer/) and add
a key `this_is_the_key`. A user would now need to use this key configured in
the Consumer object to access the API.
+## Create a Consumer credential
-```sh
-curl --location --request PUT
'http://127.0.0.1:9180/apisix/admin/consumers/jack' \
---header 'X-API-KEY: $admin_key' \
---header 'Content-Type: application/json' \
---data-raw '{
- "username": "jack",
+Create a Consumer and a separate `key-auth` credential:
+
+```shell
+curl "http://127.0.0.1:9180/apisix/admin/consumers/jack"; -X PUT \
+ -H "X-API-KEY: ${admin_key}" \
+ -H "Content-Type: application/json" \
+ -d '{
+ "username": "jack"
+ }'
+```
+
+```shell
+curl "http://127.0.0.1:9180/apisix/admin/consumers/jack/credentials"; -X PUT \
+ -H "X-API-KEY: ${admin_key}" \
+ -H "Content-Type: application/json" \
+ -d '{
+ "id": "websocket-key",
"plugins": {
- "key-auth": {
- "key": "this_is_the_key"
- }
+ "key-auth": {
+ "key": "this_is_the_key"
+ }
}
-}'
+ }'
```
-## Testing the Route
+Use a generated secret delivered through your deployment's secret-management
process in production. The fixed value above is only a local example.
-Now, if you try to connect `ws://127.0.0.1:9080/raw` without the `apikey`
header or an incorrect key, APISIX will return a `401 Unauthorized`.
+## Test the handshake
-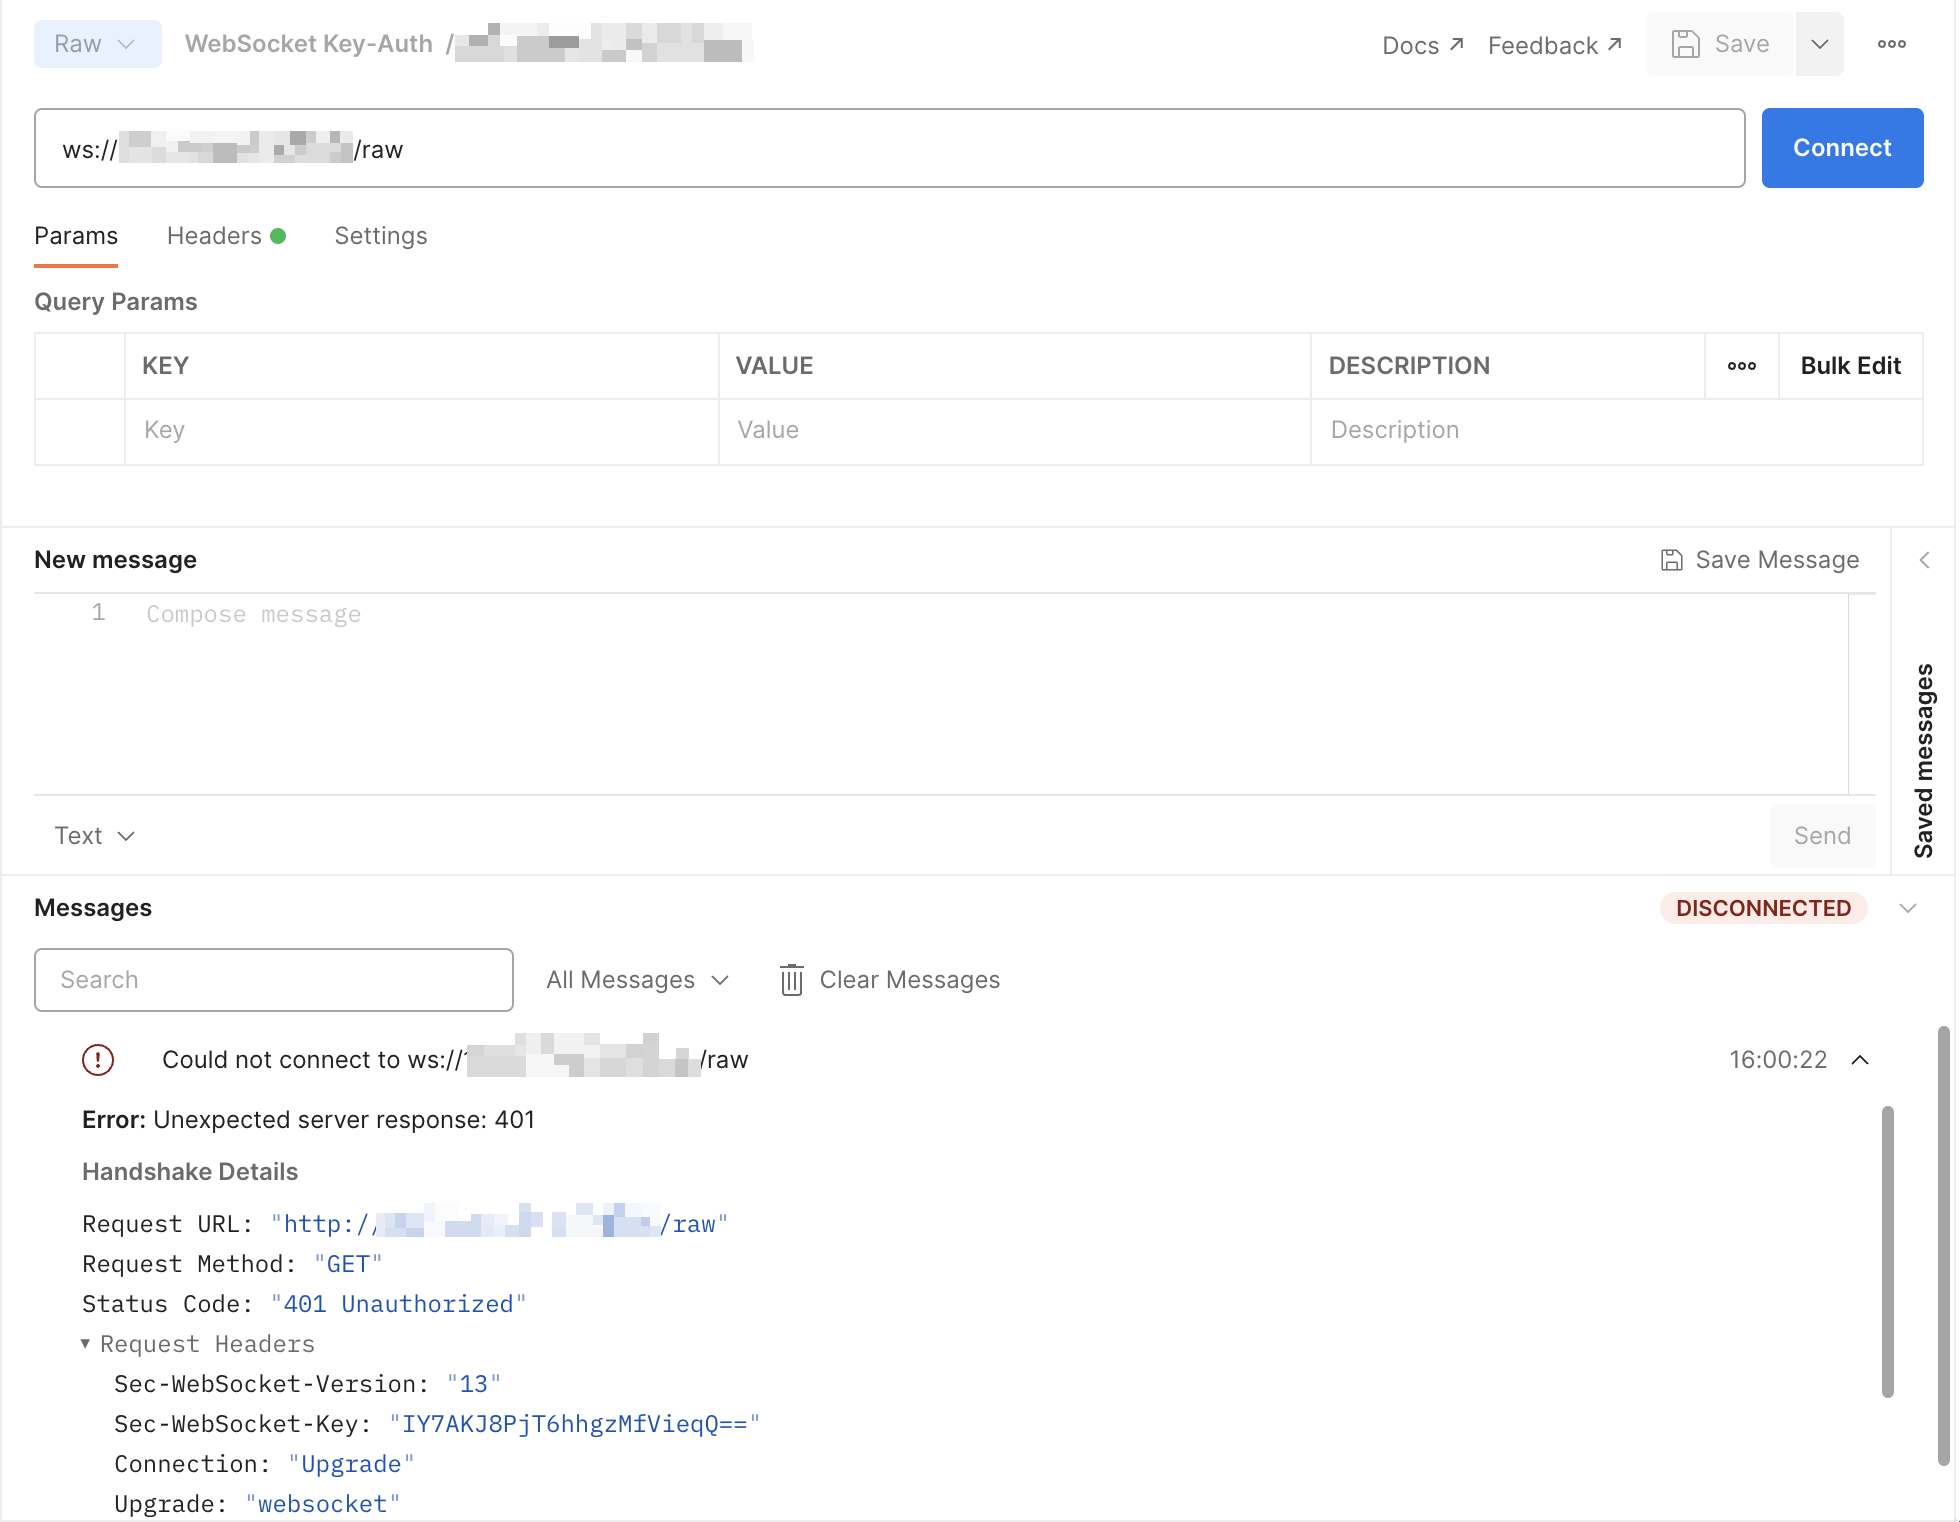
+Connecting without the configured header should fail with `401 Unauthorized`:
+
+```shell
+websocat -v ws://127.0.0.1:9080/raw
+```
+
+Connect again with the key in the configured header:
+
+```shell
+websocat -v -H='apikey: this_is_the_key' ws://127.0.0.1:9080/raw
+```
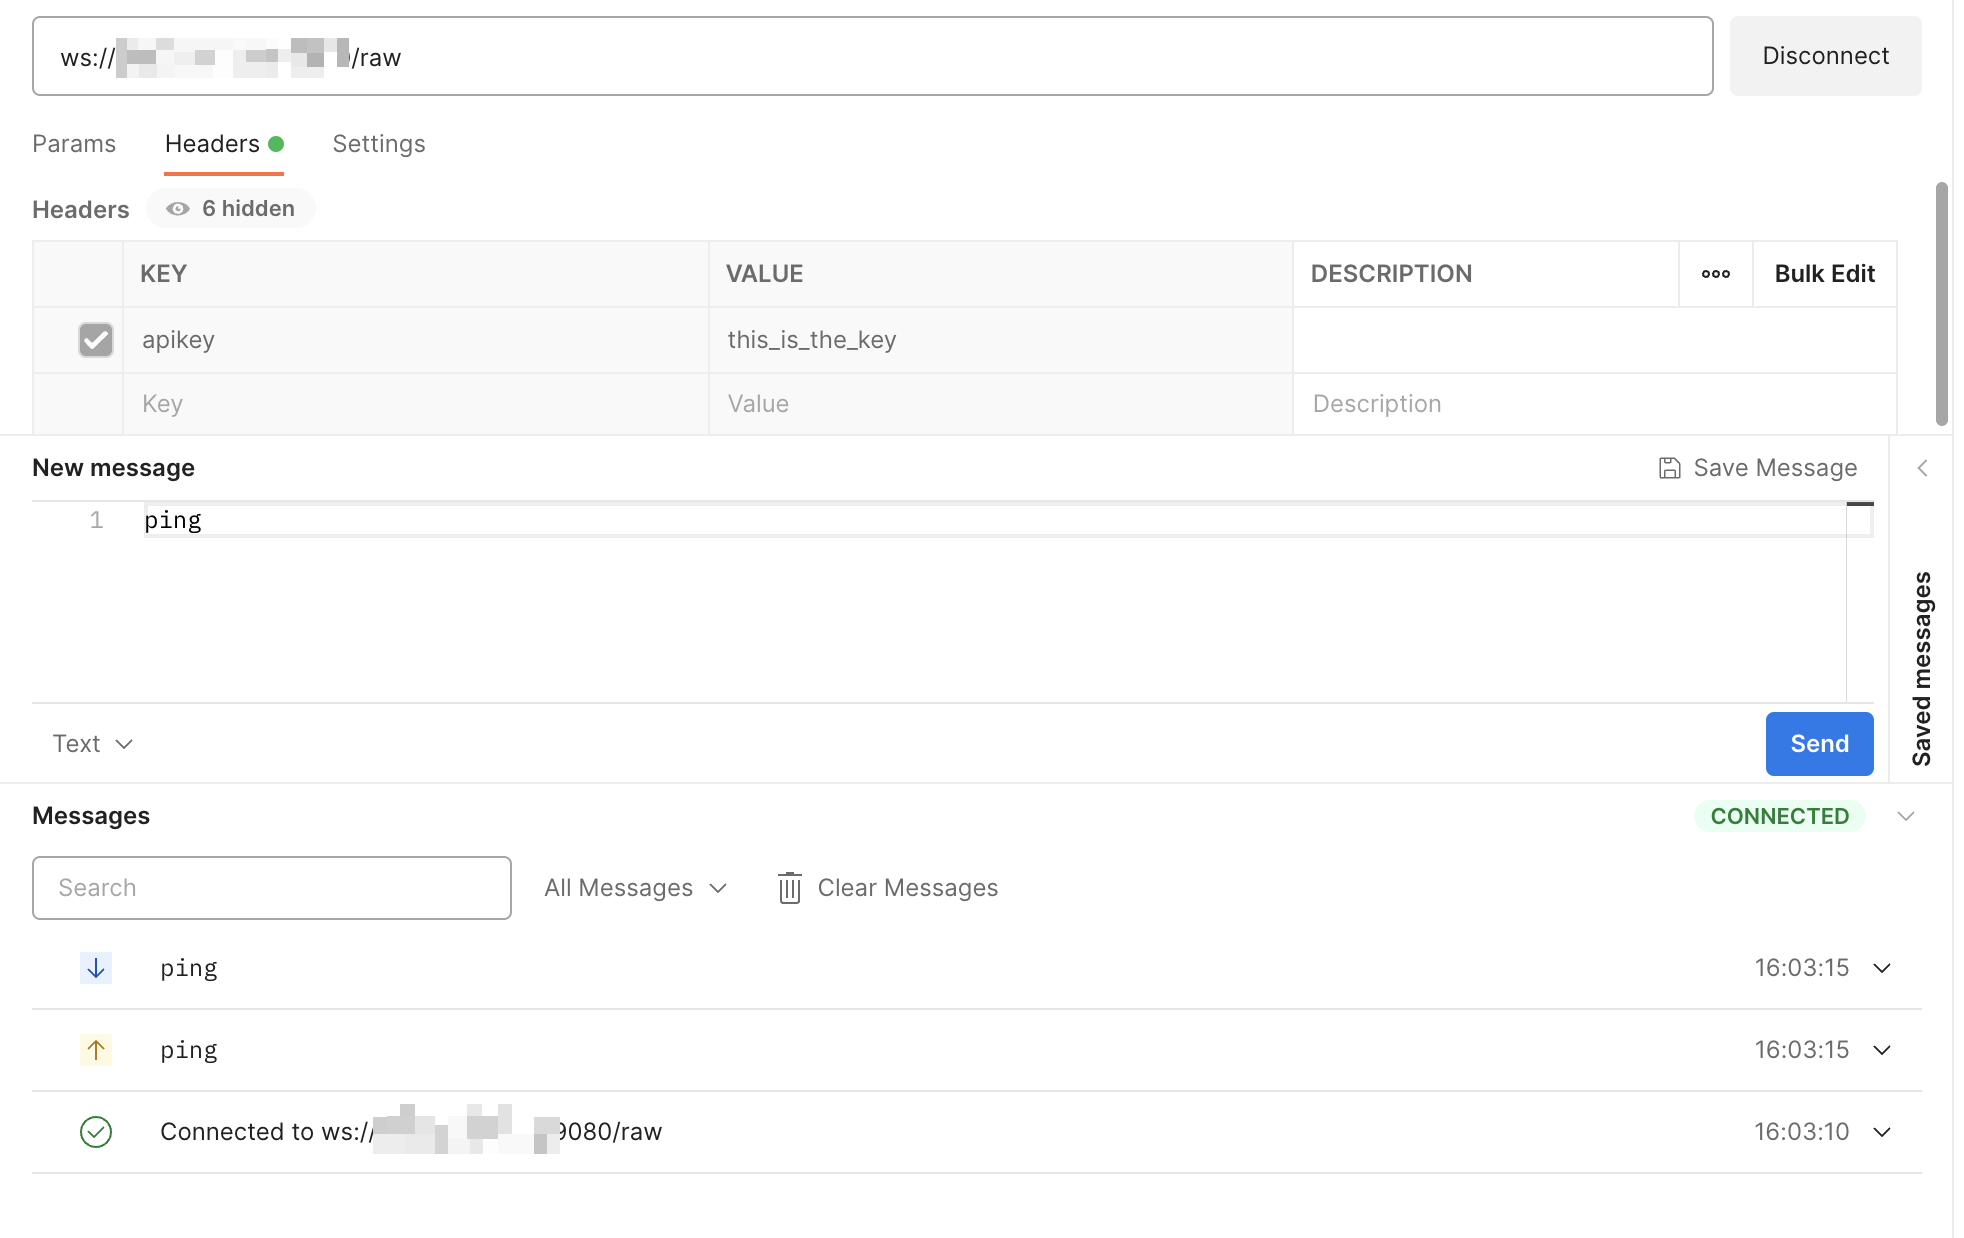
-To authenticate, you can add the header `apikey` with the value
`this_is_the_key`:
+After the server returns `101 Switching Protocols`, send a text message. The
echo service should return the same message. Verify that the upstream does not
receive the `apikey` header, that failed handshakes are logged without the raw
credential, and that your connection-termination policy works when a credential
is revoked.
-
+The `key-auth` plugin also supports a query parameter and gives the header
higher priority. If both sources are present, the plugin authenticates with the
header; `hide_credentials` removes only that matched header, so the
lower-priority query value can still reach the upstream. It also cannot prevent
a query credential from first appearing in a URL. If the route must be
header-only, reject credential-bearing query parameters at an earlier
request-policy layer and test that behavior explicitly.






