This is an automated email from the ASF dual-hosted git repository.

moonming pushed a commit to branch master
in repository https://gitbox.apache.org/repos/asf/apisix.git
The following commit(s) were added to refs/heads/master by this push:
new 66ad0afab7 docs(authz-keycloak): port Keycloak 26.7.3 guide (#13932)
66ad0afab7 is described below
commit 66ad0afab78de6803a3fc8cca26d7e8c9266d219
Author: Traky Deng <[email protected]>
AuthorDate: Tue Nov 10 14:27:45 2026 +0800
docs(authz-keycloak): port Keycloak 26.7.3 guide (#13932)
* docs(authz-keycloak): refresh Keycloak authorization guide
* docs(authz-keycloak): refresh Chinese guide
* docs(authz-keycloak): scope current configuration workflows
---
docs/en/latest/plugins/authz-keycloak.md | 964 ++++++++++++++--------------
docs/zh/latest/plugins/authz-keycloak.md | 1001 +++++++++++++++---------------
2 files changed, 959 insertions(+), 1006 deletions(-)
diff --git a/docs/en/latest/plugins/authz-keycloak.md
b/docs/en/latest/plugins/authz-keycloak.md
index 4d493dfa92..a8faaae6a7 100644
--- a/docs/en/latest/plugins/authz-keycloak.md
+++ b/docs/en/latest/plugins/authz-keycloak.md
@@ -6,7 +6,7 @@ keywords:
- Plugin
- Authz Keycloak
- authz-keycloak
-description: The authz-keycloak Plugin supports the integration with Keycloak
to authenticate and authorize users.
+description: The authz-keycloak Plugin delegates UMA permission decisions to
Keycloak Authorization Services for Apache APISIX requests.
---
<!--
@@ -37,24 +37,24 @@ import TabItem from '@theme/TabItem';
## Description
-The `authz-keycloak` Plugin integrates with
[Keycloak](https://www.keycloak.org/) to authenticate and authorize users. See
Keycloak's [Authorization Services
Guide](https://www.keycloak.org/docs/latest/authorization_services/) for more
information about the configuration options available in this Plugin.
+The `authz-keycloak` Plugin integrates APISIX with [Keycloak Authorization
Services](https://www.keycloak.org/docs/latest/authorization_services/). It
sends the caller's bearer token and requested permissions to Keycloak's
User-Managed Access (UMA) token endpoint. Keycloak evaluates its resources,
scopes, policies, and permissions before APISIX proxies the request.
-While the Plugin was developed for Keycloak, it could theoretically be used
with other OAuth/OIDC and UMA-compliant identity providers.
+Permissions can be selected dynamically or configured explicitly. With dynamic
path loading, APISIX uses a Keycloak service account to resolve the request URI
through the Protection API. With static permissions, APISIX sends the
configured resource and scope names directly to the UMA token endpoint.
## Attributes
| Name | Type | Required |
Default | Valid values
| Description
|
|----------------------------------------------|---------------|----------|-----------------------------------------------|------------------------------------------------------------------------|-------------------------------------------------------------------------------------------------------------------------------------------------------------------------------------------------------------------------------------------------------|
-| max_req_body_size | integer | False | 67108864 | >= 1 | Maximum request body
size in bytes buffered into memory. Requests with a larger body are rejected. |
-| discovery | string | False |
|
https://host.domain/realms/foo/.well-known/uma2-configuration | URL to
[discovery
document](https://www.keycloak.org/docs/latest/authorization_services/index.html)
of Keycloak Authorization Services.
|
-| token_endpoint | string | False |
|
https://host.domain/realms/foo/protocol/openid-connect/token | An
OAuth2-compliant token endpoint that supports the
`urn:ietf:params:oauth:grant-type:uma-ticket` grant type. If provided,
overrides the value from discovery.
|
-| resource_registration_endpoint | string | False |
|
https://host.domain/realms/foo/authz/protection/resource_set | A
UMA-compliant resource registration endpoint. If provided, overrides the value
from discovery.
|
-| client_id | string | True |
|
| The identifier of the resource server to
which the client is seeking access.
|
-| client_secret | string | False |
|
| The client secret, if required. You can
use APISIX Secret to store and reference this value. APISIX currently supports
storing secrets in two ways: [Environment Variables and HashiCorp
Vault](../terminology/secret.md). |
-| grant_type | string | False |
"urn:ietf:params:oauth:grant-type:uma-ticket" |
["urn:ietf:params:oauth:grant-type:uma-ticket"] |
|
-| policy_enforcement_mode | string | False |
"ENFORCING" | ["ENFORCING", "PERMISSIVE"]
|
|
-| permissions | array[string] | False |
|
| An array of strings, each representing a
set of one or more resources and scopes the client is seeking access.
|
-| lazy_load_paths | boolean | False |
false |
| When set to true, dynamically resolves
the request URI to resource(s) using the resource registration endpoint instead
of the static permission.
|
+| max_req_body_size | integer | False |
67108864 | >= 1
| Maximum request body size in bytes
buffered into memory when the Plugin generates a password-grant token. If the
body exceeds the limit or cannot be read, the Plugin returns `503 Service
Unavailable`. |
+| discovery | string | False |
|
https://host.domain/realms/foo/.well-known/uma2-configuration | URL
to the Keycloak UMA discovery document. At least one of `discovery` and
`token_endpoint` is required.
|
+| token_endpoint | string | False |
|
https://host.domain/realms/foo/protocol/openid-connect/token | Token
endpoint that supports the `urn:ietf:params:oauth:grant-type:uma-ticket` grant
type for permission evaluation. If provided, it overrides the value from the
discovery document. At least one of `discovery` and `token_endpoint` is
required. |
+| resource_registration_endpoint | string | False |
|
https://host.domain/realms/foo/authz/protection/resource_set | UMA
resource registration endpoint. With `lazy_load_paths` enabled, the Plugin uses
this value first and otherwise obtains it from discovery. Dynamic loading
requires discovery, or both the token and resource registration endpoints.
|
+| client_id | string | True |
|
| Client ID of the Keycloak resource
server.
|
+| client_secret | string | False |
|
| Client secret used when the Plugin
authenticates to the token endpoint. This field is encrypted before storage in
etcd when field encryption is enabled.
|
+| grant_type | string | False |
"urn:ietf:params:oauth:grant-type:uma-ticket" |
["urn:ietf:params:oauth:grant-type:uma-ticket"] | UMA
ticket grant used for permission evaluation. This is the only accepted value.
|
+| policy_enforcement_mode | string | False |
"ENFORCING" | ["ENFORCING", "PERMISSIVE"]
| Controls how an empty permission list is
handled before the Plugin requests a decision from Keycloak.
|
+| permissions | array[string] | False |
|
| Permissions to evaluate when
`lazy_load_paths` is `false`. Supported forms are `RESOURCE_ID#SCOPE_ID`,
`RESOURCE_ID`, and `#SCOPE_ID`.
|
+| lazy_load_paths | boolean | False |
false |
| When set to `true`, resolves the
request URI to Keycloak resources through the resource registration endpoint.
|
| http_method_as_scope | boolean | False |
false |
| When set to true, maps the HTTP
request type to scope of the same name and adds to all requested permissions.
|
| timeout | integer | False |
3000 | [1000, ...]
| Timeout in ms for the HTTP connection
with the Identity Server.
|
| access_token_expires_in | integer | False |
300 | [1, ...]
| Expiration time(s) of the access
token.
|
@@ -64,38 +64,38 @@ While the Plugin was developed for Keycloak, it could
theoretically be used with
| ssl_verify | boolean | False |
true |
| When set to true, verifies if TLS
certificate matches hostname.
|
| cache_ttl_seconds | integer | False |
86400 (equivalent to 24h) | positive integer >= 1
| Maximum time in seconds up to which
the Plugin caches discovery documents and tokens used by the Plugin to
authenticate to Keycloak.
|
| keepalive | boolean | False |
true |
| When set to true, enables HTTP
keep-alive to keep connections open after use. Set to `true` if you are
expecting a lot of requests to Keycloak.
|
-| keepalive_timeout | integer | False |
60000 | positive integer >= 1000
| Idle time after which the established
HTTP connections will be closed.
|
+| keepalive_timeout | integer | False |
60000 | positive integer >= 1000
| Idle time in milliseconds after which
an established HTTP connection is closed.
|
| keepalive_pool | integer | False | 5
| positive integer >= 1
| Maximum number of connections in the
connection pool.
|
-| access_denied_redirect_uri | string | False |
| [1, 2048]
| URI to redirect the user to instead of
returning an error message like `"error_description":"not_authorized"`.
|
-| password_grant_token_generation_incoming_uri | string | False |
| /api/token
| Set this to generate token using the
password grant type. The Plugin will compare incoming request URI to this
value.
|
+| access_denied_redirect_uri | string | False |
| [1, 2048]
| URI used for a `307 Temporary Redirect`
when the permission list is empty in `ENFORCING` mode or Keycloak returns `403
Forbidden`.
|
+| password_grant_token_generation_incoming_uri | string | False |
| /api/token
| Legacy compatibility endpoint for the
Resource Owner Password Credentials grant. OAuth 2.0 Security Best Current
Practice states that this grant must not be used. Do not configure it for new
deployments. |
-NOTE: `encrypt_fields = {"client_secret"}` is also defined in the schema,
which means that the field will be stored encrypted in etcd. See [encrypted
storage fields](../plugin-develop.md#encrypted-storage-fields).
+NOTE: The schema marks `client_secret` as an encrypted field. When field
encryption is enabled, APISIX encrypts the value before storing it in etcd. See
[encrypted storage fields](../plugin-develop.md#encrypted-storage-fields).
### Discovery and Endpoints
-It is recommended to use the `discovery` attribute as the `authz-keycloak`
Plugin can discover the Keycloak API endpoints from it.
+Use `discovery` to let the `authz-keycloak` Plugin obtain the Keycloak token
and resource registration endpoints from the UMA discovery document.
If set, the `token_endpoint` and `resource_registration_endpoint` will
override the values obtained from the discovery document.
+At least one of `discovery` and `token_endpoint` is required. Dynamic path
loading additionally requires `discovery`, or both `token_endpoint` and
`resource_registration_endpoint`.
+
### Client ID and Secret
-The Plugin needs the `client_id` attribute for identification and to specify
the context in which to evaluate permissions when interacting with Keycloak.
+The `client_id` identifies the Keycloak resource server in which permissions
are evaluated.
-If the `lazy_load_paths` attribute is set to true, then the Plugin
additionally needs to obtain an access token for itself from Keycloak. In such
cases, if the client access to Keycloak is confidential, you need to configure
the `client_secret` attribute.
+When `lazy_load_paths` is `true`, the Plugin obtains a service-account token
before querying the Protection API. Configure `client_secret` for this request
and ensure the service-account token contains the `uma_protection` role.
### Policy Enforcement Mode
-The `policy_enforcement_mode` attribute specifies how policies are enforced
when processing authorization requests sent to the server.
+The `policy_enforcement_mode` attribute controls how the Plugin handles an
empty permission list before requesting a decision from Keycloak.
#### `ENFORCING` Mode
-Requests are denied by default even when there is no policy associated with a
resource.
-
-The `policy_enforcement_mode` is set to `ENFORCING` by default.
+An empty permission list returns `403 Forbidden`, or `307 Temporary Redirect`
when `access_denied_redirect_uri` is configured. `ENFORCING` is the default
mode.
#### `PERMISSIVE` Mode
-Requests are allowed when there is no policy associated with a given resource.
+The Plugin continues to the UMA token request without a permission parameter.
Keycloak still determines whether the request is authorized.
### Permissions
@@ -103,21 +103,11 @@ When handling incoming requests, the Plugin can determine
the permissions to che
If the `lazy_load_paths` attribute is set to `false`, the permissions are
taken from the `permissions` attribute. Each entry in `permissions` needs to be
formatted as expected by the token endpoint's `permission` parameter. See
[Obtaining
Permissions](https://www.keycloak.org/docs/latest/authorization_services/index.html#_service_obtaining_permissions).
-:::note
-
-A valid permission can be a single resource or a resource paired with one or
more scopes.
-
-:::
+A permission can contain a resource, a resource and scope, or a scope.
Supported forms are `RESOURCE_ID`, `RESOURCE_ID#SCOPE_ID`, and `#SCOPE_ID`.
If the `lazy_load_paths` attribute is set to `true`, the request URI is
resolved to one or more resources configured in Keycloak using the resource
registration endpoint. The resolved resources are used as the permissions to
check.
-:::note
-
-This requires the Plugin to obtain a separate access token for itself from the
token endpoint. So, make sure to set the `Service Accounts Enabled` option in
the client settings in Keycloak.
-
-Also make sure that the issued access token contains the `resource_access`
claim with the `uma_protection` role to ensure that the Plugin is able to query
resources through the Protection API.
-
-:::
+Dynamic loading requires the Plugin to obtain a service-account token. Enable
service accounts for the Keycloak client and ensure the issued token contains
the `uma_protection` role before using the Protection API.
The Plugin forwards a request only when Keycloak grants every permission to
check, including every scope listed in each permission. If any permission or
scope is not granted, the request is rejected.
@@ -129,58 +119,78 @@ If the `http_method_as_scope` attribute is set to `true`,
the Plugin maps the re
If the `lazy_load_paths` attribute is set to false, the Plugin adds the mapped
scope to any of the static permissions configured in the `permissions`
attribute—even if they contain one or more scopes already.
-### Generating a Token Using `password` Grant
+### Legacy Password Grant Compatibility
-To generate a token using `password` grant, you can set the value of the
`password_grant_token_generation_incoming_uri` attribute.
+The `password_grant_token_generation_incoming_uri` attribute is retained for
compatibility with existing configurations. When a form-encoded `POST`
containing `username` and `password` matches this URI, the Plugin submits a
password-grant request to the configured `token_endpoint` and returns its
response.
-If the incoming URI matches the configured attribute and the request method is
POST, a token is generated using the `token_endpoint`.
-
-You also need to add `application/x-www-form-urlencoded` as `Content-Type`
header and `username` and `password` as parameters.
+OAuth 2.0 Security Best Current Practice states that the Resource Owner
Password Credentials grant must not be used. Do not configure this attribute
for new deployments. See [RFC 9700, section
2.4](https://www.rfc-editor.org/rfc/rfc9700.html#section-2.4).
## Examples
-The examples below demonstrate how you can configure `authz-keycloak` for
different scenarios.
+The following setup creates a Keycloak resource server and demonstrates
dynamic and static UMA permission checks.
-To follow along, complete the [preliminary setups](#set-up-keycloak) for
Keycloak.
+Before proceeding:
-:::note
-You can fetch the `admin_key` from `conf/config.yaml` and save to an
environment variable with the following command:
+- Install [Docker](https://docs.docker.com/get-docker/).
+- Install [cURL](https://curl.se/) and [jq](https://jqlang.org/).
+- Follow the [Getting Started tutorial](../getting-started/README.md) to start
APISIX with Docker.
+- If you plan to use ADC, [install and configure
ADC](https://docs.api7.ai/apisix/reference/adc) before continuing.
+- If you plan to use the Ingress Controller examples, [set up the Ingress
Controller and
gateway](https://apisix.apache.org/docs/ingress-controller/getting-started/) in
the `aic` namespace.
-```bash
-admin_key=$(yq '.deployment.admin.admin_key[0].key' conf/config.yaml | sed
's/"//g')
-```
+### Configure Keycloak
-:::
+Start Keycloak, then configure a protected resource, authorization policy, and
scope-based permission.
-### Set Up Keycloak
+The walkthrough uses a Keycloak service account to obtain test access tokens.
A client-scope policy permits tokens that include `httpbin-access` to access
the protected resource with the `access` authorization scope.
#### Start Keycloak
+Choose the environment that matches the APISIX deployment.
+
<Tabs
groupId="runtime"
defaultValue="docker"
values={[
{label: 'Docker', value: 'docker'},
-{label: 'Kubernetes', value: 'k8s'}
+{label: 'Kubernetes', value: 'k8s'},
]}>
<TabItem value="docker">
-Start a Keycloak instance named `apisix-quickstart-keycloak` with the
administrator name `quickstart-admin` and password `quickstart-admin-pass` in
[development
mode](https://www.keycloak.org/server/configuration#_starting_keycloak_in_development_mode):
+If `apisix-keycloak` is already running from another guide, connect it to the
APISIX quickstart network and skip the next command:
+
+```shell
+docker network connect apisix-quickstart-net apisix-keycloak
+```
+
+Otherwise, start Keycloak in development mode with the Admin Console bound to
the loopback interface:
+
+```shell
+docker run -d --name apisix-keycloak \
+ --network apisix-quickstart-net \
+ -e 'KC_BOOTSTRAP_ADMIN_USERNAME=quickstart-admin' \
+ -e 'KC_BOOTSTRAP_ADMIN_PASSWORD=quickstart-admin-pass' \
+ -p 127.0.0.1:8080:8080 \
+ quay.io/keycloak/keycloak:26.7.3 start-dev
+```
+
+Save the Keycloak address:
```shell
-docker run -d --name "apisix-quickstart-keycloak" \
- -e 'KEYCLOAK_ADMIN=quickstart-admin' \
- -e 'KEYCLOAK_ADMIN_PASSWORD=quickstart-admin-pass' \
- -p 8080:8080 \
- quay.io/keycloak/keycloak:18.0.2 start-dev
+export KEYCLOAK_URL=http://apisix-keycloak:8080
```
</TabItem>
<TabItem value="k8s">
-Deploy Keycloak to Kubernetes:
+Create the namespace if it does not already exist:
+
+```shell
+kubectl create namespace aic --dry-run=client -o yaml | kubectl apply -f -
+```
+
+Create `keycloak.yaml` with a Keycloak Deployment and Service:
```yaml title="keycloak.yaml"
apiVersion: apps/v1
@@ -200,13 +210,13 @@ spec:
spec:
containers:
- name: keycloak
- image: quay.io/keycloak/keycloak:18.0.2
+ image: quay.io/keycloak/keycloak:26.7.3
args:
- start-dev
env:
- - name: KEYCLOAK_ADMIN
+ - name: KC_BOOTSTRAP_ADMIN_USERNAME
value: quickstart-admin
- - name: KEYCLOAK_ADMIN_PASSWORD
+ - name: KC_BOOTSTRAP_ADMIN_PASSWORD
value: quickstart-admin-pass
ports:
- containerPort: 8080
@@ -224,168 +234,172 @@ spec:
targetPort: 8080
```
-Apply the manifest:
+Apply the manifest and wait for Keycloak to become available:
```shell
kubectl apply -f keycloak.yaml
+kubectl rollout status -n aic deployment/keycloak
```
-If you would like to open the Keycloak console locally, port-forward the
Service:
+Save the in-cluster Keycloak address:
```shell
-kubectl port-forward -n aic svc/keycloak 8080:8080
+export KEYCLOAK_URL=http://keycloak.aic.svc.cluster.local:8080
```
-</TabItem>
-
-</Tabs>
-
-#### Save Keycloak URL
-
-Save the Keycloak URL to an environment variable to be referenced in future
configuration:
-
-<Tabs
-groupId="runtime"
-defaultValue="docker"
-values={[
-{label: 'Docker', value: 'docker'},
-{label: 'Kubernetes', value: 'k8s'}
-]}>
-
-<TabItem value="docker">
+In a separate terminal, forward the Keycloak port so that the Admin Console is
available locally:
```shell
-KEYCLOAK_URL=http://192.168.42.145:8080 # replace with your Keycloak URL
-```
-
-</TabItem>
-
-<TabItem value="k8s">
-
-```shell
-KEYCLOAK_URL=http://keycloak.aic.svc.cluster.local:8080
+kubectl port-forward -n aic service/keycloak 8080:8080
```
</TabItem>
</Tabs>
-#### Create a Realm, Client, and Authorization Objects
-
-Navigate to `http://localhost:8080` and click __Administration Console__:
-
-
+Development mode and the example administrator credentials are intended only
for local testing. For a production deployment, use HTTPS, a production
database, and a permanent administrator account.
-Sign in with the administrator username `quickstart-admin` and password
`quickstart-admin-pass`:
+Open `http://localhost:8080/admin/` and sign in with the administrator
username `quickstart-admin` and password `quickstart-admin-pass`.
-
+#### Create a Realm and Resource Server
-Create a realm named `quickstart-realm`:
+Create a realm for the authorization resources:
-
+1. Select **Manage realms → Create realm**.
+2. Enter `authz-realm` as the realm name.
+3. Select **Create**.
-Create a client named `apisix-quickstart-client`:
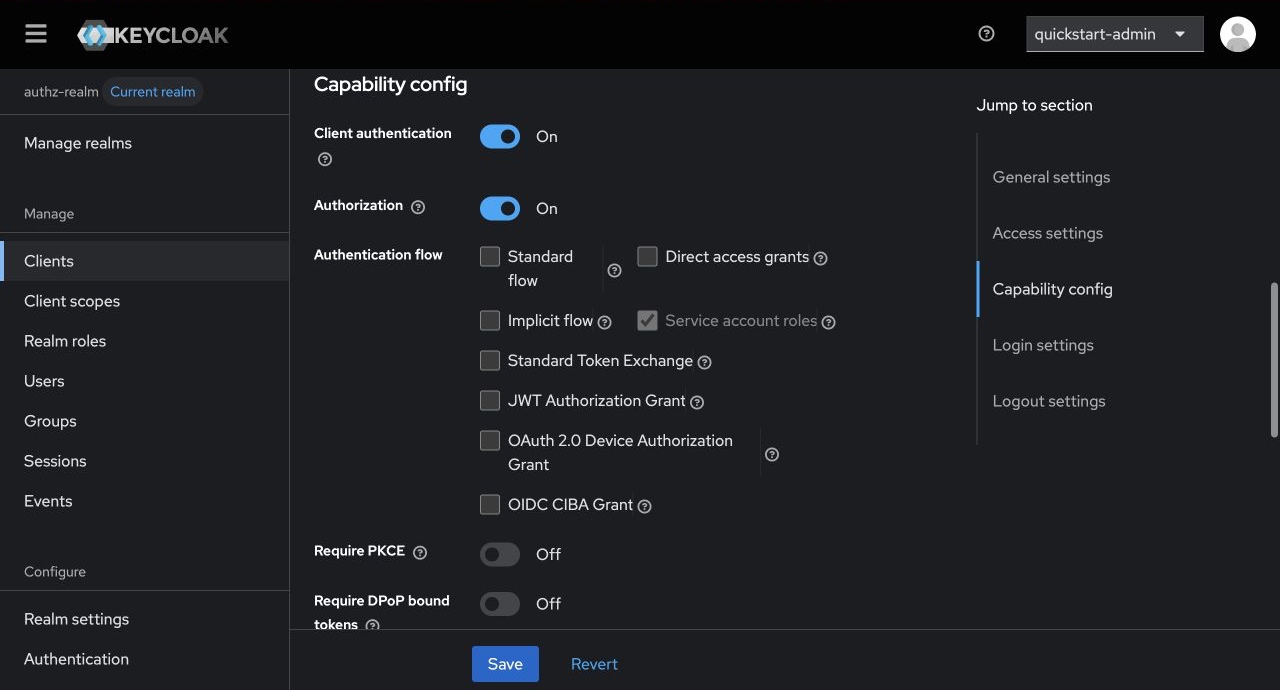
+Register a confidential OIDC client as the protected resource server:
-
+1. Select **Clients → Create client**.
+2. Keep **Client type** set to **OpenID Connect**, enter `apisix-authz` as the
client ID, and select **Next**.
+3. Turn on **Client authentication** and **Authorization**. Leave the
interactive authentication flows off and select **Save**.
-On the client settings page, select `confidential` as the access type:
+
-
+Enabling Authorization also enables the client service account and assigns its
`uma_protection` role. APISIX uses that service account to query the Protection
API when dynamic path loading is enabled.
-Enable authorization for the client and save the configuration. This should
also enable the client service account and assign the `uma_protection` role
automatically:
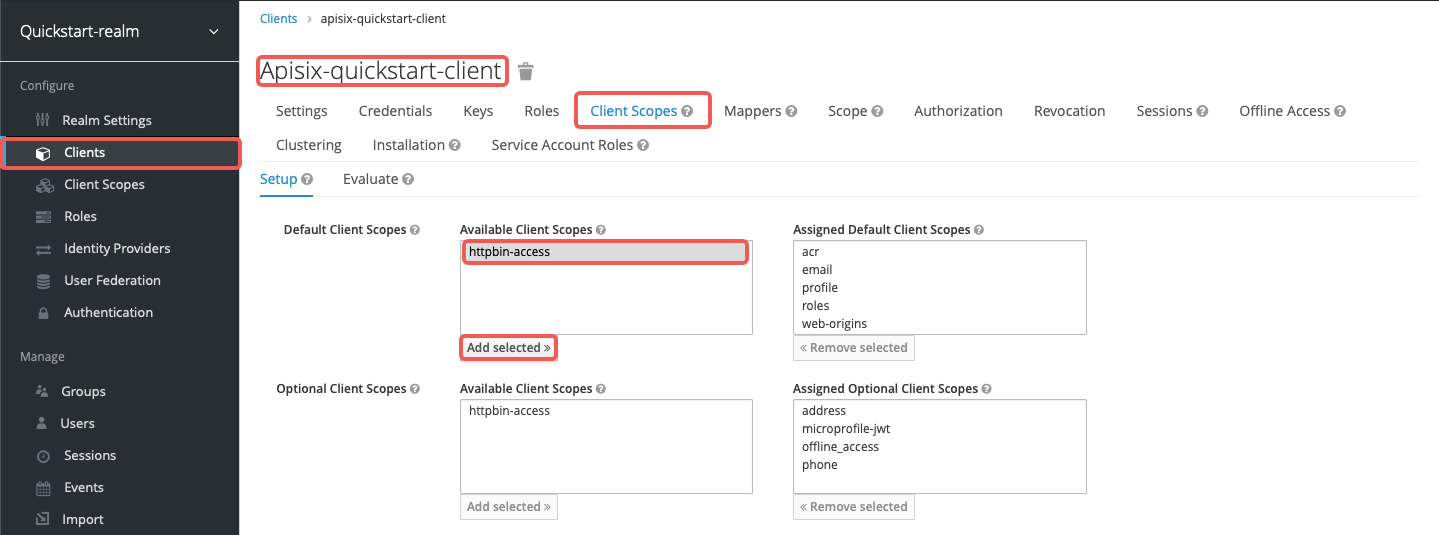
+#### Create and Assign a Client Scope
-
+Create the client scope required by the authorization policy:
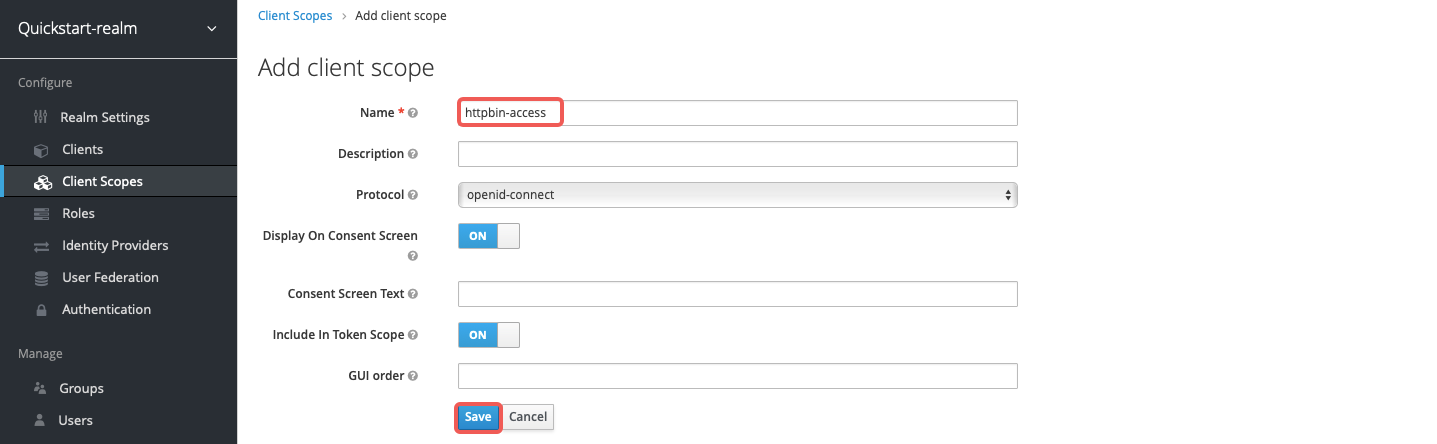
-Create a client scope named `httpbin-access`:
+1. Select **Client scopes → Create client scope**.
+2. Enter `httpbin-access` as the name and keep **Protocol** set to **OpenID
Connect**.
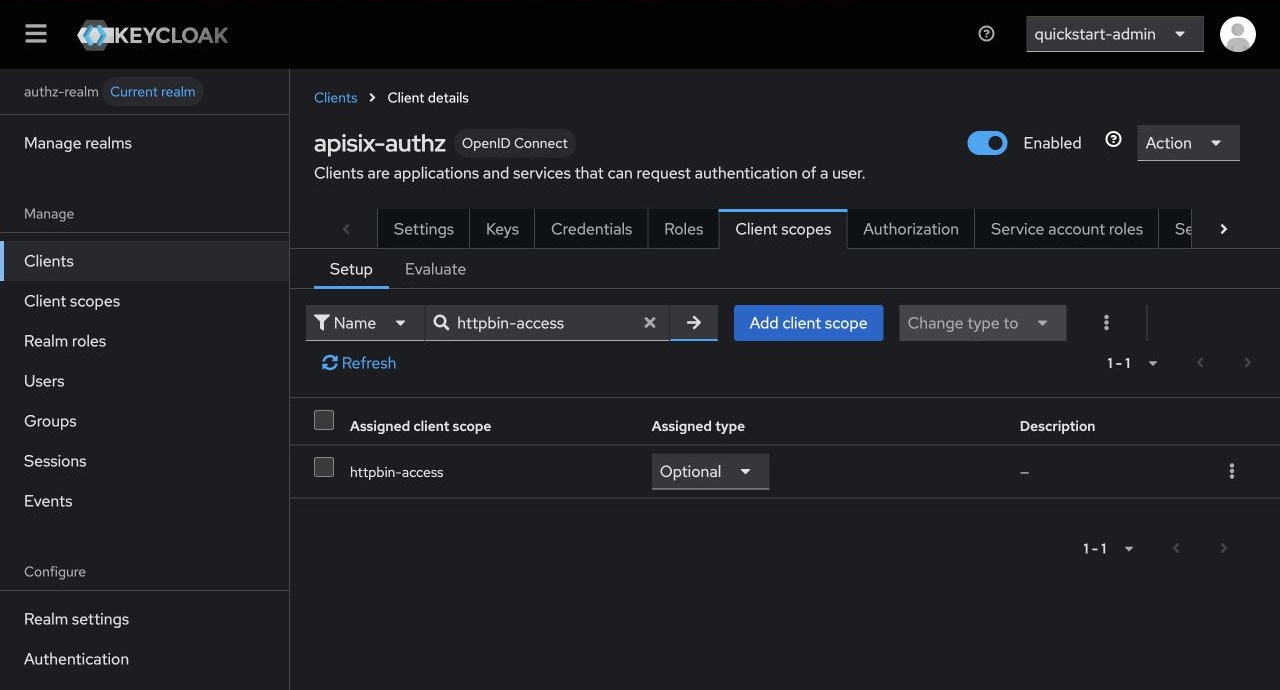
+3. Turn on **Include in token scope** and select **Save**.
+4. Open **Clients → apisix-authz → Client scopes** and select **Add client
scope**.
+5. Select `httpbin-access`, select **Add**, and add it as an optional client
scope.
-
+
-In the client's **Authorization** section, create the authorization scope
`access`:
+The token request later includes `scope=httpbin-access`. Keeping the scope
optional also makes the denied-request example reproducible without changing
the Keycloak configuration.
-
+#### Create the Authorization Objects
-Create the resource `httpbin-anything` with URI `/anything` and scope `access`:
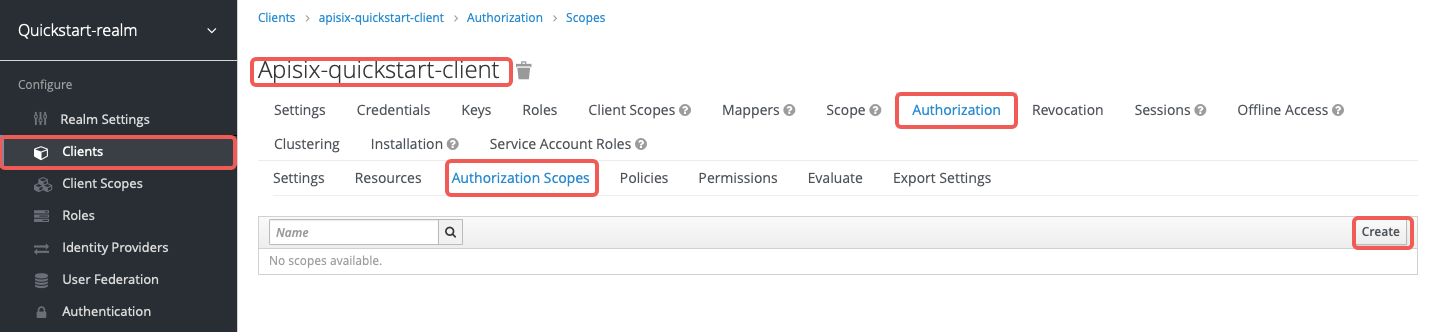
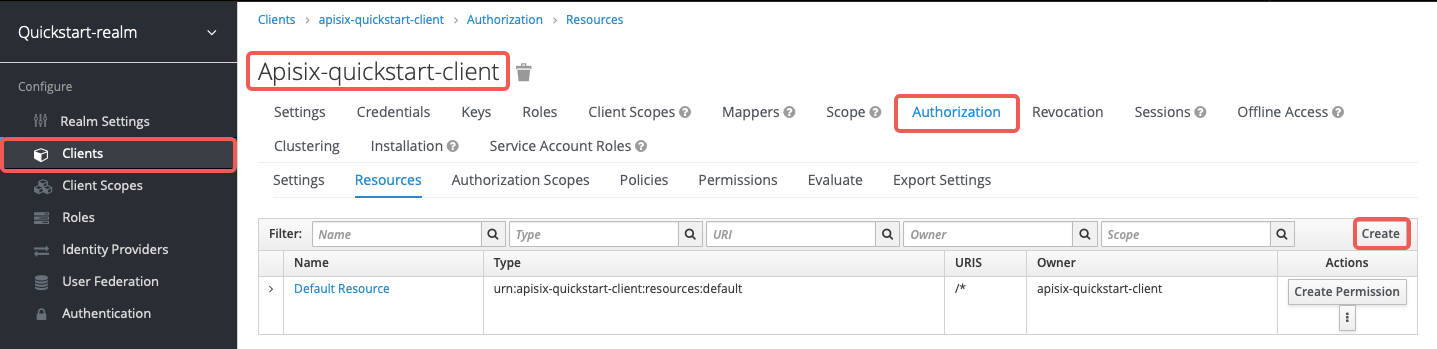
+Open **Clients → apisix-authz → Authorization** and create the scope and
protected resource:
-
+1. Open **Scopes**, select **Create authorization scope**, enter `access`, and
select **Save**.
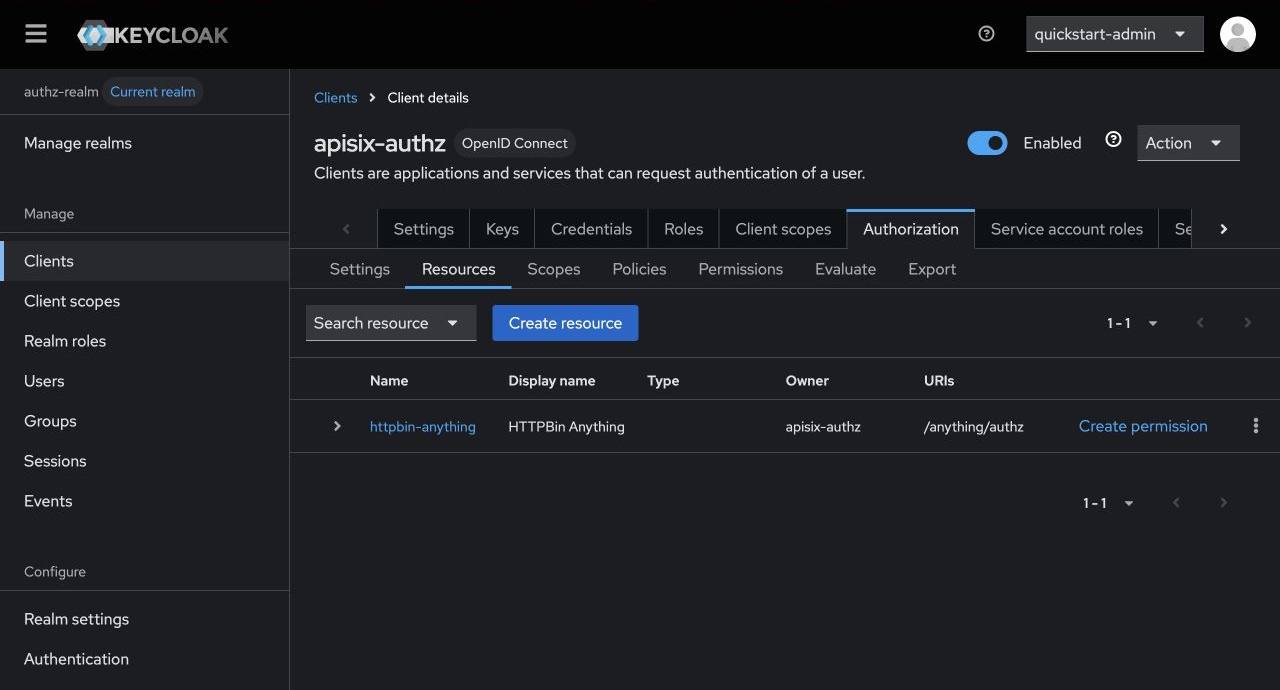
+2. Open **Resources**, select **Create resource**, and configure these values:
-Create the client scope policy `access-client-scope-policy` that requires
`httpbin-access`:
+ | Field | Value |
+ | --- | --- |
+ | **Name** | `httpbin-anything` |
+ | **Display name** | `HTTPBin Anything` |
+ | **URIs** | `/anything/authz` |
+ | **Authorization scopes** | `access` |
-
+3. Select **Save**.
-Create the scope-based permission `access-scope-perm` that uses the `access`
scope and `access-client-scope-policy`:
+
-
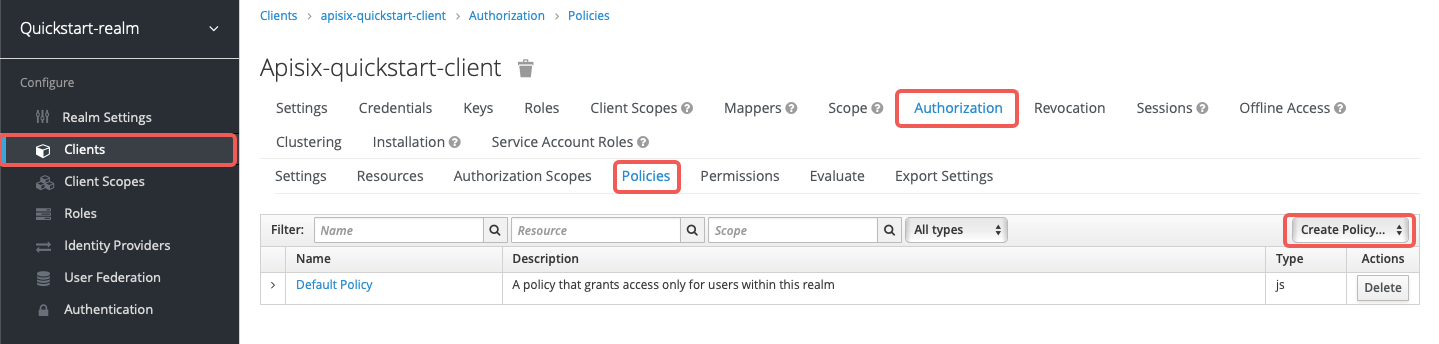
+Create the policy that requires the client scope:
-Add `httpbin-access` to the default client scopes of
`apisix-quickstart-client`:
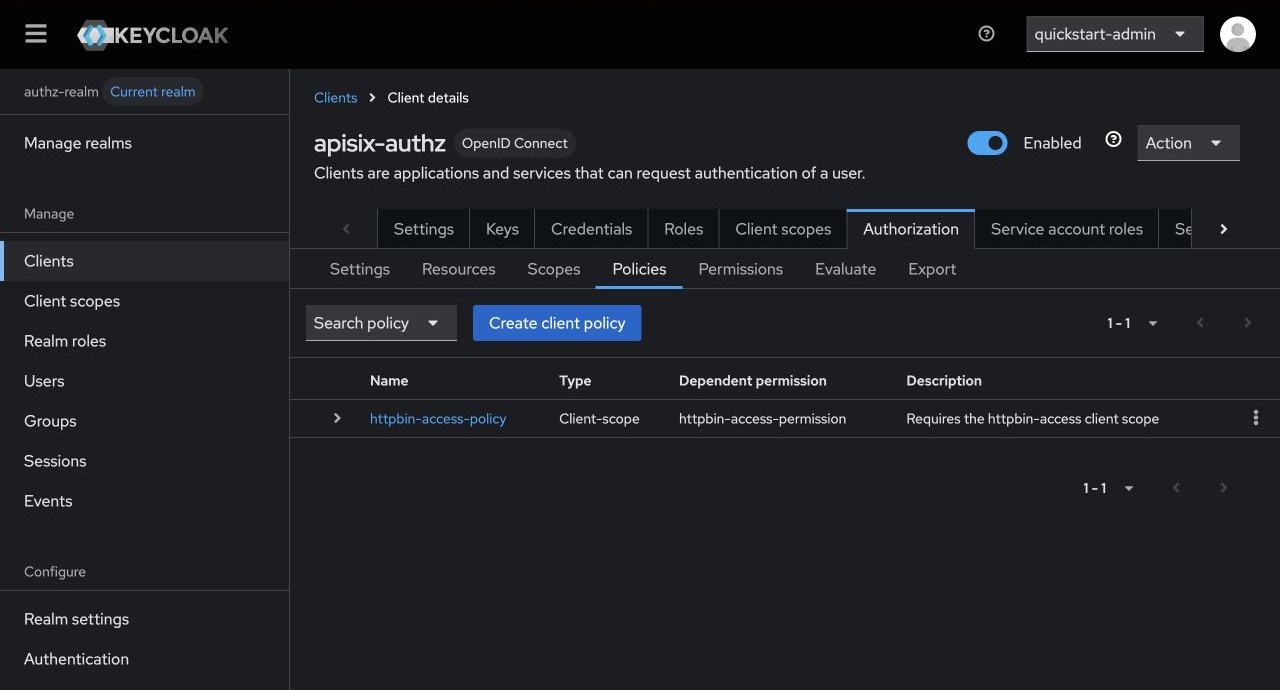
+1. Open **Policies** and select **Create client policy → Client scope**.
+2. Enter `httpbin-access-policy` as the name.
+3. Select `httpbin-access` as the client scope and mark it as required.
+4. Select **Save**.
-
+
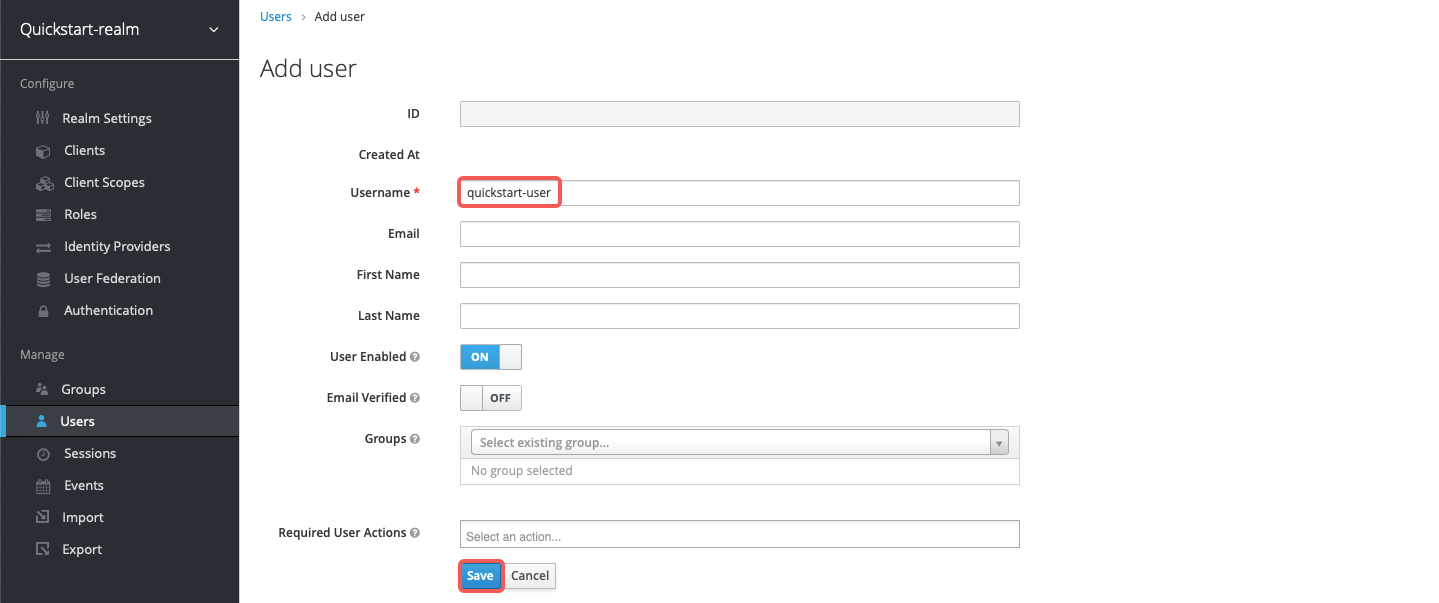
-Create a user named `quickstart-user`:
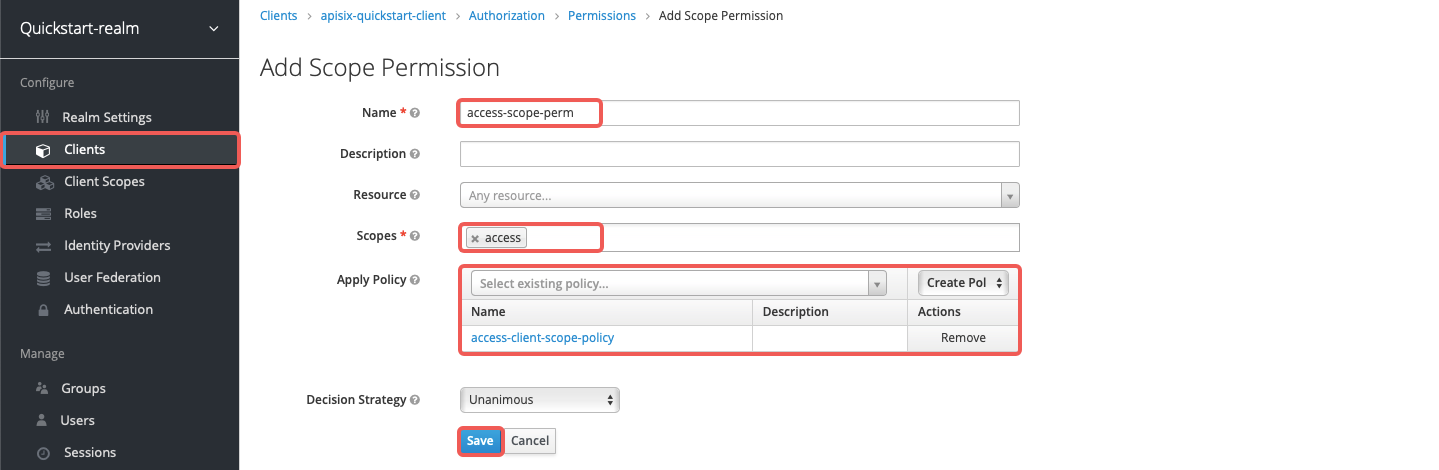
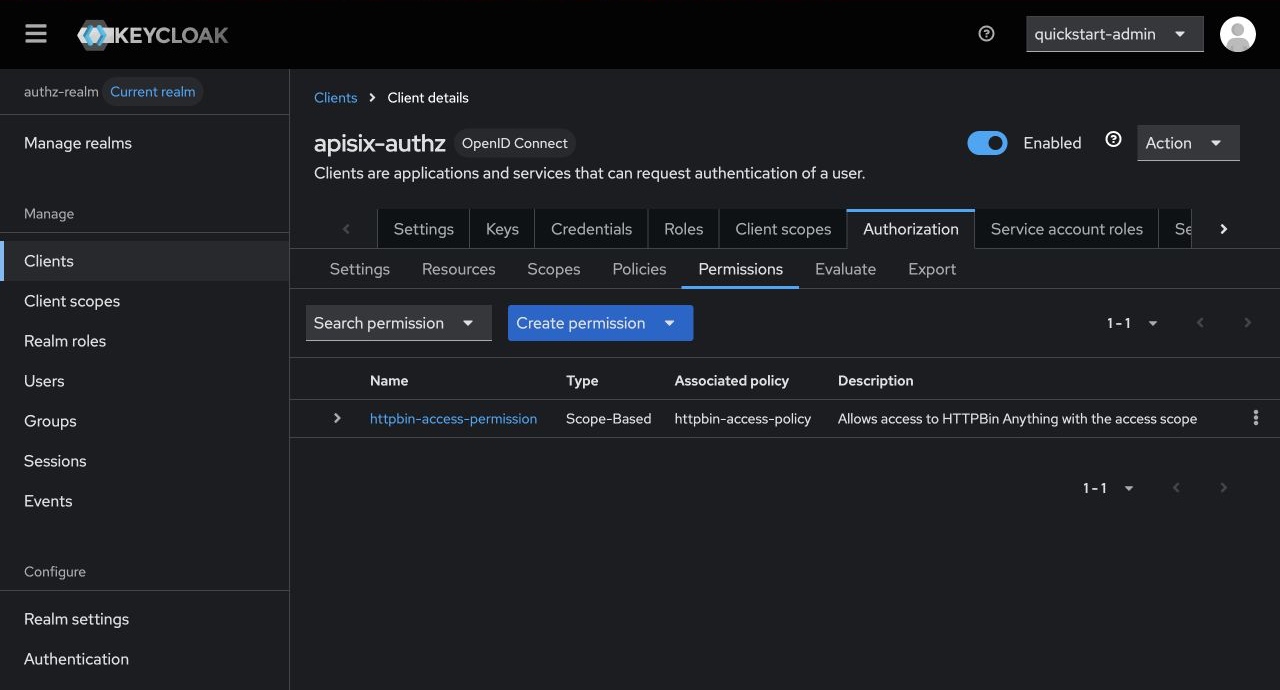
+Connect the resource and authorization scope to the policy:
-
+1. Open **Permissions** and select **Create permission → Scope-based**.
+2. Enter `httpbin-access-permission` as the name.
+3. Select `httpbin-anything` as the resource, `access` as the authorization
scope, and `httpbin-access-policy` as the policy.
+4. Select **Save**.
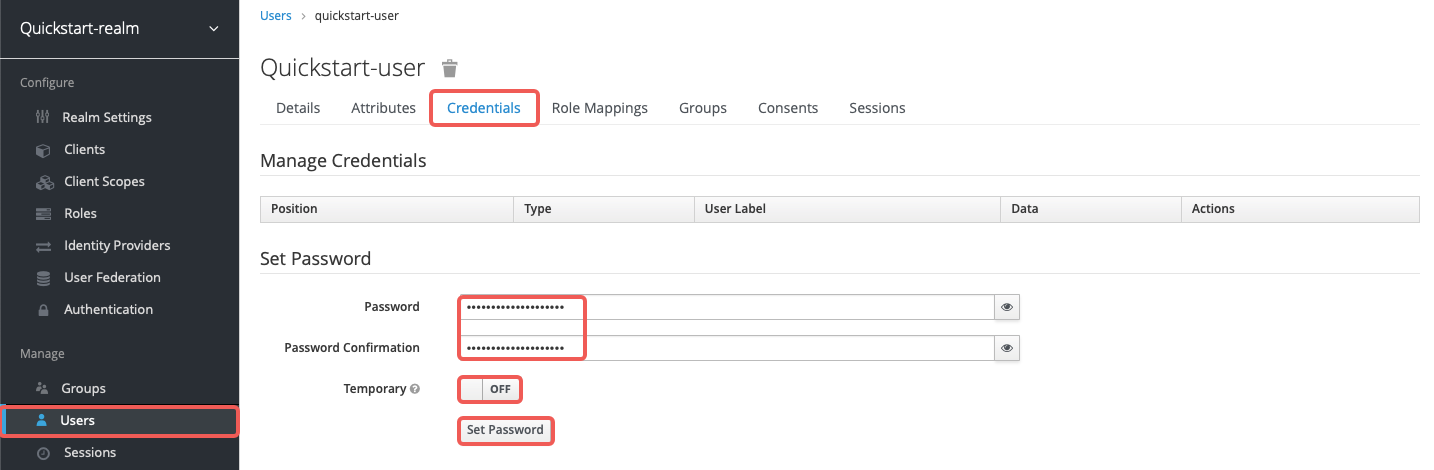
-Set the password to `quickstart-user-pass` and turn off **Temporary**:
+
-
+#### Save the Client Credentials
-Save the client secret from **Clients** > `apisix-quickstart-client` >
**Credentials**:
-
-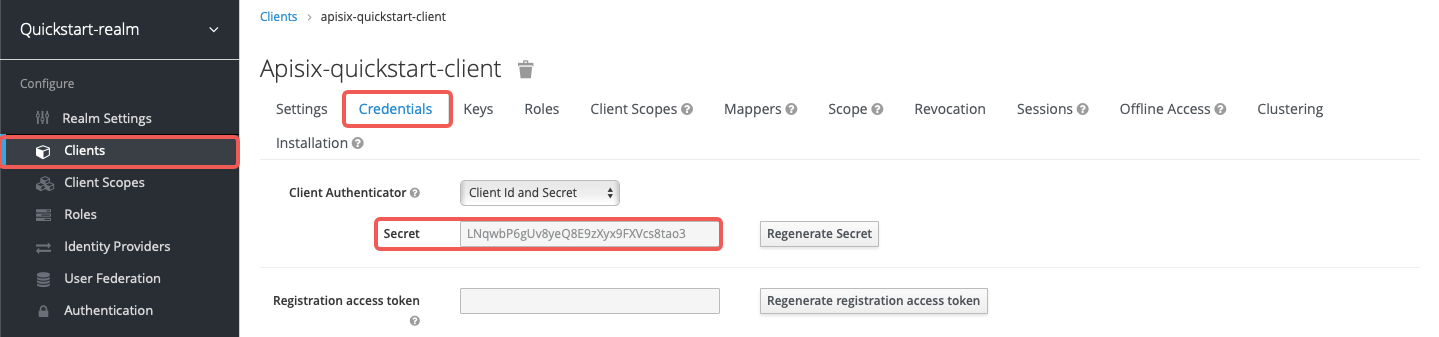
-
-Save the OIDC client ID and secret to environment variables:
+Open **Clients → apisix-authz → Credentials** and copy the client secret. Save
the client ID and secret as environment variables:
```shell
-OIDC_CLIENT_ID=apisix-quickstart-client
-OIDC_CLIENT_SECRET=bSaIN3MV1YynmtXvU8lKkfeY0iwpr9cH # replace with your value
+export KEYCLOAK_CLIENT_ID=apisix-authz
+export KEYCLOAK_CLIENT_SECRET=replace-with-your-client-secret
```
-:::tip
-
-If APISIX runs in Kubernetes, use the same Keycloak hostname consistently in
both the Plugin configuration and the token request. Otherwise, Keycloak may
reject the bearer token because the token issuer does not match the configured
authorization endpoints.
+Keep the client secret confidential. Store production credentials in a secret
manager and rotate them according to the organization's credential-rotation
policy.
-:::
+#### Request an Access Token
-#### Request Access Token
-
-Request an access token from Keycloak and save it to `ACCESS_TOKEN`:
+Request a service-account token with the optional client scope. Run the
command for the environment selected earlier.
<Tabs
groupId="runtime"
defaultValue="docker"
values={[
{label: 'Docker', value: 'docker'},
-{label: 'Kubernetes', value: 'k8s'}
+{label: 'Kubernetes', value: 'k8s'},
]}>
<TabItem value="docker">
+Run the token request from a temporary container on the quickstart network:
+
```shell
-ACCESS_TOKEN=$(curl -sS
"$KEYCLOAK_URL/realms/quickstart-realm/protocol/openid-connect/token" \
- -d 'grant_type=client_credentials' \
- -d 'client_id='$OIDC_CLIENT_ID'' \
- -d 'client_secret='$OIDC_CLIENT_SECRET'' | jq -r '.access_token')
+export ACCESS_TOKEN="$(
+ docker run --rm --network apisix-quickstart-net \
+ curlimages/curl:8.22.0 -sS \
+ "${KEYCLOAK_URL}/realms/authz-realm/protocol/openid-connect/token" \
+ --user "${KEYCLOAK_CLIENT_ID}:${KEYCLOAK_CLIENT_SECRET}" \
+ -H "Content-Type: application/x-www-form-urlencoded" \
+ --data-urlencode "grant_type=client_credentials" \
+ --data-urlencode "scope=httpbin-access" | \
+ jq -er '.access_token'
+)"
```
</TabItem>
<TabItem value="k8s">
-Run the token request inside the Keycloak pod and save the result to
`ACCESS_TOKEN`:
+Run the token request from a temporary pod in the `aic` namespace:
```shell
-ACCESS_TOKEN=$(kubectl exec -n aic deploy/keycloak -- env
OIDC_CLIENT_SECRET="$OIDC_CLIENT_SECRET" sh -lc 'curl -sS
"http://keycloak.aic.svc.cluster.local:8080/realms/quickstart-realm/protocol/openid-connect/token";
\
- -d grant_type=client_credentials \
- -d client_id=apisix-quickstart-client \
- -d client_secret="$OIDC_CLIENT_SECRET"' | jq -r '.access_token')
+export ACCESS_TOKEN="$(
+ kubectl run authz-token-request --rm -i --restart=Never --quiet \
+ --namespace aic \
+ --image curlimages/curl:8.22.0 \
+ --command -- \
+ curl -sS \
+ "${KEYCLOAK_URL}/realms/authz-realm/protocol/openid-connect/token" \
+ --user "${KEYCLOAK_CLIENT_ID}:${KEYCLOAK_CLIENT_SECRET}" \
+ -H "Content-Type: application/x-www-form-urlencoded" \
+ --data-urlencode "grant_type=client_credentials" \
+ --data-urlencode "scope=httpbin-access" | \
+ jq -er '.access_token'
+)"
```
</TabItem>
</Tabs>
-### Use Lazy Load Path and Resource Registration Endpoint
+### Authorize Requests by Path
-The examples below demonstrate how you can configure `authz-keycloak` to
dynamically resolve the request URI to one or more resources using the resource
registration endpoint instead of static permissions.
+Dynamic path loading lets APISIX resolve the incoming request URI to a
Keycloak resource. Configure a route that queries the Protection API, then asks
the UMA token endpoint whether the caller can access the resolved resource.
+
+Choose the API used to configure the route.
<Tabs
groupId="api"
@@ -393,57 +407,83 @@ defaultValue="admin-api"
values={[
{label: 'Admin API', value: 'admin-api'},
{label: 'ADC', value: 'adc'},
-{label: 'Ingress Controller', value: 'aic'}
+{label: 'Ingress Controller', value: 'aic'},
]}>
<TabItem value="admin-api">
-Create a Route with `authz-keycloak-route` as follows:
+Create the route through the Admin API:
```shell
-curl "http://127.0.0.1:9180/apisix/admin/routes"; -X PUT \
- -H "X-API-KEY: ${admin_key}" \
- -d '{
- "id": "authz-keycloak-route",
- "uri": "/anything",
- "plugins": {
- "authz-keycloak": {
- "lazy_load_paths": true,
- "resource_registration_endpoint":
"'"$KEYCLOAK_URL"'/realms/quickstart-realm/authz/protection/resource_set",
- "discovery":
"'"$KEYCLOAK_URL"'/realms/quickstart-realm/.well-known/uma2-configuration",
- "client_id": "'"$OIDC_CLIENT_ID"'",
- "client_secret": "'"$OIDC_CLIENT_SECRET"'"
- }
+curl "http://127.0.0.1:9180/apisix/admin/routes/authz-keycloak"; -X PUT \
+ --data-binary @- <<EOF
+{
+ "uri": "/anything/authz",
+ "plugins": {
+ "authz-keycloak": {
+# highlight-start
+ // Annotate 1
+ "lazy_load_paths": true,
+ // Annotate 2
+ "discovery":
"$KEYCLOAK_URL/realms/authz-realm/.well-known/uma2-configuration",
+ // Annotate 3
+ "client_id": "$KEYCLOAK_CLIENT_ID",
+ "client_secret": "$KEYCLOAK_CLIENT_SECRET"
+# highlight-end
},
- "upstream": {
- "type": "roundrobin",
- "nodes": {
- "httpbin.org:80": 1
- }
+# highlight-start
+ // Annotate 4
+ "serverless-post-function": {
+ "phase": "access",
+ "functions": [
+ "return function(conf, ctx) ngx.req.clear_header('Authorization') end"
+ ]
+ }
+# highlight-end
+ },
+ "upstream": {
+ "type": "roundrobin",
+ "nodes": {
+ "httpbin.org:80": 1
}
- }'
+ }
+}
+EOF
```
</TabItem>
<TabItem value="adc">
-Create a Route with `authz-keycloak` configured in ADC:
+Create `adc.yaml` with the route configuration:
```yaml title="adc.yaml"
services:
- - name: authz-keycloak-service
+ - name: authz-keycloak-httpbin
+ labels:
+ docs-example: authz-keycloak
routes:
- - name: authz-keycloak-route
+ - name: authz-keycloak
uris:
- - /anything
+ - /anything/authz
plugins:
authz-keycloak:
+ # highlight-start
+ // Annotate 1
lazy_load_paths: true
- resource_registration_endpoint:
${KEYCLOAK_URL}/realms/quickstart-realm/authz/protection/resource_set
- discovery:
${KEYCLOAK_URL}/realms/quickstart-realm/.well-known/uma2-configuration
- client_id: ${OIDC_CLIENT_ID}
- client_secret: ${OIDC_CLIENT_SECRET}
+ // Annotate 2
+ discovery:
"${KEYCLOAK_URL}/realms/authz-realm/.well-known/uma2-configuration"
+ // Annotate 3
+ client_id: "${KEYCLOAK_CLIENT_ID}"
+ client_secret: "${KEYCLOAK_CLIENT_SECRET}"
+ # highlight-end
+ # highlight-start
+ // Annotate 4
+ serverless-post-function:
+ phase: access
+ functions:
+ - "return function(conf, ctx)
ngx.req.clear_header('Authorization') end"
+ # highlight-end
upstream:
type: roundrobin
nodes:
@@ -452,28 +492,42 @@ services:
weight: 1
```
-Synchronize the configuration to the gateway:
+ADC reconciles services as desired state. Preview the scoped changes and
confirm that they contain no unintended updates or deletions:
+
+```shell
+adc diff -f adc.yaml \
+ --include-resource-type service \
+ --label-selector docs-example=authz-keycloak
+```
+
+Synchronize the reviewed configuration:
```shell
-adc sync -f adc.yaml
+adc sync -f adc.yaml \
+ --include-resource-type service \
+ --label-selector docs-example=authz-keycloak
```
</TabItem>
<TabItem value="aic">
-Configure `authz-keycloak` on the Route:
+Configure the Plugin with either Gateway API or APISIX custom resources.
+
+Replace `replace-with-your-client-secret` with the Keycloak client secret
before applying either manifest.
<Tabs
groupId="k8s-api"
defaultValue="gateway-api"
values={[
{label: 'Gateway API', value: 'gateway-api'},
-{label: 'APISIX CRD', value: 'apisix-crd'}
+{label: 'APISIX CRD', value: 'apisix-crd'},
]}>
<TabItem value="gateway-api">
+Create `authz-keycloak-ic.yaml`:
+
```yaml title="authz-keycloak-ic.yaml"
apiVersion: v1
kind: Service
@@ -493,17 +547,29 @@ spec:
plugins:
- name: authz-keycloak
config:
+ # highlight-start
+ // Annotate 1
lazy_load_paths: true
- resource_registration_endpoint:
http://keycloak.aic.svc.cluster.local:8080/realms/quickstart-realm/authz/protection/resource_set
- discovery:
http://keycloak.aic.svc.cluster.local:8080/realms/quickstart-realm/.well-known/uma2-configuration
- client_id: apisix-quickstart-client
+ // Annotate 2
+ discovery:
http://keycloak.aic.svc.cluster.local:8080/realms/authz-realm/.well-known/uma2-configuration
+ // Annotate 3
+ client_id: apisix-authz
client_secret: replace-with-your-client-secret
+ # highlight-end
+ # highlight-start
+ // Annotate 4
+ - name: serverless-post-function
+ config:
+ phase: access
+ functions:
+ - "return function(conf, ctx) ngx.req.clear_header('Authorization')
end"
+ # highlight-end
---
apiVersion: gateway.networking.k8s.io/v1
kind: HTTPRoute
metadata:
namespace: aic
- name: authz-keycloak-route
+ name: authz-keycloak
spec:
parentRefs:
- name: apisix
@@ -511,7 +577,7 @@ spec:
- matches:
- path:
type: Exact
- value: /anything
+ value: /anything/authz
filters:
- type: ExtensionRef
extensionRef:
@@ -523,16 +589,12 @@ spec:
port: 80
```
-Apply the configuration to your cluster:
-
-```shell
-kubectl apply -f authz-keycloak-ic.yaml
-```
-
</TabItem>
<TabItem value="apisix-crd">
+Create `authz-keycloak-ic.yaml`:
+
```yaml title="authz-keycloak-ic.yaml"
apiVersion: apisix.apache.org/v2
kind: ApisixUpstream
@@ -556,24 +618,37 @@ spec:
- name: authz-keycloak
enable: true
config:
+ # highlight-start
+ // Annotate 1
lazy_load_paths: true
- resource_registration_endpoint:
http://keycloak.aic.svc.cluster.local:8080/realms/quickstart-realm/authz/protection/resource_set
- discovery:
http://keycloak.aic.svc.cluster.local:8080/realms/quickstart-realm/.well-known/uma2-configuration
- client_id: apisix-quickstart-client
+ // Annotate 2
+ discovery:
http://keycloak.aic.svc.cluster.local:8080/realms/authz-realm/.well-known/uma2-configuration
+ // Annotate 3
+ client_id: apisix-authz
client_secret: replace-with-your-client-secret
+ # highlight-end
+ # highlight-start
+ // Annotate 4
+ - name: serverless-post-function
+ enable: true
+ config:
+ phase: access
+ functions:
+ - "return function(conf, ctx) ngx.req.clear_header('Authorization')
end"
+ # highlight-end
---
apiVersion: apisix.apache.org/v2
kind: ApisixRoute
metadata:
namespace: aic
- name: authz-keycloak-route
+ name: authz-keycloak
spec:
ingressClassName: apisix
http:
- - name: authz-keycloak-route
+ - name: authz-keycloak
match:
paths:
- - /anything
+ - /anything/authz
methods:
- GET
upstreams:
@@ -581,7 +656,11 @@ spec:
plugin_config_name: authz-keycloak-plugin-config
```
-Apply the configuration to your cluster:
+</TabItem>
+
+</Tabs>
+
+Apply the configuration:
```shell
kubectl apply -f authz-keycloak-ic.yaml
@@ -591,17 +670,24 @@ kubectl apply -f authz-keycloak-ic.yaml
</Tabs>
-</TabItem>
+❶ `lazy_load_paths`: Resolves the request URI to Keycloak resources through
the Protection API instead of using a static permission list.
-</Tabs>
+❷ `discovery`: URI of the Keycloak UMA discovery document. The Plugin obtains
the token and resource-registration endpoints from this document.
+
+❸ `client_id` and `client_secret`: Credentials of the Keycloak resource-server
client. APISIX uses them to obtain the service-account token required by the
Protection API.
+
+❹ `serverless-post-function`: Removes the caller's bearer token after
`authz-keycloak` evaluates it, preventing the sample upstream from receiving
the credential. Omit this Plugin if the upstream application must receive the
token.
+
+#### Verify Dynamic Authorization
-Send a request to the Route:
+Send the access token to the protected route:
```shell
-curl "http://127.0.0.1:9080/anything"; -H "Authorization: Bearer $ACCESS_TOKEN"
+curl -i "http://127.0.0.1:9080/anything/authz"; \
+ -H "Authorization: Bearer ${ACCESS_TOKEN}"
```
-You should see an `HTTP/1.1 200 OK` response similar to the following:
+An `HTTP/1.1 200 OK` response verifies that Keycloak permitted the token to
access the resource. The response body should contain fields similar to these:
```json
{
@@ -611,238 +697,89 @@ You should see an `HTTP/1.1 200 OK` response similar to
the following:
"form": {},
"headers": {
"Accept": "*/*",
- "Authorization": "Bearer eyJhbGciOiJSU..."
+ "Host": "127.0.0.1",
+ "User-Agent": "curl/8.7.1",
+ "X-Amzn-Trace-Id": "Root=1-...",
+ "X-Forwarded-Host": "127.0.0.1:9080"
},
"json": null,
"method": "GET",
- "url": "http://127.0.0.1/anything";
+ "origin": "192.168.155.1, xxx.xxx.xxx.xxx",
+ "url": "http://127.0.0.1:9080/anything/authz";
}
```
-### Use Static Permissions
+Header values and the reported origin address vary by environment. The sample
upstream should not receive the `Authorization` header.
-The examples below demonstrate how you can configure `authz-keycloak` to use
the static permission `httpbin-anything#access`.
+Request another access token without the required client scope.
<Tabs
-groupId="api"
-defaultValue="admin-api"
+groupId="runtime"
+defaultValue="docker"
values={[
-{label: 'Admin API', value: 'admin-api'},
-{label: 'ADC', value: 'adc'},
-{label: 'Ingress Controller', value: 'aic'}
+{label: 'Docker', value: 'docker'},
+{label: 'Kubernetes', value: 'k8s'},
]}>
-<TabItem value="admin-api">
-
-Create a Route with `authz-keycloak-route` as follows:
-
-```shell
-curl "http://127.0.0.1:9180/apisix/admin/routes"; -X PUT \
- -H "X-API-KEY: ${admin_key}" \
- -d '{
- "id": "authz-keycloak-route",
- "uri": "/anything",
- "plugins": {
- "authz-keycloak": {
- "lazy_load_paths": false,
- "discovery":
"'"$KEYCLOAK_URL"'/realms/quickstart-realm/.well-known/uma2-configuration",
- "permissions": ["httpbin-anything#access"],
- "client_id": "'"$OIDC_CLIENT_ID"'"
- }
- },
- "upstream": {
- "type": "roundrobin",
- "nodes": {
- "httpbin.org:80": 1
- }
- }
- }'
-```
-
-</TabItem>
-
-<TabItem value="adc">
-
-Create a Route with `authz-keycloak` configured in ADC:
-
-```yaml title="adc.yaml"
-services:
- - name: authz-keycloak-service
- routes:
- - name: authz-keycloak-route
- uris:
- - /anything
- plugins:
- authz-keycloak:
- lazy_load_paths: false
- discovery:
${KEYCLOAK_URL}/realms/quickstart-realm/.well-known/uma2-configuration
- permissions:
- - "httpbin-anything#access"
- client_id: ${OIDC_CLIENT_ID}
- upstream:
- type: roundrobin
- nodes:
- - host: httpbin.org
- port: 80
- weight: 1
-```
-
-Synchronize the configuration to the gateway:
+<TabItem value="docker">
```shell
-adc sync -f adc.yaml
+export TOKEN_WITHOUT_SCOPE="$(
+ docker run --rm --network apisix-quickstart-net \
+ curlimages/curl:8.22.0 -sS \
+ "${KEYCLOAK_URL}/realms/authz-realm/protocol/openid-connect/token" \
+ --user "${KEYCLOAK_CLIENT_ID}:${KEYCLOAK_CLIENT_SECRET}" \
+ -H "Content-Type: application/x-www-form-urlencoded" \
+ --data-urlencode "grant_type=client_credentials" | \
+ jq -er '.access_token'
+)"
```
</TabItem>
-<TabItem value="aic">
-
-Configure `authz-keycloak` on the Route:
-
-<Tabs
-groupId="k8s-api"
-defaultValue="gateway-api"
-values={[
-{label: 'Gateway API', value: 'gateway-api'},
-{label: 'APISIX CRD', value: 'apisix-crd'}
-]}>
-
-<TabItem value="gateway-api">
-
-```yaml title="authz-keycloak-ic.yaml"
-apiVersion: v1
-kind: Service
-metadata:
- namespace: aic
- name: httpbin-external-domain
-spec:
- type: ExternalName
- externalName: httpbin.org
----
-apiVersion: apisix.apache.org/v1alpha1
-kind: PluginConfig
-metadata:
- namespace: aic
- name: authz-keycloak-plugin-config
-spec:
- plugins:
- - name: authz-keycloak
- config:
- lazy_load_paths: false
- discovery:
http://keycloak.aic.svc.cluster.local:8080/realms/quickstart-realm/.well-known/uma2-configuration
- permissions:
- - "httpbin-anything#access"
- client_id: apisix-quickstart-client
----
-apiVersion: gateway.networking.k8s.io/v1
-kind: HTTPRoute
-metadata:
- namespace: aic
- name: authz-keycloak-route
-spec:
- parentRefs:
- - name: apisix
- rules:
- - matches:
- - path:
- type: Exact
- value: /anything
- filters:
- - type: ExtensionRef
- extensionRef:
- group: apisix.apache.org
- kind: PluginConfig
- name: authz-keycloak-plugin-config
- backendRefs:
- - name: httpbin-external-domain
- port: 80
-```
-
-Apply the configuration to your cluster:
+<TabItem value="k8s">
```shell
-kubectl apply -f authz-keycloak-ic.yaml
+export TOKEN_WITHOUT_SCOPE="$(
+ kubectl run authz-token-request --rm -i --restart=Never --quiet \
+ --namespace aic \
+ --image curlimages/curl:8.22.0 \
+ --command -- \
+ curl -sS \
+ "${KEYCLOAK_URL}/realms/authz-realm/protocol/openid-connect/token" \
+ --user "${KEYCLOAK_CLIENT_ID}:${KEYCLOAK_CLIENT_SECRET}" \
+ -H "Content-Type: application/x-www-form-urlencoded" \
+ --data-urlencode "grant_type=client_credentials" | \
+ jq -er '.access_token'
+)"
```
</TabItem>
-<TabItem value="apisix-crd">
-
-```yaml title="authz-keycloak-ic.yaml"
-apiVersion: apisix.apache.org/v2
-kind: ApisixUpstream
-metadata:
- namespace: aic
- name: httpbin-external-domain
-spec:
- ingressClassName: apisix
- externalNodes:
- - type: Domain
- name: httpbin.org
----
-apiVersion: apisix.apache.org/v2
-kind: ApisixPluginConfig
-metadata:
- namespace: aic
- name: authz-keycloak-plugin-config
-spec:
- ingressClassName: apisix
- plugins:
- - name: authz-keycloak
- enable: true
- config:
- lazy_load_paths: false
- discovery:
http://keycloak.aic.svc.cluster.local:8080/realms/quickstart-realm/.well-known/uma2-configuration
- permissions:
- - "httpbin-anything#access"
- client_id: apisix-quickstart-client
----
-apiVersion: apisix.apache.org/v2
-kind: ApisixRoute
-metadata:
- namespace: aic
- name: authz-keycloak-route
-spec:
- ingressClassName: apisix
- http:
- - name: authz-keycloak-route
- match:
- paths:
- - /anything
- methods:
- - GET
- upstreams:
- - name: httpbin-external-domain
- plugin_config_name: authz-keycloak-plugin-config
-```
+</Tabs>
-Apply the configuration to your cluster:
+Send the token to the route:
```shell
-kubectl apply -f authz-keycloak-ic.yaml
+curl -i "http://127.0.0.1:9080/anything/authz"; \
+ -H "Authorization: Bearer ${TOKEN_WITHOUT_SCOPE}"
```
-</TabItem>
+APISIX returns `HTTP/1.1 403 Forbidden` because the token does not satisfy
`httpbin-access-policy`.
-</Tabs>
-
-</TabItem>
-
-</Tabs>
-
-Send a request to the Route:
+Send a request without a bearer token:
```shell
-curl "http://127.0.0.1:9080/anything"; -H "Authorization: Bearer $ACCESS_TOKEN"
+curl -i "http://127.0.0.1:9080/anything/authz";
```
-You should see an `HTTP/1.1 200 OK` response.
+APISIX returns `HTTP/1.1 401 Unauthorized` because the request does not
contain a token for Keycloak to evaluate.
-If you remove the client scope `httpbin-access` from
`apisix-quickstart-client`, you should receive a `401 Unauthorized` response
when requesting the resource.
+### Authorize Requests with Static Permissions
-### Generate Token with Password Grant at Custom Token Endpoint
+Static permissions avoid the Protection API lookup when the required Keycloak
resource and scope are known in advance. Configure a route that always asks
Keycloak to evaluate `httpbin-anything#access`.
-The examples below demonstrate how you can configure `authz-keycloak` to
request a token with the password grant at a custom endpoint.
+Choose the API used to configure the route.
<Tabs
groupId="api"
@@ -850,59 +787,78 @@ defaultValue="admin-api"
values={[
{label: 'Admin API', value: 'admin-api'},
{label: 'ADC', value: 'adc'},
-{label: 'Ingress Controller', value: 'aic'}
+{label: 'Ingress Controller', value: 'aic'},
]}>
<TabItem value="admin-api">
-Create a Route with `authz-keycloak-route` as follows:
+Create the route through the Admin API:
```shell
-curl "http://127.0.0.1:9180/apisix/admin/routes"; -X PUT \
- -H "X-API-KEY: ${admin_key}" \
- -d '{
- "id": "authz-keycloak-route",
- "uri": "/api/*",
- "plugins": {
- "authz-keycloak": {
- "lazy_load_paths": true,
- "resource_registration_endpoint":
"'"$KEYCLOAK_URL"'/realms/quickstart-realm/authz/protection/resource_set",
- "client_id": "'"$OIDC_CLIENT_ID"'",
- "client_secret": "'"$OIDC_CLIENT_SECRET"'",
- "token_endpoint":
"'"$KEYCLOAK_URL"'/realms/quickstart-realm/protocol/openid-connect/token",
- "password_grant_token_generation_incoming_uri": "/api/token"
- }
+curl "http://127.0.0.1:9180/apisix/admin/routes/authz-keycloak-static"; -X PUT \
+ --data-binary @- <<EOF
+{
+ "uri": "/anything/authz-static",
+ "plugins": {
+ "authz-keycloak": {
+# highlight-start
+ // Annotate 1
+ "lazy_load_paths": false,
+ // Annotate 2
+ "permissions": ["httpbin-anything#access"],
+ // Annotate 3
+ "discovery":
"$KEYCLOAK_URL/realms/authz-realm/.well-known/uma2-configuration",
+ "client_id": "$KEYCLOAK_CLIENT_ID"
+# highlight-end
},
- "upstream": {
- "type": "roundrobin",
- "nodes": {
- "httpbin.org:80": 1
- }
+ "serverless-post-function": {
+ "phase": "access",
+ "functions": [
+ "return function(conf, ctx) ngx.req.clear_header('Authorization') end"
+ ]
}
- }'
+ },
+ "upstream": {
+ "type": "roundrobin",
+ "nodes": {
+ "httpbin.org:80": 1
+ }
+ }
+}
+EOF
```
</TabItem>
<TabItem value="adc">
-Create a Route with `authz-keycloak` configured in ADC:
+Create `adc-static.yaml` with the route configuration:
-```yaml title="adc.yaml"
+```yaml title="adc-static.yaml"
services:
- - name: authz-keycloak-service
+ - name: authz-keycloak-static-httpbin
+ labels:
+ docs-example: authz-keycloak-static
routes:
- - name: authz-keycloak-route
+ - name: authz-keycloak-static
uris:
- - /api/*
+ - /anything/authz-static
plugins:
authz-keycloak:
- lazy_load_paths: true
- resource_registration_endpoint:
${KEYCLOAK_URL}/realms/quickstart-realm/authz/protection/resource_set
- client_id: ${OIDC_CLIENT_ID}
- client_secret: ${OIDC_CLIENT_SECRET}
- token_endpoint:
${KEYCLOAK_URL}/realms/quickstart-realm/protocol/openid-connect/token
- password_grant_token_generation_incoming_uri: /api/token
+ # highlight-start
+ // Annotate 1
+ lazy_load_paths: false
+ // Annotate 2
+ permissions:
+ - httpbin-anything#access
+ // Annotate 3
+ discovery:
"${KEYCLOAK_URL}/realms/authz-realm/.well-known/uma2-configuration"
+ client_id: "${KEYCLOAK_CLIENT_ID}"
+ # highlight-end
+ serverless-post-function:
+ phase: access
+ functions:
+ - "return function(conf, ctx)
ngx.req.clear_header('Authorization') end"
upstream:
type: roundrobin
nodes:
@@ -911,34 +867,46 @@ services:
weight: 1
```
-Synchronize the configuration to the gateway:
+ADC reconciles services as desired state. Preview the scoped changes and
confirm that they contain no unintended updates or deletions:
```shell
-adc sync -f adc.yaml
+adc diff -f adc-static.yaml \
+ --include-resource-type service \
+ --label-selector docs-example=authz-keycloak-static
+```
+
+Synchronize the reviewed configuration:
+
+```shell
+adc sync -f adc-static.yaml \
+ --include-resource-type service \
+ --label-selector docs-example=authz-keycloak-static
```
</TabItem>
<TabItem value="aic">
-Configure `authz-keycloak` on the Route:
+Configure the static route with either Gateway API or APISIX custom resources.
<Tabs
groupId="k8s-api"
defaultValue="gateway-api"
values={[
{label: 'Gateway API', value: 'gateway-api'},
-{label: 'APISIX CRD', value: 'apisix-crd'}
+{label: 'APISIX CRD', value: 'apisix-crd'},
]}>
<TabItem value="gateway-api">
-```yaml title="authz-keycloak-ic.yaml"
+Create `authz-keycloak-static-ic.yaml`:
+
+```yaml title="authz-keycloak-static-ic.yaml"
apiVersion: v1
kind: Service
metadata:
namespace: aic
- name: httpbin-external-domain
+ name: httpbin-static-external-domain
spec:
type: ExternalName
externalName: httpbin.org
@@ -947,58 +915,63 @@ apiVersion: apisix.apache.org/v1alpha1
kind: PluginConfig
metadata:
namespace: aic
- name: authz-keycloak-plugin-config
+ name: authz-keycloak-static-plugin-config
spec:
plugins:
- name: authz-keycloak
config:
- lazy_load_paths: true
- resource_registration_endpoint:
http://keycloak.aic.svc.cluster.local:8080/realms/quickstart-realm/authz/protection/resource_set
- client_id: apisix-quickstart-client
- client_secret: replace-with-your-client-secret
- token_endpoint:
http://keycloak.aic.svc.cluster.local:8080/realms/quickstart-realm/protocol/openid-connect/token
- password_grant_token_generation_incoming_uri: /api/token
+ # highlight-start
+ // Annotate 1
+ lazy_load_paths: false
+ // Annotate 2
+ permissions:
+ - httpbin-anything#access
+ // Annotate 3
+ discovery:
http://keycloak.aic.svc.cluster.local:8080/realms/authz-realm/.well-known/uma2-configuration
+ client_id: apisix-authz
+ # highlight-end
+ - name: serverless-post-function
+ config:
+ phase: access
+ functions:
+ - "return function(conf, ctx) ngx.req.clear_header('Authorization')
end"
---
apiVersion: gateway.networking.k8s.io/v1
kind: HTTPRoute
metadata:
namespace: aic
- name: authz-keycloak-route
+ name: authz-keycloak-static
spec:
parentRefs:
- name: apisix
rules:
- matches:
- path:
- type: PathPrefix
- value: /api/
+ type: Exact
+ value: /anything/authz-static
filters:
- type: ExtensionRef
extensionRef:
group: apisix.apache.org
kind: PluginConfig
- name: authz-keycloak-plugin-config
+ name: authz-keycloak-static-plugin-config
backendRefs:
- - name: httpbin-external-domain
+ - name: httpbin-static-external-domain
port: 80
```
-Apply the configuration to your cluster:
-
-```shell
-kubectl apply -f authz-keycloak-ic.yaml
-```
-
</TabItem>
<TabItem value="apisix-crd">
-```yaml title="authz-keycloak-ic.yaml"
+Create `authz-keycloak-static-ic.yaml`:
+
+```yaml title="authz-keycloak-static-ic.yaml"
apiVersion: apisix.apache.org/v2
kind: ApisixUpstream
metadata:
namespace: aic
- name: httpbin-external-domain
+ name: httpbin-static-external-domain
spec:
ingressClassName: apisix
externalNodes:
@@ -1009,75 +982,78 @@ apiVersion: apisix.apache.org/v2
kind: ApisixPluginConfig
metadata:
namespace: aic
- name: authz-keycloak-plugin-config
+ name: authz-keycloak-static-plugin-config
spec:
ingressClassName: apisix
plugins:
- name: authz-keycloak
enable: true
config:
- lazy_load_paths: true
- resource_registration_endpoint:
http://keycloak.aic.svc.cluster.local:8080/realms/quickstart-realm/authz/protection/resource_set
- client_id: apisix-quickstart-client
- client_secret: replace-with-your-client-secret
- token_endpoint:
http://keycloak.aic.svc.cluster.local:8080/realms/quickstart-realm/protocol/openid-connect/token
- password_grant_token_generation_incoming_uri: /api/token
+ # highlight-start
+ // Annotate 1
+ lazy_load_paths: false
+ // Annotate 2
+ permissions:
+ - httpbin-anything#access
+ // Annotate 3
+ discovery:
http://keycloak.aic.svc.cluster.local:8080/realms/authz-realm/.well-known/uma2-configuration
+ client_id: apisix-authz
+ # highlight-end
+ - name: serverless-post-function
+ enable: true
+ config:
+ phase: access
+ functions:
+ - "return function(conf, ctx) ngx.req.clear_header('Authorization')
end"
---
apiVersion: apisix.apache.org/v2
kind: ApisixRoute
metadata:
namespace: aic
- name: authz-keycloak-route
+ name: authz-keycloak-static
spec:
ingressClassName: apisix
http:
- - name: authz-keycloak-route
+ - name: authz-keycloak-static
match:
paths:
- - /api/*
+ - /anything/authz-static
methods:
- GET
- - POST
upstreams:
- - name: httpbin-external-domain
- plugin_config_name: authz-keycloak-plugin-config
+ - name: httpbin-static-external-domain
+ plugin_config_name: authz-keycloak-static-plugin-config
```
-Apply the configuration to your cluster:
+</TabItem>
+
+</Tabs>
+
+Apply the configuration:
```shell
-kubectl apply -f authz-keycloak-ic.yaml
+kubectl apply -f authz-keycloak-static-ic.yaml
```
</TabItem>
</Tabs>
-</TabItem>
+❶ `lazy_load_paths`: Set to `false` to use the configured permission list
without querying the Protection API.
-</Tabs>
+❷ `permissions`: Resource and authorization scope that Keycloak evaluates for
every request to this route.
+
+❸ `discovery` and `client_id`: Identify the Keycloak UMA token endpoint and
the resource server. The static workflow does not require the client secret
because APISIX does not call the Protection API.
+
+#### Verify Static Authorization
-Send a request to the configured token endpoint. The request should use the
POST method and `application/x-www-form-urlencoded` as the `Content-Type`:
+Send the permitted token to the static route:
```shell
-OIDC_USER=quickstart-user
-OIDC_PASSWORD=quickstart-user-pass
-
-curl "http://127.0.0.1:9080/api/token"; -X POST \
- -H "Content-Type: application/x-www-form-urlencoded" \
- -H "Accept: application/json" \
- -d 'username='$OIDC_USER'' \
- -d 'password='$OIDC_PASSWORD''
+curl -i "http://127.0.0.1:9080/anything/authz-static"; \
+ -H "Authorization: Bearer ${ACCESS_TOKEN}"
```
-You should see a JSON response with an access token similar to the following:
+APISIX returns `HTTP/1.1 200 OK`. Sending `TOKEN_WITHOUT_SCOPE` instead
returns `HTTP/1.1 403 Forbidden`.
-```json
-{
- "access_token": "eyJhbGciOiJSUzI1NiIsInR5cCIgOiAiSldUIi...",
- "expires_in": 300,
- "refresh_expires_in": 1800,
- "token_type": "Bearer",
- "scope": "profile email httpbin-access"
-}
-```
+You have now configured Keycloak Authorization Services to enforce dynamic and
static permissions at APISIX. See the [attributes](#attributes) for additional
options, including HTTP-method scopes and access-denied redirects. See the
[Keycloak Authorization Services
Guide](https://www.keycloak.org/docs/latest/authorization_services/) for more
policy and permission types.
diff --git a/docs/zh/latest/plugins/authz-keycloak.md
b/docs/zh/latest/plugins/authz-keycloak.md
index 254ac99145..bceefb7a85 100644
--- a/docs/zh/latest/plugins/authz-keycloak.md
+++ b/docs/zh/latest/plugins/authz-keycloak.md
@@ -6,7 +6,7 @@ keywords:
- Plugin
- Authz Keycloak
- authz-keycloak
-description: authz-keycloak 插件与 Keycloak 集成,用于用户认证和授权,增强 API 的安全性和管理能力。
+description: authz-keycloak 插件将 Apache APISIX 请求的 UMA 权限决策委托给 Keycloak 授权服务。
---
<!--
@@ -37,149 +37,160 @@ import TabItem from '@theme/TabItem';
## 描述
-`authz-keycloak` 插件与 [Keycloak](https://www.keycloak.org/)
集成,用于用户认证和授权。有关本插件可用配置选项的更多信息,请参阅 Keycloak 的 [Authorization Services
Guide](https://www.keycloak.org/docs/latest/authorization_services/)。
+`authz-keycloak` 插件将 APISIX 与 [Keycloak
授权服务](https://www.keycloak.org/docs/latest/authorization_services/)集成。插件将调用方的
Bearer 令牌和请求的权限发送到 Keycloak 的用户管理访问 (UMA) 令牌端点。Keycloak 在 APISIX
代理请求之前评估相关资源、作用域、策略和权限。
-虽然本插件是针对 Keycloak 开发的,但理论上也可与其他符合 OAuth/OIDC 和 UMA 规范的身份提供商一起使用。
+权限可以动态选择,也可以显式配置。使用动态路径加载时,APISIX 通过 Keycloak 服务账号调用 Protection API,将请求 URI
解析为对应资源。使用静态权限时,APISIX 直接将配置的资源和作用域名称发送到 UMA 令牌端点。
## 属性
-| 名称 | 类型 | 必填 | 默认值
| 有效值
| 描述
|
-|----------------------------------------------|---------------|------|-----------------------------------------------|------------------------------------------------------------------------|-------------------------------------------------------------------------------------------------------------------------------------------------------------------------------------------------------------------------------------------------------|
-| discovery | string | 否 |
|
https://host.domain/realms/foo/.well-known/uma2-configuration | Keycloak
Authorization Services
的[发现文档](https://www.keycloak.org/docs/latest/authorization_services/index.html)
URL。
|
-| token_endpoint | string | 否 |
|
https://host.domain/realms/foo/protocol/openid-connect/token | 支持
`urn:ietf:params:oauth:grant-type:uma-ticket` 授权类型的符合 OAuth2
规范的令牌端点。若设置,将覆盖从发现文档中获取的值。
|
-| resource_registration_endpoint | string | 否 |
|
https://host.domain/realms/foo/authz/protection/resource_set | 符合 UMA
规范的资源注册端点。若设置,将覆盖从发现文档中获取的值。
|
-| client_id | string | 是 |
|
| 客户端尝试访问的资源服务器的标识符。
|
-| client_secret | string | 否 |
|
| 客户端密钥 (如需要)。可以使用 APISIX Secret 存储和引用该值。APISIX
目前支持通过两种方式存储 secret:[环境变量和 HashiCorp Vault](../terminology/secret.md)。
|
-| grant_type | string | 否 |
"urn:ietf:params:oauth:grant-type:uma-ticket" |
["urn:ietf:params:oauth:grant-type:uma-ticket"] |
|
-| policy_enforcement_mode | string | 否 |
"ENFORCING" | ["ENFORCING", "PERMISSIVE"]
|
|
-| permissions | array[string] | 否 |
|
| 字符串数组,每个字符串代表客户端请求访问的一个或多个资源和作用域的集合。
|
-| lazy_load_paths | boolean | 否 | false
|
| 设置为 `true` 时,使用资源注册端点将请求 URI 动态解析为资源,而非使用静态权限。
|
-| http_method_as_scope | boolean | 否 | false
|
| 设置为 `true` 时,将 HTTP 请求方法映射为同名作用域,并添加到所有请求的权限中。
|
-| timeout | integer | 否 | 3000
| [1000, ...]
| 与 Identity Server 进行 HTTP 连接的超时时间 (毫秒)。
|
-| access_token_expires_in | integer | 否 | 300
| [1, ...]
| 访问令牌的过期时间 (秒)。
|
-| access_token_expires_leeway | integer | 否 | 0
| [0, ...]
| 访问令牌续期的宽限时间 (秒)。设置后,将在令牌过期前
access_token_expires_leeway 秒进行续期,以避免访问令牌恰好在到达 OAuth 资源服务器时过期的错误。
|
-| refresh_token_expires_in | integer | 否 | 3600
| [1, ...]
| 刷新令牌的过期时间 (秒)。
|
-| refresh_token_expires_leeway | integer | 否 | 0
| [0, ...]
| 刷新令牌续期的宽限时间 (秒)。设置后,将在令牌过期前
refresh_token_expires_leeway 秒进行续期,以避免刷新令牌恰好在到达 OAuth 资源服务器时过期的错误。
|
-| ssl_verify | boolean | 否 | true
|
| 设置为 `true` 时,验证 TLS 证书与主机名是否匹配。
|
-| cache_ttl_seconds | integer | 否 |
86400(相当于 24 小时) | 正整数 >= 1
| 插件缓存发现文档和用于向 Keycloak 认证的令牌的最长时间 (秒)。
|
-| keepalive | boolean | 否 | true
|
| 设置为 `true` 时,启用 HTTP
keep-alive,保持连接在使用后不关闭。如果预期有大量请求发往 Keycloak,建议设为 `true`。
|
-| keepalive_timeout | integer | 否 | 60000
| 正整数 >= 1000
| 已建立的 HTTP 连接在空闲多久后关闭。
|
-| keepalive_pool | integer | 否 | 5
| 正整数 >= 1
| 连接池中的最大连接数。
|
-| access_denied_redirect_uri | string | 否 |
| [1, 2048]
| 用于替代返回 `"error_description":"not_authorized"`
错误信息而重定向用户的 URI。
|
-| password_grant_token_generation_incoming_uri | string | 否 |
| /api/token
| 设置此项以使用密码授权类型生成令牌。插件会将传入请求的 URI 与此值进行比较。
|
-
-注意:schema 中还定义了 `encrypt_fields = {"client_secret"}`,这意味着该字段将以加密方式存储在 etcd
中。请参阅[加密存储字段](../plugin-develop.md#加密存储字段)。
+| 名称 | 类型 | 必填 | 默认值
| 有效值
| 描述 |
+|----------------------------------------------|---------------|------|-----------------------------------------------|------------------------------------------------------------------------|------|
+| max_req_body_size | integer | 否 |
67108864 | >= 1
|
插件生成密码授权令牌时缓冲到内存中的请求体大小上限,单位为字节。如果请求体超过限制或无法读取,插件将返回 `503 Service Unavailable`。
|
+| discovery | string | 否 |
|
https://host.domain/realms/foo/.well-known/uma2-configuration |
Keycloak UMA 发现文档的 URL。必须至少配置 `discovery` 或 `token_endpoint` 之一。 |
+| token_endpoint | string | 否 |
|
https://host.domain/realms/foo/protocol/openid-connect/token | 支持
`urn:ietf:params:oauth:grant-type:uma-ticket`
授权类型并用于权限评估的令牌端点。该配置将覆盖发现文档中的值。必须至少配置 `discovery` 或 `token_endpoint` 之一。 |
+| resource_registration_endpoint | string | 否 |
|
https://host.domain/realms/foo/authz/protection/resource_set | UMA
资源注册端点。启用 `lazy_load_paths` 时,插件优先使用该值,否则从发现文档获取。动态加载需要配置 `discovery`,或同时配置
`token_endpoint` 和 `resource_registration_endpoint`。 |
+| client_id | string | 是 |
|
| Keycloak 资源服务器的客户端 ID。 |
+| client_secret | string | 否 |
|
| 插件向令牌端点认证时使用的客户端密钥。启用字段加密后,该值会在存入 etcd 前加密。 |
+| grant_type | string | 否 |
"urn:ietf:params:oauth:grant-type:uma-ticket" |
["urn:ietf:params:oauth:grant-type:uma-ticket"] |
用于权限评估的 UMA ticket 授权类型,也是唯一可接受的值。 |
+| policy_enforcement_mode | string | 否 |
"ENFORCING" | ["ENFORCING", "PERMISSIVE"]
| 控制插件在向 Keycloak 请求决策前如何处理空权限列表。 |
+| permissions | array[string] | 否 |
|
| `lazy_load_paths` 为 `false` 时需要评估的权限。支持
`RESOURCE_ID#SCOPE_ID`、`RESOURCE_ID` 和 `#SCOPE_ID` 格式。 |
+| lazy_load_paths | boolean | 否 | false
|
| 设置为 `true` 时,通过资源注册端点将请求 URI 解析为 Keycloak 资源。 |
+| http_method_as_scope | boolean | 否 | false
|
| 设置为 `true` 时,将 HTTP 请求方法映射为同名作用域,并添加到所有请求的权限中。
|
+| timeout | integer | 否 | 3000
| [1000, ...]
| 与身份提供商建立 HTTP 连接的超时时间,单位为毫秒。 |
+| access_token_expires_in | integer | 否 | 300
| [1, ...]
| 令牌端点响应中不包含 `expires_in` 时使用的访问令牌有效期,单位为秒。 |
+| access_token_expires_leeway | integer | 否 | 0
| [0, ...]
| 访问令牌续期的提前量,单位为秒。大于 `0` 时,插件会在令牌过期前按该值提前续期。 |
+| refresh_token_expires_in | integer | 否 | 3600
| [1, ...]
| 刷新令牌的有效期,单位为秒。 |
+| refresh_token_expires_leeway | integer | 否 | 0
| [0, ...]
| 刷新令牌续期的提前量,单位为秒。大于 `0` 时,插件会在令牌过期前按该值提前续期。 |
+| ssl_verify | boolean | 否 | true
|
| 设置为 `true` 时,验证 OpenID 提供商的 TLS 证书。 |
+| cache_ttl_seconds | integer | 否 | 86400
| 正整数 >= 1
| 插件缓存发现文档和访问令牌的时间,单位为秒。 |
+| keepalive | boolean | 否 | true
|
| 设置为 `true` 时,保持与身份提供商的 HTTP 连接以供复用。 |
+| keepalive_timeout | integer | 否 | 60000
| 正整数 >= 1000
| 已建立的 HTTP 连接在关闭前可保持空闲的时间,单位为毫秒。 |
+| keepalive_pool | integer | 否 | 5
| 正整数 >= 1
| 连接池中的最大连接数。 |
+| access_denied_redirect_uri | string | 否 |
| [1, 2048]
| 当 `ENFORCING` 模式下权限列表为空或 Keycloak 返回 `403
Forbidden` 时,用于发送 `307 Temporary Redirect` 的 URI。 |
+| password_grant_token_generation_incoming_uri | string | 否 |
| /api/token
| 兼容旧配置的资源所有者密码凭证授权端点。OAuth 2.0
安全最佳当前实践规定不得使用此授权类型。新部署中不要配置此字段。 |
+
+注意:schema 将 `client_secret` 标记为加密字段。启用字段加密后,APISIX 会在将该值存入 etcd
前进行加密。更多信息,请参阅[加密存储字段](../plugin-develop.md#加密存储字段)。
### 发现文档与端点
-建议使用 `discovery` 属性,`authz-keycloak` 插件可从中自动发现 Keycloak API 端点。
+配置 `discovery` 后,`authz-keycloak` 插件会从 UMA 发现文档获取 Keycloak 的令牌端点和资源注册端点。
-若设置 `token_endpoint` 和 `resource_registration_endpoint`,将覆盖从发现文档中获取的值。
+如果配置了 `token_endpoint` 或 `resource_registration_endpoint`,对应值将覆盖从发现文档获取的端点。
+
+必须至少配置 `discovery` 或 `token_endpoint` 之一。动态路径加载还需要配置 `discovery`,或同时配置
`token_endpoint` 和 `resource_registration_endpoint`。
### Client ID 与密钥
-插件需要 `client_id` 属性进行标识,并在与 Keycloak 交互时指定评估权限的上下文。
+`client_id` 用于标识评估权限的 Keycloak 资源服务器。
-若 `lazy_load_paths` 属性设置为 `true`,插件还需要从 Keycloak 为自身获取访问令牌。在此情况下,若客户端对
Keycloak 的访问是保密的,则需要配置 `client_secret` 属性。
+当 `lazy_load_paths` 为 `true` 时,插件会先获取服务账号令牌,再查询 Protection API。需要为该请求配置
`client_secret`,并确保服务账号令牌包含 `uma_protection` 角色。
### 策略执行模式
-`policy_enforcement_mode` 属性指定在处理发送到服务器的授权请求时如何执行策略。
+`policy_enforcement_mode` 属性控制插件在向 Keycloak 请求决策前如何处理空权限列表。
#### `ENFORCING` 模式
-即使没有与资源关联的策略,请求也会被默认拒绝。
-
-`policy_enforcement_mode` 默认设置为 `ENFORCING`。
+空权限列表会返回 `403 Forbidden`。如果配置了 `access_denied_redirect_uri`,则返回 `307 Temporary
Redirect`。默认模式为 `ENFORCING`。
#### `PERMISSIVE` 模式
-当给定资源没有关联策略时,允许请求通过。
+插件会在不携带权限参数的情况下继续发送 UMA 令牌请求,是否授权仍由 Keycloak 决定。
### 权限
-处理传入请求时,插件可以静态或动态地从请求属性中确定要与 Keycloak 核对的权限。
-
-若 `lazy_load_paths` 属性设置为 `false`,权限取自 `permissions` 属性。`permissions`
中的每个条目需要按照令牌端点 `permission` 参数的预期格式进行格式化。参阅 [Obtaining
Permissions](https://www.keycloak.org/docs/latest/authorization_services/index.html#_service_obtaining_permissions)。
-
-:::note
-
-有效的权限可以是单个资源,也可以是资源与一个或多个作用域的组合。
+处理传入请求时,插件可以静态确定要由 Keycloak 检查的权限,也可以根据请求属性动态确定。
-:::
+当 `lazy_load_paths` 为 `false` 时,插件从 `permissions` 属性读取权限。`permissions`
中的每个条目都需要使用令牌端点 `permission` 参数支持的格式。更多信息,请参阅 [Obtaining
Permissions](https://www.keycloak.org/docs/latest/authorization_services/index.html#_service_obtaining_permissions)。
-若 `lazy_load_paths` 属性设置为 `true`,将使用资源注册端点将请求 URI 解析为 Keycloak
中配置的一个或多个资源,并将解析出的资源用作待核对的权限。
+权限可以包含资源、资源和作用域,或仅包含作用域。支持的格式为 `RESOURCE_ID`、`RESOURCE_ID#SCOPE_ID` 和
`#SCOPE_ID`。
-:::note
+当 `lazy_load_paths` 为 `true` 时,插件通过资源注册端点将请求 URI 解析为 Keycloak
中配置的一个或多个资源,并使用解析出的资源作为待检查权限。
-这需要插件通过令牌端点为自身获取单独的访问令牌。请确保在 Keycloak 的客户端设置中启用 `Service Accounts Enabled` 选项。
-
-同时请确保签发的访问令牌包含带有 `uma_protection` 角色的 `resource_access` 声明,以确保插件能够通过
Protection API 查询资源。
-
-:::
+动态加载要求插件获取服务账号令牌。使用 Protection API 前,需要为 Keycloak 客户端启用服务账号,并确保签发的令牌包含
`uma_protection` 角色。
只有当 Keycloak 授予所有待核对的权限(包括每个权限中列出的所有作用域)时,插件才会转发请求。若任一权限或作用域未被授予,请求将被拒绝。
### 自动将 HTTP 方法映射到作用域
-`http_method_as_scope` 通常与 `lazy_load_paths` 一起使用,但也可以与静态权限列表配合使用。
+`http_method_as_scope` 通常与 `lazy_load_paths` 一起使用,也可以与静态权限列表配合使用。
-若 `http_method_as_scope` 属性设置为 `true`,插件会将请求的 HTTP
方法映射为同名作用域,并将该作用域添加到每个待核对的权限中。
+当 `http_method_as_scope` 为 `true` 时,插件会将请求的 HTTP 方法映射为同名作用域,并将该作用域添加到每个待检查权限。
-若 `lazy_load_paths` 属性设置为 `false`,插件会将映射的作用域添加到 `permissions`
属性中配置的所有静态权限中——即使这些权限已经包含一个或多个作用域。
+当 `lazy_load_paths` 为 `false` 时,插件会将映射的作用域添加到 `permissions`
中配置的所有静态权限,即使这些权限已经包含一个或多个作用域。
-### 使用 `password` 授权类型生成令牌
+### 旧版密码授权兼容性
-若要使用 `password` 授权类型生成令牌,可以设置 `password_grant_token_generation_incoming_uri`
属性的值。
+`password_grant_token_generation_incoming_uri` 属性用于兼容现有配置。当包含 `username` 和
`password` 的表单编码 `POST` 请求与此 URI 匹配时,插件会向配置的 `token_endpoint` 提交密码授权请求并返回其响应。
-若传入的 URI 与配置的属性匹配且请求方法为 POST,则使用 `token_endpoint` 生成令牌。
-
-还需要在请求中添加 `application/x-www-form-urlencoded` 作为 `Content-Type` 请求头,并将
`username` 和 `password` 作为参数传入。
+OAuth 2.0 安全最佳当前实践规定不得使用资源所有者密码凭证授权。新部署中不要配置此属性。更多信息,请参阅 [RFC 9700 第 2.4
节](https://www.rfc-editor.org/rfc/rfc9700.html#section-2.4)。
## 示例
-以下示例演示了如何针对不同场景配置 `authz-keycloak` 插件。
+以下配置将创建一个 Keycloak 资源服务器,并演示动态和静态 UMA 权限检查。
-请先完成 Keycloak 的[前置配置](#配置-keycloak)。
+开始之前:
-:::note
-你可以使用以下命令从 `conf/config.yaml` 获取 `admin_key` 并保存到环境变量:
+- 安装 [Docker](https://docs.docker.com/get-docker/)。
+- 安装 [cURL](https://curl.se/) 和 [jq](https://jqlang.org/)。
+- 按照[入门指南](../getting-started/README.md)使用 Docker 启动 APISIX。
+- 如果需要使用 ADC,请先[安装并配置 ADC](https://docs.api7.ai/apisix/reference/adc)。
+- 如果需要使用 Ingress Controller 示例,请先在 `aic` 命名空间中[配置 Ingress Controller
和网关](https://apisix.apache.org/zh/docs/ingress-controller/getting-started/)。
-```bash
-admin_key=$(yq '.deployment.admin.admin_key[0].key' conf/config.yaml | sed
's/"//g')
-```
+### 配置 Keycloak
-:::
+启动 Keycloak,然后配置受保护资源、授权策略和基于作用域的权限。
-### 配置 Keycloak
+本指南使用 Keycloak 服务账号获取测试访问令牌。客户端作用域策略允许包含 `httpbin-access` 的令牌使用 `access`
授权作用域访问受保护资源。
#### 启动 Keycloak
+选择与 APISIX 部署匹配的环境。
+
<Tabs
groupId="runtime"
defaultValue="docker"
values={[
{label: 'Docker', value: 'docker'},
-{label: 'Kubernetes', value: 'k8s'}
+{label: 'Kubernetes', value: 'k8s'},
]}>
<TabItem value="docker">
-以
[开发模式](https://www.keycloak.org/server/configuration#_starting_keycloak_in_development_mode)
启动一个名为 `apisix-quickstart-keycloak` 的 Keycloak 实例,管理员用户名为
`quickstart-admin`,密码为 `quickstart-admin-pass`:
+如果其他指南已启动 `apisix-keycloak`,请将其连接到 APISIX 快速入门网络,并跳过下一条命令:
+
+```shell
+docker network connect apisix-quickstart-net apisix-keycloak
+```
+
+否则,请以开发模式启动 Keycloak,并将管理控制台绑定到环回接口:
+
+```shell
+docker run -d --name apisix-keycloak \
+ --network apisix-quickstart-net \
+ -e 'KC_BOOTSTRAP_ADMIN_USERNAME=quickstart-admin' \
+ -e 'KC_BOOTSTRAP_ADMIN_PASSWORD=quickstart-admin-pass' \
+ -p 127.0.0.1:8080:8080 \
+ quay.io/keycloak/keycloak:26.7.3 start-dev
+```
+
+保存 Keycloak 地址:
```shell
-docker run -d --name "apisix-quickstart-keycloak" \
- -e 'KEYCLOAK_ADMIN=quickstart-admin' \
- -e 'KEYCLOAK_ADMIN_PASSWORD=quickstart-admin-pass' \
- -p 8080:8080 \
- quay.io/keycloak/keycloak:18.0.2 start-dev
+export KEYCLOAK_URL=http://apisix-keycloak:8080
```
</TabItem>
<TabItem value="k8s">
-将 Keycloak 部署到 Kubernetes:
+如果命名空间尚不存在,请先创建:
+
+```shell
+kubectl create namespace aic --dry-run=client -o yaml | kubectl apply -f -
+```
+
+创建 `keycloak.yaml`,其中包含 Keycloak Deployment 和 Service:
```yaml title="keycloak.yaml"
apiVersion: apps/v1
@@ -199,13 +210,13 @@ spec:
spec:
containers:
- name: keycloak
- image: quay.io/keycloak/keycloak:18.0.2
+ image: quay.io/keycloak/keycloak:26.7.3
args:
- start-dev
env:
- - name: KEYCLOAK_ADMIN
+ - name: KC_BOOTSTRAP_ADMIN_USERNAME
value: quickstart-admin
- - name: KEYCLOAK_ADMIN_PASSWORD
+ - name: KC_BOOTSTRAP_ADMIN_PASSWORD
value: quickstart-admin-pass
ports:
- containerPort: 8080
@@ -223,168 +234,172 @@ spec:
targetPort: 8080
```
-应用清单:
+应用清单并等待 Keycloak 可用:
```shell
kubectl apply -f keycloak.yaml
+kubectl rollout status -n aic deployment/keycloak
```
-如需在本地打开 Keycloak 控制台,可以端口转发 Service:
+保存集群内的 Keycloak 地址:
```shell
-kubectl port-forward -n aic svc/keycloak 8080:8080
+export KEYCLOAK_URL=http://keycloak.aic.svc.cluster.local:8080
```
-</TabItem>
-
-</Tabs>
-
-#### 保存 Keycloak URL
-
-将 Keycloak URL 保存到环境变量,以供后续配置引用:
-
-<Tabs
-groupId="runtime"
-defaultValue="docker"
-values={[
-{label: 'Docker', value: 'docker'},
-{label: 'Kubernetes', value: 'k8s'}
-]}>
-
-<TabItem value="docker">
-
-```shell
-KEYCLOAK_URL=http://192.168.42.145:8080 # 替换为你的 Keycloak URL
-```
-
-</TabItem>
-
-<TabItem value="k8s">
+在另一个终端中转发 Keycloak 端口,以便在本地访问管理控制台:
```shell
-KEYCLOAK_URL=http://keycloak.aic.svc.cluster.local:8080
+kubectl port-forward -n aic service/keycloak 8080:8080
```
</TabItem>
</Tabs>
-#### 创建 Realm、Client 和授权对象
+开发模式和示例管理员凭证仅用于本地测试。生产部署应使用 HTTPS、生产数据库和永久管理员账号。
-在浏览器中访问 `http://localhost:8080` 并点击 __Administration Console__:
+打开 `http://localhost:8080/admin/`,使用管理员用户名 `quickstart-admin` 和密码
`quickstart-admin-pass` 登录。
-
+#### 创建 Realm 和资源服务器
-输入管理员用户名 `quickstart-admin` 和密码 `quickstart-admin-pass` 登录:
+为授权资源创建 Realm:
-
+1. 选择 **Manage realms → Create realm**。
+2. 输入 `authz-realm` 作为 Realm 名称。
+3. 选择 **Create**。
-创建名为 `quickstart-realm` 的 Realm:
+注册一个机密 OIDC 客户端作为受保护资源服务器:
-
+1. 选择 **Clients → Create client**。
+2. 将 **Client type** 保持为 **OpenID Connect**,输入 `apisix-authz` 作为客户端 ID,然后选择
**Next**。
+3. 开启 **Client authentication** 和 **Authorization**。保持交互式认证流程关闭,然后选择 **Save**。
-创建名为 `apisix-quickstart-client` 的客户端:
+
-
+启用 Authorization 也会启用客户端服务账号并为其分配 `uma_protection` 角色。启用动态路径加载时,APISIX
使用该服务账号查询 Protection API。
-在客户端设置页面,将访问类型选择为 `confidential`:
+#### 创建并分配客户端作用域
-
+创建授权策略所需的客户端作用域:
-为客户端启用授权并保存配置。此操作会自动启用客户端服务账号并分配 `uma_protection` 角色:
+1. 选择 **Client scopes → Create client scope**。
+2. 输入 `httpbin-access` 作为名称,并将 **Protocol** 保持为 **OpenID Connect**。
+3. 开启 **Include in token scope**,然后选择 **Save**。
+4. 打开 **Clients → apisix-authz → Client scopes**,然后选择 **Add client scope**。
+5. 选择 `httpbin-access` 和 **Add**,并将其添加为可选客户端作用域。
-
+
-创建名为 `httpbin-access` 的客户端作用域:
+后续令牌请求将包含 `scope=httpbin-access`。将该作用域设为可选后,无需修改 Keycloak 配置即可复现拒绝请求示例。
-
+#### 创建授权对象
-在客户端的 **Authorization** 部分,创建授权作用域 `access`:
+打开 **Clients → apisix-authz → Authorization**,然后创建作用域和受保护资源:
-
+1. 打开 **Scopes**,选择 **Create authorization scope**,输入 `access`,然后选择 **Save**。
+2. 打开 **Resources**,选择 **Create resource**,然后配置以下值:
-创建资源 `httpbin-anything`,URI 为 `/anything`,作用域为 `access`:
+ | 字段 | 值 |
+ | --- | --- |
+ | **Name** | `httpbin-anything` |
+ | **Display name** | `HTTPBin Anything` |
+ | **URIs** | `/anything/authz` |
+ | **Authorization scopes** | `access` |
-
+3. 选择 **Save**。
-创建客户端作用域策略 `access-client-scope-policy`,要求客户端拥有 `httpbin-access` 作用域:
+
-
+创建要求客户端作用域的策略:
-创建基于作用域的权限 `access-scope-perm`,使用 `access` 作用域和 `access-client-scope-policy`:
+1. 打开 **Policies**,然后选择 **Create client policy → Client scope**。
+2. 输入 `httpbin-access-policy` 作为名称。
+3. 选择 `httpbin-access` 作为客户端作用域,并将其标记为必需。
+4. 选择 **Save**。
-
+
-将 `httpbin-access` 添加到 `apisix-quickstart-client` 的默认客户端作用域:
+将资源和授权作用域关联到策略:
-
+1. 打开 **Permissions**,然后选择 **Create permission → Scope-based**。
+2. 输入 `httpbin-access-permission` 作为名称。
+3. 选择 `httpbin-anything` 作为资源、`access` 作为授权作用域,并选择 `httpbin-access-policy`
作为策略。
+4. 选择 **Save**。
-创建名为 `quickstart-user` 的用户:
+
-
+#### 保存客户端凭证
-将密码设置为 `quickstart-user-pass` 并关闭 **Temporary**:
-
-
-
-从 **Clients** > `apisix-quickstart-client` > **Credentials** 保存客户端密钥:
-
-
-
-将 OIDC 客户端 ID 和密钥保存到环境变量:
+打开 **Clients → apisix-authz → Credentials** 并复制客户端密钥。将客户端 ID 和密钥保存为环境变量:
```shell
-OIDC_CLIENT_ID=apisix-quickstart-client
-OIDC_CLIENT_SECRET=bSaIN3MV1YynmtXvU8lKkfeY0iwpr9cH # 替换为你的实际值
+export KEYCLOAK_CLIENT_ID=apisix-authz
+export KEYCLOAK_CLIENT_SECRET=replace-with-your-client-secret
```
-:::tip
-
-如果 APISIX 在 Kubernetes 中运行,请在插件配置和令牌请求中保持使用相同的 Keycloak 主机名。否则,Keycloak
可能会因令牌签发者与配置的授权端点不匹配而拒绝持有者令牌。
-
-:::
+请妥善保管客户端密钥。生产凭证应存储在密钥管理器中,并根据组织的凭证轮换策略定期轮换。
#### 请求访问令牌
-从 Keycloak 请求访问令牌并保存到 `ACCESS_TOKEN`:
+请求包含可选客户端作用域的服务账号令牌。根据之前选择的环境运行相应命令。
<Tabs
groupId="runtime"
defaultValue="docker"
values={[
{label: 'Docker', value: 'docker'},
-{label: 'Kubernetes', value: 'k8s'}
+{label: 'Kubernetes', value: 'k8s'},
]}>
<TabItem value="docker">
+从快速入门网络中的临时容器发送令牌请求:
+
```shell
-ACCESS_TOKEN=$(curl -sS
"$KEYCLOAK_URL/realms/quickstart-realm/protocol/openid-connect/token" \
- -d 'grant_type=client_credentials' \
- -d 'client_id='$OIDC_CLIENT_ID'' \
- -d 'client_secret='$OIDC_CLIENT_SECRET'' | jq -r '.access_token')
+export ACCESS_TOKEN="$(
+ docker run --rm --network apisix-quickstart-net \
+ curlimages/curl:8.22.0 -sS \
+ "${KEYCLOAK_URL}/realms/authz-realm/protocol/openid-connect/token" \
+ --user "${KEYCLOAK_CLIENT_ID}:${KEYCLOAK_CLIENT_SECRET}" \
+ -H "Content-Type: application/x-www-form-urlencoded" \
+ --data-urlencode "grant_type=client_credentials" \
+ --data-urlencode "scope=httpbin-access" | \
+ jq -er '.access_token'
+)"
```
</TabItem>
<TabItem value="k8s">
-在 Keycloak Pod 内运行令牌请求并将结果保存到 `ACCESS_TOKEN`:
+从 `aic` 命名空间中的临时 Pod 发送令牌请求:
```shell
-ACCESS_TOKEN=$(kubectl exec -n aic deploy/keycloak -- env
OIDC_CLIENT_SECRET="$OIDC_CLIENT_SECRET" sh -lc 'curl -sS
"http://keycloak.aic.svc.cluster.local:8080/realms/quickstart-realm/protocol/openid-connect/token";
\
- -d grant_type=client_credentials \
- -d client_id=apisix-quickstart-client \
- -d client_secret="$OIDC_CLIENT_SECRET"' | jq -r '.access_token')
+export ACCESS_TOKEN="$(
+ kubectl run authz-token-request --rm -i --restart=Never --quiet \
+ --namespace aic \
+ --image curlimages/curl:8.22.0 \
+ --command -- \
+ curl -sS \
+ "${KEYCLOAK_URL}/realms/authz-realm/protocol/openid-connect/token" \
+ --user "${KEYCLOAK_CLIENT_ID}:${KEYCLOAK_CLIENT_SECRET}" \
+ -H "Content-Type: application/x-www-form-urlencoded" \
+ --data-urlencode "grant_type=client_credentials" \
+ --data-urlencode "scope=httpbin-access" | \
+ jq -er '.access_token'
+)"
```
</TabItem>
</Tabs>
-### 使用懒加载路径和资源注册端点
+### 按路径授权请求
-以下示例演示如何配置 `authz-keycloak` 使用资源注册端点将请求 URI 动态解析为一个或多个资源,而非使用静态权限。
+动态路径加载使 APISIX 能够将传入请求 URI 解析为 Keycloak 资源。配置路由后,APISIX 会先查询 Protection
API,再通过 UMA 令牌端点判断调用方是否可以访问解析出的资源。
+
+选择用于配置路由的 API。
<Tabs
groupId="api"
@@ -392,57 +407,83 @@ defaultValue="admin-api"
values={[
{label: 'Admin API', value: 'admin-api'},
{label: 'ADC', value: 'adc'},
-{label: 'Ingress Controller', value: 'aic'}
+{label: 'Ingress Controller', value: 'aic'},
]}>
<TabItem value="admin-api">
-按如下方式创建路由 `authz-keycloak-route`:
+通过 Admin API 创建路由:
```shell
-curl "http://127.0.0.1:9180/apisix/admin/routes"; -X PUT \
- -H "X-API-KEY: ${admin_key}" \
- -d '{
- "id": "authz-keycloak-route",
- "uri": "/anything",
- "plugins": {
- "authz-keycloak": {
- "lazy_load_paths": true,
- "resource_registration_endpoint":
"'"$KEYCLOAK_URL"'/realms/quickstart-realm/authz/protection/resource_set",
- "discovery":
"'"$KEYCLOAK_URL"'/realms/quickstart-realm/.well-known/uma2-configuration",
- "client_id": "'"$OIDC_CLIENT_ID"'",
- "client_secret": "'"$OIDC_CLIENT_SECRET"'"
- }
+curl "http://127.0.0.1:9180/apisix/admin/routes/authz-keycloak"; -X PUT \
+ --data-binary @- <<EOF
+{
+ "uri": "/anything/authz",
+ "plugins": {
+ "authz-keycloak": {
+# highlight-start
+ // Annotate 1
+ "lazy_load_paths": true,
+ // Annotate 2
+ "discovery":
"$KEYCLOAK_URL/realms/authz-realm/.well-known/uma2-configuration",
+ // Annotate 3
+ "client_id": "$KEYCLOAK_CLIENT_ID",
+ "client_secret": "$KEYCLOAK_CLIENT_SECRET"
+# highlight-end
},
- "upstream": {
- "type": "roundrobin",
- "nodes": {
- "httpbin.org:80": 1
- }
+# highlight-start
+ // Annotate 4
+ "serverless-post-function": {
+ "phase": "access",
+ "functions": [
+ "return function(conf, ctx) ngx.req.clear_header('Authorization') end"
+ ]
}
- }'
+# highlight-end
+ },
+ "upstream": {
+ "type": "roundrobin",
+ "nodes": {
+ "httpbin.org:80": 1
+ }
+ }
+}
+EOF
```
</TabItem>
<TabItem value="adc">
-在 ADC 中配置 `authz-keycloak` 创建路由:
+创建包含路由配置的 `adc.yaml`:
```yaml title="adc.yaml"
services:
- - name: authz-keycloak-service
+ - name: authz-keycloak-httpbin
+ labels:
+ docs-example: authz-keycloak
routes:
- - name: authz-keycloak-route
+ - name: authz-keycloak
uris:
- - /anything
+ - /anything/authz
plugins:
authz-keycloak:
+ # highlight-start
+ // Annotate 1
lazy_load_paths: true
- resource_registration_endpoint:
${KEYCLOAK_URL}/realms/quickstart-realm/authz/protection/resource_set
- discovery:
${KEYCLOAK_URL}/realms/quickstart-realm/.well-known/uma2-configuration
- client_id: ${OIDC_CLIENT_ID}
- client_secret: ${OIDC_CLIENT_SECRET}
+ // Annotate 2
+ discovery:
"${KEYCLOAK_URL}/realms/authz-realm/.well-known/uma2-configuration"
+ // Annotate 3
+ client_id: "${KEYCLOAK_CLIENT_ID}"
+ client_secret: "${KEYCLOAK_CLIENT_SECRET}"
+ # highlight-end
+ # highlight-start
+ // Annotate 4
+ serverless-post-function:
+ phase: access
+ functions:
+ - "return function(conf, ctx)
ngx.req.clear_header('Authorization') end"
+ # highlight-end
upstream:
type: roundrobin
nodes:
@@ -451,28 +492,42 @@ services:
weight: 1
```
-将配置同步到网关:
+ADC 会将 Service 协调为期望状态。预览限定范围后的变更,并确认其中没有非预期的更新或删除:
```shell
-adc sync -f adc.yaml
+adc diff -f adc.yaml \
+ --include-resource-type service \
+ --label-selector docs-example=authz-keycloak
+```
+
+同步已审核的配置:
+
+```shell
+adc sync -f adc.yaml \
+ --include-resource-type service \
+ --label-selector docs-example=authz-keycloak
```
</TabItem>
<TabItem value="aic">
-在路由上配置 `authz-keycloak`:
+使用 Gateway API 或 APISIX 自定义资源配置插件。
+
+应用任一清单前,请将 `replace-with-your-client-secret` 替换为 Keycloak 客户端密钥。
<Tabs
groupId="k8s-api"
defaultValue="gateway-api"
values={[
{label: 'Gateway API', value: 'gateway-api'},
-{label: 'APISIX CRD', value: 'apisix-crd'}
+{label: 'APISIX CRD', value: 'apisix-crd'},
]}>
<TabItem value="gateway-api">
+创建 `authz-keycloak-ic.yaml`:
+
```yaml title="authz-keycloak-ic.yaml"
apiVersion: v1
kind: Service
@@ -492,17 +547,29 @@ spec:
plugins:
- name: authz-keycloak
config:
+ # highlight-start
+ // Annotate 1
lazy_load_paths: true
- resource_registration_endpoint:
http://keycloak.aic.svc.cluster.local:8080/realms/quickstart-realm/authz/protection/resource_set
- discovery:
http://keycloak.aic.svc.cluster.local:8080/realms/quickstart-realm/.well-known/uma2-configuration
- client_id: apisix-quickstart-client
+ // Annotate 2
+ discovery:
http://keycloak.aic.svc.cluster.local:8080/realms/authz-realm/.well-known/uma2-configuration
+ // Annotate 3
+ client_id: apisix-authz
client_secret: replace-with-your-client-secret
+ # highlight-end
+ # highlight-start
+ // Annotate 4
+ - name: serverless-post-function
+ config:
+ phase: access
+ functions:
+ - "return function(conf, ctx) ngx.req.clear_header('Authorization')
end"
+ # highlight-end
---
apiVersion: gateway.networking.k8s.io/v1
kind: HTTPRoute
metadata:
namespace: aic
- name: authz-keycloak-route
+ name: authz-keycloak
spec:
parentRefs:
- name: apisix
@@ -510,7 +577,7 @@ spec:
- matches:
- path:
type: Exact
- value: /anything
+ value: /anything/authz
filters:
- type: ExtensionRef
extensionRef:
@@ -522,16 +589,12 @@ spec:
port: 80
```
-将配置应用到集群:
-
-```shell
-kubectl apply -f authz-keycloak-ic.yaml
-```
-
</TabItem>
<TabItem value="apisix-crd">
+创建 `authz-keycloak-ic.yaml`:
+
```yaml title="authz-keycloak-ic.yaml"
apiVersion: apisix.apache.org/v2
kind: ApisixUpstream
@@ -555,24 +618,37 @@ spec:
- name: authz-keycloak
enable: true
config:
+ # highlight-start
+ // Annotate 1
lazy_load_paths: true
- resource_registration_endpoint:
http://keycloak.aic.svc.cluster.local:8080/realms/quickstart-realm/authz/protection/resource_set
- discovery:
http://keycloak.aic.svc.cluster.local:8080/realms/quickstart-realm/.well-known/uma2-configuration
- client_id: apisix-quickstart-client
+ // Annotate 2
+ discovery:
http://keycloak.aic.svc.cluster.local:8080/realms/authz-realm/.well-known/uma2-configuration
+ // Annotate 3
+ client_id: apisix-authz
client_secret: replace-with-your-client-secret
+ # highlight-end
+ # highlight-start
+ // Annotate 4
+ - name: serverless-post-function
+ enable: true
+ config:
+ phase: access
+ functions:
+ - "return function(conf, ctx) ngx.req.clear_header('Authorization')
end"
+ # highlight-end
---
apiVersion: apisix.apache.org/v2
kind: ApisixRoute
metadata:
namespace: aic
- name: authz-keycloak-route
+ name: authz-keycloak
spec:
ingressClassName: apisix
http:
- - name: authz-keycloak-route
+ - name: authz-keycloak
match:
paths:
- - /anything
+ - /anything/authz
methods:
- GET
upstreams:
@@ -580,7 +656,11 @@ spec:
plugin_config_name: authz-keycloak-plugin-config
```
-将配置应用到集群:
+</TabItem>
+
+</Tabs>
+
+应用配置:
```shell
kubectl apply -f authz-keycloak-ic.yaml
@@ -590,17 +670,24 @@ kubectl apply -f authz-keycloak-ic.yaml
</Tabs>
-</TabItem>
+❶ `lazy_load_paths`:通过 Protection API 将请求 URI 解析为 Keycloak 资源,而不是使用静态权限列表。
-</Tabs>
+❷ `discovery`:Keycloak UMA 发现文档的 URI。插件从该文档获取令牌端点和资源注册端点。
+
+❸ `client_id` 和 `client_secret`:Keycloak 资源服务器客户端的凭证。APISIX 使用这些凭证获取
Protection API 所需的服务账号令牌。
-向路由发送请求:
+❹ `serverless-post-function`:在 `authz-keycloak` 完成评估后移除调用方的 Bearer
令牌,防止示例上游收到该凭证。如果上游应用需要接收令牌,请不要配置此插件。
+
+#### 验证动态授权
+
+携带访问令牌请求受保护路由:
```shell
-curl "http://127.0.0.1:9080/anything"; -H "Authorization: Bearer $ACCESS_TOKEN"
+curl -i "http://127.0.0.1:9080/anything/authz"; \
+ -H "Authorization: Bearer ${ACCESS_TOKEN}"
```
-你应该会看到类似如下的 `HTTP/1.1 200 OK` 响应:
+返回 `HTTP/1.1 200 OK` 表示 Keycloak 已允许该令牌访问资源。响应体应包含类似以下内容的字段:
```json
{
@@ -610,238 +697,89 @@ curl "http://127.0.0.1:9080/anything"; -H "Authorization:
Bearer $ACCESS_TOKEN"
"form": {},
"headers": {
"Accept": "*/*",
- "Authorization": "Bearer eyJhbGciOiJSU..."
+ "Host": "127.0.0.1",
+ "User-Agent": "curl/8.7.1",
+ "X-Amzn-Trace-Id": "Root=1-...",
+ "X-Forwarded-Host": "127.0.0.1:9080"
},
"json": null,
"method": "GET",
- "url": "http://127.0.0.1/anything";
+ "origin": "192.168.155.1, xxx.xxx.xxx.xxx",
+ "url": "http://127.0.0.1:9080/anything/authz";
}
```
-### 使用静态权限
+请求头值和响应中的来源地址会因环境而异。示例上游不应收到 `Authorization` 请求头。
-以下示例演示如何配置 `authz-keycloak` 使用静态权限 `httpbin-anything#access`。
+请求另一个不包含所需客户端作用域的访问令牌。
<Tabs
-groupId="api"
-defaultValue="admin-api"
+groupId="runtime"
+defaultValue="docker"
values={[
-{label: 'Admin API', value: 'admin-api'},
-{label: 'ADC', value: 'adc'},
-{label: 'Ingress Controller', value: 'aic'}
+{label: 'Docker', value: 'docker'},
+{label: 'Kubernetes', value: 'k8s'},
]}>
-<TabItem value="admin-api">
-
-按如下方式创建路由 `authz-keycloak-route`:
-
-```shell
-curl "http://127.0.0.1:9180/apisix/admin/routes"; -X PUT \
- -H "X-API-KEY: ${admin_key}" \
- -d '{
- "id": "authz-keycloak-route",
- "uri": "/anything",
- "plugins": {
- "authz-keycloak": {
- "lazy_load_paths": false,
- "discovery":
"'"$KEYCLOAK_URL"'/realms/quickstart-realm/.well-known/uma2-configuration",
- "permissions": ["httpbin-anything#access"],
- "client_id": "'"$OIDC_CLIENT_ID"'"
- }
- },
- "upstream": {
- "type": "roundrobin",
- "nodes": {
- "httpbin.org:80": 1
- }
- }
- }'
-```
-
-</TabItem>
-
-<TabItem value="adc">
-
-在 ADC 中配置 `authz-keycloak` 创建路由:
-
-```yaml title="adc.yaml"
-services:
- - name: authz-keycloak-service
- routes:
- - name: authz-keycloak-route
- uris:
- - /anything
- plugins:
- authz-keycloak:
- lazy_load_paths: false
- discovery:
${KEYCLOAK_URL}/realms/quickstart-realm/.well-known/uma2-configuration
- permissions:
- - "httpbin-anything#access"
- client_id: ${OIDC_CLIENT_ID}
- upstream:
- type: roundrobin
- nodes:
- - host: httpbin.org
- port: 80
- weight: 1
-```
-
-将配置同步到网关:
+<TabItem value="docker">
```shell
-adc sync -f adc.yaml
+export TOKEN_WITHOUT_SCOPE="$(
+ docker run --rm --network apisix-quickstart-net \
+ curlimages/curl:8.22.0 -sS \
+ "${KEYCLOAK_URL}/realms/authz-realm/protocol/openid-connect/token" \
+ --user "${KEYCLOAK_CLIENT_ID}:${KEYCLOAK_CLIENT_SECRET}" \
+ -H "Content-Type: application/x-www-form-urlencoded" \
+ --data-urlencode "grant_type=client_credentials" | \
+ jq -er '.access_token'
+)"
```
</TabItem>
-<TabItem value="aic">
-
-在路由上配置 `authz-keycloak`:
-
-<Tabs
-groupId="k8s-api"
-defaultValue="gateway-api"
-values={[
-{label: 'Gateway API', value: 'gateway-api'},
-{label: 'APISIX CRD', value: 'apisix-crd'}
-]}>
-
-<TabItem value="gateway-api">
-
-```yaml title="authz-keycloak-ic.yaml"
-apiVersion: v1
-kind: Service
-metadata:
- namespace: aic
- name: httpbin-external-domain
-spec:
- type: ExternalName
- externalName: httpbin.org
----
-apiVersion: apisix.apache.org/v1alpha1
-kind: PluginConfig
-metadata:
- namespace: aic
- name: authz-keycloak-plugin-config
-spec:
- plugins:
- - name: authz-keycloak
- config:
- lazy_load_paths: false
- discovery:
http://keycloak.aic.svc.cluster.local:8080/realms/quickstart-realm/.well-known/uma2-configuration
- permissions:
- - "httpbin-anything#access"
- client_id: apisix-quickstart-client
----
-apiVersion: gateway.networking.k8s.io/v1
-kind: HTTPRoute
-metadata:
- namespace: aic
- name: authz-keycloak-route
-spec:
- parentRefs:
- - name: apisix
- rules:
- - matches:
- - path:
- type: Exact
- value: /anything
- filters:
- - type: ExtensionRef
- extensionRef:
- group: apisix.apache.org
- kind: PluginConfig
- name: authz-keycloak-plugin-config
- backendRefs:
- - name: httpbin-external-domain
- port: 80
-```
-
-将配置应用到集群:
+<TabItem value="k8s">
```shell
-kubectl apply -f authz-keycloak-ic.yaml
+export TOKEN_WITHOUT_SCOPE="$(
+ kubectl run authz-token-request --rm -i --restart=Never --quiet \
+ --namespace aic \
+ --image curlimages/curl:8.22.0 \
+ --command -- \
+ curl -sS \
+ "${KEYCLOAK_URL}/realms/authz-realm/protocol/openid-connect/token" \
+ --user "${KEYCLOAK_CLIENT_ID}:${KEYCLOAK_CLIENT_SECRET}" \
+ -H "Content-Type: application/x-www-form-urlencoded" \
+ --data-urlencode "grant_type=client_credentials" | \
+ jq -er '.access_token'
+)"
```
</TabItem>
-<TabItem value="apisix-crd">
-
-```yaml title="authz-keycloak-ic.yaml"
-apiVersion: apisix.apache.org/v2
-kind: ApisixUpstream
-metadata:
- namespace: aic
- name: httpbin-external-domain
-spec:
- ingressClassName: apisix
- externalNodes:
- - type: Domain
- name: httpbin.org
----
-apiVersion: apisix.apache.org/v2
-kind: ApisixPluginConfig
-metadata:
- namespace: aic
- name: authz-keycloak-plugin-config
-spec:
- ingressClassName: apisix
- plugins:
- - name: authz-keycloak
- enable: true
- config:
- lazy_load_paths: false
- discovery:
http://keycloak.aic.svc.cluster.local:8080/realms/quickstart-realm/.well-known/uma2-configuration
- permissions:
- - "httpbin-anything#access"
- client_id: apisix-quickstart-client
----
-apiVersion: apisix.apache.org/v2
-kind: ApisixRoute
-metadata:
- namespace: aic
- name: authz-keycloak-route
-spec:
- ingressClassName: apisix
- http:
- - name: authz-keycloak-route
- match:
- paths:
- - /anything
- methods:
- - GET
- upstreams:
- - name: httpbin-external-domain
- plugin_config_name: authz-keycloak-plugin-config
-```
+</Tabs>
-将配置应用到集群:
+携带该令牌请求路由:
```shell
-kubectl apply -f authz-keycloak-ic.yaml
+curl -i "http://127.0.0.1:9080/anything/authz"; \
+ -H "Authorization: Bearer ${TOKEN_WITHOUT_SCOPE}"
```
-</TabItem>
+由于该令牌不满足 `httpbin-access-policy`,APISIX 返回 `HTTP/1.1 403 Forbidden`。
-</Tabs>
-
-</TabItem>
-
-</Tabs>
-
-向路由发送请求:
+发送不包含 Bearer 令牌的请求:
```shell
-curl "http://127.0.0.1:9080/anything"; -H "Authorization: Bearer $ACCESS_TOKEN"
+curl -i "http://127.0.0.1:9080/anything/authz";
```
-你应该会看到 `HTTP/1.1 200 OK` 响应。
+由于请求中没有可供 Keycloak 评估的令牌,APISIX 返回 `HTTP/1.1 401 Unauthorized`。
-如果你移除 `apisix-quickstart-client` 的客户端作用域 `httpbin-access`,访问该资源时将收到 `401
Unauthorized` 响应。
+### 使用静态权限授权请求
-### 在自定义令牌端点使用密码授权类型生成令牌
+如果所需的 Keycloak 资源和作用域已经明确,可以使用静态权限避免查询 Protection API。配置路由后,每次请求都会由 Keycloak
评估 `httpbin-anything#access`。
-以下示例演示如何配置 `authz-keycloak` 在自定义端点使用密码授权类型请求令牌。
+选择用于配置路由的 API。
<Tabs
groupId="api"
@@ -849,59 +787,78 @@ defaultValue="admin-api"
values={[
{label: 'Admin API', value: 'admin-api'},
{label: 'ADC', value: 'adc'},
-{label: 'Ingress Controller', value: 'aic'}
+{label: 'Ingress Controller', value: 'aic'},
]}>
<TabItem value="admin-api">
-按如下方式创建路由 `authz-keycloak-route`:
+通过 Admin API 创建路由:
```shell
-curl "http://127.0.0.1:9180/apisix/admin/routes"; -X PUT \
- -H "X-API-KEY: ${admin_key}" \
- -d '{
- "id": "authz-keycloak-route",
- "uri": "/api/*",
- "plugins": {
- "authz-keycloak": {
- "lazy_load_paths": true,
- "resource_registration_endpoint":
"'"$KEYCLOAK_URL"'/realms/quickstart-realm/authz/protection/resource_set",
- "client_id": "'"$OIDC_CLIENT_ID"'",
- "client_secret": "'"$OIDC_CLIENT_SECRET"'",
- "token_endpoint":
"'"$KEYCLOAK_URL"'/realms/quickstart-realm/protocol/openid-connect/token",
- "password_grant_token_generation_incoming_uri": "/api/token"
- }
+curl "http://127.0.0.1:9180/apisix/admin/routes/authz-keycloak-static"; -X PUT \
+ --data-binary @- <<EOF
+{
+ "uri": "/anything/authz-static",
+ "plugins": {
+ "authz-keycloak": {
+# highlight-start
+ // Annotate 1
+ "lazy_load_paths": false,
+ // Annotate 2
+ "permissions": ["httpbin-anything#access"],
+ // Annotate 3
+ "discovery":
"$KEYCLOAK_URL/realms/authz-realm/.well-known/uma2-configuration",
+ "client_id": "$KEYCLOAK_CLIENT_ID"
+# highlight-end
},
- "upstream": {
- "type": "roundrobin",
- "nodes": {
- "httpbin.org:80": 1
- }
+ "serverless-post-function": {
+ "phase": "access",
+ "functions": [
+ "return function(conf, ctx) ngx.req.clear_header('Authorization') end"
+ ]
}
- }'
+ },
+ "upstream": {
+ "type": "roundrobin",
+ "nodes": {
+ "httpbin.org:80": 1
+ }
+ }
+}
+EOF
```
</TabItem>
<TabItem value="adc">
-在 ADC 中配置 `authz-keycloak` 创建路由:
+创建包含路由配置的 `adc-static.yaml`:
-```yaml title="adc.yaml"
+```yaml title="adc-static.yaml"
services:
- - name: authz-keycloak-service
+ - name: authz-keycloak-static-httpbin
+ labels:
+ docs-example: authz-keycloak-static
routes:
- - name: authz-keycloak-route
+ - name: authz-keycloak-static
uris:
- - /api/*
+ - /anything/authz-static
plugins:
authz-keycloak:
- lazy_load_paths: true
- resource_registration_endpoint:
${KEYCLOAK_URL}/realms/quickstart-realm/authz/protection/resource_set
- client_id: ${OIDC_CLIENT_ID}
- client_secret: ${OIDC_CLIENT_SECRET}
- token_endpoint:
${KEYCLOAK_URL}/realms/quickstart-realm/protocol/openid-connect/token
- password_grant_token_generation_incoming_uri: /api/token
+ # highlight-start
+ // Annotate 1
+ lazy_load_paths: false
+ // Annotate 2
+ permissions:
+ - httpbin-anything#access
+ // Annotate 3
+ discovery:
"${KEYCLOAK_URL}/realms/authz-realm/.well-known/uma2-configuration"
+ client_id: "${KEYCLOAK_CLIENT_ID}"
+ # highlight-end
+ serverless-post-function:
+ phase: access
+ functions:
+ - "return function(conf, ctx)
ngx.req.clear_header('Authorization') end"
upstream:
type: roundrobin
nodes:
@@ -910,34 +867,46 @@ services:
weight: 1
```
-将配置同步到网关:
+ADC 会将 Service 协调为期望状态。预览限定范围后的变更,并确认其中没有非预期的更新或删除:
```shell
-adc sync -f adc.yaml
+adc diff -f adc-static.yaml \
+ --include-resource-type service \
+ --label-selector docs-example=authz-keycloak-static
+```
+
+同步已审核的配置:
+
+```shell
+adc sync -f adc-static.yaml \
+ --include-resource-type service \
+ --label-selector docs-example=authz-keycloak-static
```
</TabItem>
<TabItem value="aic">
-在路由上配置 `authz-keycloak`:
+使用 Gateway API 或 APISIX 自定义资源配置静态路由。
<Tabs
groupId="k8s-api"
defaultValue="gateway-api"
values={[
{label: 'Gateway API', value: 'gateway-api'},
-{label: 'APISIX CRD', value: 'apisix-crd'}
+{label: 'APISIX CRD', value: 'apisix-crd'},
]}>
<TabItem value="gateway-api">
-```yaml title="authz-keycloak-ic.yaml"
+创建 `authz-keycloak-static-ic.yaml`:
+
+```yaml title="authz-keycloak-static-ic.yaml"
apiVersion: v1
kind: Service
metadata:
namespace: aic
- name: httpbin-external-domain
+ name: httpbin-static-external-domain
spec:
type: ExternalName
externalName: httpbin.org
@@ -946,58 +915,63 @@ apiVersion: apisix.apache.org/v1alpha1
kind: PluginConfig
metadata:
namespace: aic
- name: authz-keycloak-plugin-config
+ name: authz-keycloak-static-plugin-config
spec:
plugins:
- name: authz-keycloak
config:
- lazy_load_paths: true
- resource_registration_endpoint:
http://keycloak.aic.svc.cluster.local:8080/realms/quickstart-realm/authz/protection/resource_set
- client_id: apisix-quickstart-client
- client_secret: replace-with-your-client-secret
- token_endpoint:
http://keycloak.aic.svc.cluster.local:8080/realms/quickstart-realm/protocol/openid-connect/token
- password_grant_token_generation_incoming_uri: /api/token
+ # highlight-start
+ // Annotate 1
+ lazy_load_paths: false
+ // Annotate 2
+ permissions:
+ - httpbin-anything#access
+ // Annotate 3
+ discovery:
http://keycloak.aic.svc.cluster.local:8080/realms/authz-realm/.well-known/uma2-configuration
+ client_id: apisix-authz
+ # highlight-end
+ - name: serverless-post-function
+ config:
+ phase: access
+ functions:
+ - "return function(conf, ctx) ngx.req.clear_header('Authorization')
end"
---
apiVersion: gateway.networking.k8s.io/v1
kind: HTTPRoute
metadata:
namespace: aic
- name: authz-keycloak-route
+ name: authz-keycloak-static
spec:
parentRefs:
- name: apisix
rules:
- matches:
- path:
- type: PathPrefix
- value: /api/
+ type: Exact
+ value: /anything/authz-static
filters:
- type: ExtensionRef
extensionRef:
group: apisix.apache.org
kind: PluginConfig
- name: authz-keycloak-plugin-config
+ name: authz-keycloak-static-plugin-config
backendRefs:
- - name: httpbin-external-domain
+ - name: httpbin-static-external-domain
port: 80
```
-将配置应用到集群:
-
-```shell
-kubectl apply -f authz-keycloak-ic.yaml
-```
-
</TabItem>
<TabItem value="apisix-crd">
-```yaml title="authz-keycloak-ic.yaml"
+创建 `authz-keycloak-static-ic.yaml`:
+
+```yaml title="authz-keycloak-static-ic.yaml"
apiVersion: apisix.apache.org/v2
kind: ApisixUpstream
metadata:
namespace: aic
- name: httpbin-external-domain
+ name: httpbin-static-external-domain
spec:
ingressClassName: apisix
externalNodes:
@@ -1008,75 +982,78 @@ apiVersion: apisix.apache.org/v2
kind: ApisixPluginConfig
metadata:
namespace: aic
- name: authz-keycloak-plugin-config
+ name: authz-keycloak-static-plugin-config
spec:
ingressClassName: apisix
plugins:
- name: authz-keycloak
enable: true
config:
- lazy_load_paths: true
- resource_registration_endpoint:
http://keycloak.aic.svc.cluster.local:8080/realms/quickstart-realm/authz/protection/resource_set
- client_id: apisix-quickstart-client
- client_secret: replace-with-your-client-secret
- token_endpoint:
http://keycloak.aic.svc.cluster.local:8080/realms/quickstart-realm/protocol/openid-connect/token
- password_grant_token_generation_incoming_uri: /api/token
+ # highlight-start
+ // Annotate 1
+ lazy_load_paths: false
+ // Annotate 2
+ permissions:
+ - httpbin-anything#access
+ // Annotate 3
+ discovery:
http://keycloak.aic.svc.cluster.local:8080/realms/authz-realm/.well-known/uma2-configuration
+ client_id: apisix-authz
+ # highlight-end
+ - name: serverless-post-function
+ enable: true
+ config:
+ phase: access
+ functions:
+ - "return function(conf, ctx) ngx.req.clear_header('Authorization')
end"
---
apiVersion: apisix.apache.org/v2
kind: ApisixRoute
metadata:
namespace: aic
- name: authz-keycloak-route
+ name: authz-keycloak-static
spec:
ingressClassName: apisix
http:
- - name: authz-keycloak-route
+ - name: authz-keycloak-static
match:
paths:
- - /api/*
+ - /anything/authz-static
methods:
- GET
- - POST
upstreams:
- - name: httpbin-external-domain
- plugin_config_name: authz-keycloak-plugin-config
+ - name: httpbin-static-external-domain
+ plugin_config_name: authz-keycloak-static-plugin-config
```
-将配置应用到集群:
+</TabItem>
+
+</Tabs>
+
+应用配置:
```shell
-kubectl apply -f authz-keycloak-ic.yaml
+kubectl apply -f authz-keycloak-static-ic.yaml
```
</TabItem>
</Tabs>
-</TabItem>
+❶ `lazy_load_paths`:设置为 `false`,使用配置的权限列表而不查询 Protection API。
-</Tabs>
+❷ `permissions`:Keycloak 对该路由的每个请求进行评估的资源和授权作用域。
+
+❸ `discovery` 和 `client_id`:标识 Keycloak UMA 令牌端点和资源服务器。由于静态流程不会调用 Protection
API,因此不需要客户端密钥。
+
+#### 验证静态授权
-向已配置的令牌端点发送请求。请求应使用 POST 方法,并将 `Content-Type` 设置为
`application/x-www-form-urlencoded`:
+携带允许访问的令牌请求静态路由:
```shell
-OIDC_USER=quickstart-user
-OIDC_PASSWORD=quickstart-user-pass
-
-curl "http://127.0.0.1:9080/api/token"; -X POST \
- -H "Content-Type: application/x-www-form-urlencoded" \
- -H "Accept: application/json" \
- -d 'username='$OIDC_USER'' \
- -d 'password='$OIDC_PASSWORD''
+curl -i "http://127.0.0.1:9080/anything/authz-static"; \
+ -H "Authorization: Bearer ${ACCESS_TOKEN}"
```
-你应该会看到包含访问令牌的 JSON 响应,类似如下:
+APISIX 返回 `HTTP/1.1 200 OK`。改用 `TOKEN_WITHOUT_SCOPE` 发送请求时,将返回 `HTTP/1.1 403
Forbidden`。
-```json
-{
- "access_token": "eyJhbGciOiJSUzI1NiIsInR5cCIgOiAiSldUIi...",
- "expires_in": 300,
- "refresh_expires_in": 1800,
- "token_type": "Bearer",
- "scope": "profile email httpbin-access"
-}
-```
+至此,Keycloak 授权服务已配置完成,可以在 APISIX 上执行动态和静态权限检查。有关 HTTP
方法作用域、拒绝访问重定向等选项,请参阅[属性](#属性)。有关更多策略和权限类型,请参阅 [Keycloak Authorization Services
Guide](https://www.keycloak.org/docs/latest/authorization_services/)。