This is an automated email from the ASF dual-hosted git repository.

bzp2010 pushed a commit to branch master
in repository https://gitbox.apache.org/repos/asf/apisix-website.git
The following commit(s) were added to refs/heads/master by this push:
new 8cdabe2 docs: added translations for docs (#656)
8cdabe2 is described below
commit 8cdabe2cb0f0f9f0e3d2faf7d3fe946ffd1c7302
Author: yilinzeng <[email protected]>
AuthorDate: Wed Oct 13 12:40:31 2021 +0800
docs: added translations for docs (#656)
* dcos: add translation for China Mobile case
* docs: translate java plugin doc to en
* docs: add rancher apisix translation
* fix: trailing newline char
---
.../21/use-Java-to-write-Apache-APISIX-plugins.md | 108 ++++++++---------
...n-source-gateway-and-ingress-controller-fast.md | 77 ++++++------
.../blog/2021/09/13/china-mobile-cloud-usercase.md | 130 ++++++++++-----------
.../21/use-Java-to-write-Apache-APISIX-plugins.md | 6 +-
...n-source-gateway-and-ingress-controller-fast.md | 1 +
5 files changed, 157 insertions(+), 165 deletions(-)
diff --git a/website/blog/2021/06/21/use-Java-to-write-Apache-APISIX-plugins.md
b/website/blog/2021/06/21/use-Java-to-write-Apache-APISIX-plugins.md
index b01e2a9..90d6fab 100644
--- a/website/blog/2021/06/21/use-Java-to-write-Apache-APISIX-plugins.md
+++ b/website/blog/2021/06/21/use-Java-to-write-Apache-APISIX-plugins.md
@@ -1,91 +1,89 @@
---
-title: "使用 Java 编写 Apache APISIX 插件"
-author: "屠正松"
+title: "How to Write an Apache APISIX Plugin in Java"
+author: "Zhengsong Tu"
authorURL: "https://github.com/tzssangglass";
authorImageURL: "https://avatars.githubusercontent.com/u/30819887?v=4";
keywords:
- APISIX
- Apache APISIX
- Java
-- 插件
-description: Apache APISIX 支持多语言编写插件了!不会 Lua 也没关系,现在可以用你熟悉的语言编写插件,文末还有视频教程。
+- plugin
+description: Apache APISIX now supports writing plugins in Java! You can now
write plugins in a programming language you are familiar with.
tags: [Practical Case]
---
-> Apache APISIX 支持多语言编写插件了!不会 Lua 也没关系,现在可以用你熟悉的语言编写插件,文末还有视频教程。
+> Apache APISIX now supports writing plugins in Java! You can now write
plugins in a programming language you are familiar with.
<!--truncate-->
-Apache APISIX 支持多语言编写插件了!不会 Lua 也没关系,现在可以用你熟悉的语言编写插件,文末还有**视频教程**。
-## 1. 简介
+## Introduction
-### 1.1 为什么 Apache APISIX 要支持多语言编写插件
+### Why Apache APISIX Supports Writing Plugins in Multiple Programming
Languages?
-在支持多语言编程插件前,Apache APISIX 只支持使用 Lua 语言编写插件,需要开发者掌握 Lua 和 OpenResty
相关的开发能力。然而相对于主流开发语言 Java、Go 来说,Lua 和 OpenResty 属于相对小众的技术,开发者很少。如果从头开始学习 Lua 和
OpenResty,需要付出相当多的时间和精力。
+Apache APISIX has been supporting customized plugins since the day it was
born. But it only supported plugins written in Lua. As a result, developers
need to have Lua and OpenResty-related development skills to actually write
their own plugins. However, Lua and OpenResty are relatively less popular
languages with fewer developers compared to Java and Go. Besides, learning Lua
and OpenResty from scratch requires a lot of time and effort.
-开发团队在进行技术选型的时候,最重要的考量就是所选技术是否与本团队技术栈相匹配,然而小众的技术栈就限制了 Apache APISIX
在更广阔的场景下进行技术落地。
+During technological selection, the most important consideration for the
development team is whether the chosen product matches the team's technology
stack. The niche technology stack limits Apache APISIX to become the first
choice of API Gateway product in many scenarios.
-现在 Apache APISIX 支持多语言开发插件,**更重要的是支持语言所在的开发生态圈,使用者可以使用自己熟悉的技术栈来开发 Apache
APISIX**。以支持 Java 为例,使用者不仅可以使用 Java 语言编写插件,还可以融入 Spring Cloud
生态圈,广泛使用生态圈内的各种技术组件。
+Now, Apache APISIX supports multi-language development plugins. More
importantly, the development ecosystem where the language is supported, so
users can use their familiar technology stack to develop Apache APISIX. With
Apache APISIX supporting plugins written in Java, for example, users can not
only write plugins in Java but also integrate into the Spring Cloud ecosystem
and use a wide range of technical components within the ecosystem.
-### 1.2 Apache APISIX 多语言支持架构图
+### Multiple Programming Languages Architecture Diagram
-
+
-上图左边是 Apache APISIX 的工作流程,右边的 plugin runner 是指插件运行器,泛指多语言支持的项目。本文档下面提到的
apisix-java-plugin-runner 项目就是支持 Java 语言的 plugin runner。
+The left side of the diagram shows the workflow of Apache APISIX. The right
side of the diagram is the plugin runner, which is a generic term for projects
with multiple programming languages support. The apisix-java-plugin-runner is a
plugin runner that supports the Java language.
-当你在 Apache APISIX 中配置一个 plugin runner 时,Apache APISIX 会启动一个子进程运行 plugin
runner,该子进程与 Apache APISIX 进程属于同一个用户。当我们重启或重新加载 Apache APISIX 时,plugin runner
也将被重启。
+When you configure a plugin runner in Apache APISIX, Apache APISIX starts a
subprocess to run the plugin runner, which belongs to the same user as the
Apache APISIX process. When we restart or reload Apache APISIX, the plugin
runner will also be restarted.
-如果你为一个给定的路由配置了 ext-plugin-* 插件,命中该路由的请求将触发 Apache APISIX,通过 unix socket 向
plugin runner 执行 RPC 调用。调用细分为两个阶段:
+If you configure the ext-plugin-* plugin for a given route, a request hitting
that route will trigger Apache APISIX to perform an RPC call to the plugin
runner via a Unix socket. The call is broken down into two phases:
-- ext-plugin-pre-req: 在执行 Apache APISIX 内置插件(Lua 语言插件)之前
-- ext-plugin-post-req: 在执行 Apache APISIX 内置插件(Lua 语言插件)之后
+- ext-plugin-pre-req: Before executing the Apache APISIX built-in plugin (Lua
plugin)
+- ext-plugin-post-req: After executing the Apache APISIX built-in plugin (Lua
plugin)
-根据需要配置 plugin runner 的执行时机。
+Please configure the timing of the plugin runner execution as needed.
+The plugin runner processes the RPC call, creates a simulated request inside
it, and then runs the multiple programming languages written a plugin and
returns the result to Apache APISIX.
-plugin runner 会处理 RPC 调用,在其内部创建一个模拟请求,然后运行多语言编写的插件,并将结果返回给 Apache APISIX。
+The order of execution of multiple programming languages plugins is defined in
the ext-plugin-* plugin configuration entry. Like other plugins, they can be
enabled and redefined on the fly.
-多语言插件的执行顺序是在 ext-plugin-* 插件配置项中定义的。像其他插件一样,它们可以被启用并在运行中重新定义。
+## Building Development Environment
-## 2. 搭建开发环境
+First, you need to build the Apache APISIX runtime or development environment,
please refer to [Build Apache
APISIX](https://github.com/apache/apisix/blob/master/docs/en/latest/how-to-build.md),
and [Build
apisix-java-plugin-runner](https://github.com/apache/apisix-java-plugin-runner/blob/main/docs/development.md).
-首先需要搭建 Apache APISIX 的运行环境或者开发环境,参考 [构建 Apache
APISIX](https://github.com/apache/apisix/blob/master/docs/zh/latest/how-to-build.md),以及
Java 项目的开发环境,参考 [构建
apisix-java-plugin-runner](https://github.com/apache/apisix-java-plugin-runner/blob/main/docs/development.md)。
+Note: Apache APISIX and apisix-java-plugin-runner need to be located on the
same instance.
-**注意**:Apache APISIX 和 apisix-java-plugin-runner 需要位于同一实例上。
+## Enabling Debug Mode
-## 3. 进入调试模式
+### Configuring Apache APISIX into Debug Mode
-### 3.1 设置 Apache APISIX 进入调试模式
-
-这里是指让 Apache APISIX 以调试的方式运行外部插件,在 `config.yaml` 中增加以下配置
+When Apache APISIX is configured into debug mode, it is allowed to run
external plugins in a debugging manner. Add the following configuration to
`config.yaml` to enable debug mode for Apache APISIX.
```text
ext-plugin:
path_for_test: /tmp/runner.sock
```
-这个配置的意思是,Apache APISIX 相当于 client 端,会监听位于 `/tmp/runner.sock` 位置上的 Unxi Domain
Socket 链接。
+The configuration above means that Apache APISIX acts as the client and
listens to the Unix Domain Socket link located at `/tmp/runner.sock`.
-### 3.2 设置 apisix-java-plugin-runner 进入调试模式
+### Setting apisix-java-plugin-runner to Debug Mode
-在启动 `Main
class(org.apache.apisix.plugin.runner.PluginRunnerApplication)`之前,需要配置用户级的环境变量
`APISIX_LISTEN_ADDRESS=unix:/tmp/runner.sock` 和 `APISIX_CONF_EXPIRE_TIME=3600`。
+Before starting the
`Mainclass(org.apache.apisix.plugin.runner.PluginRunnerApplication)`, you need
to configure the user-level environment variables
`APISIX_LISTEN_ADDRESS=unix:/tmp/runner.sock and APISIX_CONF_EXPIRE_TIME=3600`.
-如果你是使用 IDEA 进行开发,那么配置好的环境变量示意如下:
+If you are using IDEA for development, the configured environment variables
are shown below.
-
+
-apisix-java-plugin-runner 相当于 server 端,在启动时会主动创建 `/tmp/runner.sock`
文件,并在这个文件上与 Apache APISIX 进行 Unix Domain Socket 通信。
+apisix-java-plugin-runner is equivalent to the server side and will actively
create the `/tmp/runner.sock` file at startup and communicate with Apache
APISIX on this file for Unix Domain Socket.
-## 4. 开发
+## How to Develop a Java Plugin for Apache APISIX?
-### 4.1 场景
+### Scenario
-我们以一个场景来代入开发过程:需要验证请求 header 中 token 的有效性,验证 token 的方式是用请求中携带 token 作为参数,访问
SSO 固定的接口,如果 token 验证通过则放行请求,验证失败则阻止请求。
+Let's say we have a scenario like this: we need to verify the validity of the
token in the request header. The way to verify the token is to carry the token
as a parameter in the request and access the SSO fixed interface.
-### 4.2 配置 Apache APISIX
+### Configuring Apache APISIX
-先给插件命名为 `TokenValidator`,然后设计属性,为了尽可能做到动态配置,属性设计如下
+First, name the plugin `TokenValidator`, and then design the properties. In
order to achieve dynamic configuration as far as possible, the properties are
designed as follows.
-```text
+```json
{
"validate_header": "token",
"validate_url": "https://www.sso.foo.com/token/validate";,
@@ -93,9 +91,9 @@ apisix-java-plugin-runner 相当于 server 端,在启动时会主动创建 `/t
}
```
-启动 Apache APISIX,然后新增一条路由配置,指定该路由需要调用 apisix-java-plugin-runner 的
`TokenValidator` 插件,示例如下
+Start Apache APISIX, then add a new route configuration specifying that the
route requires a call to apisix-java-plugin-runner's `TokenValidator` plugin,
as shown in the following example.
-```text
+```shell
curl http://127.0.0.1:9080/apisix/admin/routes/1 -H 'X-API-KEY:
edd1c9f034335f136f87ad84b625c8f1' -X PUT -d '
{
"uri":"/get",
@@ -118,13 +116,11 @@ curl http://127.0.0.1:9080/apisix/admin/routes/1 -H
'X-API-KEY: edd1c9f034335f13
}
```
-需要注意的是,`TokenValidator` 的属性需要经过 json 转义,作为 string 类型进行配置。
-
-(这里上游地址配置为 httpbin.org,方便调试)
+Note that the properties of `TokenValidator` need to be escaped by json and
configured as string type (the upstream address here is configured as
httpbin.org to simplify the debugging process).
-### 4.3 开发 Java 插件
+### Developing a Java Plugin
-在 runner-plugin/src/main/java/org/apache/apisix/plugin/runner/filter 目录下,新增
`TokenValidatr.java`,代码初始骨架如下
+Add `TokenValidatr.java` with the following initial code skeleton In the
`runner-plugin/src/main/java/org/apache/apisix/plugin/runner/filter` directory.
```Java
package org.apache.apisix.plugin.runner.filter;
@@ -150,11 +146,7 @@ public class TokenValidator implements PluginFilter {
}
```
-需要继承 `PluginFilter`接口,重写 `name` 和 `filter`函数。
-
-重写 `name` 的返回值,和前面配置 APISIX 的路由属性中 "name" 保持一致。
-
-完整代码如下:
+This plugin inherits the `PluginFilter` interface and overrides the `name` and
the `filter` function. Rewrite the return value of `name` to be consistent with
"name" in the route attribute of APISIX configuration earlier. The complete
code is as follows.
```Java
package org.apache.apisix.plugin.runner.filter;
@@ -206,11 +198,11 @@ public class TokenValidator implements PluginFilter {
}
```
-### 4.4 测试
+### Testing the Plugin
-在 Apache APISIX 上配置的上游服务是 httpbin.org,可以访问 Apache APISIX,触发路由,让 Apache APISIX
调用 apisix-java-plugin-runner 去执行 TokenValidator 插件,测试一下 Java 插件效果。
+The upstream service configured on Apache APISIX is httpbin.org, which allows
you to access Apache APISIX, trigger the route, and have Apache APISIX call
apisix-java-plugin-runner to execute the TokenValidator plugin and test the
functionality of the Java plugin.
-```text
+```shell
curl -H 'token: 123456' 127.0.0.1:9080/get
{
"args": {},
@@ -227,11 +219,11 @@ curl -H 'token: 123456' 127.0.0.1:9080/get
}
```
-## 5. 部署
+## Deploying the Plugin
-插件开发完成后,部署操作可以参考 [部署
apisix-java-plugin-runner](https://github.com/apache/apisix-java-plugin-runner/blob/main/docs/how-it-works.md#run)。
+After the development of the plugin is completed, the deployment operation can
be found in referred to [Deploying
apisix-java-plugin-runner](https://github.com/apache/apisix-java-plugin-runner/blob/main/docs/how-it-works.md#run).
-## 6. 视频教程
+## Video Tutorial
<iframe
height="350"
diff --git
a/website/blog/2021/06/23/deploy-great-open-source-gateway-and-ingress-controller-fast.md
b/website/blog/2021/06/23/deploy-great-open-source-gateway-and-ingress-controller-fast.md
index d0e1b9c..83af021 100644
---
a/website/blog/2021/06/23/deploy-great-open-source-gateway-and-ingress-controller-fast.md
+++
b/website/blog/2021/06/23/deploy-great-open-source-gateway-and-ingress-controller-fast.md
@@ -1,60 +1,58 @@
---
-title: "Rancher × Apache APISIX: 极速部署更好用的开源网关和 Ingress Controller"
-author: "张晋涛"
+title: "Deploy Apache APISIX and Apache APISIX Ingress Controller on Rancher"
+author: "Jintao Zhang"
authorURL: "https://github.com/tao12345666333";
authorImageURL: "https://avatars.githubusercontent.com/u/3264292?v=4";
keywords:
- APISIX
- Rancher
- Helm Chart
-- API 网关
-description: 你可以在 Rancher 中使用 Apache APISIX 的官方 Helm 仓库直接部署 Apache APISIX 和
APISIX Ingress controller。并且 Apache APISIX 可通过作为网关,或者 APISIX Ingress controller
的数据面来承载业务流量。
+- API Gateway
+description: This article shows the procedure of installing and deploying
Apache APISIX and Apache APISIX Ingress Controller in the Rancher App Store
(Catalog), and how to proxy Kubernetes services through them.
+
tags: [Practical Case]
---
-> 你可以在 Rancher 中使用 Apache APISIX 的官方 Helm 仓库直接部署 Apache APISIX 和 APISIX
Ingress controller。并且 Apache APISIX 可通过作为网关,或者 APISIX Ingress controller
的数据面来承载业务流量。
+> This article shows the procedure of installing and deploying Apache APISIX
and Apache APISIX Ingress Controller in the Rancher App Store (Catalog), and
how to proxy Kubernetes services through them.
<!--truncate-->
-## Rancher 介绍
-
-Rancher 是一个开源的企业级多集群 Kubernetes 管理平台,实现了 Kubernetes
集群在混合云+本地数据中心的集中部署与管理,以确保集群的安全性,加速企业数字化转型。
-
-## Apache APISIX 介绍
-Apache APISIX 是一款开源的高性能、动态云原生网关,由深圳支流科技有限公司于 2019 年捐赠给 Apache 基金会,当前已经成为
Apache 基金会的顶级开源项目,也是 GitHub 上最活跃的开源网关项目。Apache APISIX 当前已经覆盖了 API
网关,LB,Kubernetes Ingress,Service Mesh 等多种场景。
+## Prerequisite
-## 前置条件
+Existing Kubernetes clusters are all hosted on Rancher.
-- 将现有 Kubernetes 集群已纳入 Rancher 管理。
+## Step 1: Configure Helm Chart in Rancher
-## 部署 Apache APISIX 和 Apache APISIX Ingress controller
+Visit Rancher’s Tools — Catalogs page.
-在 Rancher 的 *Tools - Catalogs* 页面可以进行商店(catalogs)的配置,我们在这里[添加 Apache APISIX 的
Helm 仓库](https://github.com/apache/apisix-helm-chart)。
+Click “Edit Catalog”, enter https://github.com/apache/apisix-helm-chart in
“Catalog URL” to add the Helm repository for Apache APISIX in Rancher.

-保存完成后,即可选择 *Apps* 页面进行 Apache APISIX 的部署了。选择 *Launch* 便可看到 Apache APISIX
的仓库信息了。这里我们直接选择 apisix 即可。
+Click “Save” to save the changes.
+
+Select the Apps page, select Launch to see the Apache APISIX repository
information. Here we can directly select “apisix” to deploy Apache APISIX.


-接下来着只需要在此页面中进行简单的配置即可。 **因为我们想要同时部署 APISIX Ingress controller,所以在底部的 Answers
中填入 `ingress-controller.enabled=true` 这个配置项** 。保存即可完成部署。
+Since we want to **deploy APISIX Ingress controller at the same time**, fill
in the `ingress-controller.enabled=true` in the Answers at the bottom. Then
click 'Save" to complete the deployment.

-稍等片刻即可完成部署。
+Wait a few moments for the deployment to complete.

-## 部署示例项目
+## Step 2: Deploy an Example Project
-我们使用 `kennethreitz/httpbin` 作为示例项目进行演示。这里也直接在 Rancher 中完成部署。
+We use `kennethreitz/httpbin` as a sample project for demonstration purpose.
The deployment is also done directly in Rancher.

-## 使用 Apache APISIX 作为网关代理
+## Step 3: Use Apache APISIX as an API Gateway to Proxy Services
-我们先演示如何使用 Apache APISIX 作为网关代理 Kubernetes 集群中的服务。
+First, We demonstrate how to use Apache APISIX as a gateway to proxy services
in a Kubernetes cluster.
```shell
root@apisix:~$ kubectl -n apisix exec -it `kubectl -n apisix get pods -l
app.kubernetes.io/name=apisix -o name` -- bash
@@ -71,9 +69,9 @@ bash-5.1# curl httpbin.default/get
}
```
-可以看到在 Apache APISIX 的 Pod 内可正常访问示例项目。接下来使用 Apache APISIX 对该示例项目进行代理。
+You can see that the sample project can be accessed normally from within the
Apache APISIX Pod. Next, we use Apache APISIX to proxy the sample project.
-这里我们使用 `curl` 调用 Apache APISIX 的 admin 接口,创建一条路由。将所有 host 头为 `httpbin.org`
的请求转发给 `httpbin.default:80` 这个实际的应用服务上。
+Here we use `curl` to call the admin interface of Apache APISIX to create a
route. All requests with a host header of `httpbin.org` are forwarded to the
actual application service `httpbin.default:80`.
```shell
bash-5.1# curl "http://127.0.0.1:9180/apisix/admin/routes/1"; -H "X-API-KEY:
edd1c9f034335f136f87ad84b625c8f1" -X PUT -d '
@@ -90,7 +88,7 @@ bash-5.1# curl "http://127.0.0.1:9180/apisix/admin/routes/1";
-H "X-API-KEY: edd1
{"action":"set","node":{"value":{"uri":"\/*","create_time":1623834078,"update_time":1623834078,"priority":0,"upstream":{"type":"roundrobin","hash_on":"vars","pass_host":"pass","nodes":{"httpbin.default:80":1},"scheme":"http"},"id":"1","status":1,"host":"httpbin.org"},"key":"\/apisix\/routes\/1"}}
```
-你会得到类似上面的输出,接下来验证是否代理成功:
+You will get an output similar to the above code block. Next, verify that the
proxy is successful.
```shell
bash-5.1# curl http://127.0.0.1:9080/get -H "HOST: httpbin.org"
@@ -107,7 +105,7 @@ bash-5.1# curl http://127.0.0.1:9080/get -H "HOST:
httpbin.org"
}
```
-得到上面的输出,说明已经通过 Apache APISIX 代理了示例项目的流量。接下来我们试试在集群外通过 Apache APISIX 访问示例项目。
+The above output shows that the sample project traffic has been proxied
through Apache APISIX. Next, let’s try accessing the sample project from
outside the cluster via Apache APISIX.
```shell
root@apisix:~$ kubectl -n apisix get svc -l app.kubernetes.io/name=apisix
@@ -116,7 +114,7 @@ apisix-admin ClusterIP 10.96.142.88 <none>
9180/TCP 51m
apisix-gateway NodePort 10.96.158.192 <none> 80:32763/TCP 51m
```
-在使用 Helm chart 部署的时候,默认会将 Apache APISIX 的端口通过 NodePort 的形式暴露出去。我们使用 Node IP +
NodePort 的端口进行访问测试。
+When deployed using Helm chart, the Apache APISIX port is exposed by default
as a NodePort. We use the Node IP + NodePort port for access testing.
```shell
root@apisix:~$ curl http://172.18.0.2:32763/get -H "HOST: httpbin.org"
@@ -133,20 +131,21 @@ root@apisix:~$ curl http://172.18.0.2:32763/get -H "HOST:
httpbin.org"
}
```
-可以看到,**在集群外已经可以通过 Apache APISIX 作为网关代理 Kubernetes 集群内的服务了。**
+As you can see, **Apache APISIX is able to proxy services within a Kubernetes
cluster outside the cluster**.
-## 使用 APISIX Ingress controller 代理服务
+## Step 4: Use Apache APISIX Ingress Controller Proxy Service
-我们可以直接在 Rancher 中添加 Ingress ,Apache APISIX Ingress controller 会自动将路由规则同步至
Apache APISIX 中,完成服务的代理。
+We can add Ingress directly to Rancher and the Apache APISIX Ingress
controller will automatically synchronize the routing rules to Apache APISIX to
complete the proxy for the service.

-注意右下角, 我们添加了 `kubernetes.io/ingress.class: apisix` 的 annotation 配置,用于支持集群内多
ingress-controller 的场景。
+Note in the bottom right corner, we have added the annotation configuration
`kubernetes.io/ingress.class: apisix` to support multiple ingress-controller
scenarios in the cluster.
-保存后,可看到如下界面:
+After saving, you can see the following screen.

-在终端下测试是否代理成功:
+
+Test if the proxy is successful under the terminal:
```shell
root@apisix:~$ curl http://172.18.0.2:32763/get -H "HOST: httpbin-ing.org"
@@ -163,14 +162,14 @@ root@apisix:~$ curl http://172.18.0.2:32763/get -H "HOST:
httpbin-ing.org"
}
```
-可以看到也正常代理了。
+You can see that it is also proxied properly.
-除了以上方式外,Apache APISIX Ingress controller 通过 CRD 的方式对 Kubernetes 进行了扩展,你也可以通过发布
`ApisixRoute` 等这种自定义资源来完成 Kubernetes 中服务的对外暴露。
+In addition, the Apache APISIX Ingress controller extends Kubernetes by way of
CRD, and you can also expose services in Kubernetes to the public by publishing
custom resources like `ApisixRoute`.
-## 总结
+## Conclusion
-你可以在 Rancher 中使用 Apache APISIX 的官方 Helm 仓库直接部署 Apache APISIX 和 APISIX Ingress
controller 。并且 Apache APISIX 可通过作为网关,或者 APISIX Ingress controller 的数据面来承载业务流量。
+You can deploy Apache APISIX and APISIX Ingress controller directly in Rancher
using the official Apache APISIX Helm repository. And Apache APISIX can be used
as a gateway or as a data plane for the APISIX Ingress controller to carry
business traffic.
-## 未来展望
+## Future Plans
-Apache APISIX 已经与 Rancher 社区达成合作,未来你可以直接在 Rancher 自带的应用仓库中找到 Apache APISIX
,不再需要手动添加 Helm 仓库了。
+The Rancher community has partnered with Apache APISIX community. You will be
able to find Apache APISIX directly in Rancher’s own app store in the future,
eliminating the need to manually add Helm repositories.
diff --git a/website/blog/2021/09/13/china-mobile-cloud-usercase.md
b/website/blog/2021/09/13/china-mobile-cloud-usercase.md
index 158657e..d01c89f 100644
--- a/website/blog/2021/09/13/china-mobile-cloud-usercase.md
+++ b/website/blog/2021/09/13/china-mobile-cloud-usercase.md
@@ -1,127 +1,127 @@
---
-title: "纵观移动云对象存储发展历程,也少不了 Apache APISIX 的能力加持"
-author: "陈焱山"
+title: "How Apache APISIX is implemented in China Mobile Cloud"
+author: "Yanshan Chen"
keywords:
-- 移动云存储
- Apache APISIX
-- 云服务
-- API 网关
-description: 本文整理自中国移动云能力中心陈焱山在 ApacheCon 2021 亚洲站的演讲,通过阅读本文,您可以了解到中国移动云是如何基于
Apache APISIX 进行产品的开发和功能改进与更新,打造出更完善的移动云对象存储。
+- China Mobile
+- User Case
+- API Gateway
+description: This article is compiled from a presentation given by Yanshan
Chen from China Mobile Cloud Competence Center at ApacheCon 2021 Asia. By
reading this article, you can learn how China Mobile Cloud is developing and
improving and updating its products based on Apache APISIX to create a better
mobile cloud object storage.
tags: [User Case]
---
-> 本文整理自中国移动云能力中心陈焱山在 ApacheCon 2021 亚洲站的演讲,通过阅读本文,您可以了解到中国移动云是如何基于 Apache
APISIX 进行产品的开发和功能改进与更新,打造出更完善的移动云对象存储。
+> This article is compiled from a presentation given by Yanshan Chen from
China Mobile Cloud Competence Center at ApacheCon 2021 Asia. By reading this
article, you can learn how China Mobile Cloud is developing and improving and
updating its products based on Apache APISIX to create a better mobile cloud
object storage.
<!--truncate-->
-作者陈焱山,来自中国移动云能力中心。从事分布式存储软件开发及架构方案设计工作,深度参与移动云的建设,在分布式对象存储领域有丰富的实战经验。
+## Background Information
-## 背景说明
+As the builder of China Mobile’s cloud facilities, provider of cloud services
and aggregator of cloud ecology, China Mobile’s Cloud Competence Center has
assumed six major responsibilities for mobile cloud: technology research and
development, planning and construction, operation and maintenance, cooperation
and introduction, sales support, and support for cloud deployment.
-中国移动云能力中心作为中国移动云设施构建者、云服务提供者以及云生态汇聚者,承担了移动云的技术研发、规划建设、运营维护、合作引入、销售支撑、支持上云六大工作职责。
+As of October 2020, a total of 25 public cloud nodes have been built
nationwide, with a provincial coverage rate of over 80%. Among them, object
storage EOS, as one of the underlying infrastructure capabilities, has been
deployed in all resource pools, and the overall available scale has reached EB
level.
-截至 2020 年 10 月,全国共计建成 25 个公有云节点,省份覆盖率超过 80%。其中对象存储 EOS
作为底层基础设施能力之一,已在所有资源池中进行了部署建设,整体可用规模达到 EB 级。
+Mobile cloud object storage has gone through four generations of development
history changes. Starting from self-research and development, through
functional expansion, deep customization, performance improvement to the latest
generation has a cross-regional global correction and deletion architecture, to
achieve the effect of off-site multi-live disaster recovery. Throughout the
years, it can be said that the progress is rapid.
-移动云对象存储至今已经历了四代发展历程变迁。从自研开发起手,通过功能扩展、深度定制、性能提升到最新一代拥有跨区域全局纠删架构,实现了异地多活容灾效果。纵观下来,可谓是进步飞速。
+In the early stage of cloud object storage technology selection, we
investigated many API gateways, including Nginx, Apache APISIX, etc., and
finally chose Apache APISIX, which can not only meet the current business
requirements, but also provide more ideas and choices for our products in terms
of system availability and maintainability, which is similar to that of Apache
APISIX. The overall product evolution plan and technology stack are more
compatible.
-在云对象存储技术选型初期,我们调研过很多的 API 网关,包括 Nginx、Apache APISIX 等,最终还是选择了 Apache
APISIX。Apache APISIX
不仅能够满足当前的业务要求,同时还能在系统可用性、可维护性上为我们产品提供比较多的思路和选择,与后续整体产品演进规划和技术栈比较吻合。
+## Why Did We Choose Apache APISIX as a Gateway?
-## 为什么选择 Apache APISIX 作为网关
+### Why Did We Abandon Nginx?
-### 为什么抛弃 Nginx
+#### Reason 1: Lack of Overall Capabilities
-#### 理由一:综合能力欠缺
+Apache APISIX as a microservice gateway, compared with other API gateways, its
upstream routing plugins are fully dynamic, and no restart is required to
modify the configuration. The plugin also supports hot-loading, so you can plug
and unplug and modify the plugin at any time. These capabilities are not
available in Nginx, especially in scenarios with very high business continuity
requirements.
-Apache APISIX 作为一个微服务网关,与其他 API
网关相比,它的上游路由插件是全动态的,修改配置不需要重启。同时插件支持热加载,可以随时插拔、修改插件。尤其是业务连续性要求非常高的场景,这些能力都是
Nginx 不具备的。
+#### Reason 2: Inflexible Configuration
-#### 理由二:配置不灵活
+Apache APISIX supports all-platform, multi-protocol, fully dynamic,
fine-grained routing, security protection, and is O&M friendly, and can be
docked to Prometheus, SkyWalking, etc., with highly scalable These are the
capabilities that are needed in real production.
-众所周知,像 Nginx 所有的功能都是基于配置文件来实现的,因而像 Proxy 存在路由上游的证书不能动态加载。Apache APISIX
支持全平台、多协议、全动态、精细化路由、安全防护,而且运维友好,可以对接 Prometheus、SkyWalking
等,有高度扩展能力,这些都是实际生产中需要的能力。
+### Why Did We Choose Apache APISIX?
-### 在技术选型时,为什么我们最终选择 Apache APISIX
+#### Reason 1: Based on the Need for Product Architecture
-#### 理由一:基于产品架构的需要
+As mentioned earlier, object storage has now gone through four generations of
development. With the richness of the product features, the scale of the entire
architecture cluster becomes larger, there is a need for more control surface
policies, including traffic governance, service governance and other policies
to ensure the stable operation of the entire system.
-前边提到过目前对象存储已经经历了四代发展历程。随着产品功能的丰富、整个架构集群规模变大,就需要有更多控制面策略,包括流量治理、服务治理等策略来保证整个系统的稳定运行。
+#### Reason 2: Implementation of Fine-grained Business Functions
-#### 理由二:细粒度业务功能的实现
+Apache APISIX features, functional plugins, and custom development
capabilities are available to meet our business needs during subsequent
development.
-Apache APISIX 的特性、功能插件、自定义开发功能,都可以在后续的开发过程中满足我们的业务需求。
+#### Reason 3: SLA Service Level Guarantee
-#### 理由三:SLA 服务等级保障
+The general SLA service level availability emphasizes two metrics: system mean
time to failure and system mean time to repair failure. How to effectively
lengthen the system mean time to failure? How to effectively reduce the system
mean time to repair? These two questions are our key considerations. Apache
APISIX has good traffic management and service management related capabilities
in both fault isolation and self-healing.
-一般 SLA
服务等级的可用性强调两个指标:系统平均无故障时间和系统平均故障修复时间。如何有效拉长系统平均无故障时间?如何有效缩小系统平均故障修复时间?这两个问题是我们重点考虑的。而
Apache APISIX 在故障隔离和自愈方面都有着不错的流量治理和服务治理相关能力。
+
-
+## What Did We Change in Apache APISIX Data Plane?
-## 在 Apache APISIX 的数据面,我们改了些什么
+### Improvement 1: Separate Access for Internal and External Network Requests
-### 改进一:内外网请求分离访问
+Currently our business model has two domains, the intranet domain and the
extranet domain. The intranet domain name access is the east-west access of the
resource pool, such as the internal virtual machine of the resource pool,
application platform class products, etc. The extranet domain name is
equivalent to pure public network access, such as: public cloud, toC and toB
customers in the public network, accessing object storage via satellite or
physical private line.
-目前我们的业务模型有两个域名,内网域名和外网域名。内网域名的访问是资源池东西向的访问,如资源池内部虚拟机、应用平台类的产品等。外网域名,相当于是纯公网的访问,比如:公网的公有云、toC
和 toB 的客户,通过 satellite 或者物理专线访问对象存储。
-我们通过接入 Apache APISIX 实现了内外网域名的多域名证书配置,并提供了加密访问功能,同时实现了 SSL 证书动态加载的功能实现。对于 24
小时不间断的业务,能够动态更新 SSL 证书是非常重要的。
+By accessing Apache APISIX, we realize multi-domain certificate configuration
for internal and external domain names, and provide encrypted access function,
and realize the function of dynamic loading of SSL certificate. For 24-hour
uninterrupted business, it is very important to be able to dynamically update
SSL certificate.
-### 改进二:请求熔断保护
+### Improvement 2: Request for Fuse Protection
-在这里首先给大家简单描述一下目前接入 Apache APISIX 后的对象存储 EOS
节点管理。整个对象存储分为数据平面和控制平面。数据平面主要承载整个业务的 I/O 流。业务数据是从 Apache APISIX 的 7
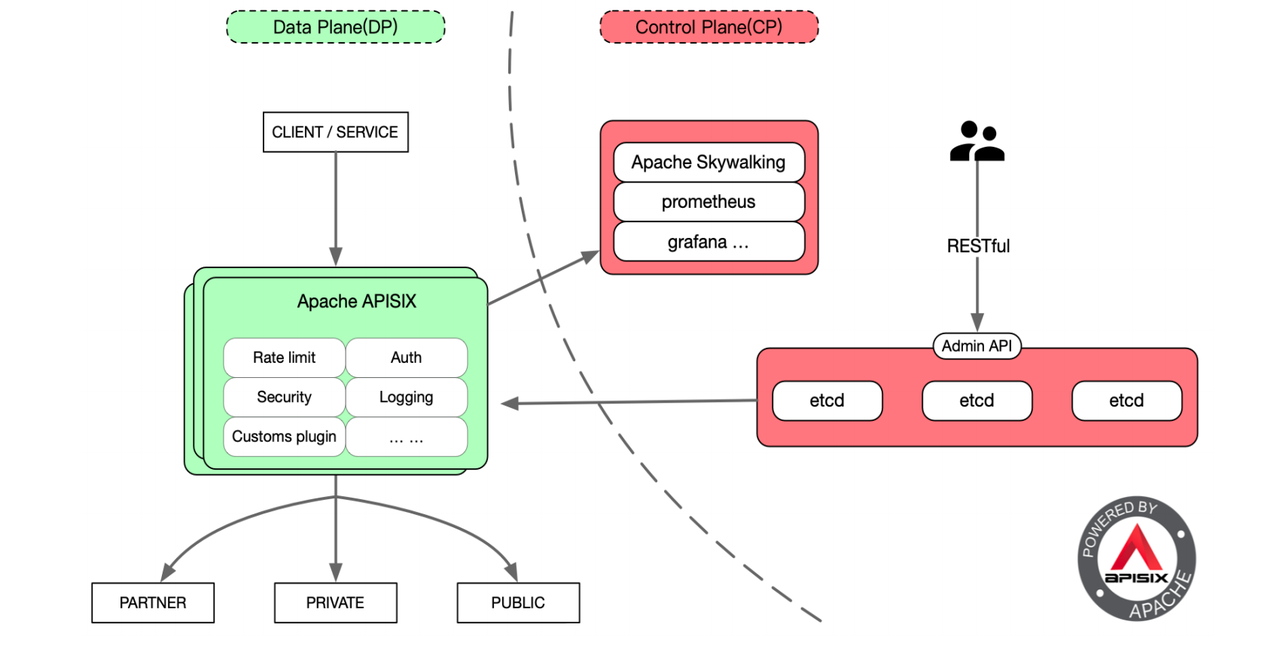
层流量治理模块作为入口,通过 APISIX 后端上游的 Accesser,实现业务接口处理的主要模块。
+Here we first give you a brief description of the current Object Storage EOS
node management after accessing Apache APISIX. The entire object store is
divided into a data plane and a control plane. The data plane mainly carries
the I/O flow of the whole business. The business data is processed from
APISIX’s Layer 7 traffic governance module as the entry point, through the
APISIX back-end upstream Accesser, which is the main module for business
interface processing.
-
+
-控制平面主要有几大服务,包括自动驾驶服务 Manager、可观测系统 Observer 和混沌工程故障注入模块 Checker。还有额外的整体交互编排系统
Orchestrator 和灰度发布平台 Publisher。
+The control plane has several main services, including the autopilot service
Manager, the observable system Observer, and the chaos engineering fault
injection module Checker. there is also an additional overall interaction
orchestration system Orchestrator and a grayscale publishing platform Publisher.
-
+
-为了实现请求熔断保护,数据面在接入 Apache APISIX 后就实现了请求介入的处理能力。而控制面端的可观测系统主要是基于 Prometheus
搭建的,进行指标收集与告警,最终实现后端整体的熔断保护。
+In order to achieve request fusion protection, the data plane is connected to
Apache APISIX to achieve the processing capability of request intervention. The
observable system at the control plane is mainly built based on Prometheus,
which collects indicators and alerts, and finally realizes the overall fusion
protection at the back-end.
-### 改进三:自定义 constant key 实现全局限流
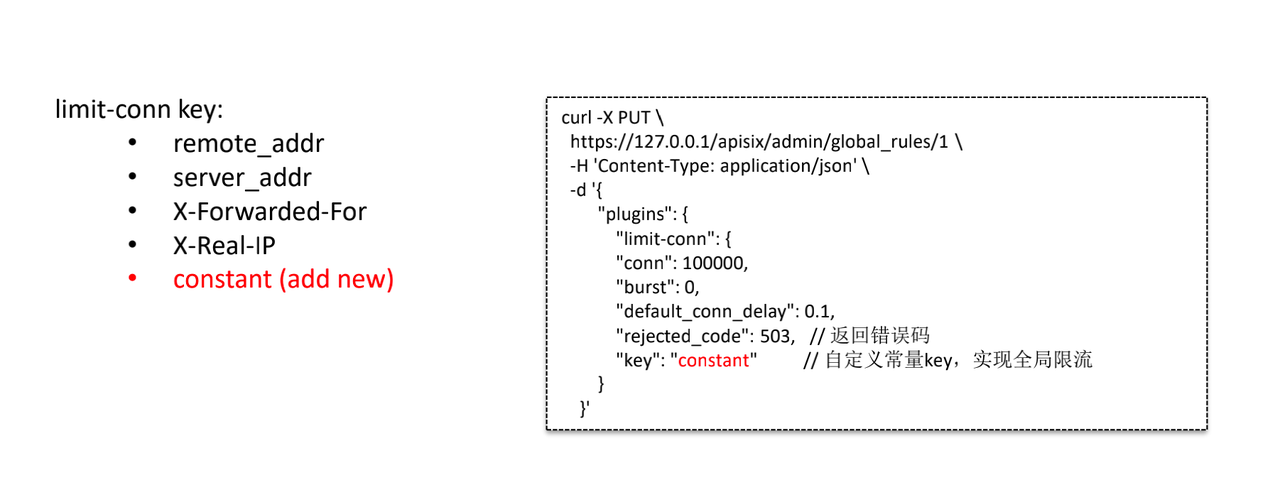
+### Improvement 3: Customize Constant Key to Achieve Global Flow-limit
-limit-conn key 这个插件主要是支持 remote_addr、server_addr、X-Forwarded-For、X-Real-IP
,但不能对南北向网关的流量做全局限流。
+limit-conn key This plugin mainly supports remote_addr, server_addr,
X-Forwarded-For, X-Real-IP, but cannot do full limit flow for north-south
gateway traffic.
+In order to match our business requirements, we customize a constant constant
as the range of imit-conn key. The right side of the above figure is the
modified configuration after accessing Apache APISIX, and the constant constant
constant key is used to achieve the function of global flow-limit.
-为了匹配我们的业务需求,通过自定义一个 constant 常量作为 limit-conn key 范围,上图右侧即是接入 Apache APISIX
后修改过的配置,通过 constant 常量 key 实现全局限流的功能。
+
-
+### Improvement 4: New Function Feature Switches
-### 改进四:新增功能特性开关
+#### Switch 1: Temporarily Turn off an Object Storage Function
-#### 开关 1:临时关闭某个对象存储功能
+In the gateway layer by accessing Apache APISIX, it is compatible with the S3
interface specification to avoid wasting resources on the access layer and
persistence layer of the back-end service.
-在网关层通过接入 Apache APISIX,兼容了 S3 接口规范,避免对后端服务的接入层、持久化层的资源浪费。
+#### Switch 2: Support the Highest Priority for GET Requests
-#### 开关 2:支持 GET 请求优先级最高
+With the support of GET request priority, GET requests have the highest
priority when retrieving user data, higher than PUT, DELETE and other requests.
-实现了在支持 GET 请求优先的情况下,在取回用户数据时 GET 请求优先级最高,高于 PUT 、DELETE 等请求。
+#### Switch 3: Return 501 Not Implemented for Ordered List Requests
-#### 开关 3:对 Ordered List 请求返回 501 Not Implemented
+In the object storage will generally have a bucket of Ordered List feature
requirements. The third and fourth generation of mobile cloud object storage
for tens of billions of file objects, if still using Ordered List, on the one
hand, request access to the back-end response time will be particularly long,
on the other hand, will take up more resources, the stability of the back-end a
greater challenge.
-在对象存储中一般会有对桶的 Ordered List 的功能需求。第三、四代移动云对象存储面向的都是百亿文件对象,如果依旧使用 Ordered
List,一方面请求访问后端响应的时间会特别长,另一方面会占用较多资源,对后端的稳定性提出较大的挑战。
+Therefore, after accessing Apache APISIX, the request will be rejected
directly at the gateway level, and the status code of 501 Not Implemented will
be returned.
-所以接入 Apache APISIX 后将直接在网关层面进行拒绝请求,并返回 501 Not Implemented 的状态码。
+### Improvement 5: Transparent Upgrade/Expansion/Configuration Change
-### 改进五:实现透明升级/扩容/配置变更
+Combined with the Apache APISIX Layer 7 governance capabilities, we perform
upgrades, scaling and configuration changes to key components upstream and
across the I/O path to control back-end weighting through dynamic scaling and
dynamic upgrade operations for subsequent request processing.
-结合 Apache APISIX 7 层治理能力,我们对上游组件和整个 I/O
路径上关键组件进行了升级、扩容和配置变更,通过动态扩容、动态升级等操作来控制后端权重,进行后续请求处理。
+### Improvement 6: Request Log Tracking Analysis Based on Request-id
-### 改进六:基于 request-id 实现请求日志跟踪分析
+Based on access.log, we have implemented a centralized log collection
management method to collect APISIX logs and logs of other processes, and then
perform a comprehensive analysis.
-基于 access.log 实现了日志集中收集的管理方式,把 APISIX 的 log 和其他进程的 log 都收集起来,然后进行综合的分析。
+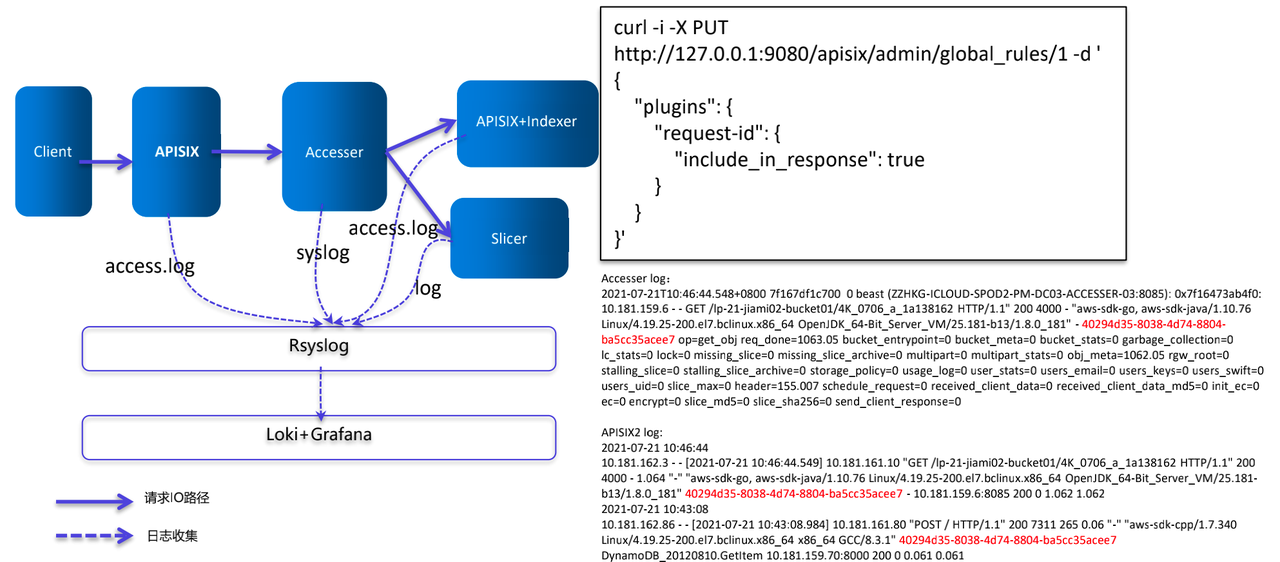
-
+The configuration item on the right side of the image above uses the
request-id plugin of Apache APISIX. Each request is assigned a request-id when
it passes through APISIX, which is used in the business logic processing layer
(Accesser) and the data persistence layer, which in turn filters out the log
timestamps of the different components in the official Loki panel and helps to
automate some analysis using AI later.
-上图右侧的配置项是使用了 Apache APISIX 的 request-id 插件。每个请求在经过 APISIX 时都会被分配一个
request-id,被用于业务逻辑处理层(Accesser)和数据持久化层,进而在 Loki 官方面板上过滤出不同组件的日志时间戳,有助于后续使用 AI
实现一些自动化的分析。
+### Improvement 7: Cross Available Zones Request Scheduling Feature
-### 改进七:跨 AZ 请求调度功能
+The backend of the current load balancing is a seven-layer traffic governance
layer based on APISIX implementation, which achieves multi-live capability by
equal ECMP + BGP routing. We define three traffic types, each APISIX node
receives service traffic and only hits the upstream service of this node to
process (level0, purple line), similar to SideCar mode.
+If a node has a problem upstream, it will be forwarded to other upstream nodes
in the same AZ for processing (green line). If all upstream nodes hang, the
ability to invoke requests across AZs (level2, red line) is implemented based
on Apache APISIX, which writes the requests to other AZs and finally achieves
request scheduling across AZs.
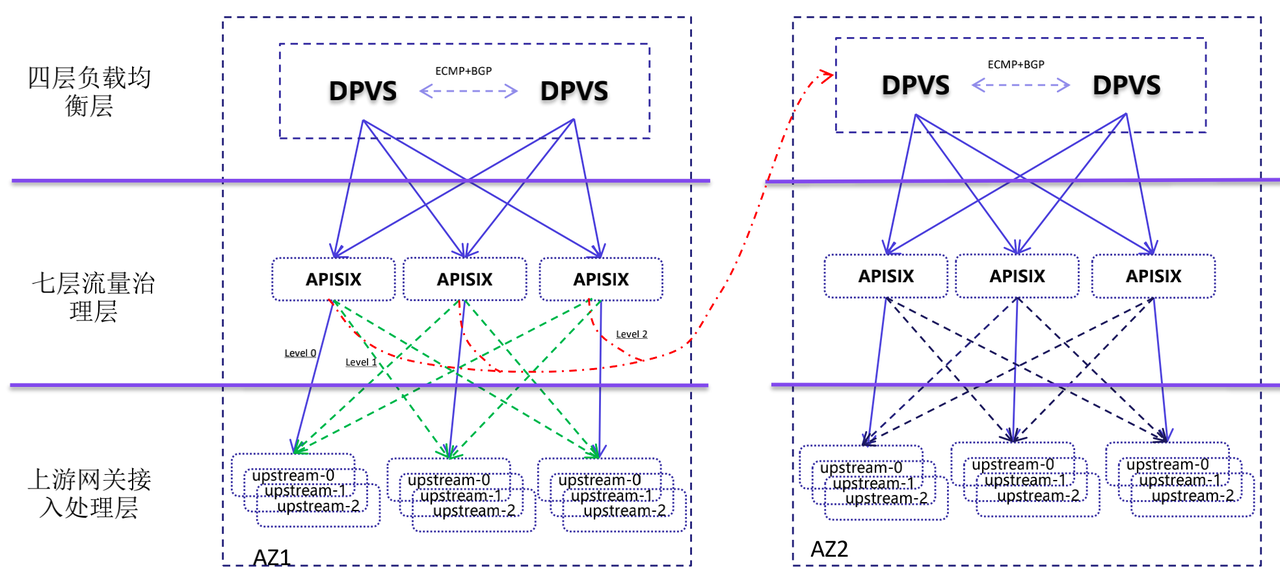
-目前负载均衡的后端是基于 APISIX 实现的七层流量治理层,通过等 ECMP + BGP 路由实现多活的能力。我们定义了三种流量类型,每个 APISIX
节点收到业务流量时只打到本节点的上游服务去处理(level0,紫线),类似 SideCar 模式。
+
-
+## Future Plans
-如果一个节点的上游出现问题,就会被转发到同 AZ 的其他上游节点进行处理(绿线)。如果所有上游节点全部挂掉,则会基于 Apache APISIX 实现请求跨
AZ 的调用能力(level2,红线),把请求写入到其他 AZ 中,最终实现跨 AZ 的请求调度。
+The future of mobile cloud object storage will fully embrace cloud-native, and
gradually achieve the following plans:
-## 未来规划
+1. Integrate data surface functions, and eventually achieve a comprehensive
containerized deployment orchestration.
-未来移动云对象存储将会全面拥抱云原生,并逐步实现以下计划:
+1. Successively access the APISIX-based Ingress Controller, through APISIX to
unify access portal.
-1. 整合数据面功能,最终实现全面的容器化部署编排
-2. 陆续接入基于 APISIX 的 Ingress Controller,通过 APISIX 来统一访问入口
-3. 加强与自动驾驶 Manager、可观测性系统 Observer 子系统的融合能力,进一步实现故障的隔离与自愈
-4. 将对象存储 S3 方面的认证能力移入到接口层。更好地实现统一鉴权认证以及安全访问,达到保护后端的效果
+1. Strengthen the integration capability with Autopilot Manager and Observer
subsystem to further achieve fault isolation and self-healing.
+
+1. Move the authentication capability of object storage S3 to the interface
layer. Better achieve unified authentication and security access to protect the
back-end effect.
diff --git
a/website/i18n/zh/docusaurus-plugin-content-blog/2021/06/21/use-Java-to-write-Apache-APISIX-plugins.md
b/website/i18n/zh/docusaurus-plugin-content-blog/2021/06/21/use-Java-to-write-Apache-APISIX-plugins.md
index b01e2a9..6f803f8 100644
---
a/website/i18n/zh/docusaurus-plugin-content-blog/2021/06/21/use-Java-to-write-Apache-APISIX-plugins.md
+++
b/website/i18n/zh/docusaurus-plugin-content-blog/2021/06/21/use-Java-to-write-Apache-APISIX-plugins.md
@@ -85,7 +85,7 @@ apisix-java-plugin-runner 相当于 server 端,在启动时会主动创建 `/t
先给插件命名为 `TokenValidator`,然后设计属性,为了尽可能做到动态配置,属性设计如下
-```text
+```json
{
"validate_header": "token",
"validate_url": "https://www.sso.foo.com/token/validate";,
@@ -95,7 +95,7 @@ apisix-java-plugin-runner 相当于 server 端,在启动时会主动创建 `/t
启动 Apache APISIX,然后新增一条路由配置,指定该路由需要调用 apisix-java-plugin-runner 的
`TokenValidator` 插件,示例如下
-```text
+```shell
curl http://127.0.0.1:9080/apisix/admin/routes/1 -H 'X-API-KEY:
edd1c9f034335f136f87ad84b625c8f1' -X PUT -d '
{
"uri":"/get",
@@ -210,7 +210,7 @@ public class TokenValidator implements PluginFilter {
在 Apache APISIX 上配置的上游服务是 httpbin.org,可以访问 Apache APISIX,触发路由,让 Apache APISIX
调用 apisix-java-plugin-runner 去执行 TokenValidator 插件,测试一下 Java 插件效果。
-```text
+```shell
curl -H 'token: 123456' 127.0.0.1:9080/get
{
"args": {},
diff --git
a/website/i18n/zh/docusaurus-plugin-content-blog/2021/06/23/deploy-great-open-source-gateway-and-ingress-controller-fast.md
b/website/i18n/zh/docusaurus-plugin-content-blog/2021/06/23/deploy-great-open-source-gateway-and-ingress-controller-fast.md
index d0e1b9c..eec2422 100644
---
a/website/i18n/zh/docusaurus-plugin-content-blog/2021/06/23/deploy-great-open-source-gateway-and-ingress-controller-fast.md
+++
b/website/i18n/zh/docusaurus-plugin-content-blog/2021/06/23/deploy-great-open-source-gateway-and-ingress-controller-fast.md
@@ -146,6 +146,7 @@ root@apisix:~$ curl http://172.18.0.2:32763/get -H "HOST:
httpbin.org"
保存后,可看到如下界面:

+
在终端下测试是否代理成功:
```shell