This is an automated email from the ASF dual-hosted git repository.

juzhiyuan pushed a commit to branch master
in repository https://gitbox.apache.org/repos/asf/apisix-website.git
The following commit(s) were added to refs/heads/master by this push:
new 37e1edd docs: add Keycloak Auth with Apache APISIX blog (#799)
37e1edd is described below
commit 37e1edd820ea2e3c800a8a2b6f0109ab385de034
Author: Sylvia <[email protected]>
AuthorDate: Fri Dec 10 12:06:05 2021 +0800
docs: add Keycloak Auth with Apache APISIX blog (#799)
---
.../12/07/apisix-integrate-skywalking-plugin.md | 12 +-
.../08/apisix-integrate-rocketmq-logger-plugin.md | 4 +-
.../12/10/integrate-keycloak-auth-in-apisix.md | 210 ++++++++++++++++++++
.../12/07/apisix-integrate-skywalking-plugin.md | 12 +-
.../08/apisix-integrate-rocketmq-logger-plugin.md | 6 +-
.../12/10/integrate-keycloak-auth-in-apisix.md | 212 +++++++++++++++++++++
6 files changed, 447 insertions(+), 9 deletions(-)
diff --git a/website/blog/2021/12/07/apisix-integrate-skywalking-plugin.md
b/website/blog/2021/12/07/apisix-integrate-skywalking-plugin.md
index a0a01d1..bba5b47 100644
--- a/website/blog/2021/12/07/apisix-integrate-skywalking-plugin.md
+++ b/website/blog/2021/12/07/apisix-integrate-skywalking-plugin.md
@@ -1,8 +1,14 @@
---
title: "Apache APISIX Integrates with SkyWalking to Create a Full Fange of Log
Processing"
-author: "Haochao Zhuang"
-authorURL: "https://github.com/dmsolr";
-authorImageURL: "https://avatars.githubusercontent.com/u/29735230?v=4";
+authors:
+ - name: "Haochao Zhuang"
+ title: "Author"
+ url: "https://github.com/dmsolr";
+ image_url: "https://avatars.githubusercontent.com/u/29735230?v=4";
+ - name: "Sylvia"
+ title: "Technical Writer"
+ url: "https://github.com/SylviaBABY";
+ image_url: "https://avatars.githubusercontent.com/u/39793568?v=4";
keywords:
- Apache APISIX
- Apache SkyWalking
diff --git a/website/blog/2021/12/08/apisix-integrate-rocketmq-logger-plugin.md
b/website/blog/2021/12/08/apisix-integrate-rocketmq-logger-plugin.md
index 90c7b8d..5d9a1a0 100644
--- a/website/blog/2021/12/08/apisix-integrate-rocketmq-logger-plugin.md
+++ b/website/blog/2021/12/08/apisix-integrate-rocketmq-logger-plugin.md
@@ -1,10 +1,12 @@
---
title: "Apache APISIX & RocketMQ Helps User API Log Monitoring Capabilities"
authors:
- - name: Zhou Yu
+ - name: "Zhou Yu"
+ title: "Author"
url: "https://github.com/yuz10";
image_url: "https://avatars.githubusercontent.com/u/14816818?v=4";
- name: "Sylvia"
+ title: "Technical Writer"
url: "https://github.com/SylviaBABY";
image_url: "https://avatars.githubusercontent.com/u/39793568?v=4";
keywords:
diff --git a/website/blog/2021/12/10/integrate-keycloak-auth-in-apisix.md
b/website/blog/2021/12/10/integrate-keycloak-auth-in-apisix.md
new file mode 100644
index 0000000..0fa768e
--- /dev/null
+++ b/website/blog/2021/12/10/integrate-keycloak-auth-in-apisix.md
@@ -0,0 +1,210 @@
+---
+title: "How to Integrate Keycloak for Authentication with Apache APISIX"
+authors:
+ - name: "Xinxin Zhu"
+ title: "Author"
+ url: "https://github.com/starsz";
+ image_url: "https://avatars.githubusercontent.com/u/25628854?v=4";
+ - name: "Sylvia"
+ title: "Technical Writer"
+ url: "https://github.com/SylviaBABY";
+ image_url: "https://avatars.githubusercontent.com/u/39793568?v=4";
+keywords:
+- Apache APISIX
+- Keycloak
+- Authentication
+- Integration
+description: This article shows you how to use OpenID-Connect protocol and
Keycloak for identity authentication in Apache APISIX through detailed steps.
+tags: [Technology]
+---
+
+> This article shows you how to use OpenID-Connect protocol and Keycloak for
identity authentication in Apache APISIX through detailed steps.
+
+<!--truncate-->
+
+[Keycloak](https://www.keycloak.org/) is an open source identity and access
management solution for modern applications and services. Keycloak supports
Single-Sign On, which enables services to interface with Keycloak through
protocols such as OpenID Connect, OAuth 2.0, etc. Keycloak also supports
integrations with different authentication services, such as Github, Google and
Facebook.
+
+In addition, Keycloak also supports user federation, and can import users
through LDAP and Kerberos. For more information about Keycloak, please refer to
the [official documentation](https://www.keycloak.org/about).
+
+## How to Use
+
+### Environment Preparation
+
+Make sure that Apache APISIX is started in your environment before proceeding
with the following steps.
+
+#### Start Keycloak
+
+Here we use `docker-compose` to start Keycloak with PostgreSQL.
+
+```yaml
+version: '3.7'
+
+services:
+ postgres:
+ image: postgres:12.2
+ container_name: postgres
+ environment:
+ POSTGRES_DB: keycloak
+ POSTGRES_USER: keycloak
+ POSTGRES_PASSWORD: password
+
+ keycloak:
+ image: jboss/keycloak:9.0.2
+ container_name: keycloak
+ environment:
+ DB_VENDOR: POSTGRES
+ DB_ADDR: postgres
+ DB_DATABASE: keycloak
+ DB_USER: keycloak
+ DB_PASSWORD: password
+ KEYCLOAK_USER: admin
+ KEYCLOAK_PASSWORD: password
+ PROXY_ADDRESS_FORWARDING: "true"
+ ports:
+ - 8080:8080
+ depends_on:
+ - postgres
+```
+
+```shell
+docker-compose up
+```
+
+After execution, you need to verify that Keycloak and postgres have started
successfully.
+
+```shell
+docker-compose ps
+```
+
+#### Configure Keycloak
+
+After Keycloak is started, use your browser to access
"http://127.0.0.1:8080/auth/admin/"; and type the `admin/password` account
password to log in to the administrator console.
+
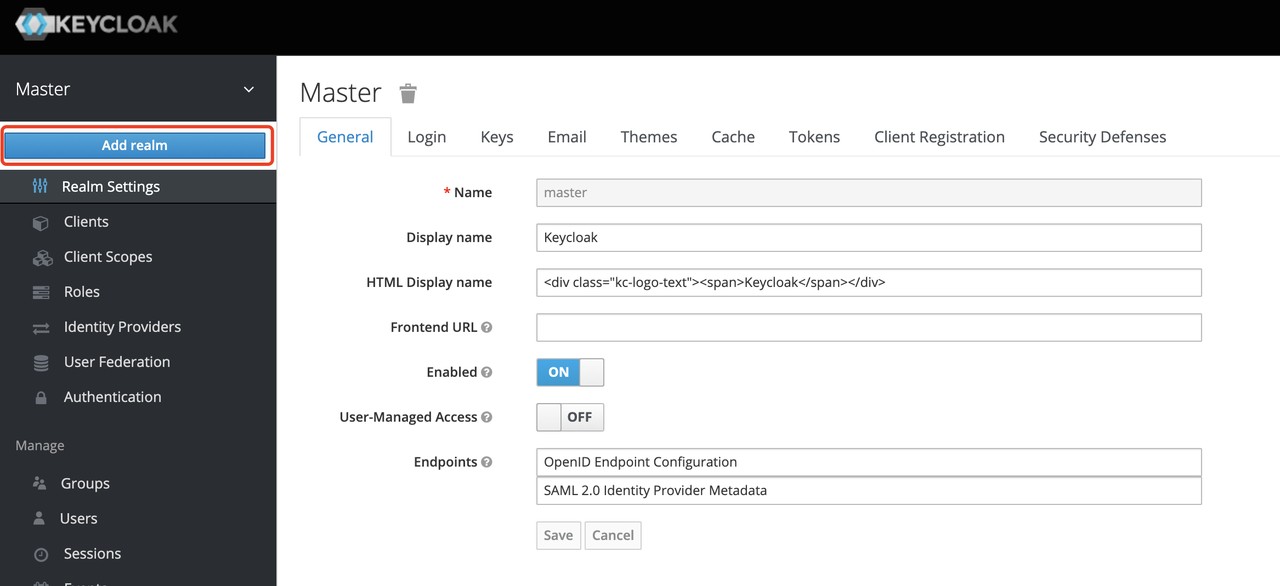
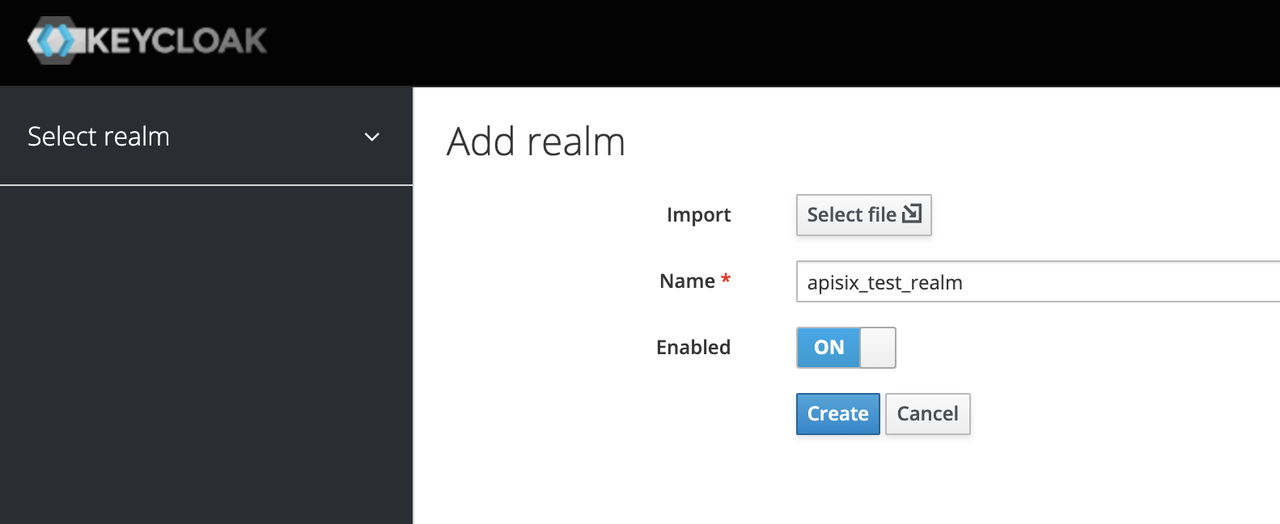
+##### Create a realm
+
+First, you need to create a realm named `apisix_test_realm`. In Keycloak, a
realm is a workspace dedicated to managing projects, and the resources of
different realms are isolated from each other.
+
+The realm in Keycloak is divided into two categories: one is the `master
realm`, which is created when Keycloak is first started and used to manage the
admin account and create other realm. the second is the `other realm`, which is
created by the admin in the master realm and can be used to create, manage and
use users and applications in this realm. The second category is the other
realm, created by admin in the master realm, where users and applications can
be created, managed and used [...]
+
+
+
+
+
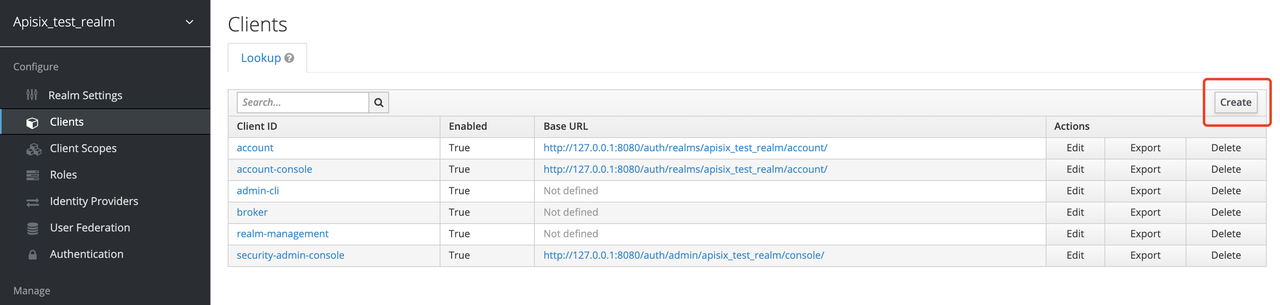
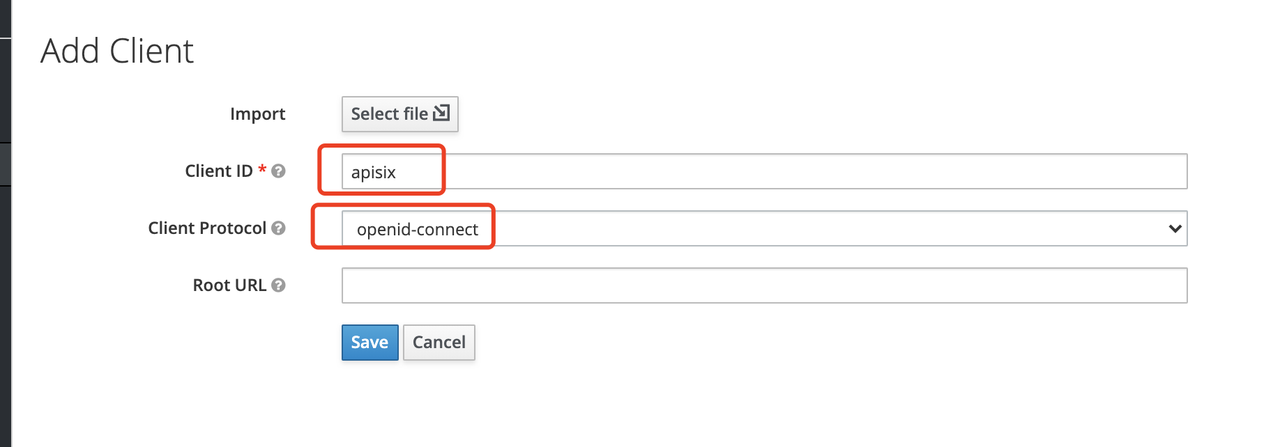
+##### Create a Client
+
+The next step is to create the `OpenID Connect Client`. In Keycloak, Client
means a client that is allowed to initiate authentication to Keycloak.
+
+In this example scenario, `Apache APISIX` is equivalent to a client that is
responsible for initiating authentication requests to Keycloak, so we create a
Client with the name `apisix`. More details about the Client can be found in
[Keycloak OIDC
Clients](https://www.keycloak.org/docs/latest/server_admin/#_oidc_clients).
+
+
+
+
+
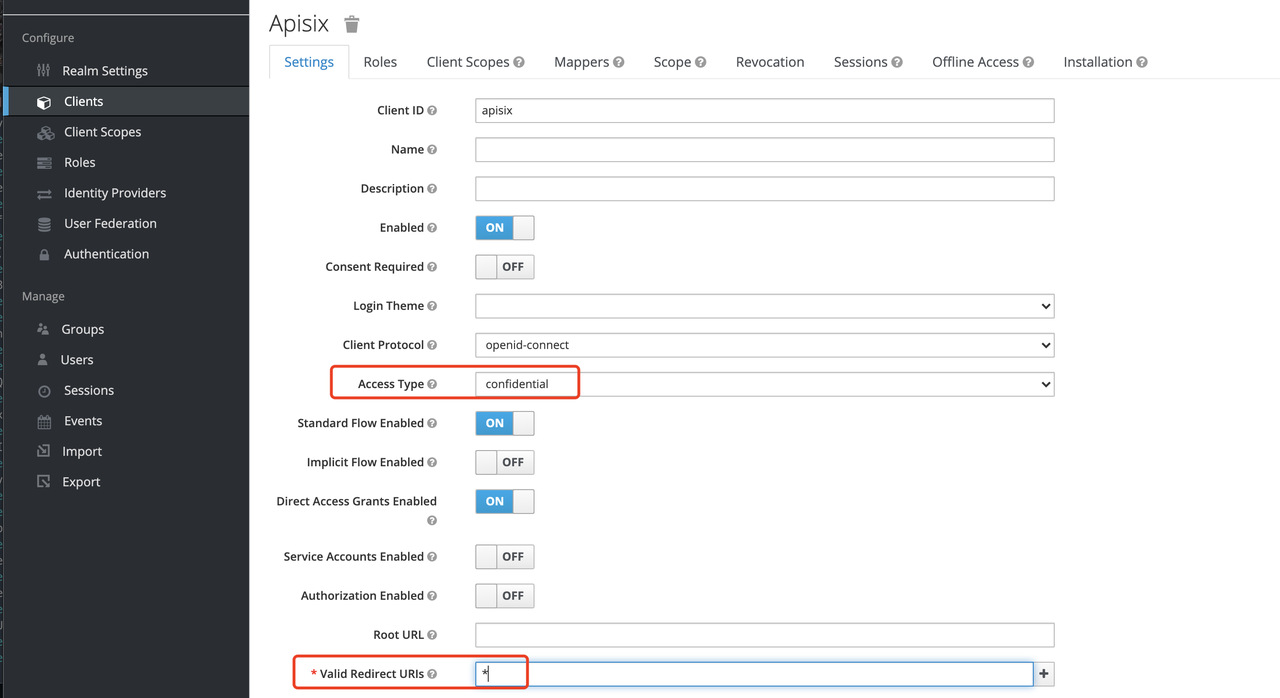
+##### Configure the Client
+
+After the Client is created, you need to configure the Apache APISIX access
type for the Client.
+
+In Keycloak, there are three types of Access Type:
+
+1. **Confidential**: which is used for applications that need to perform
browser login, and the client will get the `access token` through `client
secret`, mostly used in web systems rendered by the server.
+2. **Public**: for applications that need to perform browser login, mostly
used in front-end projects implemented using vue and react.
+3. **Bearer-only**: for applications that don't need to perform browser login,
only allow access with `bearer token`, mostly used in RESTful API scenarios.
+
+For more details about Client settings, please refer to [Keycloak OIDC Clients
Advanced
Settings](https://www.keycloak.org/docs/latest/server_admin/#advanced-settings).
+
+Since we are using Apache APISIX as the Client on the server side, we can
choose either "confidential" Access Type or "Bearer-only" Access Type. For the
demonstration below, we are using "confidential" Access Type as an example.
+
+
+
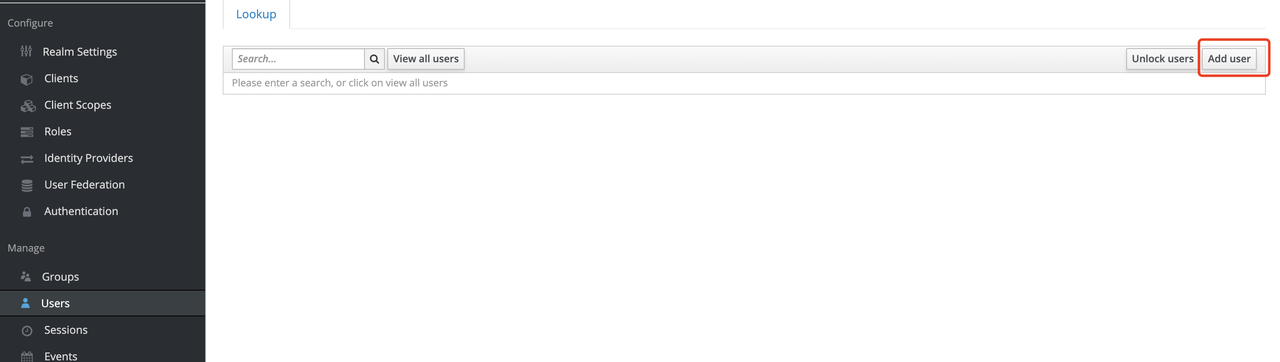
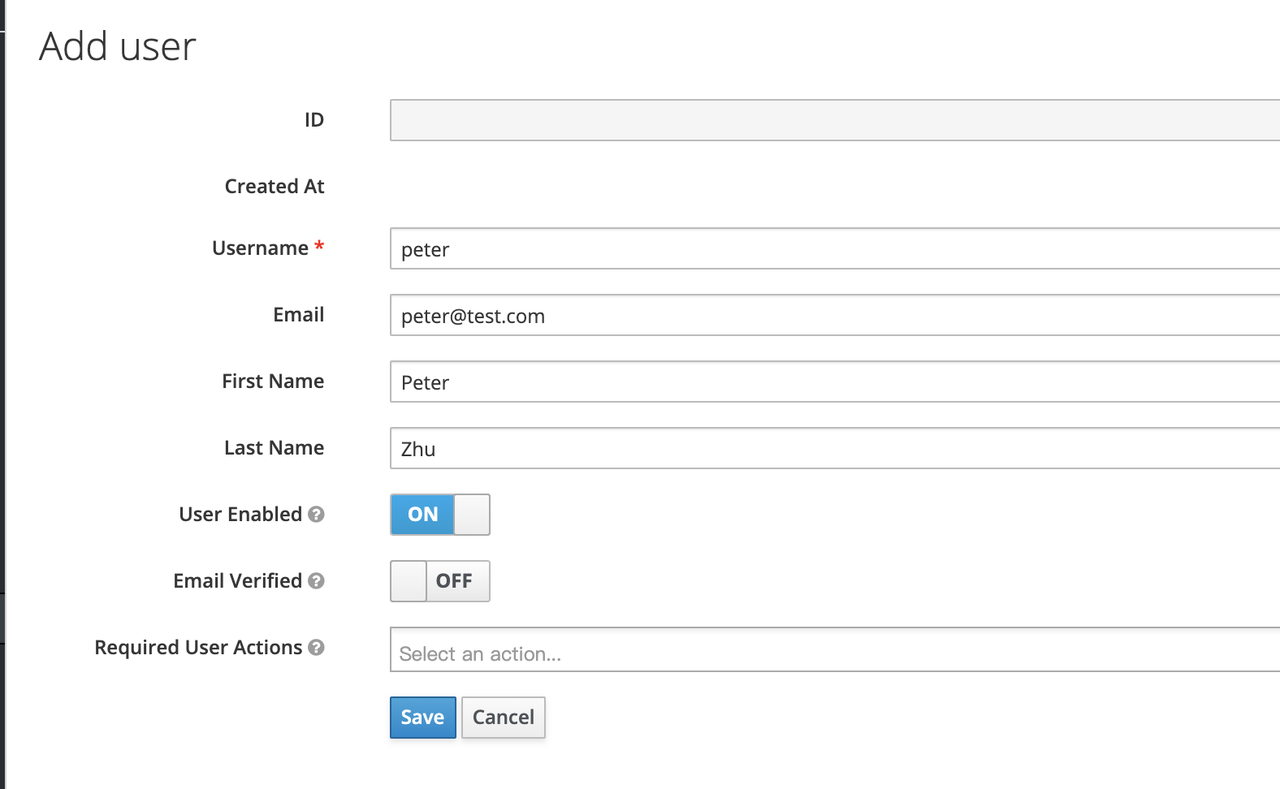
+##### Create Users
+
+Keycloak supports interfacing with other third-party user systems, such as
Google and Facebook, or importing or manually creating users using LDAP . Here
we will use "manually creating users" to demonstrate.
+
+
+
+
+
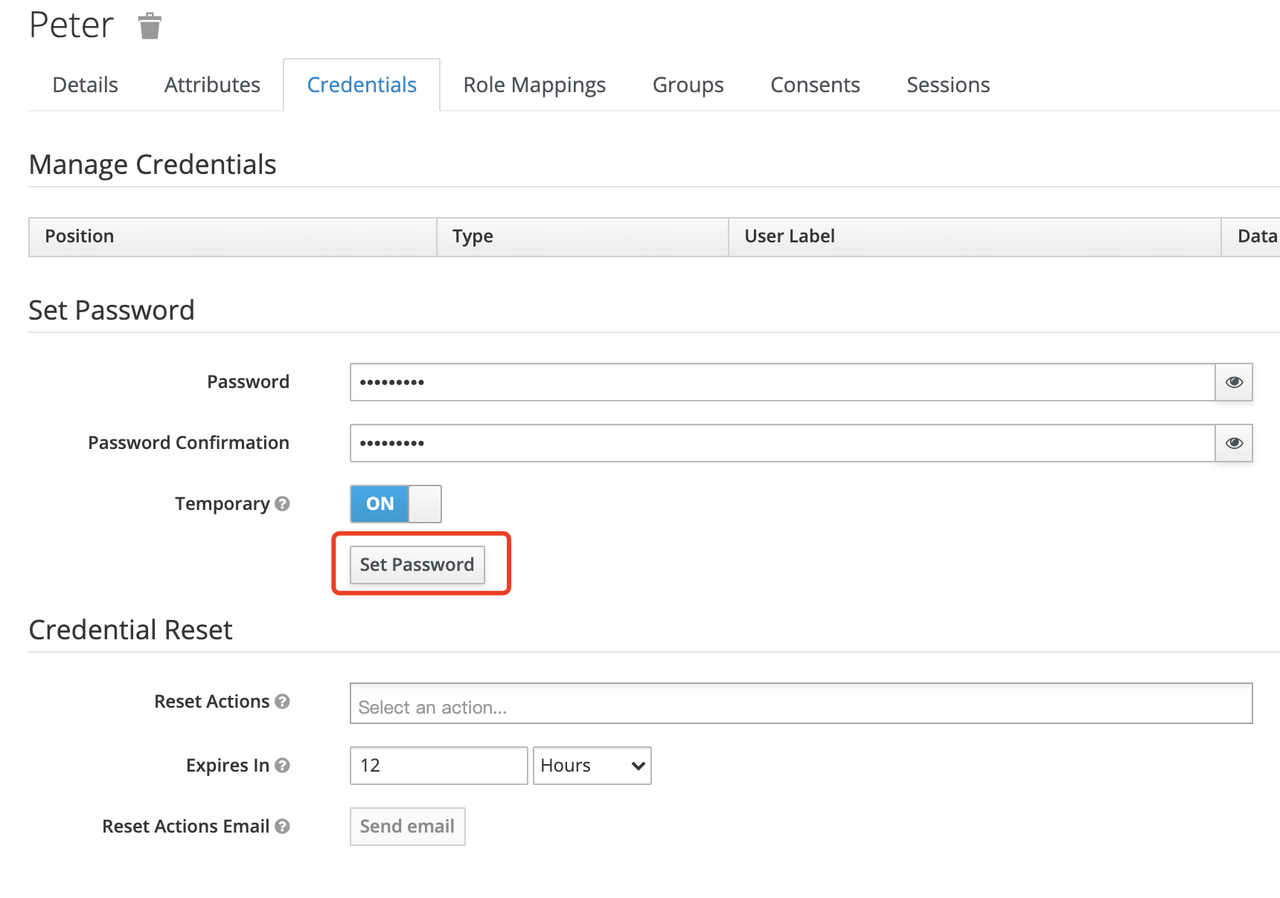
+Then set the user's password in the Credentials page.
+
+
+
+#### Create Routes
+
+After Keycloak is configured, you need to create a route and open the
`Openid-Connect` plugin . For details on the configuration of this plugin,
please refer to the [Apache APISIX OpenID-Connect
plugin](https://apisix.apache.org/docs/apisix/plugins/openid-connect).
+
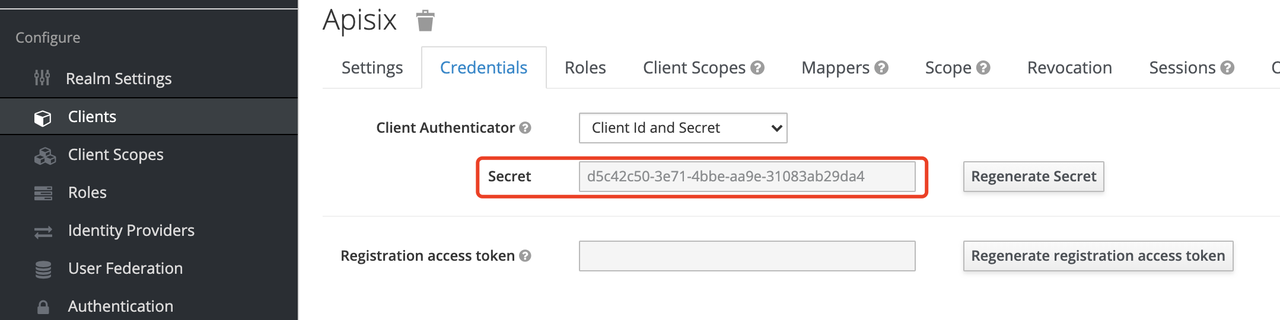
+##### Get client_id and client_secret
+
+
+
+In the above configuration.
+
+* `client_id` is the name used when creating the Client before, i.e. `apisix`
+* `client_secret` should be obtained from Clients-apisix-Credentials, for
example: `d5c42c50-3e71-4bbbe-aa9e-31083ab29da4`.
+
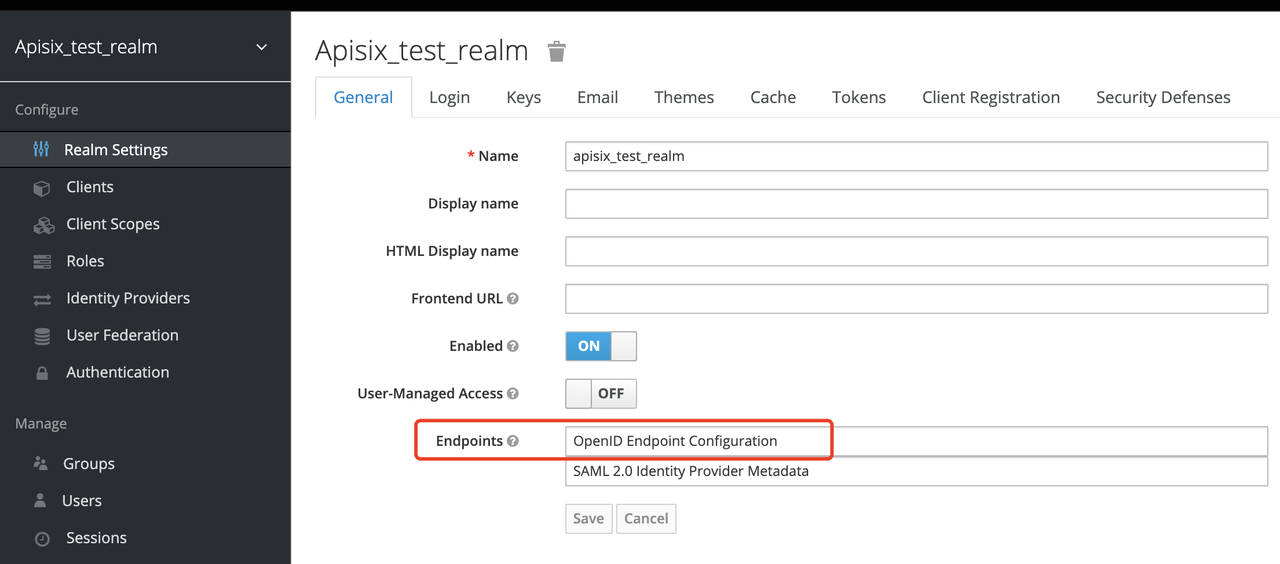
+##### Get the discovery configuration
+
+
+
+Go to Realm Settings-General-Endpoints, select the `OpenID Endpoint
Configuration` link and copy the address that the link points to, for
example:`http://127.0.0.1:8080/auth/realms/apisix_test_realm/.well-known/openid-configuration`.
+
+##### Create a route and enable the plug-in
+
+Use the following command to access the Apache APISIX Admin interface to
create a route, set the upstream to `httpbin.org`, and enable the plug-in
OpenID Connect for authentication.
+
+> Note: If you select `bearer-only` as the Access Type when creating a Client,
you need to set `bearer_only` to true when configuring the route, so that
access to Apache APISIX will not jump to the Keycloak login screen.
+
+```shell
+curl -XPOST 127.0.0.1:9080/apisix/admin/routes -H "X-Api-Key:
edd1c9f034335f136f87ad84b625c8f1" -d '{
+ "uri":"/*",
+ "plugins":{
+ "openid-connect":{
+ "client_id":"apisix",
+ "client_secret":"d5c42c50-3e71-4bbe-aa9e-31083ab29da4",
+
"discovery":"http://127.0.0.1:8080/auth/realms/apisix_test_realm/.well-known/openid-configuration";,
+ "scope":"openid profile",
+ "bearer_only":false,
+ "realm":"apisix_test_realm",
+ "introspection_endpoint_auth_method":"client_secret_post",
+ "redirect_uri":"http://127.0.0.1:9080/";
+ }
+ },
+ "upstream":{
+ "type":"roundrobin",
+ "nodes":{
+ "httpbin.org:80":1
+ }
+ }
+}'
+```
+
+### Access Testing
+
+Once the above configuration is complete, we are ready to perform the relevant
access tests in Apache APISIX.
+
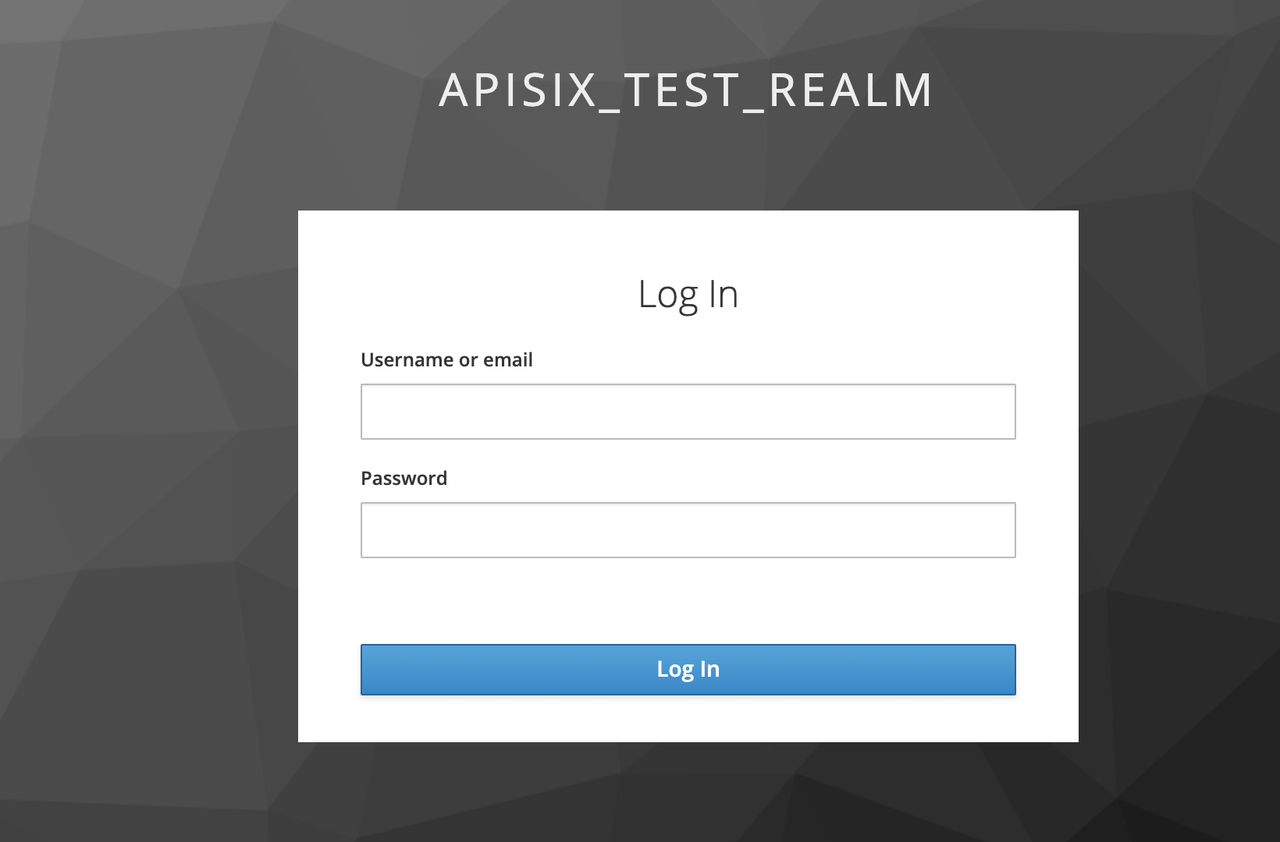
+#### Access Apache APISIX
+
+Use your browser to access http://127.0.0.1:9080/image/png.
+
+Since the OpenID-Connect plugin is enabled and `bearer-only` is set to
`false`, when you access this path for the first time, Apache APISIX will
redirect to the login screen configured in `apisix_test_realm` in Keycloak and
make a user login request.
+
+
+
+Enter the User peter created during the Keycloak configuration to complete
user login.
+
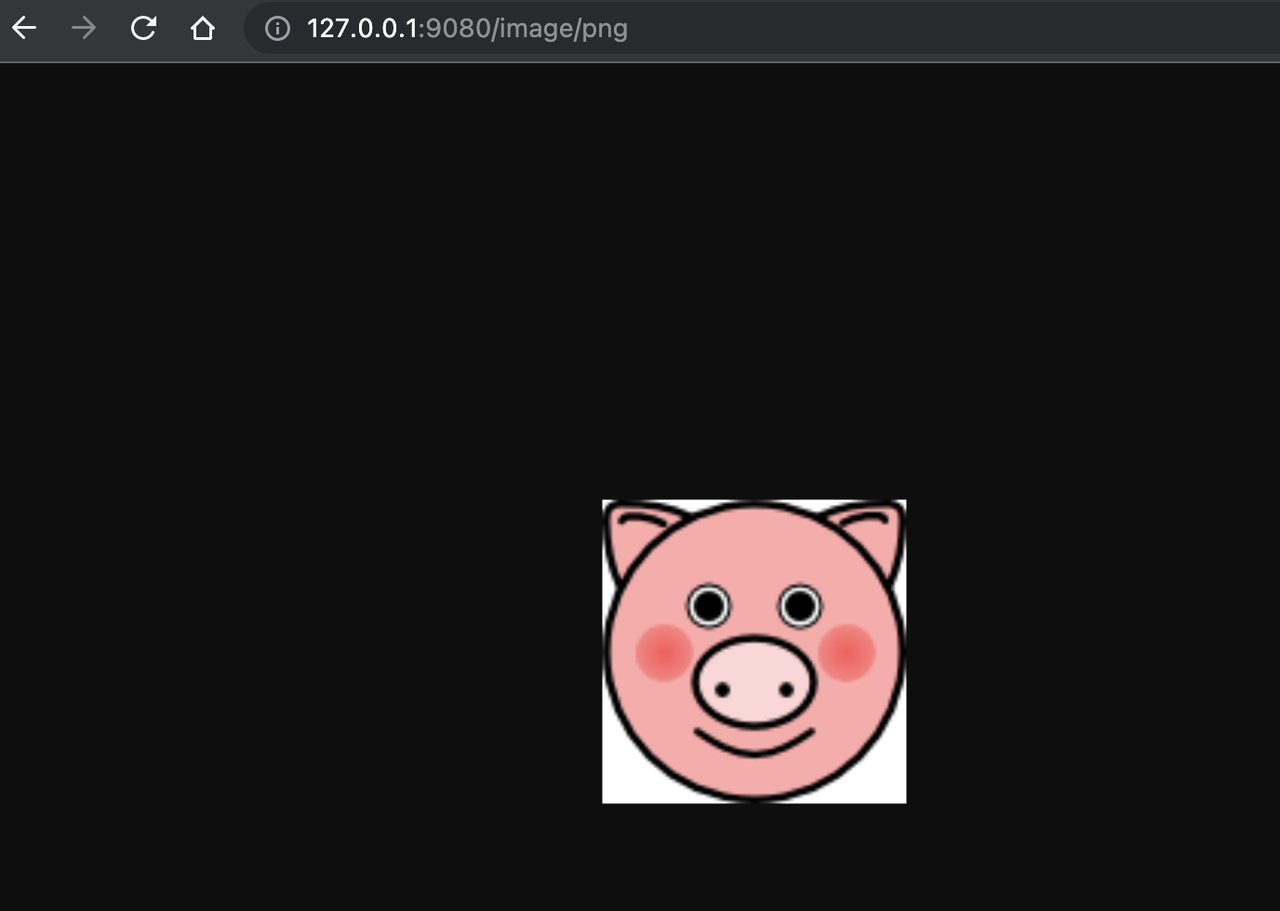
+#### Successful access
+
+After a successful login, the browser will again redirect the link to
http://127.0.0.1:9080/image/png and will successfully access the image content.
The content is identical to that of the upstream http://httpbin.org/image/png.
+
+
+
+#### Logout
+
+After the test, use your browser to access "http:/127.0.0.1:9080/logout" to
logout your account.
+
+> Note: The logout path can be specified by `logout_path` in the
OpenID-Connect plug-in configuration, the default is `logout`.
+
+## Summary
+
+This article shows the procedure of using OpenID-Connect protocol and Keycloak
for authentication in Apache APISIX. By integrating with Keycloak, Apache
APISIX can be configured to authenticate and authenticate users and application
services, which greatly reduces the development work involved.
+
+For more information about the implementation of authentication in Apache
APISIX with Okta, see [this
article](https://apisix.apache.org/zh/blog/2021/08/16/Using-the-Apache-APISIX-OpenID-Connect-Plugin-for-Centralized-Authentication/).
diff --git
a/website/i18n/zh/docusaurus-plugin-content-blog/2021/12/07/apisix-integrate-skywalking-plugin.md
b/website/i18n/zh/docusaurus-plugin-content-blog/2021/12/07/apisix-integrate-skywalking-plugin.md
index 3bf5374..8019803 100644
---
a/website/i18n/zh/docusaurus-plugin-content-blog/2021/12/07/apisix-integrate-skywalking-plugin.md
+++
b/website/i18n/zh/docusaurus-plugin-content-blog/2021/12/07/apisix-integrate-skywalking-plugin.md
@@ -1,8 +1,14 @@
---
title: "强强联合!APISIX 集成 SkyWalking 打造全方位日志处理"
-author: "庄浩潮"
-authorURL: "https://github.com/dmsolr";
-authorImageURL: "https://avatars.githubusercontent.com/u/29735230?v=4";
+authors:
+ - name: "庄浩潮"
+ title: "Author"
+ url: "https://github.com/dmsolr";
+ image_url: "https://avatars.githubusercontent.com/u/29735230?v=4";
+ - name: "苏钰"
+ title: "Technical Writer"
+ url: "https://github.com/SylviaBABY";
+ image_url: "https://avatars.githubusercontent.com/u/39793568?v=4";
keywords:
- Apache APISIX
- Apache SkyWalking
diff --git
a/website/i18n/zh/docusaurus-plugin-content-blog/2021/12/08/apisix-integrate-rocketmq-logger-plugin.md
b/website/i18n/zh/docusaurus-plugin-content-blog/2021/12/08/apisix-integrate-rocketmq-logger-plugin.md
index 026fcb3..a6040b7 100644
---
a/website/i18n/zh/docusaurus-plugin-content-blog/2021/12/08/apisix-integrate-rocketmq-logger-plugin.md
+++
b/website/i18n/zh/docusaurus-plugin-content-blog/2021/12/08/apisix-integrate-rocketmq-logger-plugin.md
@@ -1,10 +1,12 @@
---
title: "Apache APISIX 携手 RocketMQ 为实时 API 日志监控功能再下一城"
authors:
- - name: 余洲
+ - name: "余洲"
+ title: "Author"
url: "https://github.com/yuz10";
image_url: "https://avatars.githubusercontent.com/u/14816818?v=4";
- - name: 苏钰
+ - name: "苏钰"
+ title: "Technical Writer"
url: "https://github.com/SylviaBABY";
image_url: "https://avatars.githubusercontent.com/u/39793568?v=4";
keywords:
diff --git
a/website/i18n/zh/docusaurus-plugin-content-blog/2021/12/10/integrate-keycloak-auth-in-apisix.md
b/website/i18n/zh/docusaurus-plugin-content-blog/2021/12/10/integrate-keycloak-auth-in-apisix.md
new file mode 100644
index 0000000..48afdfa
--- /dev/null
+++
b/website/i18n/zh/docusaurus-plugin-content-blog/2021/12/10/integrate-keycloak-auth-in-apisix.md
@@ -0,0 +1,212 @@
+---
+title: "如何在 Apache APISIX 中集成 Keycloak 实现身份认证"
+authors:
+ - name: "朱欣欣"
+ title: "Author"
+ url: "https://github.com/starsz";
+ image_url: "https://avatars.githubusercontent.com/u/25628854?v=4";
+ - name: "苏钰"
+ title: "Technical Writer"
+ url: "https://github.com/SylviaBABY";
+ image_url: "https://avatars.githubusercontent.com/u/39793568?v=4";
+keywords:
+- Apache APISIX
+- Keycloak
+- 身份认证
+- 集成
+description: 本文通过详细的步骤为大家展示了如何在 Apache APISIX 使用 OpenID-Connect 协议和 Keycloak
进行身份认证。通过对接 Keycloak,Apache APISIX 仅需通过配置即可实现对使用者和应用服务进行认证与鉴权,从而大大减少了相关开发工作。
+tags: [Technology]
+---
+
+> 本文通过详细的步骤为大家展示了如何在 Apache APISIX 使用 OpenID-Connect 协议和 Keycloak 进行身份认证。通过对接
Keycloak,Apache APISIX 仅需通过配置即可实现对使用者和应用服务进行认证与鉴权,从而大大减少了相关开发工作。
+
+<!--truncate-->
+
+## 什么是 Keycloak
+
+[Keycloak](https://www.keycloak.org/) 是一个针对现代应用程序和服务的开源身份和访问管理解决方案。Keycloak
支持单点登录(Single-Sign On),因此服务可以通过 OpenID Connect、OAuth 2.0 等协议对接 Keycloak。同时
Keycloak 也支持集成不同的身份认证服务,例如 Github、Google 和 Facebook 等。
+
+另外 Keycloak 也支持用户联邦功能,可以通过 LDAP 或 Kerberos 来导入用户。更多 Keycloak
内容可以参考[官方文档介绍](https://www.keycloak.org/documentation)。
+
+## 如何使用
+
+### 环境准备
+
+在进行如下步骤前,请确保环境中已启动 Apache APISIX。
+
+#### 启动 Keycloak
+
+这里我们使用 `docker-compose` 将 Keycloak 与其所依赖的的 PostgreSQL 一并启动。
+
+```yaml
+version: '3.7'
+
+services:
+ postgres:
+ image: postgres:12.2
+ container_name: postgres
+ environment:
+ POSTGRES_DB: keycloak
+ POSTGRES_USER: keycloak
+ POSTGRES_PASSWORD: password
+
+ keycloak:
+ image: jboss/keycloak:9.0.2
+ container_name: keycloak
+ environment:
+ DB_VENDOR: POSTGRES
+ DB_ADDR: postgres
+ DB_DATABASE: keycloak
+ DB_USER: keycloak
+ DB_PASSWORD: password
+ KEYCLOAK_USER: admin
+ KEYCLOAK_PASSWORD: password
+ PROXY_ADDRESS_FORWARDING: "true"
+ ports:
+ - 8080:8080
+ depends_on:
+ - postgres
+```
+
+```shell
+docker-compose up
+```
+
+执行完毕后需要确认 Keycloak 和 PostgreSQL 是否已成功启动。
+
+```shell
+docker-compose ps
+```
+
+#### 配置 Keycloak
+
+Keycloak 启动完成之后,使用浏览器访问 "http://127.0.0.1:8080/auth/admin/",并键入
`admin/password` 账号密码进行登录管理员控制台。
+
+##### 创建 realm
+
+首先,创建一个名称为 `apisix_test_realm`的 `realm`。在 Keycloak 中,`realm`
是一个专门用来管理项目的工作区,不同 `realm`之间的资源是相互隔离的。
+
+Keycloak 中 `realm` 分为两类:一类是 `master realm`,由 Keycloak 刚启动时创建,用于管理 admin
账号以及创建其他的 `realm`。第二类是 `other realm`,由 `master realm` 中的 admin 创建,可以在该 `realm`
中进行用户和应用的创建并进行管理和使用。更多细节可参考 [Keycloak 中 realm 和
users](https://www.keycloak.org/docs/latest/getting_started/index.html#realms-and-users)
相关内容。
+
+
+
+
+
+##### 创建 Client
+
+接下来需要创建 `OpenID Connect Client`。在 Keycloak 中,Client 表示允许向 Keycloak 发起身份认证的客户端。
+
+在本示例场景中,`Apache APISIX` 相当于一个客户端,负责向 Keycloak 发起身份认证请求,因此我们创建一个名称为 `apisix` 的
Client。关于 Client 更多细节可参考 [Keycloak OIDC
Clients](https://www.keycloak.org/docs/latest/server_admin/#_oidc_clients)。
+
+
+
+
+
+##### 配置 Client
+
+Client 创建完成后,需要为 Client 配置 Apache APISIX 的访问类型。
+
+ 在 Keycloak 中 `Access Type` 分为三类:
+
+1. **confidential**。适用于需要执行浏览器登录的应用,客户端会通过 `client secret` 来获取 `access token`
, 多运用于服务端渲染的 web 系统。
+2. **public**。适用于需要执行浏览器登录的应用,多运用于使用 vue 和 react 实现的前端项目。
+3. **bearer-only**。适用于不需要执行浏览器登录的应用,只允许携带 `bearer token` 访问,多运用于 RESTful API
的使用场景。
+
+更多关于 Client 设置细节可参考 [Keycloak OIDC Clients
高级设置](https://www.keycloak.org/docs/latest/server_admin/#advanced-settings)。
+
+因为我们使用了 Apache APISIX 作为服务端的 Client, 因此可以选择类型一或类型三(这里以类型一为例进行演示)。
+
+
+
+##### 创建 User
+
+Keycloak 支持对接其他第三方的用户系统,例如 Google 和 Facebook。或者使用 LDAP
的方式进行导入或手动创建用户,这里我们使用「手动创建用户」来进行演示。
+
+
+
+
+
+在 Credentials 页面设置用户的密码。
+
+
+
+#### 创建路由
+
+Keycloak 配置完成后,需要在 Apache APISIX 中创建路由并开启 `Openid-Connect` 插件,具体关于该插件的配置文档可以参考
[Apache APISIX OpenID-Connect
插件](https://apisix.apache.org/docs/apisix/plugins/openid-connect)。
+
+#### 获取 client_id 和 client_secret
+
+
+
+上图配置中:
+
+* `client_id` 为之前创建 Client 时使用的名称,即 `apisix`;
+* `client_secret` 则需要进入 Clients-apisix-Credentials
中获取,例如:`d5c42c50-3e71-4bbe-aa9e-31083ab29da4`。
+
+#### 获取 discovery 配置项
+
+
+
+进入 Realm Settings-General-Endpoints 中,选择 `OpenID Endpoint Configuration`
链接,复制该链接指向的地址。例如:`http://127.0.0.1:8080/auth/realms/apisix_test_realm/.well-known/openid-configuration`。
+
+##### 创建路由并开启插件
+
+使用如下命令访问 Apache APISIX Admin 接口来创建一条路由,设置上游为 `httpbin.org`,并开启插件 OpenID
Connect 用于身份认证。
+
+> 注意:如果创建 Client 时,选择 `bearer-only` 作为 `Access Type`,在配置路由是需要将 `bearer_only`
设置为 true,此时访问 Apache APISIX 将不会跳转到 Keycloak 登录界面。
+
+```shell
+curl -XPOST 127.0.0.1:9080/apisix/admin/routes -H "X-Api-Key:
edd1c9f034335f136f87ad84b625c8f1" -d '{
+ "uri":"/*",
+ "plugins":{
+ "openid-connect":{
+ "client_id":"apisix",
+ "client_secret":"d5c42c50-3e71-4bbe-aa9e-31083ab29da4",
+
"discovery":"http://127.0.0.1:8080/auth/realms/apisix_test_realm/.well-known/openid-configuration";,
+ "scope":"openid profile",
+ "bearer_only":false,
+ "realm":"apisix_test_realm",
+ "introspection_endpoint_auth_method":"client_secret_post",
+ "redirect_uri":"http://127.0.0.1:9080/";
+ }
+ },
+ "upstream":{
+ "type":"roundrobin",
+ "nodes":{
+ "httpbin.org:80":1
+ }
+ }
+}'
+```
+
+### 访问测试
+
+上述配置完成后,我们就可以在 Apache APISIX 中进行相关的测试访问了。
+
+#### 访问 Apache APISIX
+
+使用浏览器访问 `http://127.0.0.1:9080/image/png`。
+
+由于开启了 OpenID-Connect 插件,并且设置了 `bearer-only` 为 `false` 。因此第一次访问该路径时, Apache
APISIX 将重定向到 Keycloak 中 `apisix_test_realm` 中配置的登录界面,进行用户登录请求。
+
+
+
+输入之前配置 Keycloak 时创建的 User peter,即可完成用户登录。
+
+#### 访问成功
+
+登录成功后,浏览器又会将链接重定向到
"[http://127.0.0.1:9080/image/png](http://127.0.0.1:9080/image/png)"。并成功访问到该图片内容,该内容与上游
"[http://httpbin.org/image/png](http://httpbin.org/image/png)" 一致。
+
+
+
+#### 登出账号
+
+测试完毕后,使用浏览器访问 "http:/127.0.0.1:9080/logout" 进行账号登出。
+
+> 注意:登出路径可通过 OpenID-Connect 插件配置中的 `logout_path` 指定,默认为 `logout`。
+
+## 总结
+
+本文通过详细的步骤为大家展示了如何在 Apache APISIX 使用 OpenID-Connect 协议和 Keycloak 进行身份认证。通过对接
Keycloak,Apache APISIX 仅需通过配置即可实现对使用者和应用服务进行认证与鉴权,从而大大减少了相关开发工作。
+
+更多关于 Apache APISIX 中的身份认证功能实现也可参考文章[《使用 Apache APISIX 和 Okta
来实现集中式身份认证》](https://apisix.apache.org/zh/blog/2021/08/16/Using-the-Apache-APISIX-OpenID-Connect-Plugin-for-Centralized-Authentication)。