This is an automated email from the ASF dual-hosted git repository.

juzhiyuan pushed a commit to branch master
in repository https://gitbox.apache.org/repos/asf/apisix-website.git
The following commit(s) were added to refs/heads/master by this push:
new d53f9a3 docs: add Istio with APISIX Ingress blog (#814)
d53f9a3 is described below
commit d53f9a3cff60b2dd735aae542deca8f8228c1ef5
Author: Sylvia <[email protected]>
AuthorDate: Fri Dec 17 19:53:24 2021 +0800
docs: add Istio with APISIX Ingress blog (#814)
---
.../blog/2021/12/15/deploy-apisix-in-kubernetes.md | 4 +
.../12/17/exposure-istio-with-apisix-ingress.md | 408 +++++++++++++++++++++
.../2021/12/15/deploy-apisix-in-kubernetes.md | 3 +
.../12/17/exposure-istio-with-apisix-ingress.md | 408 +++++++++++++++++++++
4 files changed, 823 insertions(+)
diff --git a/website/blog/2021/12/15/deploy-apisix-in-kubernetes.md
b/website/blog/2021/12/15/deploy-apisix-in-kubernetes.md
index 93e61ed..7112f53 100644
--- a/website/blog/2021/12/15/deploy-apisix-in-kubernetes.md
+++ b/website/blog/2021/12/15/deploy-apisix-in-kubernetes.md
@@ -88,6 +88,10 @@ Finally, the verification of the new route is performed.
Since this article uses Kind to build a local K8s cluster, the
`apisix-gateway` NodePort is not accessible, so an additional step is needed
before validation, i.e. forwarding port `80` from the cluster to port `8080` on
the local machine.
+```shell
+kubectl port-forward service/apisix-gateway 8080:80
+```
+
Start the verification process.
```shell
diff --git a/website/blog/2021/12/17/exposure-istio-with-apisix-ingress.md
b/website/blog/2021/12/17/exposure-istio-with-apisix-ingress.md
new file mode 100644
index 0000000..2a155de
--- /dev/null
+++ b/website/blog/2021/12/17/exposure-istio-with-apisix-ingress.md
@@ -0,0 +1,408 @@
+---
+title: "Secure Exposure of Istio Services with APISIX Ingress"
+authors:
+ - name: "Jintao Zhang"
+ title: "Author"
+ url: "https://github.com/tao12345666333";
+ image_url: "https://avatars.githubusercontent.com/u/3264292?v=4";
+ - name: "Sylvia"
+ title: "Technical Writer"
+ url: "https://github.com/SylviaBABY";
+ image_url: "https://avatars.githubusercontent.com/u/39793568?v=4";
+keywords:
+- Apache APISIX
+- Istio
+- Kubernetes
+- APISIX Ingress Controller
+- Service Mesh
+description: This article shows you step by step how to use Istio Service Mesh
and Apache APISIX, to expose services in a Service Mesh-enabled Kubernetes
cluster to the outside of the cluster through very detailed steps.
+tags: [Technology]
+---
+
+> This article shows you step by step how to use Istio Service Mesh and Apache
APISIX, to expose services in a Service Mesh-enabled Kubernetes cluster to the
outside of the cluster through very detailed steps.
+
+<!--truncate-->
+
+## Service Mesh
+
+With the hot development of Cloud-Native technology, Service Mesh is gradually
becoming popular in the microservices field. The popular implementations of
Service Mesh are [Istio](https://istio.io/) and [Linkerd](https://linkerd.io/).
+
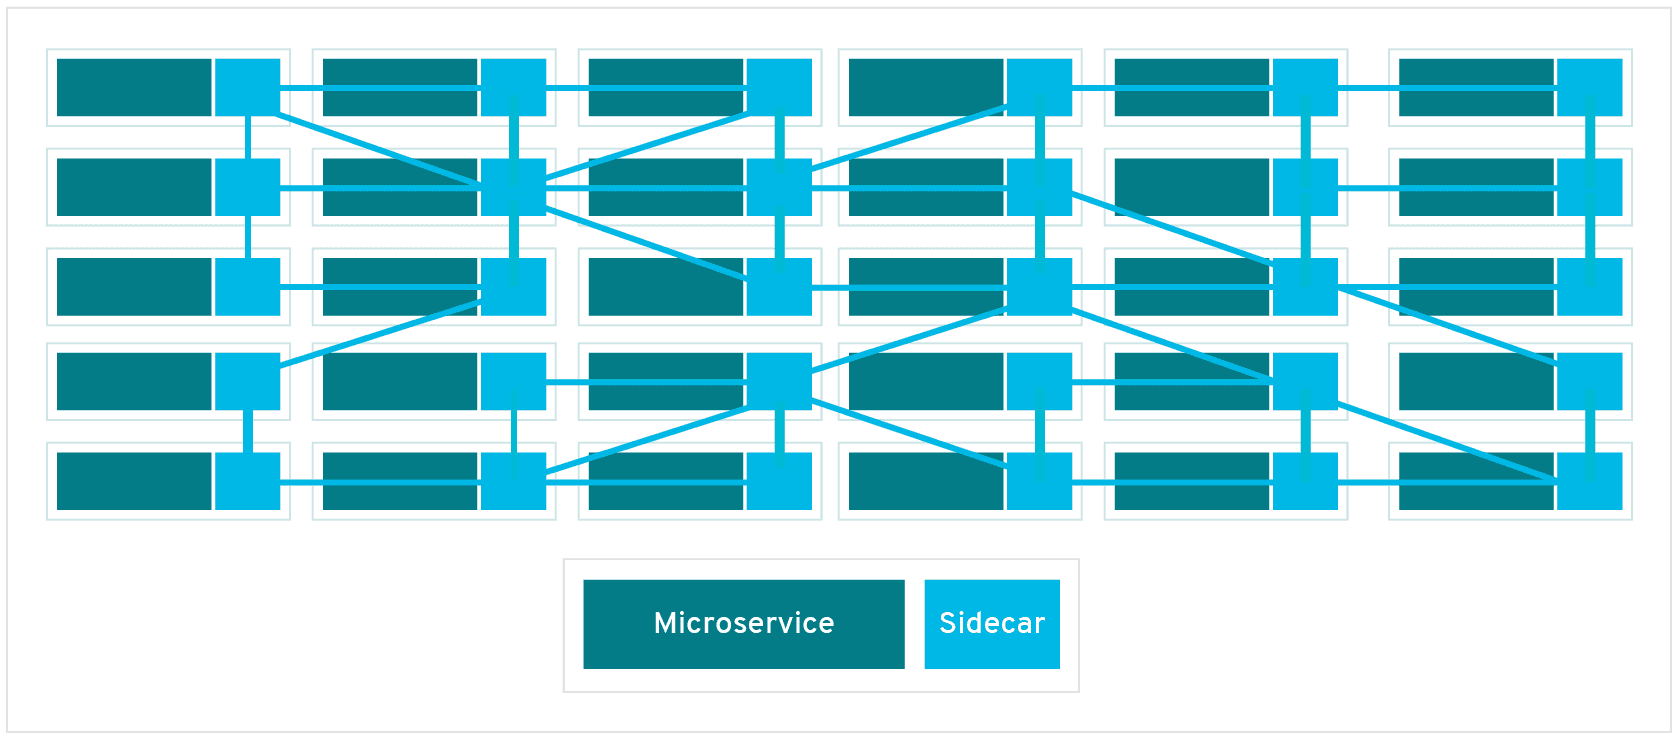
+The following diagram shows the schematic diagram of Service Mesh, which
introduces Sidecar Proxy to complete the interconnection and communication
between microservices.
+
+
+
+The diagram above shows that Service Mesh focuses more on east-west traffic in
the traditional sense, i.e., traffic between services. When we use Service Mesh
with Kubernetes, the east-west traffic corresponds to the traffic within the
Kubernetes cluster.
+
+Back in real-world usage scenarios, we won't only be exposed to traffic within
the Kubernetes cluster, we will mostly need to expose some services outside of
the cluster for users or other services to use. But when exposing services in a
Kubernetes cluster outside the cluster, we have to consider factors such as
security and observability.
+
+We'll show you how to securely expose services in a Service Mesh-enabled
Kubernetes cluster outside the cluster using Istio Service Mesh and Apache
APISIX.
+
+
+
+## Step 1: Prepare the Kubernetes cluster
+
+Here we use [Kind](https://github.com/kubernetes-sigs/kind/) to create a
temporary cluster locally for demonstration purposes. You can refer to the
[official
documentation](https://kind.sigs.k8s.io/docs/user/quick-start/#installation)
for how to install it with the Kind command.
+
+Here is the yaml configuration file used to create the demo cluster, save it
as `kind-config.yaml`.
+
+```yaml
+kind: Cluster
+apiVersion: kind.x-k8s.io/v1alpha4
+nodes:
+- role: control-plane
+- role: worker
+- role: worker
+- role: worker
+```
+
+Then use this configuration file to create a cluster.
+
+```bash
+(MoeLove) ➜ kind create cluster --config kind-config.yaml
+Creating cluster "kind" ...
+ ✓ Ensuring node image (kindest/node:v1.22.2) 🖼
+ ✓ Preparing nodes 📦 📦 📦 📦
+ ✓ Writing configuration 📜
+ ✓ Starting control-plane 🕹️
+ ✓ Installing CNI 🔌
+ ✓ Installing StorageClass 💾
+ ✓ Joining worker nodes 🚜
+Set kubectl context to "kind-kind"
+You can now use your cluster with:
+
+kubectl cluster-info --context kind-kind
+
+Not sure what to do next? 😅 Check out
https://kind.sigs.k8s.io/docs/user/quick-start/
+```
+
+## Step 2: Deploy Istio
+
+After the Kubernetes cluster is created, let's deploy Istio.
+
+First, create a directory named `apisix-istio` and do the following after
entering the directory.
+
+```bash
+(MoeLove) ➜ mkdir apisix-istio
+(MoeLove) ➜ cd apisix-istio
+(MoeLove) ➜ curl -sL https://istio.io/downloadIstio | sh -
+
+Downloading istio-1.12.1 from
https://github.com/istio/istio/releases/download/1.12.1/istio-1.12.1-linux-amd64.tar.gz
...
+
+Istio 1.12.1 Download Complete!
+
+Istio has been successfully downloaded into the istio-1.12.1 folder on your
system.
+
+Next Steps:
+See https://istio.io/latest/docs/setup/install/ to add Istio to your
Kubernetes cluster.
+
+To configure the istioctl client tool for your workstation,
+add the /root/apisix-istio/istio-1.12.1/bin directory to your environment path
variable with:
+ export PATH="$PATH:/root/apisix-istio/istio-1.12.1/bin"
+
+Begin the Istio pre-installation check by running:
+ istioctl x precheck
+
+Need more information? Visit https://istio.io/latest/docs/setup/install/
+```
+
+When the above operation is completed, a new directory will be created under
the current directory. We can follow the output of the above command to
continue the operation.
+
+```bash
+(MoeLove) ➜ ls
+istio-1.12.1
+(MoeLove) ➜ export PATH="$PATH:/root/apisix-istio/istio-1.12.1/bin"
+(MoeLove) ➜ istioctl x precheck
+✔ No issues found when checking the cluster. Istio is safe to install or
upgrade!
+ To get started, check out https://istio.io/latest/docs/setup/getting-started/
+```
+
+Next, the real deployment process begins. Just set it to `--set
profile=minimal` for a minimal installation.
+
+```bash
+(MoeLove) ➜ istioctl install --set profile=minimal -y
+✔ Istio core
+installed
+
+✔ Istiod
+installed
+
+✔ Installation
+complete
+
+Making this installation the default for injection and validation.
+
+Thank you for installing Istio 1.12. Please take a few minutes to tell us
about your install/upgrade experience! https://forms.gle/FegQbc9UvePd4Z9z7
+```
+
+Finally, check the current deployment status and you can see that the Pod is
already running.
+
+```bash
+(MoeLove) ➜ kubectl -n istio-system get pods
+NAME READY STATUS RESTARTS AGE
+istiod-58d79b7bff-g66cv 1/1 Running 0 1m
+```
+
+## Step 3: Deploy Apache APISIX
+
+Next, we will deploy Apache APISIX.
+
+First create a Namespace named `apisix-istio` and enable auto-injection.
+
+```bash
+(MoeLove) ➜ kubectl create ns apisix-istio
+namespace/apisix-istio created
+(MoeLove) ➜ kubectl label namespace apisix-istio istio-injection=enabled
+namespace/apisix-istio labeled
+```
+
+Next, add Helm Repo and use Helm for Apache APISIX and Apache APISIX Ingress
Controller deployments.
+
+```bash
+(MoeLove) ➜ helm repo add apisix https://charts.apiseven.com
+"apisix" has been added to your repositories
+(MoeLove) ➜ helm install apisix-istio apisix/apisix --set
gateway.type=NodePort --set ingress-controller.enabled=true --set
ingress-controller.config.apisix.serviceNamespace=apisix-istio --set
ingress-controller.config.apisix.serviceName=apisix-istio-admin --namespace
apisix-istio
+NAME: apisix-istio
+LAST DEPLOYED: Wed Dec 15 14:16:33 2021
+NAMESPACE: apisix-istio
+STATUS: deployed
+REVISION: 1
+TEST SUITE: None
+NOTES:
+1. Get the application URL by running these commands:
+ export NODE_PORT=$(kubectl get --namespace apisix-istio -o
jsonpath="{.spec.ports[0].nodePort}" services apisix-istio-gateway)
+ export NODE_IP=$(kubectl get nodes --namespace apisix-istio -o
jsonpath="{.items[0].status.addresses[0].address}")
+ echo http://$NODE_IP:$NODE_PORT
+```
+
+After executing the above command, you can wait for all Pods to run normally
by executing the following command.
+
+```bash
+(MoeLove) ➜ kubectl -n apisix-istio wait --for=condition=Ready pods --all
+pod/apisix-istio-7bdfcb4bd9-89jcn condition met
+pod/apisix-istio-etcd-0 condition met
+pod/apisix-istio-etcd-1 condition met
+pod/apisix-istio-etcd-2 condition met
+pod/apisix-istio-ingress-controller-5fcbb75b8c-b4nnc condition met
+```
+
+You can see that all the Pods are currently running properly. Next, let's test
and verify.
+
+## Test Session
+
+### Simple test
+
+When we deployed Apache APISIX using Helm earlier, we selected the service
exposure method as `NodePort`, so we can then access Apache APISIX directly
using the following command.
+
+```bash
+(MoeLove) ➜ export NODE_PORT=$(kubectl get --namespace apisix-istio -o
jsonpath="{.spec.ports[0].nodePort}" services apisix-istio-gateway)
+(MoeLove) ➜ export NODE_IP=$(kubectl get nodes --namespace apisix-istio -o
jsonpath="{.items[0].status.addresses[0].address}")
+(MoeLove) ➜ curl http://$NODE_IP:$NODE_PORT
+{"error_msg":"404 Route Not Found"}
+```
+
+Note that when requesting with the `curl` command we add a `-v` option to look
at the response headers of the request.
+
+```bash
+(MoeLove) ➜ curl -v http://$NODE_IP:$NODE_PORT
+* Rebuilt URL to: http://172.20.0.2:31225/
+* Trying 172.20.0.2...
+* TCP_NODELAY set
+* Connected to 172.20.0.2 (172.20.0.2) port 31225 (#0)
+> GET / HTTP/1.1
+> Host: 172.20.0.2:31225
+> User-Agent: curl/7.58.0
+> Accept: */*
+>
+< HTTP/1.1 404 Not Found
+< date: Wed, 15 Dec 2021 14:31:40 GMT
+< content-type: text/plain; charset=utf-8
+< server: istio-envoy
+< x-envoy-upstream-service-time: 1
+< x-envoy-decorator-operation:
apisix-istio-gateway.apisix-istio.svc.cluster.local:80/*
+< transfer-encoding: chunked
+<
+{"error_msg":"404 Route Not Found"}
+* Connection #0 to host 172.20.0.2 left intact
+```
+
+As you can see from the above output, the response header contains the
following.
+
+```bash
+< server: istio-envoy
+< x-envoy-upstream-service-time: 1
+< x-envoy-decorator-operation:
apisix-istio-gateway.apisix-istio.svc.cluster.local:80/*
+```
+
+This means that Istio's auto-injection has succeeded, and that it is not
Apache APISIX but Istio's Sidecar that is currently interacting directly.
+
+### BookInfo Deployment Testing
+
+Next, we use Istio's own BookInfo sample application to perform the relevant
tests.
+
+First, create a Namespace and enable Istio's auto-injection.
+
+```bash
+(MoeLove) ➜ kubectl create ns bookinfo
+namespace/bookinfo created
+(MoeLove) ➜ kubectl label namespace bookinfo istio-injection=enabled
+namespace/bookinfo labeled
+```
+
+BookInfo deployment is then performed and the relevant deployment files are
automatically created in the directory during the above-mentioned Istio
installation.
+
+```bash
+(MoeLove) ➜ kubectl -n bookinfo apply -f
istio-1.12.1/samples/bookinfo/platform/kube/bookinfo.yaml
+service/details created
+serviceaccount/bookinfo-details created
+deployment.apps/details-v1 created
+service/ratings created
+serviceaccount/bookinfo-ratings created
+deployment.apps/ratings-v1 created
+service/reviews created
+serviceaccount/bookinfo-reviews created`
+deployment.apps/reviews-v1 created
+deployment.apps/reviews-v2 created
+deployment.apps/reviews-v3 created
+service/productpage created
+serviceaccount/bookinfo-productpage created
+deployment.apps/productpage-v1 created
+```
+
+Wait for all Pods to run normally.
+
+```bash
+(MoeLove) ➜ kubectl -n bookinfo get pods
+NAME READY STATUS RESTARTS AGE
+details-v1-96cf758d8-qr6p9 2/2 Running 0 64s
+productpage-v1-5f75dfbfb-22hcw 2/2 Running 0 64s
+ratings-v1-779dbc4fdd-jt5zp 2/2 Running 0 64s
+reviews-v1-ffbbf7fc8-kxvrr 2/2 Running 0 64s
+reviews-v2-54546c6f84-pnjkn 2/2 Running 0 64s
+reviews-v3-74d6bf84cd-h4r9z 2/2 Running 0 63s
+```
+
+Now we can use Apache APISIX to expose the service outside the Kubernetes
cluster. Create a routing configuration using the following and save it as
`productpage-ar.yaml`.
+
+```yaml
+apiVersion: apisix.apache.org/v2beta2
+kind: ApisixRoute
+metadata:
+ name: productpage
+spec:
+ http:
+ - name: rule1
+ match:
+ hosts:
+ - apisix-istio.dev
+ paths:
+ - /*
+ backends:
+ - serviceName: productpage
+ servicePort: 9080
+```
+
+:::note
+The above configuration can be interpreted as creating a route with the domain
name `apisix-istio.dev` and forwarding all request traffic to port `9080` of
the `productpage` service.
+:::
+
+Then create this resource.
+
+```bash
+(MoeLove) ➜ kubectl -n bookinfo apply -f productpage-ar.yaml
+apisixroute.apisix.apache.org/productpage created
+```
+
+Request Apache APISIX again with the domain name we just configured, and you
will see that a `200` related prompt is returned.
+
+```bash
+(MoeLove) ➜ curl -I -H "HOST: apisix-istio.dev" http://$NODE_IP:$NODE_PORT/
+HTTP/1.1 200 OK
+content-type: text/html; charset=utf-8
+content-length: 1683
+date: Wed, 15 Dec 2021 15:47:30 GMT
+x-envoy-upstream-service-time: 7
+server: istio-envoy
+x-envoy-decorator-operation:
apisix-istio-gateway.apisix-istio.svc.cluster.local:80/*
+```
+
+The Apache APISIX port can then be exposed via `port-forward`.
+
+```bash
+(MoeLove) ➜ kubectl -n apisix-istio port-forward --address 0.0.0.0
svc/apisix-istio-gateway 8080:80
+Forwarding from 0.0.0.0:8080 -> 9080
+```
+
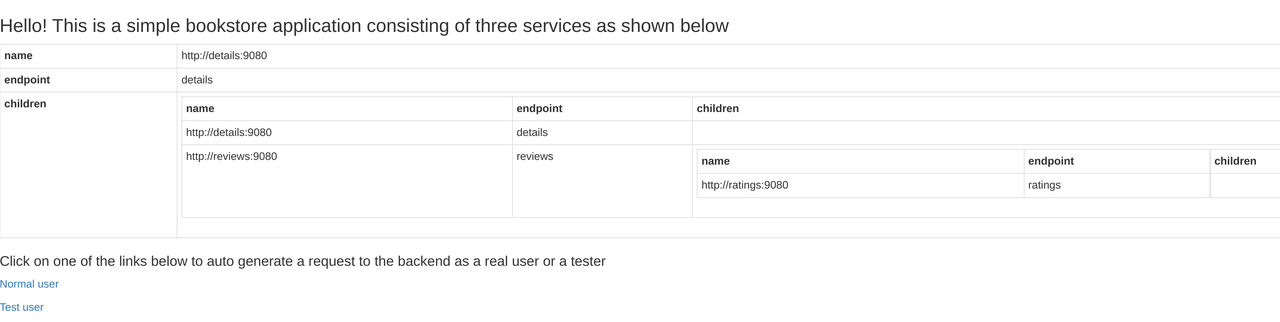
+Finally, set the Header of `HOST: apisix-istio.dev` in your browser and try to
make a request, you will get the correct page as shown below.
+
+
+
+## Visualization tool: Kiali
+
+Kiali is a tool that allows visualization of Istio and can be installed as an
Istio add-on.
+
+It is deployed here directly using the configuration files in the `addons`
directory carried by Istio.
+
+```bash
+(MoeLove) ➜ kubectl -n istio-system apply -f istio-1.12.1/samples/addons/
+serviceaccount/grafana created
+configmap/grafana created
+service/grafana created
+deployment.apps/grafana created
+configmap/istio-grafana-dashboards created
+configmap/istio-services-grafana-dashboards created
+deployment.apps/jaeger created
+service/tracing created
+service/zipkin created
+service/jaeger-collector created
+serviceaccount/kiali created
+configmap/kiali created
+clusterrole.rbac.authorization.k8s.io/kiali-viewer created
+clusterrole.rbac.authorization.k8s.io/kiali created
+clusterrolebinding.rbac.authorization.k8s.io/kiali created
+role.rbac.authorization.k8s.io/kiali-controlplane created
+rolebinding.rbac.authorization.k8s.io/kiali-controlplane created
+service/kiali created
+deployment.apps/kiali created
+serviceaccount/prometheus created
+configmap/prometheus created
+clusterrole.rbac.authorization.k8s.io/prometheus created
+clusterrolebinding.rbac.authorization.k8s.io/prometheus created
+service/prometheus created
+deployment.apps/prometheus created
+```
+
+Wait for the normal operation of Pod to view:
+
+```bash
+(MoeLove) ➜ kubectl -n istio-system get pods
+NAME READY STATUS RESTARTS AGE
+grafana-6ccd56f4b6-wq6k5 1/1 Running 0 2m12s
+istiod-58d79b7bff-g66cv 1/1 Running 0 42m
+jaeger-5d44bc5c5d-84ksf 1/1 Running 0 2m11s
+kiali-79b86ff5bc-w457g 1/1 Running 0 2m3s
+prometheus-64fd8ccd65-2mjcc 2/2 Running 0 2m9s
+```
+
+Next, execute the following command to port-forward Kiali and access it in the
browser. Of course, you can do the same thing with the above port-forward.
+
+```
+(MoeLove) ➜ istioctl dashboard kiali --address 0.0.0.0 --port 9999
--browser=false
+http://0.0.0.0:9999/kiali
+skipping opening a browser
+```
+
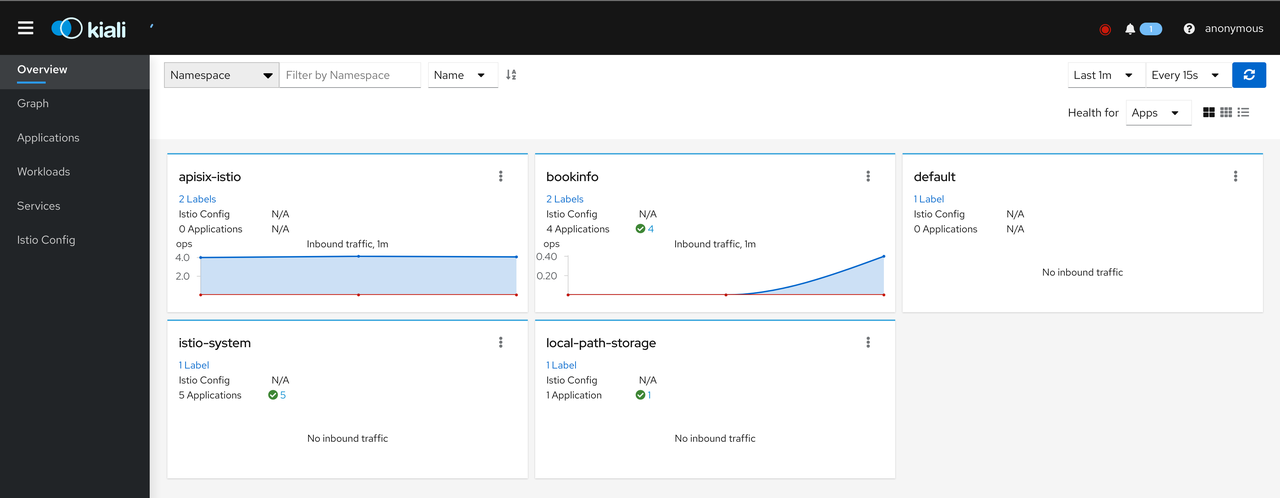
+Open `http://0.0.0.0:9999/kiali` in your browser and try to access the
BookInfo service via Apache APISIX several times to see the following results.
+
+
+
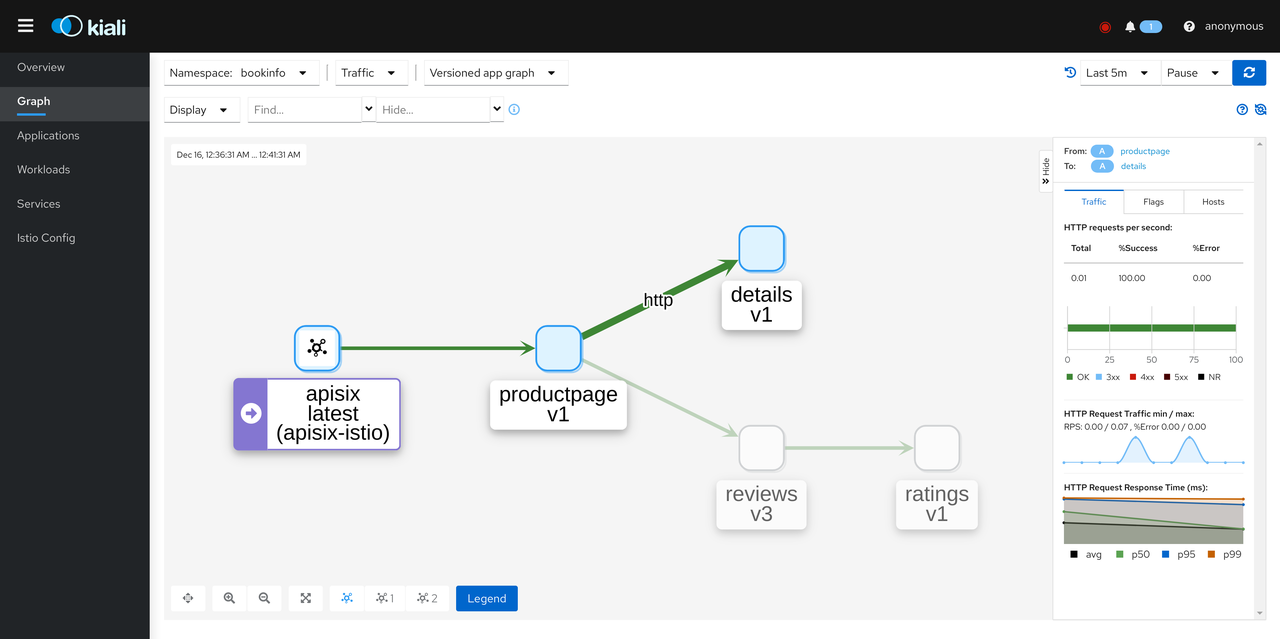
+Click Graph and select Namespace as BookInfo. During the test to access the
BookInfo application, you can see the effect shown below. You can see the
traffic coming in from the Apache APISIX and then flowing to the various
components of the application.
+
+
+
+This concludes the entire process. We have successfully exposed the services
in the Kubernetes cluster with Service Mesh enabled using Apache APISIX and
Apache APISIX Ingress Controller securely.
+
+## Summary
+
+This article shows you step-by-step how to use Istio Service Mesh and Apache
APISIX to expose the services in a Service Mesh-enabled Kubernetes cluster to
the outside of the cluster in a very detailed step-by-step manner. You can also
provide more security or traffic control through the rich plug-in capabilities
of Apache APISIX in the future.
+
+We hope that the above detailed tutorials will help you to more easily
integrate with solutions such as Istio when using Apache APISIX.
diff --git
a/website/i18n/zh/docusaurus-plugin-content-blog/2021/12/15/deploy-apisix-in-kubernetes.md
b/website/i18n/zh/docusaurus-plugin-content-blog/2021/12/15/deploy-apisix-in-kubernetes.md
index ce69d7e..159a496 100644
---
a/website/i18n/zh/docusaurus-plugin-content-blog/2021/12/15/deploy-apisix-in-kubernetes.md
+++
b/website/i18n/zh/docusaurus-plugin-content-blog/2021/12/15/deploy-apisix-in-kubernetes.md
@@ -88,7 +88,10 @@ kubectl port-forward service/apisix-admin 9080:9180
最后进行新建路由的验证环节。
由于在本文演示中使用了 Kind 来搭建本地 K8s 集群,`apisix-gateway` 的 NodePort
访问不了,所以在验证之前还需要额外一步,即将集群中的 `80` 端口转发到本机 `8080` 端口。
+
+```shell
kubectl port-forward service/apisix-gateway 8080:80
+```
开始进行验证。
diff --git
a/website/i18n/zh/docusaurus-plugin-content-blog/2021/12/17/exposure-istio-with-apisix-ingress.md
b/website/i18n/zh/docusaurus-plugin-content-blog/2021/12/17/exposure-istio-with-apisix-ingress.md
new file mode 100644
index 0000000..1db8878
--- /dev/null
+++
b/website/i18n/zh/docusaurus-plugin-content-blog/2021/12/17/exposure-istio-with-apisix-ingress.md
@@ -0,0 +1,408 @@
+---
+title: "利用 APISIX Ingress 实现 Istio 服务的安全暴露"
+authors:
+ - name: "张晋涛"
+ title: "Author"
+ url: "https://github.com/tao12345666333";
+ image_url: "https://avatars.githubusercontent.com/u/3264292?v=4";
+ - name: "苏钰"
+ title: "Technical Writer"
+ url: "https://github.com/SylviaBABY";
+ image_url: "https://avatars.githubusercontent.com/u/39793568?v=4";
+keywords:
+- Apache APISIX
+- Istio
+- Kubernetes
+- APISIX Ingress Controller
+- Service Mesh
+description: 本文将通过非常详细的操作步骤,向大家一步步地展示了如何使用 Istio Service Mesh 和 Apache
APISIX,将启用 Service Mesh 的 Kubernetes 集群中服务暴露至集群外。
+tags: [Technology]
+---
+
+> 本文将通过非常详细的操作步骤,向大家一步步地展示了如何使用 Istio Service Mesh 和 Apache APISIX,将启用 Service
Mesh 的 Kubernetes 集群中服务暴露至集群外。
+
+<!--truncate-->
+
+## Service Mesh 简介
+
+随着云原生技术的火热发展,Service Mesh 逐渐在微服务领域流行起来。当下 Service Mesh 比较流行的实现方案是
[Istio](https://istio.io/) 和 [Linkerd](https://linkerd.io/)。
+
+下图为 Service Mesh 示意图,通过引入 Sidecar Proxy 来完成微服务之间的互联及通信。
+
+
+
+通过上图我们可以看出 Service Mesh 比较侧重传统意义上的东西向流量,即服务间的流量。当我们将 Service Mesh 与 Kubernetes
配合使用时,东西向流量对应的则是 Kubernetes 集群内的流量。
+
+回到真实使用场景下,我们不会只接触到包含 Kubernetes 集群内的流量,大多数情况下都需要将一些服务暴露到集群外,供用户或其他服务使用。但将
Kubernetes 集群中的服务暴露到集群外时,我们就必须要考虑诸如安全性和可观测性等相关因素。
+
+接下来我们将通过使用 Istio Service Mesh 和 Apache APISIX,为大家演示如何将启用 Service Mesh 的
Kubernetes 集群中服务安全暴露至集群外。
+
+
+
+## 第一步:准备 Kubernetes 集群
+
+这里我们使用 [Kind](https://github.com/kubernetes-sigs/kind/) 在本地创建一个临时集群用于演示。关于如何通过
Kind
命令进行安装可参考[官方文档](https://kind.sigs.k8s.io/docs/user/quick-start/#installation)。
+
+以下为用于创建演示集群所使用的 yaml 配置文件,将其保存为 `kind-config.yaml`。
+
+```yaml
+kind: Cluster
+apiVersion: kind.x-k8s.io/v1alpha4
+nodes:
+- role: control-plane
+- role: worker
+- role: worker
+- role: worker
+```
+
+然后使用此配置文件创建一个集群。
+
+```bash
+(MoeLove) ➜ kind create cluster --config kind-config.yaml
+Creating cluster "kind" ...
+ ✓ Ensuring node image (kindest/node:v1.22.2) 🖼
+ ✓ Preparing nodes 📦 📦 📦 📦
+ ✓ Writing configuration 📜
+ ✓ Starting control-plane 🕹️
+ ✓ Installing CNI 🔌
+ ✓ Installing StorageClass 💾
+ ✓ Joining worker nodes 🚜
+Set kubectl context to "kind-kind"
+You can now use your cluster with:
+
+kubectl cluster-info --context kind-kind
+
+Not sure what to do next? 😅 Check out
https://kind.sigs.k8s.io/docs/user/quick-start/
+```
+
+## 第二步:部署 Istio
+
+在 Kubernetes 集群创建完毕后,我们来进行 Istio 的相关部署。
+
+这里先创建一个名为 `apisix-istio` 的目录,进入该目录后进行如下操作。
+
+```bash
+(MoeLove) ➜ mkdir apisix-istio
+(MoeLove) ➜ cd apisix-istio
+(MoeLove) ➜ curl -sL https://istio.io/downloadIstio | sh -
+
+Downloading istio-1.12.1 from
https://github.com/istio/istio/releases/download/1.12.1/istio-1.12.1-linux-amd64.tar.gz
...
+
+Istio 1.12.1 Download Complete!
+
+Istio has been successfully downloaded into the istio-1.12.1 folder on your
system.
+
+Next Steps:
+See https://istio.io/latest/docs/setup/install/ to add Istio to your
Kubernetes cluster.
+
+To configure the istioctl client tool for your workstation,
+add the /root/apisix-istio/istio-1.12.1/bin directory to your environment path
variable with:
+ export PATH="$PATH:/root/apisix-istio/istio-1.12.1/bin"
+
+Begin the Istio pre-installation check by running:
+ istioctl x precheck
+
+Need more information? Visit https://istio.io/latest/docs/setup/install/
+```
+
+上述操作执行完毕,会在当前目录下创建出一个新目录。我们可以按照以上命令的输出继续进行操作。
+
+```bash
+(MoeLove) ➜ ls
+istio-1.12.1
+(MoeLove) ➜ export PATH="$PATH:/root/apisix-istio/istio-1.12.1/bin"
+(MoeLove) ➜ istioctl x precheck
+✔ No issues found when checking the cluster. Istio is safe to install or
upgrade!
+ To get started, check out https://istio.io/latest/docs/setup/getting-started/
+```
+
+接下来开始进行真正的部署操作。将其设置 `--set profile=minimal` 进行最小化安装即可。
+
+```bash
+(MoeLove) ➜ istioctl install --set profile=minimal -y
+✔ Istio core
+installed
+
+✔ Istiod
+installed
+
+✔ Installation
+complete
+
+Making this installation the default for injection and validation.
+
+Thank you for installing Istio 1.12. Please take a few minutes to tell us
about your install/upgrade experience! https://forms.gle/FegQbc9UvePd4Z9z7
+```
+
+最后检查当前的部署状态,可以看到 Pod 已经在运行中了。
+
+```bash
+(MoeLove) ➜ kubectl -n istio-system get pods
+NAME READY STATUS RESTARTS AGE
+istiod-58d79b7bff-g66cv 1/1 Running 0 1m
+```
+
+## 第三步:部署 Apache APISIX
+
+接下来我们进行 Apache APISIX 的相关部署。
+
+首先创建名为 `apisix-istio` 的 Namespace 并开启自动注入。
+
+```bash
+(MoeLove) ➜ kubectl create ns apisix-istio
+namespace/apisix-istio created
+(MoeLove) ➜ kubectl label namespace apisix-istio istio-injection=enabled
+namespace/apisix-istio labeled
+```
+
+接下来添加 Helm Repo 并使用 Helm 进行 Apache APISIX 和 Apache APISIX Ingress Controller
的部署。
+
+```bash
+(MoeLove) ➜ helm repo add apisix https://charts.apiseven.com
+"apisix" has been added to your repositories
+(MoeLove) ➜ helm install apisix-istio apisix/apisix --set
gateway.type=NodePort --set ingress-controller.enabled=true --set
ingress-controller.config.apisix.serviceNamespace=apisix-istio --set
ingress-controller.config.apisix.serviceName=apisix-istio-admin --namespace
apisix-istio
+NAME: apisix-istio
+LAST DEPLOYED: Wed Dec 15 14:16:33 2021
+NAMESPACE: apisix-istio
+STATUS: deployed
+REVISION: 1
+TEST SUITE: None
+NOTES:
+1. Get the application URL by running these commands:
+ export NODE_PORT=$(kubectl get --namespace apisix-istio -o
jsonpath="{.spec.ports[0].nodePort}" services apisix-istio-gateway)
+ export NODE_IP=$(kubectl get nodes --namespace apisix-istio -o
jsonpath="{.items[0].status.addresses[0].address}")
+ echo http://$NODE_IP:$NODE_PORT
+```
+
+执行完上述命令后,可通过执行以下命令等待所有 Pod 均正常运行。
+
+```bash
+(MoeLove) ➜ kubectl -n apisix-istio wait --for=condition=Ready pods --all
+pod/apisix-istio-7bdfcb4bd9-89jcn condition met
+pod/apisix-istio-etcd-0 condition met
+pod/apisix-istio-etcd-1 condition met
+pod/apisix-istio-etcd-2 condition met
+pod/apisix-istio-ingress-controller-5fcbb75b8c-b4nnc condition met
+```
+
+可以看到当前 Pod 全部的已经正常运行了。接下来我们进行相关测试和验证。
+
+## 测试环节
+
+### 简单测试
+
+在之前使用 Helm 部署 Apache APISIX 时,我们将服务暴露方式选择为 `NodePort`,所以接下来就可以使用以下命令直接访问到
Apache APISIX。
+
+```bash
+(MoeLove) ➜ export NODE_PORT=$(kubectl get --namespace apisix-istio -o
jsonpath="{.spec.ports[0].nodePort}" services apisix-istio-gateway)
+(MoeLove) ➜ export NODE_IP=$(kubectl get nodes --namespace apisix-istio -o
jsonpath="{.items[0].status.addresses[0].address}")
+(MoeLove) ➜ curl http://$NODE_IP:$NODE_PORT
+{"error_msg":"404 Route Not Found"}
+```
+
+注意,在使用 `curl` 命令请求时我们增加一个 `-v` 选项,查看一下请求的响应头。
+
+```bash
+(MoeLove) ➜ curl -v http://$NODE_IP:$NODE_PORT
+* Rebuilt URL to: http://172.20.0.2:31225/
+* Trying 172.20.0.2...
+* TCP_NODELAY set
+* Connected to 172.20.0.2 (172.20.0.2) port 31225 (#0)
+> GET / HTTP/1.1
+> Host: 172.20.0.2:31225
+> User-Agent: curl/7.58.0
+> Accept: */*
+>
+< HTTP/1.1 404 Not Found
+< date: Wed, 15 Dec 2021 14:31:40 GMT
+< content-type: text/plain; charset=utf-8
+< server: istio-envoy
+< x-envoy-upstream-service-time: 1
+< x-envoy-decorator-operation:
apisix-istio-gateway.apisix-istio.svc.cluster.local:80/*
+< transfer-encoding: chunked
+<
+{"error_msg":"404 Route Not Found"}
+* Connection #0 to host 172.20.0.2 left intact
+```
+
+从上述的输出结果中可以看到,响应头中包含如下内容:
+
+```bash
+< server: istio-envoy
+< x-envoy-upstream-service-time: 1
+< x-envoy-decorator-operation:
apisix-istio-gateway.apisix-istio.svc.cluster.local:80/*
+```
+
+这说明 Istio 的自动注入已经成功,当前直接进行交互的并不是 Apache APISIX 而是 Istio 的 Sidecar。
+
+### BookInfo 部署测试
+
+接下来我们使用 Istio 自带的 BookInfo 示例程序进行相关测试验证。
+
+首先创建一个 Namespace,并开启 Istio 的自动注入。
+
+```bash
+(MoeLove) ➜ kubectl create ns bookinfo
+namespace/bookinfo created
+(MoeLove) ➜ kubectl label namespace bookinfo istio-injection=enabled
+namespace/bookinfo labeled
+```
+
+然后进行 BookInfo 部署,相关部署文件在上述安装 Istio 过程中会自动创建在目录中。
+
+```bash
+(MoeLove) ➜ kubectl -n bookinfo apply -f
istio-1.12.1/samples/bookinfo/platform/kube/bookinfo.yaml
+service/details created
+serviceaccount/bookinfo-details created
+deployment.apps/details-v1 created
+service/ratings created
+serviceaccount/bookinfo-ratings created
+deployment.apps/ratings-v1 created
+service/reviews created
+serviceaccount/bookinfo-reviews created`
+deployment.apps/reviews-v1 created
+deployment.apps/reviews-v2 created
+deployment.apps/reviews-v3 created
+service/productpage created
+serviceaccount/bookinfo-productpage created
+deployment.apps/productpage-v1 created
+```
+
+等待所有 Pod 正常运行。
+
+```bash
+(MoeLove) ➜ kubectl -n bookinfo get pods
+NAME READY STATUS RESTARTS AGE
+details-v1-96cf758d8-qr6p9 2/2 Running 0 64s
+productpage-v1-5f75dfbfb-22hcw 2/2 Running 0 64s
+ratings-v1-779dbc4fdd-jt5zp 2/2 Running 0 64s
+reviews-v1-ffbbf7fc8-kxvrr 2/2 Running 0 64s
+reviews-v2-54546c6f84-pnjkn 2/2 Running 0 64s
+reviews-v3-74d6bf84cd-h4r9z 2/2 Running 0 63s
+```
+
+现在我们可以使用 Apache APISIX 将服务暴露到 Kubernetes 集群外了。使用如下内容创建一条路由配置,保存为
`productpage-ar.yaml`。
+
+```yaml
+apiVersion: apisix.apache.org/v2beta2
+kind: ApisixRoute
+metadata:
+ name: productpage
+spec:
+ http:
+ - name: rule1
+ match:
+ hosts:
+ - apisix-istio.dev
+ paths:
+ - /*
+ backends:
+ - serviceName: productpage
+ servicePort: 9080
+```
+
+:::note 备注
+以上配置可理解为:创建一条路由,设置域名为 `apisix-istio.dev` 并将所有请求流量均转发至 `productpage` 服务的 `9080`
端口。
+:::
+
+然后创建此资源:
+
+```bash
+(MoeLove) ➜ kubectl -n bookinfo apply -f productpage-ar.yaml
+apisixroute.apisix.apache.org/productpage created
+```
+
+携带我们刚才配置的域名再次请求 Apache APISIX ,可以看到返回了 `200` 相关提示。
+
+```bash
+(MoeLove) ➜ curl -I -H "HOST: apisix-istio.dev" http://$NODE_IP:$NODE_PORT/
+HTTP/1.1 200 OK
+content-type: text/html; charset=utf-8
+content-length: 1683
+date: Wed, 15 Dec 2021 15:47:30 GMT
+x-envoy-upstream-service-time: 7
+server: istio-envoy
+x-envoy-decorator-operation:
apisix-istio-gateway.apisix-istio.svc.cluster.local:80/*
+```
+
+之后可以通过 `port-forward` 的方式将 Apache APISIX 端口暴露出来。
+
+```bash
+(MoeLove) ➜ kubectl -n apisix-istio port-forward --address 0.0.0.0
svc/apisix-istio-gateway 8080:80
+Forwarding from 0.0.0.0:8080 -> 9080
+```
+
+最后在浏览器中设置 `HOST: apisix-istio.dev` 的 Header 并尝试进行请求,就可以得到如下所示的正确页面了。
+
+
+
+## 可视化处理利器:Kiali
+
+Kiali 是一个可以对 Istio 进行可视化的工具,可作为 Istio add-on 进行安装。
+
+在这里直接使用 Istio 携带的 `addons` 目录中的配置文件进行部署。
+
+```bash
+(MoeLove) ➜ kubectl -n istio-system apply -f istio-1.12.1/samples/addons/
+serviceaccount/grafana created
+configmap/grafana created
+service/grafana created
+deployment.apps/grafana created
+configmap/istio-grafana-dashboards created
+configmap/istio-services-grafana-dashboards created
+deployment.apps/jaeger created
+service/tracing created
+service/zipkin created
+service/jaeger-collector created
+serviceaccount/kiali created
+configmap/kiali created
+clusterrole.rbac.authorization.k8s.io/kiali-viewer created
+clusterrole.rbac.authorization.k8s.io/kiali created
+clusterrolebinding.rbac.authorization.k8s.io/kiali created
+role.rbac.authorization.k8s.io/kiali-controlplane created
+rolebinding.rbac.authorization.k8s.io/kiali-controlplane created
+service/kiali created
+deployment.apps/kiali created
+serviceaccount/prometheus created
+configmap/prometheus created
+clusterrole.rbac.authorization.k8s.io/prometheus created
+clusterrolebinding.rbac.authorization.k8s.io/prometheus created
+service/prometheus created
+deployment.apps/prometheus created
+```
+
+等待 Pod 正常运行后查看:
+
+```bash
+(MoeLove) ➜ kubectl -n istio-system get pods
+NAME READY STATUS RESTARTS AGE
+grafana-6ccd56f4b6-wq6k5 1/1 Running 0 2m12s
+istiod-58d79b7bff-g66cv 1/1 Running 0 42m
+jaeger-5d44bc5c5d-84ksf 1/1 Running 0 2m11s
+kiali-79b86ff5bc-w457g 1/1 Running 0 2m3s
+prometheus-64fd8ccd65-2mjcc 2/2 Running 0 2m9s
+```
+
+接下来执行以下命令进行 Kiali 的端口转发并在浏览器中进行访问。当然使用上述 `port-forward` 的方式也是一样的。
+
+```
+(MoeLove) ➜ istioctl dashboard kiali --address 0.0.0.0 --port 9999
--browser=false
+http://0.0.0.0:9999/kiali
+skipping opening a browser
+```
+
+在浏览器中打开 `http://0.0.0.0:9999/kiali`,同时尝试多次通过 Apache APISIX 访问 BookInfo
服务,即可看到如下效果。
+
+
+
+点击 Graph ,将 Namespace 选择为 BookInfo。在测试访问 BookInfo 应用的过程中,可看到如下所示效果。可以看到流量从
Apache APISIX 进来,然后流向应用程序的各个组件。
+
+
+
+至此,全部流程结束。我们已经成功地使用 Apache APISIX 和 Apache APISIX Ingress Controller,将开启
Service Mesh 的 Kubernetes 集群中的服务安全地暴露出来了。
+
+## 总结
+
+本文通过非常详细的操作步骤,向大家一步步地展示了如何使用 Istio Service Mesh 和 Apache APISIX,将启用 Service
Mesh 的 Kubernetes 集群中服务暴露至集群外。后续也可以通过 Apache APISIX 丰富的插件能力提供更多安全防护或流量控制。
+
+希望通过以上的细节教学,可以帮助大家在使用 Apache APISIX 时更方便地实现与 Istio 等方案进行集成。