yzeng25 commented on a change in pull request #860:
URL: https://github.com/apache/apisix-website/pull/860#discussion_r792287644
########## File path: website/blog/2022/01/26/apisix-integrate-forward-auth-plugin.md ########## @@ -0,0 +1,102 @@ +--- +title: "Furward-auth, Another Choice for Authentication Function" +authors: + - name: "Zeping Bai" + title: "Author" + url: "https://github.com/bzp2010"; + image_url: "https://avatars.githubusercontent.com/u/8078418?v=4"; + - name: "Sylvia" + title: "Technical Writer" + url: "https://github.com/SylviaBABY"; + image_url: "https://avatars.githubusercontent.com/u/39793568?v=4"; +keywords: +- Apache APISIX +- Authentication +- Plugin +- Ecosystem +description: This article describes the use of `forward-auth`, a new plugin in Apache APISIX, and provides detailed instructions on how to use this cleanly designed authentication model. +tags: [Technology,Ecosystem,Authentication] +--- + +> This article describes the use of `forward-auth`, a new plugin in Apache APISIX, and provides detailed instructions on how to use this cleanly designed authentication model. + +<!--truncate--> + +Forward Auth cleverly moves the authentication and authorization logic to a dedicated external service, where the gateway forwards the user's request to the authentication service and blocks the original request and replaces the result when the authentication service responds with a non-20x status. In this way, it is possible to return a custom error or redirect the user to the authentication page if the authentication fails. + +## Principle + +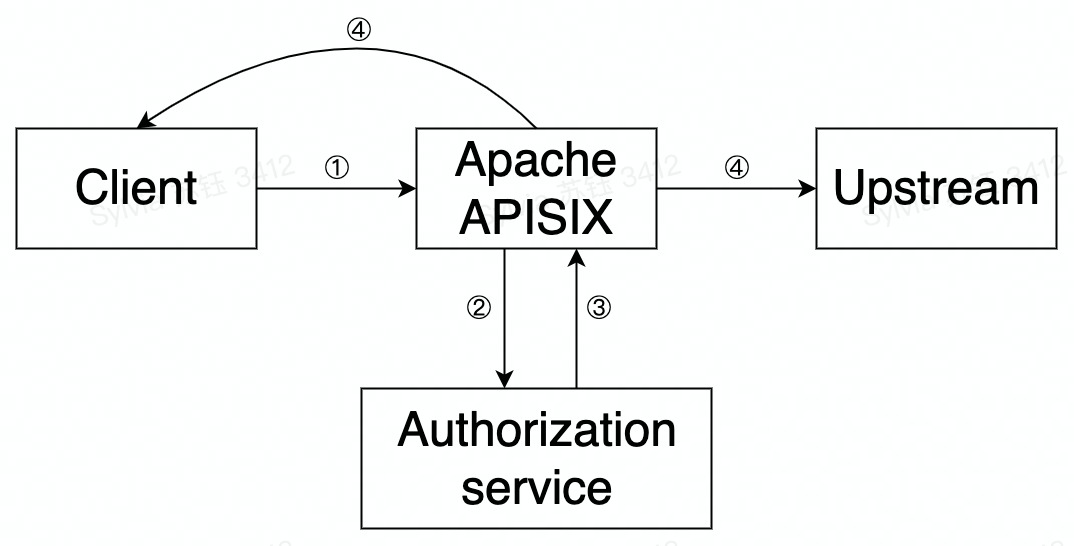 + +The principle and flow of the `forward-auth plugin` in Apache APISIX is shown in the figure above and is summarized in the following steps. + +- Step 1: A request is made by the client to APISIX +- Step 2: APISIX makes a request to the user-configured authentication service +- Step 3: The authentication service responds (2xx or exception status) +- Step 4: Based on the authentication service response, APISIX will decide to forward the request upstream or send a rejection response directly to the client + +## How to use + +### Step 1: Set up the authentication service + +Suppose there is an authentication service to which the user sends a request with an Authorization request header. If this data passes authentication, a 200 status code and a response header named `X-User-ID` are returned; if it does not pass authentication, the authentication status is considered expired and a 302 status code and `Location` response header are returned to redirect the client to the login page. + +### Step 2: Create a route and enable the `forward-auth` plugin + +Next, we will configure a route and enable the `forward-auth` plug-in to interface the above authentication service with the upstream application. Review comment: ```suggestion Next, we will configure a route and enable the `forward-auth` plugin to interface the above authentication service with the upstream application. ``` ########## File path: website/blog/2022/01/26/apisix-integrate-forward-auth-plugin.md ########## @@ -0,0 +1,102 @@ +--- +title: "Furward-auth, Another Choice for Authentication Function" Review comment: Forward ########## File path: website/blog/2022/01/26/apisix-integrate-forward-auth-plugin.md ########## @@ -0,0 +1,102 @@ +--- +title: "Furward-auth, Another Choice for Authentication Function" +authors: + - name: "Zeping Bai" + title: "Author" + url: "https://github.com/bzp2010"; + image_url: "https://avatars.githubusercontent.com/u/8078418?v=4"; + - name: "Sylvia" + title: "Technical Writer" + url: "https://github.com/SylviaBABY"; + image_url: "https://avatars.githubusercontent.com/u/39793568?v=4"; +keywords: +- Apache APISIX +- Authentication +- Plugin +- Ecosystem +description: This article describes the use of `forward-auth`, a new plugin in Apache APISIX, and provides detailed instructions on how to use this cleanly designed authentication model. +tags: [Technology,Ecosystem,Authentication] +--- + +> This article describes the use of `forward-auth`, a new plugin in Apache APISIX, and provides detailed instructions on how to use this cleanly designed authentication model. + +<!--truncate--> + +Forward Auth cleverly moves the authentication and authorization logic to a dedicated external service, where the gateway forwards the user's request to the authentication service and blocks the original request and replaces the result when the authentication service responds with a non-20x status. In this way, it is possible to return a custom error or redirect the user to the authentication page if the authentication fails. + +## Principle + + + +The principle and flow of the `forward-auth plugin` in Apache APISIX is shown in the figure above and is summarized in the following steps. + +- Step 1: A request is made by the client to APISIX +- Step 2: APISIX makes a request to the user-configured authentication service +- Step 3: The authentication service responds (2xx or exception status) +- Step 4: Based on the authentication service response, APISIX will decide to forward the request upstream or send a rejection response directly to the client + +## How to use + +### Step 1: Set up the authentication service + +Suppose there is an authentication service to which the user sends a request with an Authorization request header. If this data passes authentication, a 200 status code and a response header named `X-User-ID` are returned; if it does not pass authentication, the authentication status is considered expired and a 302 status code and `Location` response header are returned to redirect the client to the login page. + +### Step 2: Create a route and enable the `forward-auth` plugin + +Next, we will configure a route and enable the `forward-auth` plug-in to interface the above authentication service with the upstream application. + +```shell +curl http://127.0.0.1:9080/apisix/admin/routes/1 -H 'X-API-KEY: edd1c9f034335f136f87ad84b625c8f1' -X PUT -d ' +{ + "plugins": { + "forward-auth": { + "address": "http://127.0.0.1:9080/auth";, + "request_headers": ["Authorization"], + "upstream_headers": ["X-User-ID"], + "client_headers": ["Location"] + } + }, + "uri": "/user" +}' +``` + +The above configuration details are explained. + +- When a request matches the current route, a request is sent to the `address` in address with the request header Authorization defined in `request_headers` (i.e., the request header configured to be forwarded by the client to the authentication service, if not set, no request header is forwarded), whereby the authentication service can confirm the user's identity. +- If the authentication passes, the status code is 200 and returns an `X-User-ID` as defined in `upstream_headers` (i.e. the request header to be forwarded upstream by the authentication service when the authentication passes, if not set, no request header is forwarded). +- If authentication fails, the status code is 302 and returns a `Location` as defined in `client_headers` (i.e., the response header sent by the authentication service to the client if authentication fails, or no response header if it is not set). + +### Step 3: Test Requests + +```shell +# Request and send data using POST +curl http://127.0.0.1:9080/user \ + --header 'Authorization: true' + +HTTP/1.1 200 OK +Content-Type: application/json +Content-Length: 28 +Server: APISIX/2.11.0 + +{"user_id":"i-am-real-user"} + +# Request using GET +curl -i http://127.0.0.1:9080/user \ + --header 'Authorization: false' + +HTTP/1.1 302 FOUND +Server: APISIX/2.11.0 +Location: https://example.com/auth +``` + +### Addendum: Disable the plugin + +If you have finished using the Forward Auth plug-in, simply remove the `forward-auth` plug-in configuration from the route configuration and save it to turn off the Forward Auth plug-in on the route. + +Thanks to the dynamic nature of Apache APISIX, there is no need to restart Apache APISIX to turn the plug-in on and off. Review comment: ```suggestion If you have finished using the Forward Auth plugin, simply remove the `forward-auth` plugin configuration from the route configuration and save it to turn off the Forward Auth plugin on the route. Thanks to the dynamic nature of Apache APISIX, there is no need to restart Apache APISIX to turn the plugin on and off. ``` ########## File path: website/i18n/zh/docusaurus-plugin-content-blog/2022/01/26/apisix-integrate-forward-auth-plugin.md ########## @@ -0,0 +1,100 @@ +--- +title: "新插件 forward-auth 已上线,认证功能又多一项选择" +authors: + - name: "白泽平" + title: "Author" + url: "https://github.com/bzp2010"; + image_url: "https://avatars.githubusercontent.com/u/8078418?v=4"; + - name: "苏钰" + title: "Technical Writer" + url: "https://github.com/SylviaBABY"; + image_url: "https://avatars.githubusercontent.com/u/39793568?v=4"; +keywords: +- Apache APISIX +- 认证 +- 插件 +- 生态 +description: 本文将介绍 Apache APISIX 中新增插件 `forward-auth` 的使用方法,为大家详细说明如何使用这款设计简洁的认证模型。 +tags: [Technology,Ecosystem,Authentication] +--- + +> 本文将介绍 Apache APISIX 中新增插件 `forward-auth` 的使用方法,为大家详细说明如何使用这款设计简洁的认证模型。 + +<!--truncate--> + +Forward Auth 能巧妙地将认证与授权逻辑转移至专门的外部服务中,网关会将用户的请求转发至认证服务中,并在认证服务响应非 20x 状态时,阻止原有请求并替换结果。通过这样的方式,就可以实现认证未通过时,返回自定义报错或用户重定向至认证页面。接下来将为大家介绍 Apache APISIX 中新增插件 `forward-auth` 的使用方法。 + +## 原理 + + + +关于 forward-auth 插件在 Apache APISIX 中的运行原理与流程如上图所示,具体总结为以下几步: Review comment: ```suggestion 关于 `forward-auth` 插件在 Apache APISIX 中的运行原理与流程如上图所示,具体总结为以下几步: ``` -- This is an automated message from the Apache Git Service. To respond to the message, please log on to GitHub and use the URL above to go to the specific comment. To unsubscribe, e-mail: [email protected] For queries about this service, please contact Infrastructure at: [email protected]