This is an automated email from the ASF dual-hosted git repository.

juzhiyuan pushed a commit to branch master
in repository https://gitbox.apache.org/repos/asf/apisix-website.git
The following commit(s) were added to refs/heads/master by this push:
new e3399f5 docs: add csrf blog (#900)
e3399f5 is described below
commit e3399f5e7d255f70063578f32d3149f284196bda
Author: yilinzeng <[email protected]>
AuthorDate: Thu Feb 24 11:16:16 2022 +0800
docs: add csrf blog (#900)
---
website/blog/2022/02/23/csrf.md | 144 +++++++++++++++++++++
.../2022/02/23/csrf.md | 144 +++++++++++++++++++++
2 files changed, 288 insertions(+)
diff --git a/website/blog/2022/02/23/csrf.md b/website/blog/2022/02/23/csrf.md
new file mode 100644
index 0000000..6afd7da
--- /dev/null
+++ b/website/blog/2022/02/23/csrf.md
@@ -0,0 +1,144 @@
+---
+title: "Apache APISIX Enhances API Security by CSRF Plugin"
+authors:
+ - name: "Yuan Bao"
+ title: "Author"
+ url: "https://github.com/Baoyuantop";
+ image_url: "https://github.com/Baoyuantop.png";
+ - name: "Yilin Zeng"
+ title: "Technical Writer"
+ url: "https://github.com/yzeng25";
+ image_url: "https://github.com/yzeng25.png";
+keywords:
+- Apache APISIX
+- API Security
+- cross-site request forgery
+- CSRF Attack
+description: This article introduces `csrf`, the CSRF security plugin for
Apache APISIX, and details how to secure your API information in Apache APISIX
with the help of the `csrf` plugin.
+tags: [Technology,Ecosystem]
+---
+
+> This article introduces `csrf`, the CSRF security plugin for Apache APISIX,
and details how to secure your API information in Apache APISIX with the help
of the `csrf` plugin.
+
+<!--truncate-->
+
+The key point of launching a cross-site request forgery attack is to make the
target server unable to distinguish whether the source of many requests is a
real user or an attacker. The general flow of the attack is that first the
attacker will lure the user to navigate to a web page provided by the attacker.
This page contains a request that is automatically sent to the target server.
The page then loads normally and the request is automatically sent to the
server. It appears to the serv [...]
+
+This article introduces `csrf`, the CSRF security plugin for Apache APISIX,
and details how to secure your API information in Apache APISIX with the help
of the `csrf` plugin.
+
+## Plugin Introduction
+
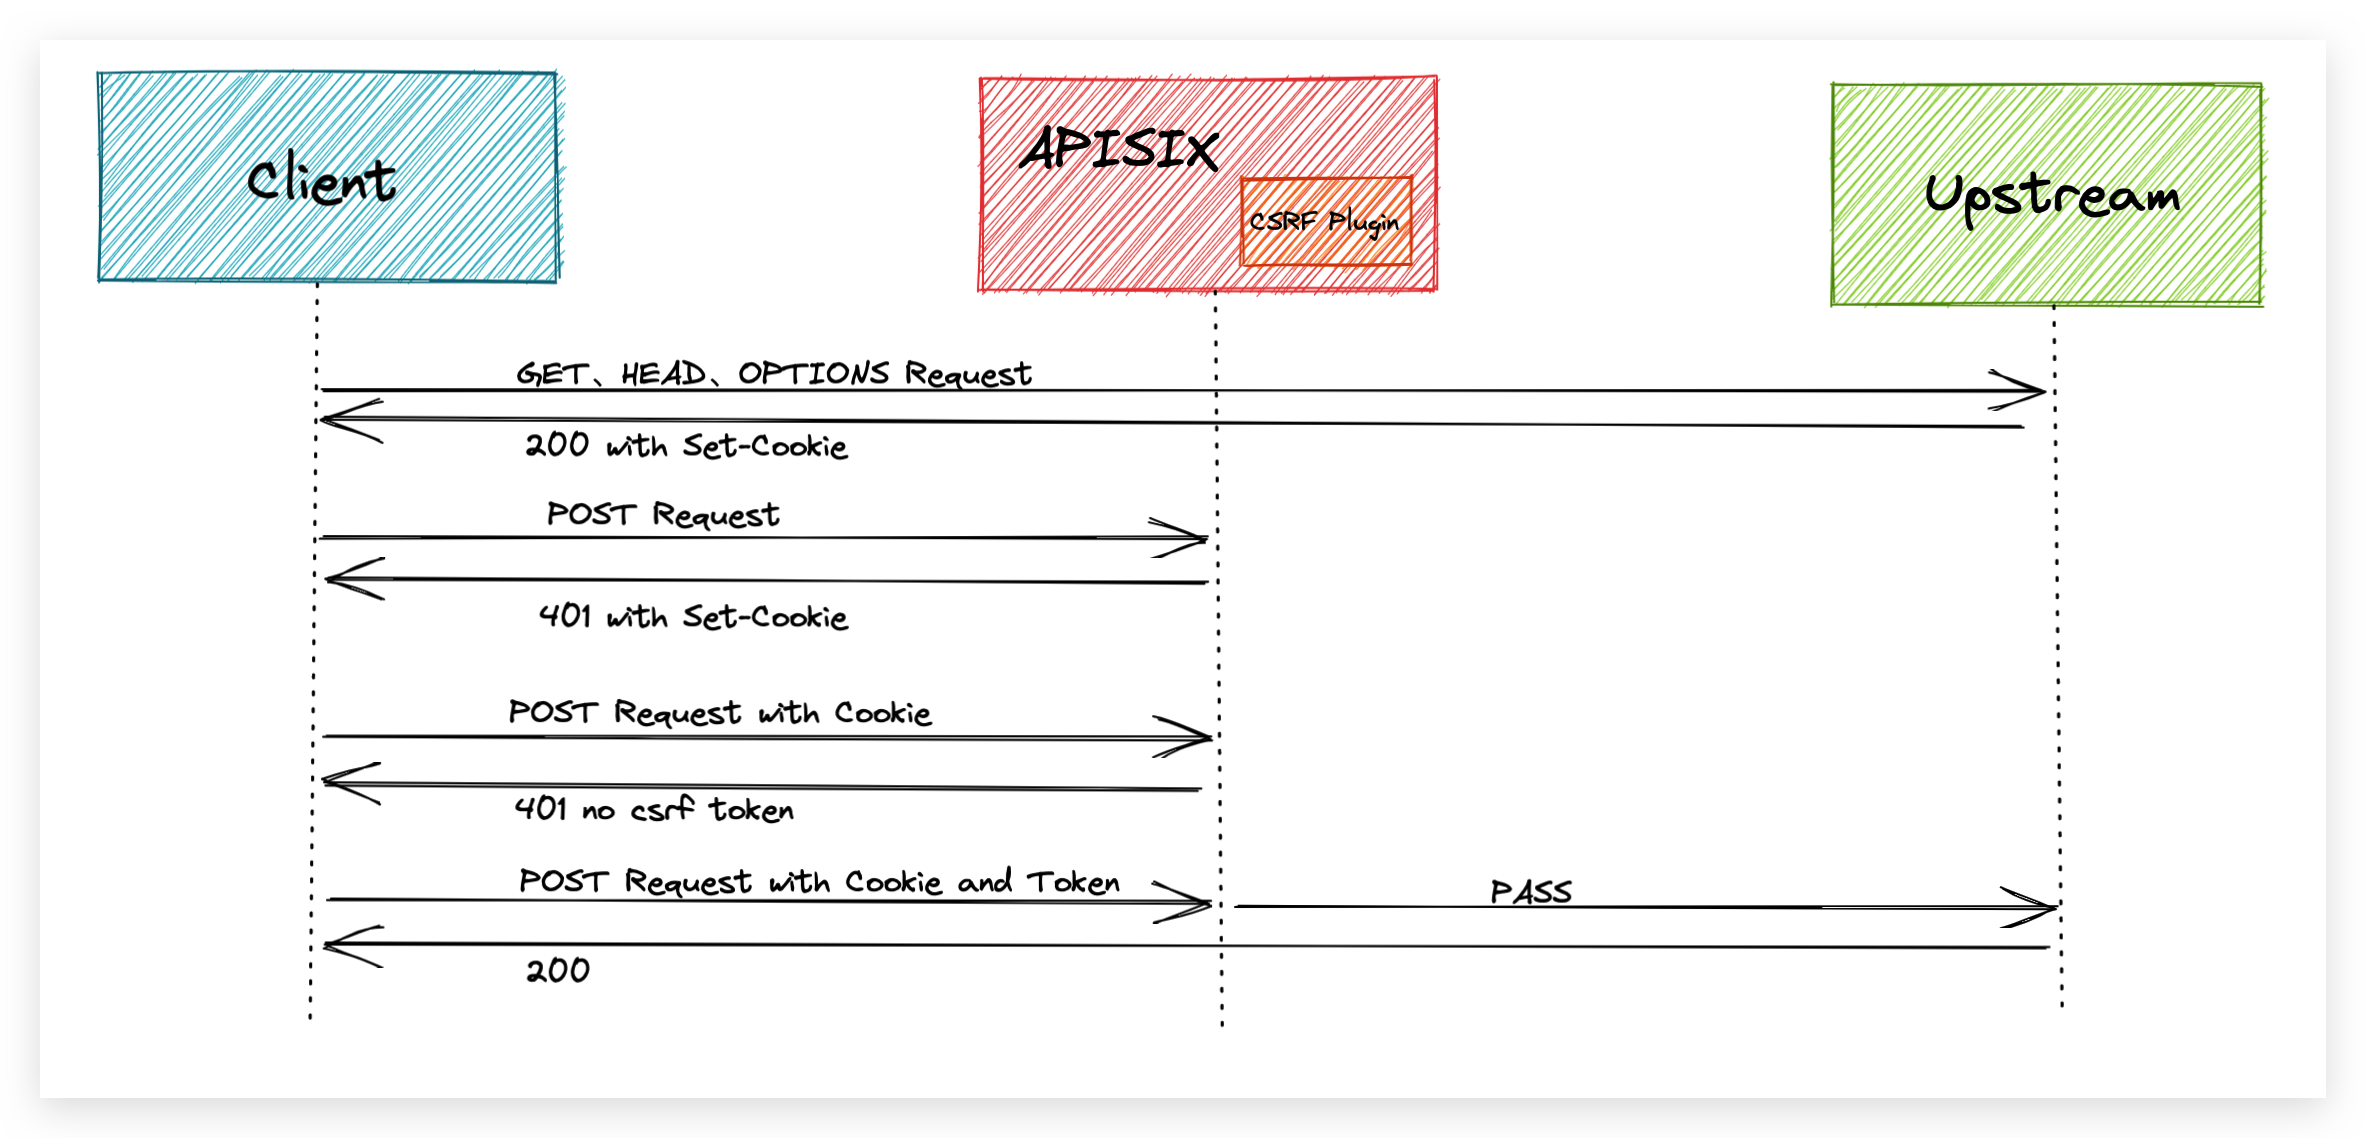
+The `csrf` plugin is implemented based on the `Double Submit Cookie` scheme.
As defined in [RFC
7231#section-4.2.1](https://datatracker.ietf.org/doc/html/rfc7231.html#section-4.2.1),
we consider the `GET`, `HEAD` and `OPTIONS` methods as **secure methods**.
According to this convention, the `csrf` plug-in will let these three methods
go directly, but will check the other methods and intercept any unsafe requests.
+
+To defend against CSRF attacks, we need to create a token or identifier that
cannot be forged and ensure that this is not sent with the attacker's request.
The user needs to carry the token that the `csrf` plugin relies on in the
request header, and the token is computed using a key for signing. This ensures
that the token cannot be forged by others, thus securing the API.
+
+
+
+When the `csrf` plugin is enabled in a route, all request responses to that
route will contain a Cookie carrying a `csrf token`.
+
+The user needs to carry this Cookie in an insecure request for this route and
add an additional field in the request header to carry the content of the
cookie. The field is the `name` value in the plugin configuration so that the
request passes the CSRF plugin's checks.
+
+The user provides a random key in the plugin's configuration, which is used by
the plugin to encrypt the token information with a sha256 hash and generate a
CSRF token, thus ensuring that the token cannot be forged.
+
+## How to Use the Plugin
+
+### Enable CSRF Plugin in a Route
+
+Create a route in APISIX using the Admin API and enable the csrf plugin.
+
+```shell
+curl -i http://127.0.0.1:9080/apisix/admin/routes/1 -H 'X-API-KEY:
edd1c9f034335f136f87ad84b625c8f1' -X PUT -d '
+{
+ "uri": "/hello",
+ "plugins": {
+ "csrf": {
+ "key": "edd1c9f034335f136f87ad84b625c8f1"
+ }
+ },
+ "upstream": {
+ "type": "roundrobin",
+ "nodes": {
+ "127.0.0.1:9001": 1
+ }
+ }
+}'
+```
+
+There are three configuration parameters for the plugin.
+
+- `key`: Required field, the value of the random secret key. The user needs to
provide a random key.
+- `expires`: Optional, the expiration time of the random secret key, the
default value is 7200 seconds. Since the CSRF token is sent to the client using
a Cookie, this configuration is placed in the Cookie's configuration to control
the Cookie's expiration time. In addition, the plugin will also calculate the
time to determine whether the token expires.
+- `name`: Optional, the name of the CSRF token, the default value is
`apisix-csrf-token`.
+
+### Send a Request
+
+The route is first accessed using a `POST` request.
+
+```shell
+curl -i http://127.0.0.1:9080/hello -X POST
+```
+
+Apache APISIX will intercept the request and return a `401` error. In the
returned header you will find a Cookie set, which should be the default value
`apisix-csrf-token=....` inside the Cookie if the name field of the plugin is
not configured . This is the CSRF token generated by the CSRF plugin. In the
request, you need to make sure that the request carries this Cookie and that
the token is written in the request header.
+
+```shell
+HTTP/1.1 401 Unauthorized
+Set-Cookie: apisix-csrf-token= ${apisix-csrf-token};path=/;Expires=Mon,
13-Dec-21 09:33:55 GMT
+{"error_msg":"no csrf token in headers"}
+```
+
+Example of using JavaScript on the client side: reading Cookies using
`js-cookie` and sending requests using `axios`.
+
+```JavaScript
+const token = Cookie.get('apisix-csrf-token');
+
+const instance = axios.create({
+ headers: {'apisix-csrf-token': token}
+});
+```
+
+If the token in the Cookie does not match the token in the request header, the
request will be intercepted by the `csrf` plugin, as shown in the following
example.
+
+```shell
+curl -i http://127.0.0.1:9080/hello -X POST -H 'apisix-csrf-token:
${apisix-csrf-token}' -b 'apisix-csrf-token= ${apisix-csrf-token}'
+```
+
+```shell
+HTTP/1.1 401 Unauthorized
+Set-Cookie: apisix-csrf-token= ${apisix-csrf-token};path=/;Expires=Mon,
13-Dec-21 09:33:55 GMT
+{"error_msg":"csrf token mismatch"}
+```
+
+Finally, use `curl` to verify regular access.
+
+```shell
+curl -i http://127.0.0.1:9080/hello -X POST -H 'apisix-csrf-token:
${apisix-csrf-token}' -b 'apisix-csrf-token= ${apisix-csrf-token}'
+```
+
+```shell
+HTTP/1.1 200 OK
+```
+
+Internally, the plugin needs to verify that the token in the Cookie matches
the token carried in the request header and recalculate the signature to verify
that the token is valid.
+
+### Disable the Plugin
+
+Remove the relevant configuration information for the `csrf` plugin and then
send a request to update the route to deactivate the plugin.
+
+```shell
+curl http://127.0.0.1:9080/apisix/admin/routes/1 -H 'X-API-KEY:
edd1c9f034335f136f87ad84b625c8f1' -X PUT -d '
+{
+ "uri": "/hello",
+ "upstream": {
+ "type": "roundrobin",
+ "nodes": {
+ "127.0.0.1:1980": 1
+ }
+ }
+}'
+```
+
+## Summary
+
+This article describes in detail how the `csrf` plugin works and how to use
it. We hope that this article can give you a clearer understanding of using the
plugin to intercept CSRF attacks in Apache APISIX and facilitate its
application in practical scenarios.
+
+Apache APISIX is also currently working on additional plugins to support the
integration of additional services, so if you are interested, feel free to
start a discussion in [GitHub
Discussion](https://github.com/apache/apisix/discussions), or via the [mailing
list](https://apisix.apache.org/zh/docs/general/subscribe-guide) to communicate.
diff --git a/website/i18n/zh/docusaurus-plugin-content-blog/2022/02/23/csrf.md
b/website/i18n/zh/docusaurus-plugin-content-blog/2022/02/23/csrf.md
new file mode 100644
index 0000000..7c69bfe
--- /dev/null
+++ b/website/i18n/zh/docusaurus-plugin-content-blog/2022/02/23/csrf.md
@@ -0,0 +1,144 @@
+---
+title: "如何使用 Apache APISIX CSRF 安全插件拦截跨站点伪造攻击"
+authors:
+ - name: "暴渊"
+ title: "Author"
+ url: "https://github.com/Baoyuantop";
+ image_url: "https://github.com/Baoyuantop.png";
+ - name: "曾奕霖"
+ title: "Technical Writer"
+ url: "https://github.com/yzeng25";
+ image_url: "https://github.com/yzeng25.png";
+keywords:
+- Apache APISIX
+- API 安全
+- 伪造跨站点请求
+- 跨站点请求攻击
+description: 本文介绍了 Apache APISIX 的 CSRF 安全插件 `csrf`,并详细说明如何在 Apache APISIX 中借助
`csrf` 插件来保护您的 API 信息安全。
+tags: [Technology,Ecosystem]
+---
+
+> 本文介绍了 Apache APISIX 的 CSRF 安全插件 `csrf`,并详细说明如何在 Apache APISIX 中借助 `csrf`
插件来保护您的 API 信息安全。
+
+<!--truncate-->
+
+CSRF(Cross-Site Request
Forgery),即跨站点请求伪造。发起跨站点请求伪造攻击的关键点在于让目标服务器无法分辨众多请求的来源是真实用户还是攻击者。攻击的一般流程为:首先攻击者会诱导用户导航至攻击者提供的网页上。该网页包含一个自动发送到目标服务器的请求。然后该网页正常加载,这个请求就会自动发送至服务器。在服务器看来,这个请求和用户正常发送的请求一模一样,殊不知这是由攻击者发起,而用户却毫不知情。由于该请求携带了用户的一些凭据,攻击者通过解析这些凭据,就可以获取用户信息,进而产生安全风险。
+
+本文介绍了 Apache APISIX 的 CSRF 安全插件 `csrf`,并详细说明如何在 Apache APISIX 中借助 `csrf`
插件来保护您的 API 信息安全。
+
+## 插件介绍
+
+`csrf` 插件基于 `Double Submit Cookie` 方案实现。根据 [RFC
7231#section-4.2.1](https://datatracker.ietf.org/doc/html/rfc7231.html#section-4.2.1)
的定义,我们把 `GET`、`HEAD` 和 `OPTIONS` 这三种方法称为安全方法。按照这一约定,`csrf`
插件会直接放行这三种方法,但会对其他的方法做检查并拦截其中的不安全请求。
+
+为了抵御 CSRF 攻击,我们需要制造一个无法伪造的令牌或标识符,并且保证这个不会与攻击者的请求一起发送。用户需要将 `csrf` 插件依赖的 token
携带在请求头,token 使用密钥进行签名计算。这样就保证了 token 无法被他人伪造,从而保证了 API 的安全。
+
+
+
+在路由中开启 `csrf` 插件后,访问该路由的所有请求响应中都会包含携带了 `csrf token` 的 Cookie。
+
+用户需要在对该路由的不安全请求中携带这一 Cookie,并在请求头添加额外的字段用来携带 Cookie 的内容。字段为插件配置中的 `name`
值,这样的请求才能通过 CSRF 插件的校验。
+
+用户在插件的配置中提供一个随机密钥,插件使用该密钥对 token 信息进行 sha256 哈希加密,然后生成 CSRF token,从而保证该 token
不可伪造。
+
+## 如何使用
+
+### 配置开启 CSRF 插件的路由
+
+在 APISIX 中使用 Admin API 创建一条路由并启用 `csrf` 插件:
+
+```shell
+curl -i http://127.0.0.1:9080/apisix/admin/routes/1 -H 'X-API-KEY:
edd1c9f034335f136f87ad84b625c8f1' -X PUT -d '
+{
+ "uri": "/hello",
+ "plugins": {
+ "csrf": {
+ "key": "edd1c9f034335f136f87ad84b625c8f1"
+ }
+ },
+ "upstream": {
+ "type": "roundrobin",
+ "nodes": {
+ "127.0.0.1:9001": 1
+ }
+ }
+}'
+```
+
+其中对于插件有三个配置项:
+
+- `key`:必填项,随机秘钥的值。用户需要提供一个随机密钥。
+- `expires`:选填项,随机秘钥的过期时间,默认值为 7200 秒。由于 CSRF token 使用 Cookie 下发至客户端,该配置会被放置在
Cookie 的配置中,从而控制 Cookie 的过期时间。另外在插件内部也会计算时间来判断 token 是否过期。
+- `name`:选填项, CSRF token 的名称,默认值为 `apisix-csrf-token`。
+
+### 发送请求测试
+
+首先使用 `POST` 请求访问该路由:
+
+```shell
+curl -i http://127.0.0.1:9080/hello -X POST
+```
+
+Apache APISIX 会拦截该请求并返回 `401` 错误。在返回的头部中会发现设置了一个 Cookie,如果没有配置插件的 `name`
字段的话,Cookie 内部应该为默认值 `apisix-csrf-token=....` 。这就是 CSRF 插件生成的 CSRF
token。在请求中,需要确保请求携带该 Cookie 并且在请求头写入该 token。
+
+```shell
+HTTP/1.1 401 Unauthorized
+Set-Cookie: apisix-csrf-token= ${apisix-csrf-token};path=/;Expires=Mon,
13-Dec-21 09:33:55 GMT
+{"error_msg":"no csrf token in headers"}
+```
+
+客户端使用 JavaScript 示例:使用 `js-cookie` 读取 Cookie 并使用 `axios` 发送请求。
+
+```js
+const token = Cookie.get('apisix-csrf-token');
+
+const instance = axios.create({
+ headers: {'apisix-csrf-token': token}
+});
+```
+
+如果 Cookie 中的 token 和请求头中的 token 不一致,请求会被 `csrf` 插件拦截,示例如下:
+
+```shell
+curl -i http://127.0.0.1:9080/hello -X POST -H 'apisix-csrf-token:
${apisix-csrf-token}' -b 'apisix-csrf-token= ${apisix-csrf-token}'
+```
+
+```shell
+HTTP/1.1 401 Unauthorized
+Set-Cookie: apisix-csrf-token= ${apisix-csrf-token};path=/;Expires=Mon,
13-Dec-21 09:33:55 GMT
+{"error_msg":"csrf token mismatch"}
+```
+
+最后使用 `curl` 验证正常的访问:
+
+```shell
+curl -i http://127.0.0.1:9080/hello -X POST -H 'apisix-csrf-token:
${apisix-csrf-token}' -b 'apisix-csrf-token= ${apisix-csrf-token}'
+```
+
+```shell
+HTTP/1.1 200 OK
+```
+
+插件在内部需要校验 Cookie 中的 token 与 请求头中携带 token 的是否一致,并对其进行重新计算签名来验证该 token 是否有效。
+
+### 禁用插件
+
+移除 `csrf` 插件的相关配置信息,然后发送一个更新路由的请求,即可停用该插件。
+
+```shell
+curl http://127.0.0.1:9080/apisix/admin/routes/1 -H 'X-API-KEY:
edd1c9f034335f136f87ad84b625c8f1' -X PUT -d '
+{
+ "uri": "/hello",
+ "upstream": {
+ "type": "roundrobin",
+ "nodes": {
+ "127.0.0.1:1980": 1
+ }
+ }
+}'
+```
+
+## 总结
+
+本文详细描述了 `csrf` 插件的工作方式以及使用方法,希望通过本文可以让大家对在 Apache APISIX 中使用插件拦截 CSRF
攻击有更清晰的认识,方便在实际场景中应用。
+
+Apache APISIX 项目目前正在开发其他插件以支持集成更多服务,如果您对此有兴趣,您可以通过 [GitHub
Discussions](https://github.com/apache/apisix/discussions)
发起讨论,或通过[邮件列表](https://apisix.apache.org/docs/general/subscribe-guide)进行交流.