This is an automated email from the ASF dual-hosted git repository.

spacewander pushed a commit to branch master
in repository https://gitbox.apache.org/repos/asf/apisix.git
The following commit(s) were added to refs/heads/master by this push:
new df17bbbd4 docs: update "Getting started" guide (#6929)
df17bbbd4 is described below
commit df17bbbd41049434216b21b388c783926aab499a
Author: Navendu Pottekkat <[email protected]>
AuthorDate: Fri Apr 29 11:49:16 2022 +0530
docs: update "Getting started" guide (#6929)
Signed-off-by: Navendu Pottekkat <[email protected]>
---
docs/assets/images/create-a-route.png | Bin 0 -> 360565 bytes
docs/assets/images/list-of-routes.png | Bin 0 -> 407723 bytes
docs/en/latest/getting-started.md | 318 +++++++++++++---------------------
3 files changed, 118 insertions(+), 200 deletions(-)
diff --git a/docs/assets/images/create-a-route.png
b/docs/assets/images/create-a-route.png
new file mode 100644
index 000000000..d89c2aff9
Binary files /dev/null and b/docs/assets/images/create-a-route.png differ
diff --git a/docs/assets/images/list-of-routes.png
b/docs/assets/images/list-of-routes.png
new file mode 100644
index 000000000..891dff15d
Binary files /dev/null and b/docs/assets/images/list-of-routes.png differ
diff --git a/docs/en/latest/getting-started.md
b/docs/en/latest/getting-started.md
index e59737f23..6973d739a 100644
--- a/docs/en/latest/getting-started.md
+++ b/docs/en/latest/getting-started.md
@@ -1,5 +1,9 @@
---
-title: Getting Started
+title: Getting started
+keywords:
+ - APISIX
+ - Getting Started
+description: This document walks you through how you can get started with
Apache APISIX.
---
<!--
@@ -21,60 +25,58 @@ title: Getting Started
#
-->
-## What is an API Gateway?
+import Tabs from '@theme/Tabs';
+import TabItem from '@theme/TabItem';
-An [API gateway](https://microservices.io/patterns/apigateway.html) is an API
management tool that acts as a mid layer service between a client and a number
backend services. Typically, the API gateway receives the clients requests and
processes it by summoning multiple microservices, aggregating the services and
returning the appropriate results.
+The guide walks you through the concepts, features and how you can get started
with Apache APISIX.
-## What is Apache APISIX?
-
-An [API gateway](https://microservices.io/patterns/apigateway.html) is an API
management tool that acts as a mid-layer service between a client and a number
of backend services. Typically, the API gateway receives the client's requests
and processes them by summoning multiple microservices, aggregating the
services, and returning the appropriate results.
-
-## What is Apache APISIX
+You will learn:
-Apache APISIX is an open-source, dynamic and high-performance cloud-native API
gateway that delivers the ultimate performance for all your APIs and
microservices. Think of APISIX as a service bus that connects APIs and
microservices in your cloud-native architecture.
-Apache APISIX facilitates interface traffic handling for Websites, Mobile and
IoT applications by providing services such as load balancing, dynamic
upstream, grayscale publishing, refined routing, current and speed limiting,
and many more.
+- What Apache APISIX is.
+- Architecture and key concepts of APISIX.
+- How to install and run APISIX in Docker.
+- How to create your first Route and configure an Upstream using Admin API.
+- How to use APISIX dashboard.
+- Where you can reach out for help.
-### The problem APISIX solves?
+## What is Apache APISIX?
- - Help enterprises to solve the difficulties in the transformation of
traditional monolithic architecture, so as to achieve rapid iteration of
business and products.
- - Apache APISIX replaces NGINX and handles traditional north-south traffic.
It also replaces Envoy to handle east-west traffic between services.
- - Handles Layer 4 and Layer 7 traffic: HTTP, HTTPs, TCP, UDP, MQTT, Dubbo,
gRPC, etc.
- - It can also be used as a [K8s ingress
controller](https://github.com/apache/apisix-ingress-controller).
- - Use IdP plugin as Zero-Trust gateway
- - Easy to use: APISIX also consists of a built-in low-code dashboard that
offers a powerful and flexible interface. You can write your own custom plugins
or use custom load balancing algorithms.
+Apache APISIX is an open source, dynamic, scalable, and high-performance cloud
native API gateway for all your APIs and microservices.
-## Features
+APISIX facilitates interface traffic handling for websites, mobile and IoT
applications by providing services such as load balancing, dynamic upstream,
canary release, fine-grained routing, rate limiting, and many more.
-Apache APISIX not only covers the traditional functions of NGINX, but also
deeply cooperates with different observability platforms, which greatly
improves service governance capabilities. Other characteristics of the Apache
APISIX gateway includes:
+### Features
- - Multi-Platform Support:
- APISIX is a cloud native, open source API gateway. You can run APISIX from
bare-metal to Kubernetes. Since APISIX supports ARM64, it avoids the lock-in
challenge of the infrastructure technology. It also provides integration to
cloud providers like AWS Lambda, Azure Functions, Lua functions and Apache
OpenWhisk.
+- Multi-platform support: APISIX can run from bare-metal machines to
Kubernetes providing a vendor neutral, multi-platform solution. It also
provides integration to cloud services like AWS Lambda, Azure Function, Lua
functions and Apache OpenWhisk.
+- Fully dynamic: APISIX supports hot-reloading, meaning you don't need to
restart the service to reflect changes in the configuration.
+- Fine-grained routing: APISIX supports using all built-in Nginx variables for
routing. You can define custom matching functions to filter Routes.
+- Ops-friendly: APISIX is renowned for its ops-friendliness by DevOps teams.
It integrates with tools and platforms like [HashiCorp
Vault](./plugins/jwt-auth.md#usage-with-hashicorp-vault),
[Zipkin](./plugins/zipkin.md), [Apache SkyWalking](./plugins/skywalking.md),
[Consul](./discovery/consul_kv.md), [Nacos](./discovery/nacos.md) and
[Eureka](./discovery.md). With [APISIX
Dashboard](https://github.com/apache/apisix-dashboard), operators can configure
APISIX through an easy-to-use and in [...]
+- Multi-language Plugin support: APISIX supports multiple programming
languages for Plugin development. Developers can choose a language-specific SDK
to write custom Plugins.
- - Full Dynamic:
- The biggest feature of Apache APISIX is that it is fully dynamic. That
includes routing, SSL certificates, plugins, upstream etc. It adopts
hot-reloading so, every feature can be dynamically configured by the admin API,
without having to restart the service at all.
+## Key concepts
- - Fine-Grained Routing:
- Support all Nginx built-in variables as conditions for routing, so you can
use cookie, args, etc. as routing conditions to implement canary release, A/B
testing, etc. Apache APISIX provides operators that serve as judgment
conditions for routing and a custom routing matching function. By using GraphQL
attributes, APISIX allows you to filter routes.
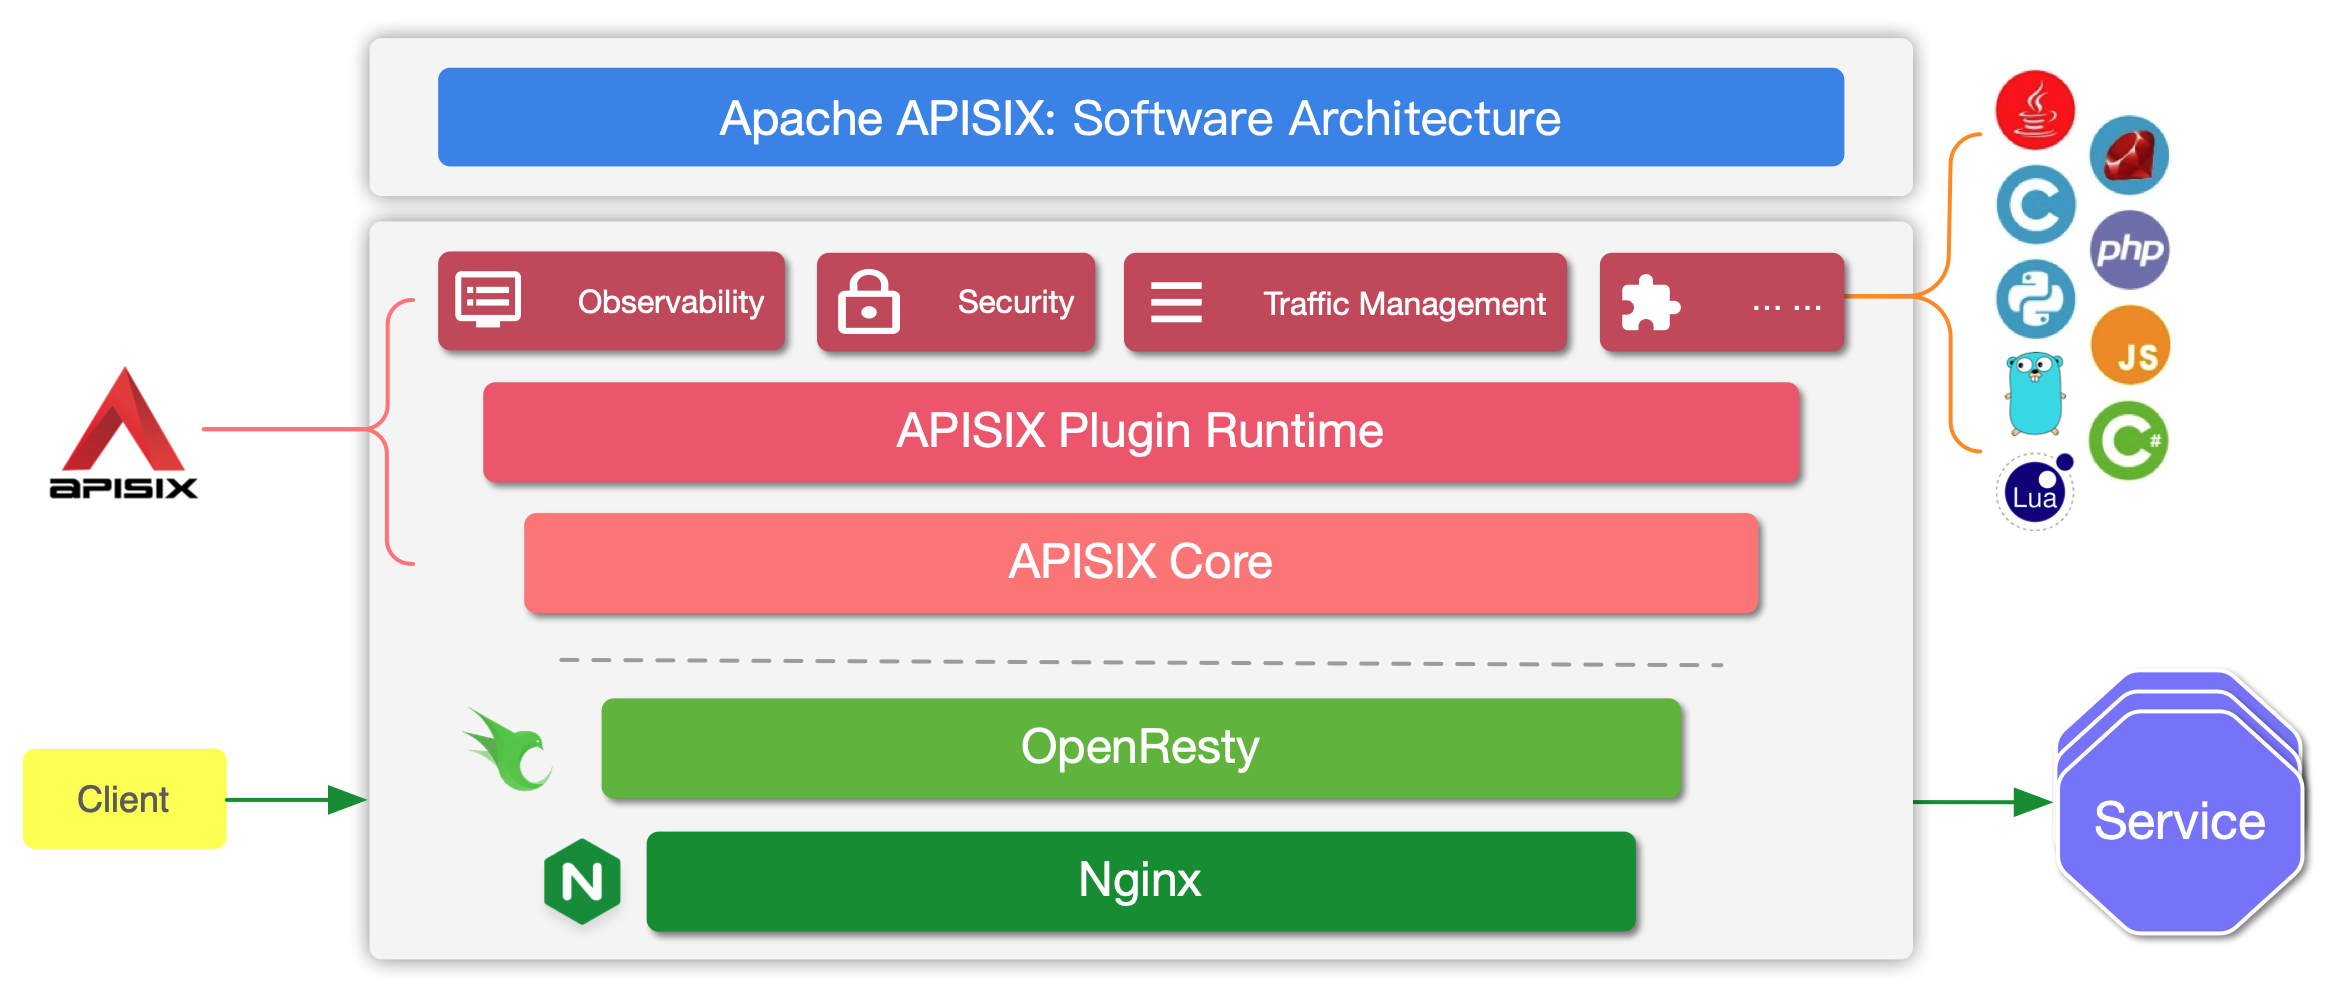
+Here is a high-level overview of APISIX's software architecture:
- - OPS Friendly:
- Apache APISIX has been adopted amongst organisation’s DevOps team because
of it Ops-friendly strategy. it supports numerous tools and platforms like
HashiCorp Vault,
[Zipkin](https://github.com/Anita-ihuman/apisix/blob/Introduction/docs/en/latest/plugins/zipkin.md),
[Apache
SkyWalking](https://github.com/Anita-ihuman/apisix/blob/Introduction/docs/en/latest/plugins/skywalking.md),
[Consul](https://github.com/Anita-ihuman/apisix/blob/Introduction/docs/en/latest/discovery/consul_kv.md),
[...]
+
- - Multi-Language Support:
- Apache APISIX is a multi-language gateway for plugin development and
supports multiple languages via RPC and Wasm. Developers choose the language
according to their needs and write the code according to the language-specific
SDKs. The plugin can be integrated with APISIX by compiling it to Wasm
(WebAssembly) bytecode. Optionally, developers can leverage the `plugin
runners` to implement specific RPC methods (the actual business logic).
Currently, APISIX supports plugin runners in Jav [...]
+The table below defines the key concepts and components of APISIX referenced
in this guide:
-## Summary
+| Concept/Component | Description
|
+|-------------------|--------------------------------------------------------------------------------------------------------------------------------------------------------------------------|
+| Route | Routes specify how requests to APISIX are forwarded to
the Upstream. They match a client's request based on defined rules and loads
and executes the configured Plugins. |
+| Upstream | Upstream is the service to forward your requests to.
They can be configured to a Route or abstracted out to an Upstream object.
|
+| Admin API | API that lets users control their deployed APISIX
instance.
|
-This guide walks through how you can get up and running with Apache APISIX.
+## Before you begin
-The guide is divided into these three steps:
+Before you start with APISIX, make sure you have the following tools installed:
-1. Installing Apache APISIX
-2. Creating a Route and binding it with an Upstream
-3. Verifying the results after binding with `curl`
+- [Docker](https://www.docker.com/) and [Docker
Compose](https://docs.docker.com/compose/).
+- [curl](https://curl.se/docs/manpage.html) for testing the API.
Alternatively, you can use tools like [Hoppscotch](https://hoppscotch.io/).
-This document also introduces some of the advanced features and operations in
Apache APISIX like authentication, prefixing a Route, using the APISIX
Dashboard, and troubleshooting.
+The example Upstream service used here is [httpbin.org](https://httpbin.org)
and you can use it for your testing.
-The following `echo` endpoint is used as an example here. This endpoint will
return the parameters we pass.
+This is an echo service, meaning it will return back the parameters we pass in
the request.
**Request**
@@ -115,55 +117,74 @@ We receive a JSON response when we send the request:
}
```
-## Pre-Requisites
+## Install Apache APISIX
-Before you jump ahead, make sure that you have your machine setup with these
tools.
+To get started, we will install Apache APISIX with Docker and enable the
[Admin API](./admin-api.md).
-- [Docker](https://www.docker.com/) and [Docker
Compose](https://docs.docker.com/compose/).
+First clone the [apisix-docker](https://github.com/apache/apisix-docker)
repository:
-- [curl](https://curl.se/docs/manpage.html) for testing the API.
Alternatively, you can use tools like [Hoppscotch](https://hoppscotch.io/) or
[Postman](https://www.postman.com/).
+```shell
+git clone https://github.com/apache/apisix-docker.git
+cd apisix-docker/example
+```
-<!--
-#
-# In addition to the basic Markdown syntax, we use remark-admonitions
-# alongside MDX to add support for admonitions. Admonitions are wrapped
-# by a set of 3 colons.
-# Please refer to
https://docusaurus.io/docs/next/markdown-features/admonitions
-# for more detail.
-#
--->
+Now, you can use `docker-compose` to start APISIX.
+
+<Tabs
+ groupId="cpu-arch"
+ defaultValue="x86"
+ values={[
+ {label: 'x86', value: 'x86'},
+ {label: 'ARM/M1', value: 'arm'},
+ ]}>
+<TabItem value="x86">
+
+```shell
+docker-compose -p docker-apisix up -d
+```
+
+</TabItem>
+
+<TabItem value="arm">
+
+```shell
+docker-compose -p docker-apisix -f docker-compose-arm64.yml up -d
+```
+
+</TabItem>
+</Tabs>
+
+:::note
+
+You can check out [Installing Apache APISIX](./how-to-build.md) for different
installation methods.
-:::note Note
-If you already have Apache APISIX installed, please skip Step 1, and go to
[Step 2](getting-started.md#step-2-create-a-route) directly.
:::
-## Step 1: Install Apache APISIX
+:::info IMPORTANT
-You can check out [Building Apache APISIX](./how-to-build.md) for different
installation methods.
+Make sure that all the required ports (default: 9080, 9443 and 2379) are
available and not used by other system processes.
-To get started quickly, we will install Apache APISIX with Docker and enable
the [Admin API](./admin-api.md).
+On Unix-based systems, you can run the command below to terminate a process
listening on a specific port:
```bash
-# Download the docker-compose file of Apache APISIX
-git clone https://github.com/apache/apisix-docker.git
-# Switch the current directory to the apisix-docker/example
-cd apisix-docker/example
-# Start Apache APISIX with docker-compose
-docker-compose -p docker-apisix up -d
+sudo fuser -k 9443/tcp
```
-> Apache APISIX already supports ARM64 architecture. To run Apache APISIX on
ARM64, run: `docker-compose -p docker-apisix -f docker-compose-arm64.yml up -d`
instead of the last step above.
+If a Docker container is crashing, you can inspect the logs to diagnose the
problem:
+
+```bash
+docker logs -f --tail <container_id>
+```
-Please remain patient as it will take some time to download the files and spin
up the containers.
+:::
-Once Apache APISIX is running, you can use `curl` to access the Admin API. You
can also check if Apache APISIX is running properly by running this command and
checking the response.
+Once APISIX is running, you can use `curl` to access the Admin API. You can
also check if APISIX is running properly by running this command and checking
the response.
```bash
-# Execute on your host machine (machine running Docker)
curl "http://127.0.0.1:9080/apisix/admin/services/"; -H 'X-API-KEY:
edd1c9f034335f136f87ad84b625c8f1'
```
-This response indicates that Apache APISIX is running successfully.
+This response indicates that APISIX is running successfully:
```json
{
@@ -177,15 +198,13 @@ This response indicates that Apache APISIX is running
successfully.
}
```
-## Step 2: Create a Route
-
-[Routes](./architecture-design/route.md) matches the client's requests based
on defined rules, loads and executes the corresponding plugins, and forwards
the request to the specified upstream.
+## Create a Route
-From the previous step, we have a running instance of Apache APISIX in Docker.
Now let's create a Route.
+From the previous step, we have a running instance of APISIX in Docker. Now
let's create a Route.
-Apache APISIX provides a powerful [Admin API](./admin-api.md) and [APISIX
Dashboard](https://github.com/apache/apisix-dashboard). Here, we will use the
Admin API to create a Route and connect it to an
[Upstream](./architecture-design/upstream.md) service. When a request arrives,
Apache APISIX will forward the request to the specified Upstream service.
+APISIX provides a powerful [Admin API](./admin-api.md) and [APISIX
Dashboard](https://github.com/apache/apisix-dashboard). Here, we will use the
Admin API to create a Route and connect it to an
[Upstream](./architecture-design/upstream.md) service. When a request arrives,
APISIX will forward the request to the specified Upstream service.
-We will create a sample configuration for our Route object so that Apache
APISIX can forward the request to the corresponding Upstream service.
+We will configure the Route so that APISIX can forward the request to the
corresponding Upstream service:
```bash
curl "http://127.0.0.1:9080/apisix/admin/routes/1"; -H "X-API-KEY:
edd1c9f034335f136f87ad84b625c8f1" -X PUT -d '
@@ -202,25 +221,25 @@ curl "http://127.0.0.1:9080/apisix/admin/routes/1"; -H
"X-API-KEY: edd1c9f034335f
}'
```
-This configuration means that it will forward all matching inbound requests to
the upstream service (`httpbin.org:80`) if they meet these specified criterion.
+This configuration means that it will forward all matching inbound requests to
the Upstream service (`httpbin.org:80`) if they meet these specified criterion:
- The HTTP method of the request is `GET`.
- The request header contains the `host` field, and its value is `example.com`.
- The request path matches `/anything/*`. `*` means any sub path. For example
`/anything/foo?arg=10`.
-Now that the Route has been created, we can access the Upstream service from
the address exposed by Apache APISIX.
+With the Route has created, we can access the Upstream service from the
address exposed by APISIX:
```bash
curl -i -X GET "http://127.0.0.1:9080/anything/foo?arg=10"; -H "Host:
example.com"
```
-This request will be forwarded to `http://httpbin.org:80/anything/foo?arg=10`
by Apache APISIX.
+This request will be forwarded to `http://httpbin.org:80/anything/foo?arg=10`
by APISIX.
-### Create an Upstream
+## Abstracting to Upstream
-In the previous session we discussed setting up a Route and an Upstream for
the Route.
+Instead of configuring the Upstream directly to the Route, you can create an
Upstream object and use it in the Route.
-To create an Upstream, we can execute the following command.
+To create an Upstream object:
```bash
curl "http://127.0.0.1:9080/apisix/admin/upstreams/1"; -H "X-API-KEY:
edd1c9f034335f136f87ad84b625c8f1" -X PUT -d '
@@ -232,151 +251,50 @@ curl "http://127.0.0.1:9080/apisix/admin/upstreams/1"; -H
"X-API-KEY: edd1c9f0343
}'
```
-We use `roundrobin` as the load balancing mechanism and set `httpbin.org:80`
as our Upstream service with an ID of `1`. See [Admin API](./admin-api.md) for
more information about the fields.
+This is the same as the Upstream service we configured directly into the Route
on the previous section.
-<!--
-#
-# In addition to the basic Markdown syntax, we use remark-admonitions
-# alongside MDX to add support for admonitions. Admonitions are wrapped
-# by a set of 3 colons.
-# Please refer to
https://docusaurus.io/docs/next/markdown-features/admonitions
-# for more detail.
-#
--->
-
-:::note Note
-Creating an Upstream service is not mandatory as we can use a
[Plugin](./architecture-design/plugin.md) to intercept the request and then
respond directly. However, for the purposes of this guide, we assume that at
least one Upstream service needs to be set up.
-:::
-
-### Binding the Route to the Upstream
-
-We can now bind a Route to the Upstream service we just created.
+To bind this Upstream to the Route, we can use the `upstream_id` as `1`:
```bash
curl "http://127.0.0.1:9080/apisix/admin/routes/1"; -H "X-API-KEY:
edd1c9f034335f136f87ad84b625c8f1" -X PUT -d '
{
- "uri": "/get",
- "host": "httpbin.org",
- "upstream_id": "1"
-}'
-```
-
-## Step 3: Validating the Route
-
-We will now access Apache APISIX to test the Route and the bounded Upstream
service.
-
-```bash
-curl -i -X GET "http://127.0.0.1:9080/get?foo1=bar1&foo2=bar2"; -H "Host:
httpbin.org"
-```
-
-This will return the data from the Upstream service we configured in our route
(`httpbin.org`).
-
-## Advanced Features and Operations
-
-This section looks at some of the advanced features and operations available
in Apache APISIX like [authentication](#authentication), [prefixing a
Route](#prefixing-a-route), using the [APISIX Dashboard](#apisix-dashboard),
and [troubleshooting](#troubleshooting).
-
-### Authentication
-
-The Route we created in [step 2](#step-2-create-a-route) is public. This means
that anyone knowing the address exposed by Apache APISIX can access the
Upstream service.
-
-This is unsafe and amounts to security risks. So, in practical applications,
we generally add authentication to the Route to enhance security.
-
-Let's assume for our scenario that we only want a specific user `John` to have
access to the Upstream service.
-
-We will use [Consumer](./architecture-design/consumer.md) a
[Plugin](./architecture-design/plugin.md) to implement authentication to handle
this scenario.
-
-First, we will use the [key-auth](./plugins/key-auth.md) plugin to create a
[Consumer](./architecture-design/consumer.md) `John`. We also need to provide
the specified key for `John`.
-
-```bash
-curl "http://127.0.0.1:9080/apisix/admin/consumers"; -H "X-API-KEY:
edd1c9f034335f136f87ad84b625c8f1" -X PUT -d '
-{
- "username": "john",
- "plugins": {
- "key-auth": {
- "key": "key-of-john"
- }
- }
-}'
-```
-
-We can now bind `consumer(John)` to the Route. For this, we just need to
enable the [key-auth](./plugins/key-auth.md) plugin as shown below.
-
-```bash
-curl "http://127.0.0.1:9080/apisix/admin/routes/1"; -H "X-API-KEY:
edd1c9f034335f136f87ad84b625c8f1" -X PUT -d '
-{
- "uri": "/get",
- "host": "httpbin.org",
- "plugins": {
- "key-auth": {}
- },
+ "methods": ["GET"],
+ "host": "example.com",
+ "uri": "/anything/*",
"upstream_id": "1"
}'
```
-Now with the authentication added, when we try to access the Route we created
in [step 2](#step-2-create-a-route) it will trigger an "Unauthorized Error".
-
-To access the Route, we need to add a `Header` named `apikey` with John's key.
+With the Route has created, we can access the Upstream service from the
address exposed by APISIX:
```bash
-curl -i -X GET http://127.0.0.1:9080/get -H "Host: httpbin.org" -H "apikey:
key-of-john"
-```
-
-### Prefixing a Route
-
-When you want to add a prefix to your Route but don't want to use the `Host`
header, you can use the `proxy-rewrite` Plugin.
-
-```bash
-curl "http://127.0.0.1:9080/apisix/admin/routes/1"; -H "X-API-KEY:
edd1c9f034335f136f87ad84b625c8f1" -X PUT -d '
-{
- "uri": "/samplePrefix/get",
- "plugins": {
- "proxy-rewrite": {
- "regex_uri": ["^/samplePrefix/get(.*)", "/get$1"]
- },
- "key-auth": {}
- },
- "upstream_id": "1"
-}'
+curl -i -X GET "http://127.0.0.1:9080/anything/foo?arg=10"; -H "Host:
example.com"
```
-Then to invoke the Route you can run:
+This request will be forwarded to `http://httpbin.org:80/anything/foo?arg=10`
by APISIX.
-```bash
-curl -i -X GET "http://127.0.0.1:9080/samplePrefix/get?param1=foo¶m2=bar";
-H "apikey: key-of-john"
-```
+## Using the APISIX Dashboard
-### APISIX Dashboard
+You can also use the APISIX Dashboard to create and configure Routes similar
to the Admin API.
-Apache APISIX comes with an intuitive
[Dashboard](https://github.com/apache/apisix-dashboard) to make it easy to
configure and perform operations.
+If you have followed the steps above, you would be able to access the
dashboard at [localhost:9000](http://localhost:9000/).
-
+Click on [Route](http://localhost:9000/routes/list) from the sidebar to view a
list of configured Routes. You would be able to see the Routes you created
using the Admin API as well.
-<!--
-#
-# In addition to the basic Markdown syntax, we use remark-admonitions
-# alongside MDX to add support for admonitions. Admonitions are wrapped
-# by a set of 3 colons.
-# Please refer to
https://docusaurus.io/docs/next/markdown-features/admonitions
-# for more detail.
-#
--->
+You can create a new Route through the dashboard by clicking the
[Create](http://localhost:9000/routes/create) button and following the
instructions:
-### Troubleshooting
+
-You can try these troubleshooting steps if you are unable to proceed as
suggested in the docs above.
+The newly created Route is added to the list of Routes:
-Please [open an issue](/docs/general/contributor-guide#submit-an-issue) if you
run into any bugs or if there are any missing troubleshooting steps.
+
-- Make sure that all required ports (**default 9080/9443/2379**) are available
(not used by other systems or processes).
+Check out the [APISIX Dashboard documentation](/docs/dashboard/USER_GUIDE) to
learn more.
- You can run the command below to terminate the processes that are
listening on a specific port (on Unix-based systems).
+## Where to go next?
- ```bash
- sudo fuser -k 9443/tcp
- ```
+If you have followed the steps above, you should have APISIX running and you
would have configured a Route.
-- If the Docker container keeps restarting or IS failing, log in to the
container and observe the logs to diagnose the problem.
+You can now look into adding Plugins to provide features like authentication,
security, traffic control and observability. See the [Plugin Hub](/plugins) to
learn more.
- ```bash
- docker logs -f --tail container_id
- ```
+If you ever get stuck, you can ask for help in the [APISIX community
channels](/docs/general/join) or [open an issue](/docs/general/submit-issue) on
GitHub.