This is an automated email from the ASF dual-hosted git repository.

juzhiyuan pushed a commit to branch master
in repository https://gitbox.apache.org/repos/asf/apisix-website.git
The following commit(s) were added to refs/heads/master by this push:
new 57c15eec760 docs: add test case blog (#1164)
57c15eec760 is described below
commit 57c15eec7602cdad36d9db7fa71a77a68ffbd640
Author: feihan <[email protected]>
AuthorDate: Fri Jul 1 10:00:14 2022 +0800
docs: add test case blog (#1164)
---
.../06/27/getting-start-with-apisix-test-cases.md | 238 +++++++++++++++++++++
.../06/27/getting-start-with-apisix-test-cases.md | 238 +++++++++++++++++++++
2 files changed, 476 insertions(+)
diff --git a/website/blog/2022/06/27/getting-start-with-apisix-test-cases.md
b/website/blog/2022/06/27/getting-start-with-apisix-test-cases.md
new file mode 100644
index 00000000000..2beb756478f
--- /dev/null
+++ b/website/blog/2022/06/27/getting-start-with-apisix-test-cases.md
@@ -0,0 +1,238 @@
+---
+title: "Getting Started with APISIX Test Cases"
+keywords:
+- Apache APISIX
+- API Gateway
+- Test cases
+- Test
+description: This article mainly introduces how to write test cases for Apache
APISIX API Gateway.
+tags: [Technology]
+---
+
+> This article mainly introduces how to write test cases for Apache APISIX API
Gateway.
+
+<!--truncate-->
+
+## Background
+
+Apache APISIX is a dynamic, real-time, high-performance API Gateway, it
provides rich traffic management features such as load balancing, dynamic
upstream, canary release, circuit breaking, authentication, observability, and
more. You can use APISIX API Gateway to handle traditional north-south traffic,
as well as east-west traffic between services.
+
+Under normal circumstances, to ensure the normal operation of the software, we
generally use various techniques and methods to check the functions of the
software manually or automatically to ensure that it is running normally before
the software goes online. We call this operation QA (testing). Testing is
generally divided into unit testing, E2E testing and chaos testing.
+
+Unit testing is used to check the correctness of a single module (such as
checking whether the serialization/deserialization of a certain RPC, data
encryption and decryption are normal), but the test lacks a global perspective
on the system. The E2E test (ie end-to-end test) can make up for the
insufficiency of the unit test. The test runs the entire system and external
dependent services, and checks the integration of the system and other systems
through real software calls; the chaos t [...]
+
+## APISIX Test Case Introduction
+
+APISIX is the world's most active API gateway, and its stability and service
robustness need to be guaranteed to a certain extent, so how to avoid potential
errors in APISIX? This needs to be achieved through test cases.
+
+A test script is not just a program file executed by the machine under test.
For developers, the test script can be used to test all functions of the
software, including the running status of the program under different
configurations and different input parameters. For the user, the test provides
a specific example of the use of a function module, such as: the configuration
and input that the program can accept, and what kind of output results are
expected to be obtained. If the user en [...]
+
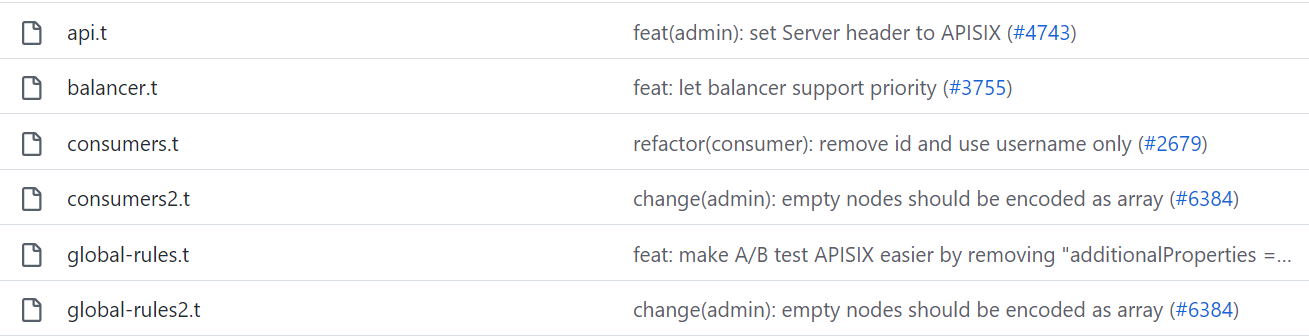
+In the APISIX project, Github Action is usually used to run CI tests and
execute the test scripts shown in the following figure. Many APISIX developers
encounter a variety of problems when writing test cases. Hope this article will
help you write APISIX test cases.
+
+
+
+## Write test cases
+
+The test cases of APISIX are written based on the `Test::NGINX` test
framework, which is a test environment implemented on the basis of the Perl
language, which can provide script-based automated testing capabilities, and
provides a large-scale test and quality assurance work for APISIX. support. Of
course, it doesn't matter if you don't use Perl, because in most scenarios, you
don't need to write Perl code, you only need to use the ability of
`TEST::NGINX` encapsulation. If you have spe [...]
+
+The test cases of APISIX are stored in the `./apisix/t` directory. Next, we
will introduce you to how to write test cases by adding the opa plugin as an
example.
+
+1. You need to create a test file ending with `.t`, eg `./t/plugin/opa.t`. If
you are adding features to existing functions, you can directly add test cases
to the corresponding test file, and add the fixed-format `ASF 2.0` protocol to
the file.
+
+2. The main function of this part is to automatically add `no_error_log` to
all test cases in the `opa.t` file, so that you don't need to add `error_log`
related code under each code, you can copy and use this code directly. segment
code. In this way, some duplication of code can be reduced.
+
+```perl
+add_block_preprocessor(sub {
+ my ($block) = @_;
+
+ if ((!defined $block->error_log) && (!defined $block->no_error_log)) {
+ $block->set_value("no_error_log", "[error]");
+ }
+
+ if (!defined $block->request) {
+ $block->set_value("request", "GET /t");
+ }
+});
+
+run_tests();
+
+DATA
+```
+
+3. Each test case has a fixed beginning, and the general format is as follows.
+
+```perl
+=== TEST 1: sanity
+```
+
+`===` is a fixed syntax structure at the beginning of a test case, and `TEST
1` represents the first test case in this file. `sanity` is the name of the
test. Usually named after the specific purpose of the test case.
+
+4. Next is the body of the test case. Almost every plugin in APISIX defines
some parameters and properties, and pre-defines JSON schema, so we need to
check whether the input parameters of the plugin can be properly verified. In
this way, we can check whether the data we input can be properly verified by
the rules of JSON schema.
+
+```perl
+--- config
+ location /t {
+ content_by_lua_block {
+ local test_cases = {
+ {host = "http://127.0.0.1:8181";, policy = "example/allow"},
+ {host = "http://127.0.0.1:8181"},
+ {host = 3233, policy = "example/allow"},
+ }
+ local plugin = require("apisix.plugins.opa")
+ for _, case in ipairs(test_cases) do
+ local ok, err = plugin.check_schema(case)
+ ngx.say(ok and "done" or err)
+ end
+ }
+ }
+--- response_body
+done
+property "policy" is required
+property "host" validation failed: wrong type: expected string, got number
+```
+
+By reading the [source
code](https://github.com/apache/apisix/blob/master/apisix/plugins/opa.lua#L46)
of the `opa` plugin, you can see that the `opa` plugin requires both `host` and
`policy` to exist, so three rules need to be defined here.
+
+- Enter the correct parameters, including `host` and `policy`. So the return
result will be `done`;
+- Enter only the `host` parameter. Does not meet the requirements of `host`
and `policy` at the same time, so the expected return result of this test will
be `property "policy" is required`;
+- A `host` value of the wrong type (integer) was entered. Because the `host`
parameter must be a string type set in the source code, the return result will
be `property "host" validation failed: wrong type: expected string, got number`.
+
+```perl
+--- config
+ location /t {
+ content_by_lua_block {
+...
+ ngx.say(ok and "done" or err)
+ end
+ }
+ }
+--- response_body
+done
+...
+```
+
+In general, each test case needs to use the `/t` function, for example, you
need to call Lua code, define `location`. You can use the
`content_by_lua_block` method to call some code-assisted tests, and finally
print the response information in the `ngx.say` method, and then use the `---
response_body` method to check whether the above program runs correctly. There
is no need to enter `request` and `error` manually, because you have already
added them automatically through the script.
+
+```perl
+ local plugin = require("apisix.plugins.opa")
+ for _, case in ipairs(test_cases) do
+ local ok, err = plugin.check_schema(case)
+ ngx.say(ok and "done" or err)
+```
+
+The above code represents a module that imports the APISIX Plugin `opa` plugin
and calls the `plugin.check_schema` function. Then pass the `for` loop to call
the parameters and return the corresponding results according to the test
situation.
+
+5. Next, we need to set up an environment for testing. For plugins, it is to
create a route, and then associate the plugin to this route. After the setup is
complete, we can verify whether the internal logic of the plugin is implemented
correctly by sending a request.
+
+```perl
+=== TEST 2: setup route with plugin
+--- config
+ location /t {
+ content_by_lua_block {
+ local t = require("lib.test_admin").test
+ local code, body = t('/apisix/admin/routes/1',
+ ngx.HTTP_PUT,
+ [[{
+ "plugins": {
+ "opa": {
+ "host": "http://127.0.0.1:8181";,
+ "policy": "example"
+ }
+ },
+ "upstream": {
+ "nodes": {
+ "127.0.0.1:1980": 1
+ },
+ "type": "roundrobin"
+ },
+ "uris": ["/hello", "/test"]
+ }]]
+ )
+ if code >= 300 then
+ ngx.status = code
+ end
+ ngx.say(body)
+ }
+ }
+--- response_body
+passed
+```
+
+In the above example, `lib_test_admin` is used to import into the `t`
function, create a route with `id` of `1`, and then use the `PUT` method to
pass in the data. In this test, we did not check the data format, because the
test case only needs to ensure that the route can be created normally using the
Admin API. Of course, we also need to judge the exception. If the status code
is greater than or equal to `300`, then The specific information will be
printed.
+
+In APISIX's test cases, you will find that many of the tests include the
following code:
+
+```perl
+local t = require("lib.test_admin").test
+local code, body = t('/apisix/admin/routes/1', ngx.HTTP_PUT)
+```
+
+The above code means importing the `lib.test_admin` module and encapsulating
it with the test function to send the request. It reduces the repetitive code
when we call HTTP interfaces such as APISIX Admin API, and only needs to simply
call and check the returned result.
+
+6. In the third test, we don't need to repeat the creation of the route since
it was already created in the second test.
+
+```perl
+=== TEST 3: hit route (with correct request)
+--- request
+GET /hello?test=1234&user=none
+--- more_headers
+test-header: only-for-test
+--- response_body
+hello world
+```
+
+The above example defines `request`. Since we defined `/hello` and `/test`
paths in the previous test, we can send a `GET` request to `/hello` and it will
then send a `test=1234` and `user=none` for the `query` parameter. You can also
add response headers via `more_headers`, such as adding a `test-header`
response header to a request sent to `hello`.
+
+The above test is to test whether adding the correct request header can be
successful. You can also add error headers in subsequent test examples and
verify the results. If you need to use `POST` request, you can also change `GET
/hello` in the above code to `POST /hello`.
+
+In some tests, you may need to create multiple upstreams or routes. In this
case, you can define an array, then define these corresponding values in the
array, and use the `for` method to call the `t` function in a loop, and then
Let it call the Admin API interface of APISIX through `put` to create a route
or upstream normally. This method is also a more common method of testing,
called: Table driving test, which is a method of driving tests through tables,
which reduces some repetitive [...]
+
+## Run the test case
+
+The test case requires the source code to install APISIX. For the specific
installation method, please refer to [Building APISIX from
source](https://apisix.apache.org/docs/apisix/next/building-apisix). Next, we
will focus on how to run test cases and error checking.
+
+### Running locally
+
+Typically, you can run a test case locally using the following command:
+
+```shell
+PATH=/usr/local/openresty/nginx/sbin:/usr/bin PERL5LIB=.:$PERL5LIB
FLUSH_ETCD=1 prove -Itest-nginx/lib -r t/admin
+```
+
+The above commands are interpreted as follows:
+
+- `PATH` specifies the directory where `openresty/nginx` is located, which can
avoid conflicts caused by incorrect configuration of some environments. If
OpenResty in the environment is installed in other locations, it can also be
specified through this command.
+- `PERL5LIB` specifies importing locally using `Perl`. Import the PERL library
that exists in this path and some of the PERL libraries attached via
environment variables.
+- `FLUSH_ETCD` specifies that after each test file is executed, all data is
cleared. It needs to call the `etcdctl` function, and it needs to ensure that
the `etcdctl` executable file can be found in the `PATH`.
+- `prove` invokes the test program to start the test execution.
+- `-Itest-nginx/lib` means import the `Itest-nginx/lib` library.
+- `-r` means to automatically find test files. If a path is specified, all
test files under this path will be searched.
+- `t/admin` means to specify the test case search path, and it can also be
specified to a unique `.t` file for qualification.
+
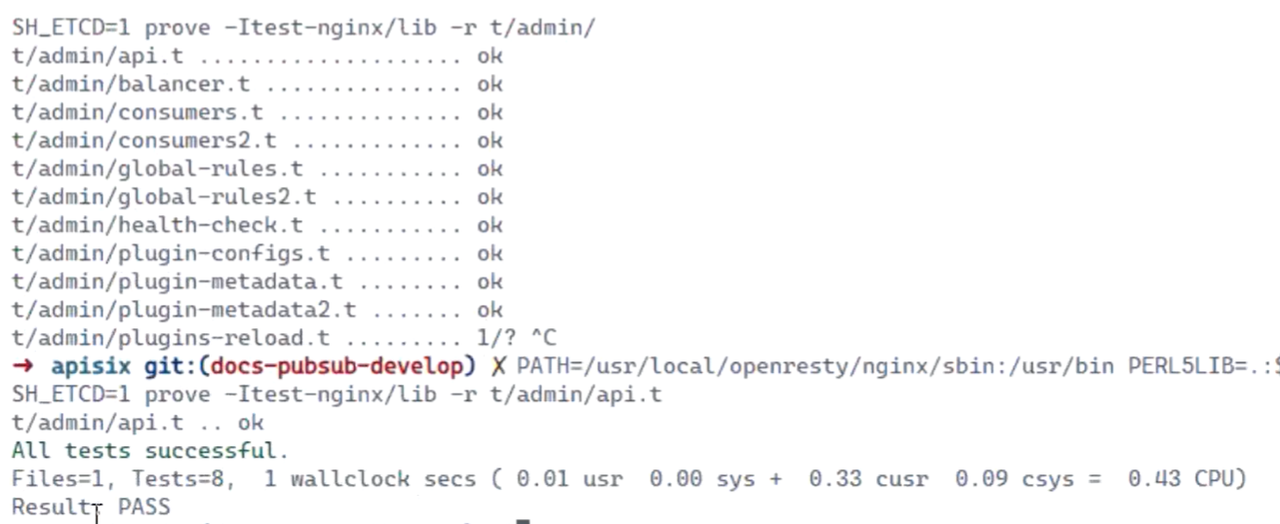
+The following is the normal return result.
+
+
+
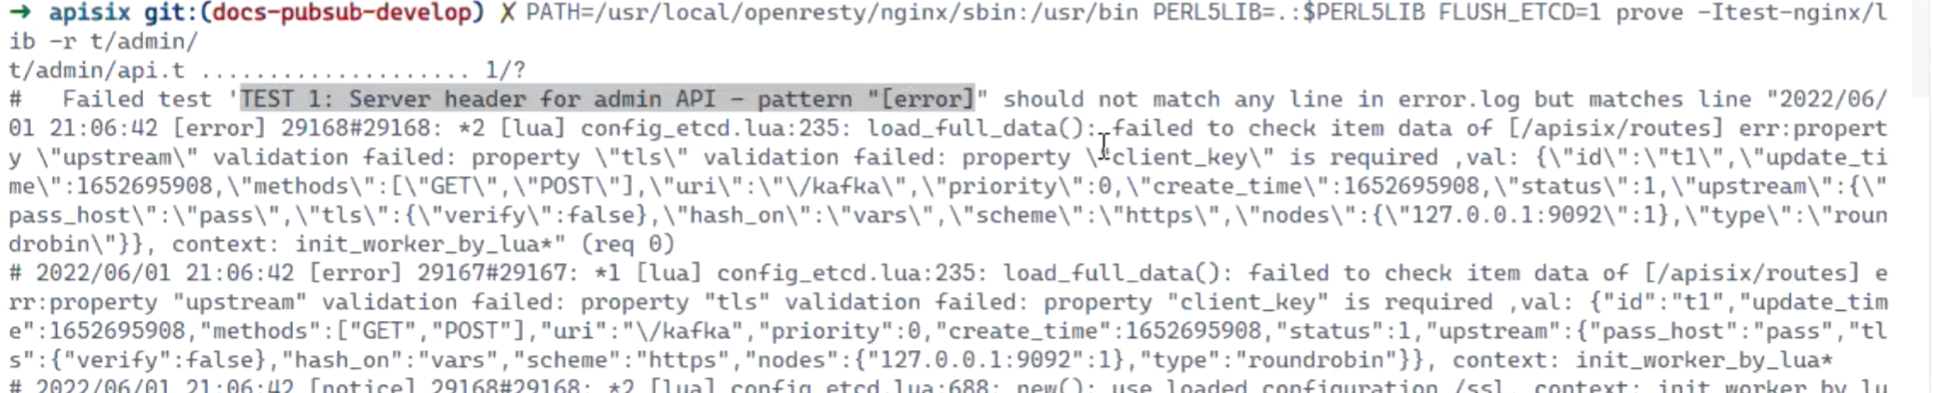
+If the test fails, the following message appears:
+
+
+
+The above information will tell you which test case in which test file failed.
+
+### Running Github
+
+In general, when submitting code in Github, the output results are similar to
those of local testing.
+
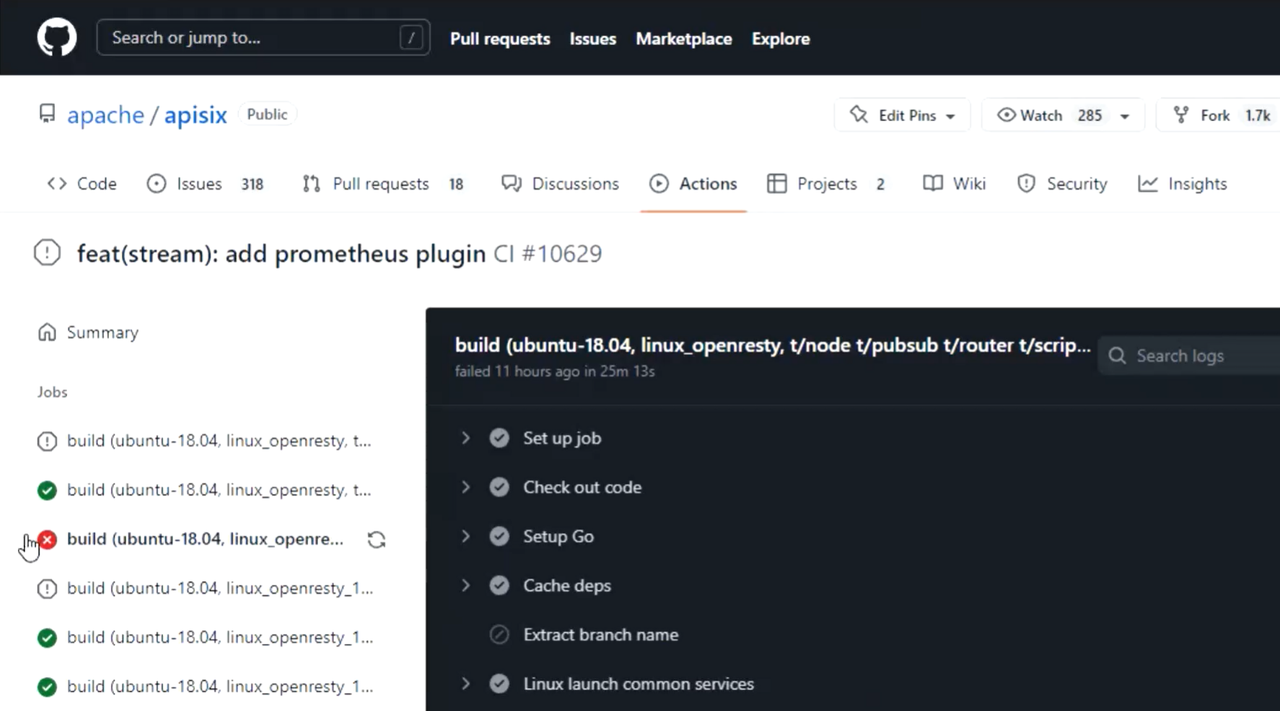
+First select the wrong execution workflow, the main test cases are in the
build series CI.
+
+
+
+We can see that, in this example, line `416` is reporting an error. Through
the error information, we can get that there is an error in a test case in a
certain test file, and the developer can look for the correction in direction.
It should be noted that there may be some strange errors in CI, which may be
caused by temporary abnormalities in the CI environment. If the code in the
corresponding module has not been modified, these errors can be ignored.
+
+
+
+## Summary
+
+This article mainly introduces the relevant process of testing, as well as the
composition of APISIX test cases and how to write test cases. I hope you can
have a general understanding of APISIX test cases through this article.
+
+However, the text only mentions some core content in the APISIX test
framework, and fails to cover all the content in the TEST::NGINX framework. In
fact, there are many powerful capabilities in `TEST::NGINX`. We can use
[Test::Nginx::Socket](https://metacpan.org/pod/Test::Nginx::Socket)
documentation for more usage. If you want to learn more about writing test
cases, you can also watch the [APISIX Test Cases Quick Start
video](https://www.bilibili.com/video/BV1qF411G78j?spm_id_from=333.1 [...]
diff --git
a/website/i18n/zh/docusaurus-plugin-content-blog/2022/06/27/getting-start-with-apisix-test-cases.md
b/website/i18n/zh/docusaurus-plugin-content-blog/2022/06/27/getting-start-with-apisix-test-cases.md
new file mode 100644
index 00000000000..b6a22ca37c0
--- /dev/null
+++
b/website/i18n/zh/docusaurus-plugin-content-blog/2022/06/27/getting-start-with-apisix-test-cases.md
@@ -0,0 +1,238 @@
+---
+title: "助力开发者,全方位解读 APISIX 测试案例"
+keywords:
+- Apache APISIX
+- API 网关
+- 测试案例
+- 测试
+description: 本文主要介绍了如何编写 API 网关 Apache APISIX 的测试案例。
+tags: [Technology]
+---
+
+> 本文主要介绍了如何编写以及运行 APISIX 的测试案例。
+
+<!--truncate-->
+
+## 背景信息
+
+Apache APISIX 是 Apache 软件基金会下的云原生 API
网关,它兼具动态、实时、高性能等特点,提供了负载均衡、动态上游、灰度发布(金丝雀发布)、服务熔断、身份认证、可观测性等丰富的流量管理功能。你可以使用
APISIX 来处理传统的南北向流量,也可以处理服务间的东西向流量。同时,它也支持作为 K8s Ingress Controller 来使用。
+
+通常情况下,想要保证软件正常运行,在软件上线前我们一般会使用各种技术和方法,通过手动或自动的方式对软件的功能进行检查以确保其运行正常。该操作我们称之为
QA(测试)。测试一般分为单元测试、E2E 测试以及混沌测试。
+
+单元测试是用来检查单一模块的正确性(比如检查某个 RPC 的序列化/反序列化、数据加解密是否正常),但是该测试缺乏对系统的全局视角。而 E2E
测试(即端到端测试),可以补足单元测试的不足,该测试将整个系统和外部依赖服务跑起来,通过真实的软件调用方式检查本系统与其他系统的集成情况;混沌测试则通过在系统各组件间制造突发情况,如
OOM Kill、网络中断等,测试整个系统错误错误的容忍程度与能力。APISIX 的测试更加偏向于 E2E 测试,保证自身功能和与其他系统集成的正确性。
+
+## APISIX 测试案例简介
+
+APISIX 作为全球最活跃的 API 网关,其稳定性及服务的健壮性需要得到一定的保障,那么如何避免 APISIX
中潜在的错误呢?这里就需要通过测试用例来实现了。
+
+测试脚本并不仅仅是一个被测试机器执行的程序文件,对于开发者来讲,可以通过测试脚本完成软件所有功能的测试,包括不同配置、不同输入参数等情况下程序的运行状况。而对于用户来说测试提供了某一个功能模块的具体使用示例,例如:程序可以接受的配置和输入,想要得到怎样的输出结果。用户在参考使用文档时遇到不懂的地方,完全可以参考现有的测试用例,寻找是否有类似的使用场景。
+
+在 APISIX 项目中,通常使用 Github Action 运行 CI 测试,执行下图展示的测试脚本。许多 APISIX
的开发者在编写测试用例时,会遇到各种各样的问题。希望通过本文,可以减少你在编写 APISIX 测试案例时出现的错误。
+
+
+
+## 编写测试案例
+
+APISIX 的测试用例基于 `TEST::NGINX` 测试框架编写,该测试框架是在 Perl
语言基础上实现的测试环境,可以提供基于脚本的自动化测试能力,为 APISIX 当前如此大规模的测试与质量保证工作提供了支持。当然你不会使用 Perl
也没有关系,因为大部分场景中是不需要编写 Perl 代码的,仅使用 `TEST::NGINX` 封装的能力即可,如果有特殊需求可以结合 Lua
代码的方式进行增强。
+
+APISIX 的测试用例均存放在 `./apisix/t` 目录下面,接下来将以添加 `opa` 插件为例为你介绍如何编写测试案例。
+
+1. 你需要创建一个 `.t` 结尾的测试文件,例如
`./t/plugin/opa.t`。如果你是在已有功能上添加特性,可以直接在对应的测试文件中添加测试用例。并在文件中添加固定格式的 ASF 2.0 协议。
+
+2. 该部分主要作用是给 `opa.t` 这个文件中所有的测试用例自动添加 `no_error_log`,这样就不需要在每个代码下添加
`error_log` 相关的代码了,你可以直接复制使用这段代码。通过这种方式,可以减少一些重复的代码。
+
+```perl
+add_block_preprocessor(sub {
+ my ($block) = @_;
+
+ if ((!defined $block->error_log) && (!defined $block->no_error_log)) {
+ $block->set_value("no_error_log", "[error]");
+ }
+
+ if (!defined $block->request) {
+ $block->set_value("request", "GET /t");
+ }
+});
+
+run_tests();
+
+DATA
+```
+
+3. 每个测试用例都有固定的开头,一般格式如下。
+
+```perl
+=== TEST 1: sanity
+```
+
+`===`是测试用例起始的固定语法结构,`TEST 1` 则代表是本文件的第一个测试用例。`sanity` 则为该测试的名称,一般以测试用例的具体目的命名。
+
+4. 接下来就是测试用例的正文部分了。在 APISIX 中几乎每个插件都会定义一些参数和属性,并且会预先定义 JSON
schema,因此我们需要先检查该插件的输入参数是否能够正常地校验,通过这种方式就可以检查我们输入的数据是否可以正确地被 JSON schema 的规则去校验。
+
+```perl
+--- config
+ location /t {
+ content_by_lua_block {
+ local test_cases = {
+ {host = "http://127.0.0.1:8181";, policy = "example/allow"},
+ {host = "http://127.0.0.1:8181"},
+ {host = 3233, policy = "example/allow"},
+ }
+ local plugin = require("apisix.plugins.opa")
+ for _, case in ipairs(test_cases) do
+ local ok, err = plugin.check_schema(case)
+ ngx.say(ok and "done" or err)
+ end
+ }
+ }
+--- response_body
+done
+property "policy" is required
+property "host" validation failed: wrong type: expected string, got number
+```
+
+通过阅读 `opa` 插件的源码,可以看到 `opa` 插件要求 `host` 和 `policy` 必须同时存在,因此这里需要定义三个规则。
+
+- 输入正确的参数,包括 `host` 和 `policy`。因此返回结果将是 `done`;
+- 仅输入 `host` 参数。不符合 `host`、`policy` 同时存在的要求,所以该测试预期返回结果将是 `property "policy"
is required`;
+- 输入类型错误(整数)的 `host` 值。因为在源码中设置了 `host` 参数必须是字符串类型,所以返回结果将是 `property "host"
validation failed: wrong type`。
+
+```perl
+--- config
+ location /t {
+ content_by_lua_block {
+...
+ ngx.say(ok and "done" or err)
+ end
+ }
+ }
+--- response_body
+done
+...
+```
+
+一般情况下,每个测试案例中需要使用 `/t` 的函数,比如说需要调用 Lua 代码,定义 `location`。你也可以使用
`content_by_lua_block` 的方式调用一些代码辅助测试,最后将响应信息以 `ngx.say` 的方式打印出来,然后再通过 `---
response_body` 的方式检查上面程序运行的是否正确。无需手动输入 `request` 和 `error`,因为我们已经通过脚本自动添加了。
+
+```perl
+ local plugin = require("apisix.plugins.opa")
+ for _, case in ipairs(test_cases) do
+ local ok, err = plugin.check_schema(case)
+ ngx.say(ok and "done" or err)
+```
+
+以上代码表示导入 APISIX Plugin `opa` 插件的模块,并且调用 `plugin.check_schema` 函数。然后通过 `for`
循环,以此调用参数,并且根据测试情况返回对应的结果。
+
+5.
接下来,我们需要配置一个测试时使用的环境。对于插件来说,就是创建一个路由,然后把插件关联到该路由上。创建完成后,我们就可以通过发送请求校验插件的内部逻辑实现是否正确。
+
+```perl
+=== TEST 2: setup route with plugin
+--- config
+ location /t {
+ content_by_lua_block {
+ local t = require("lib.test_admin").test
+ local code, body = t('/apisix/admin/routes/1',
+ ngx.HTTP_PUT,
+ [[{
+ "plugins": {
+ "opa": {
+ "host": "http://127.0.0.1:8181";,
+ "policy": "example"
+ }
+ },
+ "upstream": {
+ "nodes": {
+ "127.0.0.1:1980": 1
+ },
+ "type": "roundrobin"
+ },
+ "uris": ["/hello", "/test"]
+ }]]
+ )
+ if code >= 300 then
+ ngx.status = code
+ end
+ ngx.say(body)
+ }
+ }
+--- response_body
+passed
+```
+
+在以上示例中,使用了 `lib_test_admin` 导入到 `t` 函数,创建一个 `id` 为 `1` 的路由,然后使用 `PUT`
的方法,传入这些数据。在该测试中,我们并没有对数据格式进行检验,因为该测试用例只要保证使用 Admin API
可以正常创建路由就可以了,当然我们也需要对异常进行判断,如果状态码大于或者等于 `300` 就会打印出具体的信息。
+
+在 APISIX 的测试案例中,你会发现很多测试中都包含了以下代码:
+
+```perl
+local t = require("lib.test_admin").test
+local code, body = t('/apisix/admin/routes/1', ngx.HTTP_PUT)
+```
+
+以上代码表示导入 `lib.test_admin` 模块并使用其中 `test` 函数封装来发送请求,它减少了我们调用 APISIX Admin API 等
HTTP 接口时的重复代码,只需简单调用并检查返回结果即可。
+
+6. 在第三个测试中,我们不需要再重复创建路由,因为在第二个测试中已经创建了。
+
+```perl
+=== TEST 3: hit route (with correct request)
+--- request
+GET /hello?test=1234&user=none
+--- more_headers
+test-header: only-for-test
+--- response_body
+hello world
+```
+
+上述示例定义了 `request`。因为我们在上一个测试中定义了 `/hello` 和 `/test` 的路径,所以我们可以通过 `GET` 的方法向
`/hello` 发送请求,并然后它会发送一个 `test=1234` 和 `user=none` 的 `query` 参数。你也可以通过
`more_headers` 的方式添加响应头,比如给发送到 `hello` 的请求添加一个叫 `test-header` 的响应头。
+
+以上测试是为了测试添加正确的请求头是否可以成功。你也可以在后续的测试示例中添加错误头,并验证结果。如果你需要使用 `POST` 请求,也可以把上述代码中的
`GET /hello` 修改为 `POST /hello`。
+
+在有些测试中,你可能需要创建多个上游或者路由,此时你就可以定义一个数组,然后在数组中定义这些对应的值,并通过 `for` 方式循环地调用 `t`
函数,然后让它把这个东西正常地通过 `put` 的方式来调用 APISIX 的 Admin API
接口来正常创建路由或者上游。该方式也是测试比较常见的方式,称为:`Table driving
test`,是一种通过表的方式驱动测试的方法,该方法减少部分重复出现的代码。详细介绍,请参考APISIX测试案例快速入门视频和opa2.t测试用例。
+
+## 运行测试案例
+
+测试案例需要源码安装 APISIX,具体安装方法请参考[如何构建 Apache
APISIX](https://apisix.apache.org/zh/docs/apisix/next/installation-guide)。接下来将重点介绍如何运行测试案例及报错检查。
+
+### 本地运行
+
+通常情况下,你可以在本地使用以下指令来运行测试案例:
+
+```shell
+PATH=/usr/local/openresty/nginx/sbin:/usr/bin PERL5LIB=.:$PERL5LIB
FLUSH_ETCD=1 prove -Itest-nginx/lib -r t/admin
+```
+
+以上命令的释义如下:
+
+- `PATH` 指定了 `openresty/nginx` 所在的目录,可以避免部分环境配置错误时引起的冲突问题,如果环境中的 OpenResty
安装在其他位置,则也可以通过这个命令进行指定。
+- `PERL5LIB` 指定了使用 Perl 导入到本地。导入本路径中存在的以及部分通过环境变量附加的 `PERL` 库。
+- `FLUSH_ETCD` 指定了在每个测试文件执行完成后,则清空所有数据,它需要调用 `etcdctl` 函数,需要确保在 `PATH` 中可以找到
`etcdctl` 可执行文件。
+- `prove` 调用测试程序开始执行测试。
+- `-Itest-nginx/lib` 表示导入 `Itest-nginx/lib` 这个库。
+- `-r` 表示自动寻找测试文件。如果指定的是一个路径,则会寻找这个路径下所有的测试文件。
+- `t/admin` 表示指定测试用例搜索路径,此处也可以指定到唯一一个 `.t` 文件上进行限定。
+
+以下为上述命令的正常执行结果。
+
+
+
+ 如果测试失败,则会出现以下信息:
+
+
+
+ 以上信息则会告诉你具体是哪个测试文件中的哪个测试用例执行失败了。
+
+### Github 运行
+
+一般情况在 Github 中提交代码时,输出的结果和在本地测试相似。
+
+首先选择错误的执行工作流,主要的测试用例均在 build 系列 CI 中。
+
+
+
+我们可以看到,在该示例中,`416`
行出现了报错。通过错误信息,我们可以得到在某个测试文件中的某个测试用例出现错误,开发者定向查看修正即可。需要注意的是,CI
中可能存在一些奇怪的报错,它们可能是因为 CI 环境的临时异常导致的,如果未修改过对应模块中的代码,可以忽略这些错误。
+
+
+
+## 总结
+
+本文主要为大家介绍了测试的相关流程,以及在 APISIX 测试案例的构成和如何进行测试案例的编写,希望通过本文你可以对 APISIX
的测试案例有一个大致的认识。
+
+然而本文只提到了 APISIX 测试框架中的一些核心内容,未能覆盖 `TEST::NGINX` 框架中的全部内容,实际上 `TEST::NGINX`
中还有很多强大的能力,我们可以通过 [`Test::Nginx::Socket`
的文档](https://metacpan.org/pod/Test::Nginx::Socket)了解更多用法。如果你想学习更多编写测试案例的知识,可以观看[APISIX
测试案例快速入门视频](https://www.bilibili.com/video/BV1qF411G78j?spm_id_from=333.1007.top_right_bar_window_history.content.click&vd_source=d427acb1117c07aeea8968e15736e375)。