This is an automated email from the ASF dual-hosted git repository.

juzhiyuan pushed a commit to branch master
in repository https://gitbox.apache.org/repos/asf/apisix-website.git
The following commit(s) were added to refs/heads/master by this push:
new 505ab5351c9 docs: added how to use keycloak with api gateway? (#1193)
505ab5351c9 is described below
commit 505ab5351c95f15271815857446b9ebca32f7109
Author: 琚致远 <[email protected]>
AuthorDate: Wed Jul 6 18:07:22 2022 +0800
docs: added how to use keycloak with api gateway? (#1193)
---
...use-keycloak-with-api-gateway-to-secure-apis.md | 294 +++++++++++++++++++++
...use-keycloak-with-api-gateway-to-secure-apis.md | 285 ++++++++++++++++++++
2 files changed, 579 insertions(+)
diff --git
a/website/blog/2022/07/06/use-keycloak-with-api-gateway-to-secure-apis.md
b/website/blog/2022/07/06/use-keycloak-with-api-gateway-to-secure-apis.md
new file mode 100644
index 00000000000..29b1fd5ace7
--- /dev/null
+++ b/website/blog/2022/07/06/use-keycloak-with-api-gateway-to-secure-apis.md
@@ -0,0 +1,294 @@
+---
+title: "Use Keycloak with API Gateway to secure APIs"
+authors:
+ - name: "Xinxin Zhu"
+ title: "Apache APISIX Committer"
+ url: "https://github.com/starsz";
+ image_url: "https://github.com/starsz.png";
+ - name: "Zhiyuan Ju"
+ title: "Apache Member"
+ url: "https://github.com/juzhiyuan";
+ image_url: "https://github.com/juzhiyuan.png";
+keywords:
+ - Apache APISIX
+ - API Gateway
+ - Authentication
+ - OpenID Connect
+ - Keycloak
+description: This article describes how API Gateway integrates with Keycloak
(OpenID Connect Provider) to secure your APIs.
+tags: [Authentication]
+---
+
+> This article describes how Apache APISIX integrates with Keycloak (OpenID
Connect Provider) to secure your APIs.
+
+<!--truncate-->
+
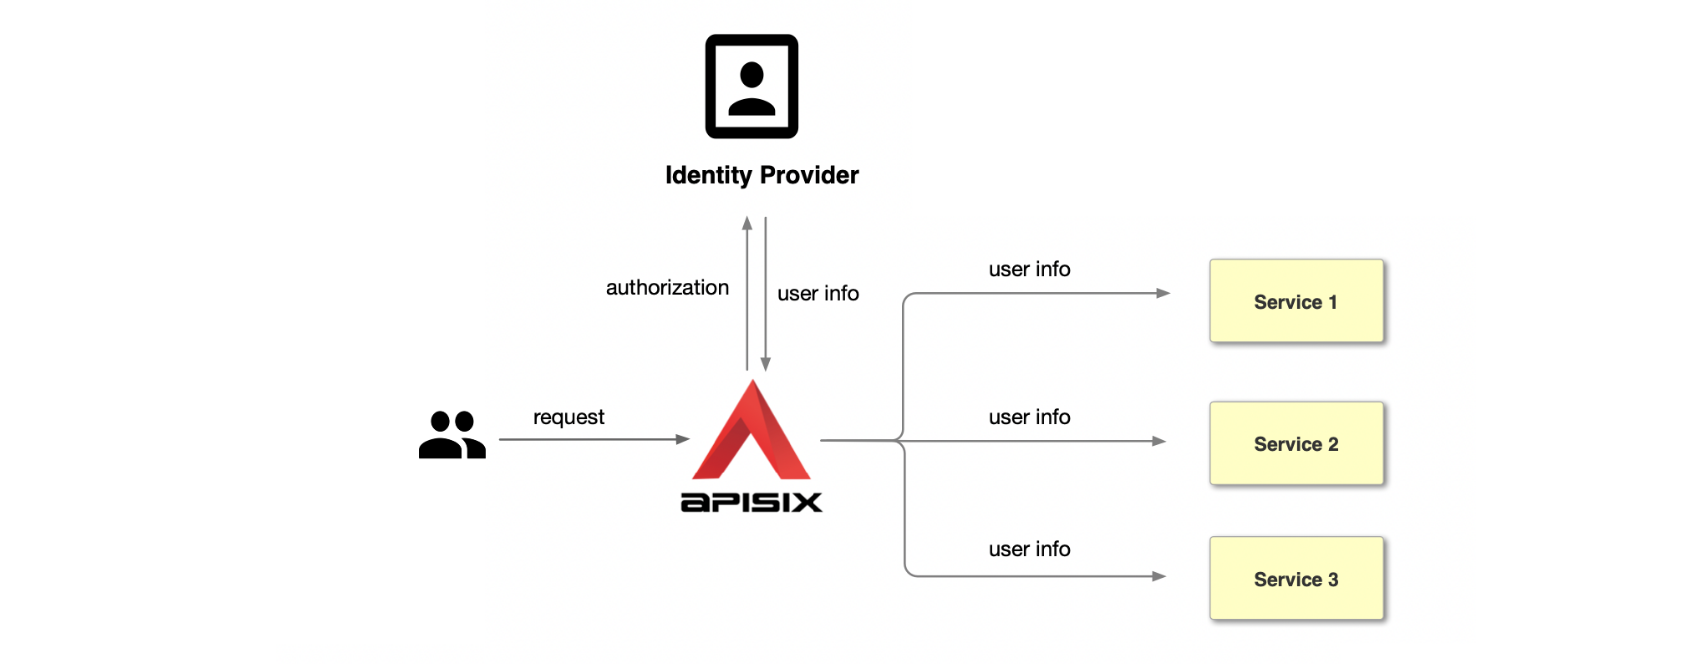
+OpenID Connect referred to as OIDC, is an authentication protocol based on the
OAuth 2.0. It allows the client to obtain user information from the identity
provider (IdP), e.g., Keycloak, Ory, Okta, Auth0, etc. The open-source API
Gateway Apache APISIX supports using the [openid-connect
plugin](https://apisix.apache.org/docs/apisix/plugins/openid-connect) to
integrate with the above identity Providers. It will redirect all
unauthenticated clients to IdP's login page. After the successful [...]
+
+
+
+Keycloak is an open-source identity and access management. It adds
authentication to applications and secures services with minimum effort. Also,
it provides user federation, strong authentication, user management,
fine-grained authorization, and more. In this post, we will take
[Keycloak](https://www.keycloak.org/docs/latest/securing_apps/) as an example,
and let's see how to integrate it with APISIX to protect your services.
+
+## Workflow
+
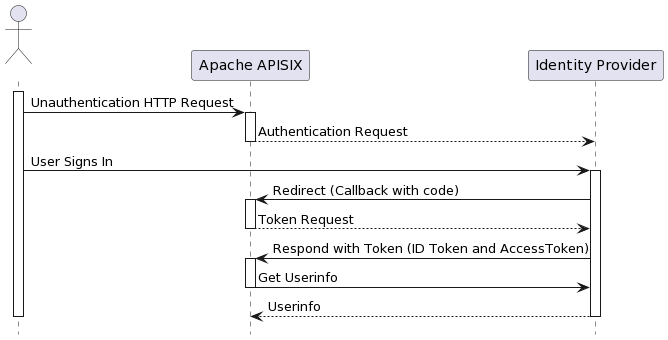
+The following diagram shows the OpenID-Connect protocol interaction flow.
+
+
+
+In the Redirect stage, Identity Provider redirects users to a pre-configured
Redirect URL, similar to `http://127.0.0.1:9080/callback`. But note: it is a
non-existent API that only captures the relevant request and processes the code
for Token exchange using OIDC logic. Please do not use this address as a
condition to trigger OIDC plugin redirection; otherwise, it will return the
error request to the redirect_uri path, but there's no session state found.
+
+## Terminology
+
+1. Bearer Only: Keycloak supports username/password or AccessTokens for
authentication, and if the bearer_only option is enabled, only AccessTokens are
allowed for authentication, which is applicable for access authentication
between services.
+2. Realm: A realm in Keycloak is the equivalent of a tenant; realms are
isolated from one another and can only manage and authenticate their users.
+3. Scope: Client scope is a way to limit the roles that get declared inside an
access token. For example, when a client requests that a user be authenticated,
the access token they receive back will only contain the role mappings you’ve
explicitly specified for the client’s scope. Client scope allows you to limit
each individual access token's permissions rather than giving the client access
to all of the user’s permissions.
+4. User: Users are entities that can log in to Keycloak. Please think about
"Sign in with Google."
+5. Client: Clients are services (entities) that want to use Keycloak to
protect themselves.
+
+## Prerequisites
+
+> 1. This guide will use CentOS 7 and Docker v20.10.17 to install and start
Keycloak.
+> 2. If you deploy Keycloak and APISIX on your server, please change the
following IP (127.0.0.1) to your server's IP.
+
+### Apache APISIX
+
+Please refer to https://apisix.apache.org/docs/apisix/getting-started to
install and start APISIX. After that, you could visit `http://127.0.0.1:9080/`
to access the APISIX instance.
+
+### Keycloak
+
+Execute the following command to run Keycloak on the server, and we pass admin
as Keycloak administrator's username and password.
+
+```shell
+docker run -d -p 8080:8080 -e KEYCLOAK_ADMIN=admin -e
KEYCLOAK_ADMIN_PASSWORD=admin quay.io/keycloak/keycloak:18.0.2 start-dev
+
+61a6d6cbfb1f9fe81a6a0dfde7e8ba15e58bf99303697c4e73ab249d005a6678
+```
+
+Check if the Keycloak container starts successfully.
+
+```shell
+docker ps -a
+
+CONTAINER ID IMAGE COMMAND
CREATED STATUS PORTS
NAMES
+61a6d6cbfb1f quay.io/keycloak/keycloak:18.0.2 "/opt/keycloak/bin/k…" 11
seconds ago Up 10 seconds 0.0.0.0:8080->8080/tcp, :::8080->8080/tcp,
8443/tcp heuristic_dirac
+```
+
+Once started, Keycloak will be available on port `8080`.
+
+#### Create a Realm
+
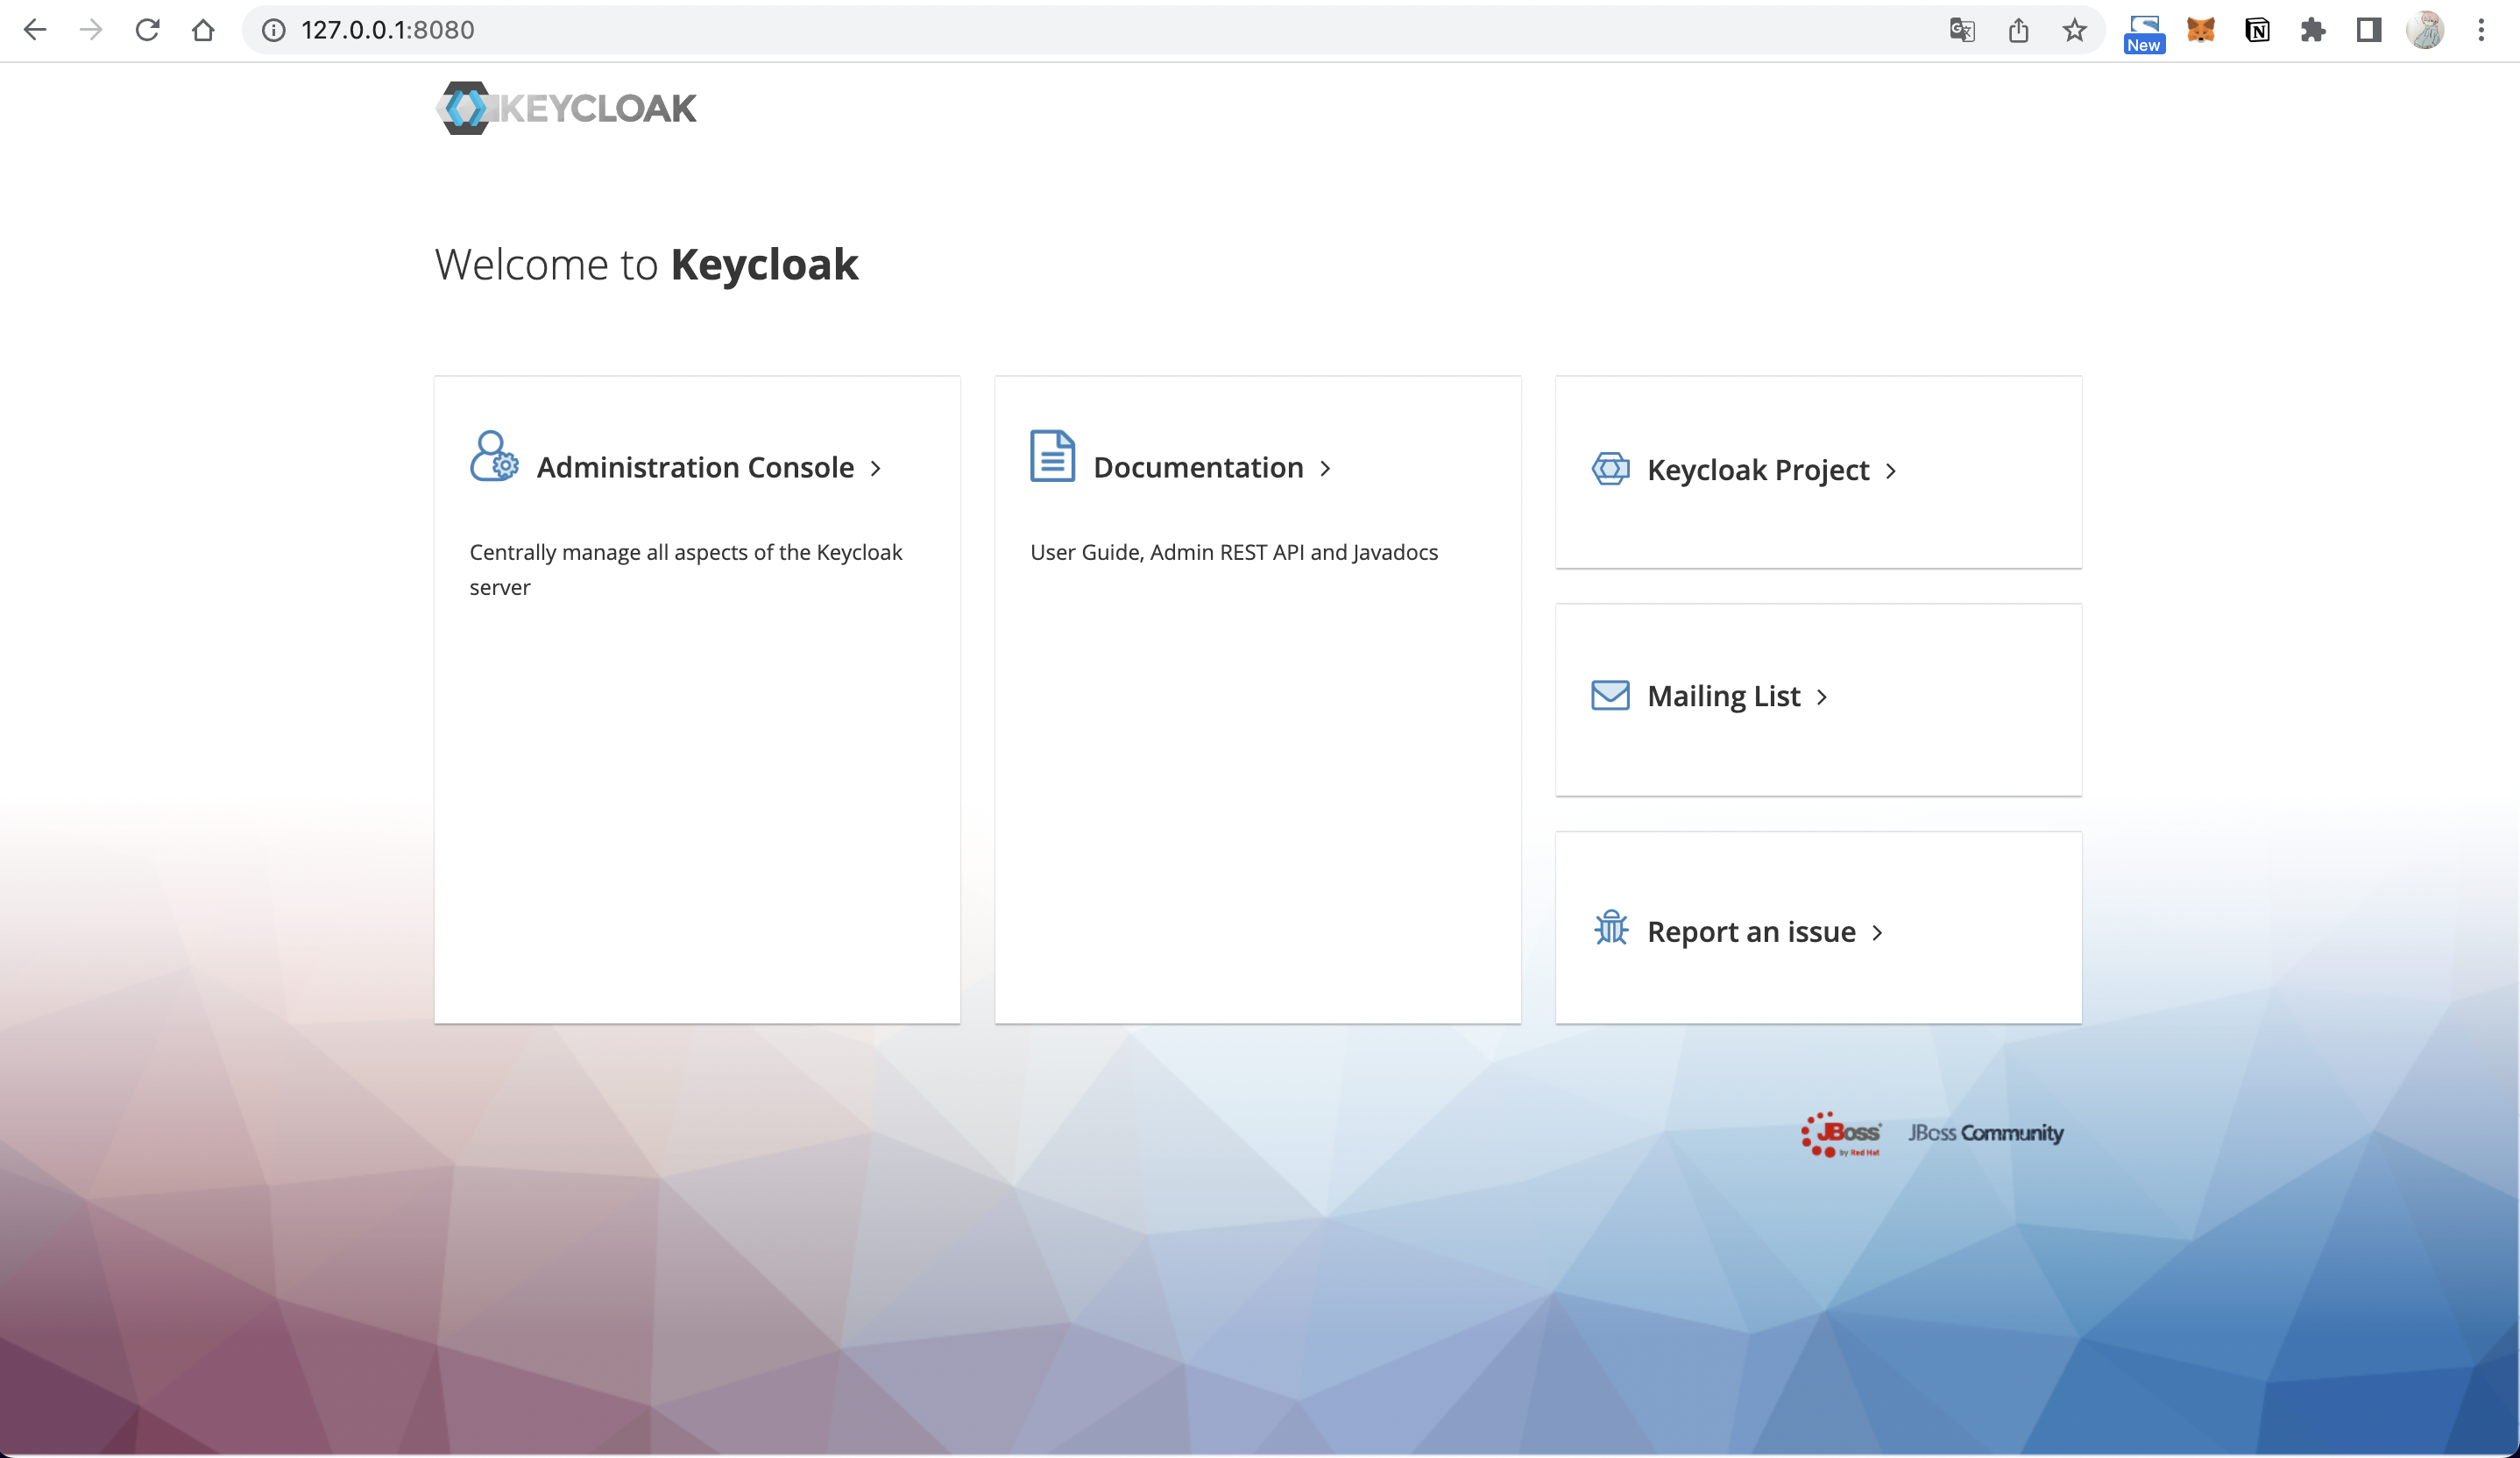
+Visit `http://127.0.0.1:8080/` in your browser to display the following
screen, indicating that Keycloak has started successfully.
+
+
+
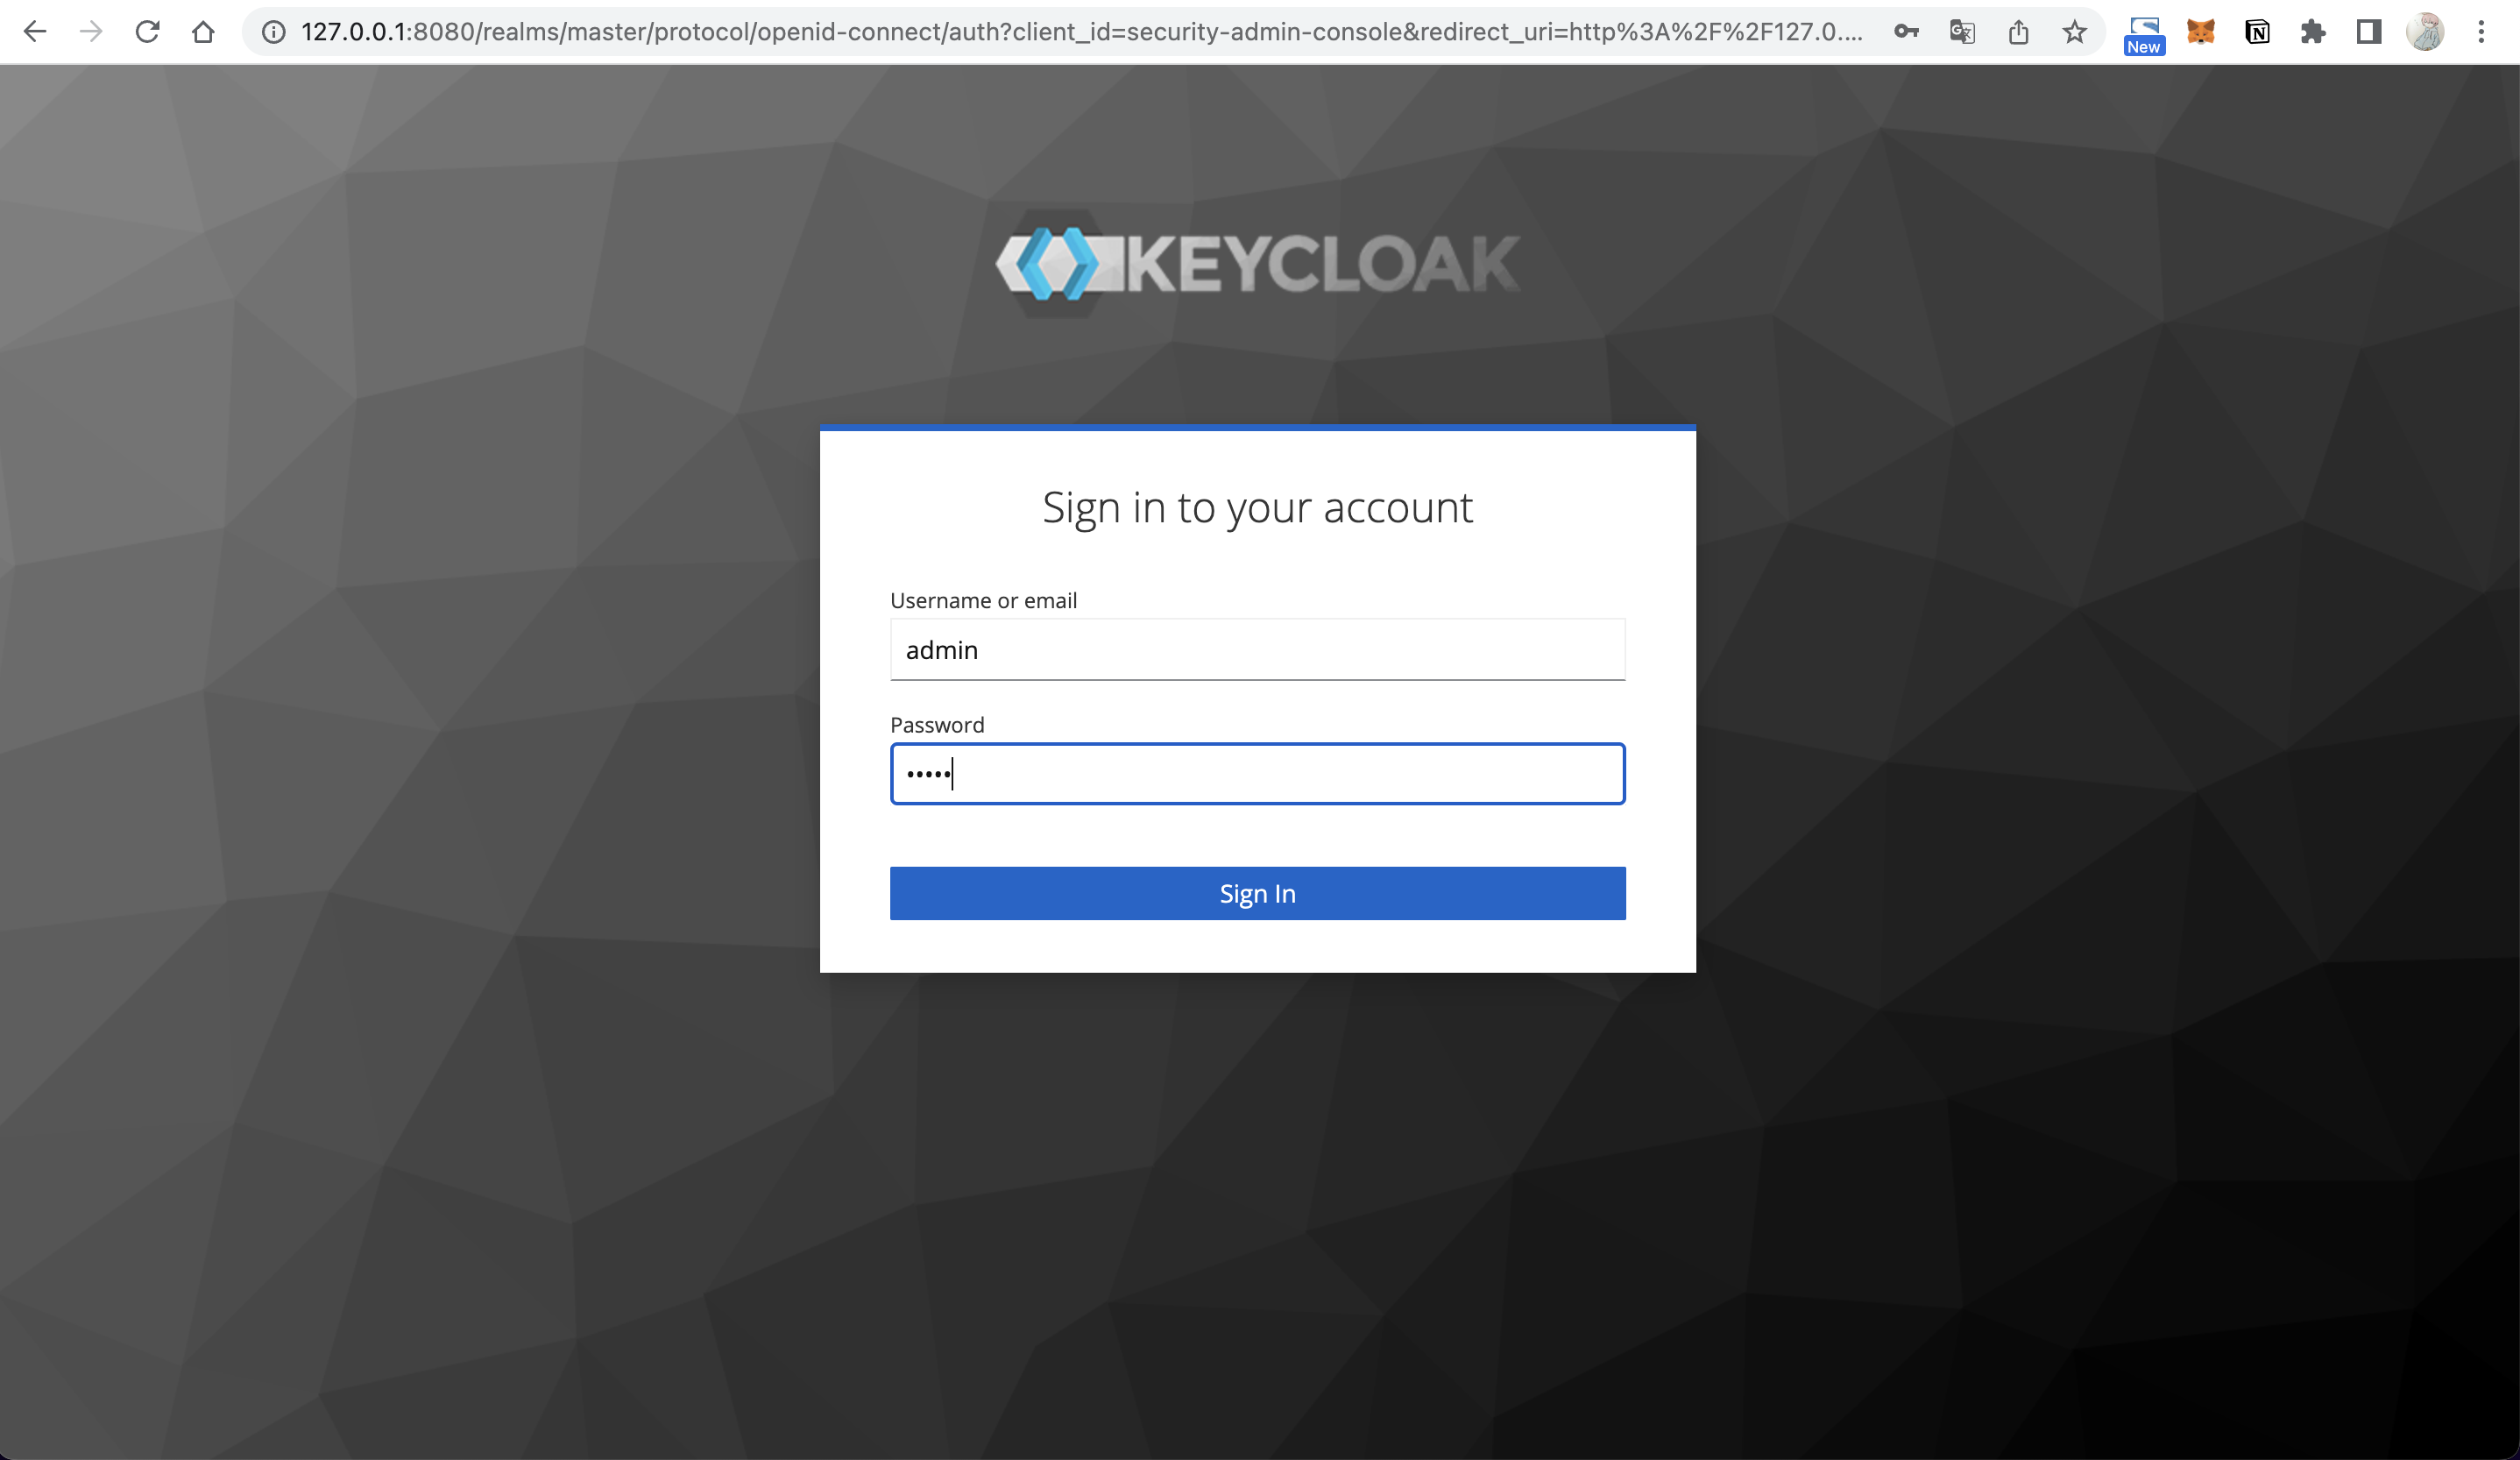
+Go to the Administrator Console and log in using admin as the username and
password.
+
+
+
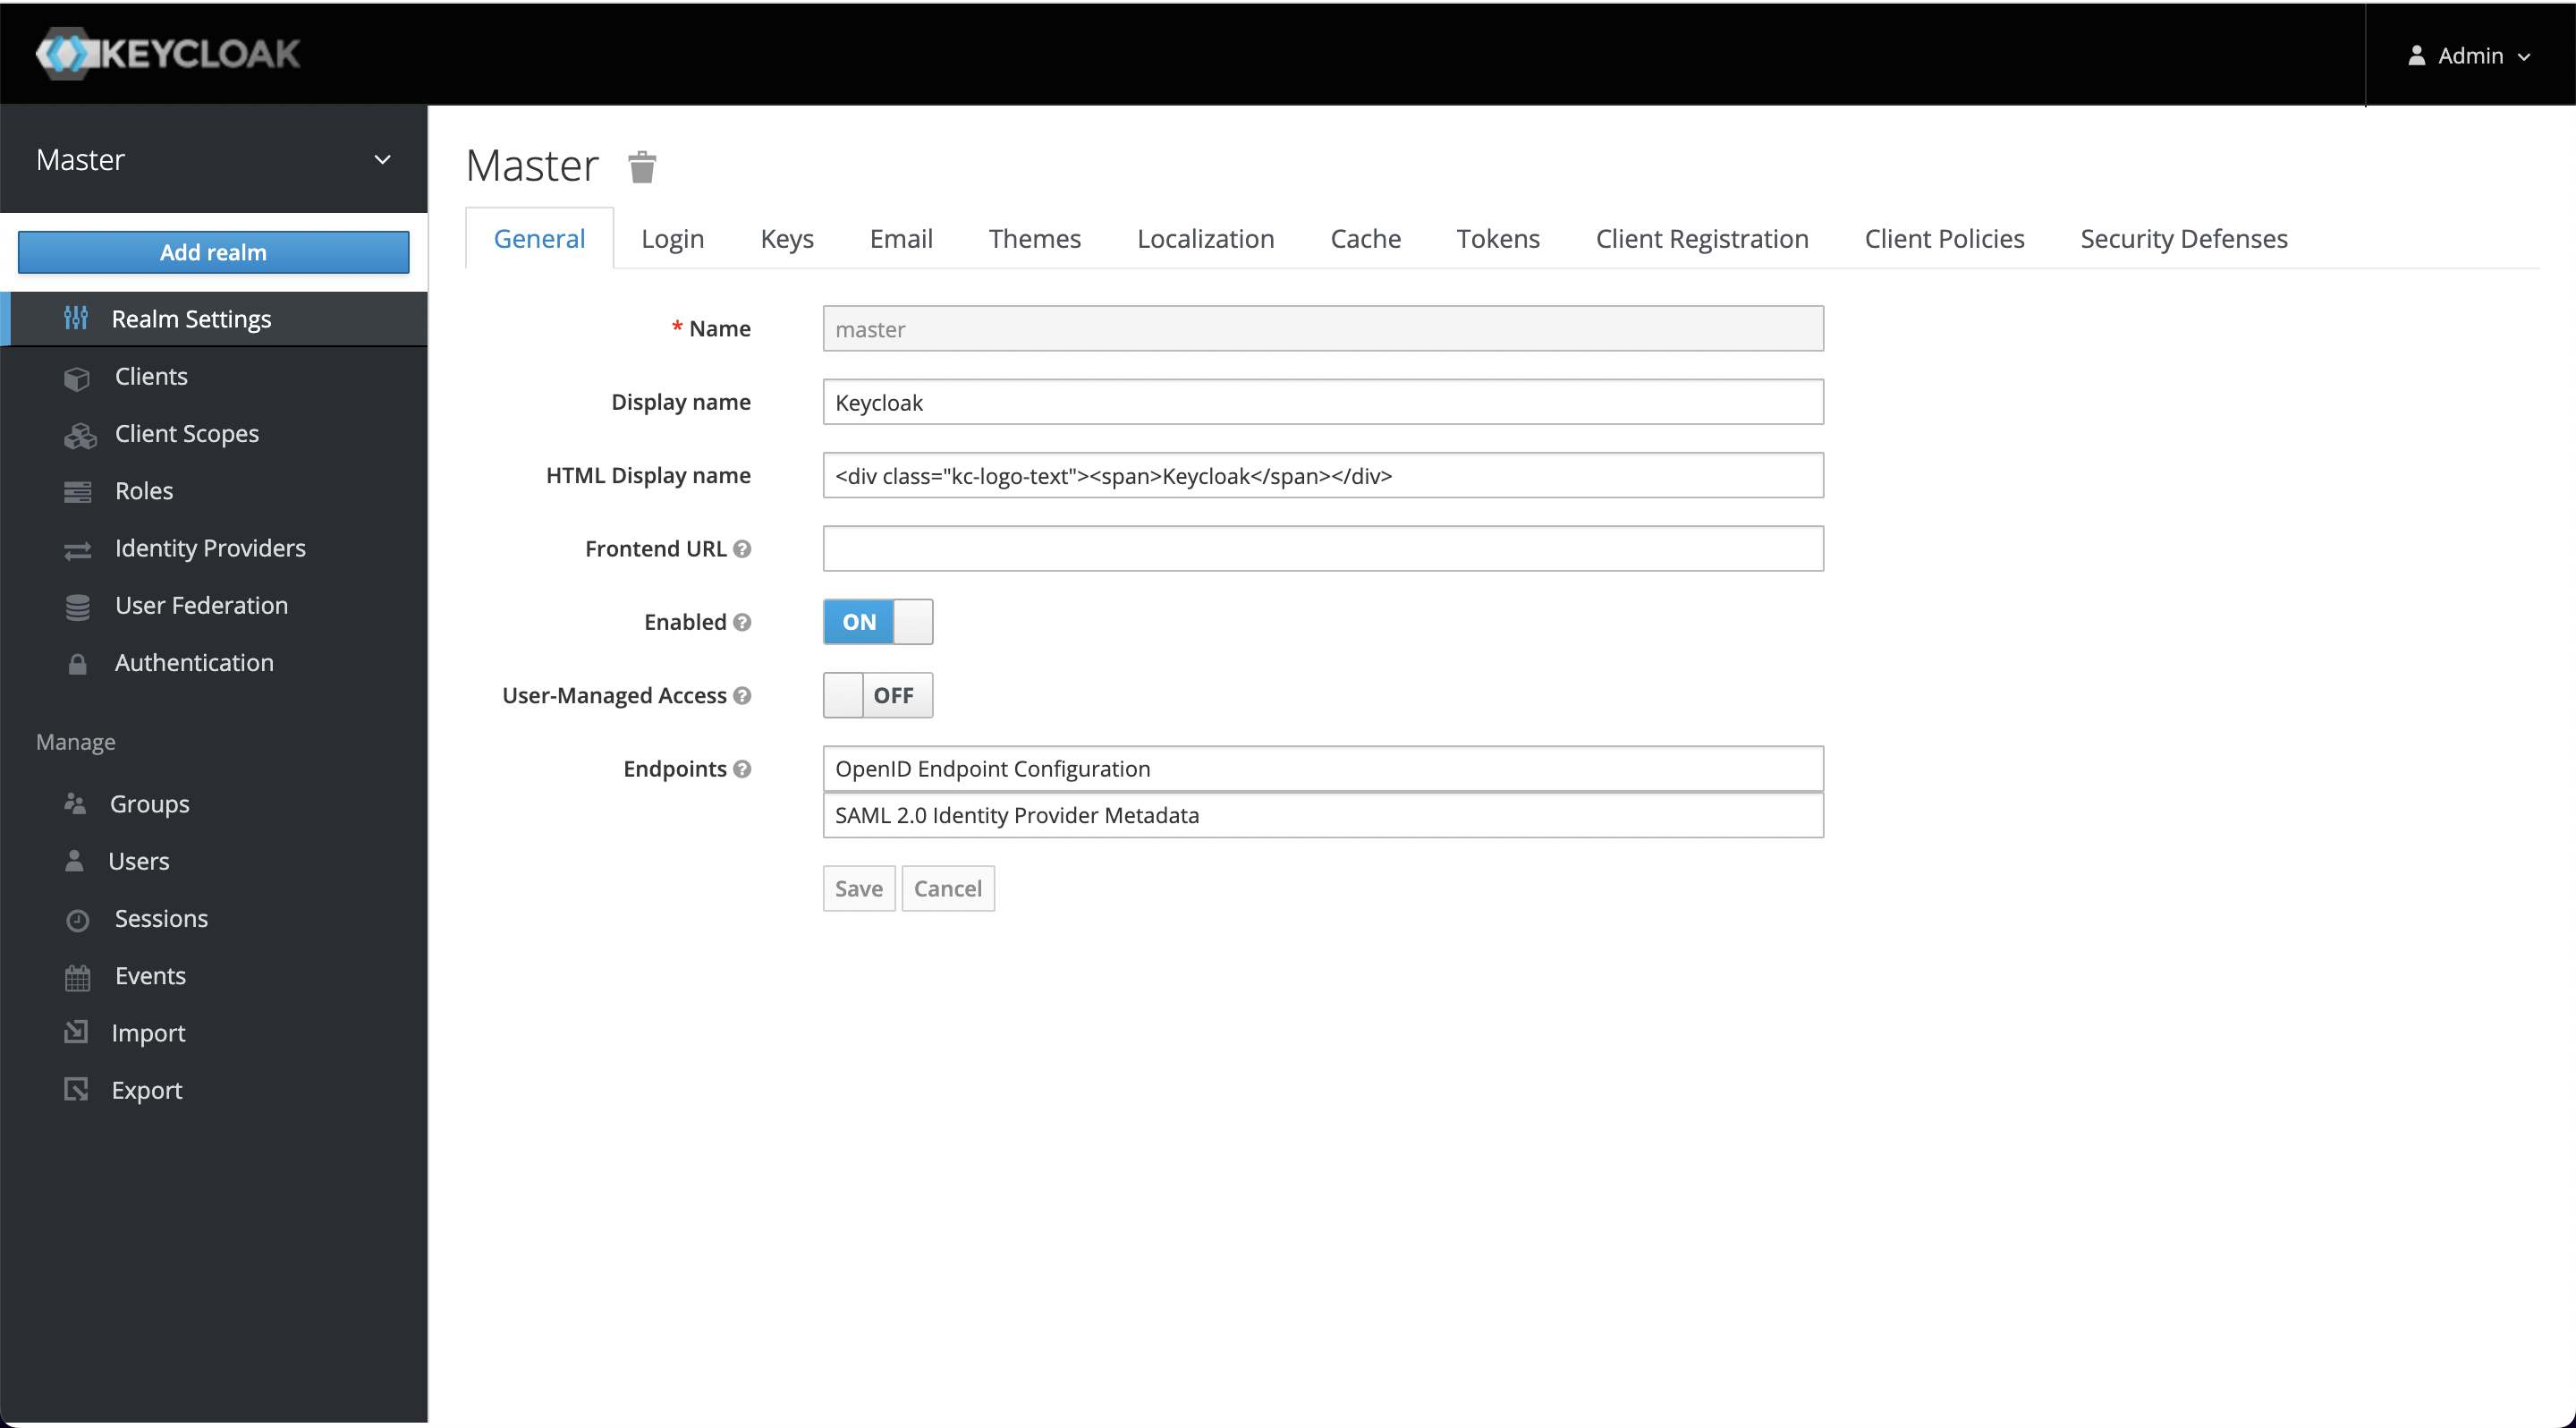
+When you log in for the first time after installation, a Realm named master
will be created in the system by default, but it's dedicated to managing
Keycloak, and we should not use it for our applications, so we need to create a
new one.
+
+
+
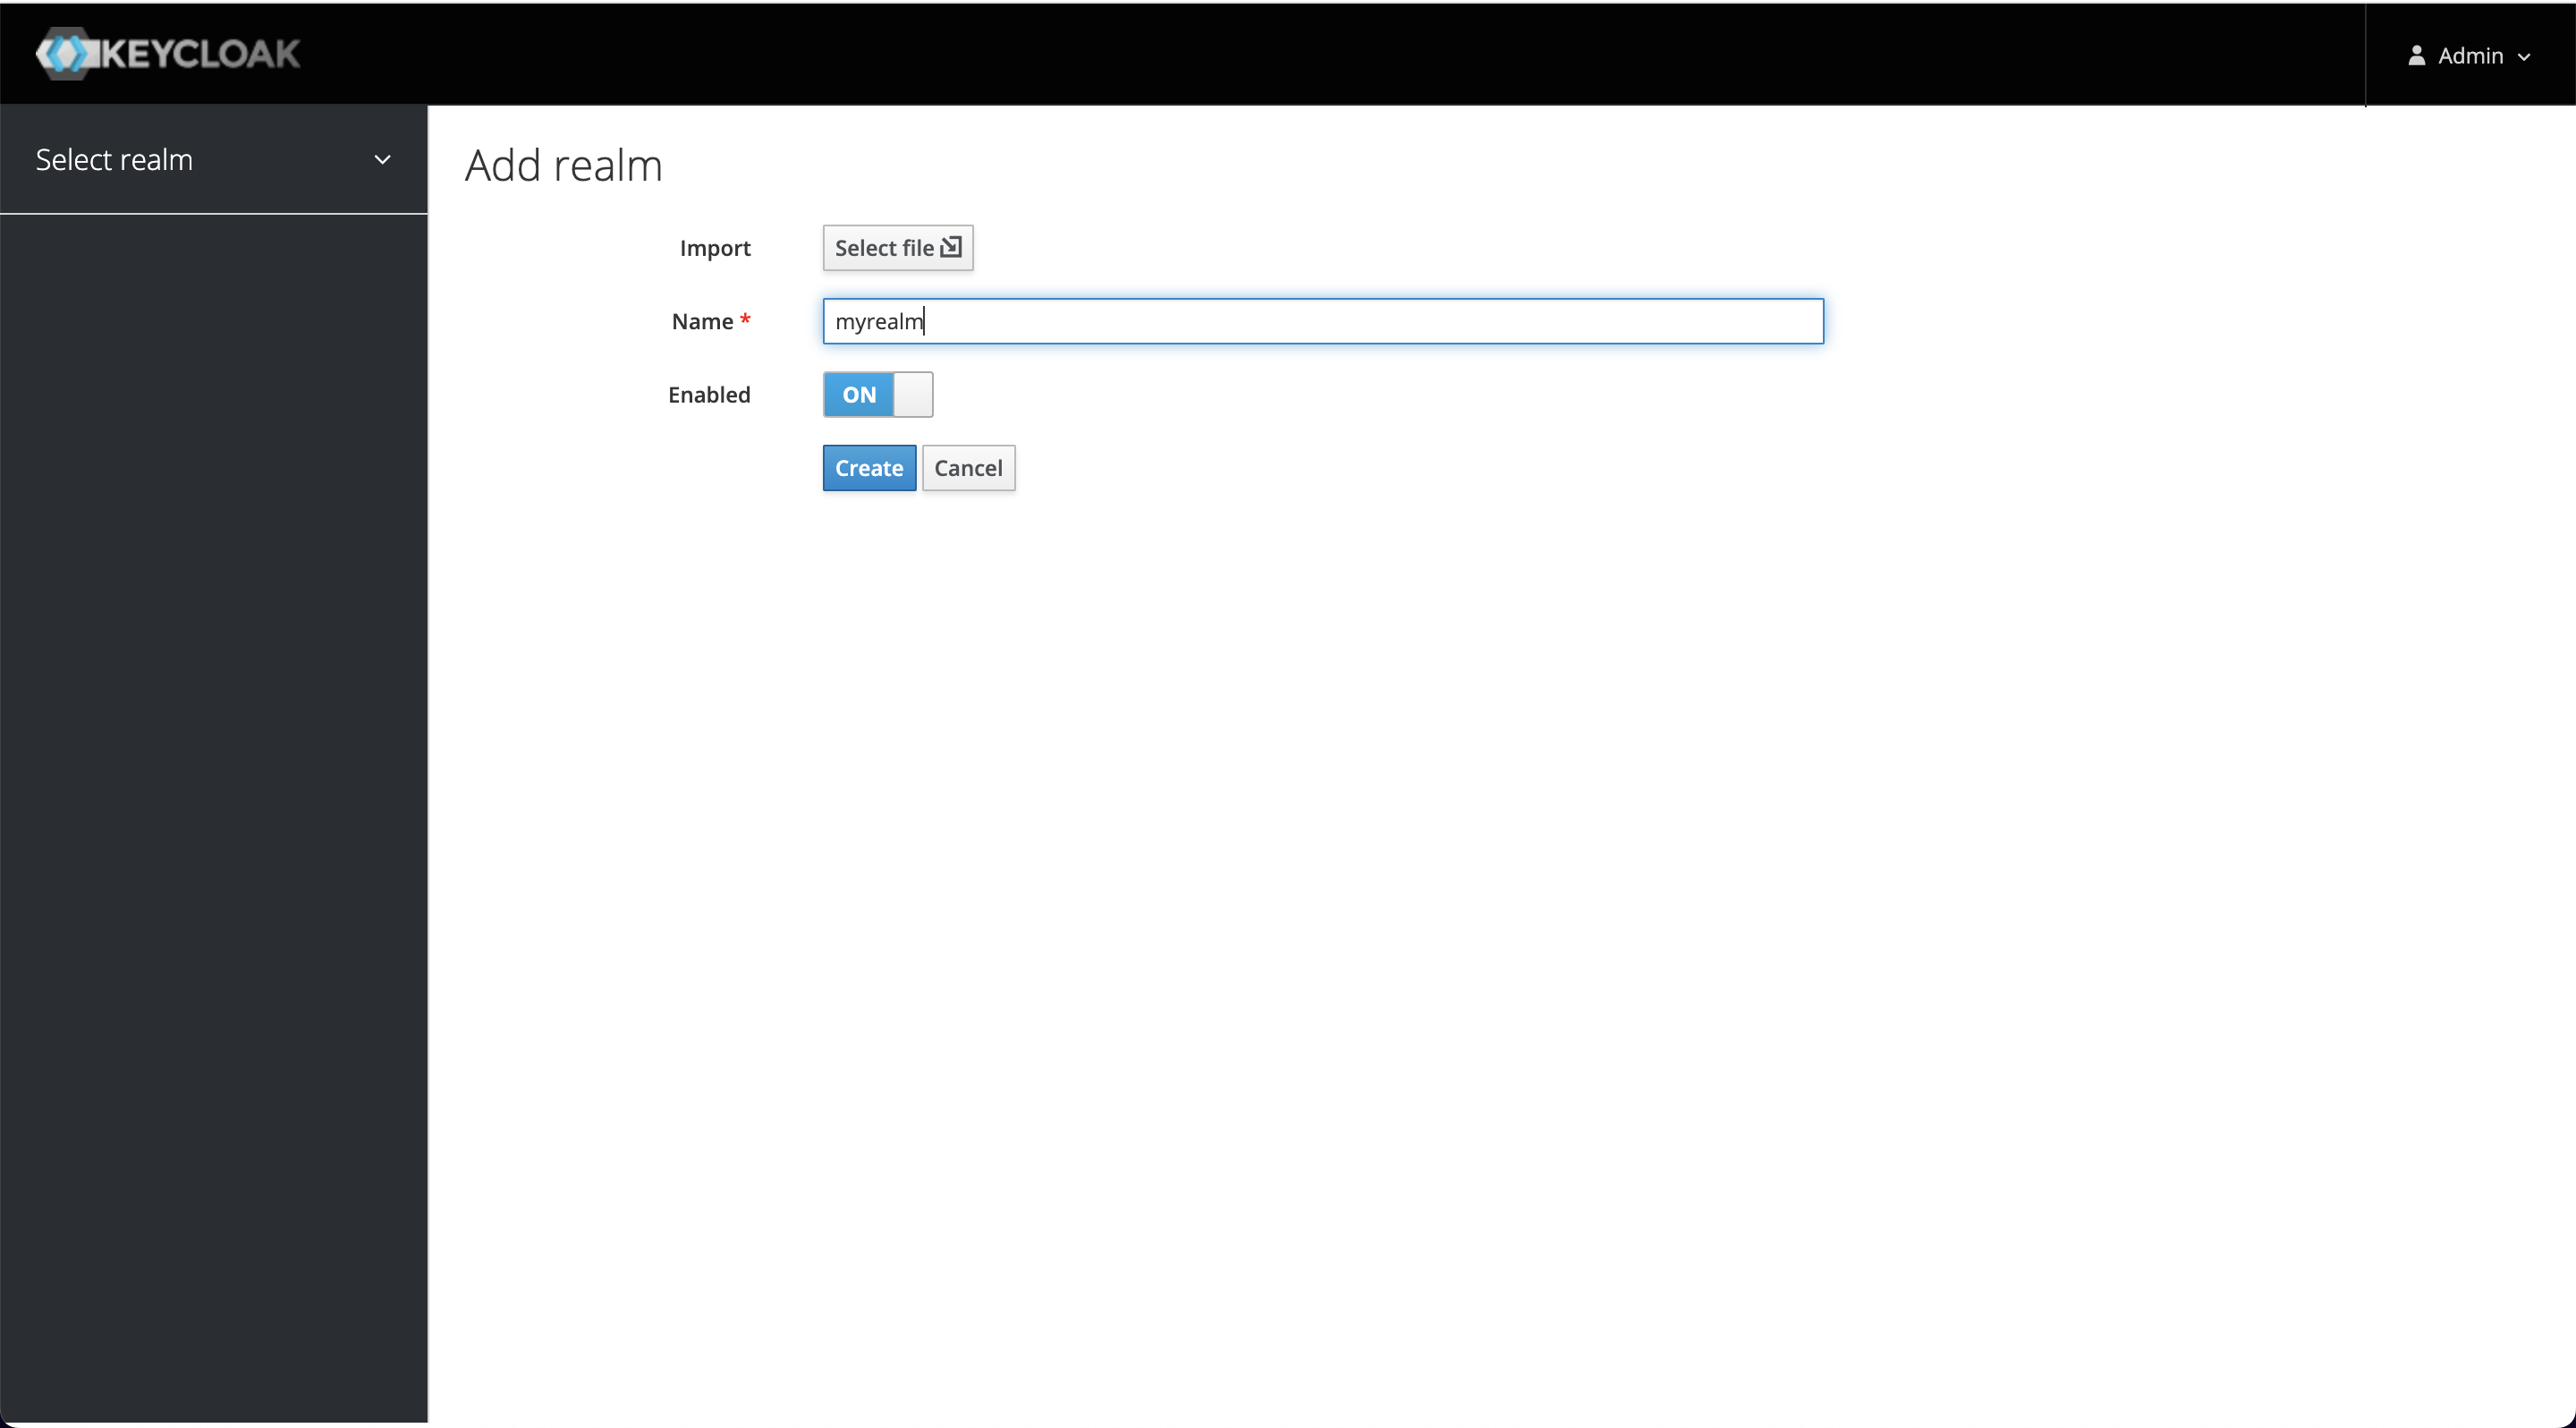
+Click Add realm when you mouse over the Master on the left and enter myrealm
as the Realm's name to create it.
+
+
+
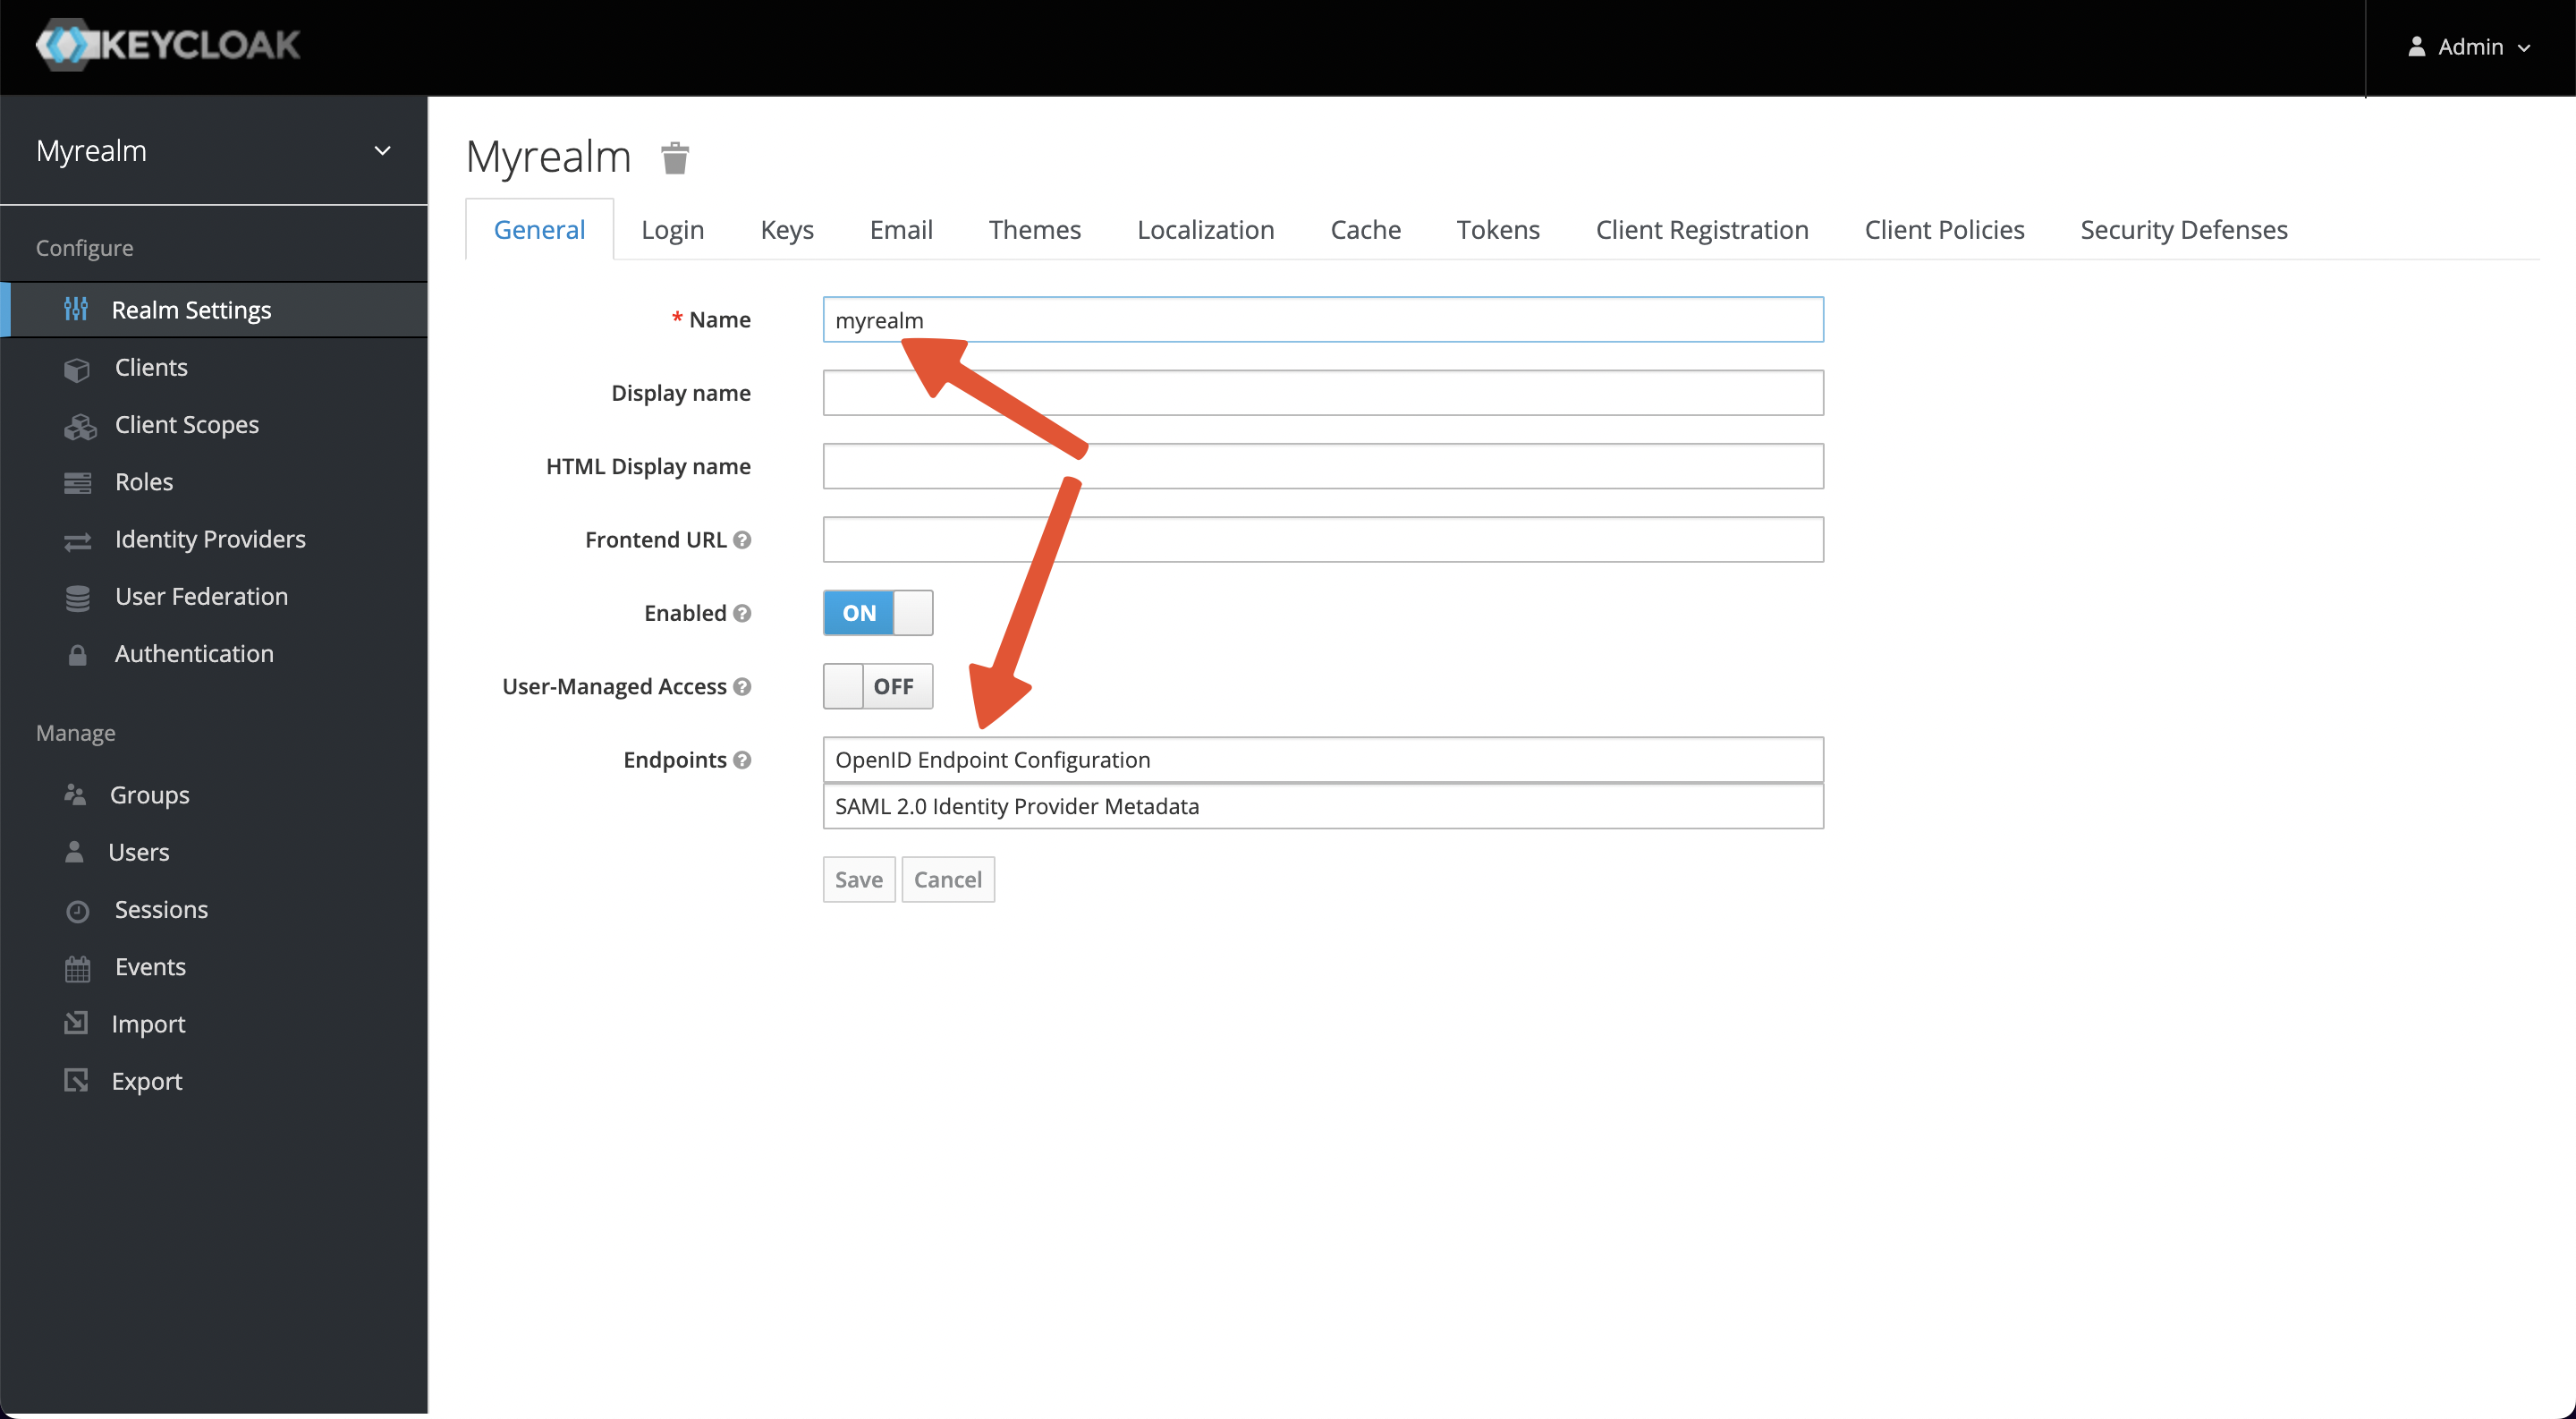
+After successful creation, you will see that you have switched to myrealm and
at the bottom, you have Endpoints -> OpenID Endpoint Configuration at
`http://127.0.0.1:8080/realms/myrealm/.well-known/openid-configuration`.
+
+This endpoint contains a Discovery file, which will be used later as the
address of each node that OIDC needs to use.
+
+
+
+#### Create a User
+
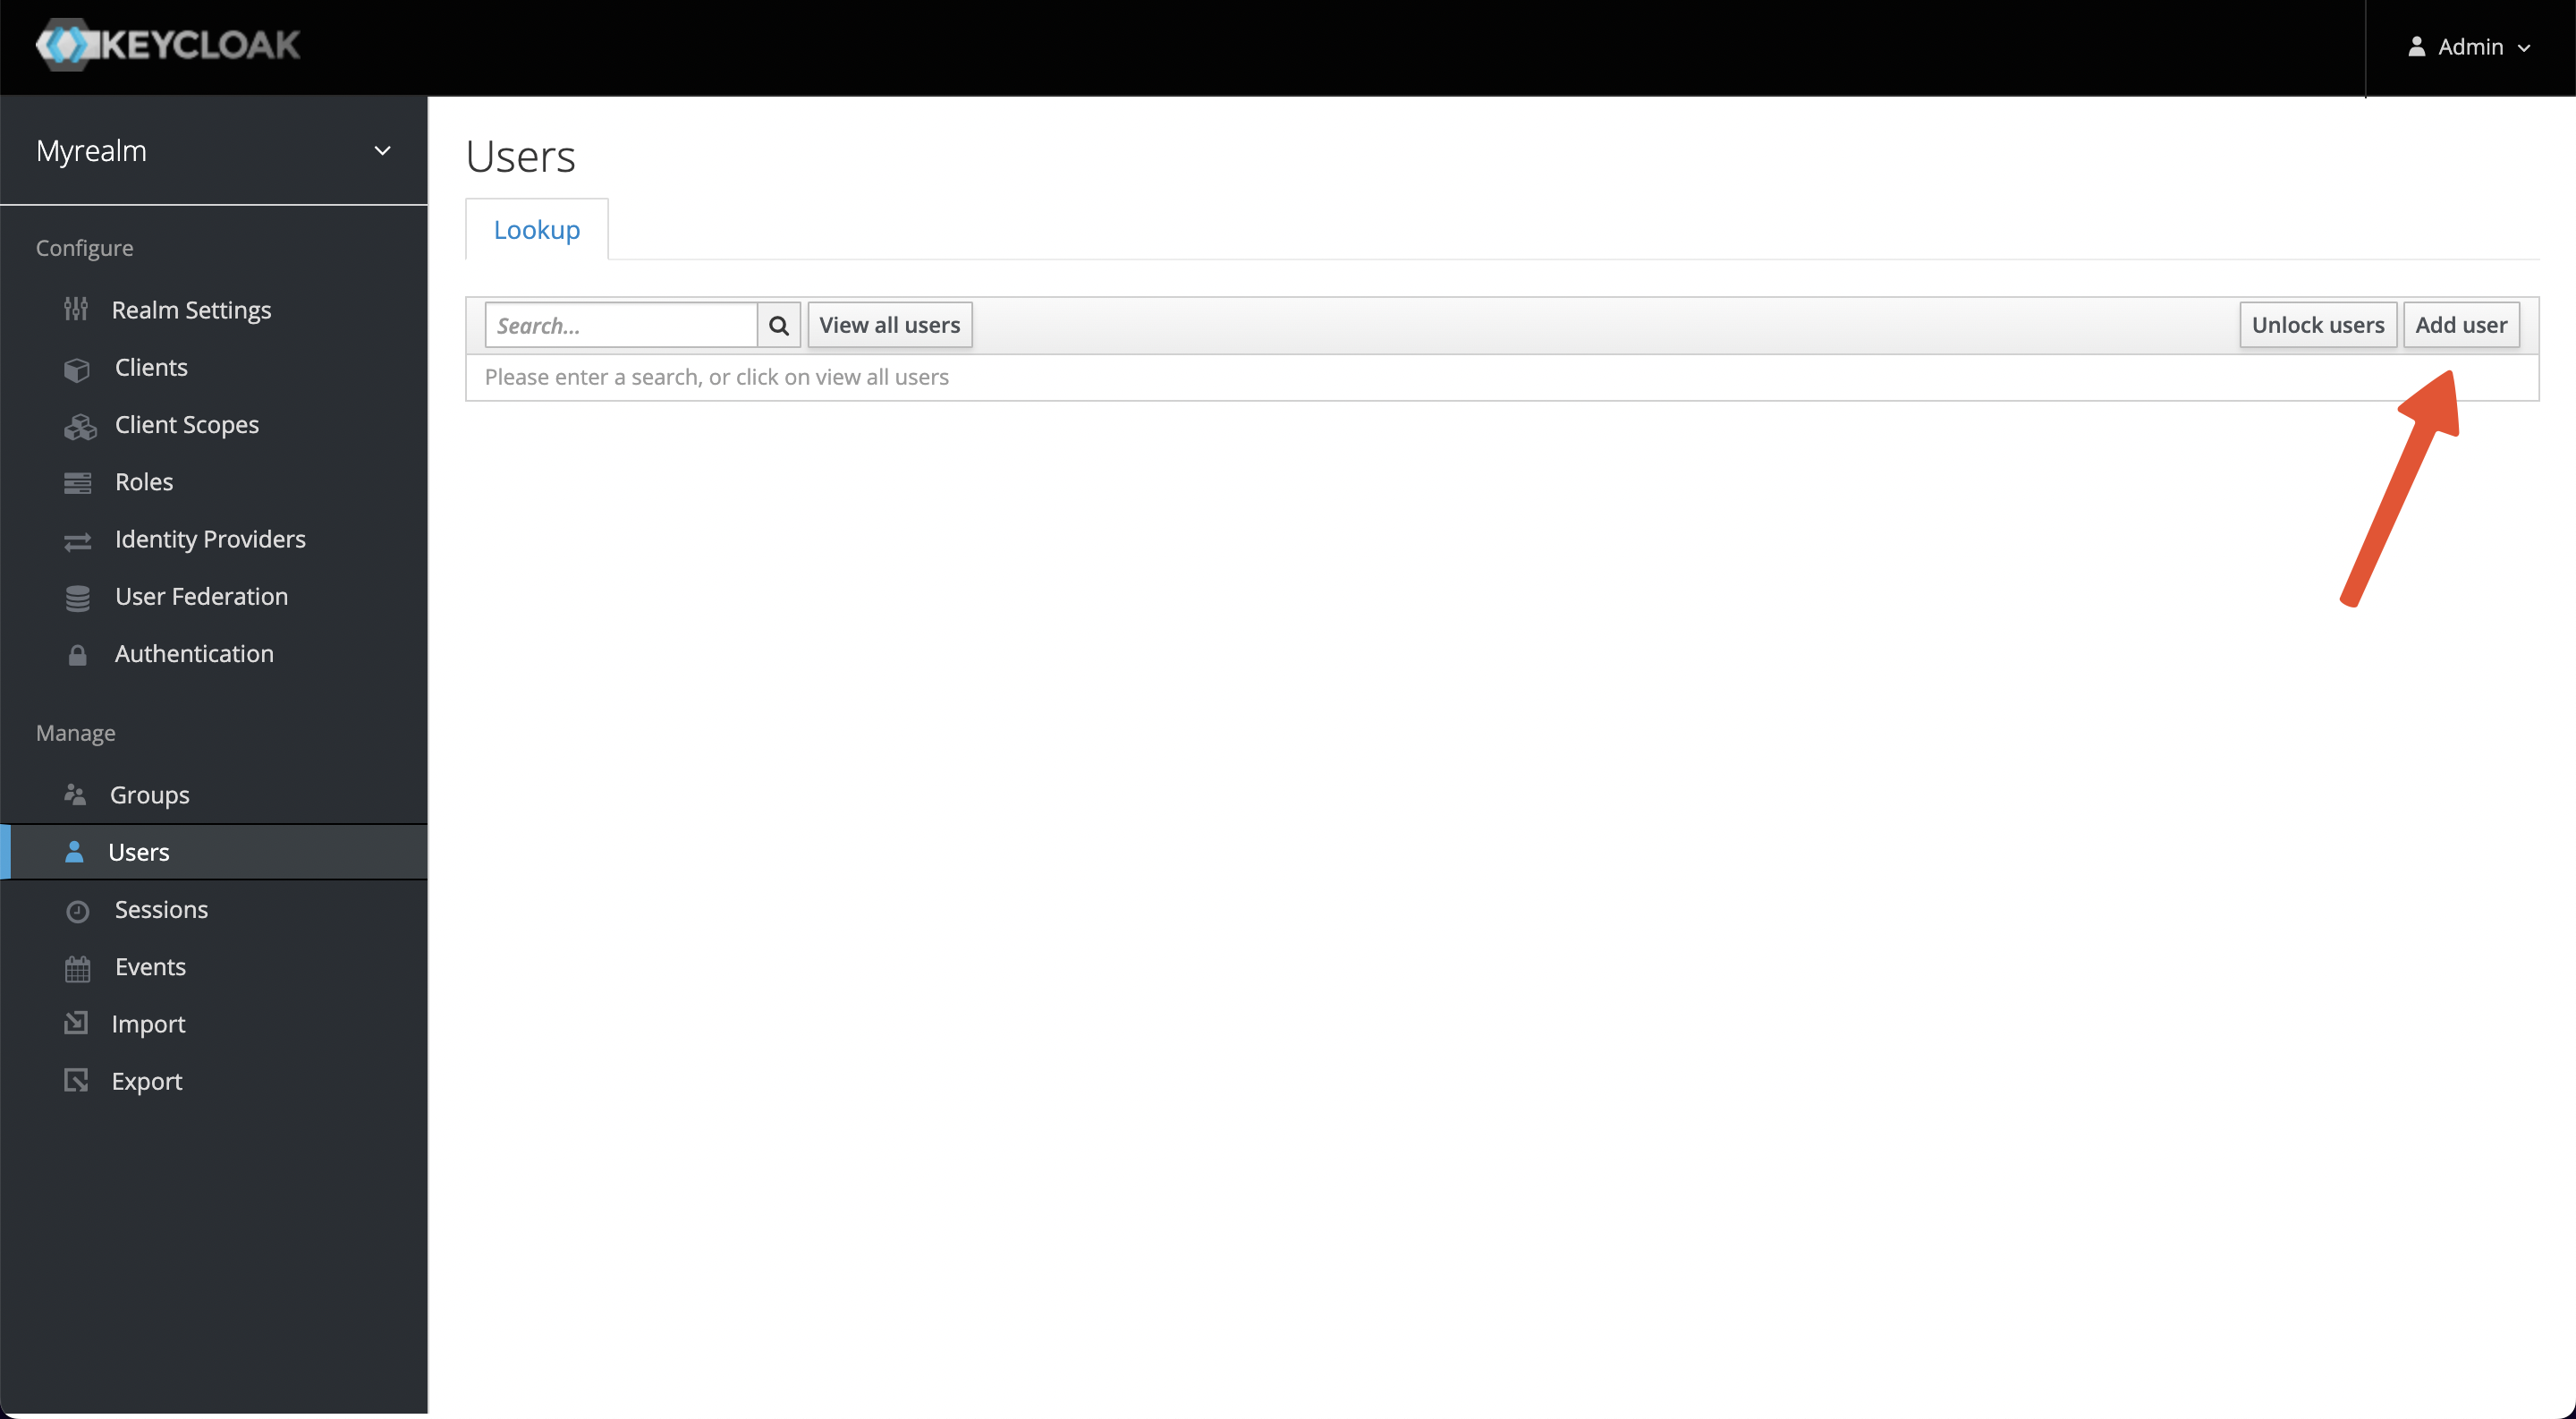
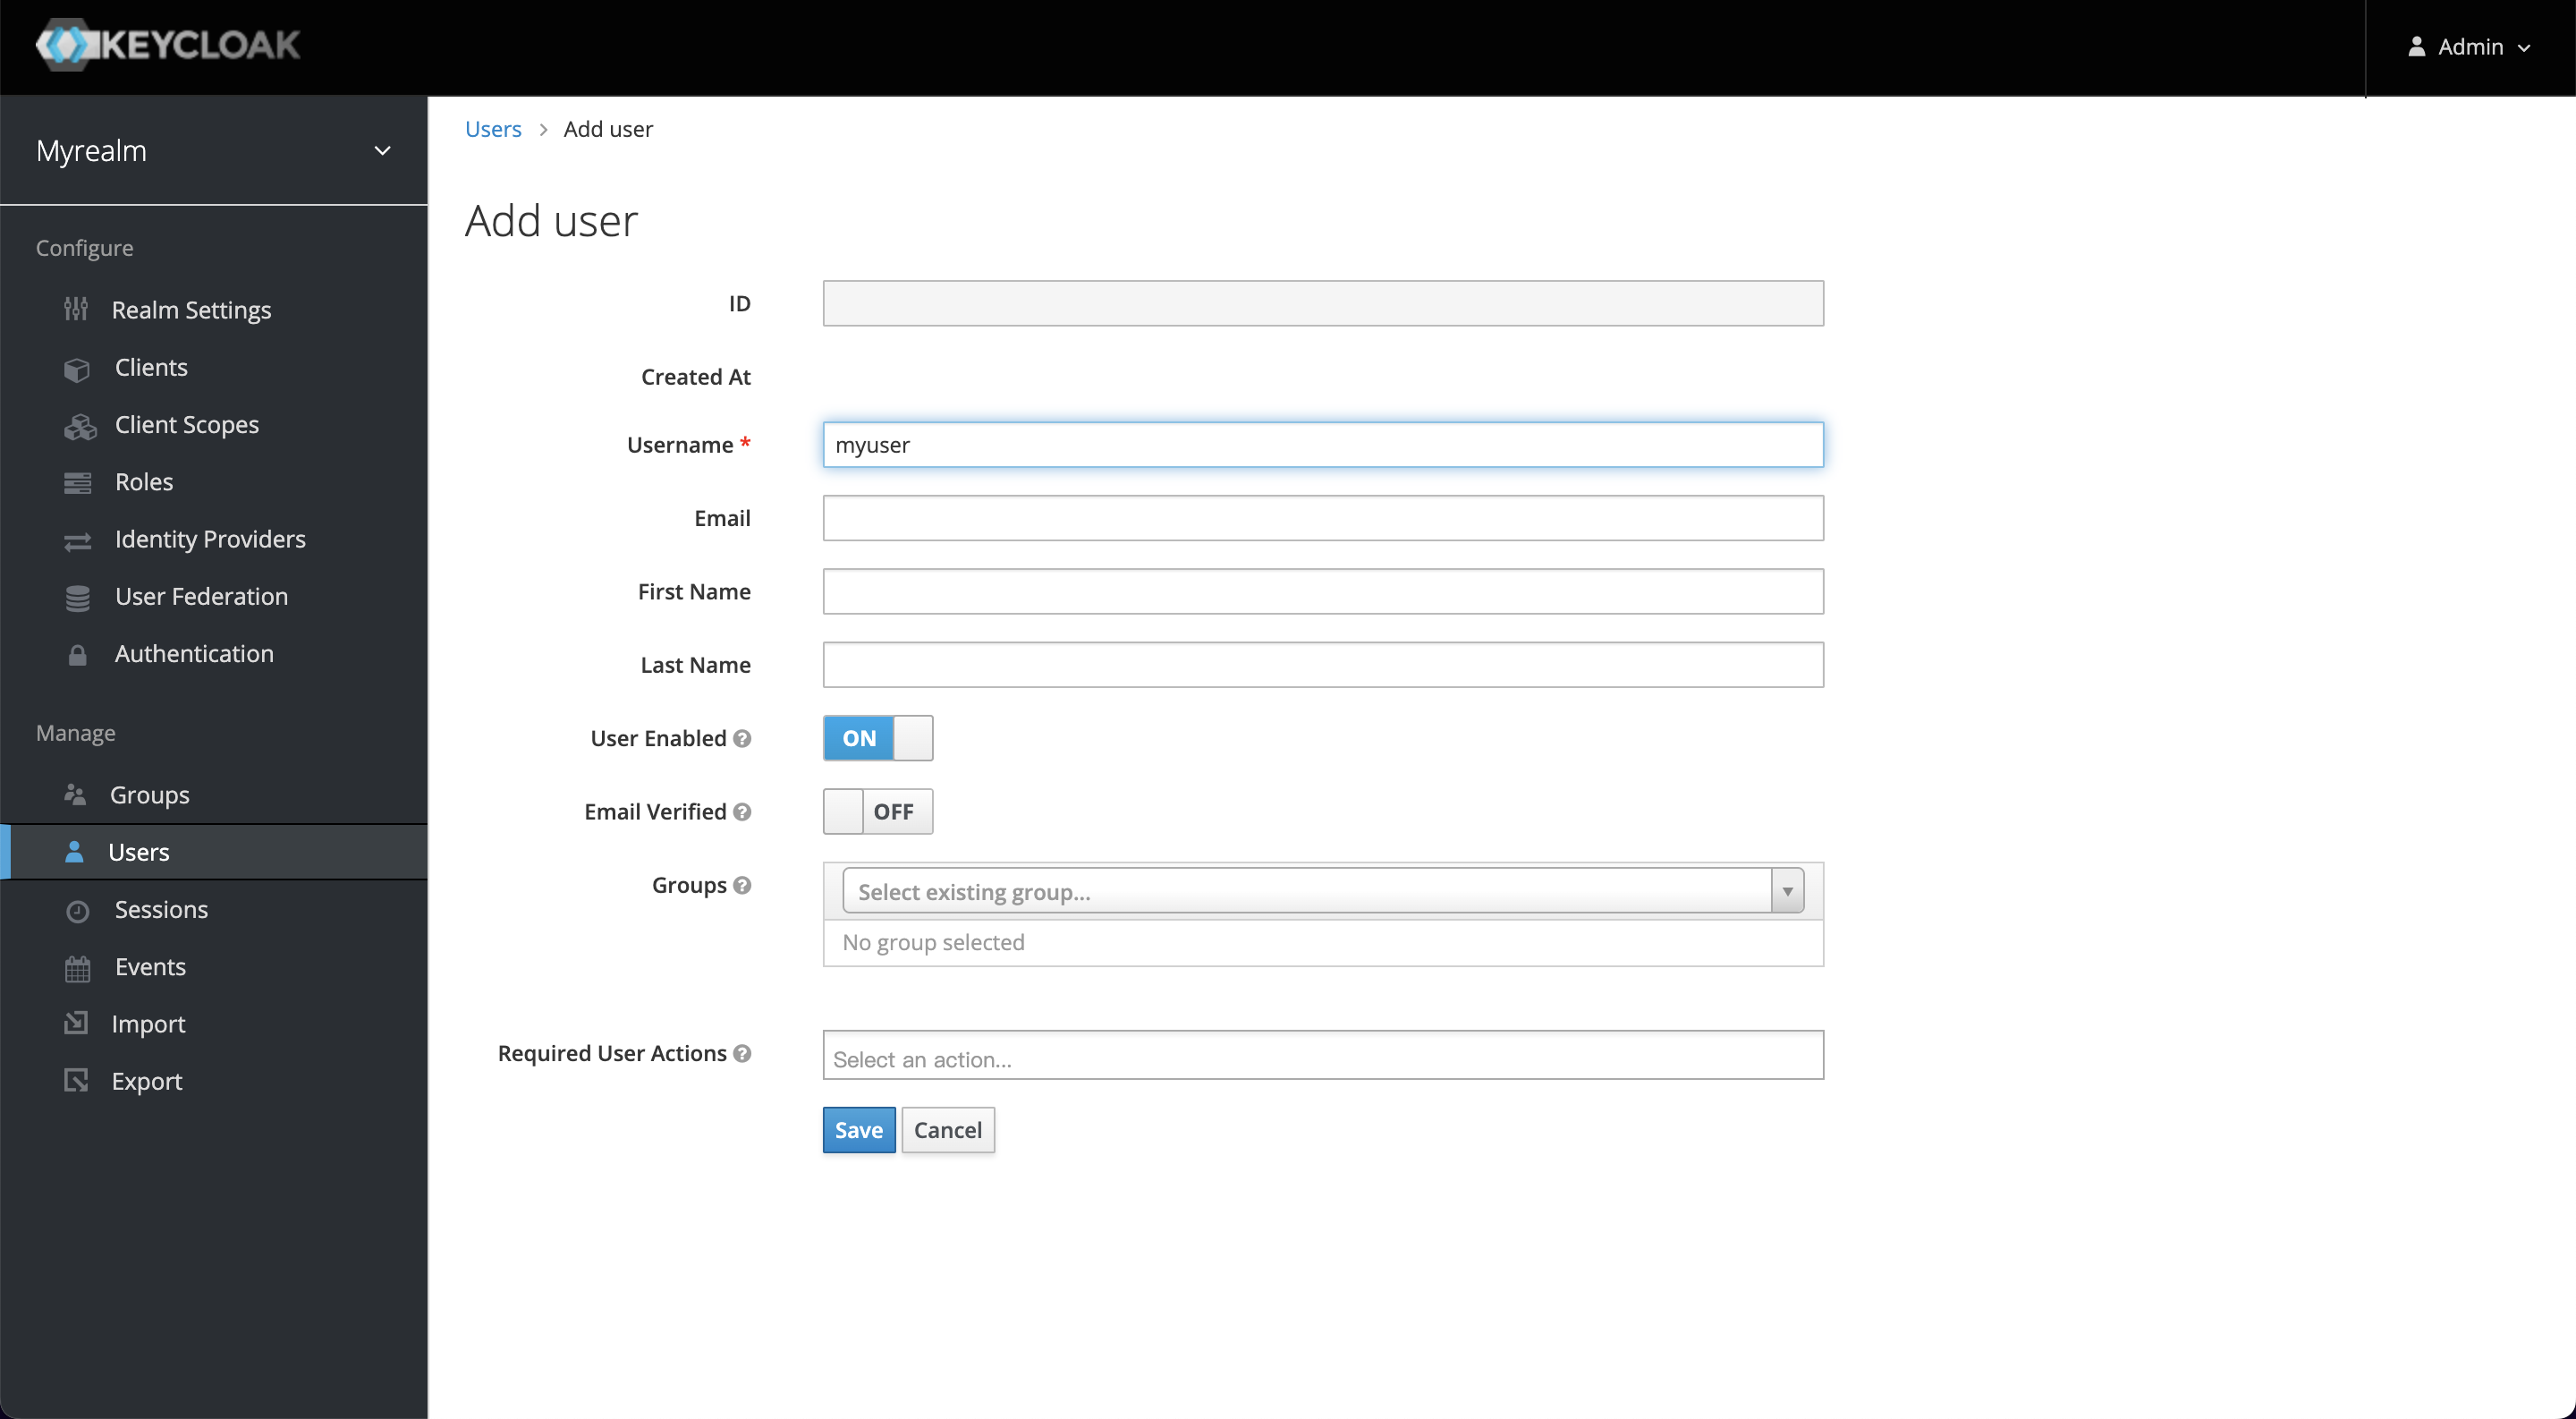
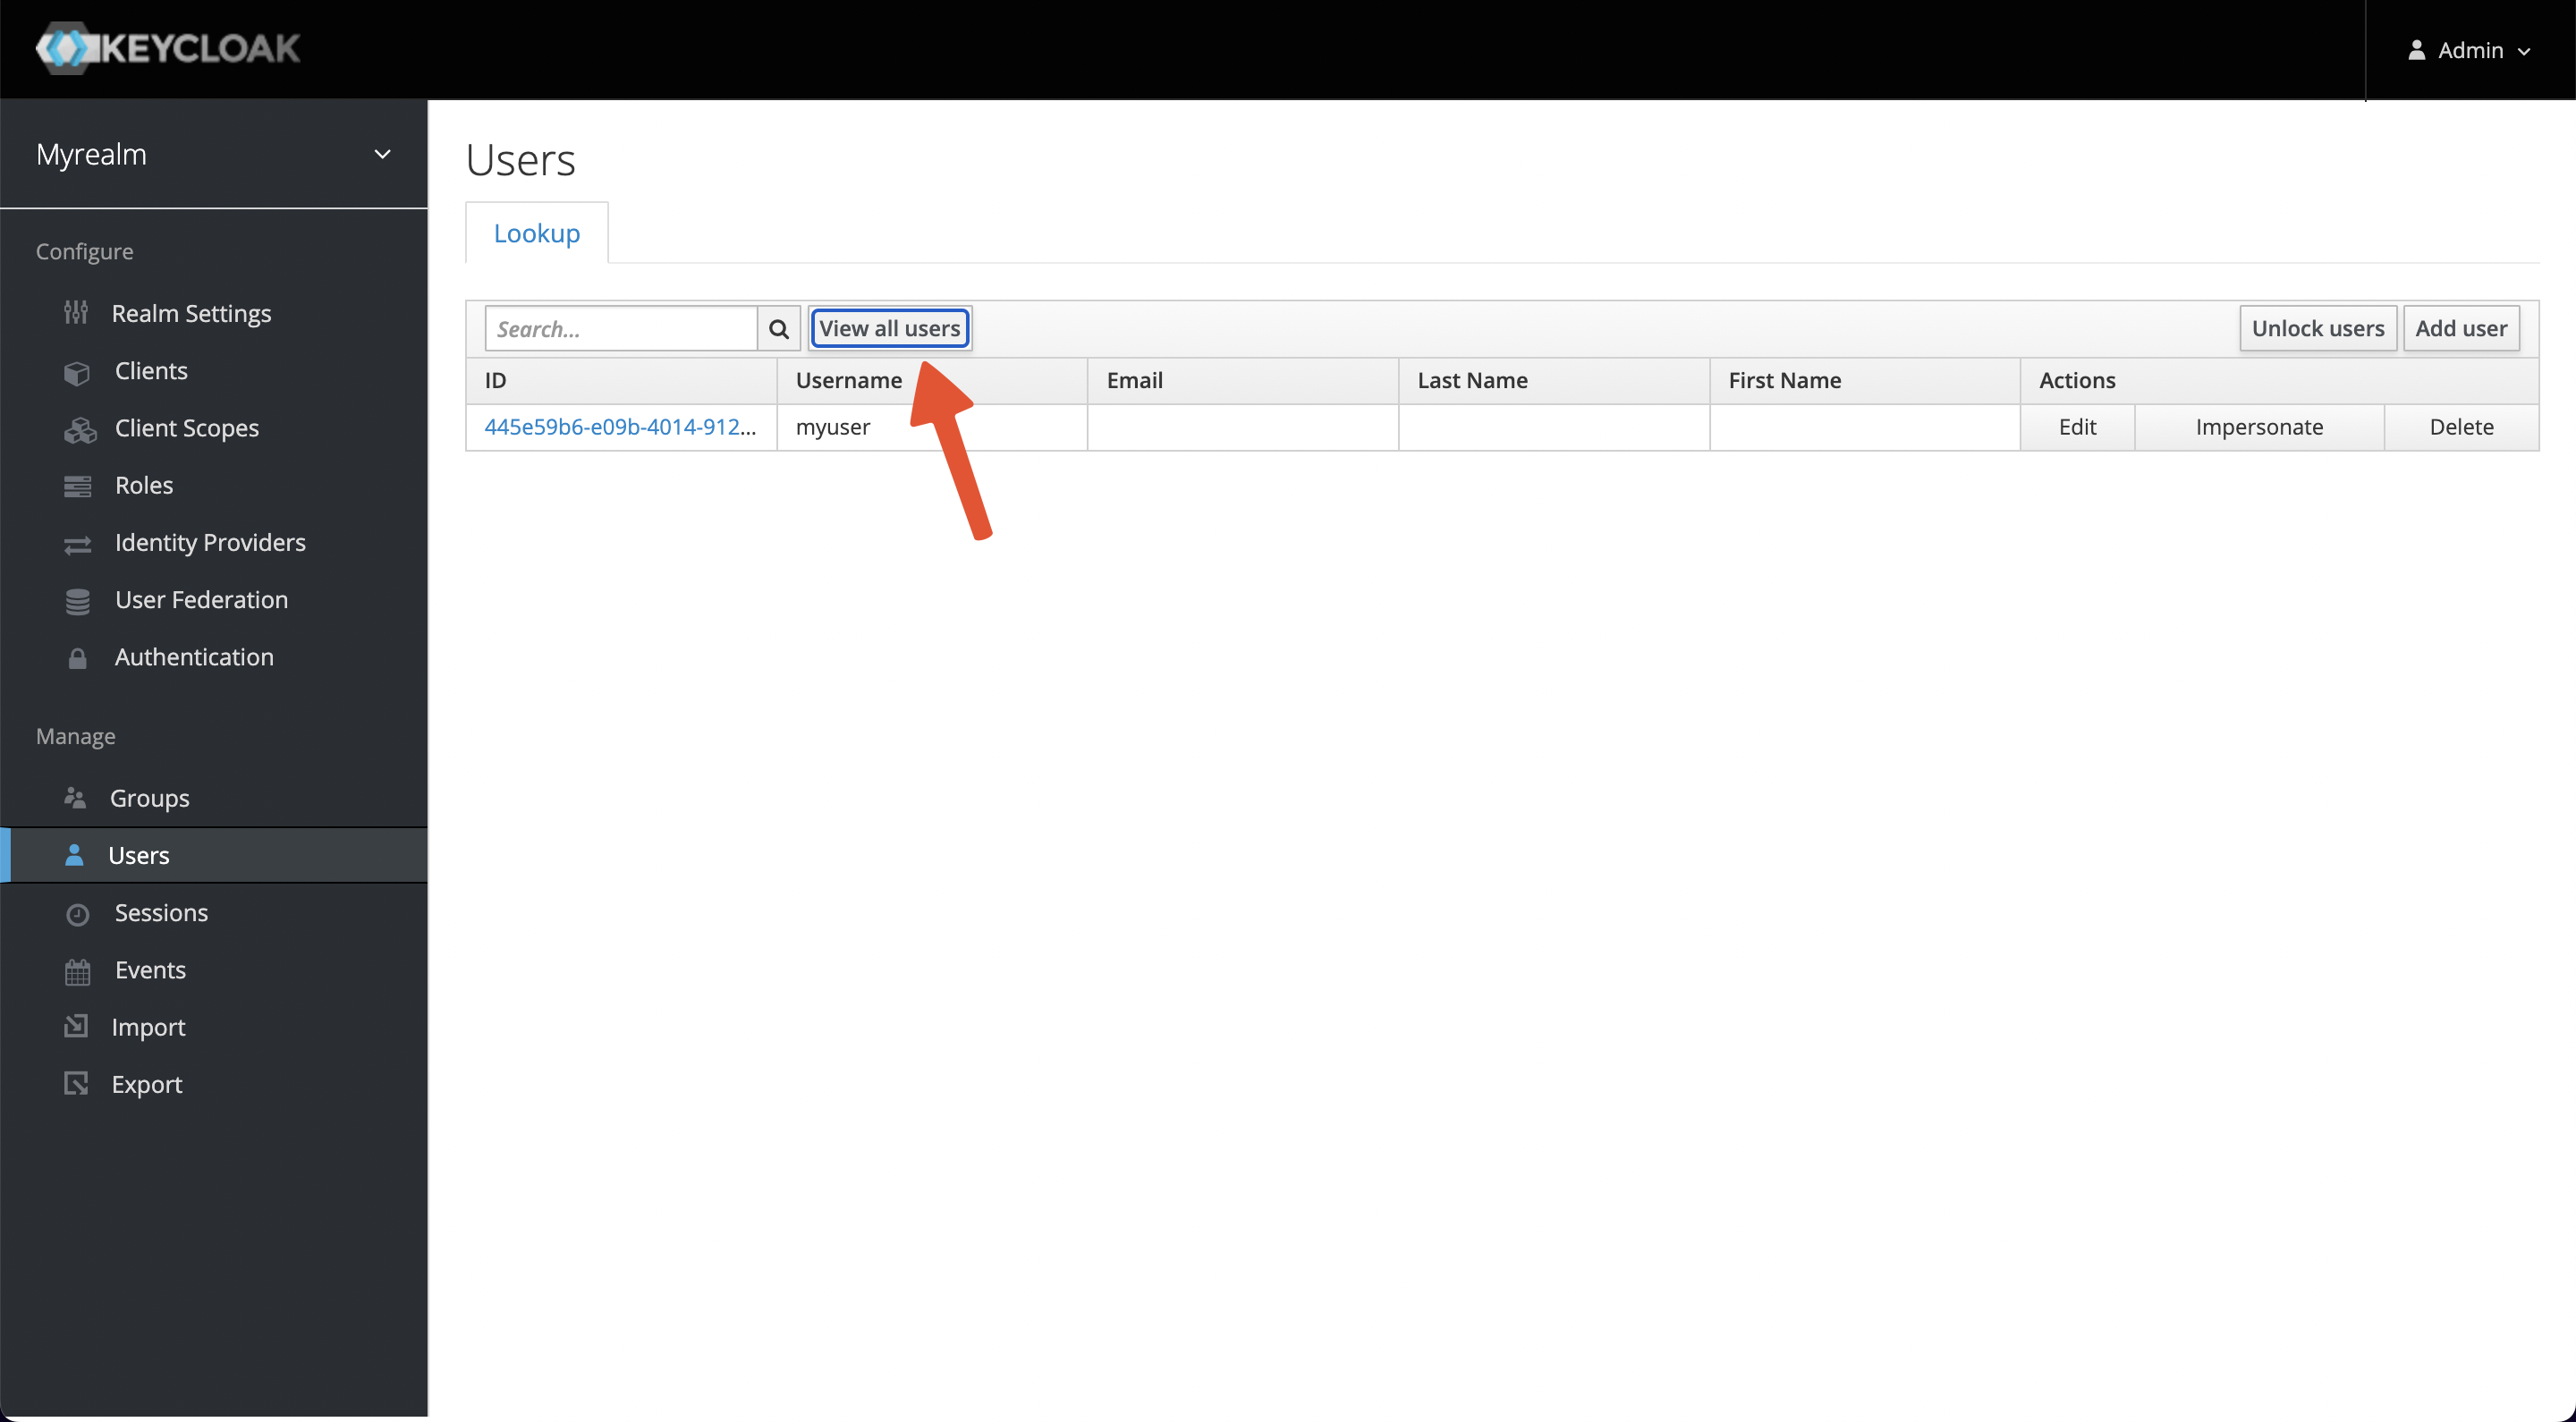
+A user belongs to one realm, we need to create a user for login
authentication. Select `Manage -> Users -> Add user` and enter myuser as the
username, save it, then visit the Users page and select `View all users`.
+
+
+
+
+
+
+
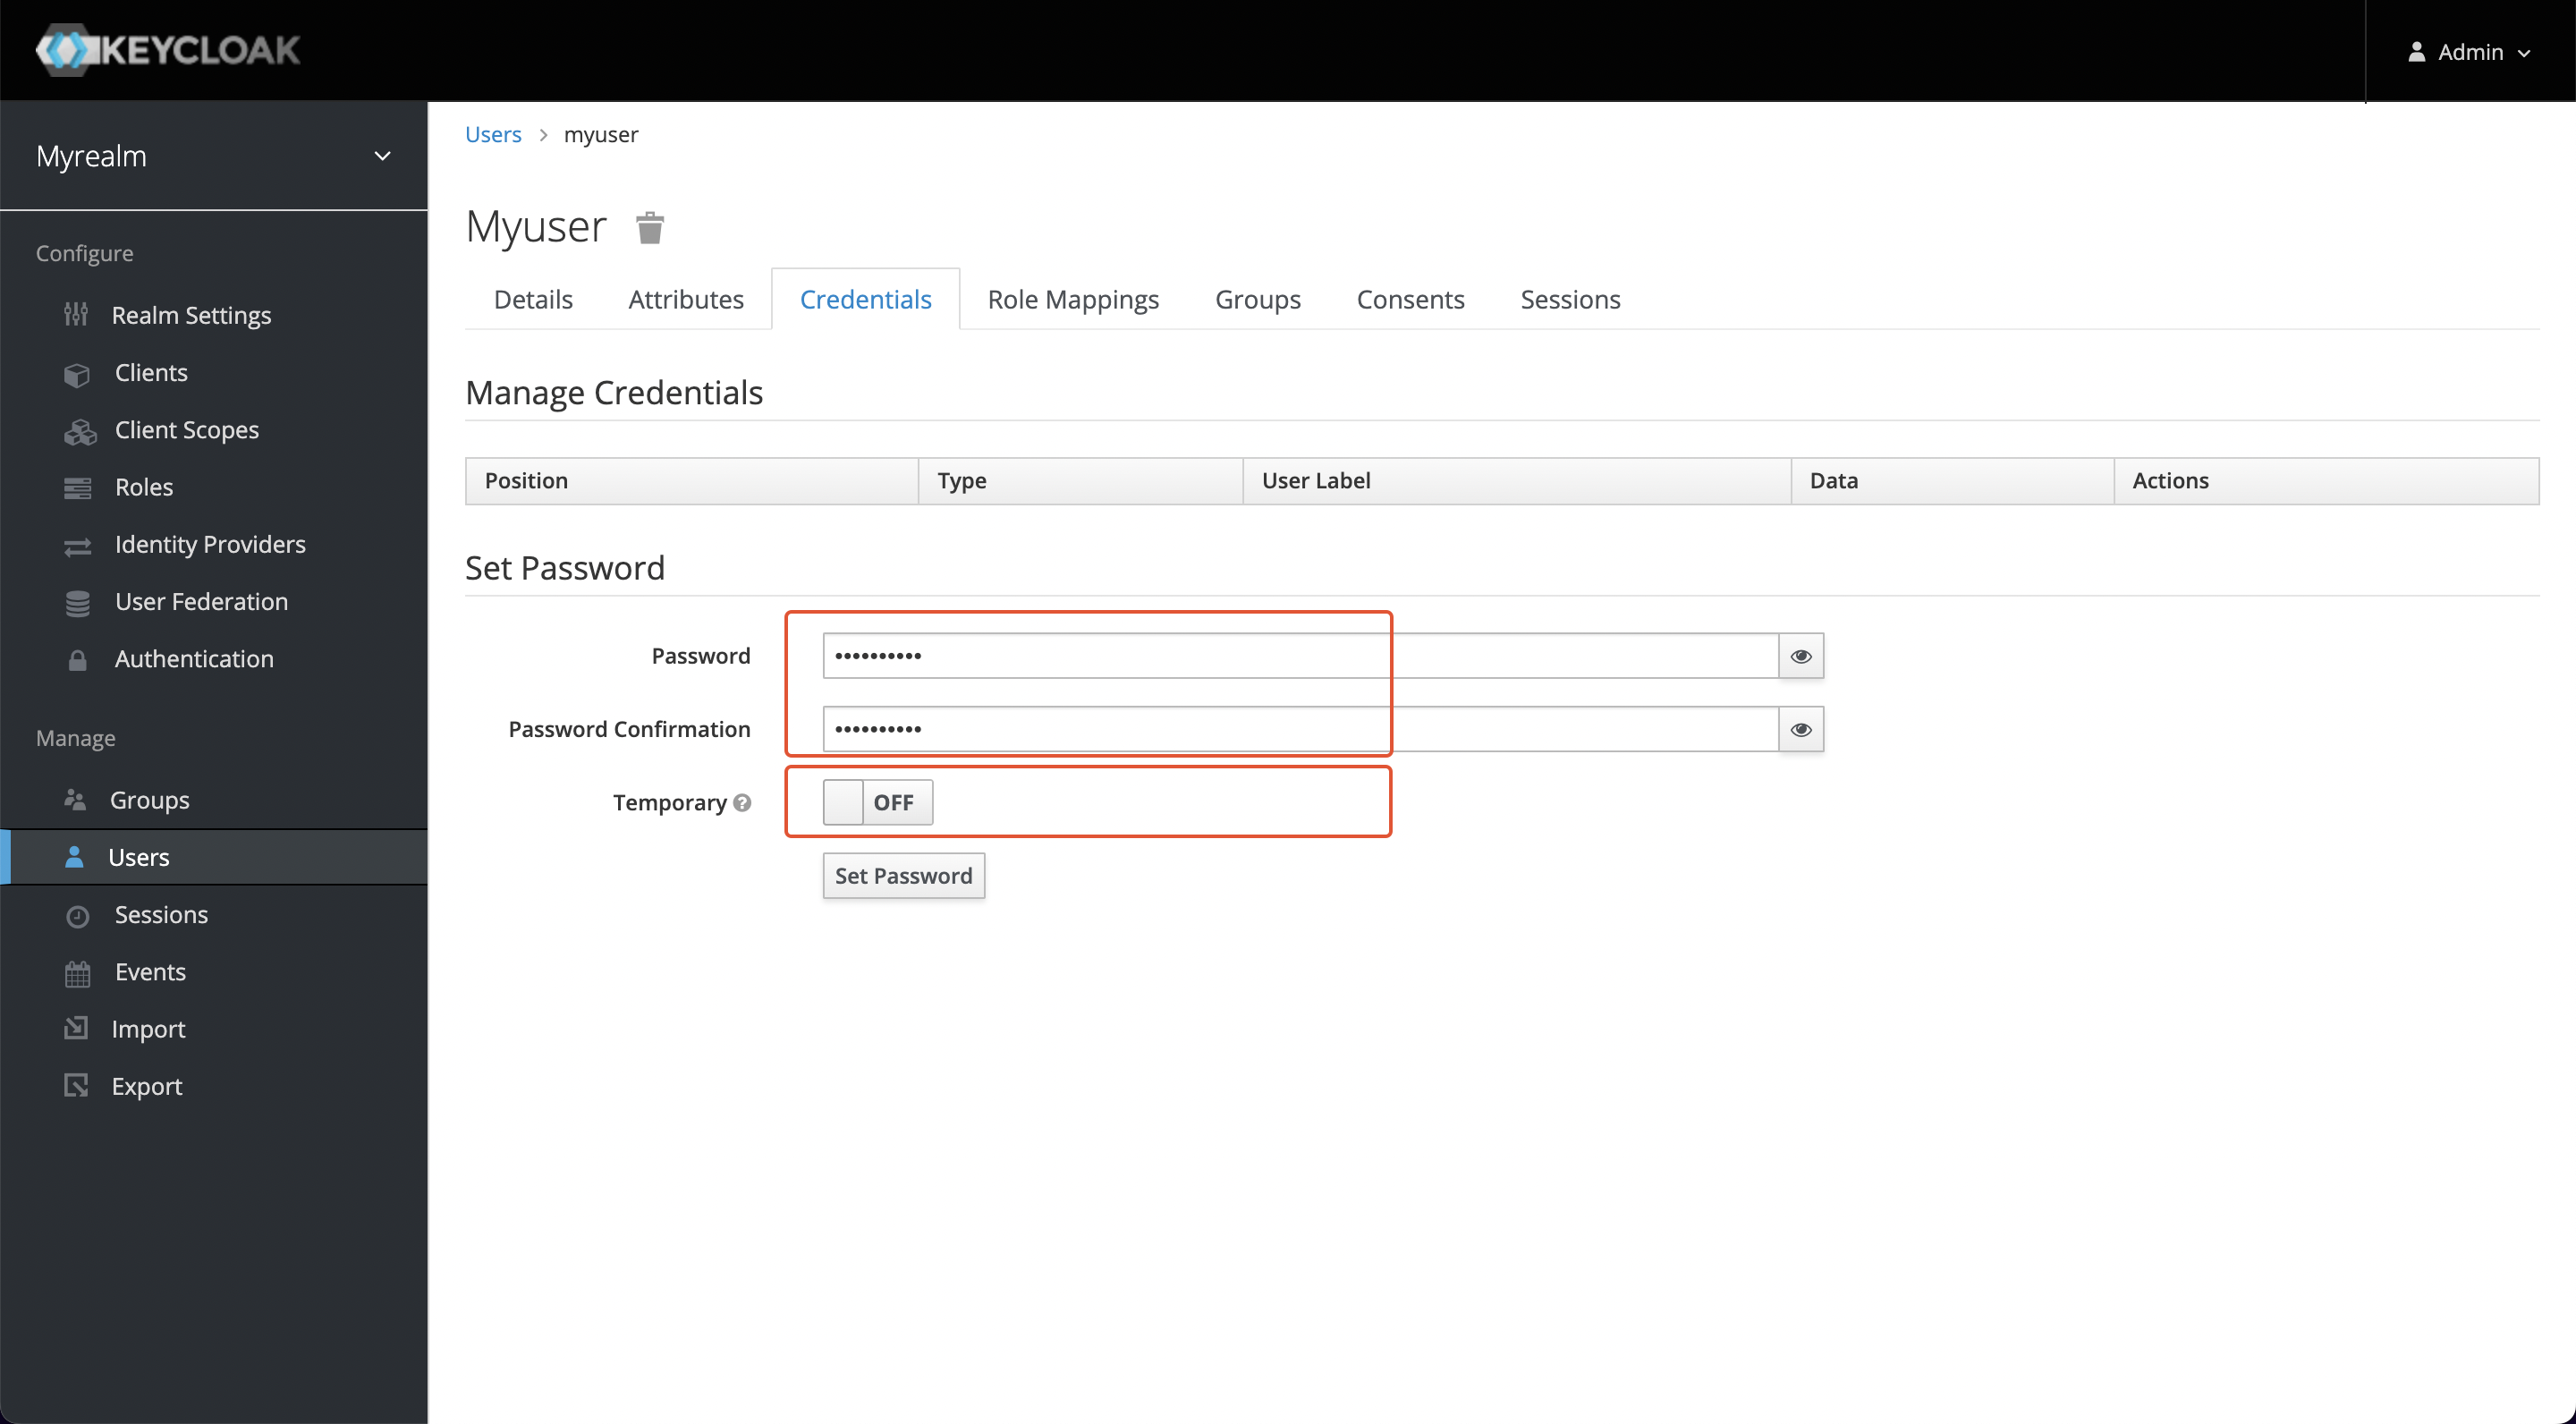
+Click on the ID, go to the Credentials tab, and set a new password (this
example uses mypassword as the password). Also, set Temporary to OFF to turn
off the restriction that you must change your password the first time you log
in.
+
+
+
+Click Set Password to save changes.
+
+#### Create a Client
+
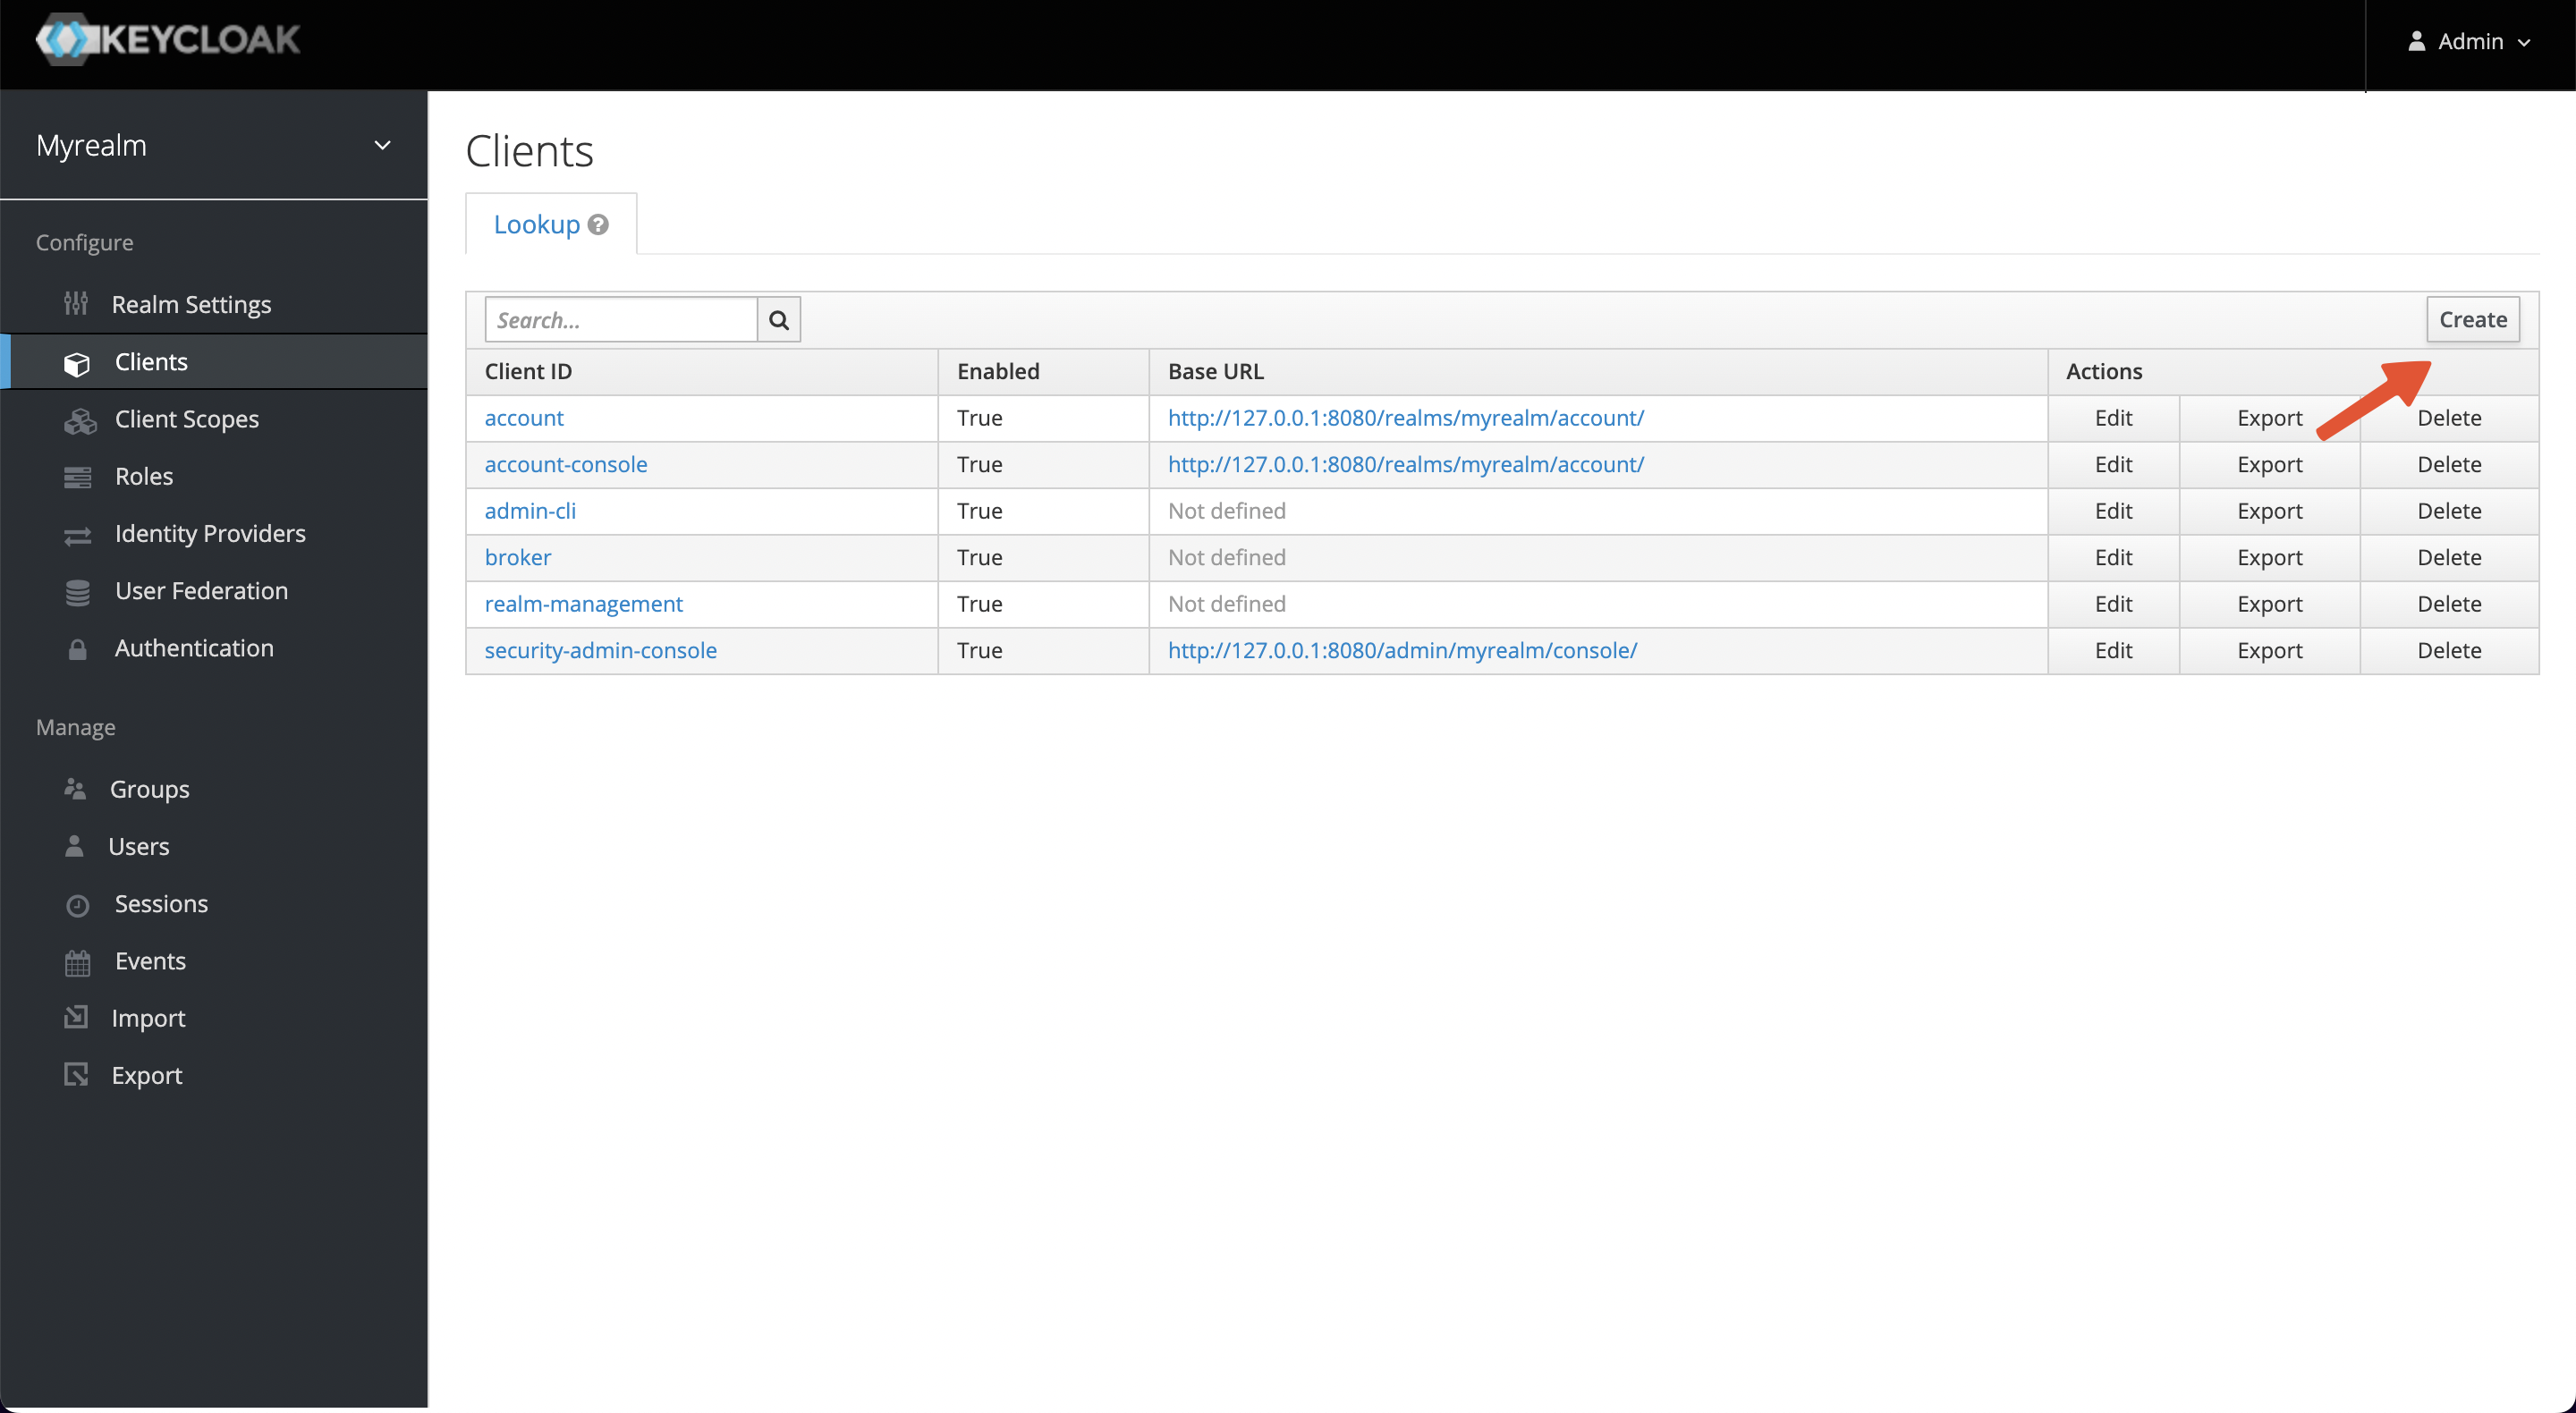
+Visit `Configure -> Clients -> Create` to create a new client and obtain a
Client ID and Client Secret, we will use that information in APISIX later.
+
+
+
+Enter the Client ID and save it. This example uses myclient as the ID.
+
+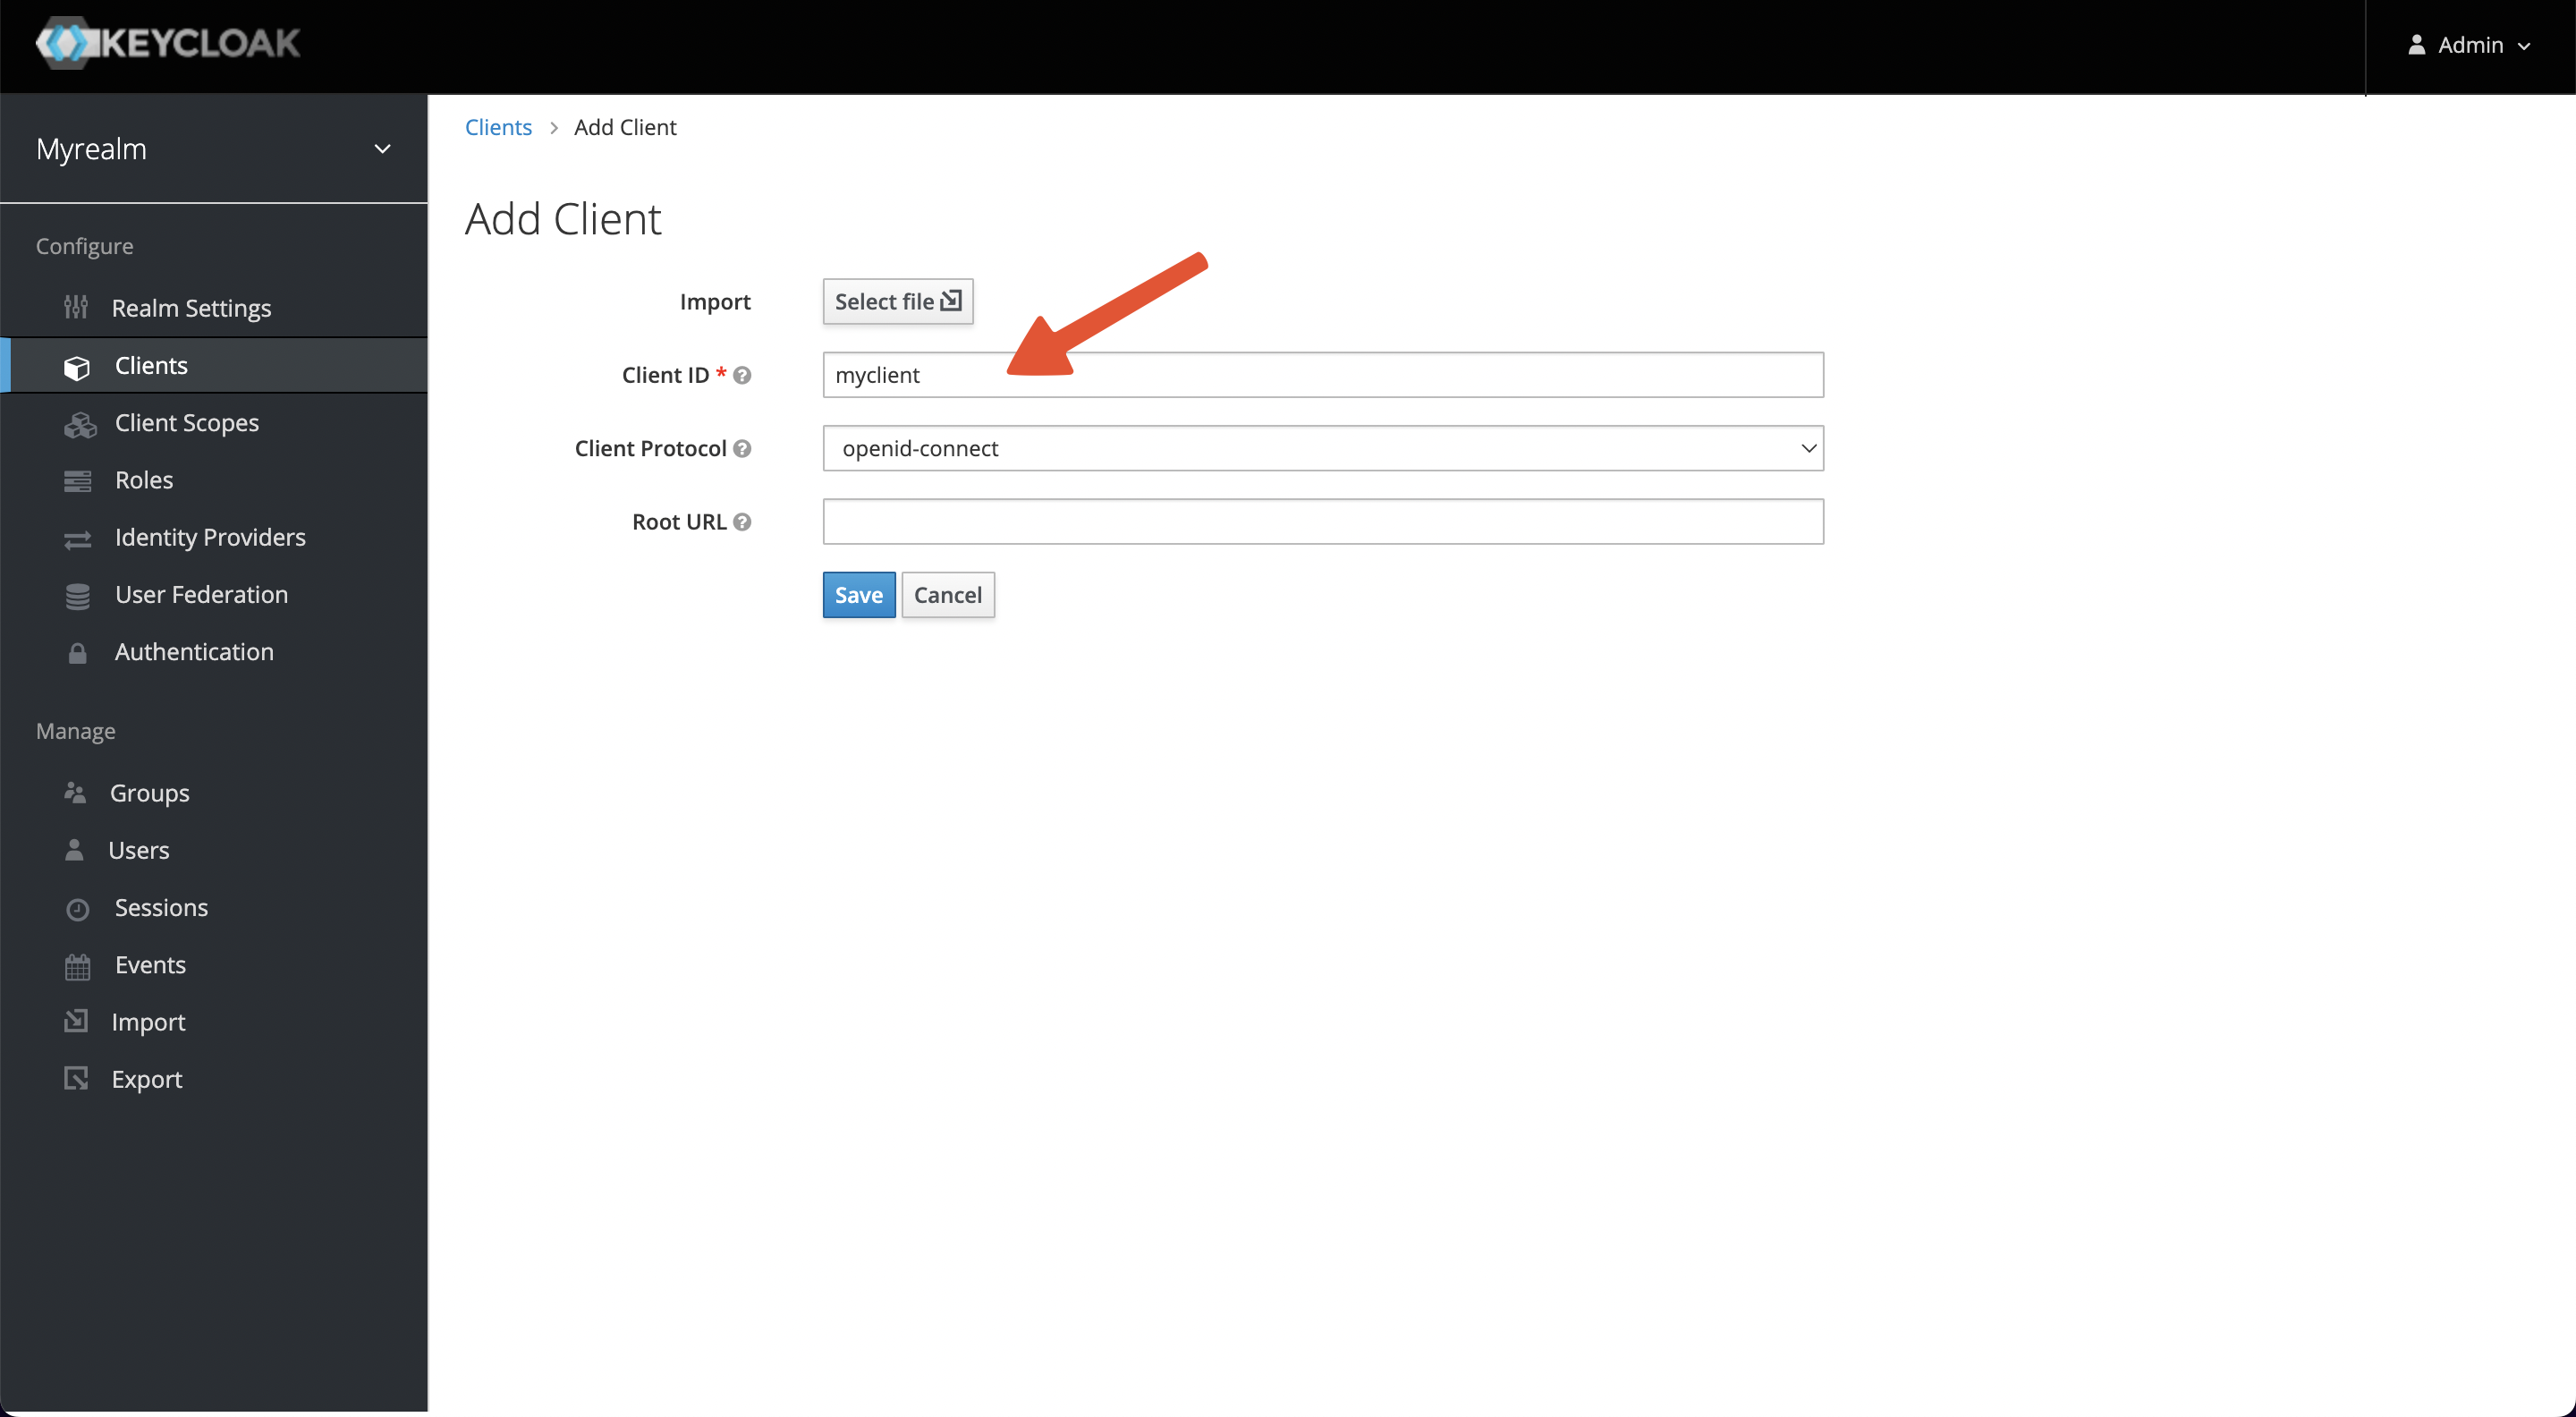
+
+After saving, 2 parameters need to be configured.
+
+1. Access Type: default is public, please change it to credential to obtain
Client Secret.
+2. Valid Redirect URIs: When the login is successful, Keycloak will carry the
state and code to redirect the client to this address, so set it to a specific
callback address for Apache APISIX, for example:
`http://127.0.0.1:9080/anything/callback`
+
+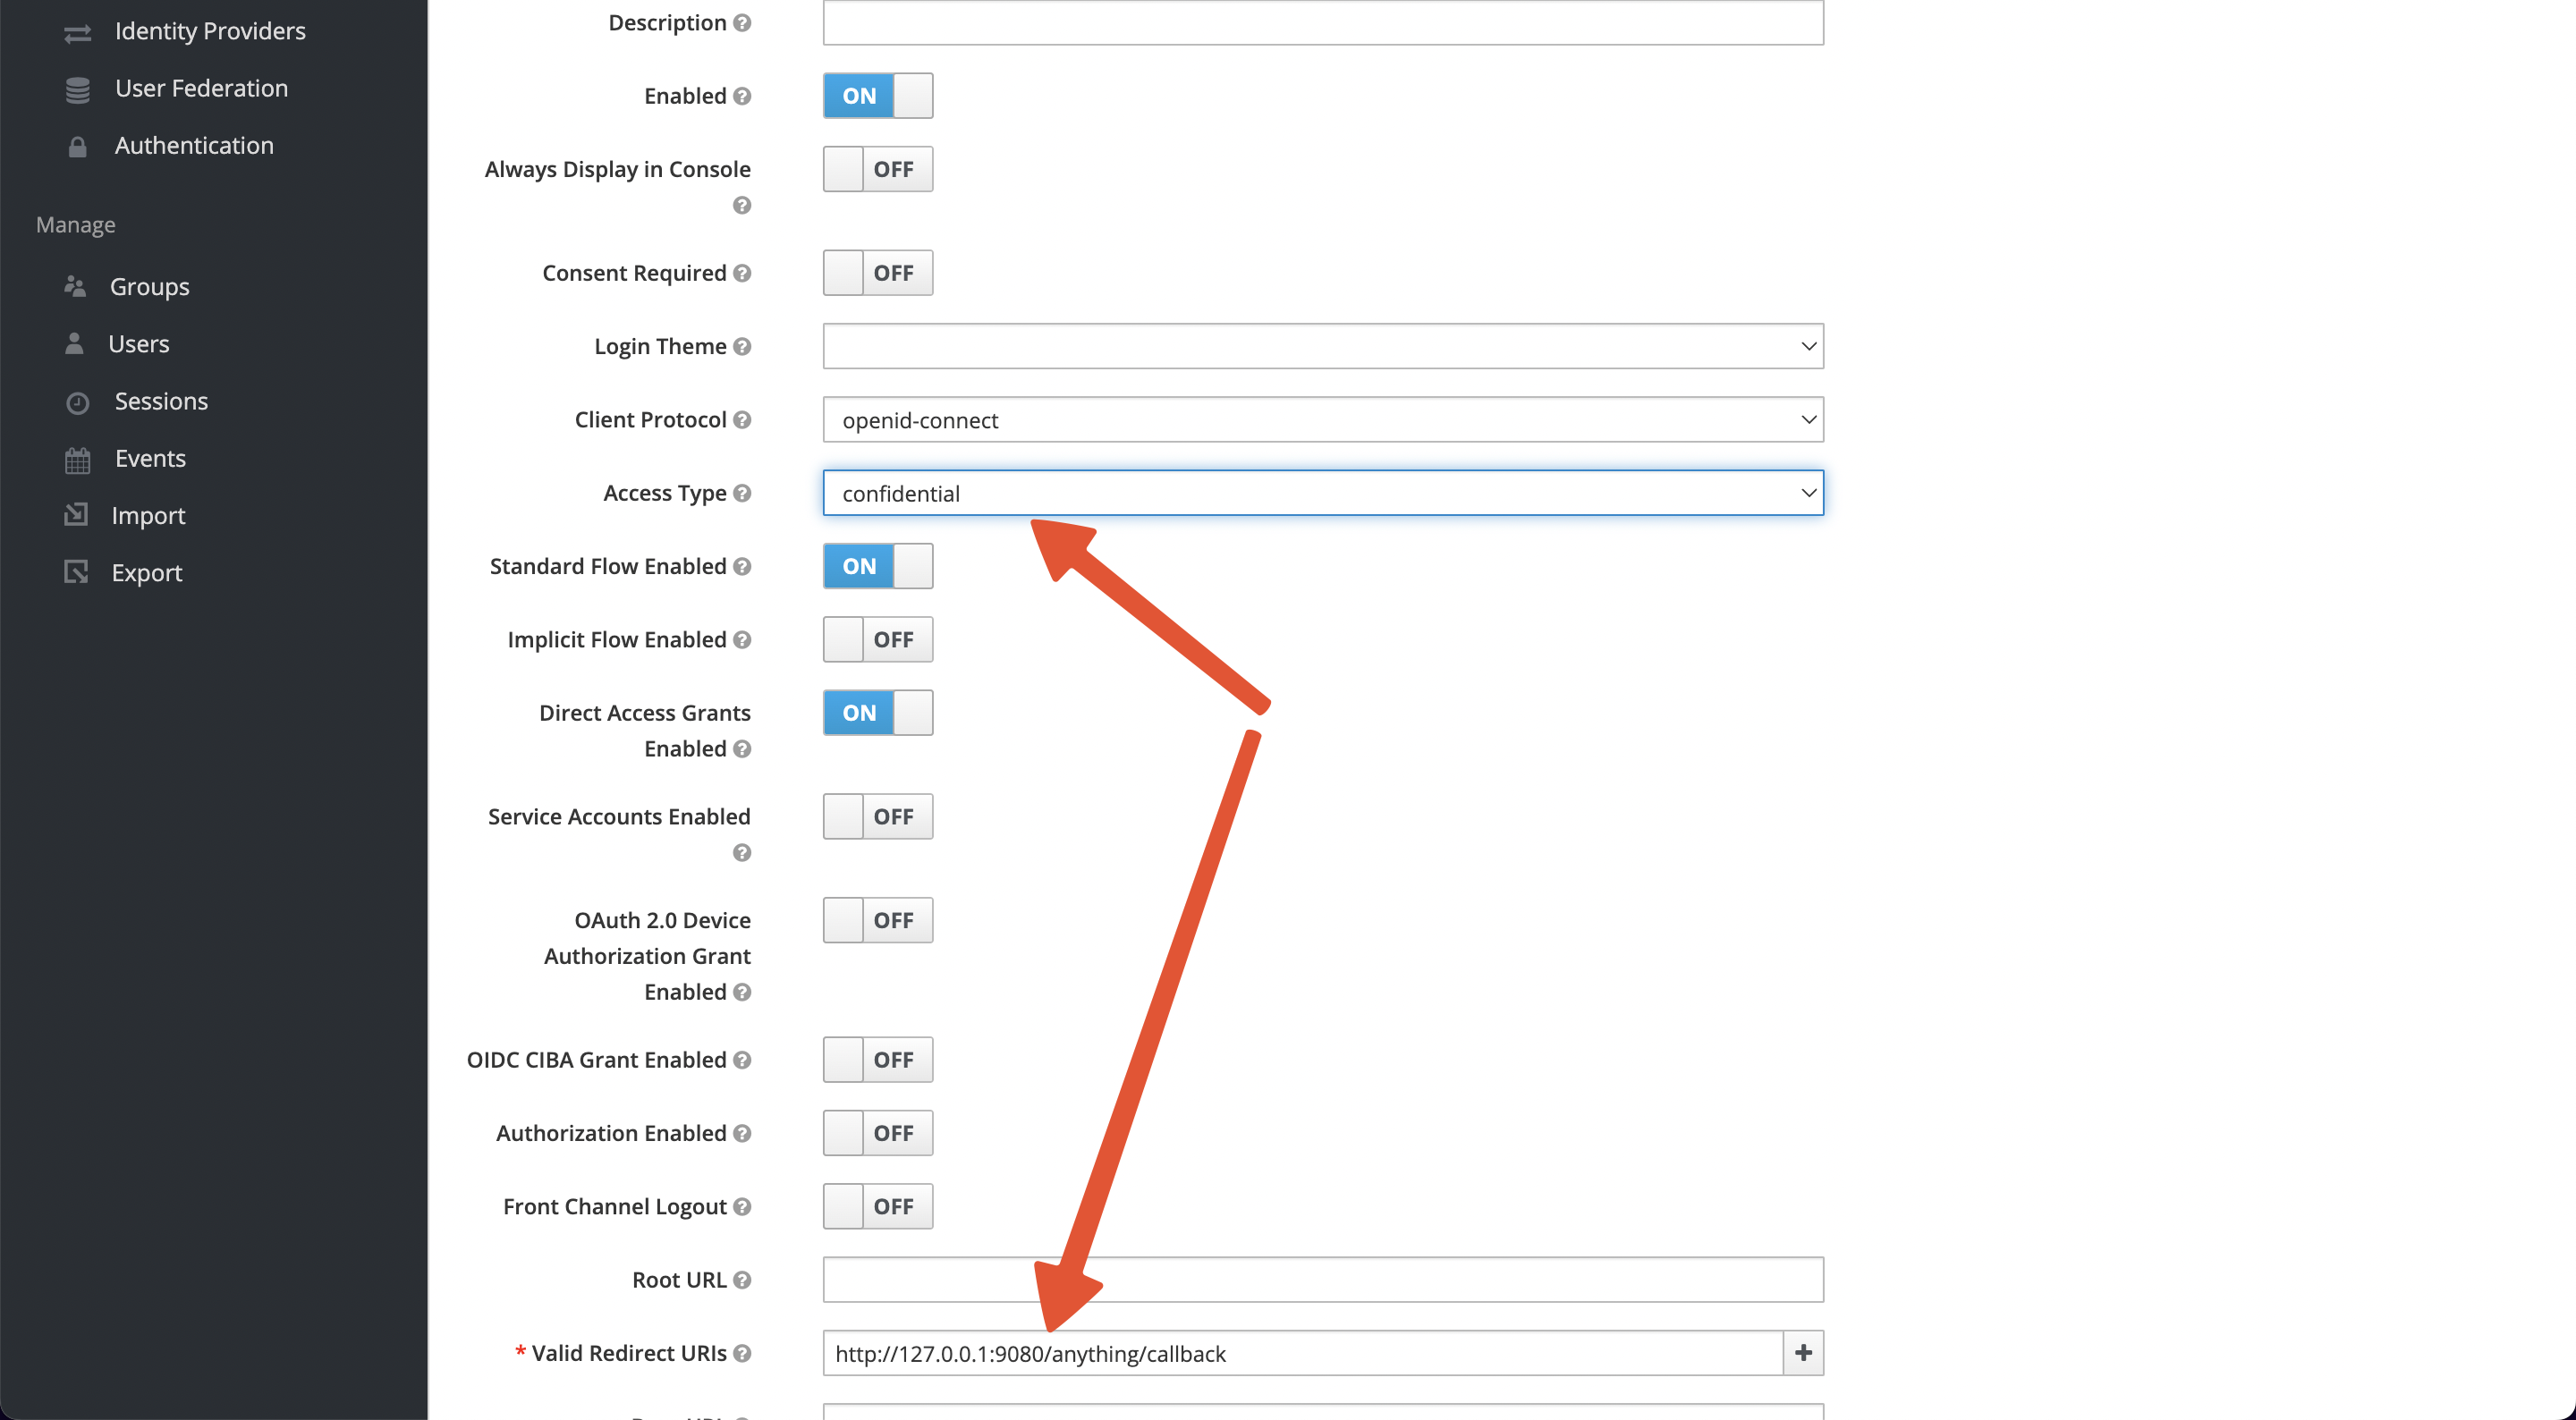
+
+When the settings are complete and saved, the Credentials tab will appear at
the top of the page, and please copy the Secret value (Client Secret).
+
+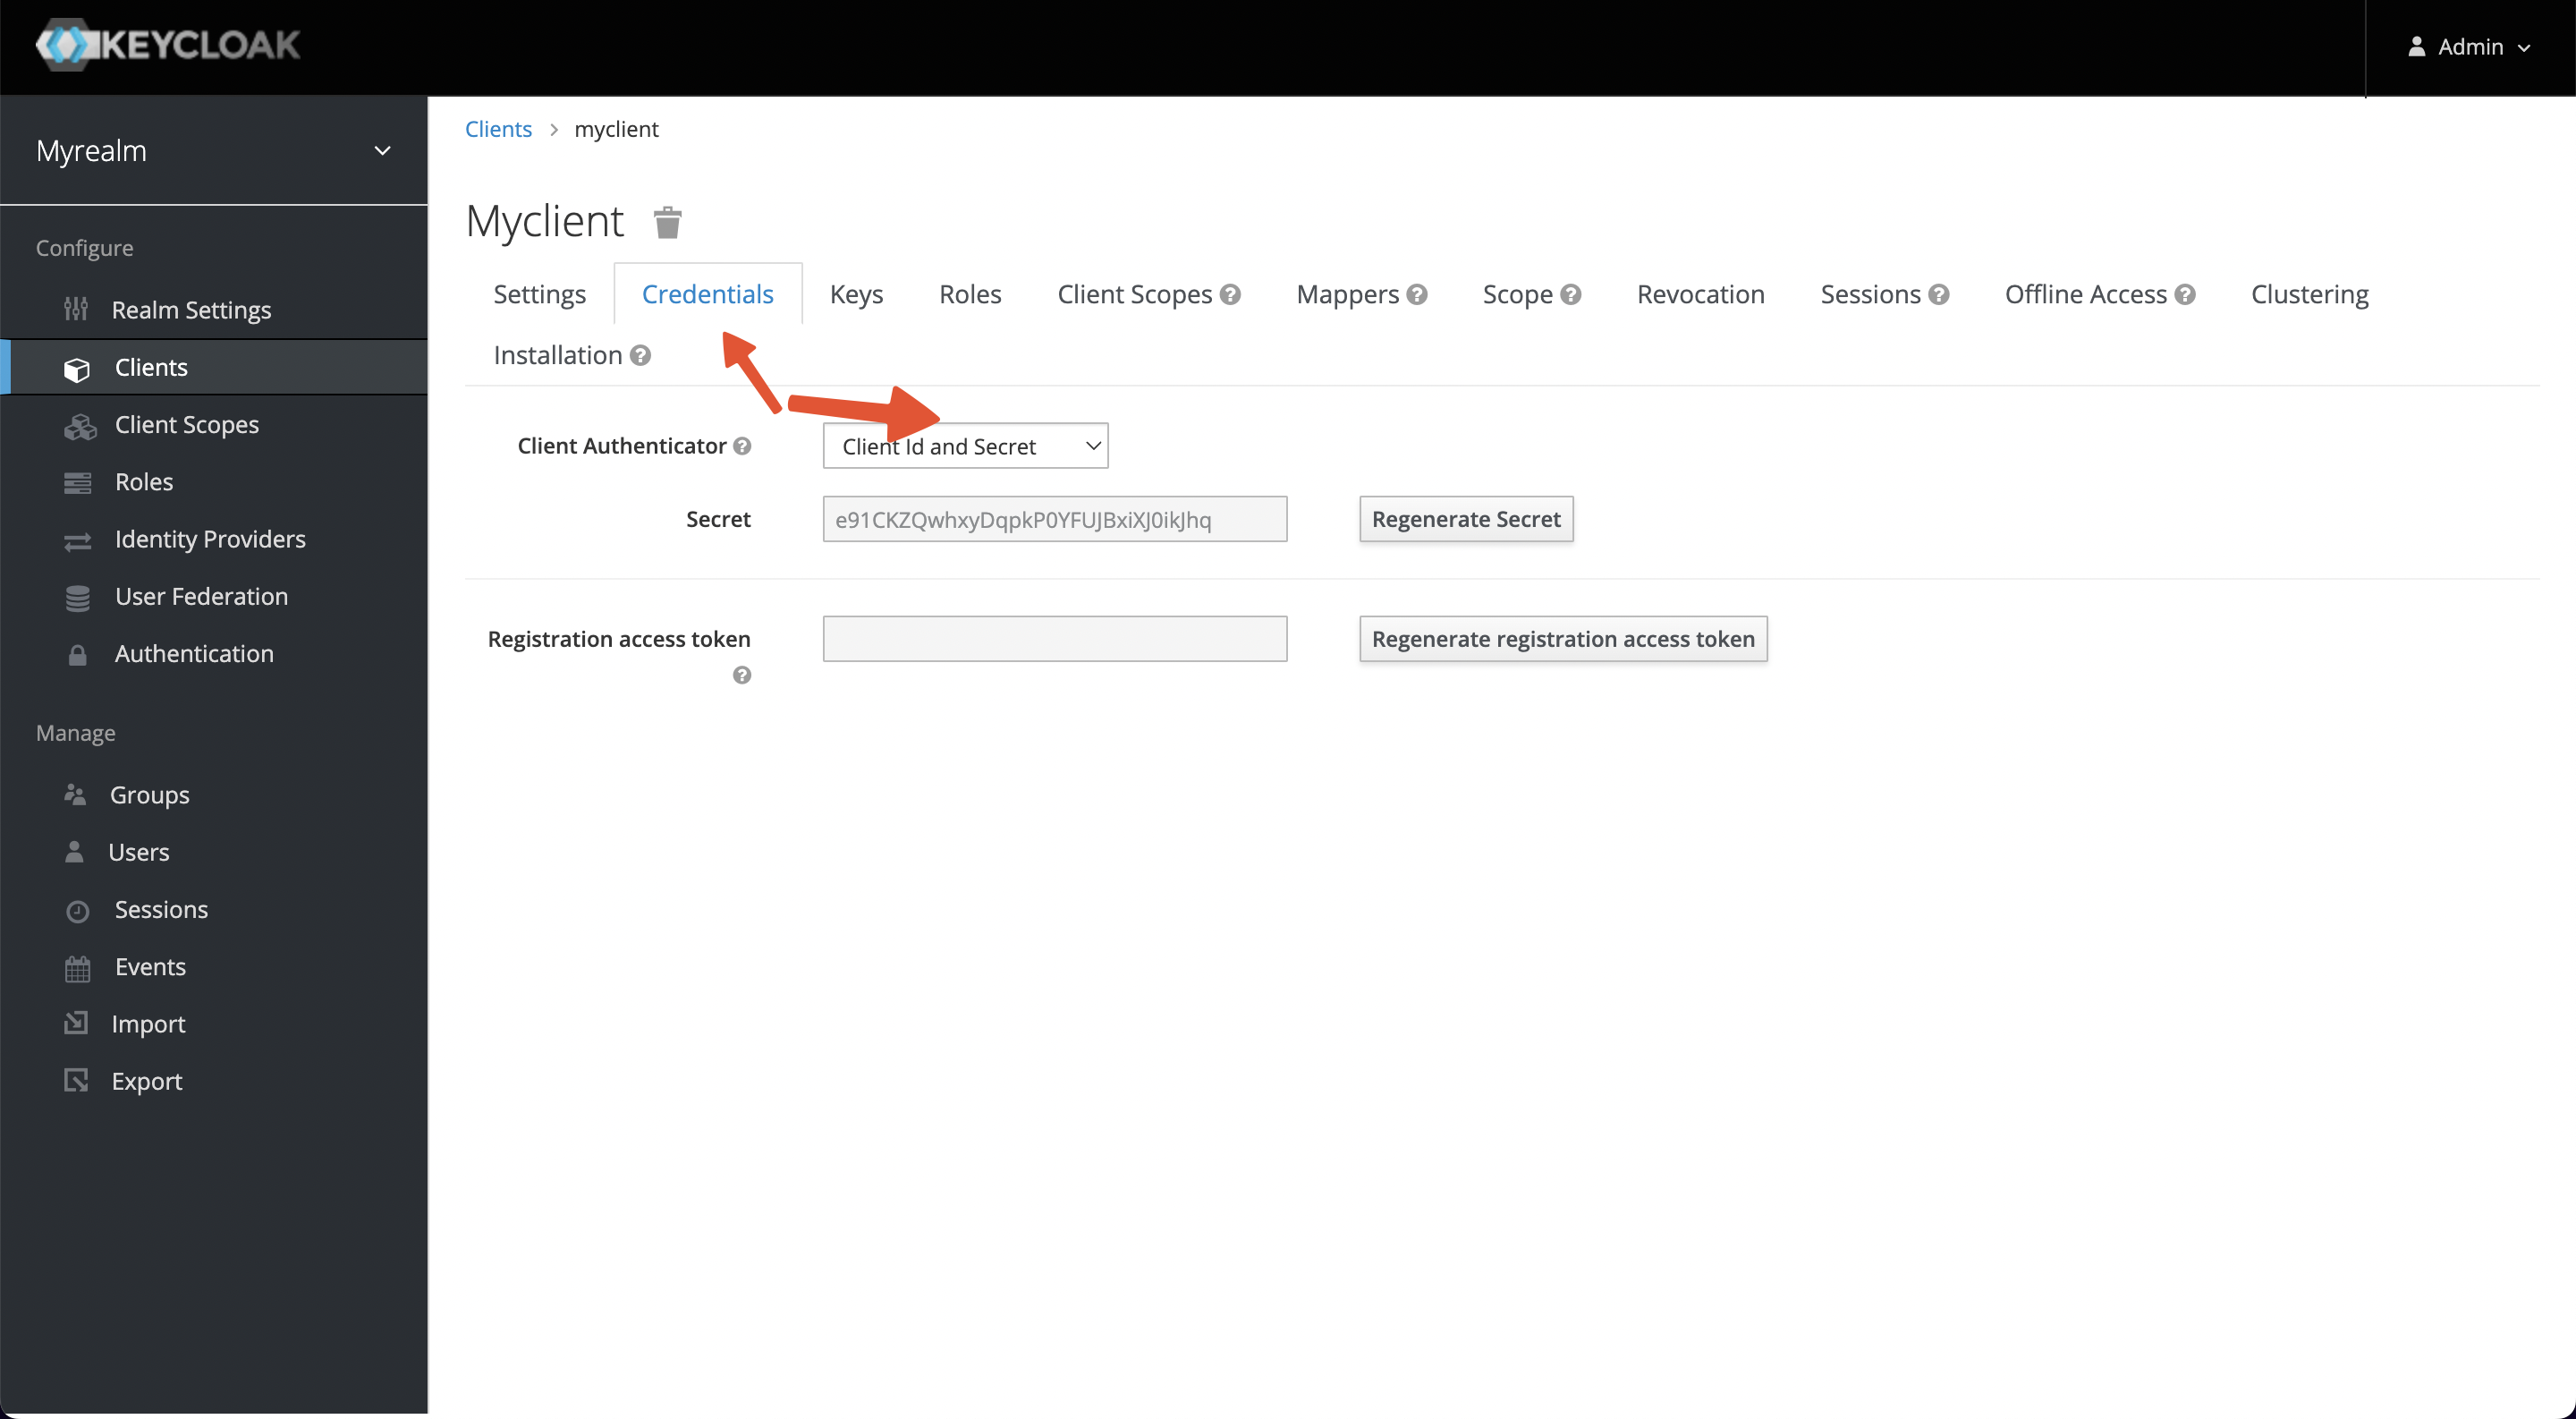
+
+### Summary
+
+#### Apache APISIX
+
+Service URL: `http://127.0.0.1:9080/`
+
+#### Keycloak
+
+1. Service URL: `http://127.0.0.1:8080/`
+2. Realm: `myrealm`
+3. Client ID: `myclient`
+4. Client Secret: `e91CKZQwhxyDqpkP0YFUJBxiXJ0ikJhq`
+5. Redirect URI: `http://127.0.0.1:9080/anything/callback`
+6. Discovery:
`http://127.0.0.1:8080/realms/myrealm/.well-known/openid-configuration`
+7. Logout URL: `/anything/logout`
+8. Bearer Only: `false`
+9. Username: `myuser`
+10. Password: `mypassword`
+
+## Scenarios
+
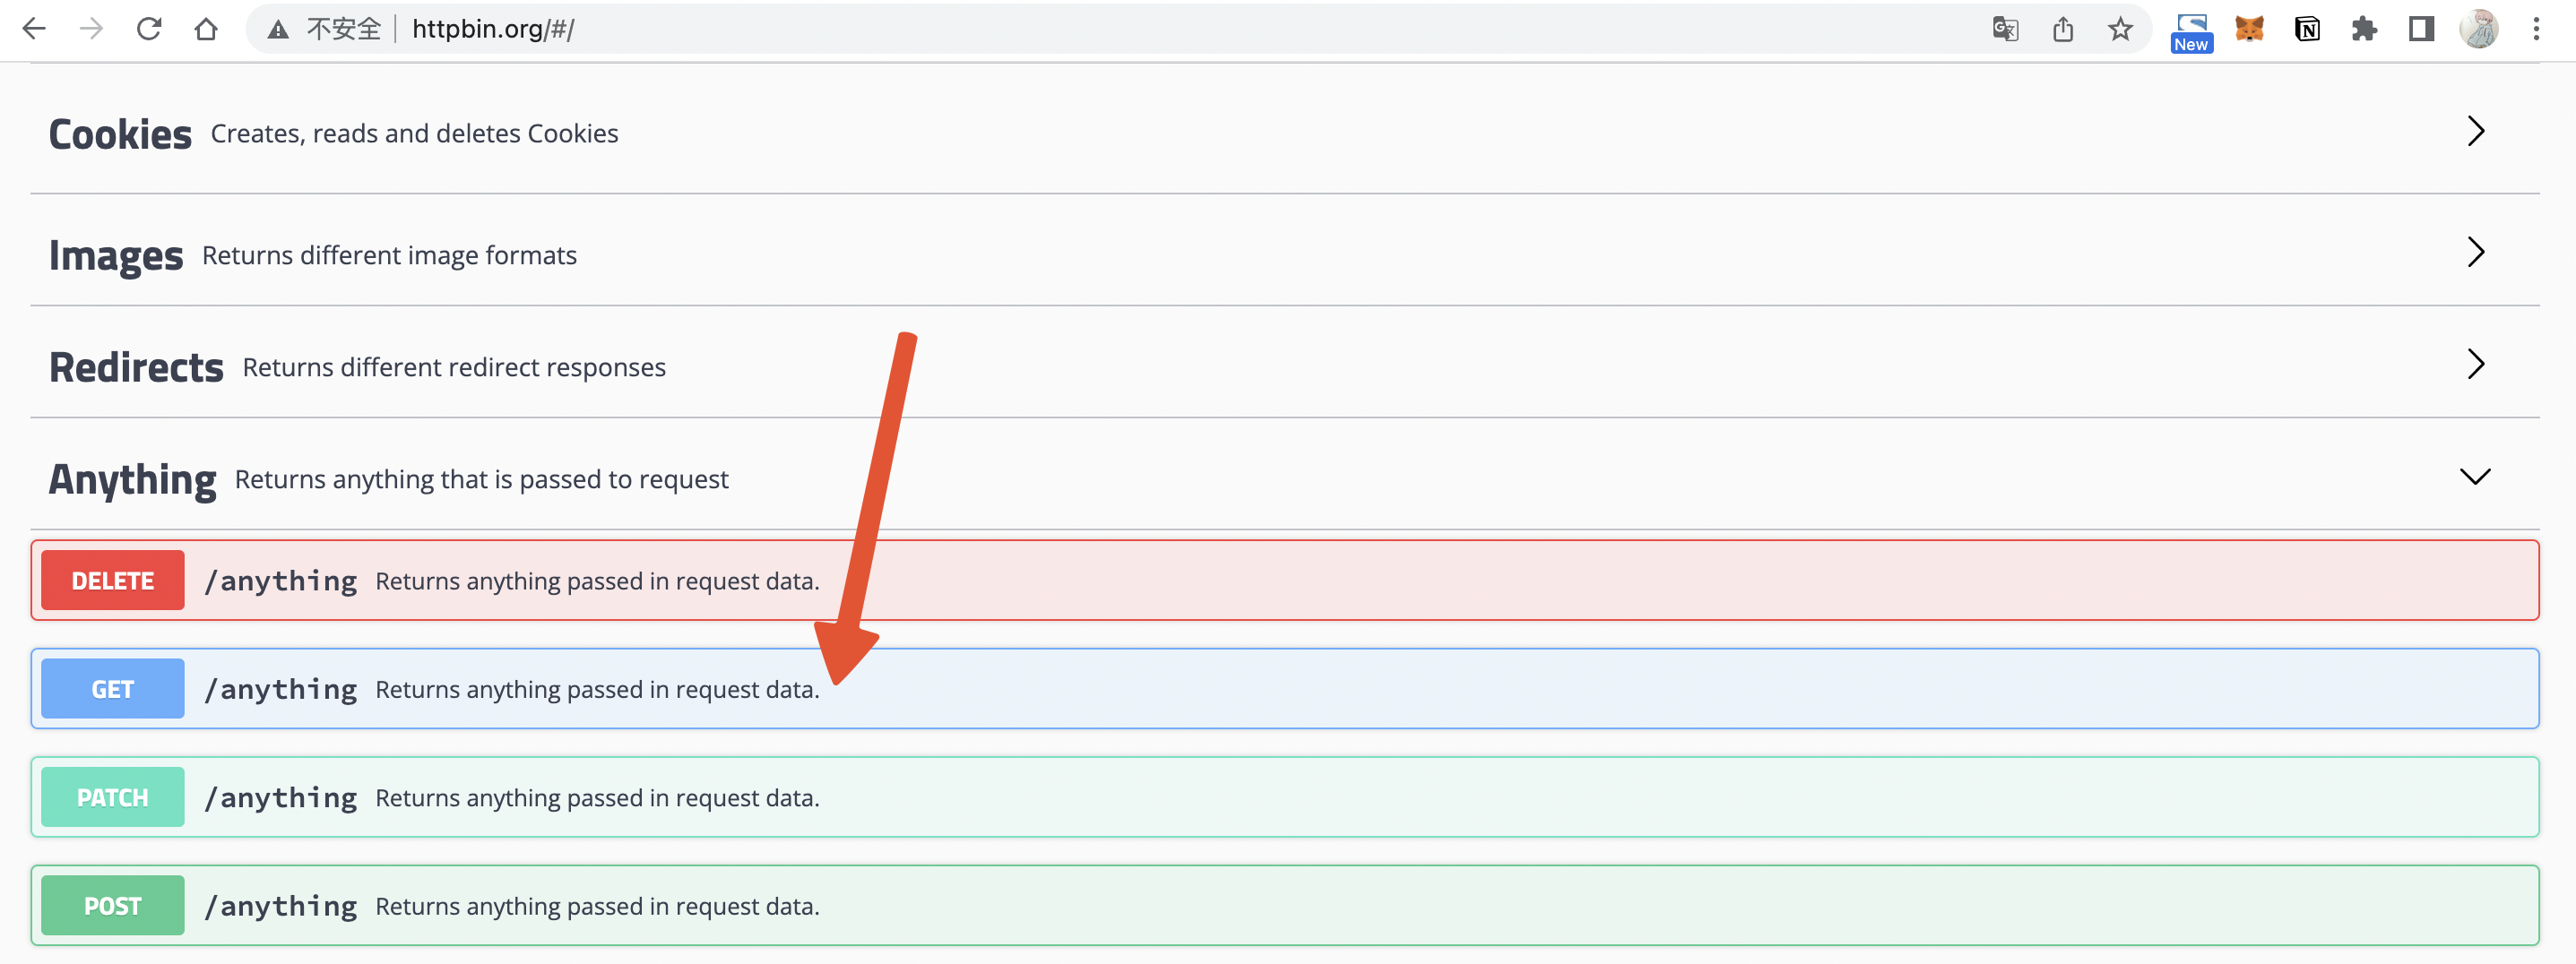
+### Note
+
+This guide will use a public service httpbin.org/anything as the upstream
service, it will return anything passed in request data.
+
+
+
+### Case 1: Use username/password to protect service
+
+This example will direct the client to the login page to authenticate using a
username and password.
+
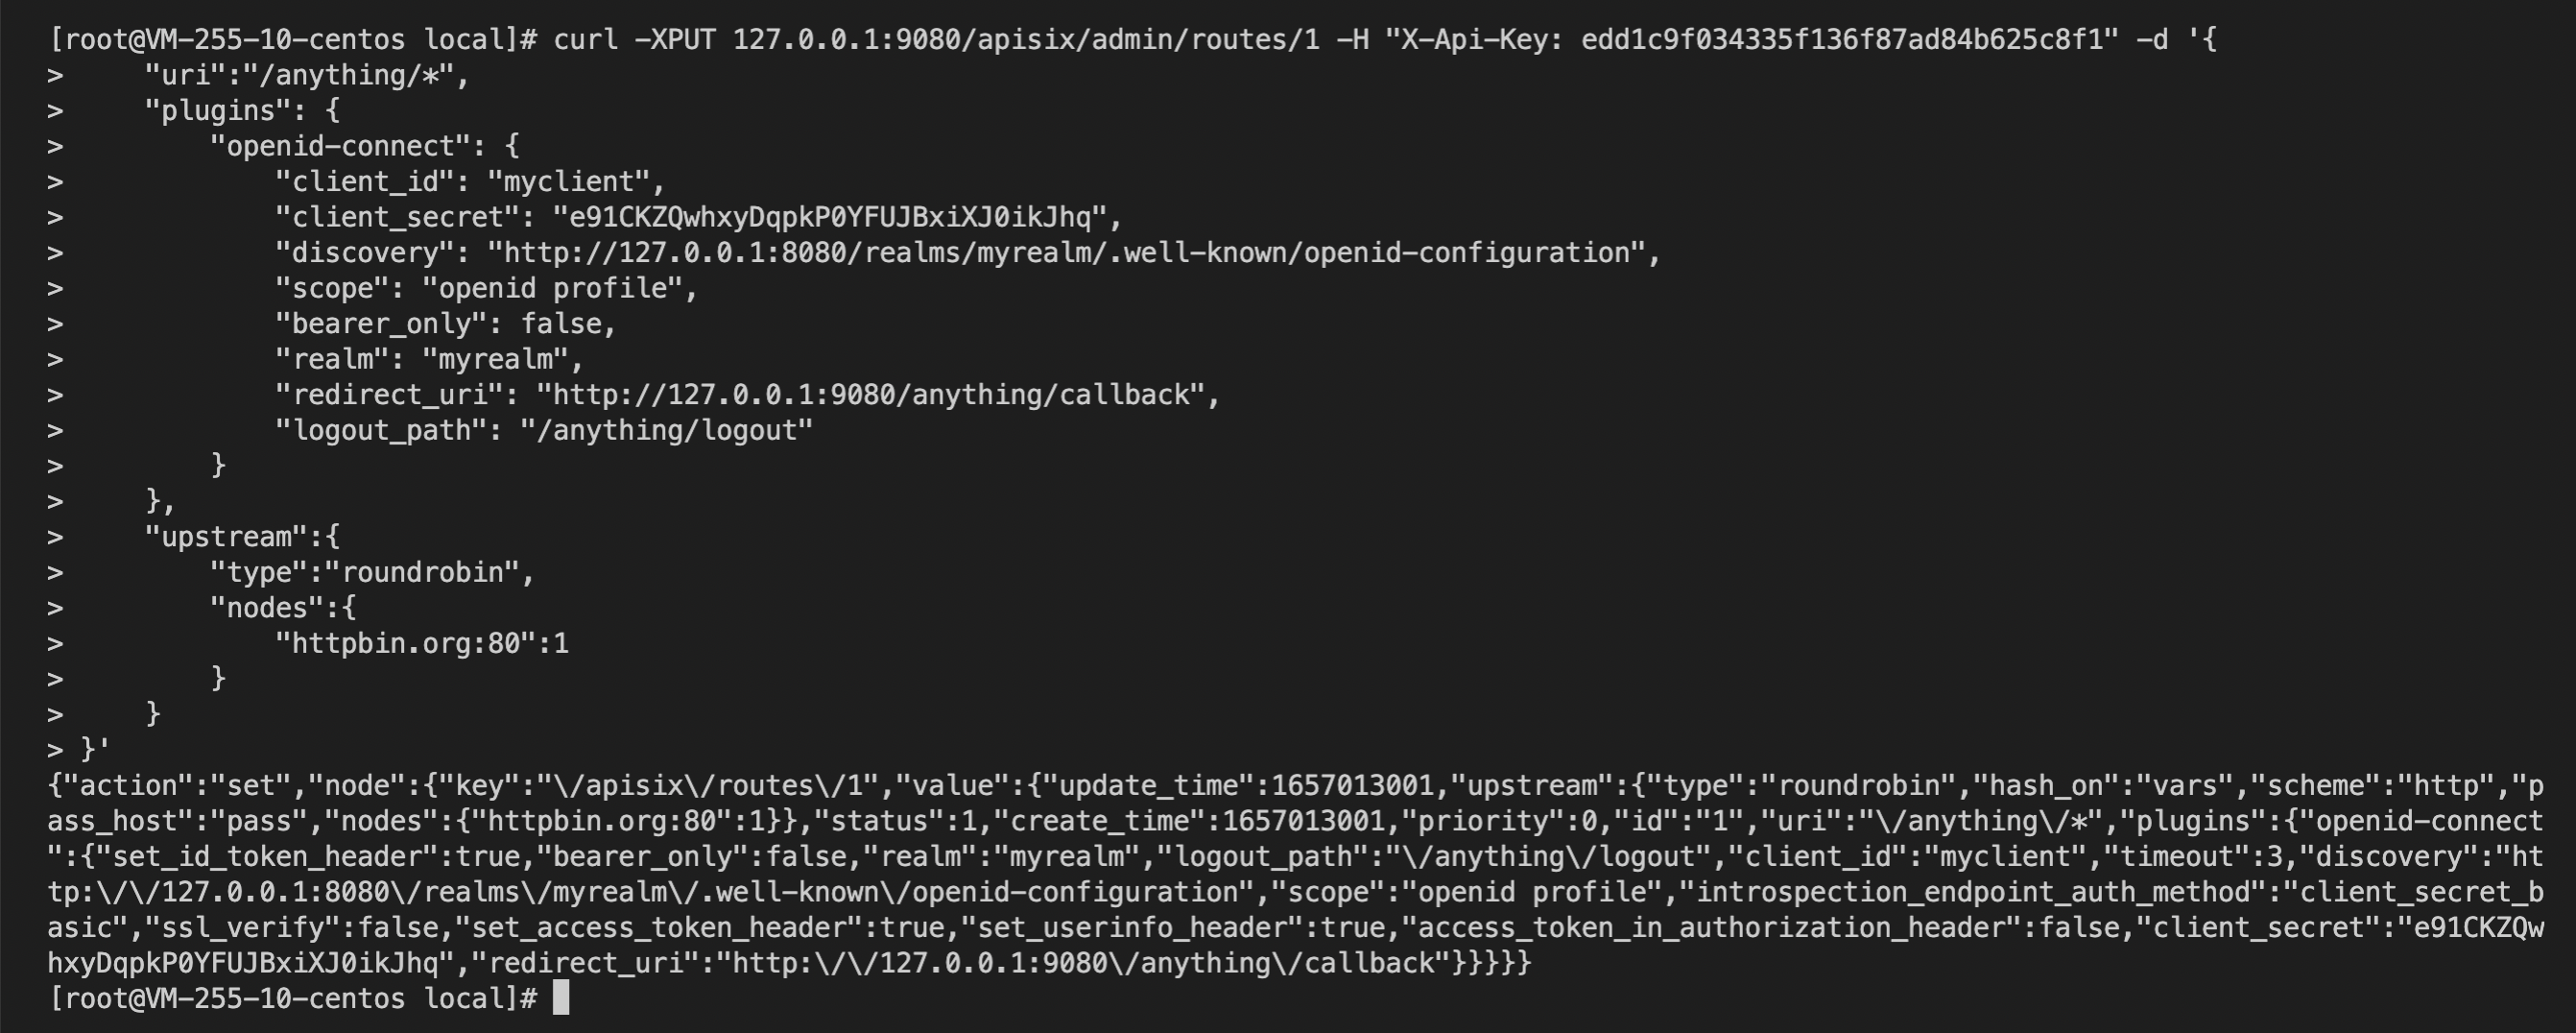
+1. Create an API:
+
+```shell
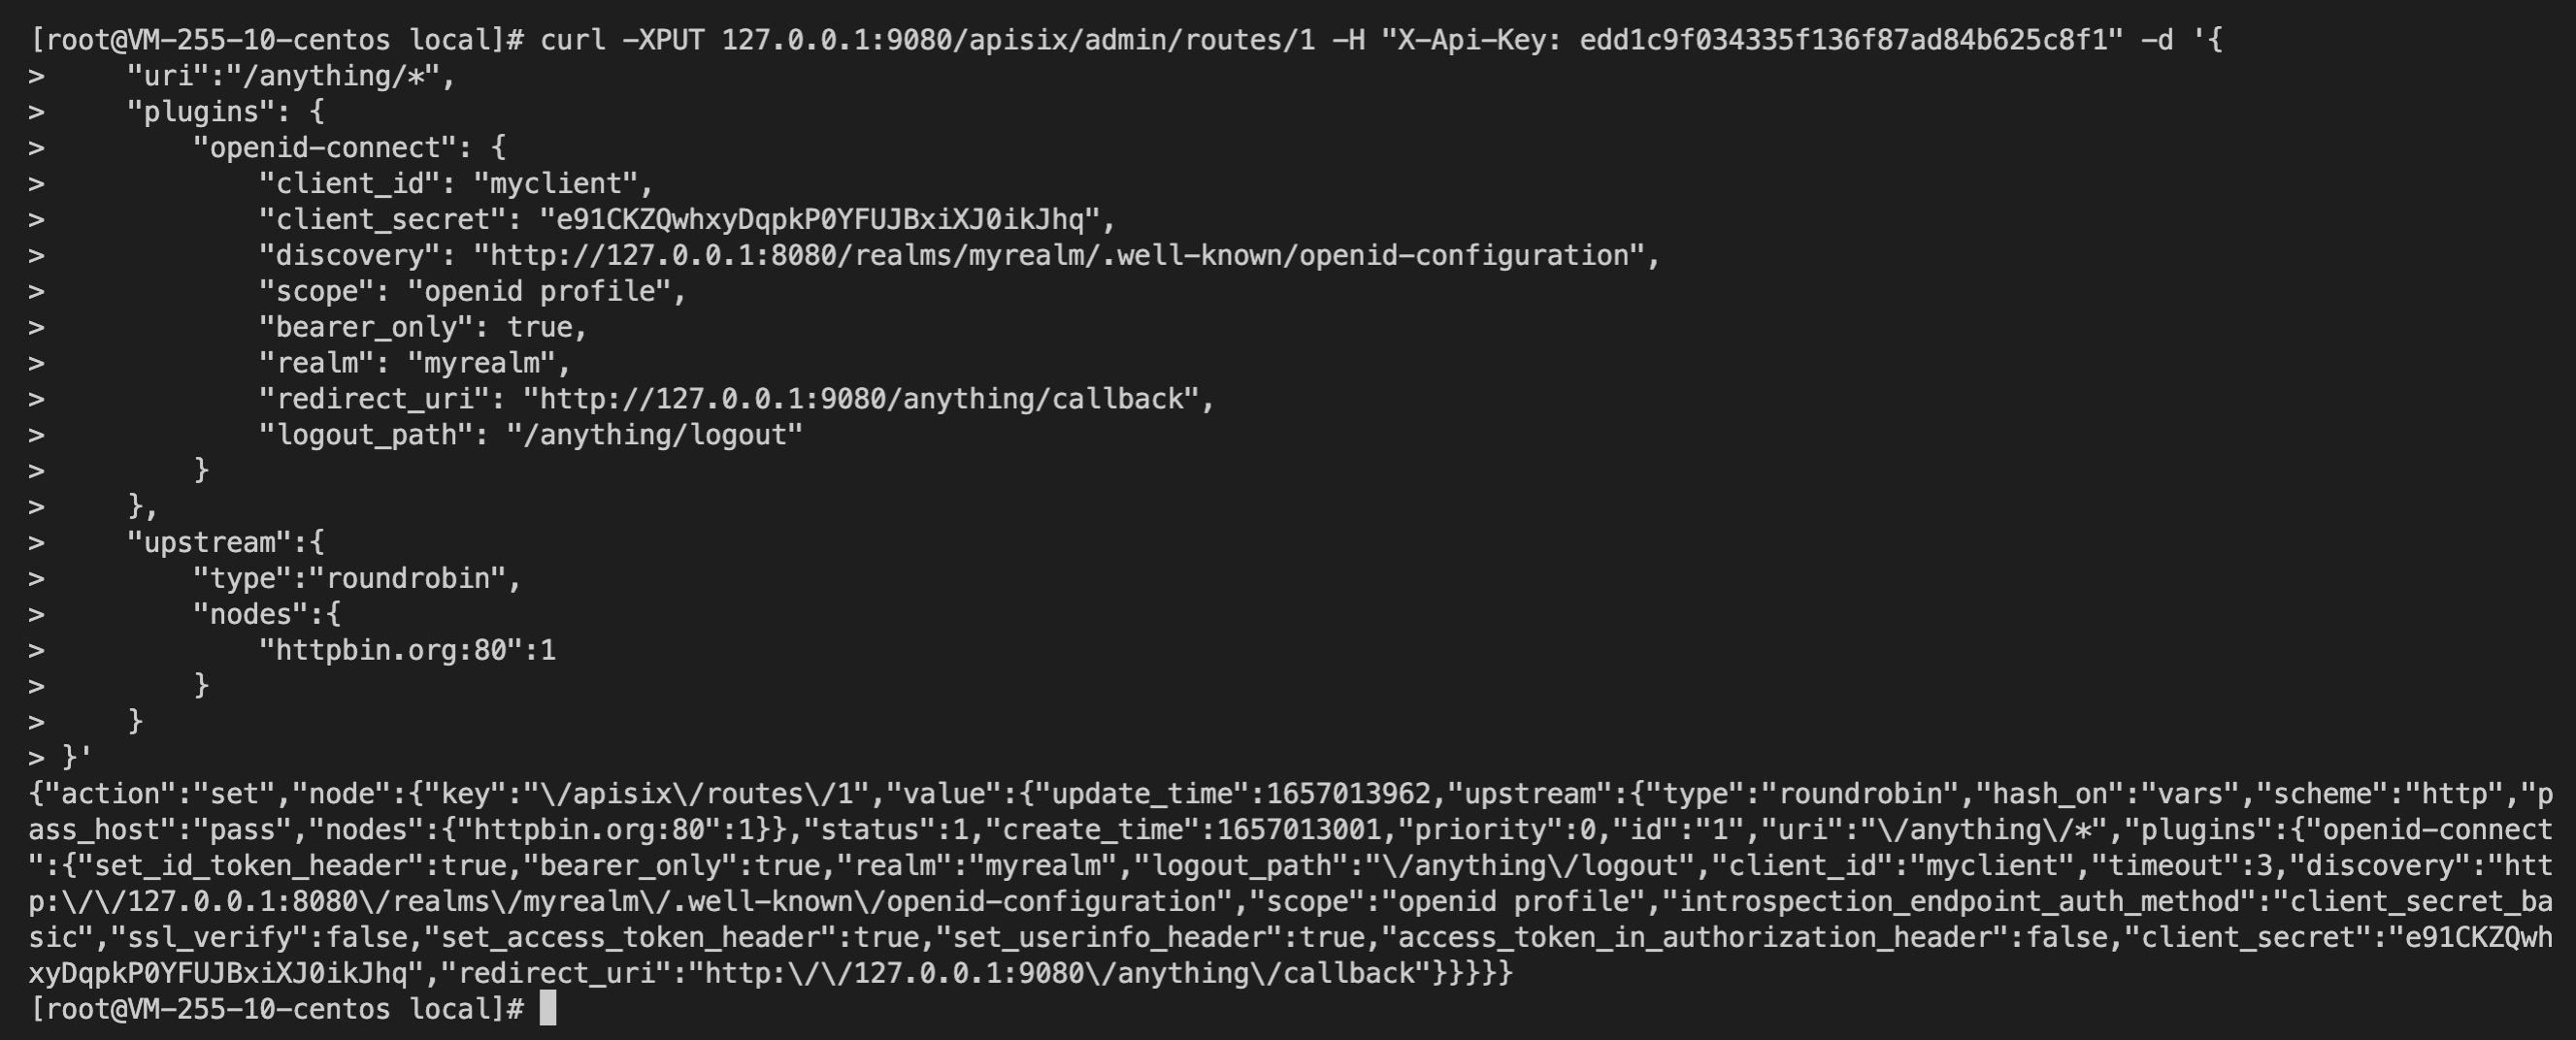
+curl -XPUT 127.0.0.1:9080/apisix/admin/routes/1 -H "X-API-KEY:
edd1c9f034335f136f87ad84b625c8f1" -d '{
+ "uri":"/anything/*",
+ "plugins": {
+ "openid-connect": {
+ "client_id": "myclient",
+ "client_secret": "e91CKZQwhxyDqpkP0YFUJBxiXJ0ikJhq",
+ "discovery":
"http://127.0.0.1:8080/realms/myrealm/.well-known/openid-configuration";,
+ "scope": "openid profile",
+ "bearer_only": false,
+ "realm": "myrealm",
+ "redirect_uri": "http://127.0.0.1:9080/anything/callback";,
+ "logout_path": "/anything/logout"
+ }
+ },
+ "upstream":{
+ "type":"roundrobin",
+ "nodes":{
+ "httpbin.org:80":1
+ }
+ }
+}'
+```
+
+
+
+2. When you visit `http://127.0.0.1:9080/anything/test` after successful API
creation, APISIX will redirect your browser to Keycloak's login page because
you need to log in.
+
+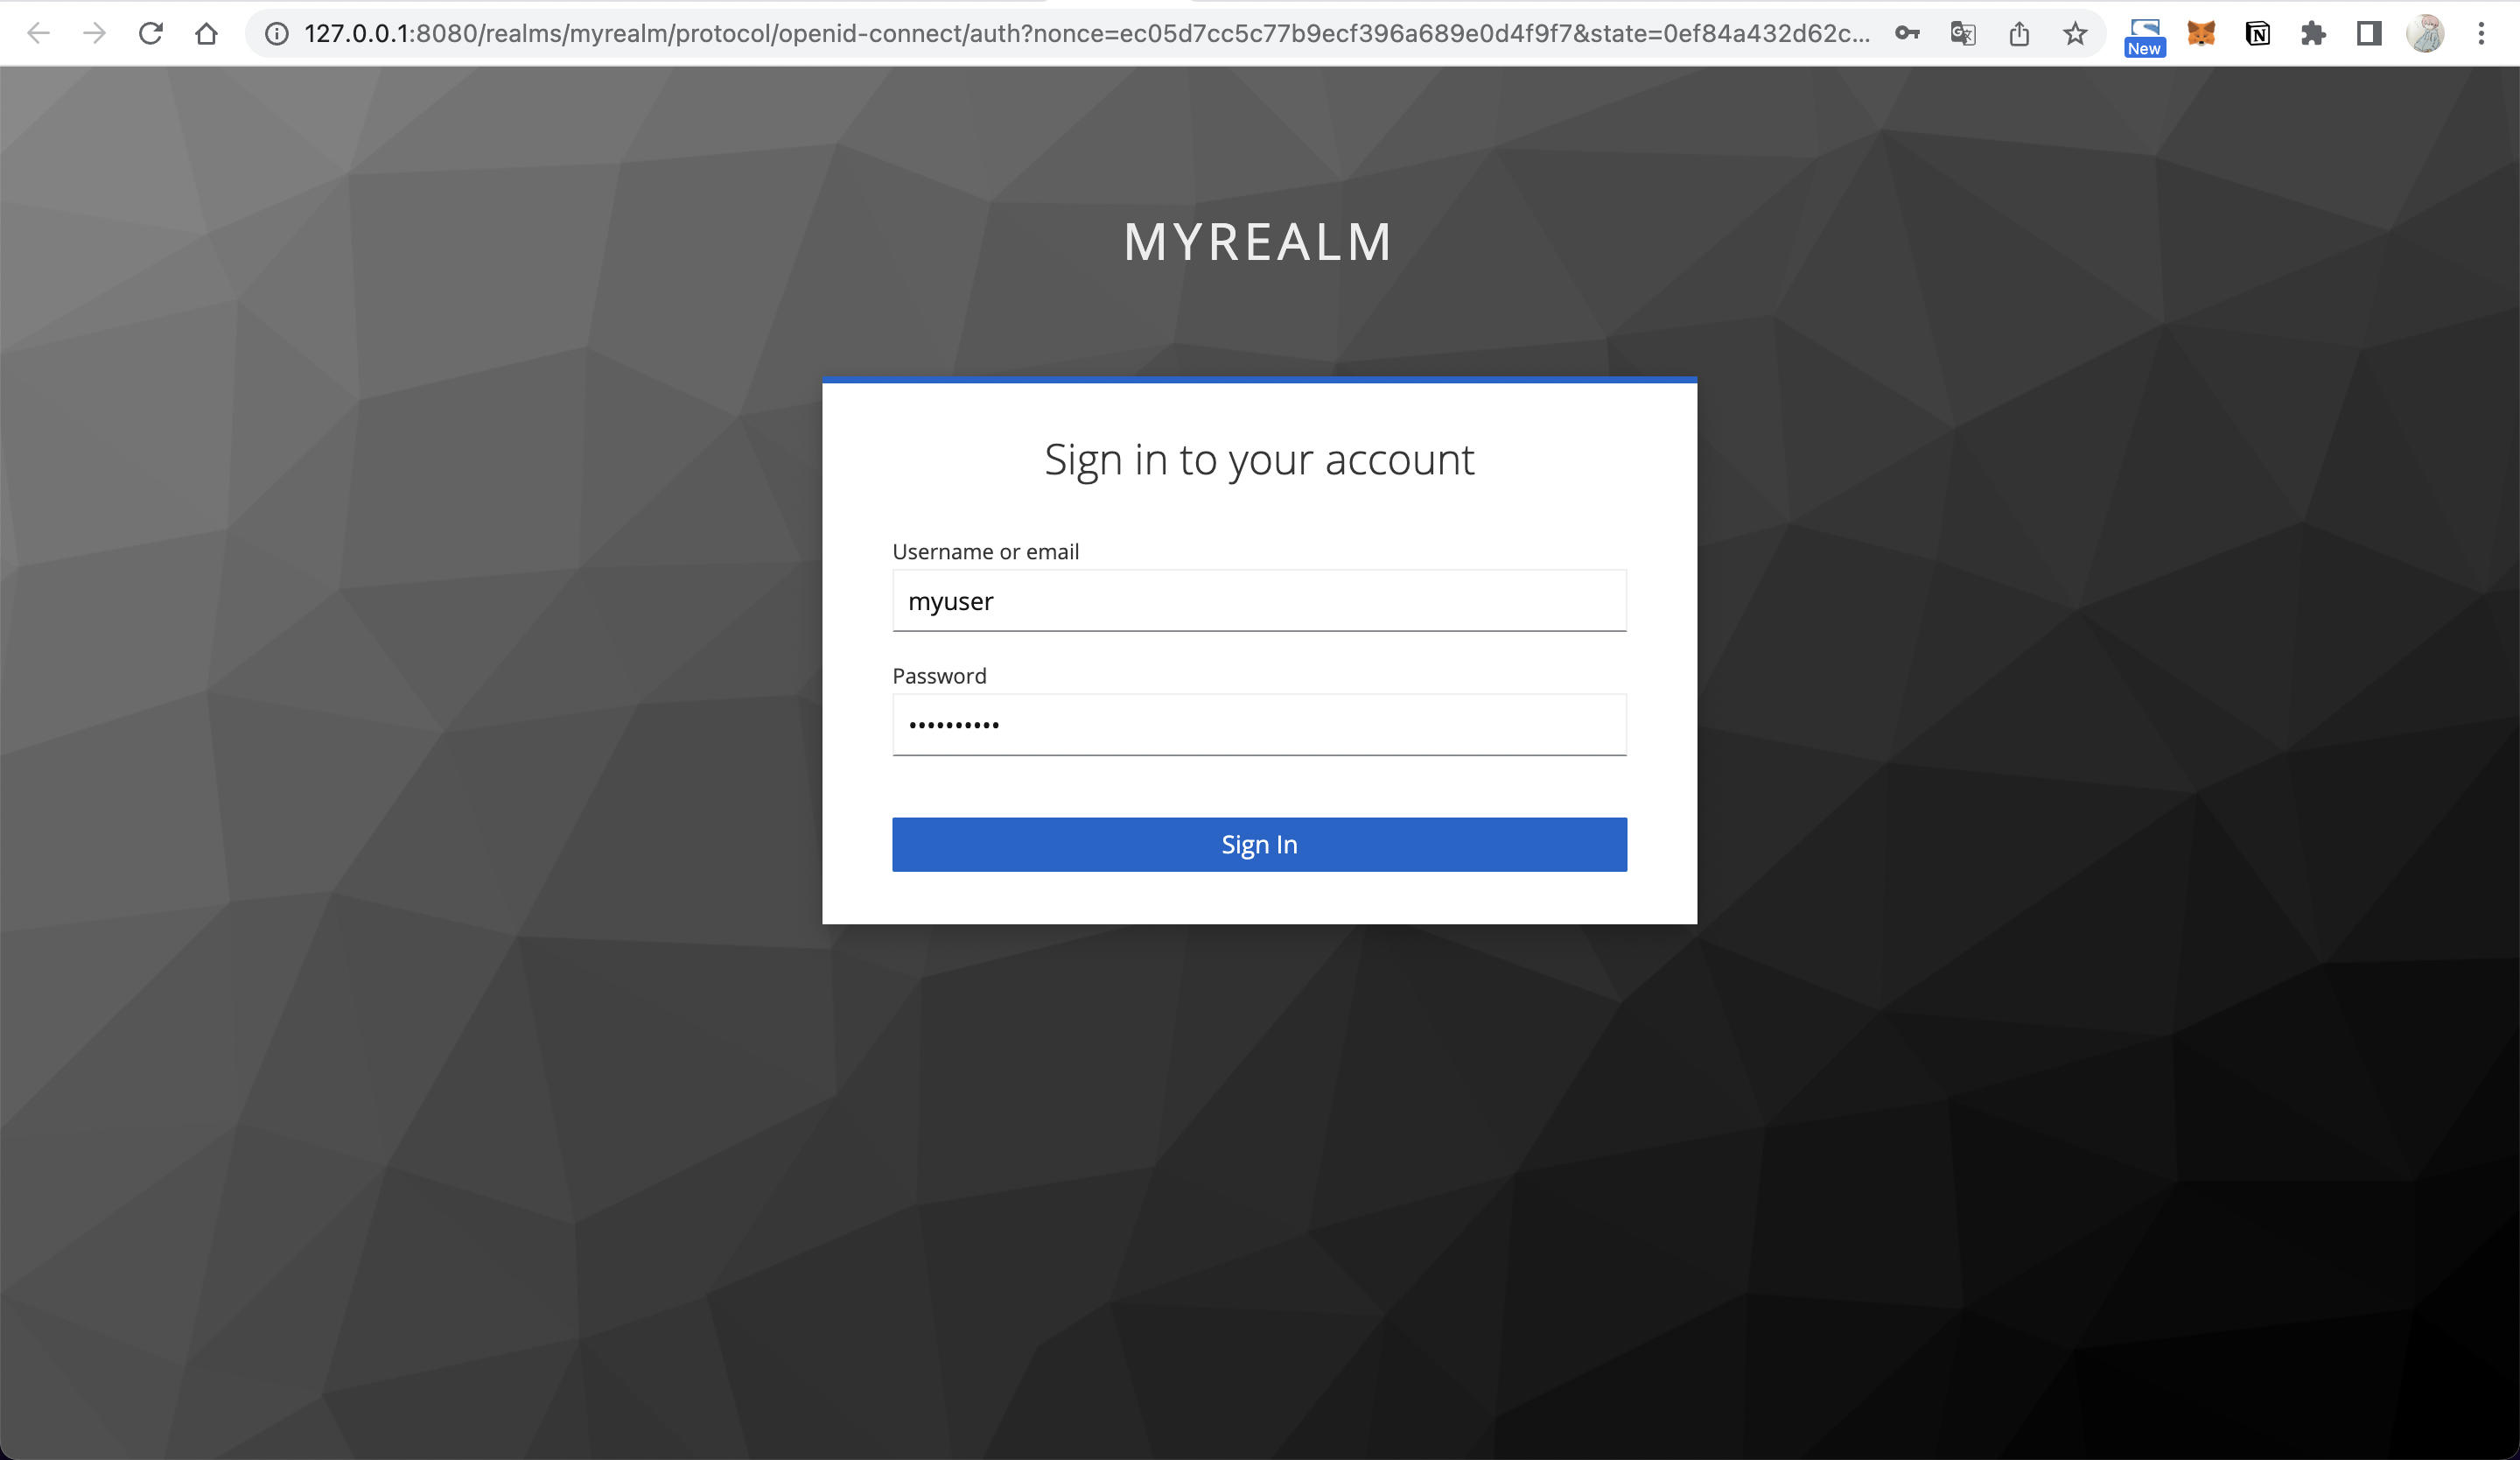
+
+3. Enter username (myuser) and password (mypassword) to log in, and your
browser will redirect to `http://127.0.0.1:9080/anything/test`.
+
+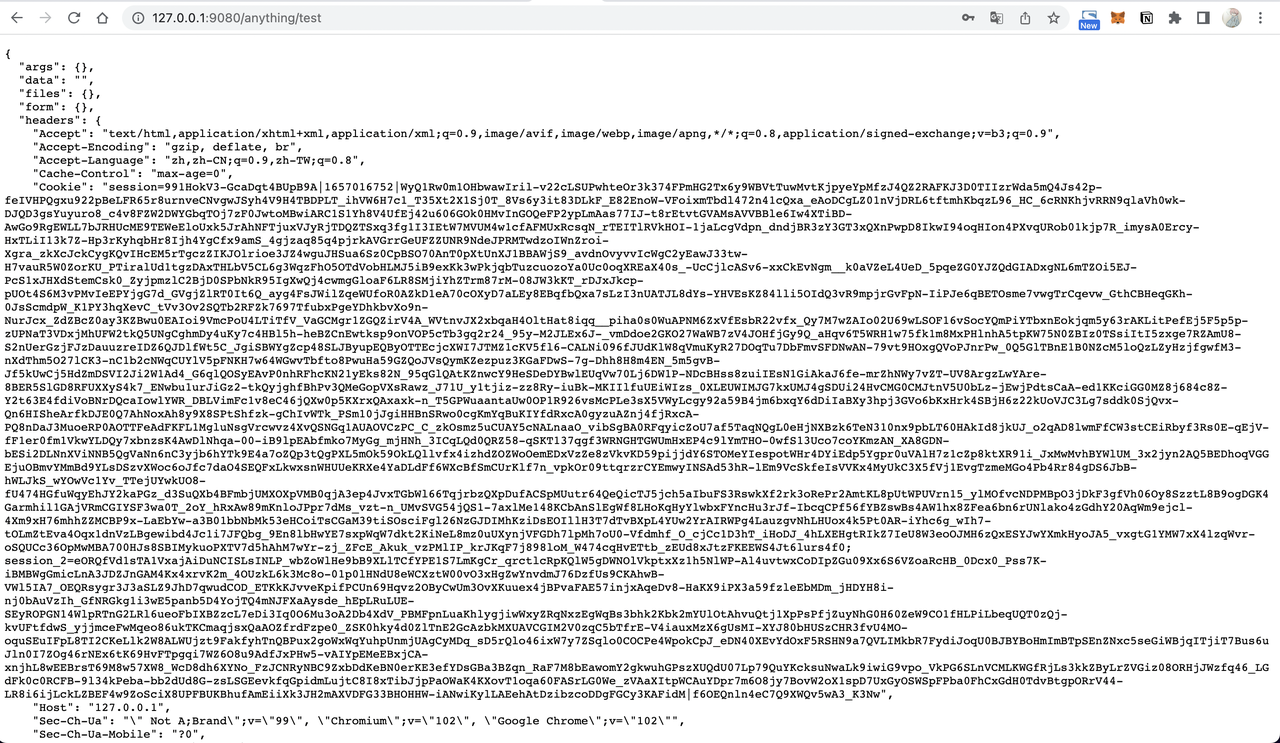
+
+4. Visit `http://127.0.0.1:9080/anything/logout` to log out:
+
+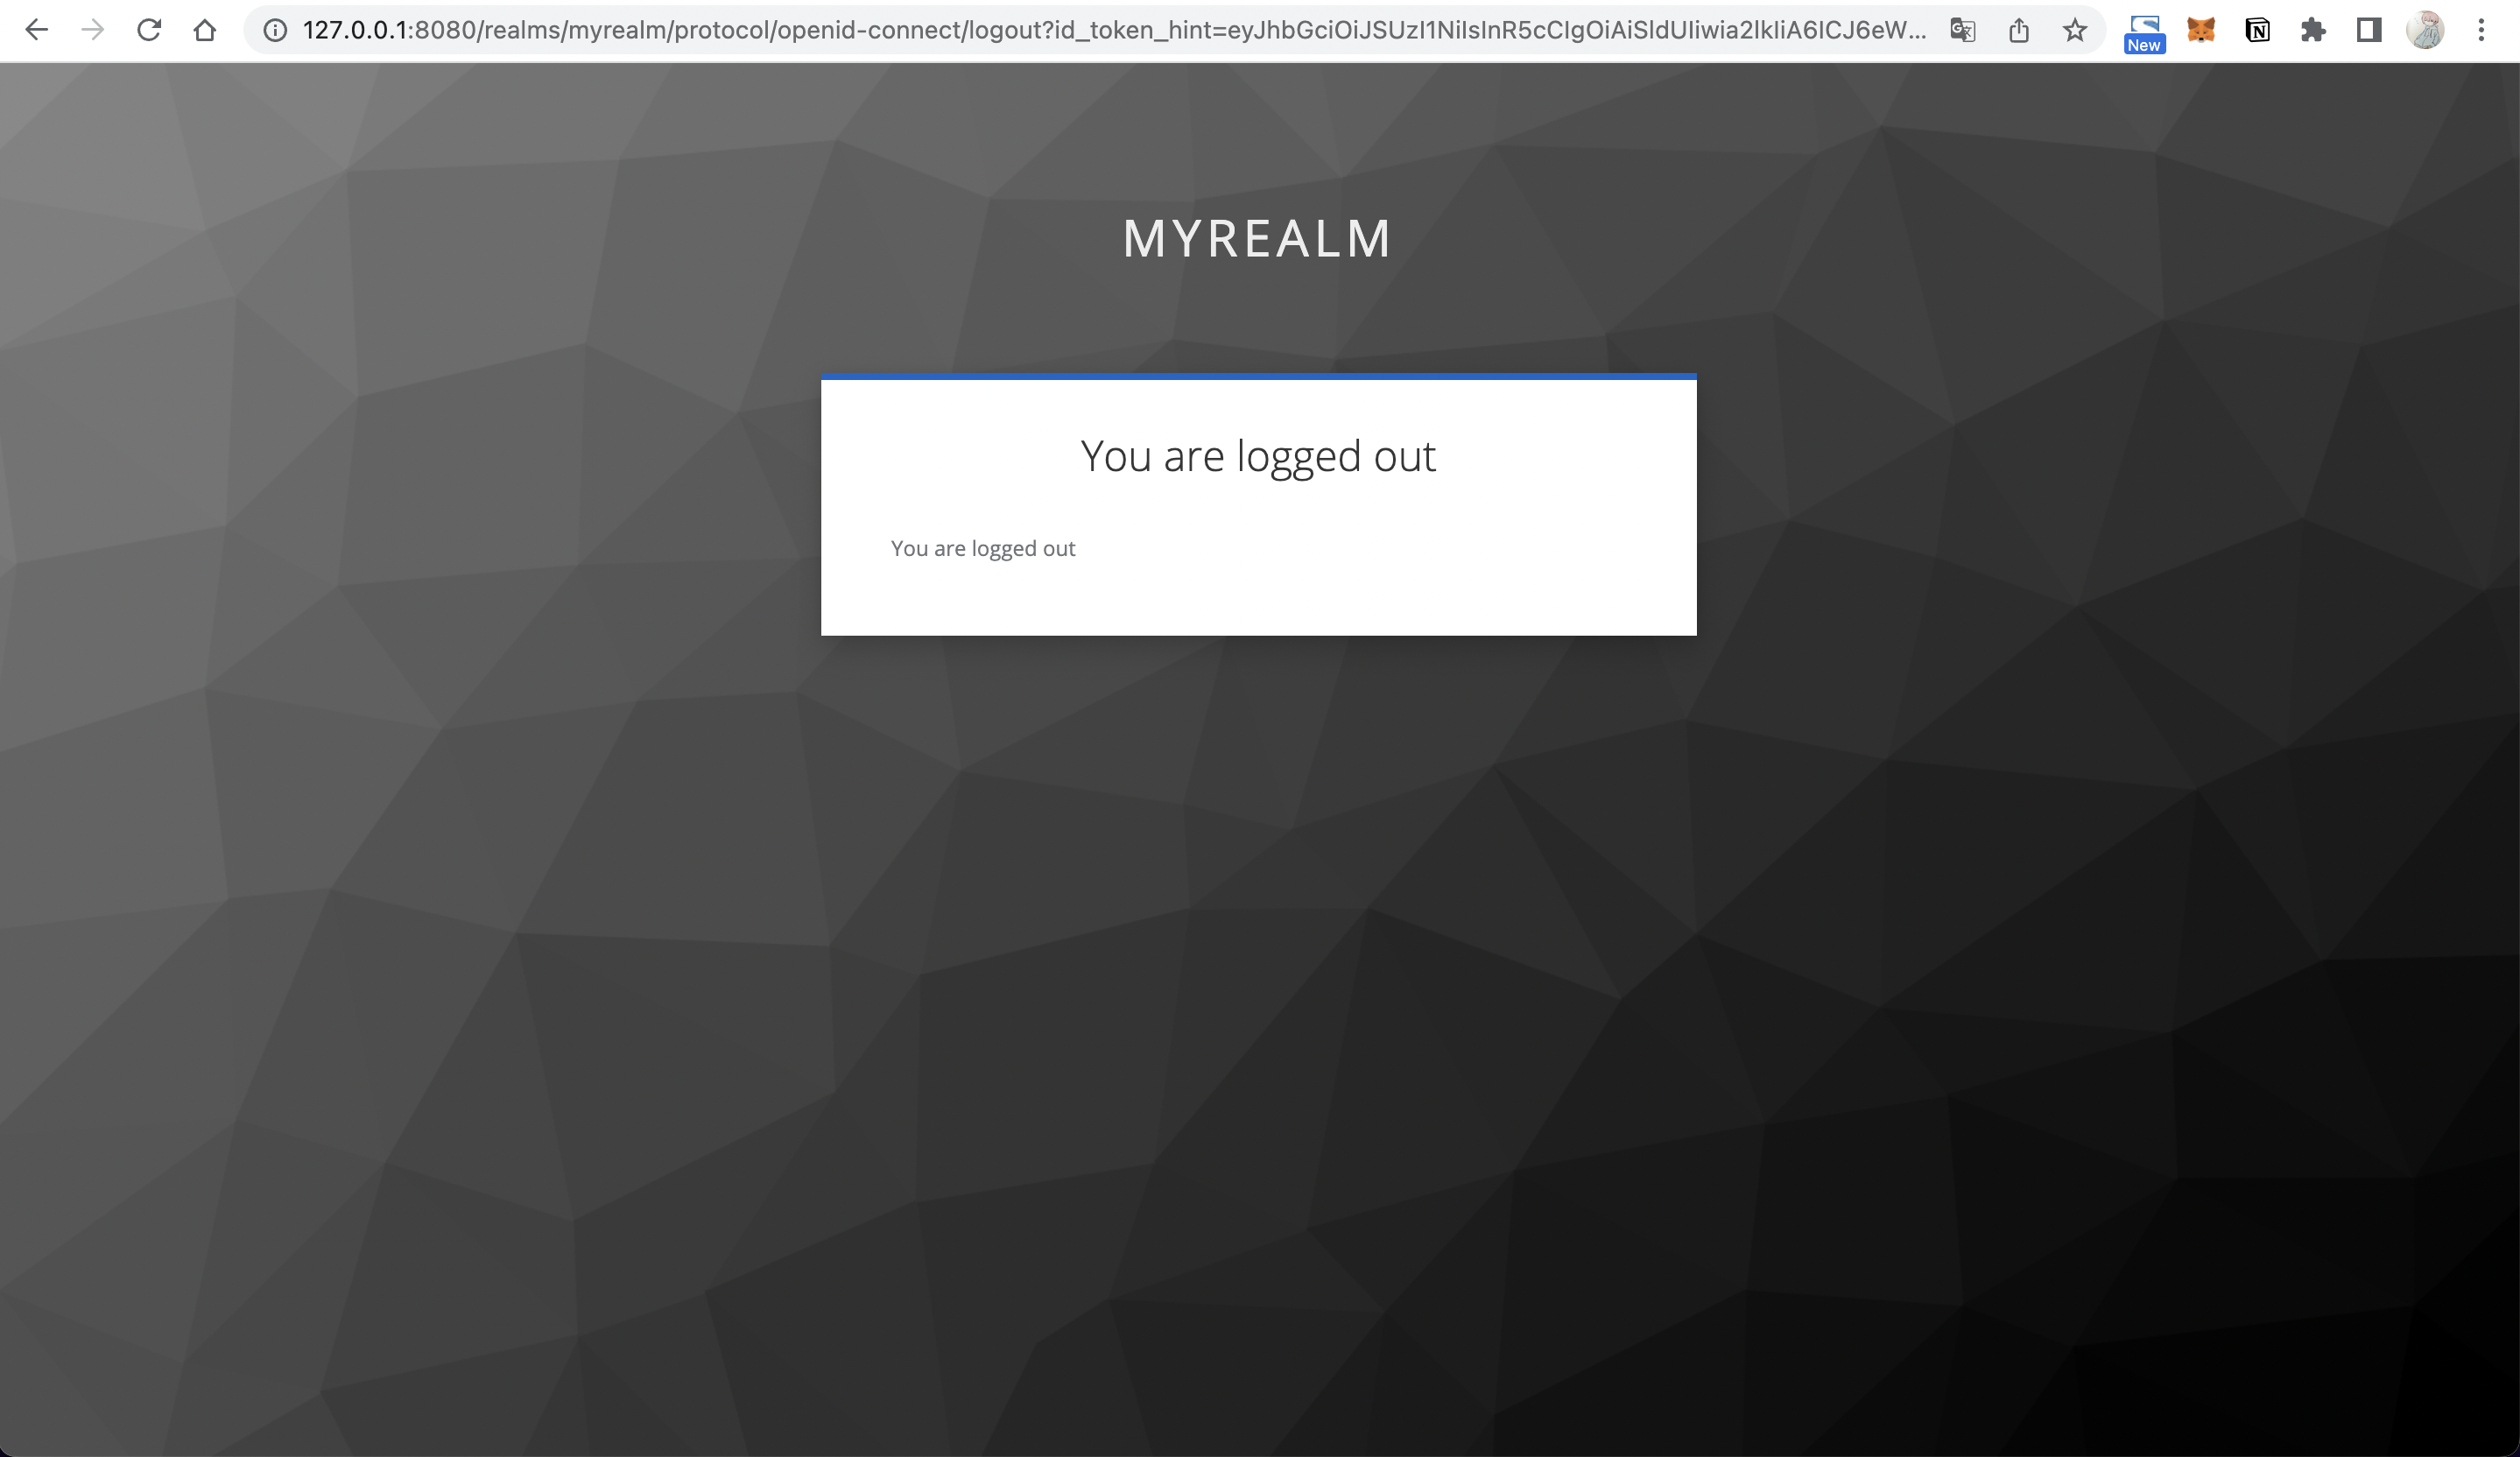
+
+### Case 2: Use AccessToken to authenticate
+
+By enabling the bearer_only parameter to authenticate calls between services,
the service must carry the Authorization Header when accessing APISIX.
Otherwise, APISIX will reject the request.
+
+1. Create an API:
+
+```shell
+curl -XPUT 127.0.0.1:9080/apisix/admin/routes/1 -H "X-API-KEY:
edd1c9f034335f136f87ad84b625c8f1" -d '{
+ "uri":"/anything/*",
+ "plugins": {
+ "openid-connect": {
+ "client_id": "myclient",
+ "client_secret": "e91CKZQwhxyDqpkP0YFUJBxiXJ0ikJhq",
+ "discovery":
"http://127.0.0.1:8080/realms/myrealm/.well-known/openid-configuration";,
+ "scope": "openid profile",
+ "bearer_only": true,
+ "realm": "myrealm",
+ "redirect_uri": "http://127.0.0.1:9080/anything/callback";,
+ "logout_path": "/anything/logout"
+ }
+ },
+ "upstream":{
+ "type":"roundrobin",
+ "nodes":{
+ "httpbin.org:80":1
+ }
+ }
+}'
+```
+
+
+
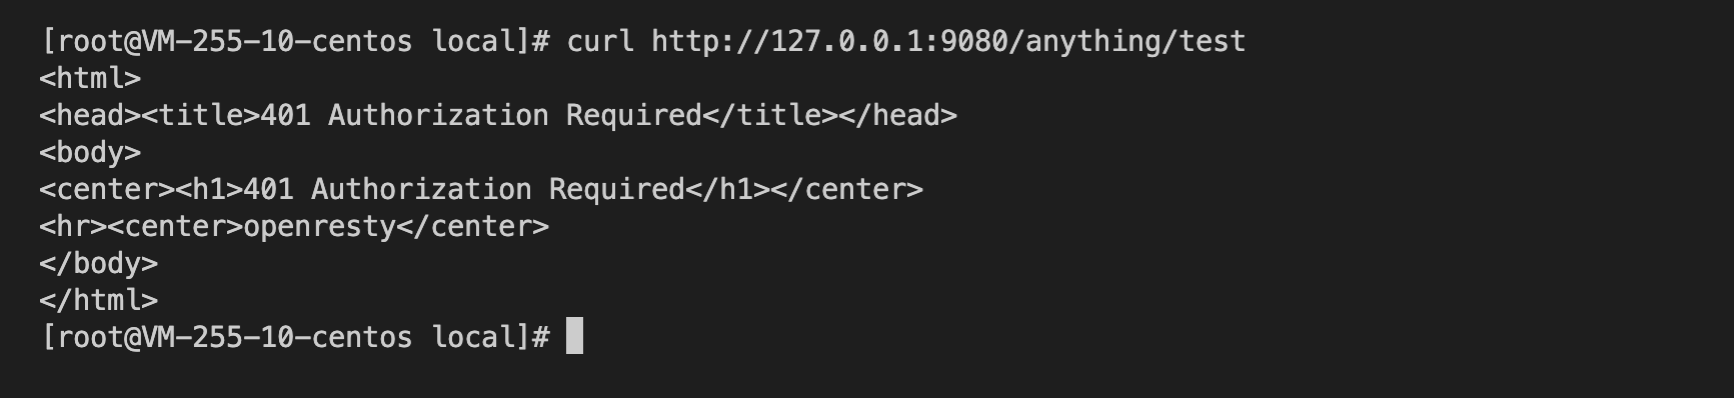
+2. Accessing Apache APISIX without an `X-Access-Token` will return 401
indicating unauthorized.
+
+
+
+3. Call the Keycloak API to obtain the AccessToken.
+
+```shell
+curl -XPOST
"http://127.0.0.1:8080/realms/myrealm/protocol/openid-connect/token"; -d
"grant_type=password&username=myuser&client_id=myclient&client_secret=e91CKZQwhxyDqpkP0YFUJBxiXJ0ikJhq&password=mypassword"
+```
+
+
+
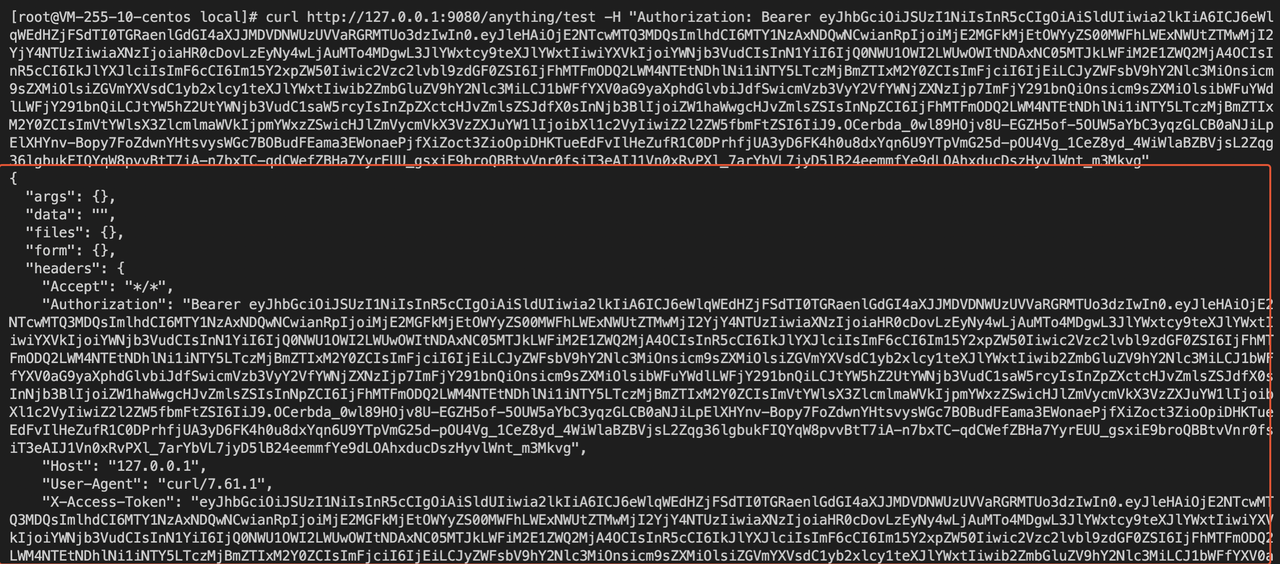
+4. Place the `AccessToken` in the Authorization header (replace
`${AccessToken}`) to request APISIX, and you can authenticate successfully.
+
+```shell
+curl http://127.0.0.1:9080/anything/test -H "Authorization: Bearer
${AccessToken}"
+```
+
+
+
+### Case 3: Parse UserInfo on upstream service
+
+When APISIX's `set_userinfo_header` is enabled, the callback request after
successful authentication will carry the `X-Userinfo` request header, which
contains basic information about the User and can be used to obtain the user
content via base64_decode.
+
+## FAQ
+
+1. **Why is the cookie value very big in APISIX?**
+
+Because APISIX writes `id_token`, `access_token`, and `refresh_token` into the
cookie, the entire cookie content is quite big. For detailed implementation,
read the logic for [setting up a
session](https://github.com/zmartzone/lua-resty-openidc/blob/b07330120ffe54dd3fbeac247726b76d0f9dc793/lib/resty/openidc.lua#L1179-L1188)
in the `lua-resty-openidc` library.
+
+2. **How to change the name and location of the cookie stored in the Session?**
+
+Currently, the openid-connect plugin does not provide the ability to customize
this part of the configuration, so we can use the method provided in
`lua-resty-session`: override its default configuration by NGINX variables.
+We rely on the NGINX configuration injection capabilities provided by APISIX
to achieve the override: the name of the Session storage cookie can be modified
by adding this code to the configuration file {apisix}/conf/config.yaml.
+
+```yaml
+nginx_config:
+ http_server_configuration_snippet: |
+ set $session_name "session_override";
+```
+
+For more information please visit:
+
+1. [lua-resty-session Init
phase](https://github.com/bungle/lua-resty-session/blob/master/lib/resty/session.lua#L348-L380)
+2. [lua-resty-session Pluggable Storage
Adapters](https://github.com/bungle/lua-resty-session#pluggable-storage-adapters)
+
+## Reference
+
+1. [Integrate Keycloak with
APISIX](https://apisix.apache.org/zh/blog/2021/12/10/integrate-keycloak-auth-in-apisix/)
+2. [Keycloak Getting
Started](https://www.keycloak.org/getting-started/getting-started-docker)
+3. [Keycloak Realm vs
Client](https://stackoverflow.com/questions/56561554/keycloak-realm-vs-keycloak-client)
+4. [Keycloak Client vs
User](https://stackoverflow.com/questions/49107701/keycloak-client-vs-user)
+5. [What is Client
Scope?](https://wjw465150.gitbooks.io/keycloak-documentation/content/server_admin/topics/roles/client-scope.html)
diff --git
a/website/i18n/zh/docusaurus-plugin-content-blog/2022/07/06/use-keycloak-with-api-gateway-to-secure-apis.md
b/website/i18n/zh/docusaurus-plugin-content-blog/2022/07/06/use-keycloak-with-api-gateway-to-secure-apis.md
new file mode 100644
index 00000000000..0b7dc7c9ae8
--- /dev/null
+++
b/website/i18n/zh/docusaurus-plugin-content-blog/2022/07/06/use-keycloak-with-api-gateway-to-secure-apis.md
@@ -0,0 +1,285 @@
+---
+title: "使用 Keycloak 与 API 网关保护你的 API"
+authors:
+ - name: "朱欣欣"
+ title: "Apache APISIX Committer"
+ url: "https://github.com/starsz";
+ image_url: "https://github.com/starsz.png";
+ - name: "琚致远"
+ title: "Apache Member"
+ url: "https://github.com/juzhiyuan";
+ image_url: "https://github.com/juzhiyuan.png";
+keywords:
+ - Apache APISIX
+ - API Gateway
+ - Authentication
+ - OpenID Connect
+ - Keycloak
+description: 本篇文章将一步一步引导你如何使用 API 网关与 Keycloak 保护你的 API。
+tags: [Authentication]
+---
+
+> 本篇文章将一步一步引导你如何使用 API 网关与 Keycloak 保护你的 API。
+
+<!--truncate-->
+
+OpenID Connect 又名 OIDC,是基于 OAuth 2.0 的认证协议。它允许客户端从身份认证服务 IdP 获取用户基本信息,常见的 IdP
有:Keycloak、Ory、Okta、Auth0、Authing 等。
+
+开源的 API 网关 Apache APISIX 支持使用 openid-connect 插件对接以上身份认证服务,APISIX
会将所有未认证的请求重定向至身份认证服务的登录页,当登录成功后 APISIX 会将获取到的用户信息发送至上游服务。
+
+
+
+Keycloak 是一个开源的身份认证管理服务,可作为 IdP
来使用。它为应用程序增加了认证服务,并能通过最小的代价保证服务的安全。同时,它还提供了用户联邦、强认证、用户管理、细粒度授权等功能。在这篇文章中,我们将以
Keycloak 为例,让我们看看如何将其与 APISIX 对接,以保护你的服务。
+
+## 流程描述
+
+下图为 OpenID Connect 协议交互流程:
+
+
+
+在重定向阶段(Redirect),IdP 将用户重定向到一个预先配置好的重定向 URL(redirect_url),例如
`http://127.0.0.1:9080/callback`。请注意:这是一个在 APISIX 中不存在的 API,它只用于捕获相关的请求,并在 OIDC
逻辑中完成 Token 交换的功能。请不要使用这个地址作为触发 OIDC 插件重定向的条件,否则,它将返回如下错误:`the error request to
the redirect_uri path, but there's no session state found`。
+
+## 相关术语
+
+1. Bearer Only: Keycloak 支持账户密码或 AccessToken 进行身份认证,若启用 bearer_only 选项,则仅允许通过
AccessToken 进行认证,该方式适用于服务之间的访问认证;
+2. Realm: Keycloak 中的 Realm 相当于一个租户,不同 Realm 是相互隔离的,只能管理和验证它们所具有的用户;
+3.
Scope:者是一种限制在访问令牌(AccessToken)中声明的角色的方法。例如,当一个客户端要求验证一个用户时,客户端收到的访问令牌将只包含范围明确指定的角色映射。客户端范围允许你限制每个单独的访问令牌的权限,而不是让客户端访问用户的所有权限;
+4. User:User 是可以登录到 Keycloak 的用户,可以思考下你所用过的 SSO 登录服务;
+5. Client:客户端是指想要使用 Keycloak 来保护的服务。
+
+## 前置步骤
+
+> 1. 本指南将使用 Docker 进行 Keycloak 的安装与启动;
+> 2. 本指南所用服务器环境为 CentOS 7,IP 为 127.0.0.1。
+
+### 安装 Apache APISIX
+
+请参考 https://apisix.apache.org/docs/apisix/getting-started 安装、启动 APISIX,本示例中
APISIX 实例地址为 `http://127.0.0.1:9080/`。
+
+### 配置 Keycloak
+
+请在服务器中执行如下命令安装 18.0.2 版本的 Keycloak:
+
+```shell
+docker run -d -p 8080:8080 -e KEYCLOAK_ADMIN=admin -e
KEYCLOAK_ADMIN_PASSWORD=admin quay.io/keycloak/keycloak:18.0.2 start-dev
+```
+
+启动完成后 Keycloak 将监听 `8080` 端口,并使用 admin 作为管理员账户与密码。
+
+#### 创建 Realm
+
+访问 `http://127.0.0.1:8080/` 将显示如下界面,这表示 Keycloak 已成功运行。
+
+
+
+访问 Administrator Console 并使用 admin 作为账户与密码进行登录。
+
+
+
+安装完毕首次登陆时,系统内将默认创建名为 master 的 Realm。Realm 是 OIDC 体系中的一个概念,可理解为租户。
+
+
+
+鼠标移动到左侧 Master 上方时点击 Add realm 并输入 myrealm 作为 Realm 的名称,创建。
+
+当安装 Keycloak 首次登录时,系统中会默认创建一个名为 master 的 Realm,但它是专门用来管理 Keycloak
的,我们不应该把它用于我们的应用,所以我们需要创建一个新的 Realm。
+
+
+
+创建成功后将看到已切换至 myrealm,且底部存有 Endpoints -> OpenID Endpoint Configuration,地址为
`http://127.0.0.1:8080/realms/myrealm/.well-known/openid-configuration`,这是一个服务发现的规范,稍后将使用该地址作为
OIDC 所需要使用的各个节点地址。
+
+
+
+#### 创建 User
+
+我们需要创建一个用户用于通过账户密码进行登陆认证。选择 Manage -> Users -> Add user,并输入 myuser 作为用户名,保存后访问
Users 页面并选择 `View all users`。
+
+
+
+
+
+
+
+点击 ID 后进入 Credentials 选项卡,设置一个新密码(本示例使用 mypassword 作为密码)。同时将 Temporary 设置为
OFF,以关闭首次登陆必须修改密码的限制。
+
+
+
+点击 Set Password 保存设置。
+
+#### 创建 Client
+
+访问 Configure -> Clients -> Create 以创建一个新的 Client,这将用于之后配置 APISIX。
+
+
+
+输入 Client ID 并保存,本例使用 myclient 作为 ID。
+
+
+
+保存后需要配置 2 个参数:
+
+1. Access Type:默认为 public,请修改为 credential 以获取 Client Secret;
+2. Valid Redirect URIs:当登陆成功时,Keycloak 将携带 state 与 code 重定向客户端至该地址,因此设置为
Apache APISIX 的特定回调地址,例如 `http://127.0.0.1:9080/anything/callback`
+
+
+
+设置完成后保存,此时页面顶部将出现 Credentials 选项卡,将 Secret 复制下来。
+
+
+
+### 配置汇总
+
+#### Apache APISIX
+
+实例地址:`http://127.0.0.1:9080/`
+
+#### Keycloak
+
+1. 服务地址:`http://127.0.0.1:8080/`
+2. Realm:`myrealm`
+3. Client ID:`myclient`
+4. Client Secret:e91CKZQwhxyDqpkP0YFUJBxiXJ0ikJhq
+5. Redirect URI:`http://127.0.0.1:9080/anything/callback`
+6.
Discovery:`http://127.0.0.1:8080/realms/myrealm/.well-known/openid-configuration`
+7. Logout URL:`/anything/logout`
+8. Bearer Only: `false`
+9. Username:`myuser`
+10. Password:`mypassword`
+
+## 场景示例
+
+### 前置条件
+
+本示例使用 httpbin.org/anything 作为上游服务,它将返回请求中的所有内容。
+
+
+
+### 场景一:使用账户密码保护上游服务
+
+本示例将引导客户端到登陆页通过账户密码的方式进行身份认证:
+
+1. 使用如下命令创建一条 API:
+
+```shell
+curl -XPUT 127.0.0.1:9080/apisix/admin/routes/1 -H "X-API-KEY:
edd1c9f034335f136f87ad84b625c8f1" -d '{
+ "uri":"/anything/*",
+ "plugins": {
+ "openid-connect": {
+ "client_id": "myclient",
+ "client_secret": "e91CKZQwhxyDqpkP0YFUJBxiXJ0ikJhq",
+ "discovery":
"http://127.0.0.1:8080/realms/myrealm/.well-known/openid-configuration";,
+ "scope": "openid profile",
+ "bearer_only": false,
+ "realm": "myrealm",
+ "redirect_uri": "http://127.0.0.1:9080/anything/callback";,
+ "logout_path": "/anything/logout"
+ }
+ },
+ "upstream":{
+ "type":"roundrobin",
+ "nodes":{
+ "httpbin.org:80":1
+ }
+ }
+}'
+```
+
+
+
+2. 创建 API 成功后访问 `http://127.0.0.1:9080/anything/test` 时,由于未进行登录,因此将被引导到
Keycloak 的登录页面:
+
+
+
+3. 输入账号(myuser)、密码(mypassword)完成登录后,成功跳转到
`http://127.0.0.1:9080/anything/test` 页面:
+
+
+
+4. 访问 `http://127.0.0.1:9080/anything/logout` 退出登录:
+
+
+
+### 场景二:使用 AccessToken 验证身份
+
+通过启用 bearer_only 参数对应用之间的调用进行身份认证,此时应用访问 APISIX 时需携带 Authorization
Header,否则该请求将被拒绝。
+
+1. 使用如下命令创建一条 API:
+
+```shell
+curl -XPUT 127.0.0.1:9080/apisix/admin/routes/1 -H "X-API-KEY:
edd1c9f034335f136f87ad84b625c8f1" -d '{
+ "uri":"/anything/*",
+ "plugins": {
+ "openid-connect": {
+ "client_id": "myclient",
+ "client_secret": "e91CKZQwhxyDqpkP0YFUJBxiXJ0ikJhq",
+ "discovery":
"http://127.0.0.1:8080/realms/myrealm/.well-known/openid-configuration";,
+ "scope": "openid profile",
+ "bearer_only": true,
+ "realm": "myrealm",
+ "redirect_uri": "http://127.0.0.1:9080/anything/callback";,
+ "logout_path": "/anything/logout"
+ }
+ },
+ "upstream":{
+ "type":"roundrobin",
+ "nodes":{
+ "httpbin.org:80":1
+ }
+ }
+}'
+```
+
+
+
+2. 未携带 X-Access-Token 访问 Apache APISIX 时将返回 401 表明未经授权:
+
+
+
+3. 调用 Keycloak API 获取 AccessToken:
+
+```shell
+curl -XPOST
"http://127.0.0.1:8080/realms/myrealm/protocol/openid-connect/token"; -d
"grant_type=password&username=myuser&client_id=myclient&client_secret=e91CKZQwhxyDqpkP0YFUJBxiXJ0ikJhq&password=mypassword"
+```
+
+
+
+4. 将 AccessToken 放于 Authorization 头中请求 APISIX(替换掉 `${AccessToken}`),可以认证成功:
+
+```shell
+curl http://127.0.0.1:9080/anything/test -H "Authorization: Bearer
${AccessToken}"
+```
+
+
+
+### 场景三:上游服务解析 UserInfo 信息
+
+当启用 APISIX `set_userinfo_header` 配置后,认证成功后回调请求将携带 `X-Userinfo` 请求头,它包含了 User
的基本信息,可通过 `base64_decode` 获得用户内容。
+
+## 常见问题
+
+1. **为什么 APISIX 中 Cookie 值非常长?**
+
+因为 APISIX 会将 `id_token`、`access_token`、`refresh_token` 等值写入 Cookie 中,因此整个
Cookie 内容比较长。具体实现可阅读 `lua-resty-openidc` 库中设置 session 的逻辑。
+
+2. **如何修改 Session 存储的 Cookie 名称、存储位置?**
+
+目前 openid-connect 插件未提供自定义这部分配置的能力,因此可以使用 lua-resty-session 中提供的方法:通过 NGINX
变量的方式对其默认配置进行覆盖。
+此处借助 APISIX 提供的 NGINX 配置注入能力以实现覆盖:通过在配置文件 {apisix}/conf/config.yaml
中添加这些代码,可修改 Session 存储 Cookie 的名称:
+
+```yaml
+nginx_config:
+ http_server_configuration_snippet: |
+ set $session_name "session_override";
+```
+
+更多配置项可参考:
+
+1. [lua-resty-session Init
phase](https://github.com/bungle/lua-resty-session/blob/master/lib/resty/session.lua#L348-L380)
+2. [lua-resty-session Pluggable Storage
Adapters](https://github.com/bungle/lua-resty-session#pluggable-storage-adapters)
+
+## 参考资料
+
+1. [Integrate Keycloak with
APISIX](https://apisix.apache.org/zh/blog/2021/12/10/integrate-keycloak-auth-in-apisix/)
+2. [Keycloak Getting
Started](https://www.keycloak.org/getting-started/getting-started-docker)
+3. [Keycloak Realm vs
Client](https://stackoverflow.com/questions/56561554/keycloak-realm-vs-keycloak-client)
+4. [Keycloak Client vs
User](https://stackoverflow.com/questions/49107701/keycloak-client-vs-user)
+5. [What is Client
Scope?](https://wjw465150.gitbooks.io/keycloak-documentation/content/server_admin/topics/roles/client-scope.html)