This is an automated email from the ASF dual-hosted git repository.

tqchen pushed a commit to branch master
in repository https://gitbox.apache.org/repos/asf/incubator-tvm.git
The following commit(s) were added to refs/heads/master by this push:
new 98e7709 [DOCS] Fix Sphinx Warnings (RST indent, cross-ref, and image
scale) (#4920)
98e7709 is described below
commit 98e7709ff9e69d48ed46e66d89145aeed074f509
Author: Cody Yu <comaniac0...@gmail.com>
AuthorDate: Thu Feb 20 14:09:34 2020 -0800
[DOCS] Fix Sphinx Warnings (RST indent, cross-ref, and image scale) (#4920)
* fix indents
* Fix image scale and cross-ref
---
docs/api/python/index.rst | 1 +
docs/api/python/relay/op.rst | 5 ---
docs/api/python/runtime.rst | 2 +-
docs/contribute/pull_request.rst | 7 ++--
docs/deploy/index.rst | 3 +-
docs/dev/inferbound.rst | 11 -----
docs/dev/relay_bring_your_own_codegen.rst | 4 +-
docs/dev/relay_intro.rst | 3 --
docs/dev/runtime.rst | 1 +
docs/dev/virtual_machine.rst | 21 +++++++++-
docs/vta/dev/hardware.rst | 1 +
docs/vta/hardware.rst | 19 ---------
tutorials/frontend/build_gcn.py | 35 ++++++++--------
tutorials/frontend/from_tflite.py | 51 ++++++++++++------------
tutorials/frontend/using_external_lib.py | 2 +-
tutorials/language/tuple_inputs.py | 2 +-
tutorials/optimize/opt_conv_tensorcore.py | 15 ++++---
tutorials/optimize/opt_gemm.py | 1 -
tutorials/optimize/opt_matmul_auto_tensorcore.py | 9 ++---
tutorials/relay_quick_start.py | 5 +--
vta/tutorials/frontend/README.txt | 2 +-
vta/tutorials/frontend/deploy_vision_on_vta.py | 21 +++++-----
22 files changed, 99 insertions(+), 122 deletions(-)
diff --git a/docs/api/python/index.rst b/docs/api/python/index.rst
index f62a4b8..796bba8 100644
--- a/docs/api/python/index.rst
+++ b/docs/api/python/index.rst
@@ -21,6 +21,7 @@ Python API
.. toctree::
:maxdepth: 2
+ tvm
runtime
ndarray
error
diff --git a/docs/api/python/relay/op.rst b/docs/api/python/relay/op.rst
index 4c62a06..3d8460a 100644
--- a/docs/api/python/relay/op.rst
+++ b/docs/api/python/relay/op.rst
@@ -53,8 +53,3 @@ tvm.relay.op
.. automodule:: tvm.relay.op.nn
:members:
-
-.. automodule:: tvm.relay.op.vision.multibox
- :members:
-
-.. autofunction:: tvm.relay.vision.nms
diff --git a/docs/api/python/runtime.rst b/docs/api/python/runtime.rst
index 9e39571..30d1b98 100644
--- a/docs/api/python/runtime.rst
+++ b/docs/api/python/runtime.rst
@@ -27,7 +27,7 @@ tvm.runtime
.. autoclass:: tvm.runtime.PackedFunc
:members:
- :inheritated-members:
+ :inherited-members:
.. autofunction:: tvm.register_func
diff --git a/docs/contribute/pull_request.rst b/docs/contribute/pull_request.rst
index 7ad5375..51626a1 100644
--- a/docs/contribute/pull_request.rst
+++ b/docs/contribute/pull_request.rst
@@ -29,12 +29,11 @@ This is a quick guide to submit a pull request, please also
refer to the detaile
git rebase upstream/master
- Make sure code style check pass by typing the following command, and all the
existing test-cases pass.
- - ``docker/bash.sh tvmai/ci-lint ./tests/scripts/task_lint.sh``
- (Note: You must install docker beforehand so you can run a docker image.)
+- ``docker/bash.sh tvmai/ci-lint ./tests/scripts/task_lint.sh``. (Note: You
must install docker beforehand so you can run a docker image.)
- Add test-cases to cover the new features or bugfix the patch introduces.
- Document the code you wrote, see more at :ref:`doc_guide`
-- Send the pull request, fix the problems reported by automatic checks.
- Request code reviews from other contributors and improves your patch
according to feedbacks.
+- Send the pull request and fix the problems reported by automatic checks.
+- Request code reviews from other contributors and improves your patch
according to feedbacks.
- To get your code reviewed quickly, we encourage you to help review others'
code so they can do the favor in return.
- Code review is a shepherding process that helps to improve contributor's
code quality.
diff --git a/docs/deploy/index.rst b/docs/deploy/index.rst
index 9a30b96..a43cce7 100644
--- a/docs/deploy/index.rst
+++ b/docs/deploy/index.rst
@@ -56,7 +56,6 @@ embedded devices is through TVM's RPC API.
Here are the links to the related tutorials.
- :ref:`tutorial-cross-compilation-and-rpc`
-- :ref:`tutorial-deploy-model-on-mali-gpu`
- :ref:`tutorial-deploy-model-on-rasp`
After you finished tuning and benchmarking, you might need to deploy the model
on the
@@ -68,3 +67,5 @@ target device without relying on RPC. see the following
resources on how to do s
cpp_deploy
android
integrate
+ aocl_fpga
+ aws_fpga
diff --git a/docs/dev/inferbound.rst b/docs/dev/inferbound.rst
index d9fedf8..2f4d428 100644
--- a/docs/dev/inferbound.rst
+++ b/docs/dev/inferbound.rst
@@ -118,13 +118,11 @@ In the Operation class declaration above, we can see that
each operation also ha
.. image::
https://raw.githubusercontent.com/tvmai/tvmai.github.io/master/images/docs/inferbound/stage_graph.png
:align: center
- :scale: 70%
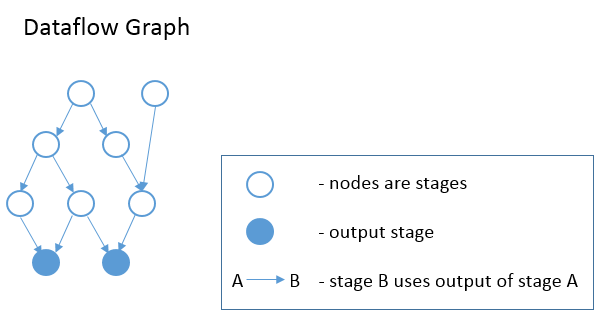
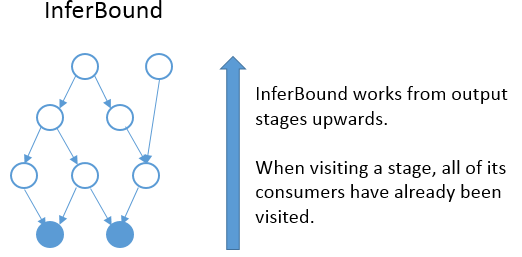
InferBound makes one pass through the graph, visiting each stage exactly once.
InferBound starts from the output stages (i.e., the solid blue nodes in the
graph above), and moves upwards (in the opposite direction of the edges). This
is achieved by performing a reverse topological sort on the nodes of the graph.
Therefore, when InferBound visits a stage, each of its consumer stages has
already been visited.
.. image::
https://raw.githubusercontent.com/tvmai/tvmai.github.io/master/images/docs/inferbound/inferbound_traversal.png
:align: center
- :scale: 70%
The InferBound pass is shown in the following pseudo-code:
@@ -162,7 +160,6 @@ Recall that all IterVars of the stage are related by
IterVarRelations. The IterV
.. image::
https://raw.githubusercontent.com/tvmai/tvmai.github.io/master/images/docs/inferbound/relations.png
:align: center
- :scale: 70%
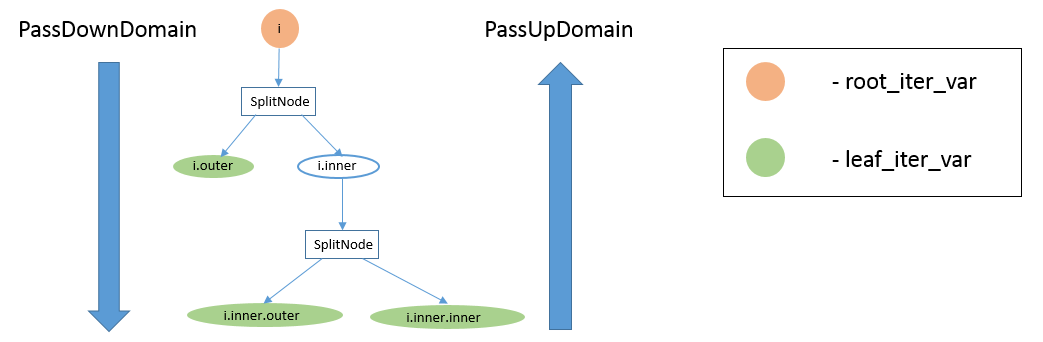
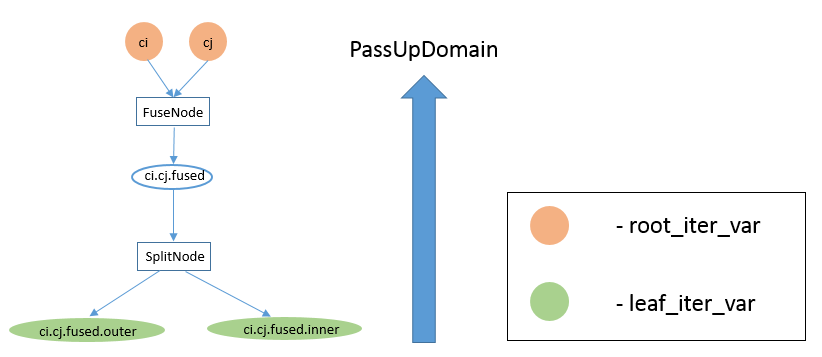
The above diagram shows the IterVar hyper-graph for one stage. The stage has
one root_iter_var, ``i``. It has been split, and the resulting inner axis
``i.inner``, has been split again. The leaf_iter_vars of the stage are shown in
green: ``i.outer``, ``i.inner.outer``, and ``i.inner.inner``.
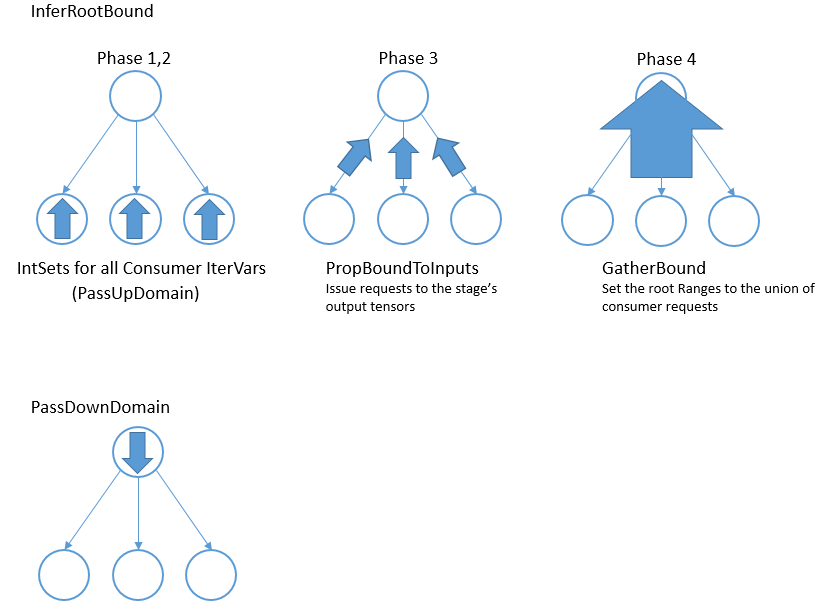
@@ -208,7 +205,6 @@ As mentioned above, a consumer may only require a small
number of elements from
.. image::
https://raw.githubusercontent.com/tvmai/tvmai.github.io/master/images/docs/inferbound/inferbound_phases.png
:align: center
- :scale: 70%
IntSets
~~~~~~~
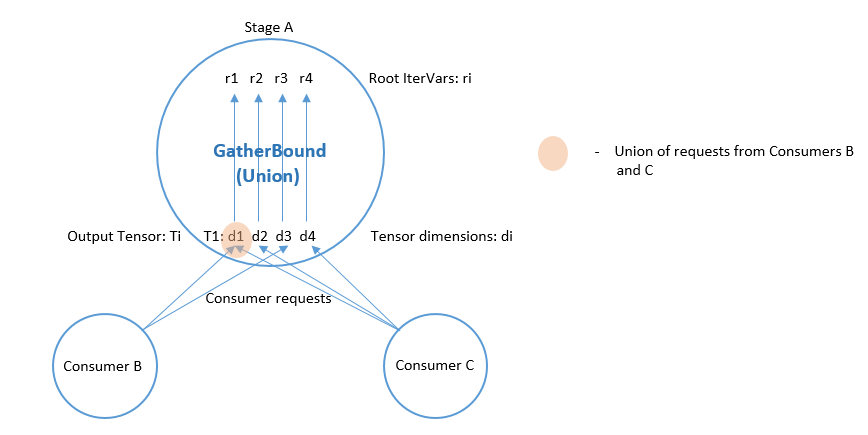
@@ -323,14 +319,12 @@ A ComputeOp has only a single output Tensor, whose axes
correspond to the axis v
.. image::
https://raw.githubusercontent.com/tvmai/tvmai.github.io/master/images/docs/inferbound/gatherbound.png
:align: center
- :scale: 70%
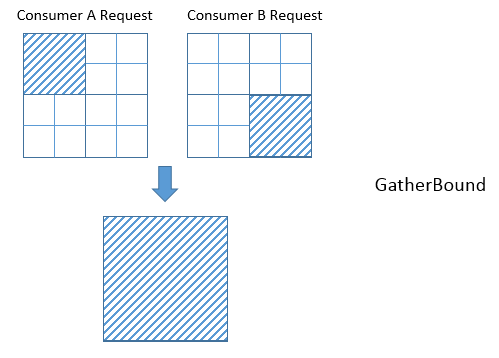
The union of IntSets is computed by converting each IntSet to an Interval, and
then taking the minimum of all minimums, and the maximum of all of these
interval's maximums.
.. image::
https://raw.githubusercontent.com/tvmai/tvmai.github.io/master/images/docs/inferbound/union.png
:align: center
- :scale: 70%
This clearly results in some unnecessary computation, i.e., tensor elements
will be computed that are never used.
@@ -340,7 +334,6 @@ Unfortunately, even if we're lucky and the IntervalSet
unions do not produce unn
.. image::
https://raw.githubusercontent.com/tvmai/tvmai.github.io/master/images/docs/inferbound/gatherbound_problem.png
:align: center
- :scale: 70%
.. _InferBoundCA:
@@ -696,7 +689,6 @@ When InferRootBound is working on stage B, it visits B's
consumer stage C to fin
.. image::
https://raw.githubusercontent.com/tvmai/tvmai.github.io/master/images/docs/inferbound/passupdomain_problem.png
:align: center
- :scale: 70%
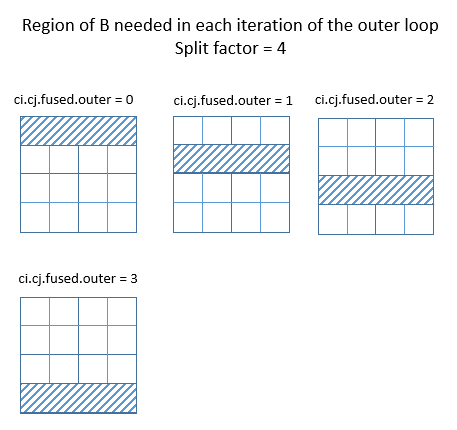
@@ -756,17 +748,14 @@ If the split factor is 4, or 8, in the above example, the
region of B needed in
.. image::
https://raw.githubusercontent.com/tvmai/tvmai.github.io/master/images/docs/inferbound/passupdomain_div.png
:align: center
- :scale: 70%
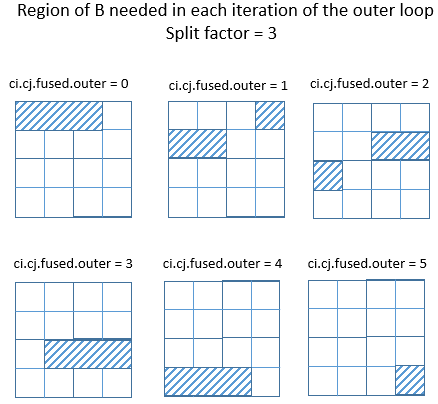
However, if the split factor is changed from 4 to 3 in the example above, it
is easy to see that the region of B that C needs can no longer be described by
an independent Range for each of its axes.
.. image::
https://raw.githubusercontent.com/tvmai/tvmai.github.io/master/images/docs/inferbound/passupdomain_nodiv.png
:align: center
- :scale: 70%
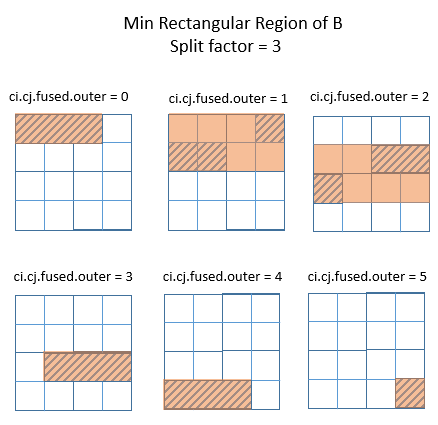
The best that can be done with rectangular regions is shown in the following
diagram. The orange regions are the minimum rectangular regions covering the
region of B that needs to be computed, at each iteration of the outer loop.
.. image::
https://raw.githubusercontent.com/tvmai/tvmai.github.io/master/images/docs/inferbound/passupdomain_min.png
:align: center
- :scale: 70%
diff --git a/docs/dev/relay_bring_your_own_codegen.rst
b/docs/dev/relay_bring_your_own_codegen.rst
index 3e3369d..b7d5fa9 100644
--- a/docs/dev/relay_bring_your_own_codegen.rst
+++ b/docs/dev/relay_bring_your_own_codegen.rst
@@ -535,7 +535,7 @@ To simplify, we define a graph representation named
"ExampleJSON" in this guide.
Then the ExampleJON of this subgraph looks like:
-.. code-block:: json
+.. code-block:: none
subgraph_0
input 0 10 10
@@ -544,7 +544,7 @@ Then the ExampleJON of this subgraph looks like:
input 3 10 10
add 4 inputs: 0 1 shape: 10 10
sub 5 inputs: 4 2 shape: 10 10
- add 6 inputs: 5 3 shape: 10 10
+ mul 6 inputs: 5 3 shape: 10 10
The ``input`` keyword declares an input tensor with its ID and shape; while
the other statements describes computations in ``<op> <output ID> inputs:
[input ID] shape: [shape]`` syntax.
diff --git a/docs/dev/relay_intro.rst b/docs/dev/relay_intro.rst
index 526822a..fac4479 100644
--- a/docs/dev/relay_intro.rst
+++ b/docs/dev/relay_intro.rst
@@ -39,7 +39,6 @@ compile for heterogeneous execution environments (e.g.,
executing parts of the g
.. image::
https://raw.githubusercontent.com/tvmai/tvmai.github.io/master/images/relay/dataflow.png
:align: center
- :scale: 70%
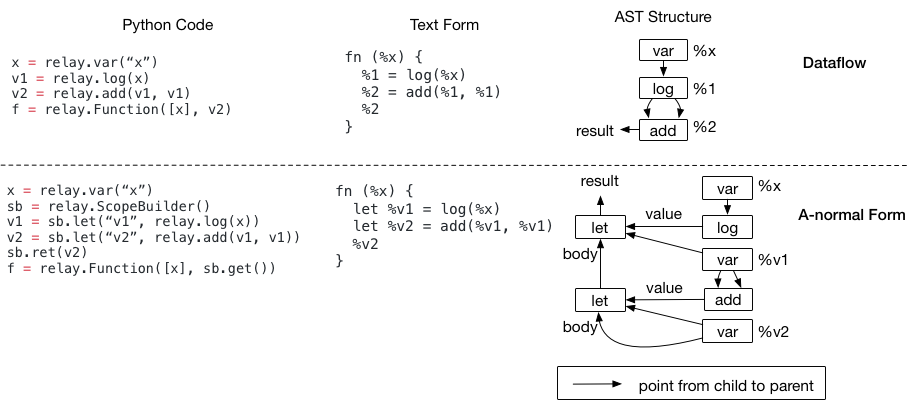
You can use Relay to build a computational (dataflow) graph. Specifically, the
above code shows how to
@@ -130,7 +129,6 @@ The code example below shows one program with two forms
side by side.
.. image::
https://raw.githubusercontent.com/tvmai/tvmai.github.io/master/images/relay/dataflow_vs_func.png
:align: center
- :scale: 70%
The nested let binding is called A-normal form, and it is commonly used as IRs
in functional programming languages.
@@ -155,7 +153,6 @@ which does not use let bindings.
.. image::
https://raw.githubusercontent.com/tvmai/tvmai.github.io/master/images/relay/let_scope.png
:align: center
- :scale: 70%
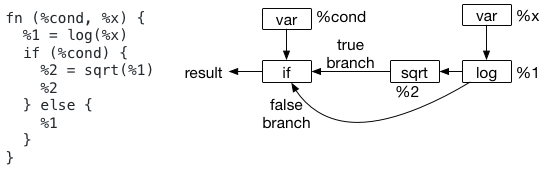
The problem comes when we try to decide where we should evaluate node ``%1``.
In particular, while the text format seems
to suggest that we should evaluate node ``%1`` outside the if scope, the
AST(as shown in the picture) does not suggest so.
diff --git a/docs/dev/runtime.rst b/docs/dev/runtime.rst
index 353b339..5ed5f86 100644
--- a/docs/dev/runtime.rst
+++ b/docs/dev/runtime.rst
@@ -258,6 +258,7 @@ It also allows us to get members of an object easily in
front-end language.
For example, in the following code, we accessed the op field of the TensorNode.
.. code:: python
+
import tvm
x = tvm.placeholder((3,4), name="x")
diff --git a/docs/dev/virtual_machine.rst b/docs/dev/virtual_machine.rst
index 338fb46..5bb5ade 100644
--- a/docs/dev/virtual_machine.rst
+++ b/docs/dev/virtual_machine.rst
@@ -91,6 +91,7 @@ Ret
^^^
**Arguments**:
::
+
RegName dst
RegName result
@@ -100,6 +101,7 @@ InvokePacked
^^^^^^^^^^^^
**Arguments**:
::
+
Index packed_index
Index arity
Index output_size
@@ -114,6 +116,7 @@ AllocTensor
^^^^^^^^^^^
**Arguments**:
::
+
RegName dst
RegName storage
uint32_t ndim
@@ -127,6 +130,7 @@ AllocTensorReg
^^^^^^^^^^^^^^
**Arguments**:
::
+
RegName dst
RegName storage
RegName shape_register
@@ -139,6 +143,7 @@ AllocStorage
^^^^^^^^^^^^
**Arguments**:
::
+
RegName dst
RegName size
RegName alignment
@@ -151,6 +156,7 @@ AllocADT
^^^^^^^^
**Arguments**:
::
+
RegName dst
Index tag
Index num_fields
@@ -163,6 +169,7 @@ AllocClosure
^^^^^^^^^^^^
**Arguments**:
::
+
RegName dst
Index clo_index
Index num_freevar
@@ -176,6 +183,7 @@ GetField
^^^^^^^^
**Arguments**:
::
+
RegName dst
RegName object
Index field_index
@@ -186,6 +194,7 @@ If
^^
**Arguments**:
::
+
RegName test
RegName target
Index true_offset
@@ -199,6 +208,7 @@ GetTag
^^^^^^
**Arguments**:
::
+
RegName object
RegName dst
@@ -212,6 +222,7 @@ Goto
^^^^
**Arguments**:
::
+
Index pc_offset
Relative unconditional jump by ``pc_offset``.
@@ -220,6 +231,7 @@ Invoke
^^^^^^
**Arguments**:
::
+
Index func_index
Invoke function at ``func_index``, consumes the number of arguments contained
in the VMFunction's
@@ -229,6 +241,7 @@ InvokeClosure
^^^^^^^^^^^^^
**Arguments**:
::
+
RegName closure
Index num_closure_args
RegName* closure_args
@@ -239,6 +252,7 @@ LoadConst
^^^^^^^^^
**Arguments**:
::
+
RegName dst
Index const_index
@@ -248,6 +262,7 @@ LoadConsti
^^^^^^^^^^
**Arguments**:
::
+
Index val
RegName dst
@@ -277,7 +292,7 @@ previous call. Registers are allocated in a continuous
space (virtual register f
We keep track of a set of Relay functions we have called, a pointer into its
bytecode, an offset into the byte code (known as the program counter).
-::
+.. code-block:: c
struct VirtualMachine {
...
@@ -331,6 +346,7 @@ Optimizations marked with `TODO` are not implemented yet.
Serialization
~~~~~~~~~~~~~
+
Serializing and deserializing the executable generated by the Relay VM
compiler is a must as
we may want to save the model to the disk and perform inference later.
Previously, Relay has produced
a serialized form in a json file for the graph runtime. However, the same
format is not directly
@@ -372,14 +388,17 @@ Unresolved Questions
How do we handle dynamic shapes?
^^^^^^^^^^^^^^^^^^^^^^^^^^^^^^^^^
+
TODO
How can we modify the VM to support JIT compilation of certain code paths?
^^^^^^^^^^^^^^^^^^^^^^^^^^^^^^^^^^^^^^^^^^^^^^^^^^^^^^^^^^^^^^^^^^^^^^^^^^
+
In the code generation space there are still many tradeoffs to be analyzed and
the VM is designed
to be very flexible so we can modify it for future experiments.
How do we support heterogenous execution?
^^^^^^^^^^^^^^^^^^^^^^^^^^^^^^^^^^^^^^^^^
+
Heterogenous execution should work out of the box assuming we have annotated
the appropriate device copies.
In order to do this properly we need to run the device annotation and copying
passes.
diff --git a/docs/vta/dev/hardware.rst b/docs/vta/dev/hardware.rst
index 7ec073b..784cd54 100644
--- a/docs/vta/dev/hardware.rst
+++ b/docs/vta/dev/hardware.rst
@@ -215,6 +215,7 @@ This would result in a ``load-gemm-activate-store`` task
pipeline which closely
Adding more stages has a cost however: it can add storage and extra logic
overhead, which is why we opted for a default 3-stage pipeline.
.. _vta-uarch:
+
Microarchitectural Overview
---------------------------
diff --git a/docs/vta/hardware.rst b/docs/vta/hardware.rst
deleted file mode 100644
index cfd7be3..0000000
--- a/docs/vta/hardware.rst
+++ /dev/null
@@ -1,19 +0,0 @@
-.. Licensed to the Apache Software Foundation (ASF) under one
- or more contributor license agreements. See the NOTICE file
- distributed with this work for additional information
- regarding copyright ownership. The ASF licenses this file
- to you under the Apache License, Version 2.0 (the
- "License"); you may not use this file except in compliance
- with the License. You may obtain a copy of the License at
-
-.. http://www.apache.org/licenses/LICENSE-2.0
-
-.. Unless required by applicable law or agreed to in writing,
- software distributed under the License is distributed on an
- "AS IS" BASIS, WITHOUT WARRANTIES OR CONDITIONS OF ANY
- KIND, either express or implied. See the License for the
- specific language governing permissions and limitations
- under the License.
-
-VTA Hardware Design Overview
-============================
diff --git a/tutorials/frontend/build_gcn.py b/tutorials/frontend/build_gcn.py
index 077b066..d385dc9 100644
--- a/tutorials/frontend/build_gcn.py
+++ b/tutorials/frontend/build_gcn.py
@@ -16,32 +16,29 @@
# under the License.
"""
Building a Graph Convolutional Network
-=====================
+======================================
**Author**: `Yulun Yao <https://yulunyao.io/>`_, \
`Chien-Yu Lin <https://homes.cs.washington.edu/~cyulin/>`_
This article is an introductory tutorial to build a Graph Convolutional
Network (GCN) with Relay.
-
In this tutorial, we will run our GCN on Cora dataset to demonstrate.
-
Cora dataset is a common benchmark for Graph Neural Networks (GNN) and
frameworks that support GNN training and inference.
-
We directly load the dataset from DGL library to do the apples to apples
comparison against DGL.
Please refer to DGL doc for DGL installation at
-https://docs.dgl.ai/install/index.html
+https://docs.dgl.ai/install/index.html.
-and refer to PyTorch guide for PyTorch installation at
-https://pytorch.org/get-started/locally/
+Please refer to PyTorch guide for PyTorch installation at
+https://pytorch.org/get-started/locally/.
"""
######################################################################
# Define GCN in DGL with PyTorch backend
-# ------------------
+# --------------------------------------
#
# DGL example: https://github.com/dmlc/dgl/tree/master/examples/pytorch/gcn
-# This part reuses the code from the above example
+# This part reuses the code from the above example.
import torch
import torch.nn as nn
import torch.nn.functional as F
@@ -78,7 +75,7 @@ class GCN(nn.Module):
######################################################################
# Define the functions to load dataset and evaluate accuracy
-# ------------------
+# ----------------------------------------------------------
# You may substitute this part with your own dataset, here we load data from
DGL
from dgl.data import load_data
from collections import namedtuple
@@ -106,7 +103,7 @@ def evaluate(data, logits):
######################################################################
# Load the data and set up model parameters
-# ------------------
+# -----------------------------------------
"""
Parameters
----------
@@ -136,7 +133,7 @@ num_classes = data.num_labels
######################################################################
# Set up the DGL-PyTorch model and get the golden results
-# ------------------
+# -------------------------------------------------------
#
# The weights are trained with
https://github.com/dmlc/dgl/blob/master/examples/pytorch/gcn/train.py
from tvm.contrib.download import download_testdata
@@ -162,7 +159,7 @@ torch_model.load_state_dict(torch.load(model_path))
######################################################################
# Run the DGL model and test for accuracy
-# ------------------
+# ---------------------------------------
torch_model.eval()
with torch.no_grad():
logits_torch = torch_model(features)
@@ -174,9 +171,8 @@ print("Test accuracy of DGL results: {:.2%}".format(acc))
######################################################################
# Define Graph Convolution Layer in Relay
-# ----------------------------
+# ---------------------------------------
# To run GCN on TVM, we first need to implement Graph Convolution Layer.
-#
# You may refer to
https://github.com/dmlc/dgl/blob/master/python/dgl/nn/mxnet/conv.py for a
GraphConv Layer implemented in DGL with MXNet Backend
#
# The layer is defined with below operations, note that we apply two
transposes to keep adjacency matrix on right hand side of sparse_dense operator,
@@ -251,7 +247,7 @@ def GraphConv(layer_name,
######################################################################
# Prepare the parameters needed in the GraphConv layers
-# ------------------
+# -----------------------------------------------------
#
import numpy as np
import networkx as nx
@@ -282,7 +278,7 @@ assert params['infeats'].shape[0] ==
params['indptr'].shape[0] - 1
######################################################################
# Put layers together
-# ------------------
+# -------------------
# Define input features, norms, adjacency matrix in Relay
infeats = relay.var("infeats", shape=data.features.shape)
@@ -321,7 +317,8 @@ func = relay.Function(relay.analysis.free_vars(output),
output)
######################################################################
# Compile and run with TVM
-# ------------------
+# ------------------------
+#
# Export the weigths from PyTorch model to Python Dict
model_params = {}
for param_tensor in torch_model.state_dict():
@@ -345,7 +342,7 @@ m.set_input(**params)
######################################################################
# Run the TVM model, test for accuracy and verify with DGL
-# ------------------
+# --------------------------------------------------------
m.run()
logits_tvm = m.get_output(0).asnumpy()
print("Print the first five outputs from TVM execution\n", logits_tvm[:5])
diff --git a/tutorials/frontend/from_tflite.py
b/tutorials/frontend/from_tflite.py
index 85ece27..e93a71c 100644
--- a/tutorials/frontend/from_tflite.py
+++ b/tutorials/frontend/from_tflite.py
@@ -16,13 +16,12 @@
# under the License.
"""
Compile TFLite Models
-===================
+=====================
**Author**: `Zhao Wu <https://github.com/FrozenGene>`_
This article is an introductory tutorial to deploy TFLite models with Relay.
To get started, Flatbuffers and TFLite package needs to be installed as
prerequisites.
-
A quick solution is to install Flatbuffers via pip
.. code-block:: bash
@@ -68,7 +67,7 @@ Below you can find an example on how to compile TFLite model
using TVM.
"""
######################################################################
# Utils for downloading and extracting zip files
-# ---------------------------------------------
+# ----------------------------------------------
import os
def extract(path):
@@ -84,28 +83,28 @@ def extract(path):
######################################################################
# Load pretrained TFLite model
-# ---------------------------------------------
-# we load mobilenet V1 TFLite model provided by Google
+# ----------------------------
+# Load mobilenet V1 TFLite model provided by Google
from tvm.contrib.download import download_testdata
model_url =
"http://download.tensorflow.org/models/mobilenet_v1_2018_08_02/mobilenet_v1_1.0_224.tgz";
-# we download model tar file and extract, finally get
mobilenet_v1_1.0_224.tflite
+# Download model tar file and extract it to get mobilenet_v1_1.0_224.tflite
model_path = download_testdata(model_url, "mobilenet_v1_1.0_224.tgz",
module=['tf', 'official'])
model_dir = os.path.dirname(model_path)
extract(model_path)
-# now we have mobilenet_v1_1.0_224.tflite on disk and open it
+# Now we can open mobilenet_v1_1.0_224.tflite
tflite_model_file = os.path.join(model_dir, "mobilenet_v1_1.0_224.tflite")
tflite_model_buf = open(tflite_model_file, "rb").read()
-# get TFLite model from buffer
+# Get TFLite model from buffer
import tflite.Model
tflite_model = tflite.Model.Model.GetRootAsModel(tflite_model_buf, 0)
######################################################################
# Load a test image
-# ---------------------------------------------
+# -----------------
# A single cat dominates the examples!
from PIL import Image
from matplotlib import pyplot as plt
@@ -118,10 +117,10 @@ plt.imshow(resized_image)
plt.show()
image_data = np.asarray(resized_image).astype("float32")
-# after expand_dims, we have format NHWC
+# Add a dimension to the image so that we have NHWC format layout
image_data = np.expand_dims(image_data, axis=0)
-# preprocess image as described here:
+# Preprocess image as described here:
#
https://github.com/tensorflow/models/blob/edb6ed22a801665946c63d650ab9a0b23d98e1b1/research/slim/preprocessing/inception_preprocessing.py#L243
image_data[:, :, :, 0] = 2.0 / 255.0 * image_data[:, :, :, 0] - 1
image_data[:, :, :, 1] = 2.0 / 255.0 * image_data[:, :, :, 1] - 1
@@ -130,50 +129,50 @@ print('input', image_data.shape)
######################################################################
# Compile the model with relay
-# ---------------------------------------------
+# ----------------------------
# TFLite input tensor name, shape and type
input_tensor = "input"
input_shape = (1, 224, 224, 3)
input_dtype = "float32"
-# parse TFLite model and convert into Relay computation graph
+# Parse TFLite model and convert it to a Relay module
from tvm import relay
mod, params = relay.frontend.from_tflite(tflite_model,
shape_dict={input_tensor:
input_shape},
dtype_dict={input_tensor:
input_dtype})
-# target x86 CPU
+# Build the module against to x86 CPU
target = "llvm"
with relay.build_config(opt_level=3):
graph, lib, params = relay.build(mod, target, params=params)
######################################################################
# Execute on TVM
-# ---------------------------------------------
+# --------------
import tvm
from tvm.contrib import graph_runtime as runtime
-# create a runtime executor module
+# Create a runtime executor module
module = runtime.create(graph, lib, tvm.cpu())
-# feed input data
+# Feed input data
module.set_input(input_tensor, tvm.nd.array(image_data))
-# feed related params
+# Feed related params
module.set_input(**params)
-# run
+# Run
module.run()
-# get output
+# Get output
tvm_output = module.get_output(0).asnumpy()
######################################################################
# Display results
-# ---------------------------------------------
+# ---------------
-# load label file
+# Load label file
label_file_url = ''.join(['https://raw.githubusercontent.com/',
'tensorflow/tensorflow/master/tensorflow/lite/java/demo/',
'app/src/main/assets/',
@@ -181,15 +180,15 @@ label_file_url =
''.join(['https://raw.githubusercontent.com/',
label_file = "labels_mobilenet_quant_v1_224.txt"
label_path = download_testdata(label_file_url, label_file, module='data')
-# list of 1001 classes
+# List of 1001 classes
with open(label_path) as f:
labels = f.readlines()
-# convert result to 1D data
+# Convert result to 1D data
predictions = np.squeeze(tvm_output)
-# get top 1 prediction
+# Get top 1 prediction
prediction = np.argmax(predictions)
-# convert id to class name and show the result
+# Convert id to class name and show the result
print("The image prediction result is: id " + str(prediction) + " name: " +
labels[prediction])
diff --git a/tutorials/frontend/using_external_lib.py
b/tutorials/frontend/using_external_lib.py
index 35b015b..71aceda 100644
--- a/tutorials/frontend/using_external_lib.py
+++ b/tutorials/frontend/using_external_lib.py
@@ -16,7 +16,7 @@
# under the License.
"""
Using External Libraries in Relay
-================================
+=================================
**Author**: `Masahiro Masuda <https://github.com/masahi>`_, `Truman Tian
<https://github.com/SiNZeRo>`_
This is a short tutorial on how to use external libraries such as cuDNN, or
cuBLAS with Relay.
diff --git a/tutorials/language/tuple_inputs.py
b/tutorials/language/tuple_inputs.py
index 0c5c85c..715e2ef 100644
--- a/tutorials/language/tuple_inputs.py
+++ b/tutorials/language/tuple_inputs.py
@@ -56,7 +56,7 @@ print(tvm.lower(s, [A0, A1, B0, B1], simple_mode=True))
# operators, and the inputs will collaborate together, e.g. :code:`argmax`.
# In the reduction procedure, :code:`argmax` need to compare the value of
# operands, also need to keep the index of operand. It can be expressed
-# with :any:`comm_reducer` as below:
+# with :py:func:`tvm.comm_reducer` as below:
# x and y are the operands of reduction, both of them is a tuple of index
# and value.
diff --git a/tutorials/optimize/opt_conv_tensorcore.py
b/tutorials/optimize/opt_conv_tensorcore.py
index 774b4c7..ef84089 100644
--- a/tutorials/optimize/opt_conv_tensorcore.py
+++ b/tutorials/optimize/opt_conv_tensorcore.py
@@ -18,7 +18,7 @@
.. _opt-conv-tensorcore:
How to optimize convolution using TensorCores
-==================================
+=============================================
**Author**: `Siyuan Feng <https://github.com/Hzfengsy>`_
In this tutorial, we will demonstrate how to write a high performance
convolution
@@ -29,7 +29,7 @@ convolution has a large batch. We strongly recommend covering
the :ref:`opt-conv
################################################################
# TensorCore Introduction
-# -------------------------
+# -----------------------
# Each Tensor Core provides a 4x4x4 matrix processing array that operates
# :code:`D = A * B + C`, where A, B, C and D are 4x4 matrices as Figure shows.
# The matrix multiplication inputs A and B are FP16 matrices, while the
accumulation
@@ -45,7 +45,7 @@ convolution has a large batch. We strongly recommend covering
the :ref:`opt-conv
################################################################
# Preparation and Algorithm
-# --------------------------
+# -------------------------
# We use the fixed size for input tensors with 256 channels and 14 x 14
dimensions.
# The batch size is 256. Convolution filters contain 512 filters of size 3 x 3.
# We use stride size 1 and padding size 1 for the convolution. In the example,
we use
@@ -126,8 +126,7 @@ s[Apad].compute_inline()
###############################################################################
# Memory Scope
-# ----------------
-#
+# ------------
# In traditional GPU schedule, we have global, shared and local memory scope.
# To support TensorCores, we add another three special memory scope:
:code:`wmma.matrix_a`,
# :code:`wmma.matrix_b` and :code:`wmma.accumulator`. On hardware, all
fragments scope
@@ -142,6 +141,7 @@ ConvF = s.cache_write(Conv, 'wmma.accumulator')
###############################################################################
# Define Tensor Intrinsic
+# -----------------------
# In fact, TensorCore is a special hardware operation. So, we can just use
tensorize
# to replace a unit of computation with the TensorCore instruction. The first
thing is
# that we need to define tensor intrinsic.
@@ -246,7 +246,6 @@ def intrin_wmma_store_matrix():
# easiest way to solve this. Then We can bind threadIdx.x to any loops
except those contain
# TensorCore intrinsics directly or indirectly. Also note that it is not the
unique solution.
# The only thing we should do is to make sure all threads in a warp can call
TensorCore at the same time.
-#
# Define tiling sizes
block_row_warps = 4
@@ -312,10 +311,9 @@ print(tvm.lower(s, [A, W, Conv], simple_mode=True))
###############################################################################
# Lowering Computation to Intrinsics
-# --------------------------
+# ----------------------------------
# The last phase is to lower the computation loops down to TensorCore hardware
intrinsics
# by mapping the 2D convolution to tensor intrinsics
-#
s[AF].tensorize(AF.op.axis[-2], intrin_wmma_load_matrix('wmma.matrix_a'))
s[WF].tensorize(WF.op.axis[-2], intrin_wmma_load_matrix('wmma.matrix_b'))
@@ -344,5 +342,6 @@ if nvcc.have_tensorcore(ctx.compute_version):
###############################################################################
# Summary
+# -------
# This tutorial demonstrates how TVM scheduling primitives can be used to
# call TensorCores on specific GPUs.
diff --git a/tutorials/optimize/opt_gemm.py b/tutorials/optimize/opt_gemm.py
index a23589a..8ed152a 100644
--- a/tutorials/optimize/opt_gemm.py
+++ b/tutorials/optimize/opt_gemm.py
@@ -232,7 +232,6 @@ print(tvm.lower(s, [A, B, C], simple_mode=True))
#
# .. image::
https://github.com/dmlc/web-data/raw/master/tvm/tutorial/array-packing.png
# :align: center
-# :scale: 100%
#
diff --git a/tutorials/optimize/opt_matmul_auto_tensorcore.py
b/tutorials/optimize/opt_matmul_auto_tensorcore.py
index 00dbe9d..eb6501b 100644
--- a/tutorials/optimize/opt_matmul_auto_tensorcore.py
+++ b/tutorials/optimize/opt_matmul_auto_tensorcore.py
@@ -18,7 +18,7 @@
.. _opt-matmul-auto-tensorcore:
How to optimize matmul with Auto TensorCore CodeGen
-==================================
+===================================================
**Author**: `Minmin Sun <https://github.com/minminsun>`_, \
`Lanbo Li <https://github.com/Orion34C>`_, \
`Chenfan Jia <https://github.com/jcf94>`_, \
@@ -31,12 +31,11 @@ with most transformations done in ir passes.
Users can also write schedule with tensorization to generate TensorCore code.
Both solutions use the same tensorcore intrinsics.
Please refer to :ref:`opt-conv-tensorcore` tutorial for more details.
-
"""
################################################################
# Preparation and Algorithm
-# --------------------------
+# -------------------------
# 2 kinds of input data types are supported: float16 and int8.
# For float16, the accumulator is float32.
# For int8, the accumulator is int32.
@@ -215,7 +214,7 @@ def test_gemm(N, L, M, dtype, layout):
###############################################################################
# AutoTune and Test
-# --------------------
+# -----------------
# Finally we use a tuner to tune the schedule, generate code with best config
# and run the kernel to compare with numpy to check whether the results are
correct.
@@ -460,6 +459,6 @@ def tune_and_evaluate(M, N, L, dtype, layout):
###############################################################################
# Summary
-# --------------------------
+# -------
# This tutorial demonstrates how to use the AutoTensorCoreCodeGen of TVM
# to generate tensorcore kernels.
diff --git a/tutorials/relay_quick_start.py b/tutorials/relay_quick_start.py
index 5461b08..6cded33 100644
--- a/tutorials/relay_quick_start.py
+++ b/tutorials/relay_quick_start.py
@@ -18,7 +18,7 @@
.. _tutorial-relay-quick-start:
Quick Start Tutorial for Compiling Deep Learning Models
-======================================================
+=======================================================
**Author**: `Yao Wang <https://github.com/kevinthesun>`_, `Truman Tian
<https://github.com/SiNZeRo>`_
This example shows how to build a neural network with Relay python frontend and
@@ -33,7 +33,6 @@ Notice that you need to build TVM with cuda and llvm enabled.
#
# .. image::
https://github.com/dmlc/web-data/raw/master/tvm/tutorial/tvm_support_list.png
# :align: center
-# :scale: 100%
#
# In this tutorial, we'll choose cuda and llvm as target backends.
# To begin with, let's import Relay and TVM.
@@ -47,7 +46,7 @@ from tvm.contrib import graph_runtime
######################################################################
# Define Neural Network in Relay
-# -----------------------------
+# ------------------------------
# First, let's define a neural network with relay python frontend.
# For simplicity, we'll use pre-defined resnet-18 network in Relay.
# Parameters are initialized with Xavier initializer.
diff --git a/vta/tutorials/frontend/README.txt
b/vta/tutorials/frontend/README.txt
index 319506d..7adec27 100644
--- a/vta/tutorials/frontend/README.txt
+++ b/vta/tutorials/frontend/README.txt
@@ -1,4 +1,4 @@
-.. _tutorial-frontend:
+.. _vta-tutorial-frontend:
Compile Deep Learning Models
----------------------------
diff --git a/vta/tutorials/frontend/deploy_vision_on_vta.py
b/vta/tutorials/frontend/deploy_vision_on_vta.py
index c410d24..df02b48 100644
--- a/vta/tutorials/frontend/deploy_vision_on_vta.py
+++ b/vta/tutorials/frontend/deploy_vision_on_vta.py
@@ -94,7 +94,7 @@ assert model in pack_dict
######################################################################
# Obtain an execution remote
-# ---------------------------------
+# --------------------------
# When target is 'pynq', reconfigure FPGA and runtime.
# Otherwise, if target is 'sim', execute locally.
@@ -136,15 +136,16 @@ ctx = remote.ext_dev(0) if device == "vta" else
remote.cpu(0)
# ---------------------------------
# Grab vision model from Gluon model zoo and compile with Relay.
# The compilation steps are:
-# 1) Front end translation from MxNet into Relay module.
-# 2) Apply 8-bit quantization: here we skip the first conv layer,
-# and dense layer which will both be executed in fp32 on the CPU.
-# 3) Perform graph packing to alter the data layout for tensorization.
-# 4) Perform constant folding to reduce number of operators (e.g. eliminate
-# batch norm multiply).
-# 5) Perform relay build to object file.
-# 6) Load the object file onto remote (FPGA device).
-# 7) Generate graph runtime, `m`.
+#
+# 1. Front end translation from MxNet into Relay module.
+# 2. Apply 8-bit quantization: here we skip the first conv layer,
+# and dense layer which will both be executed in fp32 on the CPU.
+# 3. Perform graph packing to alter the data layout for tensorization.
+# 4. Perform constant folding to reduce number of operators (e.g. eliminate
batch norm multiply).
+# 5. Perform relay build to object file.
+# 6. Load the object file onto remote (FPGA device).
+# 7. Generate graph runtime, `m`.
+#
# Load pre-configured AutoTVM schedules
with autotvm.tophub.context(target):