On 05/16/17 19:21, Greg Ercolano wrote:
> On 05/16/17 17:36, Greg Ercolano wrote:
>> root@beaglebone:~/dtb-rebuilder# make
>>   DTC     src/arm/am437x-gp-evm.dtb
>> FATAL ERROR: Unrecognized check name
"unit_address_vs_reg"                 <--
>> Makefile:136: recipe for target 'src/arm/am437x-gp-evm.dtb'
failed         <--
>> make[1]: *** [src/arm/am437x-gp-evm.dtb] Error 1
>> Makefile:84: recipe for target 'all_arm' failed
>> make: *** [all_arm] Error 2
>>
>>     Does anyone know the solution for that?
>
>     Short answer seems to be to change this line in the Makefile:
>
> -DTC_FLAGS += -Wno-unit_address_vs_reg
> +#DTC_FLAGS += -Wno-unit_address_vs_reg
>
>     ..when I did that, it breezed through the build without errors.
OK, things went pretty smoothly after that; I now have
a blinking LED via PRU control. W00t!
A DISK IMAGE WITH EVERYTHING APPLIED
====================================
So as to make this easier for others, I've taken a snapshot
of my entire 4G disk image with the OP's script applied, and
put the resulting image here:
http://seriss.com/people/erco/beaglebone/beaglebone-black-surefire--debian-8.4-pru-example--05-16-2017--4gb-erco.img.xz
* SIZE: 973589464 bytes (928M) SHASUM:
b36840a28618eb8d95545bb367e20212bae74230 CKSUM: 3178223733 973589464*
Basically write that to an SDHC card and boot it (*don't flash*),
login as root and view the /root/README.txt to blink an LED
via PRU. No external dependencies.
When done, just run 'halt', and you can revert to your normal
flashed OS by removing the SDHC from the slot and rebooting.
If this is popular, I can re-post it as a top level post.
DETAILS
=======
Breaking that down a bit, I have a BeagleBone Black (BBB) rev C.
Once the .xz image is downloaded:
1) unxz the disk image, and write the resulting .img
to a micro SDHC card that's 4GB or larger.
2) Put the micro SDHC into the BBB's slot.
3) Power up the BBB with the micro SD card in the slot.
**No need** to flash it or hold any buttons down during boot!
Just do a *normal boot* with the micro SD card in the slot.
4) When it boots, login as root. (no password)
5) Refer to the ~root/README.txt file, but basically in the
shell, run:
* modprobe uio_pruss config-pin overlay BB-BONE-PRU cd
/root/pru/pru-gcc-examples/blinking-led/host-uio ./out/pload
../pru/out/pru-core0.elf ../pru/out/pru-core1.elf*
Those commands should all succeed.
The last command runs the actual demo on the PRU's; it runs
for about a minute then exits by itself.
While it's running, an LED should be blinking at around 2Hz
if wired between P9.27 and ground thru a 1K resistor under
control of the PRU.
When it finishes running, the LED stops blinking and the
PRUs will stop. You can just run that last command again
to re-run the demo to get the LED flashing again.
For step #1, I used an 8GB micro SDHC1 card I bought at the
Walgreens down the street for $6. These disks are cheap, so buy
a few so you can boot different OS images easily, and make backups.
For step #3, I found I could just boot the card without flashing.
This is *great* because you don't have to wipe your flashed OS.
You can boot just to test without messing up your installation.
For step #4, I had my BBB plugged into my router with an ethernet
cable, and ssh'ed into it as root from one of my other machines
using the DHCP assigned IP. I assume other techniques work too,
including the USB cable approach.
In root's home directory I put a README.txt file that
explains what to do:
___________________________________________________________________
RUNNING THE EXAMPLE
===================
To blink some LEDs using the PRU, first these preparatory commands
need to have been run since the last boot:
* modprobe uio_pruss config-pin overlay BB-BONE-PRU*
..and with that, these commands should load up PRU0 and PRU1
with code to blink an LED:
* cd /root/pru/pru-gcc-examples/blinking-led/host-uio
./out/pload ../pru/out/pru-core0.elf ../pru/out/pru-core1.elf*
Assuming there are no errors, you should see an LED flashing
if connected between GPIO pin P9.27 and ground through an appropriate
current limiting resistor.
___________________________________________________________________
As an added detail:
* * *
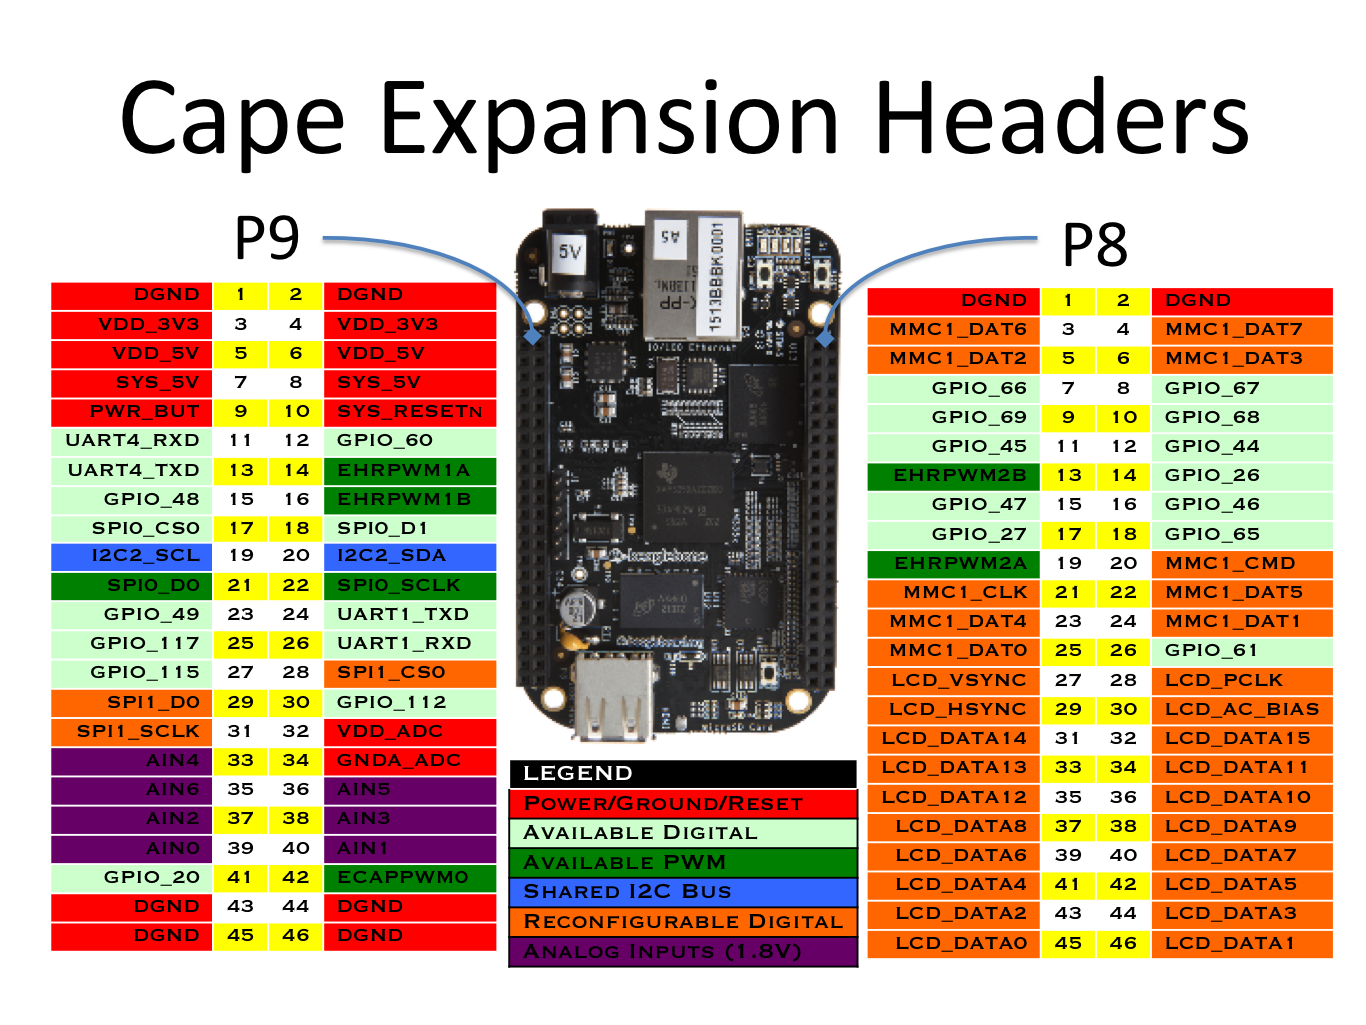
You can use this wiring diagram for wiring info:
http://beagleboard.org/static/images/cape-headers.png
Should that image go stale, holding the BBB with the
ethernet plug at 12 o'clock, P9 is the connector on
the left. The lower left pinhole is pin 45 and is GND.
The pinhole 10 holes up from the lower/left is pin 27
which is the GPIO output we use. An "ascii art" schematic:
1K
*P9 pin 27* (GPIO_115) --------/\/\/\/------(LED)------+
|
|
*P9 pin 45* (GND) -------------------------------------+
The 1K is perhaps conservative; I decided to err on the side
of being safe, as I didn't look up the max output current.
Most people use a transistor to light LEDs from the BBB,
to avoid over-driving. I did try a 440 ohm and that seemed
normal, but wasn't sure if that would overdraw the output.
the BBB's outputs.
_____
Notes about the disk image:
While it's pretty much exactly what the OP's script configures,
I did do a few extra things:
o I left the OP's script unmodified (git commit 03ece3f),
but solved the problems I ran into earlier by hand.
My bash 'history' is in the snapshot; it'll show most
if not all the commands I ran.
o I installed the kernel headers for the newer kernel.
Anyone building device drivers from source needs that.
o In my case I disabled the OP's mods to /etc/rc.local that
included the modprobe/config-pin commands on boot;
I didn't want to hide that from the first time user.
IMHO it's important developers know what device driver
is needed and how config-pin works.
o To free up space so there was more room to install
packages, and leave some elbow room for development,
I chose to uninstall x11 and cairo. This freed about
1/4 of the drive (~500MB). I used:
* apt-get remove --auto-remove --no-upgrade
x11-common apt-get remove --auto-remove --no-upgrade
libcairo2 apt-get clean*
This removed a lot actually.. most of the GUI stuff.
o I enlarged the original disk image a bit from 3.5G -> ~4G
using an fdisk/resize2fs combo so there'd be a little more
free space on the drive on boot. (I needed that extra space
to run the OP's script; without it the kernel upgrade
filled the disk to 100%)
When the OS boots, you should see almost 1G available:
* # df -h / Filesystem Size Used Avail Use% Mounted
on /dev/mmcblk0p1 3.7G 2.7G 768M 78% /*
--
For more options, visit http://beagleboard.org/discuss
---
You received this message because you are subscribed to the Google Groups
"BeagleBoard" group.
To unsubscribe from this group and stop receiving emails from it, send an email
to [email protected].
To view this discussion on the web visit
https://groups.google.com/d/msgid/beagleboard/990ba356-8fe5-455c-a1be-1103e930da20%40googlegroups.com.
For more options, visit https://groups.google.com/d/optout.