This is an automated email from the ASF dual-hosted git repository.

caogaofei pushed a commit to branch main
in repository https://gitbox.apache.org/repos/asf/iotdb-docs.git
The following commit(s) were added to refs/heads/main by this push:
new af1e845 Add Docker Deployment documentation
af1e845 is described below
commit af1e845054ce8113efcce3ec180136172c6fc561
Author: majialin <[email protected]>
AuthorDate: Fri Aug 9 16:04:40 2024 +0800
Add Docker Deployment documentation
---
src/.vuepress/sidebar/V1.3.x/en.ts | 2 +-
src/.vuepress/sidebar/V1.3.x/zh.ts | 2 +-
src/.vuepress/sidebar_timecho/V1.3.x/en.ts | 4 +-
src/.vuepress/sidebar_timecho/V1.3.x/zh.ts | 2 +-
.../Docker-Deployment.md | 418 ++++++++++++++++++
.../Docker-Deployment_timecho.md | 475 +++++++++++++++++++++
.../Docker-Install.md | 0
.../Docker-Deployment.md | 418 ++++++++++++++++++
.../Docker-Deployment_timecho.md | 475 +++++++++++++++++++++
.../Docker-Install.md | 0
.../Docker-Deployment.md | 414 ++++++++++++++++++
.../Docker-Deployment_timecho.md | 474 ++++++++++++++++++++
.../Docker-Install.md | 0
.../Docker-Deployment.md | 414 ++++++++++++++++++
.../Docker-Deployment_timecho.md | 474 ++++++++++++++++++++
.../Docker-Install.md | 0
16 files changed, 3567 insertions(+), 5 deletions(-)
diff --git a/src/.vuepress/sidebar/V1.3.x/en.ts
b/src/.vuepress/sidebar/V1.3.x/en.ts
index 4d591c5..a465954 100644
--- a/src/.vuepress/sidebar/V1.3.x/en.ts
+++ b/src/.vuepress/sidebar/V1.3.x/en.ts
@@ -72,7 +72,7 @@ export const enSidebar = {
{ text: 'Environment Requirements', link: 'Environment-Requirements' },
{ text: 'Stand-Alone Deployment', link: 'Stand-Alone-Deployment' },
{ text: 'Cluster Deployment', link: 'Cluster-Deployment' },
- { text: 'Docker Install', link: 'Docker-Install' },
+ { text: 'Docker Deployment', link: 'Docker-Deployment' },
],
},
diff --git a/src/.vuepress/sidebar/V1.3.x/zh.ts
b/src/.vuepress/sidebar/V1.3.x/zh.ts
index 5645c61..427565c 100644
--- a/src/.vuepress/sidebar/V1.3.x/zh.ts
+++ b/src/.vuepress/sidebar/V1.3.x/zh.ts
@@ -72,7 +72,7 @@ export const zhSidebar = {
{ text: '环境要求', link: 'Environment-Requirements' },
{ text: '单机版部署', link: 'Stand-Alone-Deployment' },
{ text: '集群版部署', link: 'Cluster-Deployment' },
- { text: 'docker部署', link: 'Docker-Install' },
+ { text: 'Docker部署', link: 'Docker-Deployment' },
],
},
diff --git a/src/.vuepress/sidebar_timecho/V1.3.x/en.ts
b/src/.vuepress/sidebar_timecho/V1.3.x/en.ts
index cc9a890..90fef25 100644
--- a/src/.vuepress/sidebar_timecho/V1.3.x/en.ts
+++ b/src/.vuepress/sidebar_timecho/V1.3.x/en.ts
@@ -73,8 +73,8 @@ export const enSidebar = {
{ text: 'Stand-Alone Deployment', link:
'Stand-Alone-Deployment_timecho' },
{ text: 'Cluster Deployment', link: 'Cluster-Deployment_timecho' },
{ text: 'Dual Active Deployment', link:
'Dual-Active-Deployment_timecho' },
- { text: 'Docker Install', link: 'Docker-Install' },
- { text: 'AINode_Deployment_timecho', link: 'AINode_Deployment_timecho'
},
+ { text: 'Docker Deployment', link: 'Docker-Deployment_timecho' },
+ { text: 'AINode Deployment', link: 'AINode_Deployment_timecho' },
{ text: 'Monitoring Panel Deployment', link:
'Monitoring-panel-deployment' },
{ text: 'Workbench Deployment', link: 'workbench-deployment' },
],
diff --git a/src/.vuepress/sidebar_timecho/V1.3.x/zh.ts
b/src/.vuepress/sidebar_timecho/V1.3.x/zh.ts
index 2b437ea..5228648 100644
--- a/src/.vuepress/sidebar_timecho/V1.3.x/zh.ts
+++ b/src/.vuepress/sidebar_timecho/V1.3.x/zh.ts
@@ -73,7 +73,7 @@ export const zhSidebar = {
{ text: '单机版部署', link: 'Stand-Alone-Deployment_timecho' },
{ text: '集群版部署', link: 'Cluster-Deployment_timecho' },
{ text: '双活版部署', link: 'Dual-Active-Deployment_timecho' },
- { text: 'docker部署', link: 'Docker-Install' },
+ { text: 'Docker部署', link: 'Docker-Deployment_timecho' },
{ text: 'AINode部署', link: 'AINode_Deployment_timecho' },
{ text: '工具部署(监控面板)', link: 'Monitoring-panel-deployment' },
{ text: '工具部署(可视化控制台)', link: 'workbench-deployment' },
diff --git
a/src/UserGuide/Master/Deployment-and-Maintenance/Docker-Deployment.md
b/src/UserGuide/Master/Deployment-and-Maintenance/Docker-Deployment.md
new file mode 100644
index 0000000..1cf94b2
--- /dev/null
+++ b/src/UserGuide/Master/Deployment-and-Maintenance/Docker-Deployment.md
@@ -0,0 +1,418 @@
+<!--
+
+ Licensed to the Apache Software Foundation (ASF) under one
+ or more contributor license agreements. See the NOTICE file
+ distributed with this work for additional information
+ regarding copyright ownership. The ASF licenses this file
+ to you under the Apache License, Version 2.0 (the
+ "License"); you may not use this file except in compliance
+ with the License. You may obtain a copy of the License at
+
+ http://www.apache.org/licenses/LICENSE-2.0
+
+ Unless required by applicable law or agreed to in writing,
+ software distributed under the License is distributed on an
+ "AS IS" BASIS, WITHOUT WARRANTIES OR CONDITIONS OF ANY
+ KIND, either express or implied. See the License for the
+ specific language governing permissions and limitations
+ under the License.
+
+-->
+# Docker Deployment
+
+## Environmental Preparation
+
+### 1.Docker Installation
+
+```SQL
+#Taking Ubuntu as an example, other operating systems can search for
installation methods themselves
+#step1: Install some necessary system tools
+sudo apt-get update
+sudo apt-get -y install apt-transport-https ca-certificates curl
software-properties-common
+#step2: Install GPG certificate
+curl -fsSL https://mirrors.aliyun.com/docker-ce/linux/ubuntu/gpg | sudo
apt-key add -
+#step3: Write software source information
+sudo add-apt-repository "deb [arch=amd64]
https://mirrors.aliyun.com/docker-ce/linux/ubuntu $(lsb_release -cs) stable"
+#step4: Update and install Docker CE
+sudo apt-get -y update
+sudo apt-get -y install docker-ce
+#step5: Set Docker to start automatically upon startup
+sudo systemctl enable docker
+#step6: Verify if Docker installation is successful
+docker --version #Display version information, indicating successful
installation
+```
+
+### 2. Docker-compose Installation
+
+```SQL
+#Installation command
+curl -L
"https://github.com/docker/compose/releases/download/v2.20.0/docker-compose-$(uname
-s)-$(uname -m)" -o /usr/local/bin/docker-compose
+chmod +x /usr/local/bin/docker-compose
+ln -s /usr/local/bin/docker-compose /usr/bin/docker-compose
+#Verify if the installation was successful
+docker-compose --version #Displaying version information indicates successful
installation
+```
+
+## Stand-Alone Deployment
+
+This section demonstrates how to deploy a standalone Docker version of 1C1D.
+
+### 1. Pull Image File
+
+The Docker image of Apache IoTDB has been uploaded
tohttps://hub.docker.com/r/apache/iotdb。
+
+Taking obtaining version 1.3.2 as an example, pull the image command:
+
+```bash
+docker pull apache/iotdb:1.3.2-standalone
+```
+
+View image:
+
+```bash
+docker images
+```
+
+
+
+### 2. Create Docker Bridge Network
+
+```Bash
+docker network create --driver=bridge --subnet=172.18.0.0/16
--gateway=172.18.0.1 iotdb
+```
+
+### 3. Write The Yml File For Docker-Compose
+
+Here we take the example of consolidating the IoTDB installation directory and
yml files in the/docker iotdb folder:
+
+The file directory structure is:`/docker-iotdb/iotdb`,
`/docker-iotdb/docker-compose-standalone.yml `
+
+```bash
+docker-iotdb:
+├── iotdb #Iotdb installation directory
+│── docker-compose-standalone.yml #YML file for standalone Docker Composer
+```
+
+The complete docker-compose-standalone.yml content is as follows:
+
+```bash
+version: "3"
+services:
+ iotdb-service:
+ image: apache/iotdb:1.3.2-standalone #The image used
+ hostname: iotdb
+ container_name: iotdb
+ restart: always
+ ports:
+ - "6667:6667"
+ environment:
+ - cn_internal_address=iotdb
+ - cn_internal_port=10710
+ - cn_consensus_port=10720
+ - cn_seed_config_node=iotdb:10710
+ - dn_rpc_address=iotdb
+ - dn_internal_address=iotdb
+ - dn_rpc_port=6667
+ - dn_internal_port=10730
+ - dn_mpp_data_exchange_port=10740
+ - dn_schema_region_consensus_port=10750
+ - dn_data_region_consensus_port=10760
+ - dn_seed_config_node=iotdb:10710
+ privileged: true
+ volumes:
+ - ./iotdb/data:/iotdb/data
+ - ./iotdb/logs:/iotdb/logs
+ - /dev/mem:/dev/mem:ro
+ networks:
+ iotdb:
+ ipv4_address: 172.18.0.6
+networks:
+ iotdb:
+ external: true
+```
+
+### 4. Start IoTDB
+
+Use the following command to start:
+
+```bash
+cd /docker-iotdb
+docker-compose -f docker-compose-standalone.yml up -d #Background startup
+```
+
+### 5. Validate Deployment
+
+- Viewing the log, the following words indicate successful startup
+
+```SQL
+docker logs -f iotdb-datanode #View log command
+2024-07-21 08:22:38,457 [main] INFO o.a.i.db.service.DataNode:227 -
Congratulations, IoTDB DataNode is set up successfully. Now, enjoy yourself!
+```
+
+
+
+- Enter the container to view the service running status and activation
information
+
+View the launched container
+
+```SQL
+docker ps
+```
+
+
+
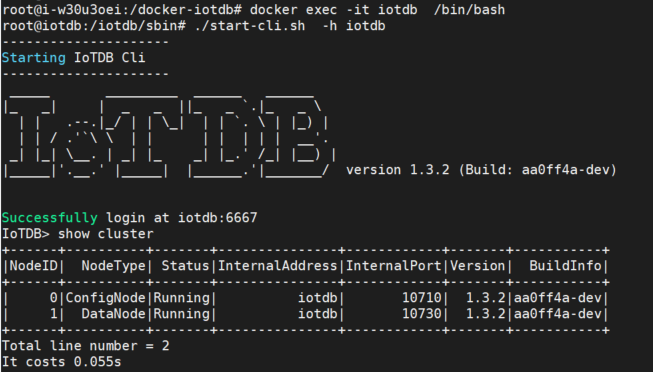
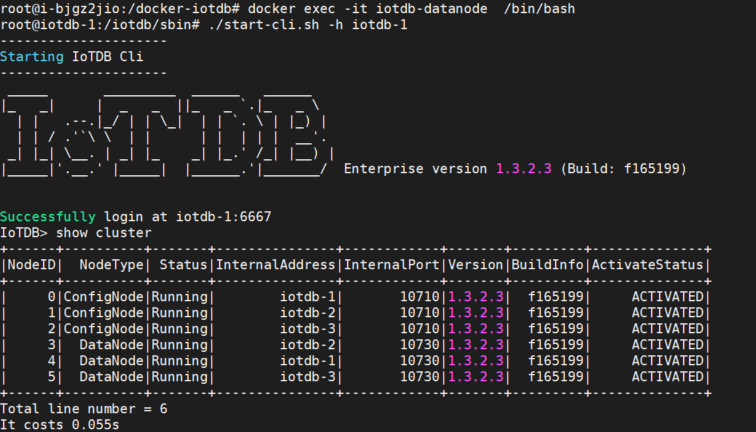
+Enter the container, log in to the database through CLI, and use the `show
cluster` command to view the service status and activation status
+
+```SQL
+docker exec -it iotdb /bin/bash #Entering the container
+./start-cli.sh -h iotdb #Log in to the database
+IoTDB> show cluster #View status
+```
+
+You can see that all services are running and the activation status shows as
activated.
+
+
+
+### 6. Map/conf Directory (optional)
+
+If you want to directly modify the configuration file in the physical machine
in the future, you can map the/conf folder in the container in three steps:
+
+Step 1: Copy the /conf directory from the container to
`/docker-iotdb/iotdb/conf`
+
+```bash
+docker cp iotdb:/iotdb/conf /docker-iotdb/iotdb/conf
+```
+
+Step 2: Add mappings in docker-compose-standalone.yml
+
+```bash
+ volumes:
+ - ./iotdb/conf:/iotdb/conf #Add mapping for this/conf folder
+ - ./iotdb/data:/iotdb/data
+ - ./iotdb/logs:/iotdb/logs
+ - /dev/mem:/dev/mem:ro
+```
+
+Step 3: Restart IoTDB
+
+```bash
+docker-compose -f docker-compose-standalone.yml up -d
+```
+
+## Cluster Deployment
+
+This section describes how to manually deploy an instance that includes 3
Config Nodes and 3 Data Nodes, commonly known as a 3C3D cluster.
+
+<div align="center">
+ <img src="https://alioss.timecho.com/docs/img/20240705141552.png"; alt=""
style="width: 60%;"/>
+</div>
+
+**Note: The cluster version currently only supports host and overlay networks,
and does not support bridge networks.**
+
+Taking the host network as an example, we will demonstrate how to deploy a
3C3D cluster.
+
+### 1.Set Host Name
+
+Assuming there are currently three Linux servers, the IP addresses and service
role assignments are as follows:
+
+| Node IP | Host Name | Service |
+| ----------- | --------- | -------------------- |
+| 192.168.1.3 | iotdb-1 | ConfigNode、DataNode |
+| 192.168.1.4 | iotdb-2 | ConfigNode、DataNode |
+| 192.168.1.5 | iotdb-3 | ConfigNode、DataNode |
+
+Configure the host names on three machines separately. To set the host names,
configure `/etc/hosts` on the target server using the following command:
+
+```Bash
+echo "192.168.1.3 iotdb-1" >> /etc/hosts
+echo "192.168.1.4 iotdb-2" >> /etc/hosts
+echo "192.168.1.5 iotdb-3" >> /etc/hosts
+```
+
+### 2. Pull Image File
+
+The Docker image of Apache IoTDB has been uploaded
tohttps://hub.docker.com/r/apache/iotdb。
+
+Pull IoTDB images from three servers separately, taking version 1.3.2 as an
example. The pull image command is:
+
+```SQL
+docker pull apache/iotdb:1.3.2-standalone
+```
+
+View image:
+
+```SQL
+docker images
+```
+
+
+
+### 3.Write The Yml File For Docker Compose
+
+Here we take the example of consolidating the IoTDB installation directory and
yml files in the `/docker-iotdb` folder:
+
+The file directory structure is :`/docker-iotdb/iotdb`,
`/docker-iotdb/confignode.yml`,`/docker-iotdb/datanode.yml`
+
+```SQL
+docker-iotdb:
+├── confignode.yml #Yml file of confignode
+├── datanode.yml #Yml file of datanode
+└── iotdb #IoTDB installation directory
+```
+
+On each server, two yml files need to be written, namely confignnode. yml and
datanode. yml. The example of yml is as follows:
+
+**confignode.yml:**
+
+```bash
+#confignode.yml
+version: "3"
+services:
+ iotdb-confignode:
+ image: iotdb-enterprise:1.3.2.3-standalone #The image used
+ hostname: iotdb-1|iotdb-2|iotdb-3 #Choose from three options based on the
actual situation
+ container_name: iotdb-confignode
+ command: ["bash", "-c", "entrypoint.sh confignode"]
+ restart: always
+ environment:
+ - cn_internal_address=iotdb-1|iotdb-2|iotdb-3 #Choose from three options
based on the actual situation
+ - cn_internal_port=10710
+ - cn_consensus_port=10720
+ - cn_seed_config_node=iotdb-1:10710 #The default first node is the
seed node
+ - schema_replication_factor=3 #Number of metadata copies
+ - data_replication_factor=2 #Number of data replicas
+ privileged: true
+ volumes:
+ - ./iotdb/activation:/iotdb/activation
+ - ./iotdb/data:/iotdb/data
+ - ./iotdb/logs:/iotdb/logs
+ - /usr/sbin/dmidecode:/usr/sbin/dmidecode:ro
+ - /dev/mem:/dev/mem:ro
+ network_mode: "host" #Using the host network
+```
+
+**datanode.yml:**
+
+```bash
+#datanode.yml
+version: "3"
+services:
+ iotdb-datanode:
+ image: iotdb-enterprise:1.3.2.3-standalone #The image used
+ hostname: iotdb-1|iotdb-2|iotdb-3 #Choose from three options based on the
actual situation
+ container_name: iotdb-datanode
+ command: ["bash", "-c", "entrypoint.sh datanode"]
+ restart: always
+ ports:
+ - "6667:6667"
+ privileged: true
+ environment:
+ - dn_rpc_address=iotdb-1|iotdb-2|iotdb-3 #Choose from three options
based on the actual situation
+ - dn_internal_address=iotdb-1|iotdb-2|iotdb-3 #Choose from three options
based on the actual situation
+ - dn_seed_config_node=iotdb-1:10710 #The default first node is the
seed node
+ - dn_rpc_port=6667
+ - dn_internal_port=10730
+ - dn_mpp_data_exchange_port=10740
+ - dn_schema_region_consensus_port=10750
+ - dn_data_region_consensus_port=10760
+ - schema_replication_factor=3 #Number of metadata copies
+ - data_replication_factor=2 #Number of data replicas
+ volumes:
+ - ./iotdb/activation:/iotdb/activation
+ - ./iotdb/data:/iotdb/data
+ - ./iotdb/logs:/iotdb/logs
+ - /usr/sbin/dmidecode:/usr/sbin/dmidecode:ro
+ - /dev/mem:/dev/mem:ro
+ network_mode: "host" #Using the host network
+```
+
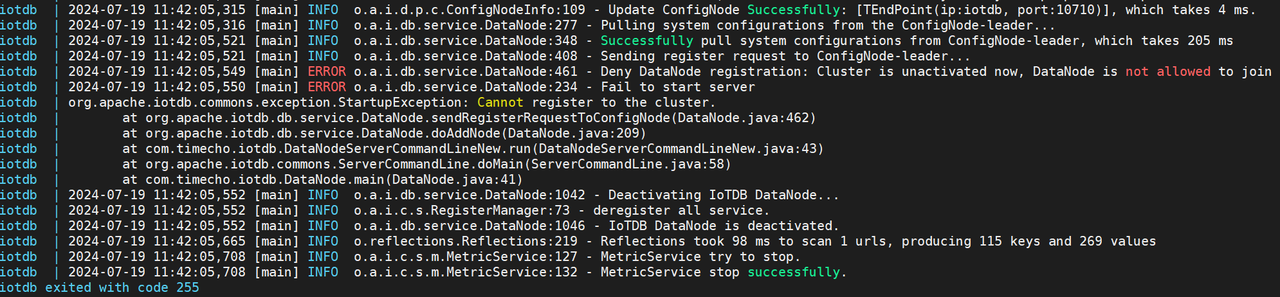
+### 4. Starting Confignode For The First Time
+
+First, start configNodes on each of the three servers to obtain the machine
code. Pay attention to the startup order, start the first iotdb-1 first, then
start iotdb-2 and iotdb-3.
+
+```bash
+cd /docker-iotdb
+docker-compose -f confignode.yml up -d #Background startup
+```
+
+### 5. Start Datanode
+
+Start datanodes on 3 servers separately
+
+```SQL
+cd /docker-iotdb
+docker-compose -f datanode.yml up -d #Background startup
+```
+
+
+
+### 6. Validate Deployment
+
+- Viewing the logs, the following words indicate that the datanode has
successfully started
+
+ ```SQL
+ docker logs -f iotdb-datanode #View log command
+ 2024-07-21 09:40:58,120 [main] INFO o.a.i.db.service.DataNode:227 -
Congratulations, IoTDB DataNode is set up successfully. Now, enjoy yourself!
+ ```
+
+

+
+- Enter any container to view the service running status and activation
information
+
+ View the launched container
+
+ ```SQL
+ docker ps
+ ```
+
+

+
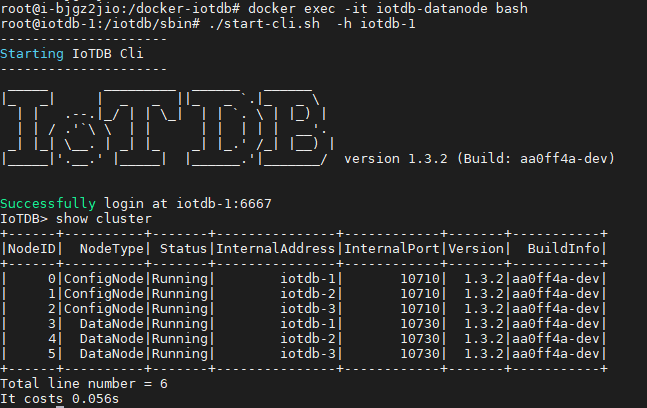
+ Enter the container, log in to the database through CLI, and use the `show
cluster` command to view the service status and activation status
+
+ ```SQL
+ docker exec -it iotdb-datanode /bin/bash #Entering the container
+ ./start-cli.sh -h iotdb-1 #Log in to the database
+ IoTDB> show cluster #View status
+ ```
+
+ You can see that all services are running and the activation status shows
as activated.
+
+
+
+### 7. Map/conf Directory (optional)
+
+If you want to directly modify the configuration file in the physical machine
in the future, you can map the/conf folder in the container in three steps:
+
+Step 1: Copy the `/conf` directory from the container to
`/docker-iotdb/iotdb/conf` on each of the three servers
+
+```bash
+docker cp iotdb-confignode:/iotdb/conf /docker-iotdb/iotdb/conf
+or
+docker cp iotdb-datanode:/iotdb/conf /docker-iotdb/iotdb/conf
+```
+
+Step 2: Add `/conf` directory mapping in `confignode.yml` and `datanode. yml`
on 3 servers
+
+```bash
+#confignode.yml
+ volumes:
+ - ./iotdb/conf:/iotdb/conf #Add mapping for this /conf folder
+ - ./iotdb/data:/iotdb/data
+ - ./iotdb/logs:/iotdb/logs
+ - /dev/mem:/dev/mem:ro
+
+#datanode.yml
+ volumes:
+ - ./iotdb/conf:/iotdb/conf #Add mapping for this /conf folder
+ - ./iotdb/data:/iotdb/data
+ - ./iotdb/logs:/iotdb/logs
+ - /dev/mem:/dev/mem:ro
+```
+
+Step 3: Restart IoTDB on 3 servers
+
+```bash
+cd /docker-iotdb
+docker-compose -f confignode.yml up -d
+docker-compose -f datanode.yml up -d
+```
\ No newline at end of file
diff --git
a/src/UserGuide/Master/Deployment-and-Maintenance/Docker-Deployment_timecho.md
b/src/UserGuide/Master/Deployment-and-Maintenance/Docker-Deployment_timecho.md
new file mode 100644
index 0000000..f083d7e
--- /dev/null
+++
b/src/UserGuide/Master/Deployment-and-Maintenance/Docker-Deployment_timecho.md
@@ -0,0 +1,475 @@
+<!--
+
+ Licensed to the Apache Software Foundation (ASF) under one
+ or more contributor license agreements. See the NOTICE file
+ distributed with this work for additional information
+ regarding copyright ownership. The ASF licenses this file
+ to you under the Apache License, Version 2.0 (the
+ "License"); you may not use this file except in compliance
+ with the License. You may obtain a copy of the License at
+
+ http://www.apache.org/licenses/LICENSE-2.0
+
+ Unless required by applicable law or agreed to in writing,
+ software distributed under the License is distributed on an
+ "AS IS" BASIS, WITHOUT WARRANTIES OR CONDITIONS OF ANY
+ KIND, either express or implied. See the License for the
+ specific language governing permissions and limitations
+ under the License.
+
+-->
+# Docker Deployment
+
+## Environmental Preparation
+
+### 1.Docker Installation
+
+```Bash
+#Taking Ubuntu as an example, other operating systems can search for
installation methods themselves
+#step1: Install some necessary system tools
+sudo apt-get update
+sudo apt-get -y install apt-transport-https ca-certificates curl
software-properties-common
+#step2: Install GPG certificate
+curl -fsSL https://mirrors.aliyun.com/docker-ce/linux/ubuntu/gpg | sudo
apt-key add -
+#step3: Write software source information
+sudo add-apt-repository "deb [arch=amd64]
https://mirrors.aliyun.com/docker-ce/linux/ubuntu $(lsb_release -cs) stable"
+#step4: Update and install Docker CE
+sudo apt-get -y update
+sudo apt-get -y install docker-ce
+#step5: Set Docker to start automatically upon startup
+sudo systemctl enable docker
+#step6: Verify if Docker installation is successful
+docker --version #Display version information, indicating successful
installation
+```
+
+### 2. Docker-compose Installation
+
+```Bash
+#Installation command
+curl -L
"https://github.com/docker/compose/releases/download/v2.20.0/docker-compose-$(uname
-s)-$(uname -m)" -o /usr/local/bin/docker-compose
+chmod +x /usr/local/bin/docker-compose
+ln -s /usr/local/bin/docker-compose /usr/bin/docker-compose
+#Verify if the installation was successful
+docker-compose --version #Displaying version information indicates successful
installation
+```
+
+### 3. Install The Dmidecode Plugin
+
+By default, Linux servers should already be installed. If not, you can use the
following command to install them.
+
+```Bash
+sudo apt-get install dmidecode
+```
+
+After installing dmidecode, search for the installation path: `wherever
dmidecode`. Assuming the result is `/usr/sbin/dmidecode`, remember this path as
it will be used in the later docker compose yml file.
+
+### 4. Get Container Image Of IoTDB
+
+You can contact business or technical support to obtain container images for
IoTDB Enterprise Edition.
+
+## Stand-Alone Deployment
+
+This section demonstrates how to deploy a standalone Docker version of 1C1D.
+
+### 1. Load Image File
+
+For example, the container image file name of IoTDB obtained here is:
`iotdb-enterprise-1.3.2-3-standalone-docker.tar.gz`
+
+Load image:
+
+```Bash
+docker load -i iotdb-enterprise-1.3.2.3-standalone-docker.tar.gz
+```
+
+View image:
+
+```Bash
+docker images
+```
+
+
+
+### 2. Create Docker Bridge Network
+
+```Bash
+docker network create --driver=bridge --subnet=172.18.0.0/16
--gateway=172.18.0.1 iotdb
+```
+
+### 3. Write The Yml File For docker-compose
+
+Here we take the example of consolidating the IoTDB installation directory and
yml files in the/docker iotdb folder:
+
+The file directory structure is:`/docker-iotdb/iotdb`,
`/docker-iotdb/docker-compose-standalone.yml `
+
+```Bash
+docker-iotdb:
+├── iotdb #Iotdb installation directory
+│── docker-compose-standalone.yml #YML file for standalone Docker Composer
+```
+
+The complete docker-compose-standalone.yml content is as follows:
+
+```Bash
+version: "3"
+services:
+ iotdb-service:
+ image: iotdb-enterprise:1.3.2.3-standalone #The image used
+ hostname: iotdb
+ container_name: iotdb
+ restart: always
+ ports:
+ - "6667:6667"
+ environment:
+ - cn_internal_address=iotdb
+ - cn_internal_port=10710
+ - cn_consensus_port=10720
+ - cn_seed_config_node=iotdb:10710
+ - dn_rpc_address=iotdb
+ - dn_internal_address=iotdb
+ - dn_rpc_port=6667
+ - dn_internal_port=10730
+ - dn_mpp_data_exchange_port=10740
+ - dn_schema_region_consensus_port=10750
+ - dn_data_region_consensus_port=10760
+ - dn_seed_config_node=iotdb:10710
+ privileged: true
+ volumes:
+ - ./iotdb/activation:/iotdb/activation
+ - ./iotdb/data:/iotdb/data
+ - ./iotdb/logs:/iotdb/logs
+ - /usr/sbin/dmidecode:/usr/sbin/dmidecode:ro
+ - /dev/mem:/dev/mem:ro
+ networks:
+ iotdb:
+ ipv4_address: 172.18.0.6
+networks:
+ iotdb:
+ external: true
+```
+
+### 4. First Launch
+
+Use the following command to start:
+
+```Bash
+cd /docker-iotdb
+docker-compose -f docker-compose-standalone.yml up
+```
+
+Due to lack of activation, it is normal to exit directly upon initial startup.
The initial startup is to obtain the machine code file for the subsequent
activation process.
+
+
+
+### 5. Apply For Activation
+
+- After the first startup, a system_info file will be generated in the
physical machine directory `/docker-iotdb/iotdb/activation`, and this file will
be copied to the Timecho staff.
+
+

+
+- Received the license file returned by the staff, copy the license file to
the `/docker iotdb/iotdb/activation` folder.
+
+

+
+### 6. Restart IoTDB
+
+```Bash
+docker-compose -f docker-compose-standalone.yml up -d
+```
+
+
+
+### 7. Validate Deployment
+
+- Viewing the log, the following words indicate successful startup
+
+ ```Bash
+ docker logs -f iotdb-datanode #View log command
+ 2024-07-19 12:02:32,608 [main] INFO o.a.i.db.service.DataNode:231 -
Congratulations, IoTDB DataNode is set up successfully. Now, enjoy yourself!
+ ```
+
+

+
+- Enter the container to view the service running status and activation
information
+
+ View the launched container
+
+ ```Bash
+ docker ps
+ ```
+
+

+
+ Enter the container, log in to the database through CLI, and use the `show
cluster` command to view the service status and activation status
+
+ ```Bash
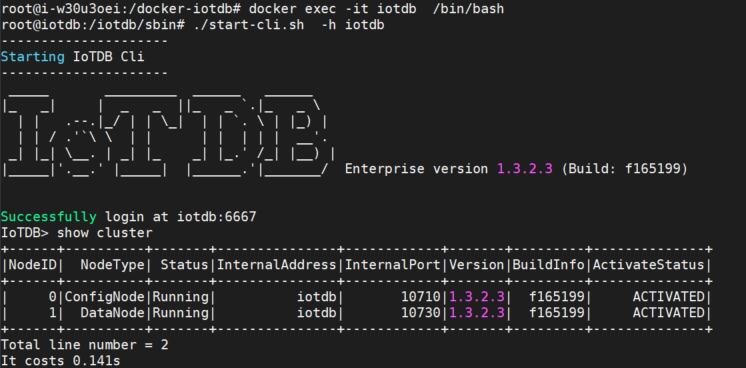
+ docker exec -it iotdb /bin/bash #Entering the container
+ ./start-cli.sh -h iotdb #Log in to the database
+ IoTDB> show cluster #View status
+ ```
+
+ You can see that all services are running and the activation status shows
as activated.
+
+
+
+### 8. Map/conf Directory (optional)
+
+If you want to directly modify the configuration file in the physical machine
in the future, you can map the/conf folder in the container in three steps:
+
+Step 1: Copy the/conf directory from the container to/docker-iotdb/iotdb/conf
+
+```Bash
+docker cp iotdb:/iotdb/conf /docker-iotdb/iotdb/conf
+```
+
+Step 2: Add mappings in docker-compose-standalone.yml
+
+```Bash
+ volumes:
+ - ./iotdb/conf:/iotdb/conf #Add mapping for this/conf folder
+ - ./iotdb/activation:/iotdb/activation
+ - ./iotdb/data:/iotdb/data
+ - ./iotdb/logs:/iotdb/logs
+ - /usr/sbin/dmidecode:/usr/sbin/dmidecode:ro
+ - /dev/mem:/dev/mem:ro
+```
+
+Step 3: Restart IoTDB
+
+```Bash
+docker-compose -f docker-compose-standalone.yml up -d
+```
+
+# Cluster Deployment
+
+This section describes how to manually deploy an instance that includes 3
Config Nodes and 3 Data Nodes, commonly known as a 3C3D cluster.
+
+<div align="center">
+ <img src="https://alioss.timecho.com/docs/img/20240705141552.png"; alt=""
style="width: 60%;"/>
+</div>
+
+**Note: The cluster version currently only supports host and overlay networks,
and does not support bridge networks.**
+
+Taking the host network as an example, we will demonstrate how to deploy a
3C3D cluster.
+
+### 1.Set Host Name
+
+Assuming there are currently three Linux servers, the IP addresses and service
role assignments are as follows:
+
+| Node IP | Host Name | Service |
+| ----------- | --------- | -------------------- |
+| 192.168.1.3 | iotdb-1 | ConfigNode、DataNode |
+| 192.168.1.4 | iotdb-2 | ConfigNode、DataNode |
+| 192.168.1.5 | iotdb-3 | ConfigNode、DataNode |
+
+Configure the host names on three machines separately. To set the host names,
configure `/etc/hosts` on the target server using the following command:
+
+```Bash
+echo "192.168.1.3 iotdb-1" >> /etc/hosts
+echo "192.168.1.4 iotdb-2" >> /etc/hosts
+echo "192.168.1.5 iotdb-3" >> /etc/hosts
+```
+
+### 2. Load Image File
+
+For example, the container image file name obtained for IoTDB is:
`iotdb-enterprise-1.3.23-standalone-docker.tar.gz`
+
+Execute the load image command on three servers separately:
+
+```Bash
+docker load -i iotdb-enterprise-1.3.2.3-standalone-docker.tar.gz
+```
+
+View image:
+
+```Bash
+docker images
+```
+
+
+
+### 3. Write The Yml File For Docker Compose
+
+Here we take the example of consolidating the IoTDB installation directory and
yml files in the /docker-iotdb folder:
+
+The file directory structure is:/docker-iotdb/iotdb,
/docker-iotdb/confignode.yml,/docker-iotdb/datanode.yml
+
+```Bash
+docker-iotdb:
+├── confignode.yml #Yml file of confignode
+├── datanode.yml #Yml file of datanode
+└── iotdb #IoTDB installation directory
+```
+
+On each server, two yml files need to be written, namely confignnode. yml and
datanode. yml. The example of yml is as follows:
+
+**confignode.yml:**
+
+```Bash
+#confignode.yml
+version: "3"
+services:
+ iotdb-confignode:
+ image: iotdb-enterprise:1.3.2.3-standalone #The image used
+ hostname: iotdb-1|iotdb-2|iotdb-3 #Choose from three options based on the
actual situation
+ container_name: iotdb-confignode
+ command: ["bash", "-c", "entrypoint.sh confignode"]
+ restart: always
+ environment:
+ - cn_internal_address=iotdb-1|iotdb-2|iotdb-3 #Choose from three options
based on the actual situation
+ - cn_internal_port=10710
+ - cn_consensus_port=10720
+ - cn_seed_config_node=iotdb-1:10710 #The default first node is the
seed node
+ - schema_replication_factor=3 #Number of metadata copies
+ - data_replication_factor=2 #Number of data replicas
+ privileged: true
+ volumes:
+ - ./iotdb/activation:/iotdb/activation
+ - ./iotdb/data:/iotdb/data
+ - ./iotdb/logs:/iotdb/logs
+ - /usr/sbin/dmidecode:/usr/sbin/dmidecode:ro
+ - /dev/mem:/dev/mem:ro
+ network_mode: "host" #Using the host network
+```
+
+**datanode.yml:**
+
+```Bash
+#datanode.yml
+version: "3"
+services:
+ iotdb-datanode:
+ image: iotdb-enterprise:1.3.2.3-standalone #The image used
+ hostname: iotdb-1|iotdb-2|iotdb-3 #Choose from three options based on the
actual situation
+ container_name: iotdb-datanode
+ command: ["bash", "-c", "entrypoint.sh datanode"]
+ restart: always
+ ports:
+ - "6667:6667"
+ privileged: true
+ environment:
+ - dn_rpc_address=iotdb-1|iotdb-2|iotdb-3 #Choose from three options
based on the actual situation
+ - dn_internal_address=iotdb-1|iotdb-2|iotdb-3 #Choose from three options
based on the actual situation
+ - dn_seed_config_node=iotdb-1:10710 #The default first node is the
seed node
+ - dn_rpc_port=6667
+ - dn_internal_port=10730
+ - dn_mpp_data_exchange_port=10740
+ - dn_schema_region_consensus_port=10750
+ - dn_data_region_consensus_port=10760
+ - schema_replication_factor=3 #Number of metadata copies
+ - data_replication_factor=2 #Number of data replicas
+ volumes:
+ - ./iotdb/activation:/iotdb/activation
+ - ./iotdb/data:/iotdb/data
+ - ./iotdb/logs:/iotdb/logs
+ - /usr/sbin/dmidecode:/usr/sbin/dmidecode:ro
+ - /dev/mem:/dev/mem:ro
+ network_mode: "host" #Using the host network
+```
+
+### 4. Starting Confignode For The First Time
+
+First, start configNodes on each of the three servers to obtain the machine
code. Pay attention to the startup order, start the first iotdb-1 first, then
start iotdb-2 and iotdb-3.
+
+```Bash
+cd /docker-iotdb
+docker-compose -f confignode.yml up -d #Background startup
+```
+
+### 5. Apply For Activation
+
+- After starting three confignodes for the first time, a system_info file will
be generated in each physical machine directory
`/docker-iotdb/iotdb/activation`, and the system_info files of the three
servers will be copied to the Timecho staff;
+
+

+
+- Put the three license files into the `/docker iotdb/iotdb/activation` folder
of the corresponding Configurable Node node;
+
+

+
+- After the license is placed in the corresponding activation folder,
confignode will be automatically activated without restarting confignode
+
+### 6. Start Datanode
+
+Start datanodes on 3 servers separately
+
+```Bash
+cd /docker-iotdb
+docker-compose -f datanode.yml up -d #Background startup
+```
+
+
+
+### 7. Validate Deployment
+
+- Viewing the logs, the following words indicate that the datanode has
successfully started
+
+ ```Bash
+ docker logs -f iotdb-datanode #View log command
+ 2024-07-20 16:50:48,937 [main] INFO o.a.i.db.service.DataNode:231 -
Congratulations, IoTDB DataNode is set up successfully. Now, enjoy yourself!
+ ```
+
+ 
+
+- Enter any container to view the service running status and activation
information
+
+ View the launched container
+
+ ```Bash
+ docker ps
+ ```
+
+

+
+ Enter the container, log in to the database through CLI, and use the `show
cluster` command to view the service status and activation status
+
+ ```Bash
+ docker exec -it iotdb-datanode /bin/bash #Entering the container
+ ./start-cli.sh -h iotdb-1 #Log in to the database
+ IoTDB> show cluster #View status
+ ```
+
+ You can see that all services are running and the activation status shows
as activated.
+
+
+
+### 8. Map/conf Directory (optional)
+
+If you want to directly modify the configuration file in the physical machine
in the future, you can map the/conf folder in the container in three steps:
+
+Step 1: Copy the `/conf` directory from the container to
`/docker-iotdb/iotdb/conf` on each of the three servers
+
+```Bash
+docker cp iotdb-confignode:/iotdb/conf /docker-iotdb/iotdb/conf
+or
+docker cp iotdb-datanode:/iotdb/conf /docker-iotdb/iotdb/conf
+```
+
+Step 2: Add `/conf` directory mapping in `confignode.yml` and `datanode. yml`
on 3 servers
+
+```Bash
+#confignode.yml
+ volumes:
+ - ./iotdb/conf:/iotdb/conf #Add mapping for this /conf folder
+ - ./iotdb/activation:/iotdb/activation
+ - ./iotdb/data:/iotdb/data
+ - ./iotdb/logs:/iotdb/logs
+ - /usr/sbin/dmidecode:/usr/sbin/dmidecode:ro
+ - /dev/mem:/dev/mem:ro
+
+#datanode.yml
+ volumes:
+ - ./iotdb/conf:/iotdb/conf #Add mapping for this /conf folder
+ - ./iotdb/activation:/iotdb/activation
+ - ./iotdb/data:/iotdb/data
+ - ./iotdb/logs:/iotdb/logs
+ - /usr/sbin/dmidecode:/usr/sbin/dmidecode:ro
+ - /dev/mem:/dev/mem:ro
+```
+
+Step 3: Restart IoTDB on 3 servers
+
+```Bash
+cd /docker-iotdb
+docker-compose -f confignode.yml up -d
+docker-compose -f datanode.yml up -d
+```
+
diff --git a/src/UserGuide/Master/Deployment-and-Maintenance/Docker-Install.md
b/src/UserGuide/Master/stage/Docker-Install.md
similarity index 100%
rename from src/UserGuide/Master/Deployment-and-Maintenance/Docker-Install.md
rename to src/UserGuide/Master/stage/Docker-Install.md
diff --git
a/src/UserGuide/latest/Deployment-and-Maintenance/Docker-Deployment.md
b/src/UserGuide/latest/Deployment-and-Maintenance/Docker-Deployment.md
new file mode 100644
index 0000000..1cf94b2
--- /dev/null
+++ b/src/UserGuide/latest/Deployment-and-Maintenance/Docker-Deployment.md
@@ -0,0 +1,418 @@
+<!--
+
+ Licensed to the Apache Software Foundation (ASF) under one
+ or more contributor license agreements. See the NOTICE file
+ distributed with this work for additional information
+ regarding copyright ownership. The ASF licenses this file
+ to you under the Apache License, Version 2.0 (the
+ "License"); you may not use this file except in compliance
+ with the License. You may obtain a copy of the License at
+
+ http://www.apache.org/licenses/LICENSE-2.0
+
+ Unless required by applicable law or agreed to in writing,
+ software distributed under the License is distributed on an
+ "AS IS" BASIS, WITHOUT WARRANTIES OR CONDITIONS OF ANY
+ KIND, either express or implied. See the License for the
+ specific language governing permissions and limitations
+ under the License.
+
+-->
+# Docker Deployment
+
+## Environmental Preparation
+
+### 1.Docker Installation
+
+```SQL
+#Taking Ubuntu as an example, other operating systems can search for
installation methods themselves
+#step1: Install some necessary system tools
+sudo apt-get update
+sudo apt-get -y install apt-transport-https ca-certificates curl
software-properties-common
+#step2: Install GPG certificate
+curl -fsSL https://mirrors.aliyun.com/docker-ce/linux/ubuntu/gpg | sudo
apt-key add -
+#step3: Write software source information
+sudo add-apt-repository "deb [arch=amd64]
https://mirrors.aliyun.com/docker-ce/linux/ubuntu $(lsb_release -cs) stable"
+#step4: Update and install Docker CE
+sudo apt-get -y update
+sudo apt-get -y install docker-ce
+#step5: Set Docker to start automatically upon startup
+sudo systemctl enable docker
+#step6: Verify if Docker installation is successful
+docker --version #Display version information, indicating successful
installation
+```
+
+### 2. Docker-compose Installation
+
+```SQL
+#Installation command
+curl -L
"https://github.com/docker/compose/releases/download/v2.20.0/docker-compose-$(uname
-s)-$(uname -m)" -o /usr/local/bin/docker-compose
+chmod +x /usr/local/bin/docker-compose
+ln -s /usr/local/bin/docker-compose /usr/bin/docker-compose
+#Verify if the installation was successful
+docker-compose --version #Displaying version information indicates successful
installation
+```
+
+## Stand-Alone Deployment
+
+This section demonstrates how to deploy a standalone Docker version of 1C1D.
+
+### 1. Pull Image File
+
+The Docker image of Apache IoTDB has been uploaded
tohttps://hub.docker.com/r/apache/iotdb。
+
+Taking obtaining version 1.3.2 as an example, pull the image command:
+
+```bash
+docker pull apache/iotdb:1.3.2-standalone
+```
+
+View image:
+
+```bash
+docker images
+```
+
+
+
+### 2. Create Docker Bridge Network
+
+```Bash
+docker network create --driver=bridge --subnet=172.18.0.0/16
--gateway=172.18.0.1 iotdb
+```
+
+### 3. Write The Yml File For Docker-Compose
+
+Here we take the example of consolidating the IoTDB installation directory and
yml files in the/docker iotdb folder:
+
+The file directory structure is:`/docker-iotdb/iotdb`,
`/docker-iotdb/docker-compose-standalone.yml `
+
+```bash
+docker-iotdb:
+├── iotdb #Iotdb installation directory
+│── docker-compose-standalone.yml #YML file for standalone Docker Composer
+```
+
+The complete docker-compose-standalone.yml content is as follows:
+
+```bash
+version: "3"
+services:
+ iotdb-service:
+ image: apache/iotdb:1.3.2-standalone #The image used
+ hostname: iotdb
+ container_name: iotdb
+ restart: always
+ ports:
+ - "6667:6667"
+ environment:
+ - cn_internal_address=iotdb
+ - cn_internal_port=10710
+ - cn_consensus_port=10720
+ - cn_seed_config_node=iotdb:10710
+ - dn_rpc_address=iotdb
+ - dn_internal_address=iotdb
+ - dn_rpc_port=6667
+ - dn_internal_port=10730
+ - dn_mpp_data_exchange_port=10740
+ - dn_schema_region_consensus_port=10750
+ - dn_data_region_consensus_port=10760
+ - dn_seed_config_node=iotdb:10710
+ privileged: true
+ volumes:
+ - ./iotdb/data:/iotdb/data
+ - ./iotdb/logs:/iotdb/logs
+ - /dev/mem:/dev/mem:ro
+ networks:
+ iotdb:
+ ipv4_address: 172.18.0.6
+networks:
+ iotdb:
+ external: true
+```
+
+### 4. Start IoTDB
+
+Use the following command to start:
+
+```bash
+cd /docker-iotdb
+docker-compose -f docker-compose-standalone.yml up -d #Background startup
+```
+
+### 5. Validate Deployment
+
+- Viewing the log, the following words indicate successful startup
+
+```SQL
+docker logs -f iotdb-datanode #View log command
+2024-07-21 08:22:38,457 [main] INFO o.a.i.db.service.DataNode:227 -
Congratulations, IoTDB DataNode is set up successfully. Now, enjoy yourself!
+```
+
+
+
+- Enter the container to view the service running status and activation
information
+
+View the launched container
+
+```SQL
+docker ps
+```
+
+
+
+Enter the container, log in to the database through CLI, and use the `show
cluster` command to view the service status and activation status
+
+```SQL
+docker exec -it iotdb /bin/bash #Entering the container
+./start-cli.sh -h iotdb #Log in to the database
+IoTDB> show cluster #View status
+```
+
+You can see that all services are running and the activation status shows as
activated.
+
+
+
+### 6. Map/conf Directory (optional)
+
+If you want to directly modify the configuration file in the physical machine
in the future, you can map the/conf folder in the container in three steps:
+
+Step 1: Copy the /conf directory from the container to
`/docker-iotdb/iotdb/conf`
+
+```bash
+docker cp iotdb:/iotdb/conf /docker-iotdb/iotdb/conf
+```
+
+Step 2: Add mappings in docker-compose-standalone.yml
+
+```bash
+ volumes:
+ - ./iotdb/conf:/iotdb/conf #Add mapping for this/conf folder
+ - ./iotdb/data:/iotdb/data
+ - ./iotdb/logs:/iotdb/logs
+ - /dev/mem:/dev/mem:ro
+```
+
+Step 3: Restart IoTDB
+
+```bash
+docker-compose -f docker-compose-standalone.yml up -d
+```
+
+## Cluster Deployment
+
+This section describes how to manually deploy an instance that includes 3
Config Nodes and 3 Data Nodes, commonly known as a 3C3D cluster.
+
+<div align="center">
+ <img src="https://alioss.timecho.com/docs/img/20240705141552.png"; alt=""
style="width: 60%;"/>
+</div>
+
+**Note: The cluster version currently only supports host and overlay networks,
and does not support bridge networks.**
+
+Taking the host network as an example, we will demonstrate how to deploy a
3C3D cluster.
+
+### 1.Set Host Name
+
+Assuming there are currently three Linux servers, the IP addresses and service
role assignments are as follows:
+
+| Node IP | Host Name | Service |
+| ----------- | --------- | -------------------- |
+| 192.168.1.3 | iotdb-1 | ConfigNode、DataNode |
+| 192.168.1.4 | iotdb-2 | ConfigNode、DataNode |
+| 192.168.1.5 | iotdb-3 | ConfigNode、DataNode |
+
+Configure the host names on three machines separately. To set the host names,
configure `/etc/hosts` on the target server using the following command:
+
+```Bash
+echo "192.168.1.3 iotdb-1" >> /etc/hosts
+echo "192.168.1.4 iotdb-2" >> /etc/hosts
+echo "192.168.1.5 iotdb-3" >> /etc/hosts
+```
+
+### 2. Pull Image File
+
+The Docker image of Apache IoTDB has been uploaded
tohttps://hub.docker.com/r/apache/iotdb。
+
+Pull IoTDB images from three servers separately, taking version 1.3.2 as an
example. The pull image command is:
+
+```SQL
+docker pull apache/iotdb:1.3.2-standalone
+```
+
+View image:
+
+```SQL
+docker images
+```
+
+
+
+### 3.Write The Yml File For Docker Compose
+
+Here we take the example of consolidating the IoTDB installation directory and
yml files in the `/docker-iotdb` folder:
+
+The file directory structure is :`/docker-iotdb/iotdb`,
`/docker-iotdb/confignode.yml`,`/docker-iotdb/datanode.yml`
+
+```SQL
+docker-iotdb:
+├── confignode.yml #Yml file of confignode
+├── datanode.yml #Yml file of datanode
+└── iotdb #IoTDB installation directory
+```
+
+On each server, two yml files need to be written, namely confignnode. yml and
datanode. yml. The example of yml is as follows:
+
+**confignode.yml:**
+
+```bash
+#confignode.yml
+version: "3"
+services:
+ iotdb-confignode:
+ image: iotdb-enterprise:1.3.2.3-standalone #The image used
+ hostname: iotdb-1|iotdb-2|iotdb-3 #Choose from three options based on the
actual situation
+ container_name: iotdb-confignode
+ command: ["bash", "-c", "entrypoint.sh confignode"]
+ restart: always
+ environment:
+ - cn_internal_address=iotdb-1|iotdb-2|iotdb-3 #Choose from three options
based on the actual situation
+ - cn_internal_port=10710
+ - cn_consensus_port=10720
+ - cn_seed_config_node=iotdb-1:10710 #The default first node is the
seed node
+ - schema_replication_factor=3 #Number of metadata copies
+ - data_replication_factor=2 #Number of data replicas
+ privileged: true
+ volumes:
+ - ./iotdb/activation:/iotdb/activation
+ - ./iotdb/data:/iotdb/data
+ - ./iotdb/logs:/iotdb/logs
+ - /usr/sbin/dmidecode:/usr/sbin/dmidecode:ro
+ - /dev/mem:/dev/mem:ro
+ network_mode: "host" #Using the host network
+```
+
+**datanode.yml:**
+
+```bash
+#datanode.yml
+version: "3"
+services:
+ iotdb-datanode:
+ image: iotdb-enterprise:1.3.2.3-standalone #The image used
+ hostname: iotdb-1|iotdb-2|iotdb-3 #Choose from three options based on the
actual situation
+ container_name: iotdb-datanode
+ command: ["bash", "-c", "entrypoint.sh datanode"]
+ restart: always
+ ports:
+ - "6667:6667"
+ privileged: true
+ environment:
+ - dn_rpc_address=iotdb-1|iotdb-2|iotdb-3 #Choose from three options
based on the actual situation
+ - dn_internal_address=iotdb-1|iotdb-2|iotdb-3 #Choose from three options
based on the actual situation
+ - dn_seed_config_node=iotdb-1:10710 #The default first node is the
seed node
+ - dn_rpc_port=6667
+ - dn_internal_port=10730
+ - dn_mpp_data_exchange_port=10740
+ - dn_schema_region_consensus_port=10750
+ - dn_data_region_consensus_port=10760
+ - schema_replication_factor=3 #Number of metadata copies
+ - data_replication_factor=2 #Number of data replicas
+ volumes:
+ - ./iotdb/activation:/iotdb/activation
+ - ./iotdb/data:/iotdb/data
+ - ./iotdb/logs:/iotdb/logs
+ - /usr/sbin/dmidecode:/usr/sbin/dmidecode:ro
+ - /dev/mem:/dev/mem:ro
+ network_mode: "host" #Using the host network
+```
+
+### 4. Starting Confignode For The First Time
+
+First, start configNodes on each of the three servers to obtain the machine
code. Pay attention to the startup order, start the first iotdb-1 first, then
start iotdb-2 and iotdb-3.
+
+```bash
+cd /docker-iotdb
+docker-compose -f confignode.yml up -d #Background startup
+```
+
+### 5. Start Datanode
+
+Start datanodes on 3 servers separately
+
+```SQL
+cd /docker-iotdb
+docker-compose -f datanode.yml up -d #Background startup
+```
+
+
+
+### 6. Validate Deployment
+
+- Viewing the logs, the following words indicate that the datanode has
successfully started
+
+ ```SQL
+ docker logs -f iotdb-datanode #View log command
+ 2024-07-21 09:40:58,120 [main] INFO o.a.i.db.service.DataNode:227 -
Congratulations, IoTDB DataNode is set up successfully. Now, enjoy yourself!
+ ```
+
+

+
+- Enter any container to view the service running status and activation
information
+
+ View the launched container
+
+ ```SQL
+ docker ps
+ ```
+
+

+
+ Enter the container, log in to the database through CLI, and use the `show
cluster` command to view the service status and activation status
+
+ ```SQL
+ docker exec -it iotdb-datanode /bin/bash #Entering the container
+ ./start-cli.sh -h iotdb-1 #Log in to the database
+ IoTDB> show cluster #View status
+ ```
+
+ You can see that all services are running and the activation status shows
as activated.
+
+

+
+### 7. Map/conf Directory (optional)
+
+If you want to directly modify the configuration file in the physical machine
in the future, you can map the/conf folder in the container in three steps:
+
+Step 1: Copy the `/conf` directory from the container to
`/docker-iotdb/iotdb/conf` on each of the three servers
+
+```bash
+docker cp iotdb-confignode:/iotdb/conf /docker-iotdb/iotdb/conf
+or
+docker cp iotdb-datanode:/iotdb/conf /docker-iotdb/iotdb/conf
+```
+
+Step 2: Add `/conf` directory mapping in `confignode.yml` and `datanode. yml`
on 3 servers
+
+```bash
+#confignode.yml
+ volumes:
+ - ./iotdb/conf:/iotdb/conf #Add mapping for this /conf folder
+ - ./iotdb/data:/iotdb/data
+ - ./iotdb/logs:/iotdb/logs
+ - /dev/mem:/dev/mem:ro
+
+#datanode.yml
+ volumes:
+ - ./iotdb/conf:/iotdb/conf #Add mapping for this /conf folder
+ - ./iotdb/data:/iotdb/data
+ - ./iotdb/logs:/iotdb/logs
+ - /dev/mem:/dev/mem:ro
+```
+
+Step 3: Restart IoTDB on 3 servers
+
+```bash
+cd /docker-iotdb
+docker-compose -f confignode.yml up -d
+docker-compose -f datanode.yml up -d
+```
\ No newline at end of file
diff --git
a/src/UserGuide/latest/Deployment-and-Maintenance/Docker-Deployment_timecho.md
b/src/UserGuide/latest/Deployment-and-Maintenance/Docker-Deployment_timecho.md
new file mode 100644
index 0000000..f083d7e
--- /dev/null
+++
b/src/UserGuide/latest/Deployment-and-Maintenance/Docker-Deployment_timecho.md
@@ -0,0 +1,475 @@
+<!--
+
+ Licensed to the Apache Software Foundation (ASF) under one
+ or more contributor license agreements. See the NOTICE file
+ distributed with this work for additional information
+ regarding copyright ownership. The ASF licenses this file
+ to you under the Apache License, Version 2.0 (the
+ "License"); you may not use this file except in compliance
+ with the License. You may obtain a copy of the License at
+
+ http://www.apache.org/licenses/LICENSE-2.0
+
+ Unless required by applicable law or agreed to in writing,
+ software distributed under the License is distributed on an
+ "AS IS" BASIS, WITHOUT WARRANTIES OR CONDITIONS OF ANY
+ KIND, either express or implied. See the License for the
+ specific language governing permissions and limitations
+ under the License.
+
+-->
+# Docker Deployment
+
+## Environmental Preparation
+
+### 1.Docker Installation
+
+```Bash
+#Taking Ubuntu as an example, other operating systems can search for
installation methods themselves
+#step1: Install some necessary system tools
+sudo apt-get update
+sudo apt-get -y install apt-transport-https ca-certificates curl
software-properties-common
+#step2: Install GPG certificate
+curl -fsSL https://mirrors.aliyun.com/docker-ce/linux/ubuntu/gpg | sudo
apt-key add -
+#step3: Write software source information
+sudo add-apt-repository "deb [arch=amd64]
https://mirrors.aliyun.com/docker-ce/linux/ubuntu $(lsb_release -cs) stable"
+#step4: Update and install Docker CE
+sudo apt-get -y update
+sudo apt-get -y install docker-ce
+#step5: Set Docker to start automatically upon startup
+sudo systemctl enable docker
+#step6: Verify if Docker installation is successful
+docker --version #Display version information, indicating successful
installation
+```
+
+### 2. Docker-compose Installation
+
+```Bash
+#Installation command
+curl -L
"https://github.com/docker/compose/releases/download/v2.20.0/docker-compose-$(uname
-s)-$(uname -m)" -o /usr/local/bin/docker-compose
+chmod +x /usr/local/bin/docker-compose
+ln -s /usr/local/bin/docker-compose /usr/bin/docker-compose
+#Verify if the installation was successful
+docker-compose --version #Displaying version information indicates successful
installation
+```
+
+### 3. Install The Dmidecode Plugin
+
+By default, Linux servers should already be installed. If not, you can use the
following command to install them.
+
+```Bash
+sudo apt-get install dmidecode
+```
+
+After installing dmidecode, search for the installation path: `wherever
dmidecode`. Assuming the result is `/usr/sbin/dmidecode`, remember this path as
it will be used in the later docker compose yml file.
+
+### 4. Get Container Image Of IoTDB
+
+You can contact business or technical support to obtain container images for
IoTDB Enterprise Edition.
+
+## Stand-Alone Deployment
+
+This section demonstrates how to deploy a standalone Docker version of 1C1D.
+
+### 1. Load Image File
+
+For example, the container image file name of IoTDB obtained here is:
`iotdb-enterprise-1.3.2-3-standalone-docker.tar.gz`
+
+Load image:
+
+```Bash
+docker load -i iotdb-enterprise-1.3.2.3-standalone-docker.tar.gz
+```
+
+View image:
+
+```Bash
+docker images
+```
+
+
+
+### 2. Create Docker Bridge Network
+
+```Bash
+docker network create --driver=bridge --subnet=172.18.0.0/16
--gateway=172.18.0.1 iotdb
+```
+
+### 3. Write The Yml File For docker-compose
+
+Here we take the example of consolidating the IoTDB installation directory and
yml files in the/docker iotdb folder:
+
+The file directory structure is:`/docker-iotdb/iotdb`,
`/docker-iotdb/docker-compose-standalone.yml `
+
+```Bash
+docker-iotdb:
+├── iotdb #Iotdb installation directory
+│── docker-compose-standalone.yml #YML file for standalone Docker Composer
+```
+
+The complete docker-compose-standalone.yml content is as follows:
+
+```Bash
+version: "3"
+services:
+ iotdb-service:
+ image: iotdb-enterprise:1.3.2.3-standalone #The image used
+ hostname: iotdb
+ container_name: iotdb
+ restart: always
+ ports:
+ - "6667:6667"
+ environment:
+ - cn_internal_address=iotdb
+ - cn_internal_port=10710
+ - cn_consensus_port=10720
+ - cn_seed_config_node=iotdb:10710
+ - dn_rpc_address=iotdb
+ - dn_internal_address=iotdb
+ - dn_rpc_port=6667
+ - dn_internal_port=10730
+ - dn_mpp_data_exchange_port=10740
+ - dn_schema_region_consensus_port=10750
+ - dn_data_region_consensus_port=10760
+ - dn_seed_config_node=iotdb:10710
+ privileged: true
+ volumes:
+ - ./iotdb/activation:/iotdb/activation
+ - ./iotdb/data:/iotdb/data
+ - ./iotdb/logs:/iotdb/logs
+ - /usr/sbin/dmidecode:/usr/sbin/dmidecode:ro
+ - /dev/mem:/dev/mem:ro
+ networks:
+ iotdb:
+ ipv4_address: 172.18.0.6
+networks:
+ iotdb:
+ external: true
+```
+
+### 4. First Launch
+
+Use the following command to start:
+
+```Bash
+cd /docker-iotdb
+docker-compose -f docker-compose-standalone.yml up
+```
+
+Due to lack of activation, it is normal to exit directly upon initial startup.
The initial startup is to obtain the machine code file for the subsequent
activation process.
+
+
+
+### 5. Apply For Activation
+
+- After the first startup, a system_info file will be generated in the
physical machine directory `/docker-iotdb/iotdb/activation`, and this file will
be copied to the Timecho staff.
+
+

+
+- Received the license file returned by the staff, copy the license file to
the `/docker iotdb/iotdb/activation` folder.
+
+

+
+### 6. Restart IoTDB
+
+```Bash
+docker-compose -f docker-compose-standalone.yml up -d
+```
+
+
+
+### 7. Validate Deployment
+
+- Viewing the log, the following words indicate successful startup
+
+ ```Bash
+ docker logs -f iotdb-datanode #View log command
+ 2024-07-19 12:02:32,608 [main] INFO o.a.i.db.service.DataNode:231 -
Congratulations, IoTDB DataNode is set up successfully. Now, enjoy yourself!
+ ```
+
+

+
+- Enter the container to view the service running status and activation
information
+
+ View the launched container
+
+ ```Bash
+ docker ps
+ ```
+
+

+
+ Enter the container, log in to the database through CLI, and use the `show
cluster` command to view the service status and activation status
+
+ ```Bash
+ docker exec -it iotdb /bin/bash #Entering the container
+ ./start-cli.sh -h iotdb #Log in to the database
+ IoTDB> show cluster #View status
+ ```
+
+ You can see that all services are running and the activation status shows
as activated.
+
+

+
+### 8. Map/conf Directory (optional)
+
+If you want to directly modify the configuration file in the physical machine
in the future, you can map the/conf folder in the container in three steps:
+
+Step 1: Copy the/conf directory from the container to/docker-iotdb/iotdb/conf
+
+```Bash
+docker cp iotdb:/iotdb/conf /docker-iotdb/iotdb/conf
+```
+
+Step 2: Add mappings in docker-compose-standalone.yml
+
+```Bash
+ volumes:
+ - ./iotdb/conf:/iotdb/conf #Add mapping for this/conf folder
+ - ./iotdb/activation:/iotdb/activation
+ - ./iotdb/data:/iotdb/data
+ - ./iotdb/logs:/iotdb/logs
+ - /usr/sbin/dmidecode:/usr/sbin/dmidecode:ro
+ - /dev/mem:/dev/mem:ro
+```
+
+Step 3: Restart IoTDB
+
+```Bash
+docker-compose -f docker-compose-standalone.yml up -d
+```
+
+# Cluster Deployment
+
+This section describes how to manually deploy an instance that includes 3
Config Nodes and 3 Data Nodes, commonly known as a 3C3D cluster.
+
+<div align="center">
+ <img src="https://alioss.timecho.com/docs/img/20240705141552.png"; alt=""
style="width: 60%;"/>
+</div>
+
+**Note: The cluster version currently only supports host and overlay networks,
and does not support bridge networks.**
+
+Taking the host network as an example, we will demonstrate how to deploy a
3C3D cluster.
+
+### 1.Set Host Name
+
+Assuming there are currently three Linux servers, the IP addresses and service
role assignments are as follows:
+
+| Node IP | Host Name | Service |
+| ----------- | --------- | -------------------- |
+| 192.168.1.3 | iotdb-1 | ConfigNode、DataNode |
+| 192.168.1.4 | iotdb-2 | ConfigNode、DataNode |
+| 192.168.1.5 | iotdb-3 | ConfigNode、DataNode |
+
+Configure the host names on three machines separately. To set the host names,
configure `/etc/hosts` on the target server using the following command:
+
+```Bash
+echo "192.168.1.3 iotdb-1" >> /etc/hosts
+echo "192.168.1.4 iotdb-2" >> /etc/hosts
+echo "192.168.1.5 iotdb-3" >> /etc/hosts
+```
+
+### 2. Load Image File
+
+For example, the container image file name obtained for IoTDB is:
`iotdb-enterprise-1.3.23-standalone-docker.tar.gz`
+
+Execute the load image command on three servers separately:
+
+```Bash
+docker load -i iotdb-enterprise-1.3.2.3-standalone-docker.tar.gz
+```
+
+View image:
+
+```Bash
+docker images
+```
+
+
+
+### 3. Write The Yml File For Docker Compose
+
+Here we take the example of consolidating the IoTDB installation directory and
yml files in the /docker-iotdb folder:
+
+The file directory structure is:/docker-iotdb/iotdb,
/docker-iotdb/confignode.yml,/docker-iotdb/datanode.yml
+
+```Bash
+docker-iotdb:
+├── confignode.yml #Yml file of confignode
+├── datanode.yml #Yml file of datanode
+└── iotdb #IoTDB installation directory
+```
+
+On each server, two yml files need to be written, namely confignnode. yml and
datanode. yml. The example of yml is as follows:
+
+**confignode.yml:**
+
+```Bash
+#confignode.yml
+version: "3"
+services:
+ iotdb-confignode:
+ image: iotdb-enterprise:1.3.2.3-standalone #The image used
+ hostname: iotdb-1|iotdb-2|iotdb-3 #Choose from three options based on the
actual situation
+ container_name: iotdb-confignode
+ command: ["bash", "-c", "entrypoint.sh confignode"]
+ restart: always
+ environment:
+ - cn_internal_address=iotdb-1|iotdb-2|iotdb-3 #Choose from three options
based on the actual situation
+ - cn_internal_port=10710
+ - cn_consensus_port=10720
+ - cn_seed_config_node=iotdb-1:10710 #The default first node is the
seed node
+ - schema_replication_factor=3 #Number of metadata copies
+ - data_replication_factor=2 #Number of data replicas
+ privileged: true
+ volumes:
+ - ./iotdb/activation:/iotdb/activation
+ - ./iotdb/data:/iotdb/data
+ - ./iotdb/logs:/iotdb/logs
+ - /usr/sbin/dmidecode:/usr/sbin/dmidecode:ro
+ - /dev/mem:/dev/mem:ro
+ network_mode: "host" #Using the host network
+```
+
+**datanode.yml:**
+
+```Bash
+#datanode.yml
+version: "3"
+services:
+ iotdb-datanode:
+ image: iotdb-enterprise:1.3.2.3-standalone #The image used
+ hostname: iotdb-1|iotdb-2|iotdb-3 #Choose from three options based on the
actual situation
+ container_name: iotdb-datanode
+ command: ["bash", "-c", "entrypoint.sh datanode"]
+ restart: always
+ ports:
+ - "6667:6667"
+ privileged: true
+ environment:
+ - dn_rpc_address=iotdb-1|iotdb-2|iotdb-3 #Choose from three options
based on the actual situation
+ - dn_internal_address=iotdb-1|iotdb-2|iotdb-3 #Choose from three options
based on the actual situation
+ - dn_seed_config_node=iotdb-1:10710 #The default first node is the
seed node
+ - dn_rpc_port=6667
+ - dn_internal_port=10730
+ - dn_mpp_data_exchange_port=10740
+ - dn_schema_region_consensus_port=10750
+ - dn_data_region_consensus_port=10760
+ - schema_replication_factor=3 #Number of metadata copies
+ - data_replication_factor=2 #Number of data replicas
+ volumes:
+ - ./iotdb/activation:/iotdb/activation
+ - ./iotdb/data:/iotdb/data
+ - ./iotdb/logs:/iotdb/logs
+ - /usr/sbin/dmidecode:/usr/sbin/dmidecode:ro
+ - /dev/mem:/dev/mem:ro
+ network_mode: "host" #Using the host network
+```
+
+### 4. Starting Confignode For The First Time
+
+First, start configNodes on each of the three servers to obtain the machine
code. Pay attention to the startup order, start the first iotdb-1 first, then
start iotdb-2 and iotdb-3.
+
+```Bash
+cd /docker-iotdb
+docker-compose -f confignode.yml up -d #Background startup
+```
+
+### 5. Apply For Activation
+
+- After starting three confignodes for the first time, a system_info file will
be generated in each physical machine directory
`/docker-iotdb/iotdb/activation`, and the system_info files of the three
servers will be copied to the Timecho staff;
+
+

+
+- Put the three license files into the `/docker iotdb/iotdb/activation` folder
of the corresponding Configurable Node node;
+
+

+
+- After the license is placed in the corresponding activation folder,
confignode will be automatically activated without restarting confignode
+
+### 6. Start Datanode
+
+Start datanodes on 3 servers separately
+
+```Bash
+cd /docker-iotdb
+docker-compose -f datanode.yml up -d #Background startup
+```
+
+
+
+### 7. Validate Deployment
+
+- Viewing the logs, the following words indicate that the datanode has
successfully started
+
+ ```Bash
+ docker logs -f iotdb-datanode #View log command
+ 2024-07-20 16:50:48,937 [main] INFO o.a.i.db.service.DataNode:231 -
Congratulations, IoTDB DataNode is set up successfully. Now, enjoy yourself!
+ ```
+
+ 
+
+- Enter any container to view the service running status and activation
information
+
+ View the launched container
+
+ ```Bash
+ docker ps
+ ```
+
+

+
+ Enter the container, log in to the database through CLI, and use the `show
cluster` command to view the service status and activation status
+
+ ```Bash
+ docker exec -it iotdb-datanode /bin/bash #Entering the container
+ ./start-cli.sh -h iotdb-1 #Log in to the database
+ IoTDB> show cluster #View status
+ ```
+
+ You can see that all services are running and the activation status shows
as activated.
+
+

+
+### 8. Map/conf Directory (optional)
+
+If you want to directly modify the configuration file in the physical machine
in the future, you can map the/conf folder in the container in three steps:
+
+Step 1: Copy the `/conf` directory from the container to
`/docker-iotdb/iotdb/conf` on each of the three servers
+
+```Bash
+docker cp iotdb-confignode:/iotdb/conf /docker-iotdb/iotdb/conf
+or
+docker cp iotdb-datanode:/iotdb/conf /docker-iotdb/iotdb/conf
+```
+
+Step 2: Add `/conf` directory mapping in `confignode.yml` and `datanode. yml`
on 3 servers
+
+```Bash
+#confignode.yml
+ volumes:
+ - ./iotdb/conf:/iotdb/conf #Add mapping for this /conf folder
+ - ./iotdb/activation:/iotdb/activation
+ - ./iotdb/data:/iotdb/data
+ - ./iotdb/logs:/iotdb/logs
+ - /usr/sbin/dmidecode:/usr/sbin/dmidecode:ro
+ - /dev/mem:/dev/mem:ro
+
+#datanode.yml
+ volumes:
+ - ./iotdb/conf:/iotdb/conf #Add mapping for this /conf folder
+ - ./iotdb/activation:/iotdb/activation
+ - ./iotdb/data:/iotdb/data
+ - ./iotdb/logs:/iotdb/logs
+ - /usr/sbin/dmidecode:/usr/sbin/dmidecode:ro
+ - /dev/mem:/dev/mem:ro
+```
+
+Step 3: Restart IoTDB on 3 servers
+
+```Bash
+cd /docker-iotdb
+docker-compose -f confignode.yml up -d
+docker-compose -f datanode.yml up -d
+```
+
diff --git a/src/UserGuide/latest/Deployment-and-Maintenance/Docker-Install.md
b/src/UserGuide/latest/stage/Docker-Install.md
similarity index 100%
rename from src/UserGuide/latest/Deployment-and-Maintenance/Docker-Install.md
rename to src/UserGuide/latest/stage/Docker-Install.md
diff --git
a/src/zh/UserGuide/Master/Deployment-and-Maintenance/Docker-Deployment.md
b/src/zh/UserGuide/Master/Deployment-and-Maintenance/Docker-Deployment.md
new file mode 100644
index 0000000..74d2941
--- /dev/null
+++ b/src/zh/UserGuide/Master/Deployment-and-Maintenance/Docker-Deployment.md
@@ -0,0 +1,414 @@
+<!--
+
+ Licensed to the Apache Software Foundation (ASF) under one
+ or more contributor license agreements. See the NOTICE file
+ distributed with this work for additional information
+ regarding copyright ownership. The ASF licenses this file
+ to you under the Apache License, Version 2.0 (the
+ "License"); you may not use this file except in compliance
+ with the License. You may obtain a copy of the License at
+
+ http://www.apache.org/licenses/LICENSE-2.0
+
+ Unless required by applicable law or agreed to in writing,
+ software distributed under the License is distributed on an
+ "AS IS" BASIS, WITHOUT WARRANTIES OR CONDITIONS OF ANY
+ KIND, either express or implied. See the License for the
+ specific language governing permissions and limitations
+ under the License.
+
+-->
+# Docker部署
+
+## 环境准备
+
+### 1. Docker安装
+
+```SQL
+#以ubuntu为例,其他操作系统可以自行搜索安装方法
+#step1: 安装一些必要的系统工具
+sudo apt-get update
+sudo apt-get -y install apt-transport-https ca-certificates curl
software-properties-common
+#step2: 安装GPG证书
+curl -fsSL https://mirrors.aliyun.com/docker-ce/linux/ubuntu/gpg | sudo
apt-key add -
+#step3: 写入软件源信息
+sudo add-apt-repository "deb [arch=amd64]
https://mirrors.aliyun.com/docker-ce/linux/ubuntu $(lsb_release -cs) stable"
+#step4: 更新并安装Docker-CE
+sudo apt-get -y update
+sudo apt-get -y install docker-ce
+#step5: 设置docker开机自启动
+sudo systemctl enable docker
+#step6: 验证docker是否安装成功
+docker --version #显示版本信息,即安装成功
+```
+
+### 2. docker-compose安装
+
+```SQL
+#安装命令
+curl -L
"https://github.com/docker/compose/releases/download/v2.20.0/docker-compose-$(uname
-s)-$(uname -m)" -o /usr/local/bin/docker-compose
+chmod +x /usr/local/bin/docker-compose
+ln -s /usr/local/bin/docker-compose /usr/bin/docker-compose
+#验证是否安装成功
+docker-compose --version #显示版本信息即安装成功
+```
+
+## 单机版
+
+本节演示如何部署1C1D的docker单机版。
+
+### 1. 拉取镜像文件
+
+Apache IoTDB的Docker镜像已经上传至https://hub.docker.com/r/apache/iotdb。
+
+以获取1.3.2版本为例,拉取镜像命令:
+
+```bash
+docker pull apache/iotdb:1.3.2-standalone
+```
+
+查看镜像:
+
+```bash
+docker images
+```
+
+
+
+### 2. 创建docker bridge网络
+
+```Bash
+docker network create --driver=bridge --subnet=172.18.0.0/16
--gateway=172.18.0.1 iotdb
+```
+
+### 3.编写docker-compose的yml文件
+
+这里我们以把IoTDB安装目录和yml文件统一放在`/docker-iotdb`文件夹下为例:
+
+文件目录结构为:`/docker-iotdb/iotdb`, `/docker-iotdb/docker-compose-standalone.yml `
+
+```bash
+docker-iotdb:
+├── iotdb #iotdb安装目录
+│── docker-compose-standalone.yml #单机版docker-compose的yml文件
+```
+
+完整的docker-compose-standalone.yml 内容如下:
+
+```bash
+version: "3"
+services:
+ iotdb-service:
+ image: apache/iotdb:1.3.2-standalone #使用的镜像
+ hostname: iotdb
+ container_name: iotdb
+ restart: always
+ ports:
+ - "6667:6667"
+ environment:
+ - cn_internal_address=iotdb
+ - cn_internal_port=10710
+ - cn_consensus_port=10720
+ - cn_seed_config_node=iotdb:10710
+ - dn_rpc_address=iotdb
+ - dn_internal_address=iotdb
+ - dn_rpc_port=6667
+ - dn_internal_port=10730
+ - dn_mpp_data_exchange_port=10740
+ - dn_schema_region_consensus_port=10750
+ - dn_data_region_consensus_port=10760
+ - dn_seed_config_node=iotdb:10710
+ privileged: true
+ volumes:
+ - ./iotdb/data:/iotdb/data
+ - ./iotdb/logs:/iotdb/logs
+ - /dev/mem:/dev/mem:ro
+ networks:
+ iotdb:
+ ipv4_address: 172.18.0.6
+networks:
+ iotdb:
+ external: true
+```
+
+### 4. 启动IoTDB
+
+使用下面的命令启动:
+
+```bash
+cd /docker-iotdb
+docker-compose -f docker-compose-standalone.yml up -d #后台启动
+```
+
+### 5. 验证部署
+
+- 查看日志,有如下字样,表示启动成功
+
+ ```SQL
+ docker logs -f iotdb-datanode #查看日志命令
+ 2024-07-21 08:22:38,457 [main] INFO o.a.i.db.service.DataNode:227 -
Congratulations, IoTDB DataNode is set up successfully. Now, enjoy yourself!
+ ```
+
+

+
+- 进入容器,查看服务运行状态
+
+ 查看启动的容器
+
+ ```SQL
+ docker ps
+ ```
+
+

+
+ 进入容器, 通过cli登录数据库, 使用show cluster命令查看服务状态
+
+ ```SQL
+ docker exec -it iotdb /bin/bash #进入容器
+ ./start-cli.sh -h iotdb #登录数据库
+ IoTDB> show cluster #查看服务状态
+ ```
+
+ 可以看到服务状态都是running, 说明IoTDB部署成功。
+
+

+
+### 6. 映射/conf目录(可选)
+
+后续如果想在物理机中直接修改配置文件,可以把容器中的/conf文件夹映射出来,分三步:
+
+步骤一:拷贝容器中的/conf目录到`/docker-iotdb/iotdb/conf`
+
+```bash
+docker cp iotdb:/iotdb/conf /docker-iotdb/iotdb/conf
+```
+
+步骤二:在`docker-compose-standalone.yml`中添加映射
+
+```bash
+ volumes:
+ - ./iotdb/conf:/iotdb/conf #增加这个/conf文件夹的映射
+ - ./iotdb/data:/iotdb/data
+ - ./iotdb/logs:/iotdb/logs
+ - /dev/mem:/dev/mem:ro
+```
+
+步骤三:重新启动IoTDB
+
+```bash
+docker-compose -f docker-compose-standalone.yml up -d
+```
+
+## 集群版
+
+本小节描述如何手动部署包括3个ConfigNode和3个DataNode的实例,即通常所说的3C3D集群。
+
+<div align="center">
+ <img
src="https://alioss.timecho.com/docs/img/%E9%9B%86%E7%BE%A4%E9%83%A8%E7%BD%B2.png";
alt="" style="width: 60%;"/>
+</div>
+
+**注意:集群版目前只支持host网络和overlay 网络,不支持bridge网络。**
+
+下面以host网络为例演示如何部署3C3D集群。
+
+### 1.设置主机名
+
+假设现在有3台linux服务器,IP地址和服务角色分配如下:
+
+| 节点ip | 主机名 | 服务 |
+| ----------- | ------- | -------------------- |
+| 192.168.1.3 | iotdb-1 | ConfigNode、DataNode |
+| 192.168.1.4 | iotdb-2 | ConfigNode、DataNode |
+| 192.168.1.5 | iotdb-3 | ConfigNode、DataNode |
+
+在3台机器上分别配置主机名,设置主机名需要在目标服务器上配置`/etc/hosts`,使用如下命令:
+
+```Bash
+echo "192.168.1.3 iotdb-1" >> /etc/hosts
+echo "192.168.1.4 iotdb-2" >> /etc/hosts
+echo "192.168.1.5 iotdb-3" >> /etc/hosts
+```
+
+### 2. 拉取镜像文件
+
+Apache IoTDB的Docker镜像已经上传至https://hub.docker.com/r/apache/iotdb。
+
+在3台服务器上分别拉取IoTDB镜像,以获取1.3.2版本为例,拉取镜像命令:
+
+```SQL
+docker pull apache/iotdb:1.3.2-standalone
+```
+
+查看镜像:
+
+```SQL
+docker images
+```
+
+
+
+### 3.编写docker-compose的yml文件
+
+这里我们以把IoTDB安装目录和yml文件统一放在`/docker-iotdb`文件夹下为例:
+
+文件目录结构为:`/docker-iotdb/iotdb`,
`/docker-iotdb/confignode.yml`,`/docker-iotdb/datanode.yml`
+
+```SQL
+docker-iotdb:
+├── confignode.yml #confignode的yml文件
+├── datanode.yml #datanode的yml文件
+└── iotdb #IoTDB安装目录
+```
+
+在每台服务器上都要编写2个yml文件,即confignode.yml和datanode.yml,yml示例如下:
+
+**confignode.yml:**
+
+```bash
+#confignode.yml
+version: "3"
+services:
+ iotdb-confignode:
+ image: apache/iotdb:1.3.2-standalone #使用的镜像
+ hostname: iotdb-1|iotdb-2|iotdb-3 #根据实际情况选择,三选一
+ container_name: iotdb-confignode
+ command: ["bash", "-c", "entrypoint.sh confignode"]
+ restart: always
+ environment:
+ - cn_internal_address=iotdb-1|iotdb-2|iotdb-3 #根据实际情况选择,三选一
+ - cn_internal_port=10710
+ - cn_consensus_port=10720
+ - cn_seed_config_node=iotdb-1:10710 #默认第一台为seed节点
+ - schema_replication_factor=3 #元数据副本数
+ - data_replication_factor=2 #数据副本数
+ privileged: true
+ volumes:
+ - ./iotdb/data:/iotdb/data
+ - ./iotdb/logs:/iotdb/logs
+ - /dev/mem:/dev/mem:ro
+ network_mode: "host" #使用host网络
+```
+
+**datanode.yml:**
+
+```bash
+#datanode.yml
+version: "3"
+services:
+ iotdb-datanode:
+ image: iotdb-enterprise:1.3.2.3-standalone #使用的镜像
+ hostname: iotdb-1|iotdb-2|iotdb-3 #根据实际情况选择,三选一
+ container_name: iotdb-datanode
+ command: ["bash", "-c", "entrypoint.sh datanode"]
+ restart: always
+ ports:
+ - "6667:6667"
+ privileged: true
+ environment:
+ - dn_rpc_address=iotdb-1|iotdb-2|iotdb-3 #根据实际情况选择,三选一
+ - dn_internal_address=iotdb-1|iotdb-2|iotdb-3 #根据实际情况选择,三选一
+ - dn_seed_config_node=iotdb-1:10710 #默认第1台为seed节点
+ - dn_rpc_port=6667
+ - dn_internal_port=10730
+ - dn_mpp_data_exchange_port=10740
+ - dn_schema_region_consensus_port=10750
+ - dn_data_region_consensus_port=10760
+ - schema_replication_factor=3 #元数据副本数
+ - data_replication_factor=2 #数据副本数
+ volumes:
+ - ./iotdb/data:/iotdb/data
+ - ./iotdb/logs:/iotdb/logs
+ - /dev/mem:/dev/mem:ro
+ network_mode: "host" #使用host网络
+```
+
+### 4. 首次启动confignode
+
+先在3台服务器上分别启动confignode, 注意启动顺序,先启动第1台iotdb-1,再启动iotdb-2和iotdb-3。
+
+```bash
+cd /docker-iotdb
+docker-compose -f confignode.yml up -d #后台启动
+```
+
+### 5. 启动datanode
+
+在3台服务器上分别启动datanode
+
+```SQL
+cd /docker-iotdb
+docker-compose -f datanode.yml up -d #后台启动
+```
+
+
+
+### 6. 验证部署
+
+- 查看日志,有如下字样,表示datanode启动成功
+
+ ```SQL
+ docker logs -f iotdb-datanode #查看日志命令
+ 2024-07-21 09:40:58,120 [main] INFO o.a.i.db.service.DataNode:227 -
Congratulations, IoTDB DataNode is set up successfully. Now, enjoy yourself!
+ ```
+
+

+
+- 进入容器,查看服务运行状态
+
+ 查看启动的容器
+
+ ```SQL
+ docker ps
+ ```
+
+

+
+ 进入任意一个容器, 通过cli登录数据库, 使用show cluster命令查看服务状态
+
+ ```SQL
+ docker exec -it iotdb-datanode /bin/bash #进入容器
+ ./start-cli.sh -h iotdb-1 #登录数据库
+ IoTDB> show cluster #查看服务状态
+ ```
+
+ 可以看到服务状态都是running, 说明IoTDB部署成功。
+
+

+
+### 7. 映射/conf目录(可选)
+
+后续如果想在物理机中直接修改配置文件,可以把容器中的/conf文件夹映射出来,分三步:
+
+步骤一:在3台服务器中分别拷贝容器中的/conf目录到/docker-iotdb/iotdb/conf
+
+```bash
+docker cp iotdb-confignode:/iotdb/conf /docker-iotdb/iotdb/conf
+或者
+docker cp iotdb-datanode:/iotdb/conf /docker-iotdb/iotdb/conf
+```
+
+步骤二:在3台服务器的confignode.yml和datanode.yml中添加/conf目录映射
+
+```bash
+#confignode.yml
+ volumes:
+ - ./iotdb/conf:/iotdb/conf #增加这个/conf文件夹的映射
+ - ./iotdb/data:/iotdb/data
+ - ./iotdb/logs:/iotdb/logs
+ - /dev/mem:/dev/mem:ro
+
+#datanode.yml
+ volumes:
+ - ./iotdb/conf:/iotdb/conf #增加这个/conf文件夹的映射
+ - ./iotdb/data:/iotdb/data
+ - ./iotdb/logs:/iotdb/logs
+ - /dev/mem:/dev/mem:ro
+```
+
+步骤三:在3台服务器上重新启动IoTDB
+
+```bash
+cd /docker-iotdb
+docker-compose -f confignode.yml up -d
+docker-compose -f datanode.yml up -d
+```
\ No newline at end of file
diff --git
a/src/zh/UserGuide/Master/Deployment-and-Maintenance/Docker-Deployment_timecho.md
b/src/zh/UserGuide/Master/Deployment-and-Maintenance/Docker-Deployment_timecho.md
new file mode 100644
index 0000000..9dab598
--- /dev/null
+++
b/src/zh/UserGuide/Master/Deployment-and-Maintenance/Docker-Deployment_timecho.md
@@ -0,0 +1,474 @@
+<!--
+
+ Licensed to the Apache Software Foundation (ASF) under one
+ or more contributor license agreements. See the NOTICE file
+ distributed with this work for additional information
+ regarding copyright ownership. The ASF licenses this file
+ to you under the Apache License, Version 2.0 (the
+ "License"); you may not use this file except in compliance
+ with the License. You may obtain a copy of the License at
+
+ http://www.apache.org/licenses/LICENSE-2.0
+
+ Unless required by applicable law or agreed to in writing,
+ software distributed under the License is distributed on an
+ "AS IS" BASIS, WITHOUT WARRANTIES OR CONDITIONS OF ANY
+ KIND, either express or implied. See the License for the
+ specific language governing permissions and limitations
+ under the License.
+
+-->
+# Docker部署
+
+## 环境准备
+
+### 1. Docker安装
+
+```Bash
+#以ubuntu为例,其他操作系统可以自行搜索安装方法
+#step1: 安装一些必要的系统工具
+sudo apt-get update
+sudo apt-get -y install apt-transport-https ca-certificates curl
software-properties-common
+#step2: 安装GPG证书
+curl -fsSL https://mirrors.aliyun.com/docker-ce/linux/ubuntu/gpg | sudo
apt-key add -
+#step3: 写入软件源信息
+sudo add-apt-repository "deb [arch=amd64]
https://mirrors.aliyun.com/docker-ce/linux/ubuntu $(lsb_release -cs) stable"
+#step4: 更新并安装Docker-CE
+sudo apt-get -y update
+sudo apt-get -y install docker-ce
+#step5: 设置docker开机自启动
+sudo systemctl enable docker
+#step6: 验证docker是否安装成功
+docker --version #显示版本信息,即安装成功
+```
+
+### 2. docker-compose安装
+
+```Bash
+#安装命令
+curl -L
"https://github.com/docker/compose/releases/download/v2.20.0/docker-compose-$(uname
-s)-$(uname -m)" -o /usr/local/bin/docker-compose
+chmod +x /usr/local/bin/docker-compose
+ln -s /usr/local/bin/docker-compose /usr/bin/docker-compose
+#验证是否安装成功
+docker-compose --version #显示版本信息即安装成功
+```
+
+### 3. 安装dmidecode插件
+
+默认情况下,linux服务器应该都已安装,如果没有安装的话,可以使用下面的命令安装。
+
+```Bash
+sudo apt-get install dmidecode
+```
+
+dmidecode 安装后,查找安装路径:`whereis
dmidecode`,这里假设结果为`/usr/sbin/dmidecode`,记住该路径,后面的docker-compose的yml文件会用到。
+
+### 4. 获取IoTDB的容器镜像
+
+关于IoTDB企业版的容器镜像您可联系商务或技术支持获取。
+
+## 单机版部署
+
+本节演示如何部署1C1D的docker单机版。
+
+### 1. load 镜像文件
+
+比如这里获取的IoTDB的容器镜像文件名是:`iotdb-enterprise-1.3.2.3-standalone-docker.tar.gz`
+
+load镜像:
+
+```Bash
+docker load -i iotdb-enterprise-1.3.2.3-standalone-docker.tar.gz
+```
+
+查看镜像:
+
+```Bash
+docker images
+```
+
+
+
+### 2. 创建docker bridge网络
+
+```Bash
+docker network create --driver=bridge --subnet=172.18.0.0/16
--gateway=172.18.0.1 iotdb
+```
+
+### 3. 编写docker-compose的yml文件
+
+这里我们以把IoTDB安装目录和yml文件统一放在`/docker-iotdb` 文件夹下为例:
+
+文件目录结构为:`/docker-iotdb/iotdb`, `/docker-iotdb/docker-compose-standalone.yml `
+
+```Bash
+docker-iotdb:
+├── iotdb #iotdb安装目录
+│── docker-compose-standalone.yml #单机版docker-compose的yml文件
+```
+
+完整的`docker-compose-standalone.yml`内容如下:
+
+```Bash
+version: "3"
+services:
+ iotdb-service:
+ image: iotdb-enterprise:1.3.2.3-standalone #使用的镜像
+ hostname: iotdb
+ container_name: iotdb
+ restart: always
+ ports:
+ - "6667:6667"
+ environment:
+ - cn_internal_address=iotdb
+ - cn_internal_port=10710
+ - cn_consensus_port=10720
+ - cn_seed_config_node=iotdb:10710
+ - dn_rpc_address=iotdb
+ - dn_internal_address=iotdb
+ - dn_rpc_port=6667
+ - dn_internal_port=10730
+ - dn_mpp_data_exchange_port=10740
+ - dn_schema_region_consensus_port=10750
+ - dn_data_region_consensus_port=10760
+ - dn_seed_config_node=iotdb:10710
+ privileged: true
+ volumes:
+ - ./iotdb/activation:/iotdb/activation
+ - ./iotdb/data:/iotdb/data
+ - ./iotdb/logs:/iotdb/logs
+ - /usr/sbin/dmidecode:/usr/sbin/dmidecode:ro
+ - /dev/mem:/dev/mem:ro
+ networks:
+ iotdb:
+ ipv4_address: 172.18.0.6
+networks:
+ iotdb:
+ external: true
+```
+
+### 4. 首次启动
+
+使用下面的命令启动:
+
+```Bash
+cd /docker-iotdb
+docker-compose -f docker-compose-standalone.yml up
+```
+
+由于没有激活,首次启动时会直接退出,属于正常现象,首次启动是为了获取机器码文件,用于后面的激活流程。
+
+
+
+### 5. 申请激活
+
+- 首次启动后,在物理机目录`/docker-iotdb/iotdb/activation`下会生成一个
`system_info`文件,将这个文件拷贝给天谋工作人员。
+
+

+
+- 收到工作人员返回的license文件,将license文件拷贝到`/docker-iotdb/iotdb/activation`文件夹下。
+
+

+
+### 6. 再次启动IoTDB
+
+```Bash
+docker-compose -f docker-compose-standalone.yml up -d
+```
+
+
+
+### 7. 验证部署
+
+- 查看日志,有如下字样,表示启动成功
+
+```Bash
+docker logs -f iotdb-datanode #查看日志命令
+2024-07-19 12:02:32,608 [main] INFO o.a.i.db.service.DataNode:231 -
Congratulations, IoTDB DataNode is set up successfully. Now, enjoy yourself!
+```
+
+
+
+- 进入容器,查看服务运行状态及激活信息
+
+ 查看启动的容器
+
+ ```Bash
+ docker ps
+ ```
+
+

+
+ 进入容器, 通过cli登录数据库, 使用show cluster命令查看服务状态及激活状态
+
+ ```Bash
+ docker exec -it iotdb /bin/bash #进入容器
+ ./start-cli.sh -h iotdb #登录数据库
+ IoTDB> show cluster #查看状态
+ ```
+
+ 可以看到服务都是running,激活状态显示已激活。
+
+

+
+### 8. 映射/conf目录(可选)
+
+后续如果想在物理机中直接修改配置文件,可以把容器中的/conf文件夹映射出来,分三步:
+
+步骤一:拷贝容器中的/conf目录到`/docker-iotdb/iotdb/conf`
+
+```Bash
+docker cp iotdb:/iotdb/conf /docker-iotdb/iotdb/conf
+```
+
+步骤二:在docker-compose-standalone.yml中添加映射
+
+```Bash
+ volumes:
+ - ./iotdb/conf:/iotdb/conf #增加这个/conf文件夹的映射
+ - ./iotdb/activation:/iotdb/activation
+ - ./iotdb/data:/iotdb/data
+ - ./iotdb/logs:/iotdb/logs
+ - /usr/sbin/dmidecode:/usr/sbin/dmidecode:ro
+ - /dev/mem:/dev/mem:ro
+```
+
+步骤三:重新启动IoTDB
+
+```Bash
+docker-compose -f docker-compose-standalone.yml up -d
+```
+
+## 集群版部署
+
+本小节描述如何手动部署包括3个ConfigNode和3个DataNode的实例,即通常所说的3C3D集群。
+
+<div align="center">
+ <img
src="https://alioss.timecho.com/docs/img/%E9%9B%86%E7%BE%A4%E9%83%A8%E7%BD%B2.png";
alt="" style="width: 60%;"/>
+</div>
+
+**注意:集群版目前只支持host网络和overlay 网络,不支持bridge网络。**
+
+下面以host网络为例演示如何部署3C3D集群。
+
+### 1. 设置主机名
+
+假设现在有3台linux服务器,IP地址和服务角色分配如下:
+
+| 节点ip | 主机名 | 服务 |
+| ----------- | ------- | -------------------- |
+| 192.168.1.3 | iotdb-1 | ConfigNode、DataNode |
+| 192.168.1.4 | iotdb-2 | ConfigNode、DataNode |
+| 192.168.1.5 | iotdb-3 | ConfigNode、DataNode |
+
+在3台机器上分别配置主机名,设置主机名需要在目标服务器上配置/etc/hosts,使用如下命令:
+
+```Bash
+echo "192.168.1.3 iotdb-1" >> /etc/hosts
+echo "192.168.1.4 iotdb-2" >> /etc/hosts
+echo "192.168.1.5 iotdb-3" >> /etc/hosts
+```
+
+### 2. load镜像文件
+
+比如获取的IoTDB的容器镜像文件名是:`iotdb-enterprise-1.3.2.3-standalone-docker.tar.gz`
+
+在3台服务器上分别执行load镜像命令:
+
+```Bash
+docker load -i iotdb-enterprise-1.3.2.3-standalone-docker.tar.gz
+```
+
+查看镜像:
+
+```Bash
+docker images
+```
+
+
+
+### 3. 编写docker-compose的yml文件
+
+这里我们以把IoTDB安装目录和yml文件统一放在/docker-iotdb文件夹下为例:
+
+文件目录结构为:`/docker-iotdb/iotdb`,`/docker-iotdb/confignode.yml`,`/docker-iotdb/datanode.yml`
+
+```Bash
+docker-iotdb:
+├── confignode.yml #confignode的yml文件
+├── datanode.yml #datanode的yml文件
+└── iotdb #IoTDB安装目录
+```
+
+在每台服务器上都要编写2个yml文件,即`confignode.yml`和`datanode.yml`,yml示例如下:
+
+**confignode.yml:**
+
+```Bash
+#confignode.yml
+version: "3"
+services:
+ iotdb-confignode:
+ image: iotdb-enterprise:1.3.2.3-standalone #使用的镜像
+ hostname: iotdb-1|iotdb-2|iotdb-3 #根据实际情况选择,三选一
+ container_name: iotdb-confignode
+ command: ["bash", "-c", "entrypoint.sh confignode"]
+ restart: always
+ environment:
+ - cn_internal_address=iotdb-1|iotdb-2|iotdb-3 #根据实际情况选择,三选一
+ - cn_internal_port=10710
+ - cn_consensus_port=10720
+ - cn_seed_config_node=iotdb-1:10710 #默认第一台为seed节点
+ - schema_replication_factor=3 #元数据副本数
+ - data_replication_factor=2 #数据副本数
+ privileged: true
+ volumes:
+ - ./iotdb/activation:/iotdb/activation
+ - ./iotdb/data:/iotdb/data
+ - ./iotdb/logs:/iotdb/logs
+ - /usr/sbin/dmidecode:/usr/sbin/dmidecode:ro
+ - /dev/mem:/dev/mem:ro
+ network_mode: "host" #使用host网络
+```
+
+**datanode.yml:**
+
+```Bash
+#datanode.yml
+version: "3"
+services:
+ iotdb-datanode:
+ image: iotdb-enterprise:1.3.2.3-standalone #使用的镜像
+ hostname: iotdb-1|iotdb-2|iotdb-3 #根据实际情况选择,三选一
+ container_name: iotdb-datanode
+ command: ["bash", "-c", "entrypoint.sh datanode"]
+ restart: always
+ ports:
+ - "6667:6667"
+ privileged: true
+ environment:
+ - dn_rpc_address=iotdb-1|iotdb-2|iotdb-3 #根据实际情况选择,三选一
+ - dn_internal_address=iotdb-1|iotdb-2|iotdb-3 #根据实际情况选择,三选一
+ - dn_seed_config_node=iotdb-1:10710 #默认第1台为seed节点
+ - dn_rpc_port=6667
+ - dn_internal_port=10730
+ - dn_mpp_data_exchange_port=10740
+ - dn_schema_region_consensus_port=10750
+ - dn_data_region_consensus_port=10760
+ - schema_replication_factor=3 #元数据副本数
+ - data_replication_factor=2 #数据副本数
+ volumes:
+ - ./iotdb/activation:/iotdb/activation
+ - ./iotdb/data:/iotdb/data
+ - ./iotdb/logs:/iotdb/logs
+ - /usr/sbin/dmidecode:/usr/sbin/dmidecode:ro
+ - /dev/mem:/dev/mem:ro
+ network_mode: "host" #使用host网络
+```
+
+### 4. 首次启动confignode
+
+先在3台服务器上分别启动confignode, 用来获取机器码,注意启动顺序,先启动第1台iotdb-1,再启动iotdb-2和iotdb-3。
+
+```Bash
+cd /docker-iotdb
+docker-compose -f confignode.yml up -d #后台启动
+```
+
+### 5. 申请激活
+
+-
首次启动3个confignode后,在每个物理机目录`/docker-iotdb/iotdb/activation`下都会生成一个`system_info`文件,将3个服务器的`system_info`文件拷贝给天谋工作人员;
+
+

+
+- 将3个license文件分别放入对应的ConfigNode节点的`/docker-iotdb/iotdb/activation`文件夹下;
+
+

+
+- license放入对应的activation文件夹后,confignode会自动激活,不用重启confignode
+
+### 6. 启动datanode
+
+在3台服务器上分别启动datanode
+
+```Bash
+cd /docker-iotdb
+docker-compose -f datanode.yml up -d #后台启动
+```
+
+
+
+### 7. 验证部署
+
+- 查看日志,有如下字样,表示datanode启动成功
+
+ ```Bash
+ docker logs -f iotdb-datanode #查看日志命令
+ 2024-07-20 16:50:48,937 [main] INFO o.a.i.db.service.DataNode:231 -
Congratulations, IoTDB DataNode is set up successfully. Now, enjoy yourself!
+ ```
+
+ 
+
+- 进入任意一个容器,查看服务运行状态及激活信息
+
+ 查看启动的容器
+
+ ```Bash
+ docker ps
+ ```
+
+

+
+ 进入容器,通过cli登录数据库,使用`show cluster`命令查看服务状态及激活状态
+
+ ```Bash
+ docker exec -it iotdb-datanode /bin/bash #进入容器
+ ./start-cli.sh -h iotdb-1 #登录数据库
+ IoTDB> show cluster #查看状态
+ ```
+
+ 可以看到服务都是running,激活状态显示已激活。
+
+

+
+### 8. 映射/conf目录(可选)
+
+后续如果想在物理机中直接修改配置文件,可以把容器中的/conf文件夹映射出来,分三步:
+
+步骤一:在3台服务器中分别拷贝容器中的/conf目录到`/docker-iotdb/iotdb/conf`
+
+```Bash
+docker cp iotdb-confignode:/iotdb/conf /docker-iotdb/iotdb/conf
+或者
+docker cp iotdb-datanode:/iotdb/conf /docker-iotdb/iotdb/conf
+```
+
+步骤二:在3台服务器的`confignode.yml`和`datanode.yml`中添加/conf目录映射
+
+```Bash
+#confignode.yml
+ volumes:
+ - ./iotdb/conf:/iotdb/conf #增加这个/conf文件夹的映射
+ - ./iotdb/activation:/iotdb/activation
+ - ./iotdb/data:/iotdb/data
+ - ./iotdb/logs:/iotdb/logs
+ - /usr/sbin/dmidecode:/usr/sbin/dmidecode:ro
+ - /dev/mem:/dev/mem:ro
+
+#datanode.yml
+ volumes:
+ - ./iotdb/conf:/iotdb/conf #增加这个/conf文件夹的映射
+ - ./iotdb/activation:/iotdb/activation
+ - ./iotdb/data:/iotdb/data
+ - ./iotdb/logs:/iotdb/logs
+ - /usr/sbin/dmidecode:/usr/sbin/dmidecode:ro
+ - /dev/mem:/dev/mem:ro
+```
+
+步骤三:在3台服务器上重新启动IoTDB
+
+```Bash
+cd /docker-iotdb
+docker-compose -f confignode.yml up -d
+docker-compose -f datanode.yml up -d
+```
\ No newline at end of file
diff --git
a/src/zh/UserGuide/Master/Deployment-and-Maintenance/Docker-Install.md
b/src/zh/UserGuide/Master/stage/Docker-Install.md
similarity index 100%
rename from src/zh/UserGuide/Master/Deployment-and-Maintenance/Docker-Install.md
rename to src/zh/UserGuide/Master/stage/Docker-Install.md
diff --git
a/src/zh/UserGuide/latest/Deployment-and-Maintenance/Docker-Deployment.md
b/src/zh/UserGuide/latest/Deployment-and-Maintenance/Docker-Deployment.md
new file mode 100644
index 0000000..74d2941
--- /dev/null
+++ b/src/zh/UserGuide/latest/Deployment-and-Maintenance/Docker-Deployment.md
@@ -0,0 +1,414 @@
+<!--
+
+ Licensed to the Apache Software Foundation (ASF) under one
+ or more contributor license agreements. See the NOTICE file
+ distributed with this work for additional information
+ regarding copyright ownership. The ASF licenses this file
+ to you under the Apache License, Version 2.0 (the
+ "License"); you may not use this file except in compliance
+ with the License. You may obtain a copy of the License at
+
+ http://www.apache.org/licenses/LICENSE-2.0
+
+ Unless required by applicable law or agreed to in writing,
+ software distributed under the License is distributed on an
+ "AS IS" BASIS, WITHOUT WARRANTIES OR CONDITIONS OF ANY
+ KIND, either express or implied. See the License for the
+ specific language governing permissions and limitations
+ under the License.
+
+-->
+# Docker部署
+
+## 环境准备
+
+### 1. Docker安装
+
+```SQL
+#以ubuntu为例,其他操作系统可以自行搜索安装方法
+#step1: 安装一些必要的系统工具
+sudo apt-get update
+sudo apt-get -y install apt-transport-https ca-certificates curl
software-properties-common
+#step2: 安装GPG证书
+curl -fsSL https://mirrors.aliyun.com/docker-ce/linux/ubuntu/gpg | sudo
apt-key add -
+#step3: 写入软件源信息
+sudo add-apt-repository "deb [arch=amd64]
https://mirrors.aliyun.com/docker-ce/linux/ubuntu $(lsb_release -cs) stable"
+#step4: 更新并安装Docker-CE
+sudo apt-get -y update
+sudo apt-get -y install docker-ce
+#step5: 设置docker开机自启动
+sudo systemctl enable docker
+#step6: 验证docker是否安装成功
+docker --version #显示版本信息,即安装成功
+```
+
+### 2. docker-compose安装
+
+```SQL
+#安装命令
+curl -L
"https://github.com/docker/compose/releases/download/v2.20.0/docker-compose-$(uname
-s)-$(uname -m)" -o /usr/local/bin/docker-compose
+chmod +x /usr/local/bin/docker-compose
+ln -s /usr/local/bin/docker-compose /usr/bin/docker-compose
+#验证是否安装成功
+docker-compose --version #显示版本信息即安装成功
+```
+
+## 单机版
+
+本节演示如何部署1C1D的docker单机版。
+
+### 1. 拉取镜像文件
+
+Apache IoTDB的Docker镜像已经上传至https://hub.docker.com/r/apache/iotdb。
+
+以获取1.3.2版本为例,拉取镜像命令:
+
+```bash
+docker pull apache/iotdb:1.3.2-standalone
+```
+
+查看镜像:
+
+```bash
+docker images
+```
+
+
+
+### 2. 创建docker bridge网络
+
+```Bash
+docker network create --driver=bridge --subnet=172.18.0.0/16
--gateway=172.18.0.1 iotdb
+```
+
+### 3.编写docker-compose的yml文件
+
+这里我们以把IoTDB安装目录和yml文件统一放在`/docker-iotdb`文件夹下为例:
+
+文件目录结构为:`/docker-iotdb/iotdb`, `/docker-iotdb/docker-compose-standalone.yml `
+
+```bash
+docker-iotdb:
+├── iotdb #iotdb安装目录
+│── docker-compose-standalone.yml #单机版docker-compose的yml文件
+```
+
+完整的docker-compose-standalone.yml 内容如下:
+
+```bash
+version: "3"
+services:
+ iotdb-service:
+ image: apache/iotdb:1.3.2-standalone #使用的镜像
+ hostname: iotdb
+ container_name: iotdb
+ restart: always
+ ports:
+ - "6667:6667"
+ environment:
+ - cn_internal_address=iotdb
+ - cn_internal_port=10710
+ - cn_consensus_port=10720
+ - cn_seed_config_node=iotdb:10710
+ - dn_rpc_address=iotdb
+ - dn_internal_address=iotdb
+ - dn_rpc_port=6667
+ - dn_internal_port=10730
+ - dn_mpp_data_exchange_port=10740
+ - dn_schema_region_consensus_port=10750
+ - dn_data_region_consensus_port=10760
+ - dn_seed_config_node=iotdb:10710
+ privileged: true
+ volumes:
+ - ./iotdb/data:/iotdb/data
+ - ./iotdb/logs:/iotdb/logs
+ - /dev/mem:/dev/mem:ro
+ networks:
+ iotdb:
+ ipv4_address: 172.18.0.6
+networks:
+ iotdb:
+ external: true
+```
+
+### 4. 启动IoTDB
+
+使用下面的命令启动:
+
+```bash
+cd /docker-iotdb
+docker-compose -f docker-compose-standalone.yml up -d #后台启动
+```
+
+### 5. 验证部署
+
+- 查看日志,有如下字样,表示启动成功
+
+ ```SQL
+ docker logs -f iotdb-datanode #查看日志命令
+ 2024-07-21 08:22:38,457 [main] INFO o.a.i.db.service.DataNode:227 -
Congratulations, IoTDB DataNode is set up successfully. Now, enjoy yourself!
+ ```
+
+

+
+- 进入容器,查看服务运行状态
+
+ 查看启动的容器
+
+ ```SQL
+ docker ps
+ ```
+
+

+
+ 进入容器, 通过cli登录数据库, 使用show cluster命令查看服务状态
+
+ ```SQL
+ docker exec -it iotdb /bin/bash #进入容器
+ ./start-cli.sh -h iotdb #登录数据库
+ IoTDB> show cluster #查看服务状态
+ ```
+
+ 可以看到服务状态都是running, 说明IoTDB部署成功。
+
+

+
+### 6. 映射/conf目录(可选)
+
+后续如果想在物理机中直接修改配置文件,可以把容器中的/conf文件夹映射出来,分三步:
+
+步骤一:拷贝容器中的/conf目录到`/docker-iotdb/iotdb/conf`
+
+```bash
+docker cp iotdb:/iotdb/conf /docker-iotdb/iotdb/conf
+```
+
+步骤二:在`docker-compose-standalone.yml`中添加映射
+
+```bash
+ volumes:
+ - ./iotdb/conf:/iotdb/conf #增加这个/conf文件夹的映射
+ - ./iotdb/data:/iotdb/data
+ - ./iotdb/logs:/iotdb/logs
+ - /dev/mem:/dev/mem:ro
+```
+
+步骤三:重新启动IoTDB
+
+```bash
+docker-compose -f docker-compose-standalone.yml up -d
+```
+
+## 集群版
+
+本小节描述如何手动部署包括3个ConfigNode和3个DataNode的实例,即通常所说的3C3D集群。
+
+<div align="center">
+ <img
src="https://alioss.timecho.com/docs/img/%E9%9B%86%E7%BE%A4%E9%83%A8%E7%BD%B2.png";
alt="" style="width: 60%;"/>
+</div>
+
+**注意:集群版目前只支持host网络和overlay 网络,不支持bridge网络。**
+
+下面以host网络为例演示如何部署3C3D集群。
+
+### 1.设置主机名
+
+假设现在有3台linux服务器,IP地址和服务角色分配如下:
+
+| 节点ip | 主机名 | 服务 |
+| ----------- | ------- | -------------------- |
+| 192.168.1.3 | iotdb-1 | ConfigNode、DataNode |
+| 192.168.1.4 | iotdb-2 | ConfigNode、DataNode |
+| 192.168.1.5 | iotdb-3 | ConfigNode、DataNode |
+
+在3台机器上分别配置主机名,设置主机名需要在目标服务器上配置`/etc/hosts`,使用如下命令:
+
+```Bash
+echo "192.168.1.3 iotdb-1" >> /etc/hosts
+echo "192.168.1.4 iotdb-2" >> /etc/hosts
+echo "192.168.1.5 iotdb-3" >> /etc/hosts
+```
+
+### 2. 拉取镜像文件
+
+Apache IoTDB的Docker镜像已经上传至https://hub.docker.com/r/apache/iotdb。
+
+在3台服务器上分别拉取IoTDB镜像,以获取1.3.2版本为例,拉取镜像命令:
+
+```SQL
+docker pull apache/iotdb:1.3.2-standalone
+```
+
+查看镜像:
+
+```SQL
+docker images
+```
+
+
+
+### 3.编写docker-compose的yml文件
+
+这里我们以把IoTDB安装目录和yml文件统一放在`/docker-iotdb`文件夹下为例:
+
+文件目录结构为:`/docker-iotdb/iotdb`,
`/docker-iotdb/confignode.yml`,`/docker-iotdb/datanode.yml`
+
+```SQL
+docker-iotdb:
+├── confignode.yml #confignode的yml文件
+├── datanode.yml #datanode的yml文件
+└── iotdb #IoTDB安装目录
+```
+
+在每台服务器上都要编写2个yml文件,即confignode.yml和datanode.yml,yml示例如下:
+
+**confignode.yml:**
+
+```bash
+#confignode.yml
+version: "3"
+services:
+ iotdb-confignode:
+ image: apache/iotdb:1.3.2-standalone #使用的镜像
+ hostname: iotdb-1|iotdb-2|iotdb-3 #根据实际情况选择,三选一
+ container_name: iotdb-confignode
+ command: ["bash", "-c", "entrypoint.sh confignode"]
+ restart: always
+ environment:
+ - cn_internal_address=iotdb-1|iotdb-2|iotdb-3 #根据实际情况选择,三选一
+ - cn_internal_port=10710
+ - cn_consensus_port=10720
+ - cn_seed_config_node=iotdb-1:10710 #默认第一台为seed节点
+ - schema_replication_factor=3 #元数据副本数
+ - data_replication_factor=2 #数据副本数
+ privileged: true
+ volumes:
+ - ./iotdb/data:/iotdb/data
+ - ./iotdb/logs:/iotdb/logs
+ - /dev/mem:/dev/mem:ro
+ network_mode: "host" #使用host网络
+```
+
+**datanode.yml:**
+
+```bash
+#datanode.yml
+version: "3"
+services:
+ iotdb-datanode:
+ image: iotdb-enterprise:1.3.2.3-standalone #使用的镜像
+ hostname: iotdb-1|iotdb-2|iotdb-3 #根据实际情况选择,三选一
+ container_name: iotdb-datanode
+ command: ["bash", "-c", "entrypoint.sh datanode"]
+ restart: always
+ ports:
+ - "6667:6667"
+ privileged: true
+ environment:
+ - dn_rpc_address=iotdb-1|iotdb-2|iotdb-3 #根据实际情况选择,三选一
+ - dn_internal_address=iotdb-1|iotdb-2|iotdb-3 #根据实际情况选择,三选一
+ - dn_seed_config_node=iotdb-1:10710 #默认第1台为seed节点
+ - dn_rpc_port=6667
+ - dn_internal_port=10730
+ - dn_mpp_data_exchange_port=10740
+ - dn_schema_region_consensus_port=10750
+ - dn_data_region_consensus_port=10760
+ - schema_replication_factor=3 #元数据副本数
+ - data_replication_factor=2 #数据副本数
+ volumes:
+ - ./iotdb/data:/iotdb/data
+ - ./iotdb/logs:/iotdb/logs
+ - /dev/mem:/dev/mem:ro
+ network_mode: "host" #使用host网络
+```
+
+### 4. 首次启动confignode
+
+先在3台服务器上分别启动confignode, 注意启动顺序,先启动第1台iotdb-1,再启动iotdb-2和iotdb-3。
+
+```bash
+cd /docker-iotdb
+docker-compose -f confignode.yml up -d #后台启动
+```
+
+### 5. 启动datanode
+
+在3台服务器上分别启动datanode
+
+```SQL
+cd /docker-iotdb
+docker-compose -f datanode.yml up -d #后台启动
+```
+
+
+
+### 6. 验证部署
+
+- 查看日志,有如下字样,表示datanode启动成功
+
+ ```SQL
+ docker logs -f iotdb-datanode #查看日志命令
+ 2024-07-21 09:40:58,120 [main] INFO o.a.i.db.service.DataNode:227 -
Congratulations, IoTDB DataNode is set up successfully. Now, enjoy yourself!
+ ```
+
+

+
+- 进入容器,查看服务运行状态
+
+ 查看启动的容器
+
+ ```SQL
+ docker ps
+ ```
+
+

+
+ 进入任意一个容器, 通过cli登录数据库, 使用show cluster命令查看服务状态
+
+ ```SQL
+ docker exec -it iotdb-datanode /bin/bash #进入容器
+ ./start-cli.sh -h iotdb-1 #登录数据库
+ IoTDB> show cluster #查看服务状态
+ ```
+
+ 可以看到服务状态都是running, 说明IoTDB部署成功。
+
+

+
+### 7. 映射/conf目录(可选)
+
+后续如果想在物理机中直接修改配置文件,可以把容器中的/conf文件夹映射出来,分三步:
+
+步骤一:在3台服务器中分别拷贝容器中的/conf目录到/docker-iotdb/iotdb/conf
+
+```bash
+docker cp iotdb-confignode:/iotdb/conf /docker-iotdb/iotdb/conf
+或者
+docker cp iotdb-datanode:/iotdb/conf /docker-iotdb/iotdb/conf
+```
+
+步骤二:在3台服务器的confignode.yml和datanode.yml中添加/conf目录映射
+
+```bash
+#confignode.yml
+ volumes:
+ - ./iotdb/conf:/iotdb/conf #增加这个/conf文件夹的映射
+ - ./iotdb/data:/iotdb/data
+ - ./iotdb/logs:/iotdb/logs
+ - /dev/mem:/dev/mem:ro
+
+#datanode.yml
+ volumes:
+ - ./iotdb/conf:/iotdb/conf #增加这个/conf文件夹的映射
+ - ./iotdb/data:/iotdb/data
+ - ./iotdb/logs:/iotdb/logs
+ - /dev/mem:/dev/mem:ro
+```
+
+步骤三:在3台服务器上重新启动IoTDB
+
+```bash
+cd /docker-iotdb
+docker-compose -f confignode.yml up -d
+docker-compose -f datanode.yml up -d
+```
\ No newline at end of file
diff --git
a/src/zh/UserGuide/latest/Deployment-and-Maintenance/Docker-Deployment_timecho.md
b/src/zh/UserGuide/latest/Deployment-and-Maintenance/Docker-Deployment_timecho.md
new file mode 100644
index 0000000..9dab598
--- /dev/null
+++
b/src/zh/UserGuide/latest/Deployment-and-Maintenance/Docker-Deployment_timecho.md
@@ -0,0 +1,474 @@
+<!--
+
+ Licensed to the Apache Software Foundation (ASF) under one
+ or more contributor license agreements. See the NOTICE file
+ distributed with this work for additional information
+ regarding copyright ownership. The ASF licenses this file
+ to you under the Apache License, Version 2.0 (the
+ "License"); you may not use this file except in compliance
+ with the License. You may obtain a copy of the License at
+
+ http://www.apache.org/licenses/LICENSE-2.0
+
+ Unless required by applicable law or agreed to in writing,
+ software distributed under the License is distributed on an
+ "AS IS" BASIS, WITHOUT WARRANTIES OR CONDITIONS OF ANY
+ KIND, either express or implied. See the License for the
+ specific language governing permissions and limitations
+ under the License.
+
+-->
+# Docker部署
+
+## 环境准备
+
+### 1. Docker安装
+
+```Bash
+#以ubuntu为例,其他操作系统可以自行搜索安装方法
+#step1: 安装一些必要的系统工具
+sudo apt-get update
+sudo apt-get -y install apt-transport-https ca-certificates curl
software-properties-common
+#step2: 安装GPG证书
+curl -fsSL https://mirrors.aliyun.com/docker-ce/linux/ubuntu/gpg | sudo
apt-key add -
+#step3: 写入软件源信息
+sudo add-apt-repository "deb [arch=amd64]
https://mirrors.aliyun.com/docker-ce/linux/ubuntu $(lsb_release -cs) stable"
+#step4: 更新并安装Docker-CE
+sudo apt-get -y update
+sudo apt-get -y install docker-ce
+#step5: 设置docker开机自启动
+sudo systemctl enable docker
+#step6: 验证docker是否安装成功
+docker --version #显示版本信息,即安装成功
+```
+
+### 2. docker-compose安装
+
+```Bash
+#安装命令
+curl -L
"https://github.com/docker/compose/releases/download/v2.20.0/docker-compose-$(uname
-s)-$(uname -m)" -o /usr/local/bin/docker-compose
+chmod +x /usr/local/bin/docker-compose
+ln -s /usr/local/bin/docker-compose /usr/bin/docker-compose
+#验证是否安装成功
+docker-compose --version #显示版本信息即安装成功
+```
+
+### 3. 安装dmidecode插件
+
+默认情况下,linux服务器应该都已安装,如果没有安装的话,可以使用下面的命令安装。
+
+```Bash
+sudo apt-get install dmidecode
+```
+
+dmidecode 安装后,查找安装路径:`whereis
dmidecode`,这里假设结果为`/usr/sbin/dmidecode`,记住该路径,后面的docker-compose的yml文件会用到。
+
+### 4. 获取IoTDB的容器镜像
+
+关于IoTDB企业版的容器镜像您可联系商务或技术支持获取。
+
+## 单机版部署
+
+本节演示如何部署1C1D的docker单机版。
+
+### 1. load 镜像文件
+
+比如这里获取的IoTDB的容器镜像文件名是:`iotdb-enterprise-1.3.2.3-standalone-docker.tar.gz`
+
+load镜像:
+
+```Bash
+docker load -i iotdb-enterprise-1.3.2.3-standalone-docker.tar.gz
+```
+
+查看镜像:
+
+```Bash
+docker images
+```
+
+
+
+### 2. 创建docker bridge网络
+
+```Bash
+docker network create --driver=bridge --subnet=172.18.0.0/16
--gateway=172.18.0.1 iotdb
+```
+
+### 3. 编写docker-compose的yml文件
+
+这里我们以把IoTDB安装目录和yml文件统一放在`/docker-iotdb` 文件夹下为例:
+
+文件目录结构为:`/docker-iotdb/iotdb`, `/docker-iotdb/docker-compose-standalone.yml `
+
+```Bash
+docker-iotdb:
+├── iotdb #iotdb安装目录
+│── docker-compose-standalone.yml #单机版docker-compose的yml文件
+```
+
+完整的`docker-compose-standalone.yml`内容如下:
+
+```Bash
+version: "3"
+services:
+ iotdb-service:
+ image: iotdb-enterprise:1.3.2.3-standalone #使用的镜像
+ hostname: iotdb
+ container_name: iotdb
+ restart: always
+ ports:
+ - "6667:6667"
+ environment:
+ - cn_internal_address=iotdb
+ - cn_internal_port=10710
+ - cn_consensus_port=10720
+ - cn_seed_config_node=iotdb:10710
+ - dn_rpc_address=iotdb
+ - dn_internal_address=iotdb
+ - dn_rpc_port=6667
+ - dn_internal_port=10730
+ - dn_mpp_data_exchange_port=10740
+ - dn_schema_region_consensus_port=10750
+ - dn_data_region_consensus_port=10760
+ - dn_seed_config_node=iotdb:10710
+ privileged: true
+ volumes:
+ - ./iotdb/activation:/iotdb/activation
+ - ./iotdb/data:/iotdb/data
+ - ./iotdb/logs:/iotdb/logs
+ - /usr/sbin/dmidecode:/usr/sbin/dmidecode:ro
+ - /dev/mem:/dev/mem:ro
+ networks:
+ iotdb:
+ ipv4_address: 172.18.0.6
+networks:
+ iotdb:
+ external: true
+```
+
+### 4. 首次启动
+
+使用下面的命令启动:
+
+```Bash
+cd /docker-iotdb
+docker-compose -f docker-compose-standalone.yml up
+```
+
+由于没有激活,首次启动时会直接退出,属于正常现象,首次启动是为了获取机器码文件,用于后面的激活流程。
+
+
+
+### 5. 申请激活
+
+- 首次启动后,在物理机目录`/docker-iotdb/iotdb/activation`下会生成一个
`system_info`文件,将这个文件拷贝给天谋工作人员。
+
+

+
+- 收到工作人员返回的license文件,将license文件拷贝到`/docker-iotdb/iotdb/activation`文件夹下。
+
+

+
+### 6. 再次启动IoTDB
+
+```Bash
+docker-compose -f docker-compose-standalone.yml up -d
+```
+
+
+
+### 7. 验证部署
+
+- 查看日志,有如下字样,表示启动成功
+
+```Bash
+docker logs -f iotdb-datanode #查看日志命令
+2024-07-19 12:02:32,608 [main] INFO o.a.i.db.service.DataNode:231 -
Congratulations, IoTDB DataNode is set up successfully. Now, enjoy yourself!
+```
+
+
+
+- 进入容器,查看服务运行状态及激活信息
+
+ 查看启动的容器
+
+ ```Bash
+ docker ps
+ ```
+
+

+
+ 进入容器, 通过cli登录数据库, 使用show cluster命令查看服务状态及激活状态
+
+ ```Bash
+ docker exec -it iotdb /bin/bash #进入容器
+ ./start-cli.sh -h iotdb #登录数据库
+ IoTDB> show cluster #查看状态
+ ```
+
+ 可以看到服务都是running,激活状态显示已激活。
+
+

+
+### 8. 映射/conf目录(可选)
+
+后续如果想在物理机中直接修改配置文件,可以把容器中的/conf文件夹映射出来,分三步:
+
+步骤一:拷贝容器中的/conf目录到`/docker-iotdb/iotdb/conf`
+
+```Bash
+docker cp iotdb:/iotdb/conf /docker-iotdb/iotdb/conf
+```
+
+步骤二:在docker-compose-standalone.yml中添加映射
+
+```Bash
+ volumes:
+ - ./iotdb/conf:/iotdb/conf #增加这个/conf文件夹的映射
+ - ./iotdb/activation:/iotdb/activation
+ - ./iotdb/data:/iotdb/data
+ - ./iotdb/logs:/iotdb/logs
+ - /usr/sbin/dmidecode:/usr/sbin/dmidecode:ro
+ - /dev/mem:/dev/mem:ro
+```
+
+步骤三:重新启动IoTDB
+
+```Bash
+docker-compose -f docker-compose-standalone.yml up -d
+```
+
+## 集群版部署
+
+本小节描述如何手动部署包括3个ConfigNode和3个DataNode的实例,即通常所说的3C3D集群。
+
+<div align="center">
+ <img
src="https://alioss.timecho.com/docs/img/%E9%9B%86%E7%BE%A4%E9%83%A8%E7%BD%B2.png";
alt="" style="width: 60%;"/>
+</div>
+
+**注意:集群版目前只支持host网络和overlay 网络,不支持bridge网络。**
+
+下面以host网络为例演示如何部署3C3D集群。
+
+### 1. 设置主机名
+
+假设现在有3台linux服务器,IP地址和服务角色分配如下:
+
+| 节点ip | 主机名 | 服务 |
+| ----------- | ------- | -------------------- |
+| 192.168.1.3 | iotdb-1 | ConfigNode、DataNode |
+| 192.168.1.4 | iotdb-2 | ConfigNode、DataNode |
+| 192.168.1.5 | iotdb-3 | ConfigNode、DataNode |
+
+在3台机器上分别配置主机名,设置主机名需要在目标服务器上配置/etc/hosts,使用如下命令:
+
+```Bash
+echo "192.168.1.3 iotdb-1" >> /etc/hosts
+echo "192.168.1.4 iotdb-2" >> /etc/hosts
+echo "192.168.1.5 iotdb-3" >> /etc/hosts
+```
+
+### 2. load镜像文件
+
+比如获取的IoTDB的容器镜像文件名是:`iotdb-enterprise-1.3.2.3-standalone-docker.tar.gz`
+
+在3台服务器上分别执行load镜像命令:
+
+```Bash
+docker load -i iotdb-enterprise-1.3.2.3-standalone-docker.tar.gz
+```
+
+查看镜像:
+
+```Bash
+docker images
+```
+
+
+
+### 3. 编写docker-compose的yml文件
+
+这里我们以把IoTDB安装目录和yml文件统一放在/docker-iotdb文件夹下为例:
+
+文件目录结构为:`/docker-iotdb/iotdb`,`/docker-iotdb/confignode.yml`,`/docker-iotdb/datanode.yml`
+
+```Bash
+docker-iotdb:
+├── confignode.yml #confignode的yml文件
+├── datanode.yml #datanode的yml文件
+└── iotdb #IoTDB安装目录
+```
+
+在每台服务器上都要编写2个yml文件,即`confignode.yml`和`datanode.yml`,yml示例如下:
+
+**confignode.yml:**
+
+```Bash
+#confignode.yml
+version: "3"
+services:
+ iotdb-confignode:
+ image: iotdb-enterprise:1.3.2.3-standalone #使用的镜像
+ hostname: iotdb-1|iotdb-2|iotdb-3 #根据实际情况选择,三选一
+ container_name: iotdb-confignode
+ command: ["bash", "-c", "entrypoint.sh confignode"]
+ restart: always
+ environment:
+ - cn_internal_address=iotdb-1|iotdb-2|iotdb-3 #根据实际情况选择,三选一
+ - cn_internal_port=10710
+ - cn_consensus_port=10720
+ - cn_seed_config_node=iotdb-1:10710 #默认第一台为seed节点
+ - schema_replication_factor=3 #元数据副本数
+ - data_replication_factor=2 #数据副本数
+ privileged: true
+ volumes:
+ - ./iotdb/activation:/iotdb/activation
+ - ./iotdb/data:/iotdb/data
+ - ./iotdb/logs:/iotdb/logs
+ - /usr/sbin/dmidecode:/usr/sbin/dmidecode:ro
+ - /dev/mem:/dev/mem:ro
+ network_mode: "host" #使用host网络
+```
+
+**datanode.yml:**
+
+```Bash
+#datanode.yml
+version: "3"
+services:
+ iotdb-datanode:
+ image: iotdb-enterprise:1.3.2.3-standalone #使用的镜像
+ hostname: iotdb-1|iotdb-2|iotdb-3 #根据实际情况选择,三选一
+ container_name: iotdb-datanode
+ command: ["bash", "-c", "entrypoint.sh datanode"]
+ restart: always
+ ports:
+ - "6667:6667"
+ privileged: true
+ environment:
+ - dn_rpc_address=iotdb-1|iotdb-2|iotdb-3 #根据实际情况选择,三选一
+ - dn_internal_address=iotdb-1|iotdb-2|iotdb-3 #根据实际情况选择,三选一
+ - dn_seed_config_node=iotdb-1:10710 #默认第1台为seed节点
+ - dn_rpc_port=6667
+ - dn_internal_port=10730
+ - dn_mpp_data_exchange_port=10740
+ - dn_schema_region_consensus_port=10750
+ - dn_data_region_consensus_port=10760
+ - schema_replication_factor=3 #元数据副本数
+ - data_replication_factor=2 #数据副本数
+ volumes:
+ - ./iotdb/activation:/iotdb/activation
+ - ./iotdb/data:/iotdb/data
+ - ./iotdb/logs:/iotdb/logs
+ - /usr/sbin/dmidecode:/usr/sbin/dmidecode:ro
+ - /dev/mem:/dev/mem:ro
+ network_mode: "host" #使用host网络
+```
+
+### 4. 首次启动confignode
+
+先在3台服务器上分别启动confignode, 用来获取机器码,注意启动顺序,先启动第1台iotdb-1,再启动iotdb-2和iotdb-3。
+
+```Bash
+cd /docker-iotdb
+docker-compose -f confignode.yml up -d #后台启动
+```
+
+### 5. 申请激活
+
+-
首次启动3个confignode后,在每个物理机目录`/docker-iotdb/iotdb/activation`下都会生成一个`system_info`文件,将3个服务器的`system_info`文件拷贝给天谋工作人员;
+
+

+
+- 将3个license文件分别放入对应的ConfigNode节点的`/docker-iotdb/iotdb/activation`文件夹下;
+
+

+
+- license放入对应的activation文件夹后,confignode会自动激活,不用重启confignode
+
+### 6. 启动datanode
+
+在3台服务器上分别启动datanode
+
+```Bash
+cd /docker-iotdb
+docker-compose -f datanode.yml up -d #后台启动
+```
+
+
+
+### 7. 验证部署
+
+- 查看日志,有如下字样,表示datanode启动成功
+
+ ```Bash
+ docker logs -f iotdb-datanode #查看日志命令
+ 2024-07-20 16:50:48,937 [main] INFO o.a.i.db.service.DataNode:231 -
Congratulations, IoTDB DataNode is set up successfully. Now, enjoy yourself!
+ ```
+
+ 
+
+- 进入任意一个容器,查看服务运行状态及激活信息
+
+ 查看启动的容器
+
+ ```Bash
+ docker ps
+ ```
+
+

+
+ 进入容器,通过cli登录数据库,使用`show cluster`命令查看服务状态及激活状态
+
+ ```Bash
+ docker exec -it iotdb-datanode /bin/bash #进入容器
+ ./start-cli.sh -h iotdb-1 #登录数据库
+ IoTDB> show cluster #查看状态
+ ```
+
+ 可以看到服务都是running,激活状态显示已激活。
+
+

+
+### 8. 映射/conf目录(可选)
+
+后续如果想在物理机中直接修改配置文件,可以把容器中的/conf文件夹映射出来,分三步:
+
+步骤一:在3台服务器中分别拷贝容器中的/conf目录到`/docker-iotdb/iotdb/conf`
+
+```Bash
+docker cp iotdb-confignode:/iotdb/conf /docker-iotdb/iotdb/conf
+或者
+docker cp iotdb-datanode:/iotdb/conf /docker-iotdb/iotdb/conf
+```
+
+步骤二:在3台服务器的`confignode.yml`和`datanode.yml`中添加/conf目录映射
+
+```Bash
+#confignode.yml
+ volumes:
+ - ./iotdb/conf:/iotdb/conf #增加这个/conf文件夹的映射
+ - ./iotdb/activation:/iotdb/activation
+ - ./iotdb/data:/iotdb/data
+ - ./iotdb/logs:/iotdb/logs
+ - /usr/sbin/dmidecode:/usr/sbin/dmidecode:ro
+ - /dev/mem:/dev/mem:ro
+
+#datanode.yml
+ volumes:
+ - ./iotdb/conf:/iotdb/conf #增加这个/conf文件夹的映射
+ - ./iotdb/activation:/iotdb/activation
+ - ./iotdb/data:/iotdb/data
+ - ./iotdb/logs:/iotdb/logs
+ - /usr/sbin/dmidecode:/usr/sbin/dmidecode:ro
+ - /dev/mem:/dev/mem:ro
+```
+
+步骤三:在3台服务器上重新启动IoTDB
+
+```Bash
+cd /docker-iotdb
+docker-compose -f confignode.yml up -d
+docker-compose -f datanode.yml up -d
+```
\ No newline at end of file
diff --git
a/src/zh/UserGuide/latest/Deployment-and-Maintenance/Docker-Install.md
b/src/zh/UserGuide/latest/stage/Docker-Install.md
similarity index 100%
rename from src/zh/UserGuide/latest/Deployment-and-Maintenance/Docker-Install.md
rename to src/zh/UserGuide/latest/stage/Docker-Install.md