This is an automated email from the ASF dual-hosted git repository.

paulirwin pushed a commit to branch docs/beta00018
in repository https://gitbox.apache.org/repos/asf/lucenenet.git
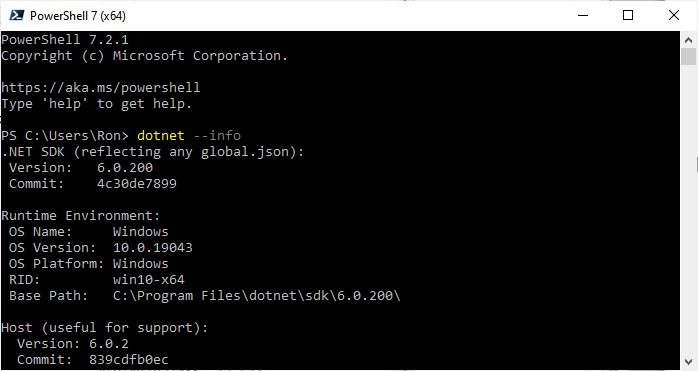
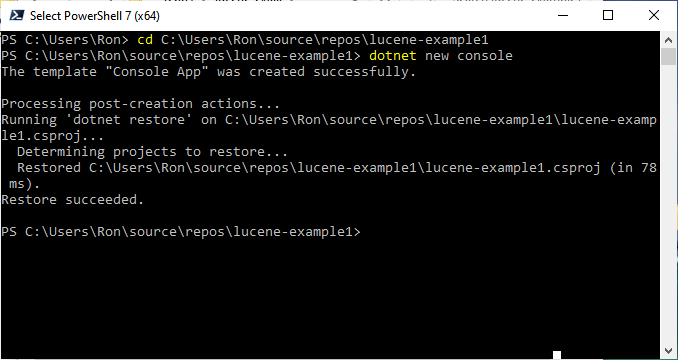
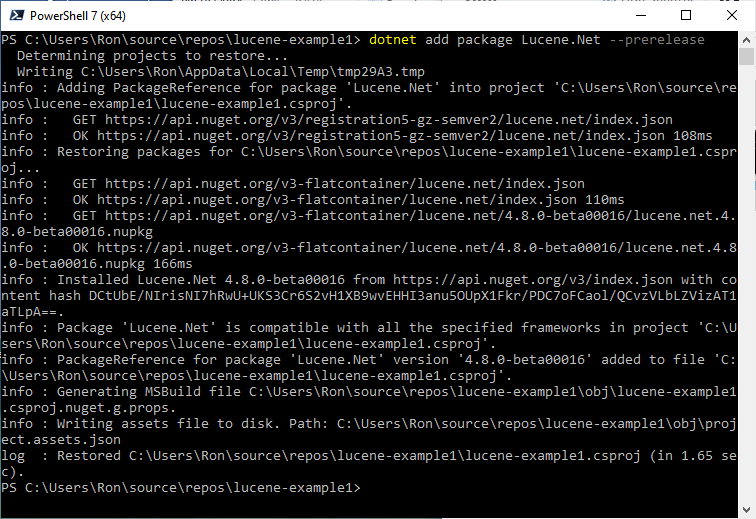
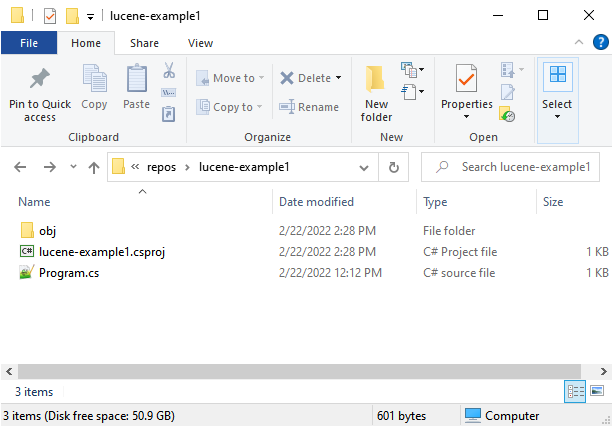
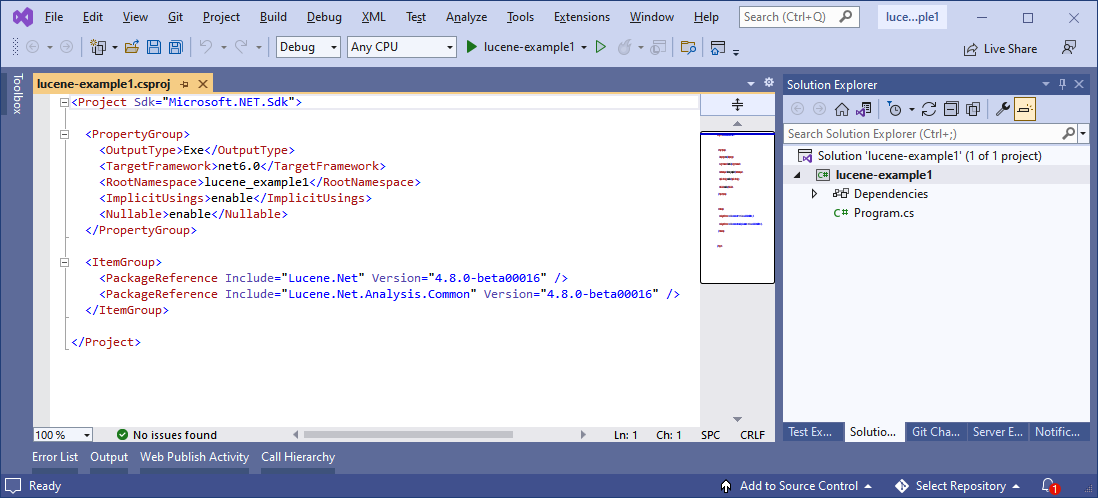
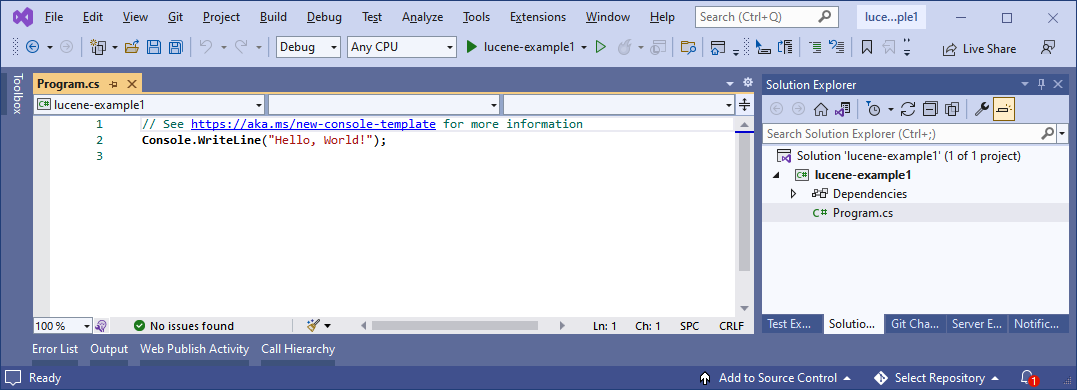
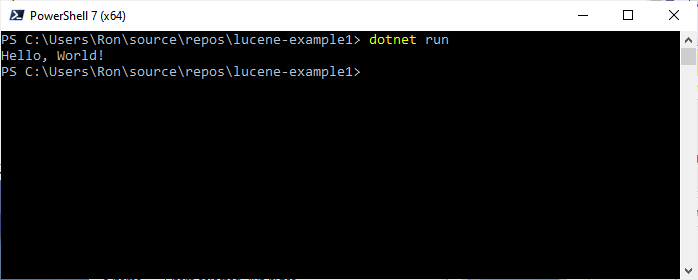
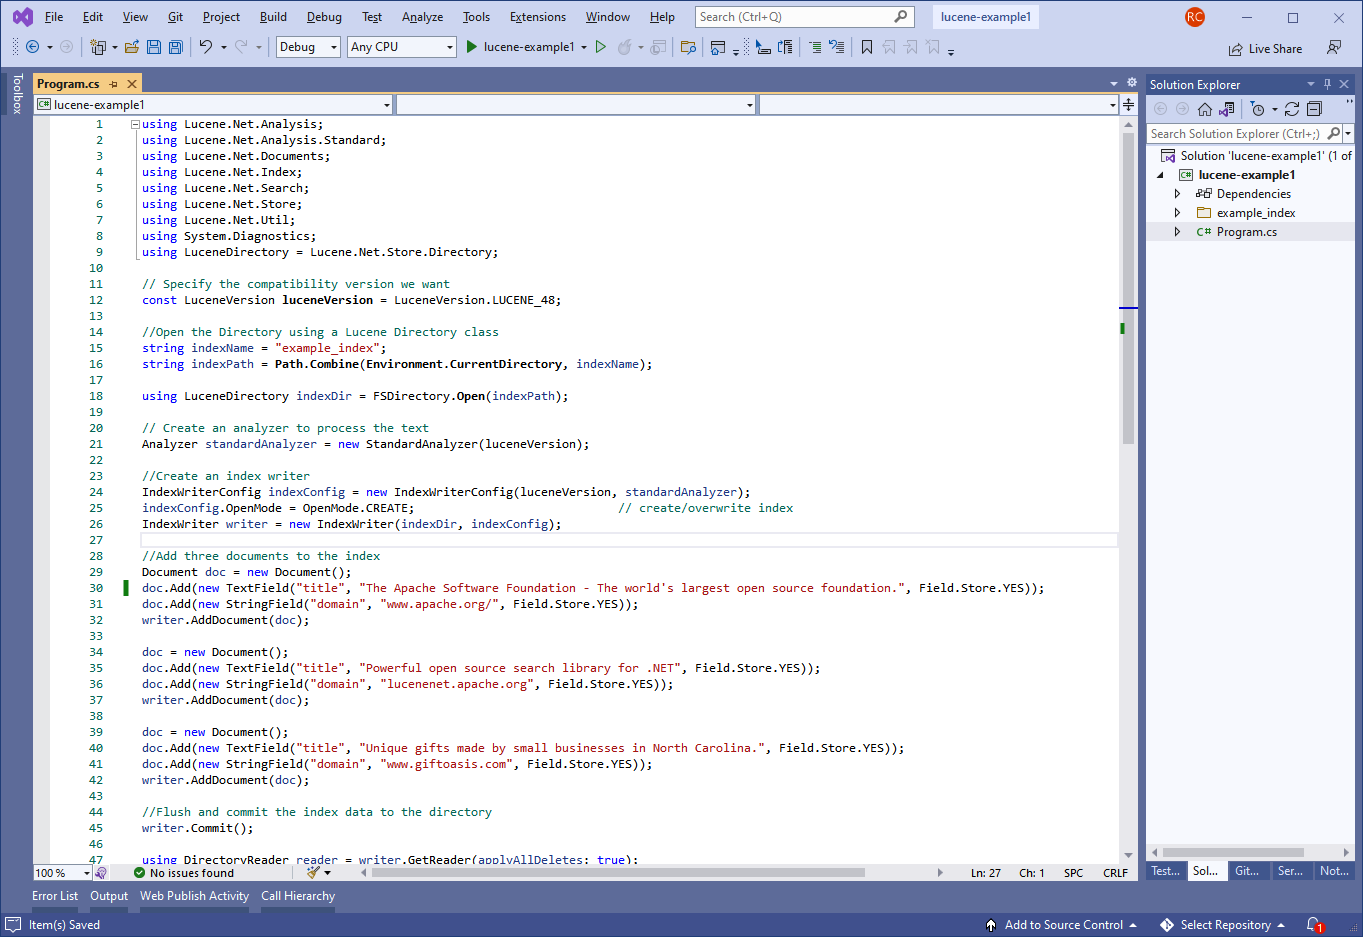
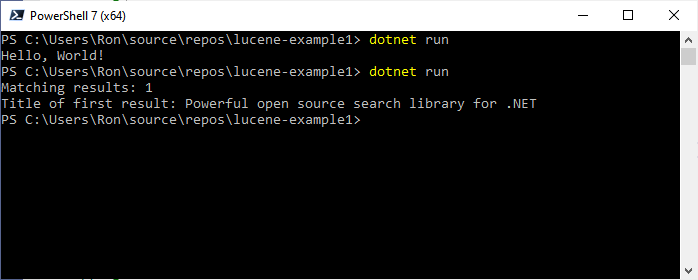
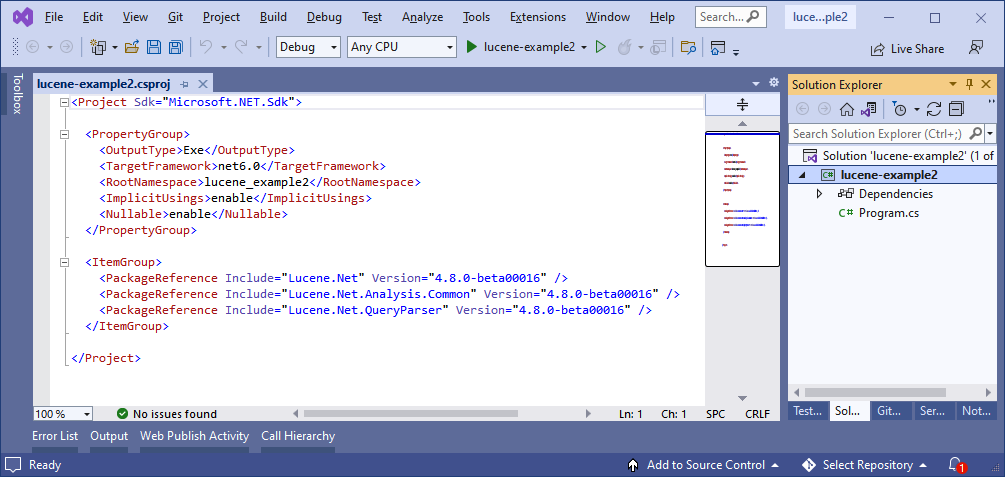
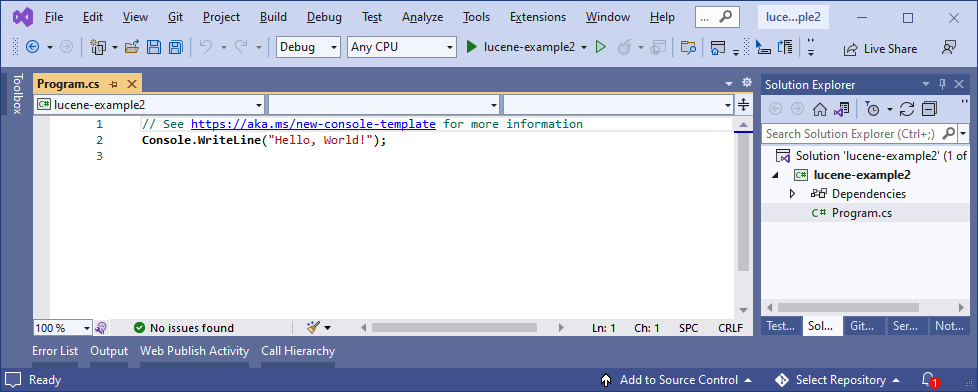
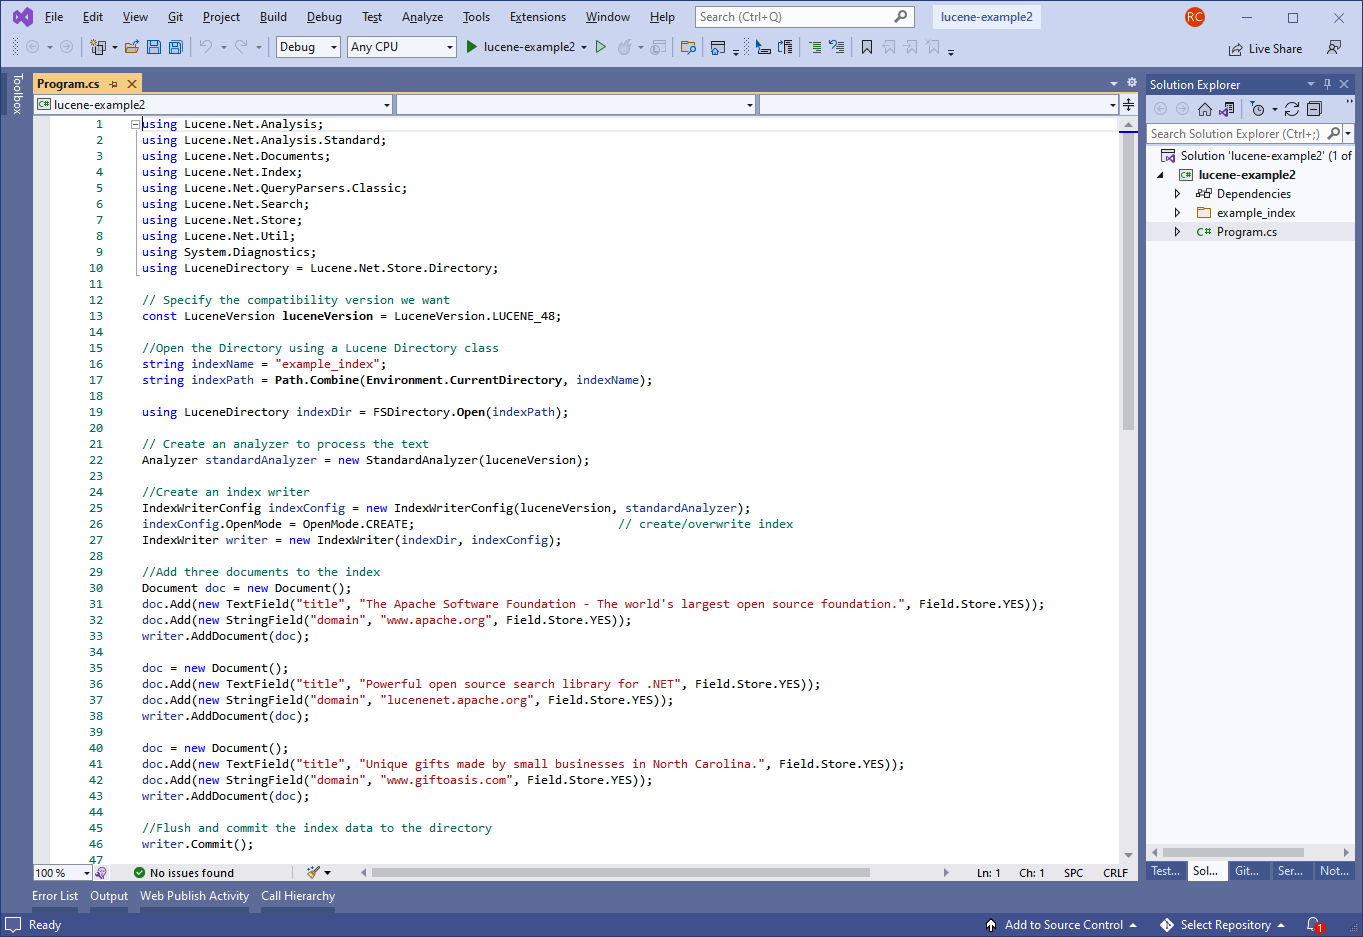
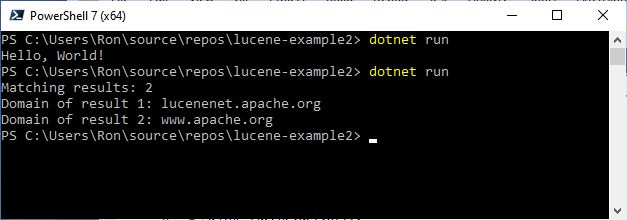
commit c0aec333190a301462f82ecb2412f3161e8f9f6e
Author: Paul Irwin <[email protected]>
AuthorDate: Thu Nov 21 07:40:12 2024 -0700

    Websites docs changes for dropping .NET 6
---
 websites/apidocs/apiSpec/core/Lucene_Net_Codecs.md | 12 ++---
 websites/site/quick-start/tutorial.md              | 58 +++++++++++-----------
 2 files changed, 35 insertions(+), 35 deletions(-)

diff --git a/websites/apidocs/apiSpec/core/Lucene_Net_Codecs.md
b/websites/apidocs/apiSpec/core/Lucene_Net_Codecs.md
index c709092a6..73769dd5e 100644
--- a/websites/apidocs/apiSpec/core/Lucene_Net_Codecs.md
+++ b/websites/apidocs/apiSpec/core/Lucene_Net_Codecs.md
@@ -31,7 +31,7 @@ Codecs API: API for customization of the encoding and
structure of the index.
 * FieldInfos - see <xref:Lucene.Net.Codecs.FieldInfosFormat>
 * SegmentInfo - see <xref:Lucene.Net.Codecs.SegmentInfoFormat>
 * Norms - see <xref:Lucene.Net.Codecs.NormsFormat>
-* Live documents - see <xref:Lucene.Net.Codecs.LiveDocsFormat>
+* Live documents - see <xref:Lucene.Net.Codecs.LiveDocsFormat>

 For some concrete implementations beyond Lucene's official index format, see
the [Codecs module](../codecs/overview.html).

@@ -39,7 +39,7 @@ Codecs are identified by name through the
<xref:Lucene.Net.Codecs.ICodecFactory>

 ```cs
 // By default, the name will be "My" because the "Codec" suffix is removed
-public class MyCodec : Codec
+public class MyCodec : Codec
 {
 }
 ```
@@ -49,7 +49,7 @@ public class MyCodec : Codec

 To override the default codec name, decorate the custom codec with the
<xref:Lucene.Net.Codecs.CodecNameAttribute>.

-The <xref:Lucene.Net.Codecs.CodecNameAttribute> can be used to set the name to
that of a built-in codec to override its registration in the
<xref:Lucene.Net.Codecs.DefaultCodecFactory>.
+The <xref:Lucene.Net.Codecs.CodecNameAttribute> can be used to set the name to
that of a built-in codec to override its registration in the
<xref:Lucene.Net.Codecs.DefaultCodecFactory>.

 ```cs
 [CodecName("MyCodec")] // Sets the codec name explicitly
@@ -110,7 +110,7 @@ Codec.SetCodecFactory(services.GetService<ICodecFactory>());
 If your application is not using dependency injection, you can register a
custom codec by adding your codec at start up.

 ```cs
-Codec.SetCodecFactory(new DefaultCodecFactory {
+Codec.SetCodecFactory(new DefaultCodecFactory {
     CustomCodecTypes = new Type[] { typeof(MyCodec) }
 });
 ```
@@ -178,7 +178,7 @@ The <xref:Lucene.Net.TestFramework> library contains
specialized classes to mini
 > See [Unit testing C# with NUnit and .NET
 > Core](https://docs.microsoft.com/en-us/dotnet/core/testing/unit-testing-with-nunit)
 >  for detailed instructions on how to set up a class library to use with
 > NUnit.

 > [!NOTE]
-> .NET Standard is not an executable target. Tests will not run unless you
target a framework such as `net6.0` or `net48`.
+> .NET Standard is not an executable target. Tests will not run unless you
target a framework such as `net8.0` or `net48`.

 Here is an example project file for .NET 8 for testing a project named
`MyCodecs.csproj`.

@@ -242,7 +242,7 @@ namespace ExampleLuceneNetTestFramework
 }
 ```

-The <xref:Lucene.Net.Index.BasePostingsFormatTestCase> class includes a
barrage of 8 tests that can now be run using your favorite test runner, such as
Visual Studio Test Explorer.
+The <xref:Lucene.Net.Index.BasePostingsFormatTestCase> class includes a
barrage of 8 tests that can now be run using your favorite test runner, such as
Visual Studio Test Explorer.

  - TestDocsAndFreqs
  - TestDocsAndFreqsAndPositions
diff --git a/websites/site/quick-start/tutorial.md
b/websites/site/quick-start/tutorial.md
index 2597d296a..a53ed95a0 100644
--- a/websites/site/quick-start/tutorial.md
+++ b/websites/site/quick-start/tutorial.md
@@ -23,7 +23,7 @@ However you are totally free to use [Visual
Studio](https://visualstudio.microso
 First you must install the .NET Core SDK, if it's not already installed on
your machine. The .NET Core SDK contains the .NET runtime, .NET Libraries and
the .NET CLI. If you haven't installed it yet, download it from
https://dotnet.microsoft.com/en-us/download and run the installer. It's a
pretty straightforward process. I'll be using the **.NET 6.0 SDK** in this
tutorial.

 > [!NOTE]
-> The C# code we present **requires the .NET 6.0 SDK or later**.  However,
with a few simple modifications it can run on older SDKs including 4.x. To do
that, the Program.cs file will need to have a namespace, Program class and a
static void main method.  See Microsoft docs
[here](https://docs.microsoft.com/en-us/dotnet/core/tutorials/with-visual-studio?pivots=dotnet-5-0#code-try-3)
 for details.  You will also need to add [braces to the using
statements](https://docs.microsoft.com/en-us/ [...]
+> The C# code we present **requires the .NET 6.0 SDK or later**.  However,
with a few simple modifications it can run on older SDKs including 4.x. To do
that, the Program.cs file will need to have a namespace, Program class and a
static void main method.  See Microsoft docs
[here](https://docs.microsoft.com/en-us/dotnet/core/tutorials/with-visual-studio?pivots=dotnet-5-0#code-try-3)
 for details.  You will also need to add [braces to the using
statements](https://docs.microsoft.com/en-us/ [...]

 ## Download and Install PowerShell
 PowerShell is cross platform and runs everywhere .NET runs, so we will be
using PowerShell for all of our command line work. If you don't already have
PowerShell installed you can download and find instructions for installing it
on Window, Unix or Mac on this [Installing
PowerShell](https://docs.microsoft.com/en-us/powershell/scripting/install/installing-powershell)
 page. In my examples I'm using PowerShell 7.2 but the specific version
probably doesn't make a difference.
@@ -36,7 +36,7 @@ Let's use PowerShell now to verify that you have the .NET SDK
with the .NET CLI
 This command will show the latest version of the .NET SDK installed and also
show a list of all versions installed. If the .NET SDK is not installed this
the command will return an error indicating the command was not found.

 Below I show the top of the results for the `dotnet --info` command ran on my
machine. You can see I'm using .NET SDK 6.0.200 on windows for this demo. In my
case I had to scroll the screen up to see this info since I have many versions
of the .NET SDK installed and it shows info on each version which scrolled the
info about the latest version off the screen. Your latest version will likely
be different than mine and perhaps you may be running on Unix or Mac. That's
fine. But remember ** [...]
-
+
 <img
src='https://lucenenet.apache.org/images/quick-start/tutorial/power-shell01.png'>

 Now that our prerequisites are installed, we are ready to get started with our
first example of using Lucene.NET.
@@ -57,7 +57,7 @@ In my case, since I'm on Windows, I'll create the directory
using the GUI and us
 To create a C# console application project in the current directory, type this
command in PowerShell:

 `dotnet new console`
-
+
 <img
src='https://lucenenet.apache.org/images/quick-start/tutorial/power-shell03.png'>

 ### Add NuGet References
@@ -65,7 +65,7 @@ We need to add references from our project to the Lucene.NET
Nuget packages we n

 `dotnet add package Lucene.Net --prerelease`

-
+
 <img
src='https://lucenenet.apache.org/images/quick-start/tutorial/power-shell04.png'>

 And now add the 2nd Nuget package by executing this command in PowerShell:
@@ -77,14 +77,14 @@ And now add the 2nd Nuget package by executing this command
in PowerShell:
 At this point, our directory has two files in it plus an obj directory with
some additional files.  We are mostly concerned with the lucene-example1.csproj
project file and the Program.cs C# code file.

 Our directory looks like this:
-
+
 <img
src='https://lucenenet.apache.org/images/quick-start/tutorial/directory-files-example1.png'>

 ### Viewing the Two Main files
 From here on out, you can use your favorite editor to view and edit files as
we walk through the rest of the example.  I'll be using Visual Studio 2022 on
Windows, but you could just as easily use VIM, Visual Studio Code or any other
editor and even be doing that on Ubuntu on a Raspberry Pi if you like.
Remember, Lucene.NET and the .NET framework both support a wide variety of
platforms.

 Below is what the project file looks like which we created using the dotnet
CLI. Notice that it contains package references to the two Lucene.NET Nuget
packages we specified.
-
+
 <img
src='https://lucenenet.apache.org/images/quick-start/tutorial/example1.csproj.png'>

 Here is that file's contents:
@@ -94,7 +94,7 @@ Here is that file's contents:

   <PropertyGroup>
     <OutputType>Exe</OutputType>
-    <TargetFramework>net6.0</TargetFramework>
+    <TargetFramework>net8.0</TargetFramework>
     <RootNamespace>lucene_example1</RootNamespace>
     <ImplicitUsings>enable</ImplicitUsings>
     <Nullable>enable</Nullable>
@@ -110,7 +110,7 @@ Here is that file's contents:


 Now let's look at the `Program.cs` file that got generated.  It looks like:
-
+
 <img
src='https://lucenenet.apache.org/images/quick-start/tutorial/program01.png'>


@@ -122,7 +122,7 @@ If you are using Visual Studio or Visual Studio Code you
can just hit F5 to run
 `dotnet run`

 This will run the project from the PowerShell current directory after it does
a restore of the Nuget packages for the project.
-
+
 <img
src='https://lucenenet.apache.org/images/quick-start/tutorial/hello-world-example1.png'>

 And there you go.  You can see in the window above that we get the output we
expected.
@@ -144,7 +144,7 @@ using OpenMode = Lucene.Net.Index.OpenMode;
 using Document = Lucene.Net.Documents.Document;

 // Specify the compatibility version we want
-const LuceneVersion luceneVersion = LuceneVersion.LUCENE_48;
+const LuceneVersion luceneVersion = LuceneVersion.LUCENE_48;

 //Open the Directory using a Lucene Directory class
 string indexName = "example_index";
@@ -152,7 +152,7 @@ string indexPath =
Path.Combine(Environment.CurrentDirectory, indexName);

 using LuceneDirectory indexDir = FSDirectory.Open(indexPath);

-//Create an analyzer to process the text
+//Create an analyzer to process the text
 Analyzer standardAnalyzer = new StandardAnalyzer(luceneVersion);

 //Create an index writer
@@ -195,7 +195,7 @@ Console.WriteLine($"Title of first result: {title}");
 ```

 > [!WARNING]
-> As mentioned earlier, if you are not running .NET 6.0 SDK or later you will
need to modify the above code in the following two ways: 1) Program.cs file
will need to have a namespace, Program class and a static void main method.
See Microsoft docs
[here](https://docs.microsoft.com/en-us/dotnet/core/tutorials/with-visual-studio?pivots=dotnet-5-0#code-try-3)
 for details; and 2) you will need to add [braces to the using
statements](https://docs.microsoft.com/en-us/dotnet/csharp/language-r [...]
+> As mentioned earlier, if you are not running .NET 6.0 SDK or later you will
need to modify the above code in the following two ways: 1) Program.cs file
will need to have a namespace, Program class and a static void main method.
See Microsoft docs
[here](https://docs.microsoft.com/en-us/dotnet/core/tutorials/with-visual-studio?pivots=dotnet-5-0#code-try-3)
 for details; and 2) you will need to add [braces to the using
statements](https://docs.microsoft.com/en-us/dotnet/csharp/language-r [...]

 ### Code Walkthrough
 Before running the code let's talk about what it does.
@@ -204,7 +204,7 @@ The using declarations at the top of the file specify the
various namespaces we

  ```c#
 // Specify the compatibility version we want
-const LuceneVersion luceneVersion = LuceneVersion.LUCENE_48;
+const LuceneVersion luceneVersion = LuceneVersion.LUCENE_48;

 //Open the Directory using a Lucene Directory class
 string indexName = "example_index";
@@ -215,7 +215,7 @@ using LuceneDirectory indexDir =
FSDirectory.Open(indexPath);

 Then in the next block we create an `IndexWriter` that will use our
`LuceneDirectory`. The `IndexWriter` is a important class in Lucene.NET and is
used to write documents to the Index (among other things).

-The `IndexWriter` will create our subdirectory for us since it doesn't yet
exist and it will create the index since it also doesn't yet exist.  By using
`OpenMode.CREATE` we are telling Lucene.NET that we want to recreate the index
if it already exists.  This works great for a demo like this since every time
the console app is ran we will be recreating our LuceneIndex which means we
will get the same output each time.
+The `IndexWriter` will create our subdirectory for us since it doesn't yet
exist and it will create the index since it also doesn't yet exist.  By using
`OpenMode.CREATE` we are telling Lucene.NET that we want to recreate the index
if it already exists.  This works great for a demo like this since every time
the console app is ran we will be recreating our LuceneIndex which means we
will get the same output each time.

 ```c#
 //Create an index writer
@@ -281,12 +281,12 @@ Console.WriteLine($"Title of first result: {title}");

 ### View of the Project.cs file with Our Code
 The `Program.cs` file should now look something like this in your editor:
-
+
 <img
src='https://lucenenet.apache.org/images/quick-start/tutorial/example1-new-program.cs.png'>

 ### Run the Lucene.NET Code
 So now you can hit F5 in Visual Studio or VS Code or you can execute `dotnet
run` in PowerShell to see the code run and to see if it outputs what we expect.
-
+
 <img
src='https://lucenenet.apache.org/images/quick-start/tutorial/run-example1.png'>

 And in the above screenshot we can see that the 2nd time we executed `dotnet
run` (ie. after we modified the Program.cs file, out output says:
@@ -297,7 +297,7 @@ Title of first result: Powerful open source search library
for .NET
 This is exactly what we would expect.


-### Conclusion - Example 1
+### Conclusion - Example 1
 While this example is not particularly complicated, it will get you started.
It provides fully working code that uses Lucne.NET that you now understand.

 When looking at this code it's pretty easy to imagine how one might use a
while loop instead of inline code for adding documents and how one could
perhaps add 10,000 documents (or a million documents) instead of just three.
And it's pretty easy to imagine how one would add several fields per document
rather then just two.
@@ -310,7 +310,7 @@ Then move onto the next example that demonstrates full text
search.
 We are going to create a console application that uses Lucene.NET to index
three documents that each have two fields and then the app will search those
docs on a certain field doing an full text search and output some info about
the results.

 This example assumes you did Example 1 so:
-1.     You already have the .NET SDK installed,
+1.     You already have the .NET SDK installed,
 2.     You already have PowerShell installed,
 3.     You know how to create a C# console application project,
 4.     You are familiar with the Example 1 code.
@@ -337,7 +337,7 @@ Technically the line above to `dotnet add package
Lucene.Net --prerelease` is no

 ### View the Project Files
 Just like in the prior example the project folder will have two files and an
obj directory with some files.  Now use your favorite editor to view the
project's .proj file. It should look like this:
-
+
 <img
src='https://lucenenet.apache.org/images/quick-start/tutorial/example2.csproj.png'>

 Here is that file's contents:
@@ -347,7 +347,7 @@ Here is that file's contents:

   <PropertyGroup>
     <OutputType>Exe</OutputType>
-    <TargetFramework>net6.0</TargetFramework>
+    <TargetFramework>net8.0</TargetFramework>
     <RootNamespace>lucene_example2</RootNamespace>
     <ImplicitUsings>enable</ImplicitUsings>
     <Nullable>enable</Nullable>
@@ -364,12 +364,12 @@ Here is that file's contents:
 ```

 And the `Program.cs` file that got generated will look like this again:
-
+
 <img
src='https://lucenenet.apache.org/images/quick-start/tutorial/program02.png'>

 ### Run the App
 If you are using Visual Studio or VS Code you can hit F5 to run the app.  I
will execute `dotnet run` in PowerShell to run it:
-
+
 <img
src='https://lucenenet.apache.org/images/quick-start/tutorial/hello-world-example2.png'>

 And we can see it output Hello World! Just as it did in Example 1.
@@ -398,7 +398,7 @@ string indexPath =
Path.Combine(Environment.CurrentDirectory, indexName);

 using LuceneDirectory indexDir = FSDirectory.Open(indexPath);

-// Create an analyzer to process the text
+// Create an analyzer to process the text
 Analyzer standardAnalyzer = new StandardAnalyzer(luceneVersion);

 //Create an index writer
@@ -455,7 +455,7 @@ As you might guess we have an additional using declaration
`using Lucene.Net.Que

 We are creating a `LuceneDirectory` and `IndexWriter` the same way and we are
adding the same documents and then committing them.   All stuff we saw in
Example1.  Also in this example we get our index reader and searcher the same
way we did in the last example.

-**But** the way we query back documents in this example is different.
+**But** the way we query back documents in this example is different.

 This time around, instead of using a `TermQuery` to do an exact match search,
have these two lines of code:

@@ -466,7 +466,7 @@ Query query = parser.Parse("open source");

 These lines allow us to create a query that will perform a full text search.
This type of search is similar to what you are use to when doing a google or
bing search.

-What we are saying in these two lines is that we want to create a query that
will search the `title` field of our documents and we want back document that
contain "open source" or just "open" or just "source" and we want them sorted
by how well they match our "open source" query.
+What we are saying in these two lines is that we want to create a query that
will search the `title` field of our documents and we want back document that
contain "open source" or just "open" or just "source" and we want them sorted
by how well they match our "open source" query.

 So when the line of code below runs, Lucene.NET will score each of our docs
that match the query and return the top 3 matching documents sorted by score.

@@ -491,17 +491,17 @@ for (int i = 0; i < topDocs.TotalHits; i++)

 ### View of the Project.cs file with Our Code
 The `Program.cs` file should now look something like this in your editor:
-
+
 <img
src='https://lucenenet.apache.org/images/quick-start/tutorial/example2-new-program.cs.png'>

 ### Run the Lucene.NET Code
 So now you can hit F5 in Visual Studio or VS Code or you can execute `dotnet
run` in PowerShell to see the code run and to see if it outputs what we expect.
-
+
 <img
src='https://lucenenet.apache.org/images/quick-start/tutorial/run-example2.png'>

-If you go back and review the contents of the `title` field for each document
you will see the output from running the code does indeed return the only two
documents that that contain "open source" in the title field.
+If you go back and review the contents of the `title` field for each document
you will see the output from running the code does indeed return the only two
documents that that contain "open source" in the title field.

-### Conclusion - Example 2
+### Conclusion - Example 2
 In this Example we saw Lucene.NET's full text search feature.  But we only
scratched the surface.

 It's the responsibility of the analyzer to tokenize the text and it's the
tokens that are stored in the index as terms.  In our case we used the
`StandardAnalyzer` which removes punctuation, lower cases the text so it's not
case sensitive and removes stop words (common words like "a" "an" and "the").