alpinegizmo commented on a change in pull request #16:
URL: https://github.com/apache/flink-playgrounds/pull/16#discussion_r498114079
########## File path: pyflink-walkthrough/README.md ########## @@ -0,0 +1,140 @@ +# pyflink-walkthrough + +## Background + +In this playground, you will learn how to build and run an end-to-end PyFlink pipeline for data analytics, covering the following steps: + +* Reading data from a Kafka source; +* Creating data using a [UDF](https://ci.apache.org/projects/flink/flink-docs-release-1.11/dev/python/table-api-users-guide/udfs/python_udfs.html); +* Performing a simple aggregation over the source data; +* Writing the results to Elasticsearch and visualizing them in Kibana. + +The environment is based on Docker Compose, so the only requirement is that you have [Docker](https://docs.docker.com/get-docker/) +installed in your machine. + +### Kafka +You will be using Kafka to store sample input data about payment transactions. A simple data generator [generate_source_data.py](generator/generate_source_data.py) is provided to +continuously write new records to the `payment_msg` Kafka topic. Each record is structured as follows: + +`{"createTime": "2020-08-12 06:29:02", "orderId": 1597213797, "payAmount": 28306.44976403719, "payPlatform": 0, "provinceId": 4}` + +* `createTime`: The creation time of the transaction. +* `orderId`: The id of the current transaction. +* `payAmount`: The amount being paid with this transaction. +* `payPlatform`: The platform used to create this payment: pc or mobile. +* `provinceId`: The id of the province for the user. + +You can use the following command to read data from the Kafka topic and check whether it's generated correctly: +```shell script +$ docker-compose exec kafka kafka-console-consumer.sh --bootstrap-server kafka:9092 --topic payment_msg +{"createTime":"2020-07-27 09:25:32.77","orderId":1595841867217,"payAmount":7732.44,"payPlatform":0,"provinceId":3} +{"createTime":"2020-07-27 09:25:33.231","orderId":1595841867218,"payAmount":75774.05,"payPlatform":0,"provinceId":3} +{"createTime":"2020-07-27 09:25:33.72","orderId":1595841867219,"payAmount":65908.55,"payPlatform":0,"provinceId":0} +{"createTime":"2020-07-27 09:25:34.216","orderId":1595841867220,"payAmount":15341.11,"payPlatform":0,"provinceId":1} +{"createTime":"2020-07-27 09:25:34.698","orderId":1595841867221,"payAmount":37504.42,"payPlatform":0,"provinceId":0} +``` +You can also create a new topic by executing the following command: +```shell script +$ docker-compose exec kafka kafka-topics.sh --bootstrap-server kafka:9092 --create --topic <YOUR-TOPIC-NAME> --partitions 8 --replication-factor 1 +``` + +### PyFlink + +The transaction data will be processed with PyFlink using the Python script [payment_msg_processing.py](payment_msg_proccessing.py). +This script will first map the `provinceId` in the input records to its corresponding province name using a Python UDF, +and then compute the sum of the transaction amounts for each province. + +### ElasticSearch + +ElasticSearch is used to store the results and to provide an efficient query service. + +### Kibana + +Kibana is an open source data visualization dashboard for ElasticSearch. You will use it to visualize +the results of your PyFlink pipeline. + +## Setup + +As mentioned, the environment for this walkthrough is based on Docker Compose; It uses a custom image +to spin up Flink (JobManager+TaskManager), Kafka+Zookeeper, the data generator, and Elasticsearch+Kibana containers. + +You can find the [docker-compose.yaml](docker-compose.yml) file of the pyflink-walkthrough in the `pyflink-walkthrough` root directory. + +### Building the Docker image + +First, build the Docker image by running: + +```bash +docker-compose build +``` + +### Starting the Playground + +Once the Docker image build is complete, run the following command to start the playground: + +```bash +docker-compose up -d +``` + +One way of checking if the playground was successfully started is to access some of the services that are exposed: + +1. visiting Flink Web UI [http://localhost:8081](http://localhost:8081). +2. visiting Elasticsearch [http://localhost:9200](http://localhost:9200). +3. visiting Kibana [http://localhost:5601](http://localhost:5601). + +**Note:** you may need to wait around 1 minute before all the services come up. + +### Stopping the Playground + +To stop the playground, run the following command: + +```bash +docker-compose down +``` + + +## Running the PyFlink job + +1. Submit the PyFlink job. +```shell script +$ docker-compose exec jobmanager ./bin/flink run -py /opt/pyflink-walkthrough/payment_msg_proccessing.py -d +``` +Navigate to the [Flink Web UI](http://localhost:8081) after the job is submitted successfully. There should be a job in the running job list. +Click the job to get more details. You should see that the `StreamGraph` of the `payment_msg_proccessing` consists of two nodes, each with a parallelism of 1. +There is also a table in the bottom of the page that shows the metrics of every node (e.g. bytes received/sent, records received/sent). + + + + + +2. Navigate to the [Kibana UI](http://localhost:5601) and choose the pre-created dashboard `payment_dashboard`. There will be a vertical bar chart and a pie chart demonstrating the total amount and the proportion of each province. + + + + + +3. Stop the PyFlink job: + +Visit the Flink Web UI at [http://localhost:8081/#/overview](http://localhost:8081/#/overview) , select the job and click `Cancel` on the upper right side. Review comment: ```suggestion Visit the Flink Web UI at [http://localhost:8081/#/overview](http://localhost:8081/#/overview), select the job, and click `Cancel Job` in the upper right corner. ``` ########## File path: pyflink-walkthrough/README.md ########## @@ -0,0 +1,140 @@ +# pyflink-walkthrough + +## Background + +In this playground, you will learn how to build and run an end-to-end PyFlink pipeline for data analytics, covering the following steps: + +* Reading data from a Kafka source; +* Creating data using a [UDF](https://ci.apache.org/projects/flink/flink-docs-release-1.11/dev/python/table-api-users-guide/udfs/python_udfs.html); +* Performing a simple aggregation over the source data; +* Writing the results to Elasticsearch and visualizing them in Kibana. + +The environment is based on Docker Compose, so the only requirement is that you have [Docker](https://docs.docker.com/get-docker/) +installed in your machine. + +### Kafka +You will be using Kafka to store sample input data about payment transactions. A simple data generator [generate_source_data.py](generator/generate_source_data.py) is provided to +continuously write new records to the `payment_msg` Kafka topic. Each record is structured as follows: + +`{"createTime": "2020-08-12 06:29:02", "orderId": 1597213797, "payAmount": 28306.44976403719, "payPlatform": 0, "provinceId": 4}` + +* `createTime`: The creation time of the transaction. +* `orderId`: The id of the current transaction. +* `payAmount`: The amount being paid with this transaction. +* `payPlatform`: The platform used to create this payment: pc or mobile. +* `provinceId`: The id of the province for the user. + +You can use the following command to read data from the Kafka topic and check whether it's generated correctly: +```shell script +$ docker-compose exec kafka kafka-console-consumer.sh --bootstrap-server kafka:9092 --topic payment_msg +{"createTime":"2020-07-27 09:25:32.77","orderId":1595841867217,"payAmount":7732.44,"payPlatform":0,"provinceId":3} +{"createTime":"2020-07-27 09:25:33.231","orderId":1595841867218,"payAmount":75774.05,"payPlatform":0,"provinceId":3} +{"createTime":"2020-07-27 09:25:33.72","orderId":1595841867219,"payAmount":65908.55,"payPlatform":0,"provinceId":0} +{"createTime":"2020-07-27 09:25:34.216","orderId":1595841867220,"payAmount":15341.11,"payPlatform":0,"provinceId":1} +{"createTime":"2020-07-27 09:25:34.698","orderId":1595841867221,"payAmount":37504.42,"payPlatform":0,"provinceId":0} +``` +You can also create a new topic by executing the following command: +```shell script +$ docker-compose exec kafka kafka-topics.sh --bootstrap-server kafka:9092 --create --topic <YOUR-TOPIC-NAME> --partitions 8 --replication-factor 1 +``` Review comment: It is confusing to present, this early in the documentation, details of how to work with Kafka that won't actually work before having built and launched the docker image. Some, or perhaps all, of the information in this background section needs to come later, in a "just in time" fashion, when it is needed. Readers want to make a single, linear pass through one of these walkthroughs, executing commands as they go. Presenting shell commands before they can be used will confuse some readers. ########## File path: README.md ########## @@ -15,6 +15,8 @@ Flink job. The playground is presented in detail in * The **Table Walkthrough** (in the `table-walkthrough` folder) shows to use the Table API to build an analytics pipeline that reads streaming data from Kafka and writes results to MySQL, along with a real-time dashboard in Grafana. The walkthrough is presented in detail in ["Real Time Reporting with the Table API"](https://ci.apache.org/projects/flink/flink-docs-release-1.11/try-flink/table_api.html), which is part of the _Try Flink_ section of the Flink documentation. +* The **PyFlink Walkthrough** (in the `pyflink-walkthrough` folder) provides a complete example that uses the Python API, and guides you through the steps needed to run and manage Pyflink Jobs. The pipeline used in this walkthrough reads data from Kafka, performs aggregations, and writes results to Elasticsearch that are visualized with Kibana. Review comment: ```suggestion * The **PyFlink Walkthrough** (in the `pyflink-walkthrough` folder) provides a complete example that uses the Python API, and guides you through the steps needed to run and manage Pyflink Jobs. The pipeline used in this walkthrough reads data from Kafka, performs aggregations, and writes results to Elasticsearch that are visualized with Kibana. This walkthrough is presented in detail in the [pyflink-walkthrough README](pyflink-walkthrough). ``` ########## File path: pyflink-walkthrough/README.md ########## @@ -0,0 +1,140 @@ +# pyflink-walkthrough + +## Background + +In this playground, you will learn how to build and run an end-to-end PyFlink pipeline for data analytics, covering the following steps: + +* Reading data from a Kafka source; +* Creating data using a [UDF](https://ci.apache.org/projects/flink/flink-docs-release-1.11/dev/python/table-api-users-guide/udfs/python_udfs.html); +* Performing a simple aggregation over the source data; +* Writing the results to Elasticsearch and visualizing them in Kibana. + +The environment is based on Docker Compose, so the only requirement is that you have [Docker](https://docs.docker.com/get-docker/) +installed in your machine. + +### Kafka +You will be using Kafka to store sample input data about payment transactions. A simple data generator [generate_source_data.py](generator/generate_source_data.py) is provided to +continuously write new records to the `payment_msg` Kafka topic. Each record is structured as follows: + +`{"createTime": "2020-08-12 06:29:02", "orderId": 1597213797, "payAmount": 28306.44976403719, "payPlatform": 0, "provinceId": 4}` + +* `createTime`: The creation time of the transaction. +* `orderId`: The id of the current transaction. +* `payAmount`: The amount being paid with this transaction. +* `payPlatform`: The platform used to create this payment: pc or mobile. +* `provinceId`: The id of the province for the user. + +You can use the following command to read data from the Kafka topic and check whether it's generated correctly: +```shell script +$ docker-compose exec kafka kafka-console-consumer.sh --bootstrap-server kafka:9092 --topic payment_msg +{"createTime":"2020-07-27 09:25:32.77","orderId":1595841867217,"payAmount":7732.44,"payPlatform":0,"provinceId":3} +{"createTime":"2020-07-27 09:25:33.231","orderId":1595841867218,"payAmount":75774.05,"payPlatform":0,"provinceId":3} +{"createTime":"2020-07-27 09:25:33.72","orderId":1595841867219,"payAmount":65908.55,"payPlatform":0,"provinceId":0} +{"createTime":"2020-07-27 09:25:34.216","orderId":1595841867220,"payAmount":15341.11,"payPlatform":0,"provinceId":1} +{"createTime":"2020-07-27 09:25:34.698","orderId":1595841867221,"payAmount":37504.42,"payPlatform":0,"provinceId":0} +``` +You can also create a new topic by executing the following command: +```shell script +$ docker-compose exec kafka kafka-topics.sh --bootstrap-server kafka:9092 --create --topic <YOUR-TOPIC-NAME> --partitions 8 --replication-factor 1 +``` + +### PyFlink + +The transaction data will be processed with PyFlink using the Python script [payment_msg_processing.py](payment_msg_proccessing.py). +This script will first map the `provinceId` in the input records to its corresponding province name using a Python UDF, +and then compute the sum of the transaction amounts for each province. + +### ElasticSearch + +ElasticSearch is used to store the results and to provide an efficient query service. + +### Kibana + +Kibana is an open source data visualization dashboard for ElasticSearch. You will use it to visualize +the results of your PyFlink pipeline. + +## Setup + +As mentioned, the environment for this walkthrough is based on Docker Compose; It uses a custom image +to spin up Flink (JobManager+TaskManager), Kafka+Zookeeper, the data generator, and Elasticsearch+Kibana containers. + +You can find the [docker-compose.yaml](docker-compose.yml) file of the pyflink-walkthrough in the `pyflink-walkthrough` root directory. + +### Building the Docker image + +First, build the Docker image by running: + +```bash +docker-compose build Review comment: When I tried this, it took me a couple of minutes to realize it hadn't done the right things because I was still in the parent directory. ```suggestion cd pyflink-walkthrough docker-compose build ``` ########## File path: pyflink-walkthrough/README.md ########## @@ -0,0 +1,140 @@ +# pyflink-walkthrough + +## Background + +In this playground, you will learn how to build and run an end-to-end PyFlink pipeline for data analytics, covering the following steps: + +* Reading data from a Kafka source; +* Creating data using a [UDF](https://ci.apache.org/projects/flink/flink-docs-release-1.11/dev/python/table-api-users-guide/udfs/python_udfs.html); +* Performing a simple aggregation over the source data; +* Writing the results to Elasticsearch and visualizing them in Kibana. + +The environment is based on Docker Compose, so the only requirement is that you have [Docker](https://docs.docker.com/get-docker/) +installed in your machine. + +### Kafka +You will be using Kafka to store sample input data about payment transactions. A simple data generator [generate_source_data.py](generator/generate_source_data.py) is provided to +continuously write new records to the `payment_msg` Kafka topic. Each record is structured as follows: + +`{"createTime": "2020-08-12 06:29:02", "orderId": 1597213797, "payAmount": 28306.44976403719, "payPlatform": 0, "provinceId": 4}` + +* `createTime`: The creation time of the transaction. +* `orderId`: The id of the current transaction. +* `payAmount`: The amount being paid with this transaction. +* `payPlatform`: The platform used to create this payment: pc or mobile. +* `provinceId`: The id of the province for the user. + +You can use the following command to read data from the Kafka topic and check whether it's generated correctly: +```shell script +$ docker-compose exec kafka kafka-console-consumer.sh --bootstrap-server kafka:9092 --topic payment_msg +{"createTime":"2020-07-27 09:25:32.77","orderId":1595841867217,"payAmount":7732.44,"payPlatform":0,"provinceId":3} +{"createTime":"2020-07-27 09:25:33.231","orderId":1595841867218,"payAmount":75774.05,"payPlatform":0,"provinceId":3} +{"createTime":"2020-07-27 09:25:33.72","orderId":1595841867219,"payAmount":65908.55,"payPlatform":0,"provinceId":0} +{"createTime":"2020-07-27 09:25:34.216","orderId":1595841867220,"payAmount":15341.11,"payPlatform":0,"provinceId":1} +{"createTime":"2020-07-27 09:25:34.698","orderId":1595841867221,"payAmount":37504.42,"payPlatform":0,"provinceId":0} +``` +You can also create a new topic by executing the following command: +```shell script +$ docker-compose exec kafka kafka-topics.sh --bootstrap-server kafka:9092 --create --topic <YOUR-TOPIC-NAME> --partitions 8 --replication-factor 1 +``` + +### PyFlink + +The transaction data will be processed with PyFlink using the Python script [payment_msg_processing.py](payment_msg_proccessing.py). +This script will first map the `provinceId` in the input records to its corresponding province name using a Python UDF, +and then compute the sum of the transaction amounts for each province. + +### ElasticSearch + +ElasticSearch is used to store the results and to provide an efficient query service. + +### Kibana + +Kibana is an open source data visualization dashboard for ElasticSearch. You will use it to visualize +the results of your PyFlink pipeline. + +## Setup + +As mentioned, the environment for this walkthrough is based on Docker Compose; It uses a custom image +to spin up Flink (JobManager+TaskManager), Kafka+Zookeeper, the data generator, and Elasticsearch+Kibana containers. + +You can find the [docker-compose.yaml](docker-compose.yml) file of the pyflink-walkthrough in the `pyflink-walkthrough` root directory. + +### Building the Docker image + +First, build the Docker image by running: + +```bash +docker-compose build +``` + +### Starting the Playground + +Once the Docker image build is complete, run the following command to start the playground: + +```bash +docker-compose up -d +``` + +One way of checking if the playground was successfully started is to access some of the services that are exposed: + +1. visiting Flink Web UI [http://localhost:8081](http://localhost:8081). +2. visiting Elasticsearch [http://localhost:9200](http://localhost:9200). +3. visiting Kibana [http://localhost:5601](http://localhost:5601). + +**Note:** you may need to wait around 1 minute before all the services come up. + +### Stopping the Playground + +To stop the playground, run the following command: + +```bash +docker-compose down +``` Review comment: This should come later. If it is left here, some folks will blindly stop the playground at this point. ########## File path: pyflink-walkthrough/README.md ########## @@ -0,0 +1,140 @@ +# pyflink-walkthrough + +## Background + +In this playground, you will learn how to build and run an end-to-end PyFlink pipeline for data analytics, covering the following steps: + +* Reading data from a Kafka source; +* Creating data using a [UDF](https://ci.apache.org/projects/flink/flink-docs-release-1.11/dev/python/table-api-users-guide/udfs/python_udfs.html); +* Performing a simple aggregation over the source data; +* Writing the results to Elasticsearch and visualizing them in Kibana. + +The environment is based on Docker Compose, so the only requirement is that you have [Docker](https://docs.docker.com/get-docker/) +installed in your machine. + +### Kafka +You will be using Kafka to store sample input data about payment transactions. A simple data generator [generate_source_data.py](generator/generate_source_data.py) is provided to +continuously write new records to the `payment_msg` Kafka topic. Each record is structured as follows: + +`{"createTime": "2020-08-12 06:29:02", "orderId": 1597213797, "payAmount": 28306.44976403719, "payPlatform": 0, "provinceId": 4}` + +* `createTime`: The creation time of the transaction. +* `orderId`: The id of the current transaction. +* `payAmount`: The amount being paid with this transaction. +* `payPlatform`: The platform used to create this payment: pc or mobile. +* `provinceId`: The id of the province for the user. + +You can use the following command to read data from the Kafka topic and check whether it's generated correctly: +```shell script +$ docker-compose exec kafka kafka-console-consumer.sh --bootstrap-server kafka:9092 --topic payment_msg +{"createTime":"2020-07-27 09:25:32.77","orderId":1595841867217,"payAmount":7732.44,"payPlatform":0,"provinceId":3} +{"createTime":"2020-07-27 09:25:33.231","orderId":1595841867218,"payAmount":75774.05,"payPlatform":0,"provinceId":3} +{"createTime":"2020-07-27 09:25:33.72","orderId":1595841867219,"payAmount":65908.55,"payPlatform":0,"provinceId":0} +{"createTime":"2020-07-27 09:25:34.216","orderId":1595841867220,"payAmount":15341.11,"payPlatform":0,"provinceId":1} +{"createTime":"2020-07-27 09:25:34.698","orderId":1595841867221,"payAmount":37504.42,"payPlatform":0,"provinceId":0} +``` +You can also create a new topic by executing the following command: +```shell script +$ docker-compose exec kafka kafka-topics.sh --bootstrap-server kafka:9092 --create --topic <YOUR-TOPIC-NAME> --partitions 8 --replication-factor 1 +``` + +### PyFlink + +The transaction data will be processed with PyFlink using the Python script [payment_msg_processing.py](payment_msg_proccessing.py). +This script will first map the `provinceId` in the input records to its corresponding province name using a Python UDF, +and then compute the sum of the transaction amounts for each province. + +### ElasticSearch + +ElasticSearch is used to store the results and to provide an efficient query service. + +### Kibana + +Kibana is an open source data visualization dashboard for ElasticSearch. You will use it to visualize +the results of your PyFlink pipeline. + +## Setup + +As mentioned, the environment for this walkthrough is based on Docker Compose; It uses a custom image +to spin up Flink (JobManager+TaskManager), Kafka+Zookeeper, the data generator, and Elasticsearch+Kibana containers. + +You can find the [docker-compose.yaml](docker-compose.yml) file of the pyflink-walkthrough in the `pyflink-walkthrough` root directory. + +### Building the Docker image + +First, build the Docker image by running: + +```bash +docker-compose build +``` + +### Starting the Playground + +Once the Docker image build is complete, run the following command to start the playground: + +```bash +docker-compose up -d +``` + +One way of checking if the playground was successfully started is to access some of the services that are exposed: + +1. visiting Flink Web UI [http://localhost:8081](http://localhost:8081). +2. visiting Elasticsearch [http://localhost:9200](http://localhost:9200). +3. visiting Kibana [http://localhost:5601](http://localhost:5601). + +**Note:** you may need to wait around 1 minute before all the services come up. + +### Stopping the Playground + +To stop the playground, run the following command: + +```bash +docker-compose down +``` + + +## Running the PyFlink job + +1. Submit the PyFlink job. +```shell script +$ docker-compose exec jobmanager ./bin/flink run -py /opt/pyflink-walkthrough/payment_msg_proccessing.py -d +``` +Navigate to the [Flink Web UI](http://localhost:8081) after the job is submitted successfully. There should be a job in the running job list. +Click the job to get more details. You should see that the `StreamGraph` of the `payment_msg_proccessing` consists of two nodes, each with a parallelism of 1. +There is also a table in the bottom of the page that shows the metrics of every node (e.g. bytes received/sent, records received/sent). + + + + + +2. Navigate to the [Kibana UI](http://localhost:5601) and choose the pre-created dashboard `payment_dashboard`. There will be a vertical bar chart and a pie chart demonstrating the total amount and the proportion of each province. + + + + + +3. Stop the PyFlink job: + +Visit the Flink Web UI at [http://localhost:8081/#/overview](http://localhost:8081/#/overview) , select the job and click `Cancel` on the upper right side. + + + +## Further Explorations + +If you would like to explore this example more deeply, you can edit [payment_msg_processing.py](payment_msg_proccessing.py) +or create new PyFlink projects that perform more complex processing. You can do this locally under +the `pyflink-walkthrough` directory, since it is mounted on the `jobmanager` docker container. + +Ideas: +* Add your own Kafka source table; +* Create a new index for the Elasticsearch sink; +* Count the number of transactions, grouped by a 1 minute [tumbling window](https://ci.apache.org/projects/flink/flink-docs-stable/dev/table/tableApi.html#tumble-tumbling-windows) and `payPlatform`. + +After making a modification, you can submit the new job by executing the same command mentioned at +[Running the PyFlink Job](#running-the-pyflink-job) +```shell script +$ docker-compose exec jobmanager ./bin/flink run -py /opt/pyflink-walkthrough/payment_msg_proccessing.py -d +``` + +Furthermore, you can also [create new Kibana dashboards](https://www.elastic.co/guide/en/kibana/7.8/dashboard-create-new-dashboard.html) +to visualize other aspects of the data in the Elasticsearch. Review comment: ```suggestion to visualize other aspects of the data in Elasticsearch. ``` ########## File path: pyflink-walkthrough/payment_msg_proccessing.py ########## @@ -0,0 +1,90 @@ +################################################################################ +# Licensed to the Apache Software Foundation (ASF) under one +# or more contributor license agreements. See the NOTICE file +# distributed with this work for additional information +# regarding copyright ownership. The ASF licenses this file +# to you under the Apache License, Version 2.0 (the +# "License"); you may not use this file except in compliance +# with the License. You may obtain a copy of the License at +# +# http://www.apache.org/licenses/LICENSE-2.0 +# +# Unless required by applicable law or agreed to in writing, software +# distributed under the License is distributed on an "AS IS" BASIS, +# WITHOUT WARRANTIES OR CONDITIONS OF ANY KIND, either express or implied. +# See the License for the specific language governing permissions and +# limitations under the License. +################################################################################ + +from pyflink.datastream import StreamExecutionEnvironment, TimeCharacteristic +from pyflink.table import StreamTableEnvironment, DataTypes, EnvironmentSettings +from pyflink.table.udf import udf + + +provinces = ("Beijing", "Shanghai", "Hangzhou", "Shenzhen", "Jiangxi", "Chongqing", "Xizang") + + +@udf(input_types=[DataTypes.STRING()], result_type=DataTypes.STRING()) +def province_id_to_name(id): + return provinces[id] + + +def log_processing(): + env = StreamExecutionEnvironment.get_execution_environment() + t_env = StreamTableEnvironment.create(stream_execution_environment=env) + t_env.get_config().get_configuration().set_boolean("python.fn-execution.memory.managed", True) + + source_ddl = """ Review comment: ```suggestion create_kafka_source_ddl = """ ``` ########## File path: pyflink-walkthrough/README.md ########## @@ -0,0 +1,140 @@ +# pyflink-walkthrough + +## Background + +In this playground, you will learn how to build and run an end-to-end PyFlink pipeline for data analytics, covering the following steps: + +* Reading data from a Kafka source; +* Creating data using a [UDF](https://ci.apache.org/projects/flink/flink-docs-release-1.11/dev/python/table-api-users-guide/udfs/python_udfs.html); +* Performing a simple aggregation over the source data; +* Writing the results to Elasticsearch and visualizing them in Kibana. + +The environment is based on Docker Compose, so the only requirement is that you have [Docker](https://docs.docker.com/get-docker/) +installed in your machine. + +### Kafka +You will be using Kafka to store sample input data about payment transactions. A simple data generator [generate_source_data.py](generator/generate_source_data.py) is provided to +continuously write new records to the `payment_msg` Kafka topic. Each record is structured as follows: + +`{"createTime": "2020-08-12 06:29:02", "orderId": 1597213797, "payAmount": 28306.44976403719, "payPlatform": 0, "provinceId": 4}` + +* `createTime`: The creation time of the transaction. +* `orderId`: The id of the current transaction. +* `payAmount`: The amount being paid with this transaction. +* `payPlatform`: The platform used to create this payment: pc or mobile. +* `provinceId`: The id of the province for the user. + +You can use the following command to read data from the Kafka topic and check whether it's generated correctly: +```shell script +$ docker-compose exec kafka kafka-console-consumer.sh --bootstrap-server kafka:9092 --topic payment_msg +{"createTime":"2020-07-27 09:25:32.77","orderId":1595841867217,"payAmount":7732.44,"payPlatform":0,"provinceId":3} +{"createTime":"2020-07-27 09:25:33.231","orderId":1595841867218,"payAmount":75774.05,"payPlatform":0,"provinceId":3} +{"createTime":"2020-07-27 09:25:33.72","orderId":1595841867219,"payAmount":65908.55,"payPlatform":0,"provinceId":0} +{"createTime":"2020-07-27 09:25:34.216","orderId":1595841867220,"payAmount":15341.11,"payPlatform":0,"provinceId":1} +{"createTime":"2020-07-27 09:25:34.698","orderId":1595841867221,"payAmount":37504.42,"payPlatform":0,"provinceId":0} +``` +You can also create a new topic by executing the following command: +```shell script +$ docker-compose exec kafka kafka-topics.sh --bootstrap-server kafka:9092 --create --topic <YOUR-TOPIC-NAME> --partitions 8 --replication-factor 1 +``` + +### PyFlink + +The transaction data will be processed with PyFlink using the Python script [payment_msg_processing.py](payment_msg_proccessing.py). +This script will first map the `provinceId` in the input records to its corresponding province name using a Python UDF, +and then compute the sum of the transaction amounts for each province. + +### ElasticSearch + +ElasticSearch is used to store the results and to provide an efficient query service. + +### Kibana + +Kibana is an open source data visualization dashboard for ElasticSearch. You will use it to visualize +the results of your PyFlink pipeline. + +## Setup + +As mentioned, the environment for this walkthrough is based on Docker Compose; It uses a custom image +to spin up Flink (JobManager+TaskManager), Kafka+Zookeeper, the data generator, and Elasticsearch+Kibana containers. + +You can find the [docker-compose.yaml](docker-compose.yml) file of the pyflink-walkthrough in the `pyflink-walkthrough` root directory. + +### Building the Docker image + +First, build the Docker image by running: + +```bash +docker-compose build +``` + +### Starting the Playground + +Once the Docker image build is complete, run the following command to start the playground: + +```bash +docker-compose up -d +``` + +One way of checking if the playground was successfully started is to access some of the services that are exposed: + +1. visiting Flink Web UI [http://localhost:8081](http://localhost:8081). +2. visiting Elasticsearch [http://localhost:9200](http://localhost:9200). +3. visiting Kibana [http://localhost:5601](http://localhost:5601). + +**Note:** you may need to wait around 1 minute before all the services come up. + +### Stopping the Playground + +To stop the playground, run the following command: + +```bash +docker-compose down +``` + + +## Running the PyFlink job + +1. Submit the PyFlink job. +```shell script +$ docker-compose exec jobmanager ./bin/flink run -py /opt/pyflink-walkthrough/payment_msg_proccessing.py -d +``` +Navigate to the [Flink Web UI](http://localhost:8081) after the job is submitted successfully. There should be a job in the running job list. +Click the job to get more details. You should see that the `StreamGraph` of the `payment_msg_proccessing` consists of two nodes, each with a parallelism of 1. +There is also a table in the bottom of the page that shows the metrics of every node (e.g. bytes received/sent, records received/sent). Review comment: ```suggestion There is also a table in the bottom of the page that shows some metrics for each node (e.g. bytes received/sent, records received/sent). Note that Flink's metrics only report bytes and records communicated within the Flink cluster, and so will always report 0 bytes and 0 records received by sources, and 0 bytes and 0 records sent to sinks — so don't be confused that nothing is reported as being read from Kafka, or written to Elasticsearch. ``` ########## File path: pyflink-walkthrough/payment_msg_proccessing.py ########## @@ -0,0 +1,90 @@ +################################################################################ +# Licensed to the Apache Software Foundation (ASF) under one +# or more contributor license agreements. See the NOTICE file +# distributed with this work for additional information +# regarding copyright ownership. The ASF licenses this file +# to you under the Apache License, Version 2.0 (the +# "License"); you may not use this file except in compliance +# with the License. You may obtain a copy of the License at +# +# http://www.apache.org/licenses/LICENSE-2.0 +# +# Unless required by applicable law or agreed to in writing, software +# distributed under the License is distributed on an "AS IS" BASIS, +# WITHOUT WARRANTIES OR CONDITIONS OF ANY KIND, either express or implied. +# See the License for the specific language governing permissions and +# limitations under the License. +################################################################################ + +from pyflink.datastream import StreamExecutionEnvironment, TimeCharacteristic +from pyflink.table import StreamTableEnvironment, DataTypes, EnvironmentSettings +from pyflink.table.udf import udf + + +provinces = ("Beijing", "Shanghai", "Hangzhou", "Shenzhen", "Jiangxi", "Chongqing", "Xizang") + + +@udf(input_types=[DataTypes.STRING()], result_type=DataTypes.STRING()) +def province_id_to_name(id): + return provinces[id] + + +def log_processing(): + env = StreamExecutionEnvironment.get_execution_environment() + t_env = StreamTableEnvironment.create(stream_execution_environment=env) + t_env.get_config().get_configuration().set_boolean("python.fn-execution.memory.managed", True) + + source_ddl = """ + CREATE TABLE payment_msg( + createTime VARCHAR, + orderId BIGINT, + payAmount DOUBLE, + payPlatform INT, + provinceId INT + ) WITH ( + 'connector.type' = 'kafka', + 'connector.version' = 'universal', + 'connector.topic' = 'payment_msg', + 'connector.properties.bootstrap.servers' = 'kafka:9092', + 'connector.properties.group.id' = 'test_3', + 'connector.startup-mode' = 'latest-offset', + 'format.type' = 'json' + ) + """ + + es_sink_ddl = """ Review comment: ```suggestion create_es_sink_ddl = """ ``` ########## File path: pyflink-walkthrough/README.md ########## @@ -0,0 +1,140 @@ +# pyflink-walkthrough + +## Background + +In this playground, you will learn how to build and run an end-to-end PyFlink pipeline for data analytics, covering the following steps: + +* Reading data from a Kafka source; +* Creating data using a [UDF](https://ci.apache.org/projects/flink/flink-docs-release-1.11/dev/python/table-api-users-guide/udfs/python_udfs.html); +* Performing a simple aggregation over the source data; +* Writing the results to Elasticsearch and visualizing them in Kibana. + +The environment is based on Docker Compose, so the only requirement is that you have [Docker](https://docs.docker.com/get-docker/) +installed in your machine. + +### Kafka +You will be using Kafka to store sample input data about payment transactions. A simple data generator [generate_source_data.py](generator/generate_source_data.py) is provided to +continuously write new records to the `payment_msg` Kafka topic. Each record is structured as follows: + +`{"createTime": "2020-08-12 06:29:02", "orderId": 1597213797, "payAmount": 28306.44976403719, "payPlatform": 0, "provinceId": 4}` + +* `createTime`: The creation time of the transaction. +* `orderId`: The id of the current transaction. +* `payAmount`: The amount being paid with this transaction. +* `payPlatform`: The platform used to create this payment: pc or mobile. +* `provinceId`: The id of the province for the user. + +You can use the following command to read data from the Kafka topic and check whether it's generated correctly: +```shell script +$ docker-compose exec kafka kafka-console-consumer.sh --bootstrap-server kafka:9092 --topic payment_msg +{"createTime":"2020-07-27 09:25:32.77","orderId":1595841867217,"payAmount":7732.44,"payPlatform":0,"provinceId":3} +{"createTime":"2020-07-27 09:25:33.231","orderId":1595841867218,"payAmount":75774.05,"payPlatform":0,"provinceId":3} +{"createTime":"2020-07-27 09:25:33.72","orderId":1595841867219,"payAmount":65908.55,"payPlatform":0,"provinceId":0} +{"createTime":"2020-07-27 09:25:34.216","orderId":1595841867220,"payAmount":15341.11,"payPlatform":0,"provinceId":1} +{"createTime":"2020-07-27 09:25:34.698","orderId":1595841867221,"payAmount":37504.42,"payPlatform":0,"provinceId":0} +``` +You can also create a new topic by executing the following command: +```shell script +$ docker-compose exec kafka kafka-topics.sh --bootstrap-server kafka:9092 --create --topic <YOUR-TOPIC-NAME> --partitions 8 --replication-factor 1 +``` + +### PyFlink + +The transaction data will be processed with PyFlink using the Python script [payment_msg_processing.py](payment_msg_proccessing.py). +This script will first map the `provinceId` in the input records to its corresponding province name using a Python UDF, +and then compute the sum of the transaction amounts for each province. + +### ElasticSearch + +ElasticSearch is used to store the results and to provide an efficient query service. + +### Kibana + +Kibana is an open source data visualization dashboard for ElasticSearch. You will use it to visualize +the results of your PyFlink pipeline. + +## Setup + +As mentioned, the environment for this walkthrough is based on Docker Compose; It uses a custom image +to spin up Flink (JobManager+TaskManager), Kafka+Zookeeper, the data generator, and Elasticsearch+Kibana containers. + +You can find the [docker-compose.yaml](docker-compose.yml) file of the pyflink-walkthrough in the `pyflink-walkthrough` root directory. + +### Building the Docker image + +First, build the Docker image by running: + +```bash +docker-compose build +``` + +### Starting the Playground + +Once the Docker image build is complete, run the following command to start the playground: + +```bash +docker-compose up -d +``` + +One way of checking if the playground was successfully started is to access some of the services that are exposed: + +1. visiting Flink Web UI [http://localhost:8081](http://localhost:8081). +2. visiting Elasticsearch [http://localhost:9200](http://localhost:9200). Review comment: This is what I see at localhost:9200 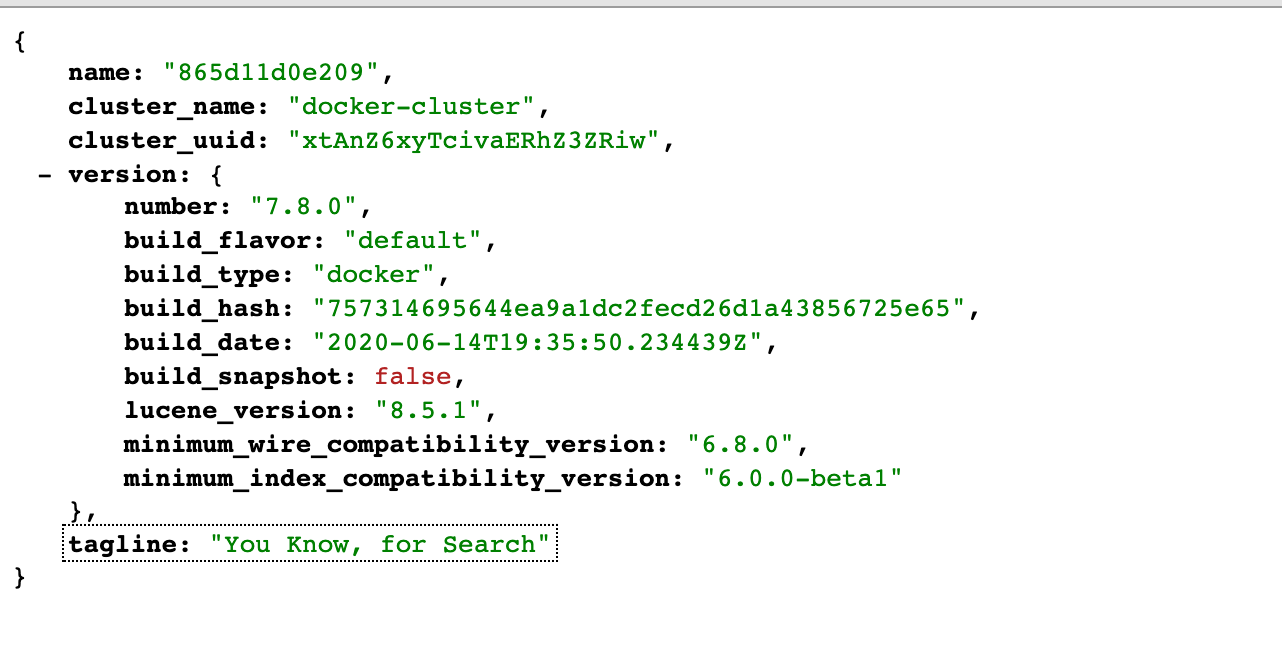 ########## File path: pyflink-walkthrough/README.md ########## @@ -0,0 +1,141 @@ +# pyflink-walkthrough + +## Background + +In this playground, you will learn how to build and run an end-to-end PyFlink pipeline for data analytics, covering the following steps: + +* Reading data from a Kafka source; +* Creating data using a [UDF](https://ci.apache.org/projects/flink/flink-docs-release-1.11/dev/python/table-api-users-guide/udfs/python_udfs.html); +* Performing a simple aggregation over the source data; +* Writing the results to Elasticsearch and visualizing them in Kibana. + +The environment is based on Docker Compose, so the only requirement is that you have [Docker](https://docs.docker.com/get-docker/) +installed in your machine. + +### Kafka +You will be using Kafka to store sample input data about payment transactions. A simple data generator [generate_source_data.py](generator/generate_source_data.py) is provided to +continuously write new records to the `payment_msg` Kafka topic. Each record is structured as follows: + +`{"createTime": "2020-08-12 06:29:02", "orderId": 1597213797, "payAmount": 28306.44976403719, "payPlatform": 0, "provinceId": 4}` + +* `createTime`: The creation time of the transaction. +* `orderId`: The id of the current transaction. +* `payAmount`: The amount being paid with this transaction. +* `payPlatform`: The platform used to create this payment: pc or mobile. +* `provinceId`: The id of the province for the user. + +You can use the following command to read data from the Kafka topic and check whether it's generated correctly: +```shell script +$ docker-compose exec kafka kafka-console-consumer.sh --bootstrap-server kafka:9092 --topic payment_msg +{"createTime":"2020-07-27 09:25:32.77","orderId":1595841867217,"payAmount":7732.44,"payPlatform":0,"provinceId":3} +{"createTime":"2020-07-27 09:25:33.231","orderId":1595841867218,"payAmount":75774.05,"payPlatform":0,"provinceId":3} +{"createTime":"2020-07-27 09:25:33.72","orderId":1595841867219,"payAmount":65908.55,"payPlatform":0,"provinceId":0} +{"createTime":"2020-07-27 09:25:34.216","orderId":1595841867220,"payAmount":15341.11,"payPlatform":0,"provinceId":1} +{"createTime":"2020-07-27 09:25:34.698","orderId":1595841867221,"payAmount":37504.42,"payPlatform":0,"provinceId":0} +``` +You can also create a new topic by executing the following command: +```shell script +$ docker-compose exec kafka kafka-topics.sh --bootstrap-server kafka:9092 --create --topic <YOUR-TOPIC-NAME> --partitions 8 --replication-factor 1 +``` + +### PyFlink + +The transaction data will be processed with PyFlink using the Python script [payment_msg_processing.py](payment_msg_proccessing.py). +This script will first map the `provinceId` in the input records to its corresponding province name using a Python UDF, +and then compute the sum of the transaction amounts for each province. + +### ElasticSearch + +ElasticSearch is used to store the upstream processing results and to provide an efficient query service. + +### Kibana + +Kibana is an open source data visualization dashboard for ElasticSearch. You will use it to visualize +the results of your PyFlink pipeline. + +## Setup + +As mentioned, the environment for this walkthrough is based on Docker Compose; It uses a custom image +to spin up Flink (JobManager+TaskManager), Kafka+Zookeeper, the data generator, and Elasticsearch+Kibana +containers. + +Your can find the [docker-compose.yaml](docker-compose.yml) file of the pyflink-walkthrough is located in the `pyflink-walkthrough` root directory. + +### Building the Docker image + +First, build the Docker image by running: + +```bash +docker-compose build +``` + +### Starting the Playground + +Once the Docker image build is complete, run the following command to start the playground: + +```bash +docker-compose up -d +``` + +One way of checking if the playground was successfully started is to access some of the services that are exposed: + +1. visiting Flink Web UI [http://localhost:8081](http://localhost:8081). +2. visiting Elasticsearch [http://localhost:9200](http://localhost:9200). +3. visiting Kibana [http://localhost:5601](http://localhost:5601). + +**Note:** you may need to wait around 1 minute before all the services come up. + +### Stopping the Playground + +To stop the playground, run the following command: + +```bash +docker-compose down +``` + + +## Running the PyFlink job + +1. Submit the PyFlink job. +```shell script +$ docker-compose exec jobmanager ./bin/flink run -py /opt/pyflink-walkthrough/payment_msg_proccessing.py -d +``` +Navigate to the [Flink Web UI](http://localhost:8081) after the job is submitted successfully, There will be a job in the running job list. +Click the job to turn to the main page of it. You can see that the StreamGraph of the `payment_msg_proccessing` job is consist of two nodes, each of them has parallelism of 1. +And there is a table in the bottom of the page shows the metrics of every node (bytes received/sent, records received/sent, etc). + + Review comment: @shuiqiangchen Do you plan to add a link to this walkthrough from the docs somewhere? ########## File path: pyflink-walkthrough/payment_msg_proccessing.py ########## @@ -0,0 +1,90 @@ +################################################################################ +# Licensed to the Apache Software Foundation (ASF) under one +# or more contributor license agreements. See the NOTICE file +# distributed with this work for additional information +# regarding copyright ownership. The ASF licenses this file +# to you under the Apache License, Version 2.0 (the +# "License"); you may not use this file except in compliance +# with the License. You may obtain a copy of the License at +# +# http://www.apache.org/licenses/LICENSE-2.0 +# +# Unless required by applicable law or agreed to in writing, software +# distributed under the License is distributed on an "AS IS" BASIS, +# WITHOUT WARRANTIES OR CONDITIONS OF ANY KIND, either express or implied. +# See the License for the specific language governing permissions and +# limitations under the License. +################################################################################ + +from pyflink.datastream import StreamExecutionEnvironment, TimeCharacteristic +from pyflink.table import StreamTableEnvironment, DataTypes, EnvironmentSettings +from pyflink.table.udf import udf + + +provinces = ("Beijing", "Shanghai", "Hangzhou", "Shenzhen", "Jiangxi", "Chongqing", "Xizang") + + +@udf(input_types=[DataTypes.STRING()], result_type=DataTypes.STRING()) +def province_id_to_name(id): + return provinces[id] + + +def log_processing(): + env = StreamExecutionEnvironment.get_execution_environment() + t_env = StreamTableEnvironment.create(stream_execution_environment=env) + t_env.get_config().get_configuration().set_boolean("python.fn-execution.memory.managed", True) + + source_ddl = """ + CREATE TABLE payment_msg( + createTime VARCHAR, + orderId BIGINT, + payAmount DOUBLE, + payPlatform INT, + provinceId INT + ) WITH ( + 'connector.type' = 'kafka', + 'connector.version' = 'universal', + 'connector.topic' = 'payment_msg', + 'connector.properties.bootstrap.servers' = 'kafka:9092', + 'connector.properties.group.id' = 'test_3', + 'connector.startup-mode' = 'latest-offset', + 'format.type' = 'json' + ) + """ + + es_sink_ddl = """ + CREATE TABLE es_sink ( + province VARCHAR PRIMARY KEY, + pay_amount DOUBLE + ) with ( + 'connector.type' = 'elasticsearch', + 'connector.version' = '7', + 'connector.hosts' = 'http://elasticsearch:9200', + 'connector.index' = 'platform_pay_amount_1', + 'connector.document-type' = 'payment', + 'update-mode' = 'upsert', + 'connector.flush-on-checkpoint' = 'true', + 'connector.key-delimiter' = '$', + 'connector.key-null-literal' = 'n/a', + 'connector.bulk-flush.max-size' = '42mb', + 'connector.bulk-flush.max-actions' = '32', + 'connector.bulk-flush.interval' = '1000', + 'connector.bulk-flush.backoff.delay' = '1000', + 'format.type' = 'json' + ) + """ + + t_env.execute_sql(source_ddl) + t_env.execute_sql(es_sink_ddl) Review comment: ```suggestion t_env.execute_sql(create_kafka_source_ddl) t_env.execute_sql(create_es_sink_ddl) ``` ########## File path: pyflink-walkthrough/README.md ########## @@ -0,0 +1,141 @@ +# pyflink-walkthrough + +## Background + +In this playground, you will learn how to build and run an end-to-end PyFlink pipeline for data analytics, covering the following steps: + +* Reading data from a Kafka source; +* Creating data using a [UDF](https://ci.apache.org/projects/flink/flink-docs-release-1.11/dev/python/table-api-users-guide/udfs/python_udfs.html); +* Performing a simple aggregation over the source data; +* Writing the results to Elasticsearch and visualizing them in Kibana. + +The environment is based on Docker Compose, so the only requirement is that you have [Docker](https://docs.docker.com/get-docker/) +installed in your machine. + +### Kafka +You will be using Kafka to store sample input data about payment transactions. A simple data generator [generate_source_data.py](generator/generate_source_data.py) is provided to +continuously write new records to the `payment_msg` Kafka topic. Each record is structured as follows: + +`{"createTime": "2020-08-12 06:29:02", "orderId": 1597213797, "payAmount": 28306.44976403719, "payPlatform": 0, "provinceId": 4}` + +* `createTime`: The creation time of the transaction. +* `orderId`: The id of the current transaction. +* `payAmount`: The amount being paid with this transaction. +* `payPlatform`: The platform used to create this payment: pc or mobile. +* `provinceId`: The id of the province for the user. + +You can use the following command to read data from the Kafka topic and check whether it's generated correctly: +```shell script +$ docker-compose exec kafka kafka-console-consumer.sh --bootstrap-server kafka:9092 --topic payment_msg +{"createTime":"2020-07-27 09:25:32.77","orderId":1595841867217,"payAmount":7732.44,"payPlatform":0,"provinceId":3} +{"createTime":"2020-07-27 09:25:33.231","orderId":1595841867218,"payAmount":75774.05,"payPlatform":0,"provinceId":3} +{"createTime":"2020-07-27 09:25:33.72","orderId":1595841867219,"payAmount":65908.55,"payPlatform":0,"provinceId":0} +{"createTime":"2020-07-27 09:25:34.216","orderId":1595841867220,"payAmount":15341.11,"payPlatform":0,"provinceId":1} +{"createTime":"2020-07-27 09:25:34.698","orderId":1595841867221,"payAmount":37504.42,"payPlatform":0,"provinceId":0} +``` +You can also create a new topic by executing the following command: +```shell script +$ docker-compose exec kafka kafka-topics.sh --bootstrap-server kafka:9092 --create --topic <YOUR-TOPIC-NAME> --partitions 8 --replication-factor 1 +``` + +### PyFlink + +The transaction data will be processed with PyFlink using the Python script [payment_msg_processing.py](payment_msg_proccessing.py). +This script will first map the `provinceId` in the input records to its corresponding province name using a Python UDF, +and then compute the sum of the transaction amounts for each province. + +### ElasticSearch + +ElasticSearch is used to store the upstream processing results and to provide an efficient query service. + +### Kibana + +Kibana is an open source data visualization dashboard for ElasticSearch. You will use it to visualize +the results of your PyFlink pipeline. + +## Setup + +As mentioned, the environment for this walkthrough is based on Docker Compose; It uses a custom image +to spin up Flink (JobManager+TaskManager), Kafka+Zookeeper, the data generator, and Elasticsearch+Kibana +containers. + +Your can find the [docker-compose.yaml](docker-compose.yml) file of the pyflink-walkthrough is located in the `pyflink-walkthrough` root directory. + +### Building the Docker image + +First, build the Docker image by running: + +```bash +docker-compose build +``` + +### Starting the Playground + +Once the Docker image build is complete, run the following command to start the playground: + +```bash +docker-compose up -d +``` + +One way of checking if the playground was successfully started is to access some of the services that are exposed: + +1. visiting Flink Web UI [http://localhost:8081](http://localhost:8081). +2. visiting Elasticsearch [http://localhost:9200](http://localhost:9200). +3. visiting Kibana [http://localhost:5601](http://localhost:5601). + +**Note:** you may need to wait around 1 minute before all the services come up. + +### Stopping the Playground + +To stop the playground, run the following command: + +```bash +docker-compose down +``` + + +## Running the PyFlink job + +1. Submit the PyFlink job. +```shell script +$ docker-compose exec jobmanager ./bin/flink run -py /opt/pyflink-walkthrough/payment_msg_proccessing.py -d +``` +Navigate to the [Flink Web UI](http://localhost:8081) after the job is submitted successfully, There will be a job in the running job list. +Click the job to turn to the main page of it. You can see that the StreamGraph of the `payment_msg_proccessing` job is consist of two nodes, each of them has parallelism of 1. +And there is a table in the bottom of the page shows the metrics of every node (bytes received/sent, records received/sent, etc). + + Review comment: @morsapaes FWIW, this content isn't targeted for the docs. This is intended to be a github README. I only just realized this myself. Since the other walkthroughs are in the docs, I assume this one was as planned to be as well, but it's not. ########## File path: pyflink-walkthrough/README.md ########## @@ -0,0 +1,140 @@ +# pyflink-walkthrough + +## Background + +In this playground, you will learn how to build and run an end-to-end PyFlink pipeline for data analytics, covering the following steps: + +* Reading data from a Kafka source; +* Creating data using a [UDF](https://ci.apache.org/projects/flink/flink-docs-release-1.11/dev/python/table-api-users-guide/udfs/python_udfs.html); +* Performing a simple aggregation over the source data; +* Writing the results to Elasticsearch and visualizing them in Kibana. + +The environment is based on Docker Compose, so the only requirement is that you have [Docker](https://docs.docker.com/get-docker/) +installed in your machine. + +### Kafka +You will be using Kafka to store sample input data about payment transactions. A simple data generator [generate_source_data.py](generator/generate_source_data.py) is provided to +continuously write new records to the `payment_msg` Kafka topic. Each record is structured as follows: + +`{"createTime": "2020-08-12 06:29:02", "orderId": 1597213797, "payAmount": 28306.44976403719, "payPlatform": 0, "provinceId": 4}` + +* `createTime`: The creation time of the transaction. +* `orderId`: The id of the current transaction. +* `payAmount`: The amount being paid with this transaction. +* `payPlatform`: The platform used to create this payment: pc or mobile. +* `provinceId`: The id of the province for the user. + +You can use the following command to read data from the Kafka topic and check whether it's generated correctly: +```shell script +$ docker-compose exec kafka kafka-console-consumer.sh --bootstrap-server kafka:9092 --topic payment_msg +{"createTime":"2020-07-27 09:25:32.77","orderId":1595841867217,"payAmount":7732.44,"payPlatform":0,"provinceId":3} +{"createTime":"2020-07-27 09:25:33.231","orderId":1595841867218,"payAmount":75774.05,"payPlatform":0,"provinceId":3} +{"createTime":"2020-07-27 09:25:33.72","orderId":1595841867219,"payAmount":65908.55,"payPlatform":0,"provinceId":0} +{"createTime":"2020-07-27 09:25:34.216","orderId":1595841867220,"payAmount":15341.11,"payPlatform":0,"provinceId":1} +{"createTime":"2020-07-27 09:25:34.698","orderId":1595841867221,"payAmount":37504.42,"payPlatform":0,"provinceId":0} +``` +You can also create a new topic by executing the following command: +```shell script +$ docker-compose exec kafka kafka-topics.sh --bootstrap-server kafka:9092 --create --topic <YOUR-TOPIC-NAME> --partitions 8 --replication-factor 1 +``` + +### PyFlink + +The transaction data will be processed with PyFlink using the Python script [payment_msg_processing.py](payment_msg_proccessing.py). +This script will first map the `provinceId` in the input records to its corresponding province name using a Python UDF, +and then compute the sum of the transaction amounts for each province. + +### ElasticSearch + +ElasticSearch is used to store the results and to provide an efficient query service. + +### Kibana + +Kibana is an open source data visualization dashboard for ElasticSearch. You will use it to visualize +the results of your PyFlink pipeline. + +## Setup + +As mentioned, the environment for this walkthrough is based on Docker Compose; It uses a custom image +to spin up Flink (JobManager+TaskManager), Kafka+Zookeeper, the data generator, and Elasticsearch+Kibana containers. + +You can find the [docker-compose.yaml](docker-compose.yml) file of the pyflink-walkthrough in the `pyflink-walkthrough` root directory. + +### Building the Docker image + +First, build the Docker image by running: + +```bash +docker-compose build +``` + +### Starting the Playground + +Once the Docker image build is complete, run the following command to start the playground: + +```bash +docker-compose up -d +``` + +One way of checking if the playground was successfully started is to access some of the services that are exposed: + +1. visiting Flink Web UI [http://localhost:8081](http://localhost:8081). +2. visiting Elasticsearch [http://localhost:9200](http://localhost:9200). +3. visiting Kibana [http://localhost:5601](http://localhost:5601). + +**Note:** you may need to wait around 1 minute before all the services come up. + +### Stopping the Playground + +To stop the playground, run the following command: + +```bash +docker-compose down +``` + + +## Running the PyFlink job + +1. Submit the PyFlink job. +```shell script +$ docker-compose exec jobmanager ./bin/flink run -py /opt/pyflink-walkthrough/payment_msg_proccessing.py -d +``` +Navigate to the [Flink Web UI](http://localhost:8081) after the job is submitted successfully. There should be a job in the running job list. +Click the job to get more details. You should see that the `StreamGraph` of the `payment_msg_proccessing` consists of two nodes, each with a parallelism of 1. +There is also a table in the bottom of the page that shows the metrics of every node (e.g. bytes received/sent, records received/sent). + + + + + +2. Navigate to the [Kibana UI](http://localhost:5601) and choose the pre-created dashboard `payment_dashboard`. There will be a vertical bar chart and a pie chart demonstrating the total amount and the proportion of each province. Review comment: This didn't work for me. localhost:5061 redirected to http://localhost:5601/app/kibana#/home where I see this: 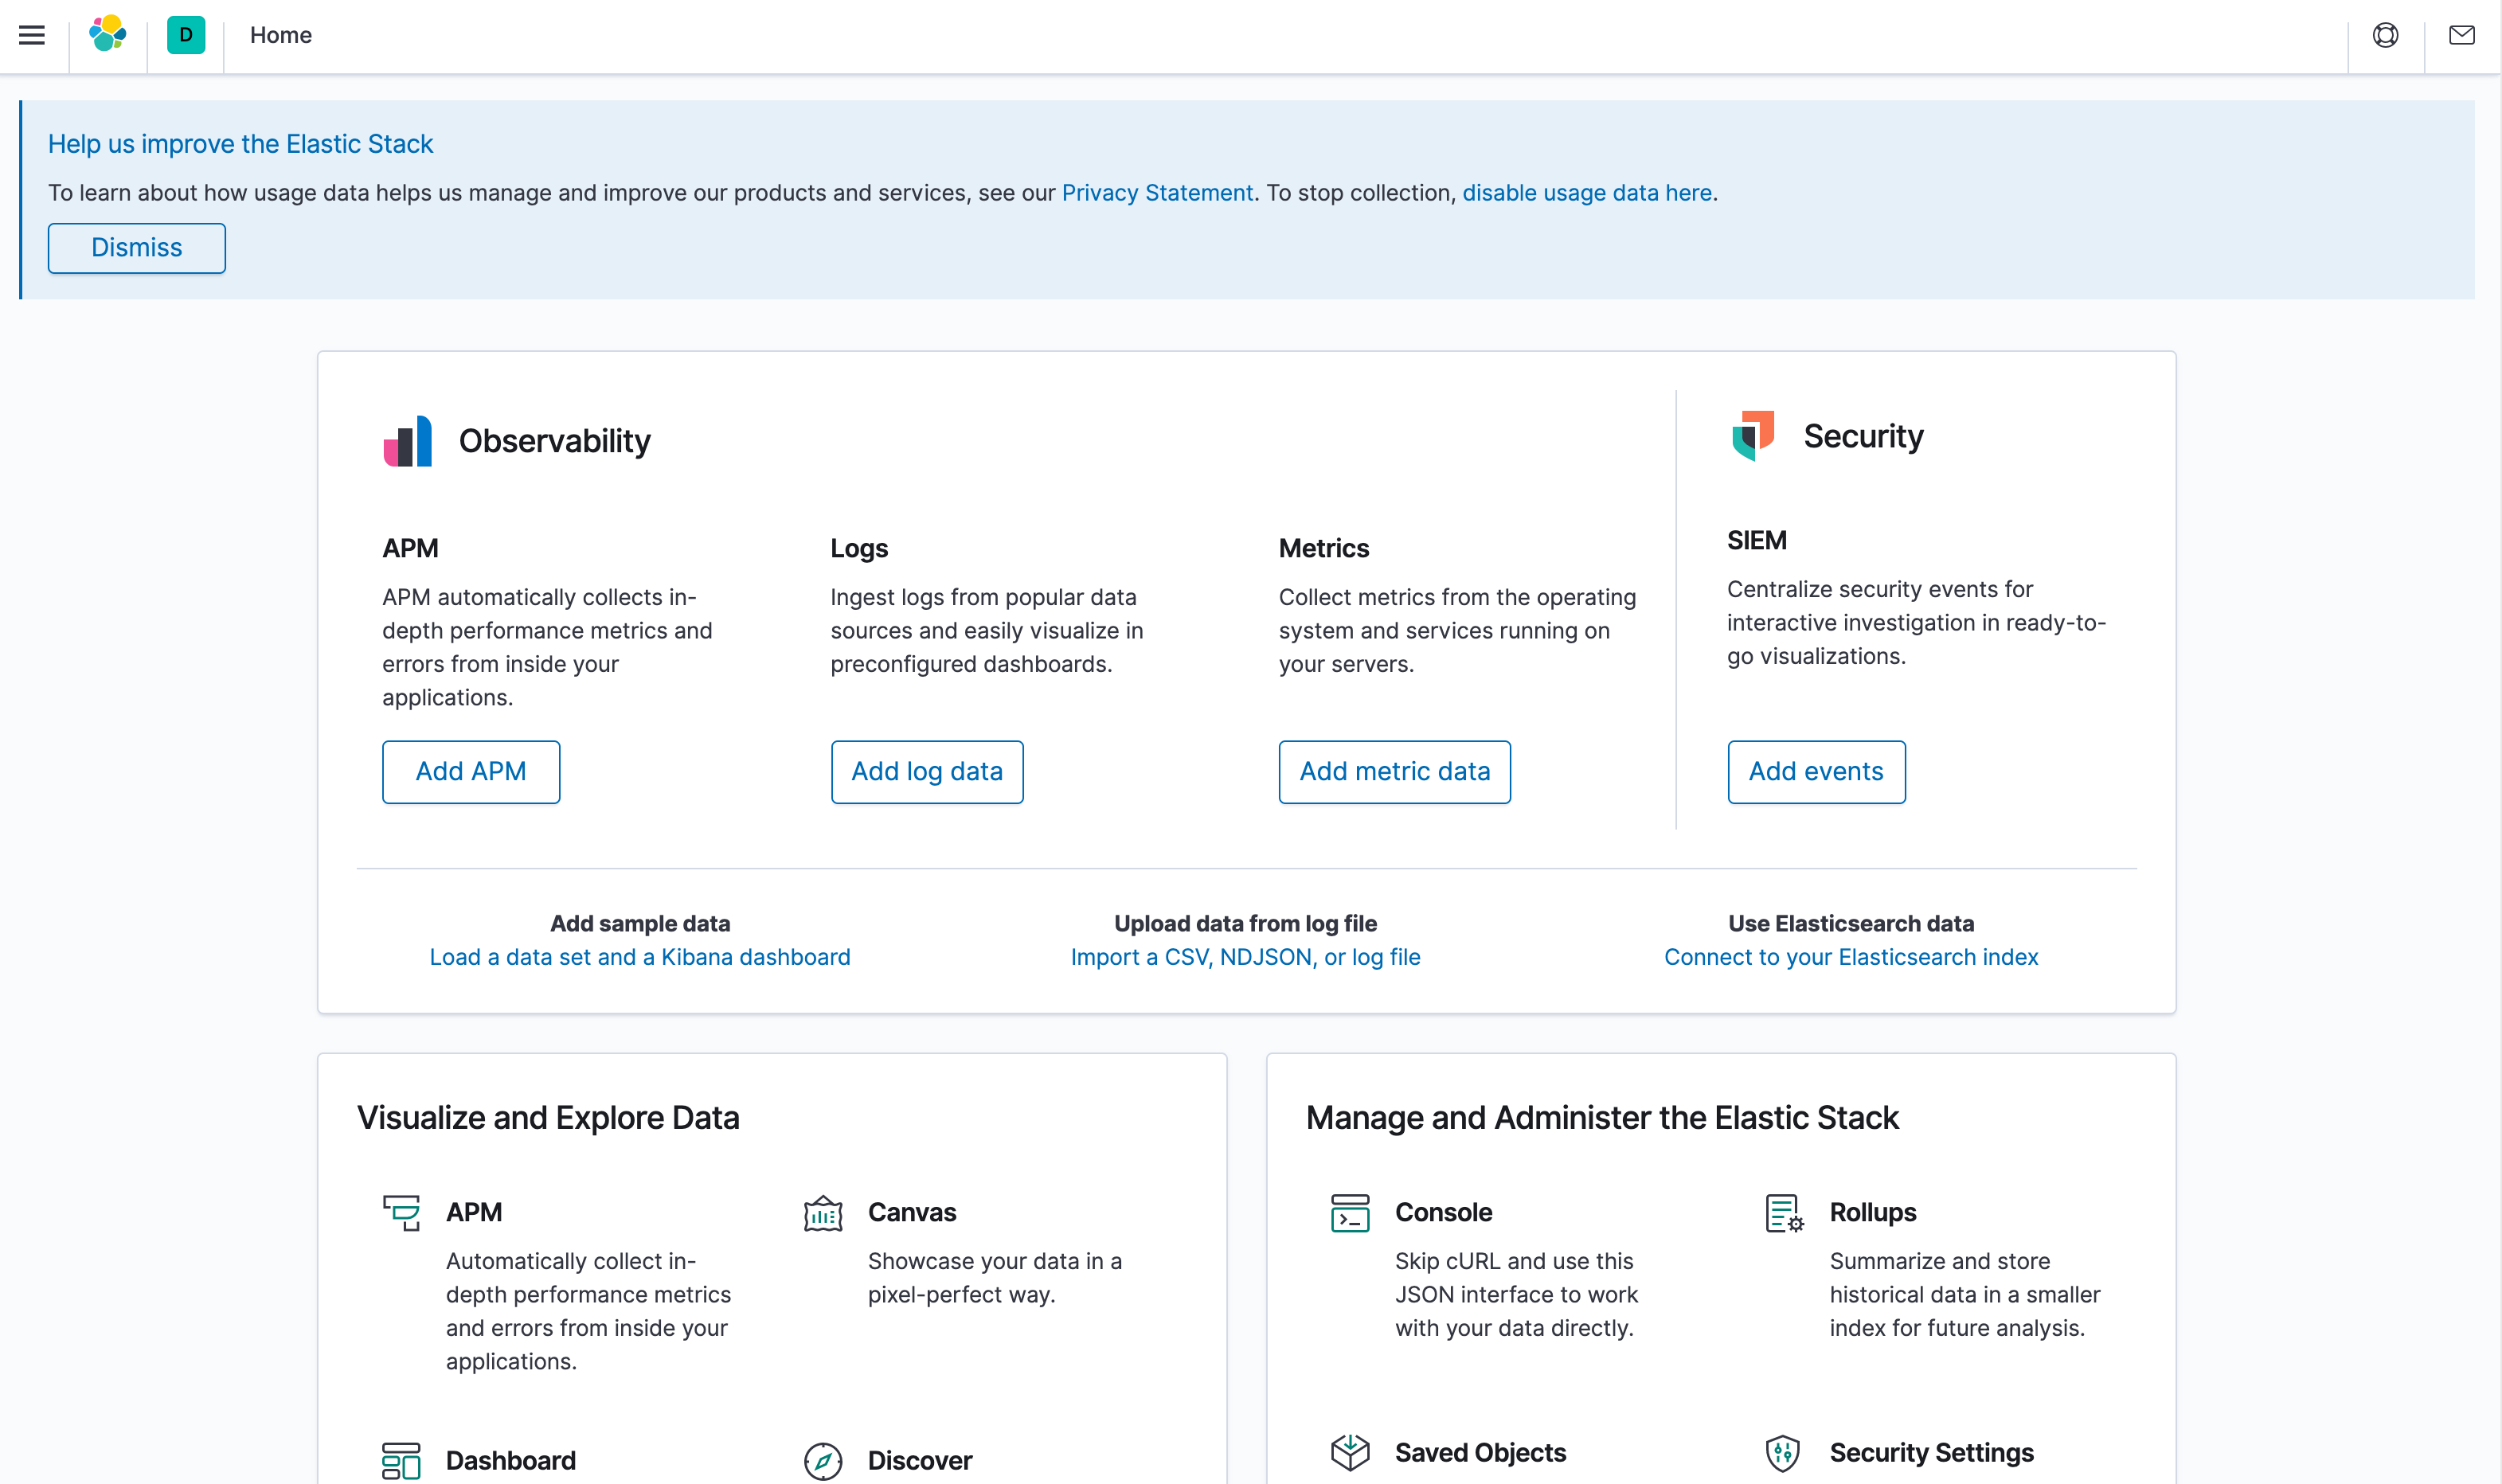 ########## File path: pyflink-walkthrough/README.md ########## @@ -0,0 +1,140 @@ +# pyflink-walkthrough + +## Background + +In this playground, you will learn how to build and run an end-to-end PyFlink pipeline for data analytics, covering the following steps: + +* Reading data from a Kafka source; +* Creating data using a [UDF](https://ci.apache.org/projects/flink/flink-docs-release-1.11/dev/python/table-api-users-guide/udfs/python_udfs.html); +* Performing a simple aggregation over the source data; +* Writing the results to Elasticsearch and visualizing them in Kibana. + +The environment is based on Docker Compose, so the only requirement is that you have [Docker](https://docs.docker.com/get-docker/) +installed in your machine. + +### Kafka +You will be using Kafka to store sample input data about payment transactions. A simple data generator [generate_source_data.py](generator/generate_source_data.py) is provided to +continuously write new records to the `payment_msg` Kafka topic. Each record is structured as follows: + +`{"createTime": "2020-08-12 06:29:02", "orderId": 1597213797, "payAmount": 28306.44976403719, "payPlatform": 0, "provinceId": 4}` + +* `createTime`: The creation time of the transaction. +* `orderId`: The id of the current transaction. +* `payAmount`: The amount being paid with this transaction. +* `payPlatform`: The platform used to create this payment: pc or mobile. +* `provinceId`: The id of the province for the user. + +You can use the following command to read data from the Kafka topic and check whether it's generated correctly: +```shell script +$ docker-compose exec kafka kafka-console-consumer.sh --bootstrap-server kafka:9092 --topic payment_msg +{"createTime":"2020-07-27 09:25:32.77","orderId":1595841867217,"payAmount":7732.44,"payPlatform":0,"provinceId":3} +{"createTime":"2020-07-27 09:25:33.231","orderId":1595841867218,"payAmount":75774.05,"payPlatform":0,"provinceId":3} +{"createTime":"2020-07-27 09:25:33.72","orderId":1595841867219,"payAmount":65908.55,"payPlatform":0,"provinceId":0} +{"createTime":"2020-07-27 09:25:34.216","orderId":1595841867220,"payAmount":15341.11,"payPlatform":0,"provinceId":1} +{"createTime":"2020-07-27 09:25:34.698","orderId":1595841867221,"payAmount":37504.42,"payPlatform":0,"provinceId":0} +``` +You can also create a new topic by executing the following command: +```shell script +$ docker-compose exec kafka kafka-topics.sh --bootstrap-server kafka:9092 --create --topic <YOUR-TOPIC-NAME> --partitions 8 --replication-factor 1 +``` + +### PyFlink + +The transaction data will be processed with PyFlink using the Python script [payment_msg_processing.py](payment_msg_proccessing.py). +This script will first map the `provinceId` in the input records to its corresponding province name using a Python UDF, +and then compute the sum of the transaction amounts for each province. + +### ElasticSearch + +ElasticSearch is used to store the results and to provide an efficient query service. + +### Kibana + +Kibana is an open source data visualization dashboard for ElasticSearch. You will use it to visualize +the results of your PyFlink pipeline. + +## Setup + +As mentioned, the environment for this walkthrough is based on Docker Compose; It uses a custom image +to spin up Flink (JobManager+TaskManager), Kafka+Zookeeper, the data generator, and Elasticsearch+Kibana containers. + +You can find the [docker-compose.yaml](docker-compose.yml) file of the pyflink-walkthrough in the `pyflink-walkthrough` root directory. + +### Building the Docker image + +First, build the Docker image by running: + +```bash +docker-compose build +``` + +### Starting the Playground + +Once the Docker image build is complete, run the following command to start the playground: + +```bash +docker-compose up -d +``` + +One way of checking if the playground was successfully started is to access some of the services that are exposed: + +1. visiting Flink Web UI [http://localhost:8081](http://localhost:8081). +2. visiting Elasticsearch [http://localhost:9200](http://localhost:9200). +3. visiting Kibana [http://localhost:5601](http://localhost:5601). + +**Note:** you may need to wait around 1 minute before all the services come up. + +### Stopping the Playground + +To stop the playground, run the following command: + +```bash +docker-compose down +``` + + +## Running the PyFlink job + +1. Submit the PyFlink job. +```shell script +$ docker-compose exec jobmanager ./bin/flink run -py /opt/pyflink-walkthrough/payment_msg_proccessing.py -d Review comment: I suggest being consistent, and putting a $ prompt in front of all of the other shell commands in this README as well. ---------------------------------------------------------------- This is an automated message from the Apache Git Service. To respond to the message, please log on to GitHub and use the URL above to go to the specific comment. For queries about this service, please contact Infrastructure at: [email protected]