Koen Aers [http://community.jboss.org/people/koen.aers] modified the blog post:
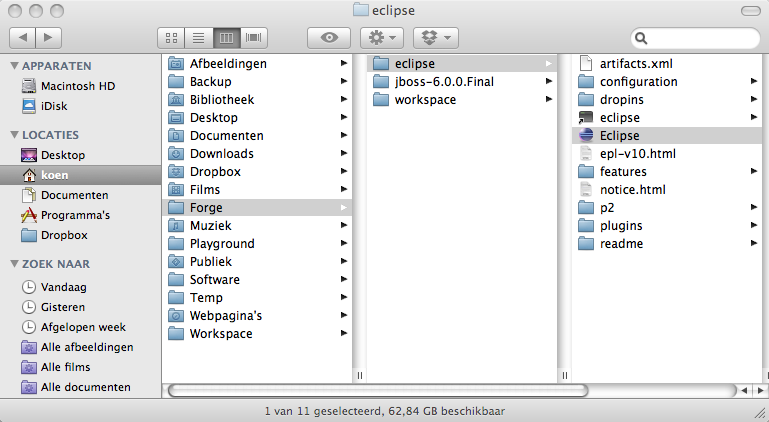
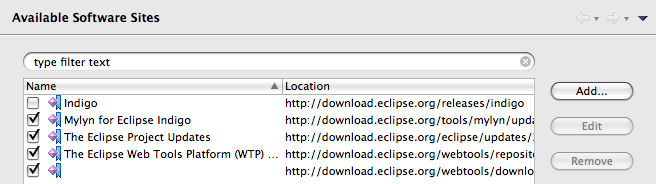
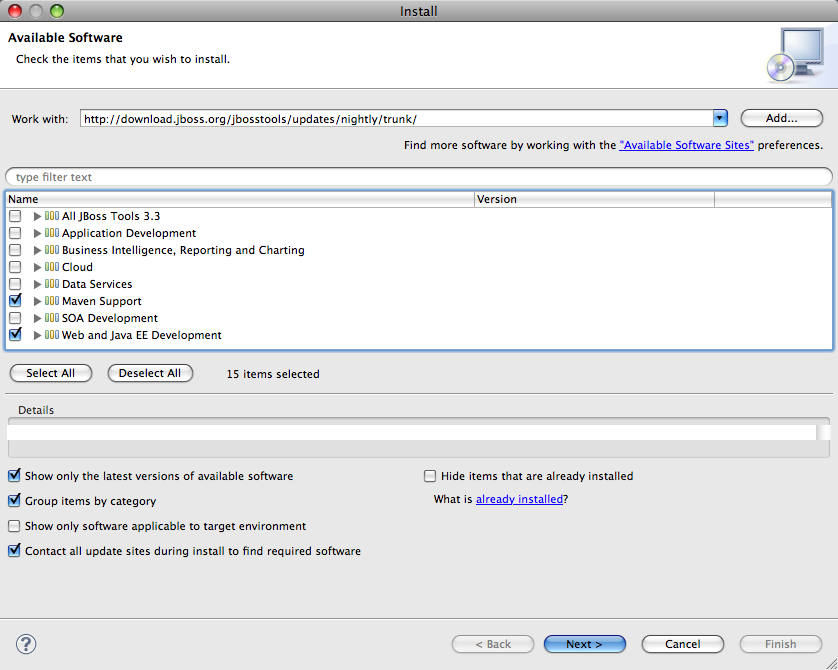
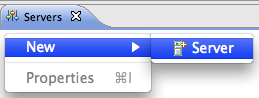
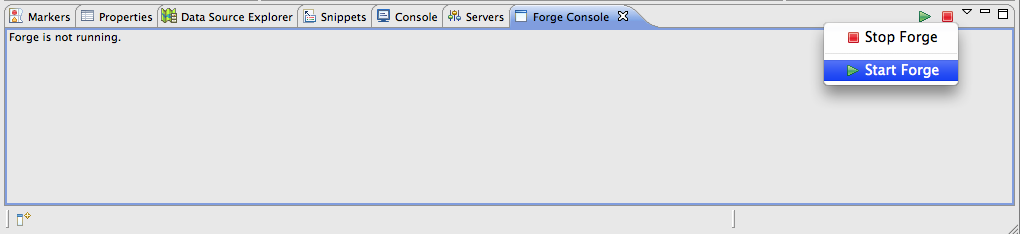
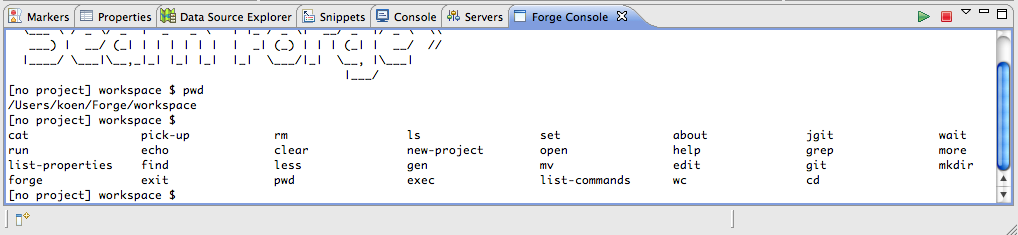
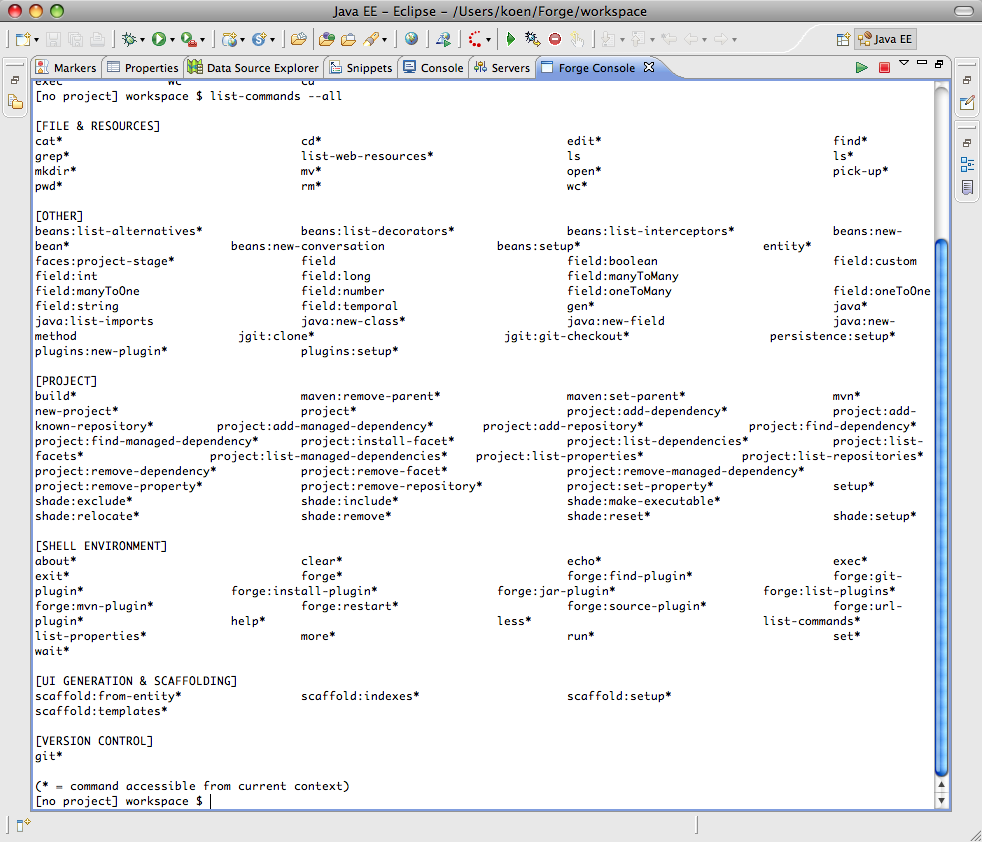
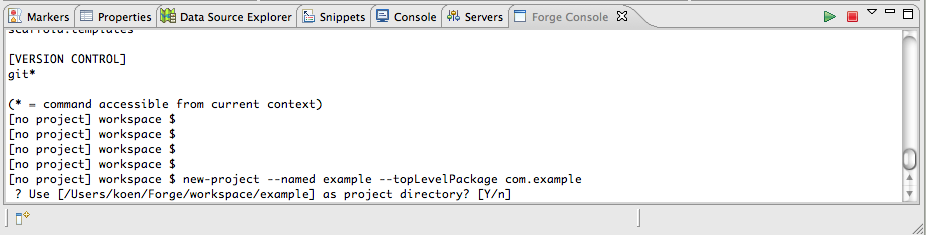
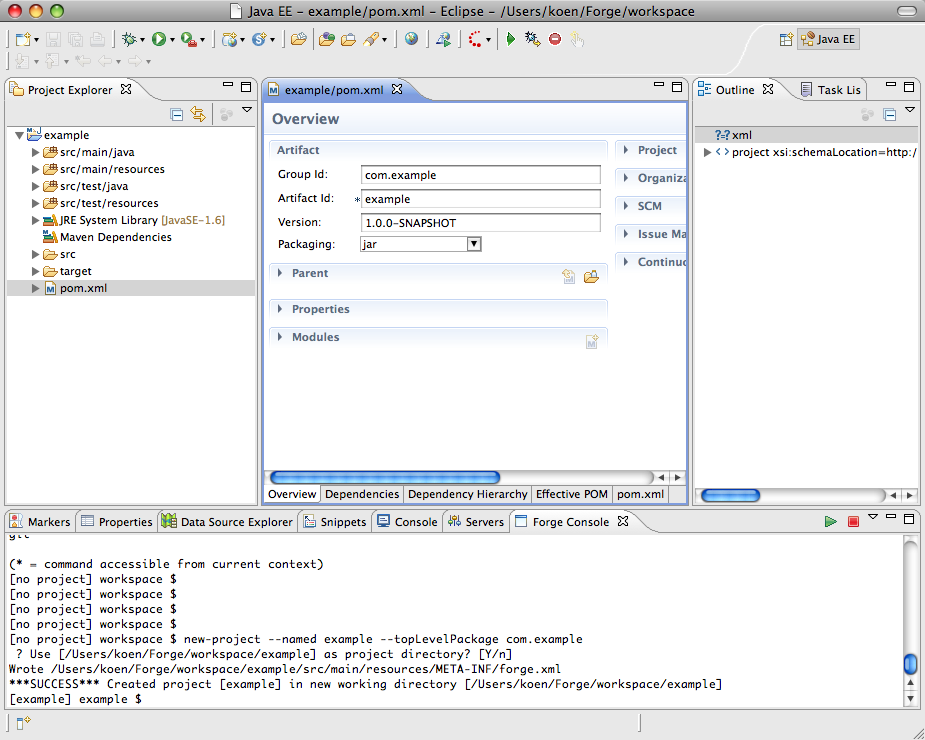
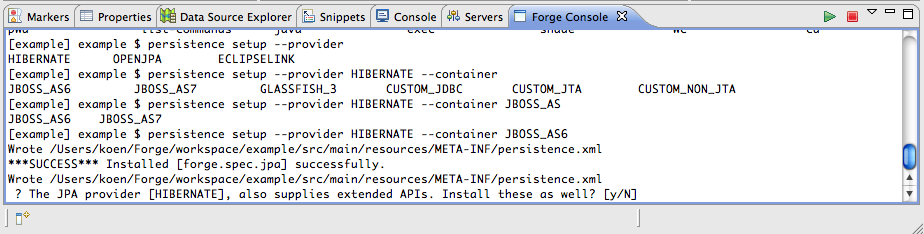
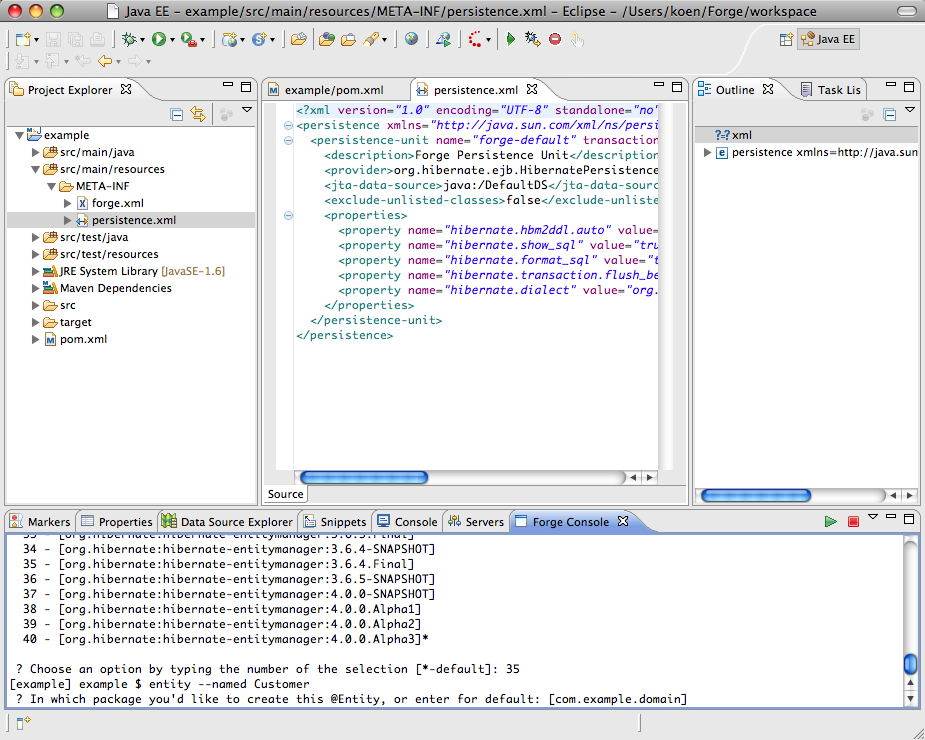
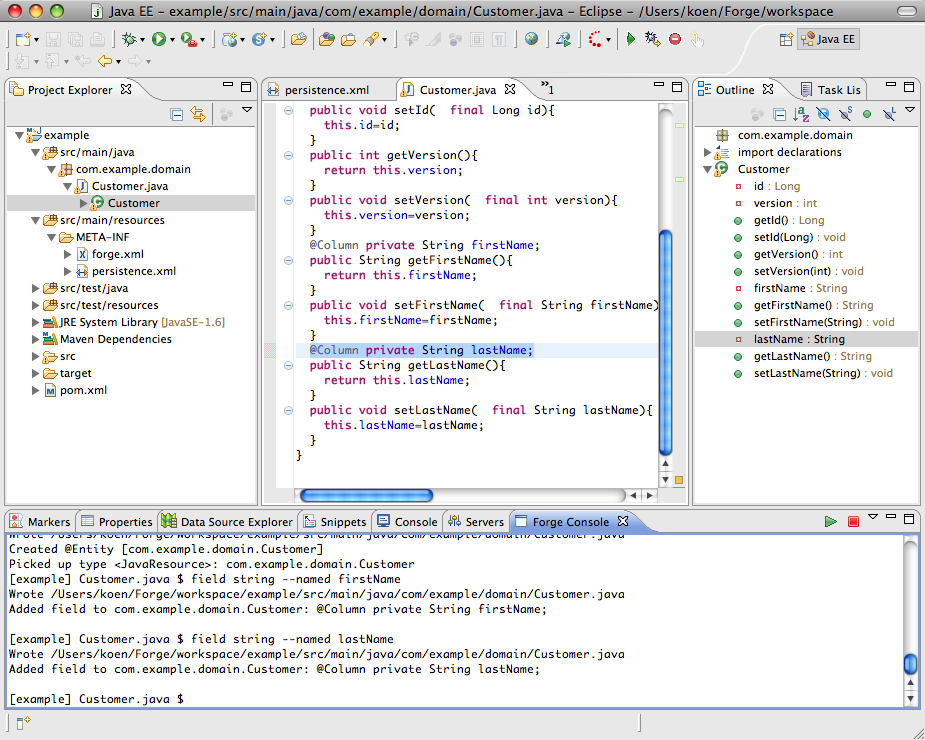
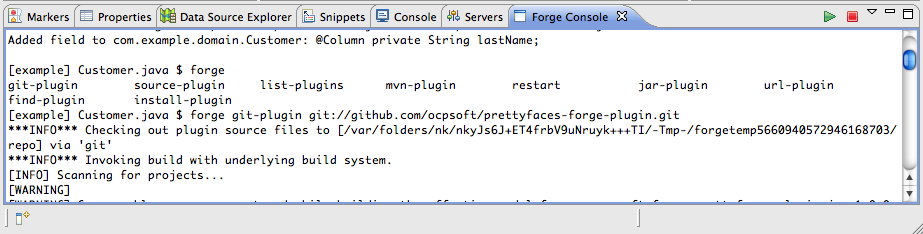
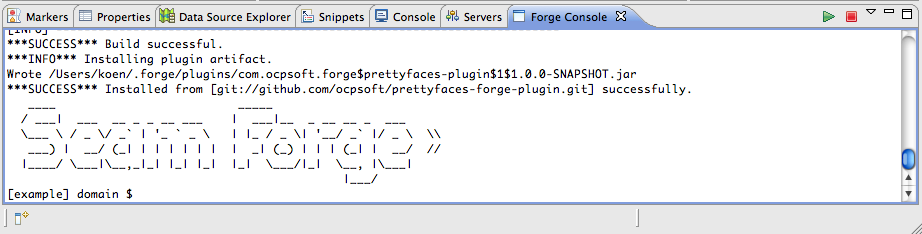
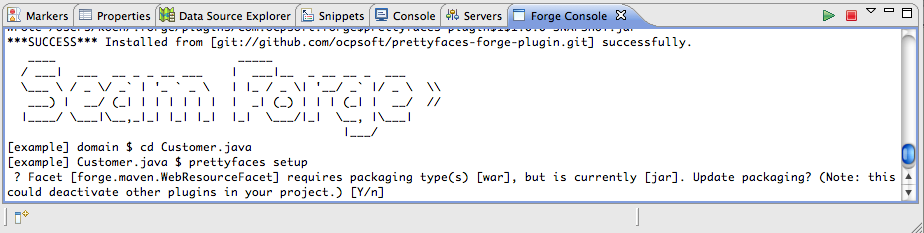
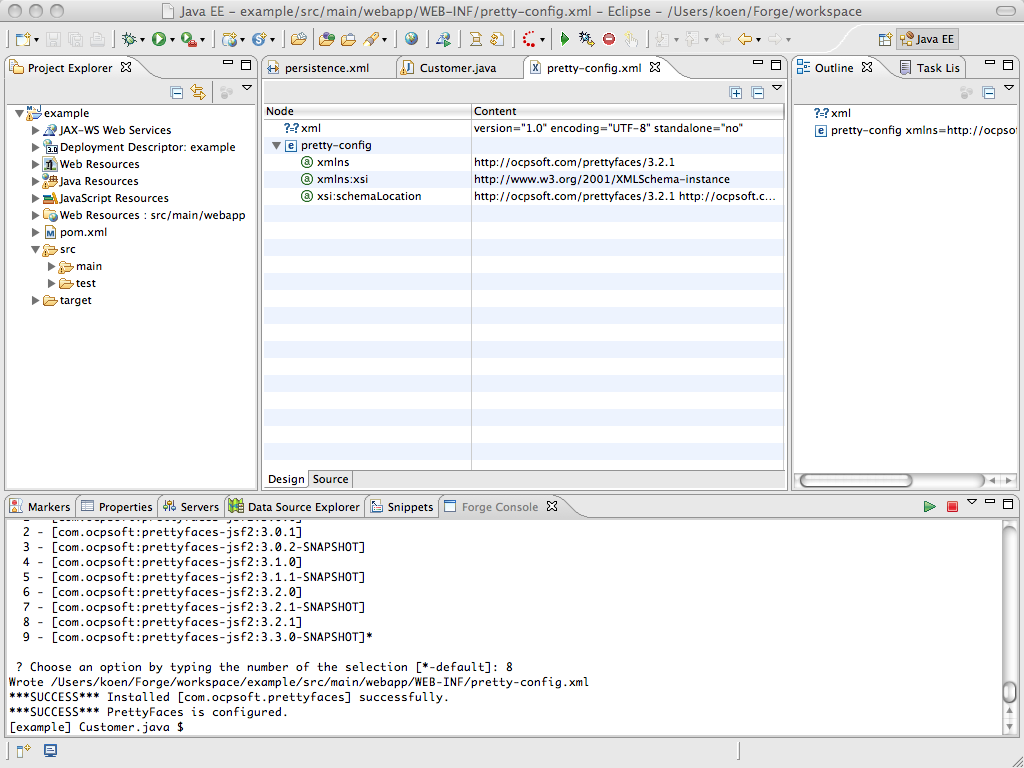
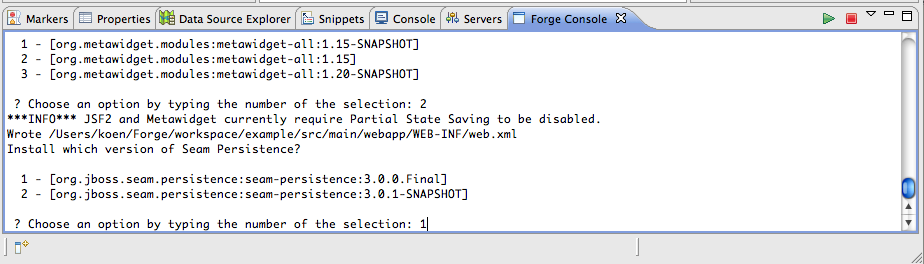
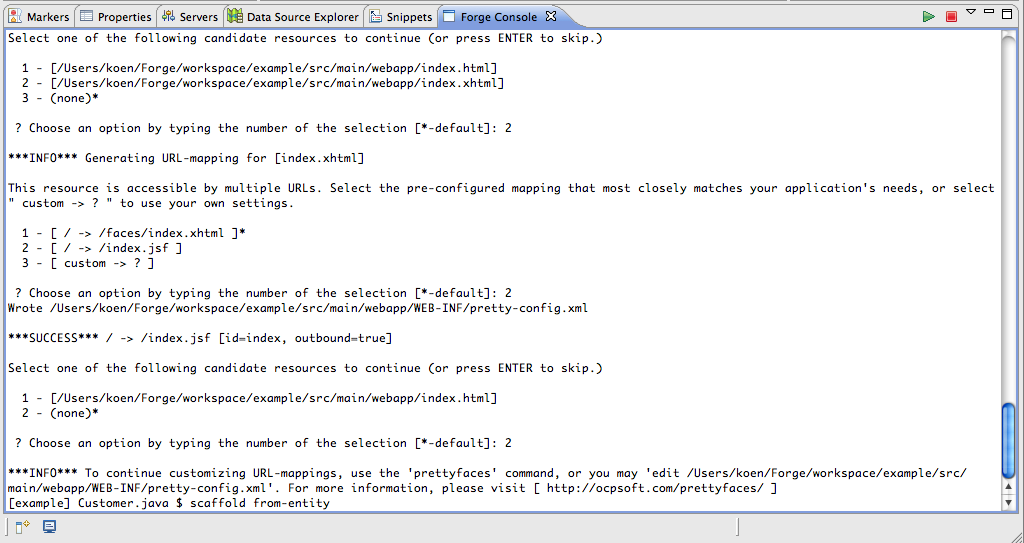
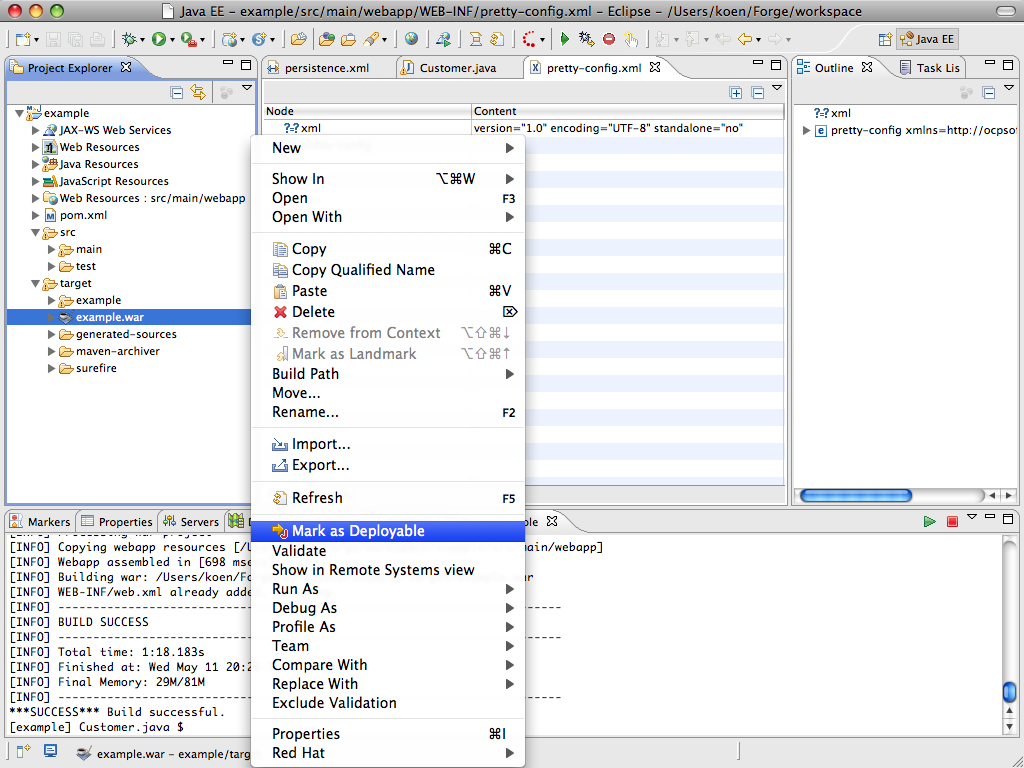
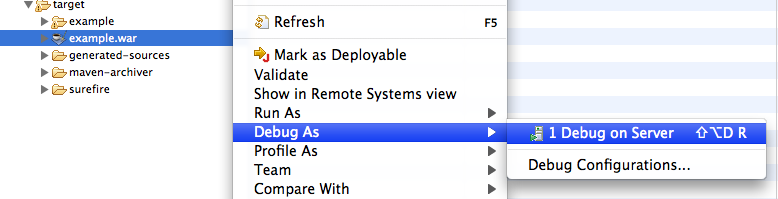
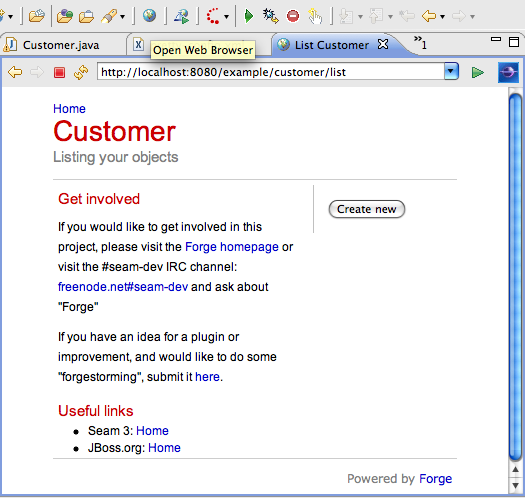
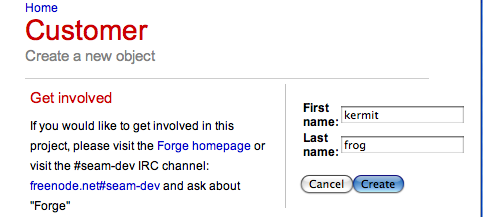
"Have Your Cake and Eat It Too : Forge Tools"

To view the blog post, visit:
http://community.jboss.org/community/tools/blog/2011/05/11/have-your-cake-and-eat-it-too-forge-tools

--------------------------------------------------------------
As I
http://community.jboss.org/en/tools/blog/2011/01/27/forging-of-the-forge-tools
reported earlier I am currently working on the integration of Forge in JBoss
Tools.  http://vimeo.com/22463907 Lincoln's excellent screencast inspired me to
write up a tutorial that shows how his work looks in the context of JBoss
Tools. For the people that are too busy to read through the entire post and
prefer to watch a movie, I have recorded a short version. In true Hollywood
style, this is basically a remake of Lincoln's version. We will create, deploy
and debug a simple JEE web application on JBoss AS but this time using JBoss
Tools.

Media Description: Link:
http://www.vimeo.com/moogaloop.swf?clip_id=video&server=www.vimeo.com&show_title=1&show_byline=1&show_portrait=0&color=&fullscreen=1


Now for the brave among you. Let's see the detailed steps on how to do this
yourself...
h1. Setting Up
If you want to try out the different steps in this article the first piece of
software you will need to install is JBoss AS. I recommend to
http://sourceforge.net/projects/jboss/files/JBoss/JBoss-6.0.0.Final/ download
AS 6 Final and extract it into your place of choice.

The other item that you need is JBoss Tools. We are going to live on the
bleeding edge and use a nightly build of JBoss Tools 3.3 which embeds a
snapshot of the Forge runtime. A word of warning is in its place here: as usual
when using nightlies and alpha software it is very well possible that things
are broken. If this would happen please don't get frustrated and try again some
time later. Or even better, report the issue on the
http://community.jboss.org/en/tools?view=discussions JBoss Tools Forum or on
the Forge mailing list ( mailto:[email protected]
[email protected]).

I assume, dear reader, that you are hardcore enough not to be scared away by
these minor inconveniences and are ready to download the
http://www.eclipse.org/downloads/packages/release/indigo/m6 Indigo M6 release
of the Eclipse IDE for Java EE Developers. Extract the archive into your place
of choice and fire up the Eclipse IDE. The screenshot below shows you what the
installation folder looks like on my machine.

http://community.jboss.org/servlet/JiveServlet/showImage/38-3794-16284/installation_layout.png

http://community.jboss.org/servlet/JiveServlet/downloadImage/38-3794-16284/450-246/installation_layout.png

When this is done let's go ahead and install the appropriate elements of JBoss
Tools. To do this, we select Help->Install New Software. To avoid clashes
between the JBoss Tools and Eclipse Indigo update sites we have to disable the
latter. Click on the Available Software Sites link and uncheck the Indigo
entry.

http://community.jboss.org/servlet/JiveServlet/showImage/38-3794-16357/available_software_sites.png

http://community.jboss.org/servlet/JiveServlet/downloadImage/38-3794-16357/450-125/available_software_sites.png

After this, we enter the address of the
http://download.jboss.org/jbosstools/updates/nightly/trunk/ JBoss Tools nightly
update site in the Work with: text field. In the resulting list of available
software elements we select Maven Support and Web and Java EE Development. This
is illustrated in the screenshot below.

http://community.jboss.org/servlet/JiveServlet/showImage/38-3794-16285/install_jboss_tools.png

http://community.jboss.org/servlet/JiveServlet/downloadImage/38-3794-16285/450-359/install_jboss_tools.png

The rest of this installation is pretty straightforward. We press Next> and
wait until all the needed dependencies have been calculated. Then we press
Next> again on the Installation Details page, we accept the license agreements
on the Review Licenses page and press Finish to launch the process that will
download the required packages. We press OK when the security warning appears
and Restart Now when prompted.

Now we are ready for the next step which will be to configure and start the
application server.

h1. Configuring the Application Server
In order to debug a webapp in our running server we need to make JBoss Tools
aware of the server. The first step to do this is bring up the context menu in
the Servers view and select New->Server.

http://community.jboss.org/servlet/JiveServlet/showImage/38-3794-16286/new_server.png

http://community.jboss.org/servlet/JiveServlet/downloadImage/38-3794-16286/259-98/new_server.png
 The New Server wizard opens. On the first page of this wizard we select JBoss
Community->JBoss AS 6.0 as the server type and push the Next> button. The only
thing we still need to do is specify the folder where we extracted the
previously downloaded JBoss AS 6 archive in the Home Directory text field. The
situation on my machine is illustrated in the screenshot below.

http://community.jboss.org/servlet/JiveServlet/showImage/38-3794-16287/JBoss_Runtime.png

http://community.jboss.org/servlet/JiveServlet/downloadImage/38-3794-16287/450-472/JBoss_Runtime.png

We leave all the default settings and push the Finish button to close the
wizard. The newly configured server shows up in the Servers view. The only
thing that we still need to do is launch it by selecting this new server,
bringing up the context menu. Since we want to debug our application we will
select Debug to launch it in debug mode.

http://community.jboss.org/servlet/JiveServlet/showImage/38-3794-16289/debug_server.png

http://community.jboss.org/servlet/JiveServlet/downloadImage/38-3794-16289/450-87/debug_server.png

The Console view opens and shows the console messages generated by the starting
application server. After some time our server is up and running and we are
ready to roll.

h1. First Forge Steps
Until now we haven't seen any sign of our beloved Forge project. Let's change
that and open up the Forge console by selecting Window->Show View->Other... and
then Forge->Forge Console as illustrated above. The Forge Console view opens.
An image of that is shown below.

http://community.jboss.org/servlet/JiveServlet/showImage/38-3794-16292/start_forge.png

http://community.jboss.org/servlet/JiveServlet/downloadImage/38-3794-16292/450-103/start_forge.png

As you can see there are two buttons in the top left corner of this view as
well as a drop down menu with two entries to start and stop our Forge runtime.
Go ahead and select either the green arrow or the 'Start Forge' entry from the
menu. After some time the Forge start banner should appear and Forge is
prompting for input. Entering the pwd command should indicate the path to your
current workspace.

http://community.jboss.org/servlet/JiveServlet/showImage/38-3794-16293/forge_banner.png

http://community.jboss.org/servlet/JiveServlet/downloadImage/38-3794-16293/450-103/forge_banner.png

It can sometimes be unclear to a beginning user as to what commands you can
issue at a particular moment when working with Forge. Luckily there are a
number of tools at your disposal that can help at this point. Typing a tab
character can help you at any time. When you do this at an empty prompt Forge
will give you a list of commands that can be used at that particular scope.
Below you see the list that is produced when we type a tab character at this
time.

http://community.jboss.org/servlet/JiveServlet/showImage/38-3794-16295/tab_character.png

http://community.jboss.org/servlet/JiveServlet/downloadImage/38-3794-16295/450-103/tab_character.png

You can also use the tab character when in the middle of typing a command. When
there are multiple choices Forge will list all the possibilities but when there
is only one possibility Forge will complete your command. Furthermore, as you
can see, there is the list-commands command. This will print the commands
applicable in the current scope listed by category. If you use this command
with the --all option, it will list all the possible commands disregarding the
current scope. The ones that are applicable in the current scope are marked
with an asterisk.

http://community.jboss.org/servlet/JiveServlet/showImage/38-3794-16296/list_commands_all.png

http://community.jboss.org/servlet/JiveServlet/downloadImage/38-3794-16296/450-385/list_commands_all.png

Before we start the interesting work, it is worth mentioning one last thing.
The Forge runtime that we are currently working with is embedded in JBoss
Tools. Currently this is a snapshot build that removes some of the issues that
were present in the 1.0.0.Alpha3 release. Of course it is probable that at one
time you will want to change the provided runtime. You can do so by opening the
Installed Forge Runtimes preferences page. On this page you can add new
runtimes and select the one that you want to use.

http://community.jboss.org/servlet/JiveServlet/showImage/38-3794-16294/forge_preferences.png

http://community.jboss.org/servlet/JiveServlet/downloadImage/38-3794-16294/450-364/forge_preferences.png

Now that we have covered the basics, it is time for some real work. Let's
create an example project.

h1. Creating the Example Project
Surprisingly enough or not, to create a new project, you need to use the
new-project command. This command has two important parameters: the name of the
project itself and the fully qualified name of the top level package. Using the
tab character is really convenient as you will quickly learn when using Forge
for a while as it reduces the long command illustrated below to just a few key
presses. Of course you will still have to write the respective names.

http://community.jboss.org/servlet/JiveServlet/showImage/38-3794-16297/new_project.png

http://community.jboss.org/servlet/JiveServlet/downloadImage/38-3794-16297/450-113/new_project.png

We accept the default project directory that Forge presents us by pressing
enter once again. At this time the Forge runtime starts off creating a project
with a typical Maven layout. When this is done JBoss Tools will automatically
import this newly created project into the current workspace. The result is
shown in the screenshot below.

http://community.jboss.org/servlet/JiveServlet/showImage/38-3794-16298/after_project_import.png

http://community.jboss.org/servlet/JiveServlet/downloadImage/38-3794-16298/450-360/after_project_import.png

As you can see, this went really very smoothly. But let's make it even more
interesting by creating an entity.

h1. Adding the Customer Entity
Adding an entity is done using the entity command. At this time, in the current
scope, the 'entity' command is not enabled. We first have to setup the
persistence. This is done using the persistence setup command. We will need to
specify the JPA provider for which we choose Hibernate and the target container
which will be JBoss AS 6. The full command to issue is persistence setup
--provider HIBERNATE --container JBOSS_AS6.

http://community.jboss.org/servlet/JiveServlet/showImage/38-3794-16299/persistence_setup.png

http://community.jboss.org/servlet/JiveServlet/downloadImage/38-3794-16299/450-113/persistence_setup.png
 As you can see we have the opportunity to accept support for the extended APIs
which we will do. When prompted we select version 3.6.4.Final of Hibernate. As
shown below, an editor opens and shows the generated persistence.xml file.

http://community.jboss.org/servlet/JiveServlet/showImage/38-3794-16302/entity_command.png

http://community.jboss.org/servlet/JiveServlet/downloadImage/38-3794-16302/450-360/entity_command.png

Now the we can create entities. As shown above we issue the following command
entity --named Customer. We will be lazy again and accept the proposed default
package. This time the java editor opens on the generated Customer.java file.

http://community.jboss.org/servlet/JiveServlet/showImage/38-3794-16303/field_command.png

http://community.jboss.org/servlet/JiveServlet/downloadImage/38-3794-16303/450-360/field_command.png

Next we will create two fields in our Customer class. One for the first name
and one for the last name of the customer. The two commands to be issued are
field string --named firstName and field string --named lastName. Observe how
the newly created fields get selected in the editor and the outline view.

http://community.jboss.org/servlet/JiveServlet/showImage/38-3794-16304/after_adding_fields.png

http://community.jboss.org/servlet/JiveServlet/downloadImage/38-3794-16304/450-360/after_adding_fields.png

Now that we have our Customer class, let's develop the user interface. We want
to make use of PrettyFaces to provide us with pretty URLs. Fortunately for us,
there is a Forge plugin for PrettyFaces that we can use. As a bonus it will
enable us to show how to install additional plugins into Forge.

h1. Adding the PrettyFaces Plugin
The commands available in Forge are provided by plugins. The Forge runtime
embedded in JBoss Tools comes with a number of standard plugins that provide us
with the commands that were shown earlier when we tried the list-commands --all
command. The prettyfaces setup command which we need to use if we want to
enable PrettyFaces in our example project is not one of those standard
commands. Luckily the list of Forge commands is extensible. To do so we can
install plugins with the forge command. There are a number of different ways to
install those plugins such as providing a jar file or a Maven identifier. We
are going to install our PrettyFaces plugin using git. As shown below we issue
the forge git-plugin git://github.com/ocpsoft/prettyfaces-forge-plugin.git
command.

http://community.jboss.org/servlet/JiveServlet/showImage/38-3794-16310/install_prettyfaces.png

http://community.jboss.org/servlet/JiveServlet/downloadImage/38-3794-16310/450-113/install_prettyfaces.png

Forge will start by checking out the plugin source code into a temporary
folder, launch Maven on the checked out code to build the plugin and then
install the plugin in the ~/.forge folder. It will then restart Forge so that
the new plugin is available.

http://community.jboss.org/servlet/JiveServlet/showImage/38-3794-16309/prettyfaces_installed.png

http://community.jboss.org/servlet/JiveServlet/downloadImage/38-3794-16309/450-113/prettyfaces_installed.png

Now that our prettyfaces plugin is installed, we can start using it.

h1. PrettyFaces in the Example Project
We start of where we left earlier and setup PrettyFaces for our example project
by issuing the command prettyfaces setup. Forge will ask us if it's OK to
change the packaging from 'jar' to 'war', which we accept.

http://community.jboss.org/servlet/JiveServlet/showImage/38-3794-16316/prettyfaces_setup.png

http://community.jboss.org/servlet/JiveServlet/downloadImage/38-3794-16316/450-113/prettyfaces_setup.png

After that we need to choose the technology to use for our application. We
choose Java EE 6 and Servlet >= 3.0.

http://community.jboss.org/servlet/JiveServlet/showImage/38-3794-16317/prettyfaces_technology.png

http://community.jboss.org/servlet/JiveServlet/downloadImage/38-3794-16317/450-113/prettyfaces_technology.png

The last thing Forge asks from us is to choose the version of PrettyFaces that
we want to use. We choose version 3.2.1. The pretty-config.xml file opens in an
xml editor. Also notice how the layout of the project changes. This is because
setting up PrettyFaces has changed our packaging from 'jar' to 'war'. The
Eclipse Maven integration picks this up and the Forge Tools automatically
update the project configuration accordingly.

http://community.jboss.org/servlet/JiveServlet/showImage/38-3794-16353/prettyfaces_installed.png

http://community.jboss.org/servlet/JiveServlet/downloadImage/38-3794-16353/450-337/prettyfaces_installed.png

Now we are sure we will be able to create pretty urls and we are ready to
scaffold our Customer application.

h1. Scaffolding the Example Application
The first thing to do is setup scaffolding. We issue the scaffold setup command
and accept the default for the scaffold type and instruct Forge to install the
scaffold provider for our project.

http://community.jboss.org/servlet/JiveServlet/showImage/38-3794-16324/scaffold_setup.png

http://community.jboss.org/servlet/JiveServlet/downloadImage/38-3794-16324/450-113/scaffold_setup.png

We install version 1.15 of Metawidget and version 3.0.0.Final of Seam
Persistence.

http://community.jboss.org/servlet/JiveServlet/showImage/38-3794-16325/scaffold_versions.png

http://community.jboss.org/servlet/JiveServlet/downloadImage/38-3794-16325/450-128/scaffold_versions.png

We accept the index.html file to be overwritten and choose to generate a pretty
URL ('/') for the combination of the index.xhtml resource and the /index.jsf
URL.

http://community.jboss.org/servlet/JiveServlet/showImage/38-3794-16356/scaffold_index.png

http://community.jboss.org/servlet/JiveServlet/downloadImage/38-3794-16356/450-238/scaffold_index.png

Now we need to scaffold the user interface for the Customer entity. We can do
this by issuing the scaffold from-entity command. We again accept the default
for the scaffold type and then generate the following URL combinations:
* /customer/view -> /faces/scaffold/customer/view.xhtml for the view.xhtml
resource.
* /customer/create -> /faces/scaffold/customer/create.xhtml for the
create.xhtml resource
* /customer/list -> /faces/scaffold/customer/list.xhtml for the list.xhtml
resource
The process is illustrated below for the first one of these.

http://community.jboss.org/servlet/JiveServlet/showImage/38-3794-16358/scaffold_from_entity.png

http://community.jboss.org/servlet/JiveServlet/downloadImage/38-3794-16358/450-177/scaffold_from_entity.png

After this, we can proceed by building and deploying our application.
*
*
h1. Building and Deploying
Building the application is only a matter of entering the build command. This
will invoke Maven and build the project.

http://community.jboss.org/servlet/JiveServlet/showImage/38-3794-16359/mark_as_deployable.png

http://community.jboss.org/servlet/JiveServlet/downloadImage/38-3794-16359/450-337/mark_as_deployable.png

When the build is finished, we navigate to the created example.war artefact in
the target folder, bring up the context menu on this file and select Mark as
Deployable. After that, we bring up the context menu a second time on this file
and select Debug As->Debug on Server.

http://community.jboss.org/servlet/JiveServlet/showImage/38-3794-16360/debug_on_server.png

http://community.jboss.org/servlet/JiveServlet/downloadImage/38-3794-16360/450-114/debug_on_server.png

The Debug on Server wizard pops up. We select our JBoss AS 6 Runtime Server
that we configured in the beginning and push the Finish button. The Eclipse
console view should appear, showing the activity of the server while it is
deploying our application.
When deployment is finished, we are ready to see how debugging works.
*
*
h1. Debugging the Application
Let's put a breakpoint setLastName method of our Customer class.

http://community.jboss.org/servlet/JiveServlet/showImage/38-3794-16361/breakpoint.png

http://community.jboss.org/servlet/JiveServlet/downloadImage/38-3794-16361/443-81/breakpoint.png

Next we open the Eclipse browser window by clicking the globe icon in the
toolbar and enter the URL of our application:
http://localhost:8080/example/customer/list.

http://community.jboss.org/servlet/JiveServlet/showImage/38-3794-16362/webbrowser.png

http://community.jboss.org/servlet/JiveServlet/downloadImage/38-3794-16362/449-426/webbrowser.png

As expected there are no customers in our database. Let's change this by
pushing the Create new button. On the next screen we enter the first and last
names of our first customer and press Create.

http://community.jboss.org/servlet/JiveServlet/showImage/38-3794-16364/kermit_frog.png

http://community.jboss.org/servlet/JiveServlet/downloadImage/38-3794-16364/450-202/kermit_frog.png

We are prompted by Eclipse to change to the Debug perspective and as expected,
our application is halted on the breakpoint tht we set a moment ago.

http://community.jboss.org/servlet/JiveServlet/showImage/38-3794-16365/debug.png

http://community.jboss.org/servlet/JiveServlet/downloadImage/38-3794-16365/450-337/debug.png

Now we can do all the things developers do while debugging applications. I
encourage you to remove the breakpoint and push the Resume button (or F8) to
continue the application, play around and see how Forge created a basic CRUD
user interface for our Customer entity. For me the time has come to finish this
long article and come to a conclusion.
*
*
h1. Conclusion
In this article I have tried to illustrate how easy it is to get started with
Forge to create, deploy and debug a JEE application. Also, I have tried to show
you how developers can benefit greatly of the combined power of a command line
oriented interface that is integrated in a full featured IDE. As you have seen,
the IDE can provide immediate feedback of what happened by issuing the commands
at the command line in the Forge Console view.
Finally, I would encourage you to test drive Forge and its JBoss Tools
integration and provide us with all you feedback. For that you can use the
Forge mailing list ( mailto:[email protected]
[email protected]) as well as the
http://community.jboss.org/en/tools?view=discussions JBoss Tools discussion
forum. Bugs and feature requests can be filed against the
https://issues.jboss.org/browse/SEAMFORGE Forge or the  http:// JBoss Tools
issue trackers.

Happy Forging!
Koen
--------------------------------------------------------------

Comment by going to Community
[http://community.jboss.org/community/tools/blog/2011/05/11/have-your-cake-and-eat-it-too-forge-tools]
_______________________________________________
jboss-user mailing list
[email protected]
https://lists.jboss.org/mailman/listinfo/jboss-user