tao12345666333 commented on code in PR #1312:
URL: https://github.com/apache/apisix-website/pull/1312#discussion_r962501178
########## blog/en/blog/2022/09/09/kubernetes-ingress-with-apisix.md: ########## @@ -0,0 +1,248 @@ +--- +title: "Hands-On: Set Up Ingress on Kubernetes With Apache APISIX Ingress Controller" +authors: + - name: Navendu Pottekkat + title: Author + url: https://github.com/navendu-pottekkat + image_url: https://avatars.githubusercontent.com/u/49474499 +keywords: +- Ingress controller +- Kubernetes ingress +- Apache APISIX +- APISIX ingress controller +description: A tutorial on using Ingress in your Kubernetes cluster with Apache APISIX. +tags: [Ingress, Kubernetes] +image: https://mermaid.ink/img/pako:eNp9kttKAzEQhl9ljDctdLVdQXARwRNaFJFuLwTjRZqdtqE5rDm0lLbv4aP4PD6J2W61ithc_cz_5Z8ZkgXhpkCSkaE0Mz5m1sN9j2reuJQCtW_CaZKcwZKSHr5mcDhN4ea6T6nuoSszuEUpDQytUXD-2IVpetDeo2QJjGoG1UXXaVDy8fYOA2YxUUILFVTCSpFMO5Q0v7BlzwSPS3Dpv3i6xgXfALFd3n2Crh5ZdA640d4aKdFGLEYmUP4Gq_FGzOOMzddBzs8lQgkuXptgBvt4nHbSE6ql0JN8bbZ3meku8-ivSTXE48JgZFk5hslzPd1dGKDV6DGuIIPz1fwvNVsdtpWu80OntUZd_ElmMbne-VdSISxyL4yG_sW2KvhWl9-ZpEUUWsVEEf_FoipT4seokJIsyoLZCSWtuu7wNaDma2tRJ8Ti2MzyjfEQVFzRVb63AStkRfUq9ghlER_kuhDeWJINmXTYIix4k881J1lFf0FXgsXt1IZafQIiC97o +--- + +> A tutorial on using Ingress in your Kubernetes cluster with Apache APISIX. + +<!--truncate--> + +In Kubernetes, [Ingress](https://kubernetes.io/docs/concepts/services-networking/ingress/) is a native object that allows you to access your services externally by defining a set of rules. Using a reverse proxy, an [Ingress controller](https://kubernetes.io/docs/concepts/services-networking/ingress-controllers/) implements these defined rules and routes external traffic to your services. + +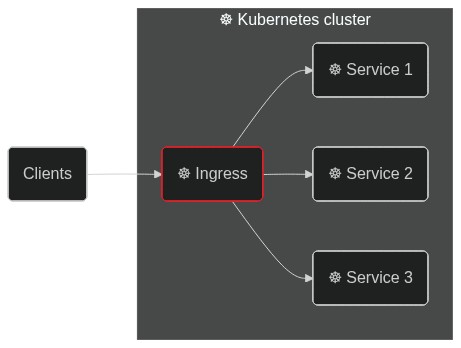 + +[Apache APISIX](https://apisix.apache.org/) is an open source API gateway (a souped-up reverse proxy) that provides features like authentication, traffic routing, load balancing, canary releases, monitoring, and more. APISIX also supports custom Plugins and integrates with popular open source projects like [Apache SkyWalking](https://apisix.apache.org/docs/apisix/next/plugins/skywalking/) and [Prometheus](https://apisix.apache.org/docs/apisix/next/plugins/prometheus/). To learn more about APISIX, you can see the [official documentation](https://apisix.apache.org/docs/apisix/getting-started/). + +The [Apache APISIX Ingress controller](https://apisix.apache.org/docs/ingress-controller/next/getting-started/) sits between the defined Ingress rules and the APISIX API gateway. It configures the proxy to route traffic based on the defined rules. + +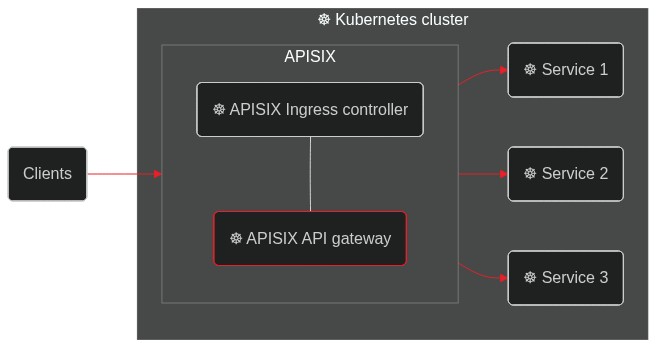 + +This hands-on tutorial will teach you how to set up the APISIX Ingress controller on your Kubernetes cluster and route traffic to your services. + +Before you move on, make sure you: + +1. Have access to a Kubernetes cluster. This tutorial uses [minikube](https://minikube.sigs.k8s.io/) for creating a cluster. +2. Install and configure `kubectl` to communicate with your cluster. +3. [Install Helm](https://helm.sh/docs/intro/install/) to deploy the APISIX Ingress controller. + +## Deploying a Sample Application + +We will use a sample HTTP server application ([bare-minimum-api](https://github.com/navendu-pottekkat/bare-minimum-api)) to demonstrate the working of the Ingress controller. + +While running the application, you can set a "version" and a port to listen to. For this example, we will create two "versions" of this application which will return different responses as shown below: + +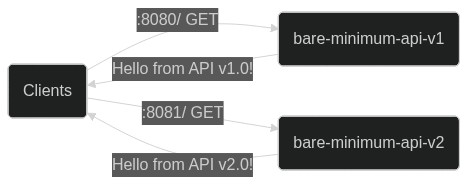 + +You can deploy the application on your Kubernetes cluster by running: + +```shell +kubectl run bare-minimum-api-v1 --image navendup/bare-minimum-api --port 8080 -- 8080 v1.0 +kubectl expose pod bare-minimum-api-v1 --port 8080 +``` + +To test the application outside the cluster, you can use `port-forward`: + +```shell +kubectl port-forward bare-minimum-api-v1 8080:8080 +``` + +Now, if you open up a new terminal window and run: + +```shell +curl http://127.0.0.1:8080 +``` + +You will get back a response from the application: + +```shell {title="output"} +Hello from API v1.0! +``` + +Similarly, you can deploy another "version" of the application by running: + +```shell +kubectl run bare-minimum-api-v2 --image navendup/bare-minimum-api --port 8081 -- 8081 v2.0 +kubectl expose pod bare-minimum-api-v2 --port 8081 +``` + +Now, we can deploy APISIX Ingress and expose these applications to external traffic. + +## Deploying APISIX Ingress + +APISIX and APISIX Ingress controller can be installed using Helm: + +```shell +helm repo add apisix https://charts.apiseven.com +helm repo add bitnami https://charts.bitnami.com/bitnami +helm repo update +kubectl create ns ingress-apisix +helm install apisix apisix/apisix \ + --set gateway.type=NodePort \ + --set ingress-controller.enabled=true \ + --namespace ingress-apisix \ + --set ingress-controller.config.apisix.serviceNamespace=ingress-apisix +kubectl get service --namespace ingress-apisix Review Comment: I think it is more suitable to judge whether the installation is complete by checking the status of the pod resources ########## blog/en/blog/2022/09/09/kubernetes-ingress-with-apisix.md: ########## @@ -0,0 +1,248 @@ +--- +title: "Hands-On: Set Up Ingress on Kubernetes With Apache APISIX Ingress Controller" +authors: + - name: Navendu Pottekkat + title: Author + url: https://github.com/navendu-pottekkat + image_url: https://avatars.githubusercontent.com/u/49474499 +keywords: +- Ingress controller +- Kubernetes ingress +- Apache APISIX +- APISIX ingress controller +description: A tutorial on using Ingress in your Kubernetes cluster with Apache APISIX. +tags: [Ingress, Kubernetes] +image: https://mermaid.ink/img/pako:eNp9kttKAzEQhl9ljDctdLVdQXARwRNaFJFuLwTjRZqdtqE5rDm0lLbv4aP4PD6J2W61ithc_cz_5Z8ZkgXhpkCSkaE0Mz5m1sN9j2reuJQCtW_CaZKcwZKSHr5mcDhN4ea6T6nuoSszuEUpDQytUXD-2IVpetDeo2QJjGoG1UXXaVDy8fYOA2YxUUILFVTCSpFMO5Q0v7BlzwSPS3Dpv3i6xgXfALFd3n2Crh5ZdA640d4aKdFGLEYmUP4Gq_FGzOOMzddBzs8lQgkuXptgBvt4nHbSE6ql0JN8bbZ3meku8-ivSTXE48JgZFk5hslzPd1dGKDV6DGuIIPz1fwvNVsdtpWu80OntUZd_ElmMbne-VdSISxyL4yG_sW2KvhWl9-ZpEUUWsVEEf_FoipT4seokJIsyoLZCSWtuu7wNaDma2tRJ8Ti2MzyjfEQVFzRVb63AStkRfUq9ghlER_kuhDeWJINmXTYIix4k881J1lFf0FXgsXt1IZafQIiC97o +--- + +> A tutorial on using Ingress in your Kubernetes cluster with Apache APISIX. + +<!--truncate--> + +In Kubernetes, [Ingress](https://kubernetes.io/docs/concepts/services-networking/ingress/) is a native object that allows you to access your services externally by defining a set of rules. Using a reverse proxy, an [Ingress controller](https://kubernetes.io/docs/concepts/services-networking/ingress-controllers/) implements these defined rules and routes external traffic to your services. + + + +[Apache APISIX](https://apisix.apache.org/) is an open source API gateway (a souped-up reverse proxy) that provides features like authentication, traffic routing, load balancing, canary releases, monitoring, and more. APISIX also supports custom Plugins and integrates with popular open source projects like [Apache SkyWalking](https://apisix.apache.org/docs/apisix/next/plugins/skywalking/) and [Prometheus](https://apisix.apache.org/docs/apisix/next/plugins/prometheus/). To learn more about APISIX, you can see the [official documentation](https://apisix.apache.org/docs/apisix/getting-started/). + +The [Apache APISIX Ingress controller](https://apisix.apache.org/docs/ingress-controller/next/getting-started/) sits between the defined Ingress rules and the APISIX API gateway. It configures the proxy to route traffic based on the defined rules. + + + +This hands-on tutorial will teach you how to set up the APISIX Ingress controller on your Kubernetes cluster and route traffic to your services. + +Before you move on, make sure you: + +1. Have access to a Kubernetes cluster. This tutorial uses [minikube](https://minikube.sigs.k8s.io/) for creating a cluster. +2. Install and configure `kubectl` to communicate with your cluster. +3. [Install Helm](https://helm.sh/docs/intro/install/) to deploy the APISIX Ingress controller. + +## Deploying a Sample Application + +We will use a sample HTTP server application ([bare-minimum-api](https://github.com/navendu-pottekkat/bare-minimum-api)) to demonstrate the working of the Ingress controller. + +While running the application, you can set a "version" and a port to listen to. For this example, we will create two "versions" of this application which will return different responses as shown below: + + + +You can deploy the application on your Kubernetes cluster by running: + +```shell +kubectl run bare-minimum-api-v1 --image navendup/bare-minimum-api --port 8080 -- 8080 v1.0 +kubectl expose pod bare-minimum-api-v1 --port 8080 +``` + +To test the application outside the cluster, you can use `port-forward`: + +```shell +kubectl port-forward bare-minimum-api-v1 8080:8080 +``` + +Now, if you open up a new terminal window and run: + +```shell +curl http://127.0.0.1:8080 +``` + +You will get back a response from the application: + +```shell {title="output"} +Hello from API v1.0! +``` + +Similarly, you can deploy another "version" of the application by running: + +```shell +kubectl run bare-minimum-api-v2 --image navendup/bare-minimum-api --port 8081 -- 8081 v2.0 +kubectl expose pod bare-minimum-api-v2 --port 8081 +``` + +Now, we can deploy APISIX Ingress and expose these applications to external traffic. + +## Deploying APISIX Ingress + +APISIX and APISIX Ingress controller can be installed using Helm: + +```shell +helm repo add apisix https://charts.apiseven.com +helm repo add bitnami https://charts.bitnami.com/bitnami +helm repo update +kubectl create ns ingress-apisix +helm install apisix apisix/apisix \ + --set gateway.type=NodePort \ + --set ingress-controller.enabled=true \ + --namespace ingress-apisix \ + --set ingress-controller.config.apisix.serviceNamespace=ingress-apisix +kubectl get service --namespace ingress-apisix +``` + +:::note + +We are using `NodePort` as the Gateway service type. You can also set it to `LoadBalancer` if your cluster has one. + +::: + +Helm will create five resources in your cluster: + +1. `apisix-gateway`: The data plane that handles external traffic. +2. `apisix-admin`: Control plane that processes configuration changes. +3. `apisix-ingress-controller`: The ingress controller. +4. `apisix-etcd` and 5. `apisix-etcd headless`: To store configuration and handle internal communication. + +Once all the pods and services are running, you can test APISIX by accessing the Admin API: + +```shell +kubectl exec -it -n ingress-apisix apisix-<rest of the pod name> -- curl http://127.0.0.1:9180/apisix/admin/routes -H 'X-API-Key: edd1c9f034335f136f87ad84b625c8f1' Review Comment: ``` kubectl exec -n ingress-apisix deploy/apisix -- curl -s http://127.0.0.1:9180/apisix/admin/routes -H 'X-API-Key: edd1c9f034335f136f87ad84b625c8f1' ``` You can use `exec deploy/apisix` without paying attention to the pod's name. ########## blog/en/blog/2022/09/09/kubernetes-ingress-with-apisix.md: ########## @@ -0,0 +1,248 @@ +--- +title: "Hands-On: Set Up Ingress on Kubernetes With Apache APISIX Ingress Controller" +authors: + - name: Navendu Pottekkat + title: Author + url: https://github.com/navendu-pottekkat + image_url: https://avatars.githubusercontent.com/u/49474499 +keywords: +- Ingress controller +- Kubernetes ingress +- Apache APISIX +- APISIX ingress controller +description: A tutorial on using Ingress in your Kubernetes cluster with Apache APISIX. +tags: [Ingress, Kubernetes] +image: https://mermaid.ink/img/pako:eNp9kttKAzEQhl9ljDctdLVdQXARwRNaFJFuLwTjRZqdtqE5rDm0lLbv4aP4PD6J2W61ithc_cz_5Z8ZkgXhpkCSkaE0Mz5m1sN9j2reuJQCtW_CaZKcwZKSHr5mcDhN4ea6T6nuoSszuEUpDQytUXD-2IVpetDeo2QJjGoG1UXXaVDy8fYOA2YxUUILFVTCSpFMO5Q0v7BlzwSPS3Dpv3i6xgXfALFd3n2Crh5ZdA640d4aKdFGLEYmUP4Gq_FGzOOMzddBzs8lQgkuXptgBvt4nHbSE6ql0JN8bbZ3meku8-ivSTXE48JgZFk5hslzPd1dGKDV6DGuIIPz1fwvNVsdtpWu80OntUZd_ElmMbne-VdSISxyL4yG_sW2KvhWl9-ZpEUUWsVEEf_FoipT4seokJIsyoLZCSWtuu7wNaDma2tRJ8Ti2MzyjfEQVFzRVb63AStkRfUq9ghlER_kuhDeWJINmXTYIix4k881J1lFf0FXgsXt1IZafQIiC97o +--- + +> A tutorial on using Ingress in your Kubernetes cluster with Apache APISIX. + +<!--truncate--> + +In Kubernetes, [Ingress](https://kubernetes.io/docs/concepts/services-networking/ingress/) is a native object that allows you to access your services externally by defining a set of rules. Using a reverse proxy, an [Ingress controller](https://kubernetes.io/docs/concepts/services-networking/ingress-controllers/) implements these defined rules and routes external traffic to your services. + + + +[Apache APISIX](https://apisix.apache.org/) is an open source API gateway (a souped-up reverse proxy) that provides features like authentication, traffic routing, load balancing, canary releases, monitoring, and more. APISIX also supports custom Plugins and integrates with popular open source projects like [Apache SkyWalking](https://apisix.apache.org/docs/apisix/next/plugins/skywalking/) and [Prometheus](https://apisix.apache.org/docs/apisix/next/plugins/prometheus/). To learn more about APISIX, you can see the [official documentation](https://apisix.apache.org/docs/apisix/getting-started/). + +The [Apache APISIX Ingress controller](https://apisix.apache.org/docs/ingress-controller/next/getting-started/) sits between the defined Ingress rules and the APISIX API gateway. It configures the proxy to route traffic based on the defined rules. + + + +This hands-on tutorial will teach you how to set up the APISIX Ingress controller on your Kubernetes cluster and route traffic to your services. + +Before you move on, make sure you: + +1. Have access to a Kubernetes cluster. This tutorial uses [minikube](https://minikube.sigs.k8s.io/) for creating a cluster. +2. Install and configure `kubectl` to communicate with your cluster. +3. [Install Helm](https://helm.sh/docs/intro/install/) to deploy the APISIX Ingress controller. + +## Deploying a Sample Application + +We will use a sample HTTP server application ([bare-minimum-api](https://github.com/navendu-pottekkat/bare-minimum-api)) to demonstrate the working of the Ingress controller. + +While running the application, you can set a "version" and a port to listen to. For this example, we will create two "versions" of this application which will return different responses as shown below: + + + +You can deploy the application on your Kubernetes cluster by running: + +```shell +kubectl run bare-minimum-api-v1 --image navendup/bare-minimum-api --port 8080 -- 8080 v1.0 +kubectl expose pod bare-minimum-api-v1 --port 8080 +``` + +To test the application outside the cluster, you can use `port-forward`: + +```shell +kubectl port-forward bare-minimum-api-v1 8080:8080 +``` + +Now, if you open up a new terminal window and run: + +```shell +curl http://127.0.0.1:8080 +``` + +You will get back a response from the application: + +```shell {title="output"} +Hello from API v1.0! +``` + +Similarly, you can deploy another "version" of the application by running: + +```shell +kubectl run bare-minimum-api-v2 --image navendup/bare-minimum-api --port 8081 -- 8081 v2.0 +kubectl expose pod bare-minimum-api-v2 --port 8081 +``` + +Now, we can deploy APISIX Ingress and expose these applications to external traffic. + +## Deploying APISIX Ingress + +APISIX and APISIX Ingress controller can be installed using Helm: + +```shell +helm repo add apisix https://charts.apiseven.com +helm repo add bitnami https://charts.bitnami.com/bitnami +helm repo update +kubectl create ns ingress-apisix +helm install apisix apisix/apisix \ + --set gateway.type=NodePort \ + --set ingress-controller.enabled=true \ + --namespace ingress-apisix \ + --set ingress-controller.config.apisix.serviceNamespace=ingress-apisix +kubectl get service --namespace ingress-apisix +``` + +:::note + +We are using `NodePort` as the Gateway service type. You can also set it to `LoadBalancer` if your cluster has one. + +::: + +Helm will create five resources in your cluster: + +1. `apisix-gateway`: The data plane that handles external traffic. +2. `apisix-admin`: Control plane that processes configuration changes. +3. `apisix-ingress-controller`: The ingress controller. +4. `apisix-etcd` and 5. `apisix-etcd headless`: To store configuration and handle internal communication. + +Once all the pods and services are running, you can test APISIX by accessing the Admin API: + +```shell +kubectl exec -it -n ingress-apisix apisix-<rest of the pod name> -- curl http://127.0.0.1:9180/apisix/admin/routes -H 'X-API-Key: edd1c9f034335f136f87ad84b625c8f1' +``` + +:::note + +Replace the pod name with your APISIX gateway pod name. + +::: + +If you get a response similar to the one shown below, APISIX is up and running: + +```json {title="output"} +{ + "action": "get", + "node": { + "key": "/apisix/routes", + "dir": true, + "nodes": [] + }, + "count": 0 +} +``` + +## Configuring APISIX Ingress + +Once you have verified that the APISIX gateway and Ingress controller is running, you can create [Routes](https://apisix.apache.org/docs/apisix/terminology/route/) to expose the deployed application to external traffic. + +This will route traffic between the two application versions based on the client request: + +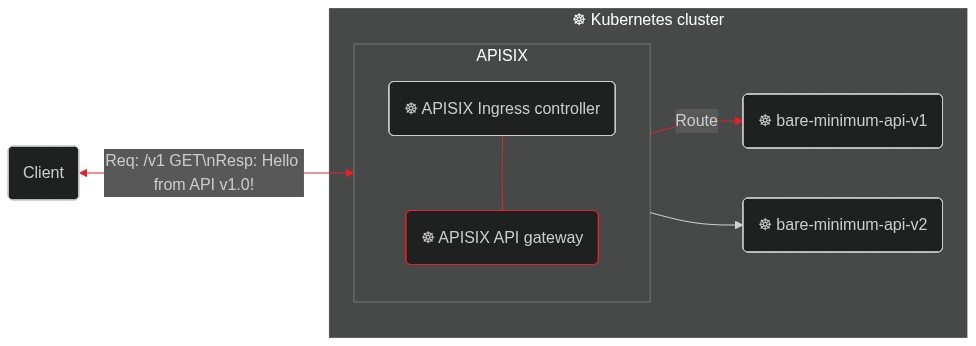 + +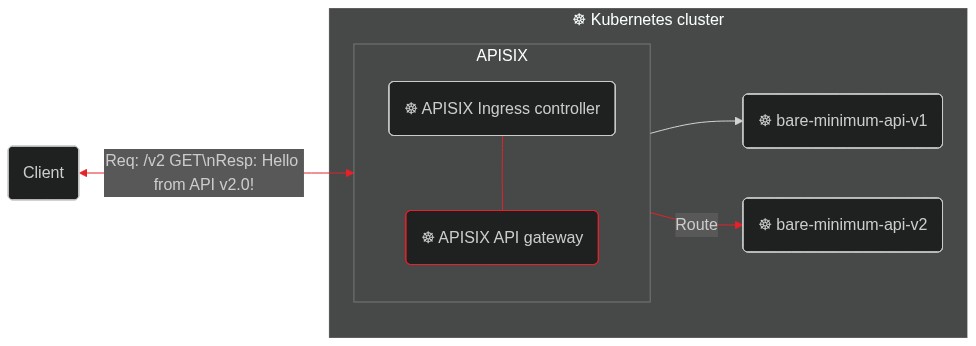 + +To configure Routes, APISIX comes with declarative and easy-to-use [custom resource](https://apisix.apache.org/docs/ingress-controller/next/references/apisix_route_v2beta3/): + +```yaml {title="apisix-ingress-manifest.yaml"} +apiVersion: apisix.apache.org/v2beta2 Review Comment: ```suggestion apiVersion: apisix.apache.org/v2beta3 ``` The current latest api version is v2beta3. ########## blog/en/blog/2022/09/09/kubernetes-ingress-with-apisix.md: ########## @@ -0,0 +1,248 @@ +--- +title: "Hands-On: Set Up Ingress on Kubernetes With Apache APISIX Ingress Controller" +authors: + - name: Navendu Pottekkat + title: Author + url: https://github.com/navendu-pottekkat + image_url: https://avatars.githubusercontent.com/u/49474499 +keywords: +- Ingress controller +- Kubernetes ingress +- Apache APISIX +- APISIX ingress controller +description: A tutorial on using Ingress in your Kubernetes cluster with Apache APISIX. +tags: [Ingress, Kubernetes] +image: https://mermaid.ink/img/pako:eNp9kttKAzEQhl9ljDctdLVdQXARwRNaFJFuLwTjRZqdtqE5rDm0lLbv4aP4PD6J2W61ithc_cz_5Z8ZkgXhpkCSkaE0Mz5m1sN9j2reuJQCtW_CaZKcwZKSHr5mcDhN4ea6T6nuoSszuEUpDQytUXD-2IVpetDeo2QJjGoG1UXXaVDy8fYOA2YxUUILFVTCSpFMO5Q0v7BlzwSPS3Dpv3i6xgXfALFd3n2Crh5ZdA640d4aKdFGLEYmUP4Gq_FGzOOMzddBzs8lQgkuXptgBvt4nHbSE6ql0JN8bbZ3meku8-ivSTXE48JgZFk5hslzPd1dGKDV6DGuIIPz1fwvNVsdtpWu80OntUZd_ElmMbne-VdSISxyL4yG_sW2KvhWl9-ZpEUUWsVEEf_FoipT4seokJIsyoLZCSWtuu7wNaDma2tRJ8Ti2MzyjfEQVFzRVb63AStkRfUq9ghlER_kuhDeWJINmXTYIix4k881J1lFf0FXgsXt1IZafQIiC97o +--- + +> A tutorial on using Ingress in your Kubernetes cluster with Apache APISIX. + +<!--truncate--> + +In Kubernetes, [Ingress](https://kubernetes.io/docs/concepts/services-networking/ingress/) is a native object that allows you to access your services externally by defining a set of rules. Using a reverse proxy, an [Ingress controller](https://kubernetes.io/docs/concepts/services-networking/ingress-controllers/) implements these defined rules and routes external traffic to your services. + + + +[Apache APISIX](https://apisix.apache.org/) is an open source API gateway (a souped-up reverse proxy) that provides features like authentication, traffic routing, load balancing, canary releases, monitoring, and more. APISIX also supports custom Plugins and integrates with popular open source projects like [Apache SkyWalking](https://apisix.apache.org/docs/apisix/next/plugins/skywalking/) and [Prometheus](https://apisix.apache.org/docs/apisix/next/plugins/prometheus/). To learn more about APISIX, you can see the [official documentation](https://apisix.apache.org/docs/apisix/getting-started/). + +The [Apache APISIX Ingress controller](https://apisix.apache.org/docs/ingress-controller/next/getting-started/) sits between the defined Ingress rules and the APISIX API gateway. It configures the proxy to route traffic based on the defined rules. + + + +This hands-on tutorial will teach you how to set up the APISIX Ingress controller on your Kubernetes cluster and route traffic to your services. + +Before you move on, make sure you: + +1. Have access to a Kubernetes cluster. This tutorial uses [minikube](https://minikube.sigs.k8s.io/) for creating a cluster. +2. Install and configure `kubectl` to communicate with your cluster. +3. [Install Helm](https://helm.sh/docs/intro/install/) to deploy the APISIX Ingress controller. + +## Deploying a Sample Application + +We will use a sample HTTP server application ([bare-minimum-api](https://github.com/navendu-pottekkat/bare-minimum-api)) to demonstrate the working of the Ingress controller. + +While running the application, you can set a "version" and a port to listen to. For this example, we will create two "versions" of this application which will return different responses as shown below: + + + +You can deploy the application on your Kubernetes cluster by running: + +```shell +kubectl run bare-minimum-api-v1 --image navendup/bare-minimum-api --port 8080 -- 8080 v1.0 +kubectl expose pod bare-minimum-api-v1 --port 8080 +``` + +To test the application outside the cluster, you can use `port-forward`: + +```shell +kubectl port-forward bare-minimum-api-v1 8080:8080 +``` + +Now, if you open up a new terminal window and run: + +```shell +curl http://127.0.0.1:8080 +``` + +You will get back a response from the application: + +```shell {title="output"} +Hello from API v1.0! +``` + +Similarly, you can deploy another "version" of the application by running: + +```shell +kubectl run bare-minimum-api-v2 --image navendup/bare-minimum-api --port 8081 -- 8081 v2.0 +kubectl expose pod bare-minimum-api-v2 --port 8081 +``` + +Now, we can deploy APISIX Ingress and expose these applications to external traffic. + +## Deploying APISIX Ingress + +APISIX and APISIX Ingress controller can be installed using Helm: + +```shell +helm repo add apisix https://charts.apiseven.com +helm repo add bitnami https://charts.bitnami.com/bitnami +helm repo update +kubectl create ns ingress-apisix +helm install apisix apisix/apisix \ + --set gateway.type=NodePort \ + --set ingress-controller.enabled=true \ + --namespace ingress-apisix \ + --set ingress-controller.config.apisix.serviceNamespace=ingress-apisix +kubectl get service --namespace ingress-apisix +``` + +:::note + +We are using `NodePort` as the Gateway service type. You can also set it to `LoadBalancer` if your cluster has one. + +::: + +Helm will create five resources in your cluster: + +1. `apisix-gateway`: The data plane that handles external traffic. +2. `apisix-admin`: Control plane that processes configuration changes. +3. `apisix-ingress-controller`: The ingress controller. +4. `apisix-etcd` and 5. `apisix-etcd headless`: To store configuration and handle internal communication. + +Once all the pods and services are running, you can test APISIX by accessing the Admin API: + +```shell +kubectl exec -it -n ingress-apisix apisix-<rest of the pod name> -- curl http://127.0.0.1:9180/apisix/admin/routes -H 'X-API-Key: edd1c9f034335f136f87ad84b625c8f1' +``` + +:::note + +Replace the pod name with your APISIX gateway pod name. + +::: + +If you get a response similar to the one shown below, APISIX is up and running: + +```json {title="output"} +{ + "action": "get", + "node": { + "key": "/apisix/routes", + "dir": true, + "nodes": [] + }, + "count": 0 +} +``` + +## Configuring APISIX Ingress + +Once you have verified that the APISIX gateway and Ingress controller is running, you can create [Routes](https://apisix.apache.org/docs/apisix/terminology/route/) to expose the deployed application to external traffic. + +This will route traffic between the two application versions based on the client request: + + + + + +To configure Routes, APISIX comes with declarative and easy-to-use [custom resource](https://apisix.apache.org/docs/ingress-controller/next/references/apisix_route_v2beta3/): + +```yaml {title="apisix-ingress-manifest.yaml"} +apiVersion: apisix.apache.org/v2beta2 +kind: ApisixRoute +metadata: + name: api-routes +spec: + http: + - name: route-1 + match: + hosts: + - local.navendu.me + paths: + - /v1 + backends: + - serviceName: bare-minimum-api-v1 + servicePort: 8080 + - name: route-2 + match: + hosts: + - local.navendu.me + paths: + - /v2 + backends: + - serviceName: bare-minimum-api-v2 + servicePort: 8081 +``` + +The APISIX Ingress controller converts this resource to an APISIX gateway configuration. + +APISIX also supports configuration using native [Kubernetes Ingress resource](https://kubernetes.io/docs/concepts/services-networking/ingress/#the-ingress-resource): + +```yaml {title="kubernetes-ingress-manifest.yaml"} +apiVersion: networking.k8s.io/v1 +kind: Ingress +metadata: + name: api-routes +spec: + ingressClassName: apisix + rules: + - host: local.navendu.me + http: + paths: + - backend: + service: + name: bare-minimum-api-v1 + port: + number: 8080 + path: /v1 + pathType: Exact + - backend: + service: + name: bare-minimum-api-v2 + port: + number: 8081 + path: /v2 + pathType: Exact +``` + +You can use either to configure APISIX but I prefer the easier APISIX custom resource. We can apply this manifest file to our cluster to create Routes in APISIX: + +```shell +kubectl apply -f apisix-ingress-manifest.yaml +``` + +If the Ingress controller is configured correctly, you should see a response indicating that APISIX API gateway has been configured: + +```shell {title="output"} +apisixroute.apisix.apache.org/api-routes created +``` + +Now, let's test these Routes. + +## Testing the Created Routes + +If you were following along using minikube and `NodePort`, you should be able to access APISIX through the Node IP of the service `apisix-gateway`. If the Node IP is not reachable directly (if you are on Darwin, Windows, or WSL), you can create a tunnel to access the service on your machine: + +```shell +minikube service apisix-gateway --url -n ingress-apisix +``` + +This will show the URL with which you can access the `apisix-gateway` service. + +You can send a `GET` request to this URL and it would be Routed to the appropriate service: + +```shell +curl http://127.0.0.1:51538/v2 -H 'host:local.navendu.me' Review Comment: Maybe add a `/v1` access example? -- This is an automated message from the Apache Git Service. To respond to the message, please log on to GitHub and use the URL above to go to the specific comment. To unsubscribe, e-mail: [email protected] For queries about this service, please contact Infrastructure at: [email protected]