This is an automated email from the ASF dual-hosted git repository.

yilinzeng pushed a commit to branch master
in repository https://gitbox.apache.org/repos/asf/apisix-website.git
The following commit(s) were added to refs/heads/master by this push:
new 8a143690da5 docs: add apisix integrates with hydra blog (#1187)
8a143690da5 is described below
commit 8a143690da51614acb807cd727c56ca554ee6756
Author: HanFei <[email protected]>
AuthorDate: Tue Jul 5 11:18:27 2022 +0800
docs: add apisix integrates with hydra blog (#1187)
---
.../2022/07/04/apisix-integrates-with-hydra.md | 290 +++++++++++++++++++++
.../2022/07/04/apisix-integrates-with-hydra.md | 290 +++++++++++++++++++++
2 files changed, 580 insertions(+)
diff --git a/website/blog/2022/07/04/apisix-integrates-with-hydra.md
b/website/blog/2022/07/04/apisix-integrates-with-hydra.md
new file mode 100644
index 00000000000..5cee893eac2
--- /dev/null
+++ b/website/blog/2022/07/04/apisix-integrates-with-hydra.md
@@ -0,0 +1,290 @@
+---
+title: "APISIX integrates with Ory Hydra"
+authors:
+ - name: "Fei Han"
+ title: "Technical Writer"
+ url: "https://github.com/hf400159";
+ image_url: "https://github.com/hf400159.png";
+ - name: "Sylvia"
+ title: "Technical Writer"
+ url: "https://github.com/SylviaBABY";
+ image_url: "https://avatars.githubusercontent.com/u/39793568?v=4";
+keywords:
+- Apache APISIX
+- API Gateway
+- Authentication
+- Hydra
+- OpenID Connect
+- OIDC
+description: This article describes the API gateway Apache APISIX for
centralized authentication via the OpenID Connect plugin Hydra integration.
+tags: [Authentication]
+---
+
+> This article describes how Apache APISIX integrates with Ory Hydra to
implement centralized authentication.
+
+<!--truncate-->
+
+## Background Information
+
+### Apache APISIX
+
+[Apache APISIX](https://github.com/apache/apisix) is an open source cloud
native API gateway. As an API gateway, it has the characteristics of dynamic,
real-time, and high performance. It provides rich traffic management functions
such as load balancing, dynamic upstream, gray-scale publishing, service
fusing, identity authentication and observability. You can use APISIX to handle
the traditional north-south traffic and the east-west traffic between services.
It can also be used as a K8s [...]
+
+The `openid-connect` plugin of APISIX supports the OpenID Connect protocol.
Users can use this plugin to allow Apache APISIX to connect with many
authentication service providers and deploy it in enterprises as a centralized
authentication gateway.
+
+### ORY Hydra
+
+[Ory Hydra](https://github.com/ory/hydra) is one of the identity providers
that supports the OAuth 2.0 and OpenID Connect protocols, based on the OAuth
2.0 authorization framework and the Open ID Connect Core 1.0 framework, with
both open source and cloud native features. It can be integrated with any login
system, and through OAuth 2.0 Access, Refresh, and ID Tokens, third parties can
easily access your API, enabling users to interact with any application
anytime, anywhere.
+
+Ory Hydra is written in Go language and provides SDKs for almost all
languages, including Dart, .NET, Go, Java, PHP, Python, Ruby, Rust, and
Typescript. It works with any login system, and the login experience can be
easily customized.
+
+## Introduction
+
+OpenID is a centralized authentication mode, and it is a decentralized
identity authentication system. The advantage of using OpenID is that users
only need to register and log in on one OpenID identity provider's website and
use one account and password information to access different applications.
+
+With the `openid-connect` plugin supported by APISIX, we can integrate with
authenticators supporting the OpenID Connect protocol. For example: Ory Hydra.
For more information, please refer to: [Centralized Identity
Authentication](https://apisix.apache.org/blog/2021/08/25/using-the-apache-apisix-openid-connect-plugin-for-centralized-authentication/#what-is-authentication).
+
+One of the biggest advantages of Ory Hydra is that it implements the OAuth and
OpenID Connect standards instead of forcing you to use "Hydra user management"
(login, logout, profile management, registration), a specific template engine,
or a predefined front end.
+
+It allows to use the authentication mechanisms required by your program
(token-based 2FA, SMS 2FA, etc.) and implement user management and login in
your technology stack. Of course, you can also use existing solutions, such as
[authboss](https://github.com/go-authboss/authboss). It gives you all the great
features of OAuth 2.0 and OpenID Connect while being minimally intrusive to
your business logic and technology stack.
+
+OAuth 2.0 can be used in many environments for various purposes. The following
information may help you decide whether OAuth 2.0 and Hydra are suitable for a
certain scenario:
+
+1. enable third-party solutions to access your APIs.
+2. be an Identity Provider like Google, Facebook, or Microsoft.
+3. enable your browser, mobile, or wearable applications to access your APIs:
Running an OAuth2 Provider can work great for this. You don't have to store
passwords on the device and can revoke access tokens at any time.
+4. you want to limit what type of information your backend services can read
from each other. For example, the comment service should only be allowed to
fetch user profile updates but shouldn't be able to read user passwords.
+
+## Operation steps
+
+Next, I will show you how APISIX integrates with Hydra using a real example.
In this example, Docker will be used to running the required environment.
Please install [Docker](https://docs.docker.com/engine/install/) before doing
this.
+
+### Step 1: Create and deploy the database
+
+For quick deployment of the test environment, we will use Docker to run
PostgreSQL as Hydra's database. It's not recommended to use Docker to run the
database in production.
+
+```shell
+docker network create hydraguide && \
+docker run \
+ --network hydraguide \
+ --name ory-hydra-example--postgres \
+ -e POSTGRES_USER=hydra \
+ -e POSTGRES_PASSWORD=secret \
+ -e POSTGRES_DB=hydra \
+ -d postgres:9.6
+```
+
+The above command will create a network named `hydraguide` and start a
Postgres instance named `ory-hydra-example--postgres` which creates the
database `hydra`, the user `hydra`, and the user password `secret`.
+
+### Step 2: Deploy Hydra
+
+This step will map `4444` to `5444` and `4445` to `5445` ports, please make
sure that these ports are not used.
+
+1. The system key can only be set for the new database, and does not support
key rotation. This key is used to encrypt the database and needs to be set to
the same value each time the process restarts. You can use `/dev/urandom` to
generate keys. But make sure that the key must be the same when you define it.
For example, you can store the value somewhere:
+
+```shell
+export SECRETS_SYSTEM=$(export LC_CTYPE=C; cat /dev/urandom | tr -dc
'a-zA-Z0-9' | fold -w 32 | head -n 1)
+```
+
+Set Hydra's database URL to point to your Postgres instance by configuring an
environment variable.
+
+```shell
+export
DSN=postgres://hydra:secret@ory-hydra-example--postgres:5432/hydra?sslmode=disable
+```
+
+2. Ory Hydra does not migrate SQL automatically, so you need to manually
perform the database migration.
+
+```shell
+docker pull oryd/hydra:v1.10.6 && \
+docker run -it --rm \
+ --network hydraguide \
+ oryd/hydra:v1.10.6 \
+ migrate sql --yes $DSN
+```
+
+3. Run the Hydra server with the following command. For more information,
please refer to
[deploy-ory-hydra](https://www.ory.sh/docs/hydra/configure-deploy#deploy-ory-hydra).
+
+```shell
+docker run -d \
+ --name ory-hydra-example--hydra \
+ --network hydraguide \
+ -p 5444:4444 \
+ -p 5445:4445 \
+ -e SECRETS_SYSTEM=$SECRETS_SYSTEM \
+ -e DSN=$DSN \
+ -e URLS_SELF_ISSUER=https://localhost:5444/ \
+ -e URLS_CONSENT=http://localhost:9020/consent \
+ -e URLS_LOGIN=http://localhost:9020/login \
+ oryd/hydra:v1.10.6 serve all
+```
+
+You can view Hydra logs using the following command:
+
+```shell
+docker logs ory-hydra-example--hydra
+```
+
+:::note
+
+If the Hydra password is not specified, you can find the password information
in the log. If you forget your password, you will not be able to restart Hydra.
+
+:::
+
+You can also use the following commands to view Hydra related introductions
and operation commands.
+
+```shell
+docker run -it --rm --entrypoint hydra oryd/hydra:v1.10.6 help serve
+```
+
+### Step 3: Deploy login and authentication programs
+
+Login Provider and Consent Provider can be two separate web services. Hydra
provides sample programs that combine both functions in one application. Next,
we'll deploy the application using Docker.
+
+```shell
+docker pull oryd/hydra-login-consent-node:v1.10.6 && \
+docker run -d \
+ --name ory-hydra-example--consent \
+ -p 9020:3000 \
+ --network hydraguide \
+ -e HYDRA_ADMIN_URL=https://ory-hydra-example--hydra:4445 \
+ -e NODE_TLS_REJECT_UNAUTHORIZED=0 \
+ oryd/hydra-login-consent-node:v1.10.6
+```
+
+You can use the following command to check whether the program runs normally:
+
+```shell
+docker logs ory-hydra-example--consent
+```
+
+Returns the result normally:
+
+```shell
+> [email protected] serve /usr/src/app
+> node lib/app.js
+
+Listening on http://0.0.0.0:3000
+```
+
+### Step 4: Execute the OAuth 2.0 Authorization Code Flow
+
+Hydra supports the ability to set an OAuth 2.0 consumer and OAuth 2.0 callback
URL via the CLI, and is a third-party application that requests access to user
resources on the server.
+
+This information is required when configuring the APISIX `openid-connect`
plugin:
+
+- `id` corresponds to the `client_id` configure by the plugin in the following
route.
+- `secret` corresponds to the `client_secret` configured by the plugin in the
following route.
+- `scope` corresponds to the `scope` configured by the plugin in the following
route.
+
+```shell
+docker run --rm -it \
+ -e HYDRA_ADMIN_URL=https://ory-hydra-example--hydra:4445 \
+ -- network hydraguide \
+ oryd/hydra:v1.10.6 \
+ clients create --skip-tls-verify \
+ --id facebook-photo-backup \
+ --secret some-secret \
+ --grant-types authorization_code,refresh_token,client_credentials,implicit
\
+ --response-types token,code,id_token \
+ --scope openid,offline,photos.read \
+ --callbacks http://127.0.0.1:9010/callback
+```
+
+The following example will perform an OAuth 2.0 authorization flow. To
simplify this, the Hydra CLI provides a helper command called `hydra token
user`.
+
+```shell
+ docker run --rm -it \
+ --network hydraguide \
+ -p 9010:9010 \
+ oryd/hydra:v1.10.6 \
+ token user --skip-tls-verify \
+ --port 9010 \
+ --auth-url https://localhost:5444/oauth2/auth \
+ --token-url https://localhost:5444/oauth2/token \
+ --client-id facebook-photo-backup \
+ --client-secret some-secret \
+ --scope openid,offline,photos.read
+```
+
+If the returned result is as follows, the configuration is normal:
+
+```shell
+Setting up home route on http://127.0.0.1:9010/
+Setting up callback listener on http://127.0.0.1:9010/callback
+Press ctrl + c on Linux / Windows or cmd + c on OSX to end the process.
+If your browser doesn't open automatically, navigate to:
+
+ http://127.0.0.1:9010/
+```
+
+This step will start a user login program, we will use this program in the
next step.
+
+### Step 5: Start APISIX and configure routing
+
+If you do not have APISIX installed, please refer to:
[Installation](https://apisix.apache.org/docs/apisix/next/installation-guide).
+
+Once installed, just create routes and configure `openid-connect` plugin. In
order to verify the effect more intuitively, we also need to start an NGINX
service as upstream, you can also use existing upstream services.
+
+:::note
+
+APISIX in this example is installed on the host. If it is started with Docker,
there may be network problems.
+
+:::
+
+1. First create an NGINX upstream using Docker.
+
+```shell
+docker run -d --name test-nginx -p 8081:80 nginx
+```
+
+2. Create a route and configure the `openid-connect` plugin with the following
commands.
+
+`client_id`, `client_secret` and `scope` are the IDs set in step four. You can
refer to Preparing for [Production for
additional](https://www.ory.sh/docs/hydra/production#exposing-administrative-and-public-api-endpoints)
information. From the above link, we can see that the address of `discovery`
is `https://{IP:Port}/.well-known/openid-configuration`.
+
+```shell
+curl http://127.0.0.1:9080/apisix/admin/routes/1 \
+-H 'X-API-KEY: edd1c9f034335f136f87ad84b625c8f1' -X PUT -d '
+{
+ "uri":"/*",
+ "plugins":{
+ "openid-connect":{
+ "client_id":"facebook-photo-backup",
+ "client_secret":"some-secret",
+
"discovery":"https://127.0.0.1:5444/.well-known/openid-configuration";,
+ "scope":"openid",
+ "token_endpoint_auth_method": "client_secret_basic",
+ "bearer_only": false,
+ "redirect_uri":"http://127.0.0.1:9080/callback";
+ }
+ },
+ "upstream":{
+ "type":"roundrobin",
+ "nodes":{
+ "127.0.0.1:8081":1
+ }
+ }
+}'
+```
+
+### Step 6: Visit the webpage
+
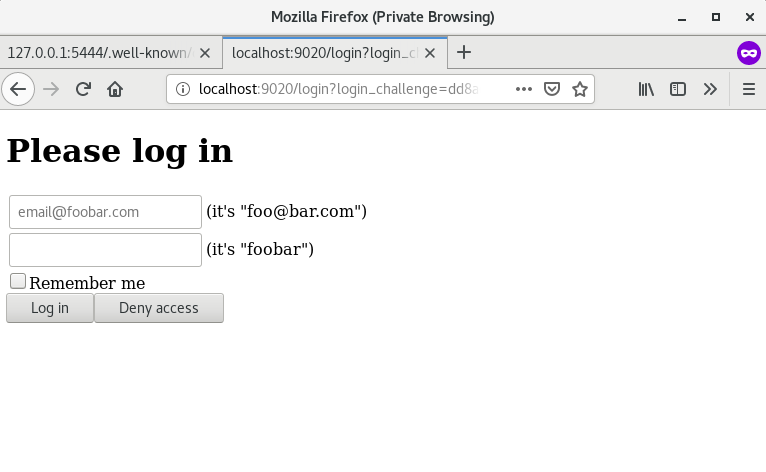
+ 1. Enter `http://127.0.0.1:9080/index.html` in the browser. Since the
`openid-connect` plugin has been enabled, the page is redirected to the login
page, enter the default account password into the user authentication program.
+
+ 
+
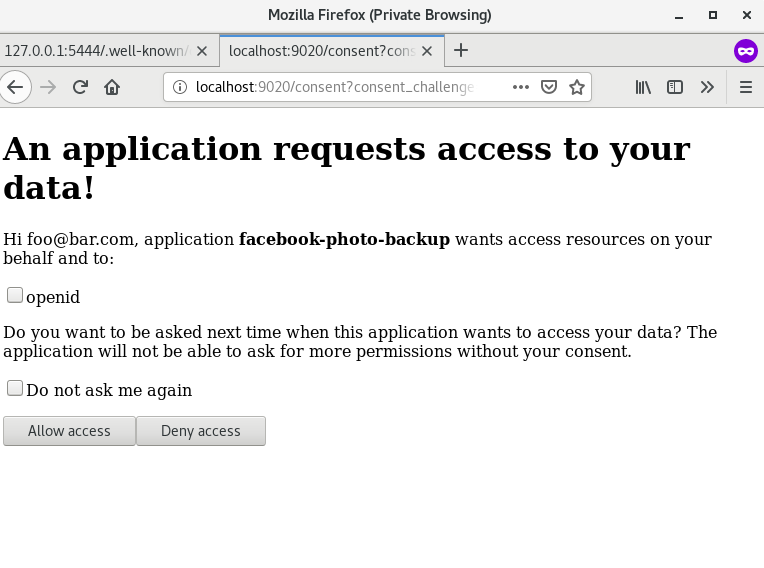
+ 2. Select the authentication protocol and click `Allow Access`.
+
+ 
+
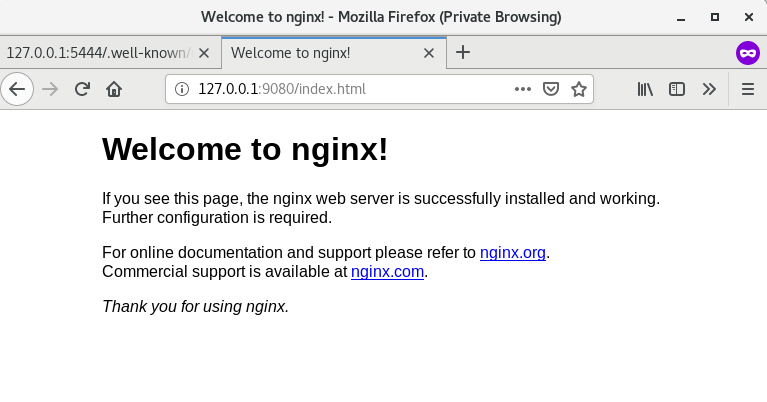
+ 3. After successful verification, you can access the upstream service page.
+
+ 
+
+## Summary
+
+This article mainly introduces how Hydra integrates with APISIX and the
application scenarios of Hydra. You only need to install Hydra related programs
on the server, and you can use it directly as your authentication program.
+
+## Related reading
+
+- [Using the Apache APISIX OpenID Connect Plugin for Okta Centralized
Authentication](https://apisix.apache.org/blog/2021/08/16/using-the-apache-apisix-openid-connect-plugin-for-centralized-authentication)
+- [Centralized authentication using the OpenID Connect plug-in for Apache
APISIX](https://apisix.apache.org/blog/2021/08/25/using-the-apache-apisix-openid-connect-plugin-for-centralized-authentication)
diff --git
a/website/i18n/zh/docusaurus-plugin-content-blog/2022/07/04/apisix-integrates-with-hydra.md
b/website/i18n/zh/docusaurus-plugin-content-blog/2022/07/04/apisix-integrates-with-hydra.md
new file mode 100644
index 00000000000..ede7f6a8a89
--- /dev/null
+++
b/website/i18n/zh/docusaurus-plugin-content-blog/2022/07/04/apisix-integrates-with-hydra.md
@@ -0,0 +1,290 @@
+---
+title: "APISIX 与 Ory Hydra 集成丰富身份认证方式"
+authors:
+ - name: "Fei Han"
+ title: "Technical Writer"
+ url: "https://github.com/hf400159";
+ image_url: "https://github.com/hf400159.png";
+ - name: "Sylvia"
+ title: "Technical Writer"
+ url: "https://github.com/SylviaBABY";
+ image_url: "https://avatars.githubusercontent.com/u/39793568?v=4";
+keywords:
+- Apache APISIX
+- API 网关
+- 身份认证
+- Hydra
+- OpenID Connect
+- OIDC
+description: 本文介绍了 API 网关 Apache APISIX 通过 OpenID Connect 插件 与 Ory Hydra
集成实现集中式身份认证。
+tags: [Authentication]
+---
+
+> 本文介绍了 Apache APISIX 如何与 Ory Hydra 集成实现集中式身份认证。
+
+<!--truncate-->
+
+## 背景介绍
+
+### Apache APISIX
+
+[Apache APISIX](https://github.com/apache/apisix) 是一个开源的云原生 API 网关,作为 API
网关,它兼具动态、实时、高性能等特点,提供了负载均衡、动态上游、灰度发布、服务熔断、身份认证、可观测性等丰富的流量管理功能。你可以使用 APISIX
来处理传统的南北向流量,以及服务间的东西向流量,也可以当做 K8s Ingress controller 来使用。
+
+APISIX 的 `openid-connect` 插件支持 OpenID Connect 协议,用户可以使用该插件让 APISIX
对接众多认证鉴权软件,作为集中式认证网关部署于企业中。
+
+### ORY Hydra
+
+[Ory Hydra](https://github.com/ory/hydra) 是支持 OAuth 2.0 和 OpenID Connect
协议的身份提供商之一,基于 OAuth 2.0 授权框架以及 Open ID Connect Core 1.0
框架实现,兼具开源与云原生特性。它可以与任何登录系统集成,通过 OAuth 2.0 Acces、Refresh 和 ID
Tokens,使得第三方能够轻松访问你的 API,实现用户随时随地与任何应用程序的交互。
+
+Ory Hydra 采用 Go 语言开发,为几乎所有开发语言都提供了 SDK,包括
Dart、.NET、Go、Java、PHP、Python、Ruby、Rust 和 Typescript。它适用于任何登录系统,并且可以轻松自定义登录体验。
+
+## 简介
+
+OpenID 是一种集中认证模式,它是一个去中心化的身份认证系统。使用 OpenID 的好处是:用户只需要在一个 OpenID
身份提供方的网站上注册和登录,使用一份账户密码信息即可访问不同应用。
+
+通过 APISIX 支持的 `openid-connect` 插件,我们可以与支持 OpenID Connect 协议的认证程序集成。比如 Ory
Hydra。更多信息请参考:[集中身份认证](https://apisix.apache.org/zh/blog/2021/08/25/using-the-apache-apisix-openid-connect-plugin-for-centralized-authentication)。
+
+Ory Hydra 的最大优势之一是:它实现了 OAuth 和 OpenID Connect 标准,而不是强制你使用 “Hydra
用户管理”(登录、注销、配置文件管理、注册)、特定模板引擎或者预定义的前端。
+
+它允许使用你的程序所需的身份验证机制(基于令牌的 2FA、SMS 2FA 等),并且在你的业务系统中实现用户管理和登录。当然你也可以使用现有的解决方案,例如
[authboss](https://github.com/go-authboss/authboss),并为你提供 OAuth 2.0 和 OpenID
Connect 的所有优势功能,同时对业务逻辑和技术栈的侵入性最小。
+
+OAuth 2.0 适用于多种环境和多用途场景。以下信息可能会帮助你确定 OAuth 2.0 和 Hydra 是否适合某个场景:
+
+1. 允许第三方的合作方访问你的 API。
+2. 成为像 Google、Facebook 或 Microsoft 这样的身份认证提供者。
+3. 使浏览器、移动设备或可穿戴应用程序能够访问你的 API:运行 OAuth2
提供程序可以很好地实现这一点。你不必在设备上存储密码,并且可以随时撤销访问令牌。
+4. 想要限制后端服务可以相互读取的信息类型。例如,只允许评论服务获取用户配置文件更新,但不能读取用户密码。
+
+## 操作步骤
+
+接下来,将使用真实示例为你展示 APISIX 如何与 Hydra 集成。在该示例中将使用 Docker 部署所需的环境,请在执行本操作前安装完成
[Docker](https://docs.docker.com/engine/install/)。
+
+### 步骤一:创建并部署数据库
+
+为了快速部署测试环境,我们将使用 Docker 运行 PostgreSQL 作为 Hydra 的数据库。建议不要在生产环境使用 Docker 运行数据库。
+
+```shell
+docker network create hydraguide && \
+docker run \
+ --network hydraguide \
+ --name ory-hydra-example--postgres \
+ -e POSTGRES_USER=hydra \
+ -e POSTGRES_PASSWORD=secret \
+ -e POSTGRES_DB=hydra \
+ -d postgres:9.6
+```
+
+上述命令将创建一个名称为 `hydraguide` 的网络,并且启动一个名称为 `ory-hydra-example--postgres` 的
Postgres 实例,该实例创建了数据库 `hydra`,用户 `hydra` 和用户密码 `secret`。
+
+### 步骤二:部署 Hydra
+
+该步骤中会分别将 `4444` 和 `4445` 映射到 `5444` 和 `5445` 端口,请确保这些端口未被占用。
+
+1. 系统密钥只能针对新数据库设置,不支持密钥轮换。 此密钥用于加密数据库,每次进程(重新)启动时都需要设置为相同的值。 你可以使用
`/dev/urandom` 生成密钥。但请确保在你定义它的时候,该密钥都必须相同。例如,你可以将值存储在某处:
+
+```shell
+export SECRETS_SYSTEM=$(export LC_CTYPE=C; cat /dev/urandom | tr -dc
'a-zA-Z0-9' | fold -w 32 | head -n 1)
+```
+
+通过配置环境变量,设置 Hydra 的数据库 URL 指向 Postgres 实例。
+
+```shell
+export
DSN=postgres://hydra:secret@ory-hydra-example--postgres:5432/hydra?sslmode=disable
+```
+
+2. Ory Hydra 没有自动迁移数据库,因此你需要手动执行迁移数据库的操作。
+
+```shell
+docker pull oryd/hydra:v1.10.6 && \
+docker run -it --rm \
+ --network hydraguide \
+ oryd/hydra:v1.10.6 \
+ migrate sql --yes $DSN
+```
+
+3. 通过以下命令运行 Hydra 服务器。更多信息,请参考
[deploy-ory-hydra](https://www.ory.sh/docs/hydra/configure-deploy#deploy-ory-hydra)。
+
+```shell
+docker run -d \
+ --name ory-hydra-example--hydra \
+ --network hydraguide \
+ -p 5444:4444 \
+ -p 5445:4445 \
+ -e SECRETS_SYSTEM=$SECRETS_SYSTEM \
+ -e DSN=$DSN \
+ -e URLS_SELF_ISSUER=https://localhost:5444/ \
+ -e URLS_CONSENT=http://localhost:9020/consent \
+ -e URLS_LOGIN=http://localhost:9020/login \
+ oryd/hydra:v1.10.6 serve all
+```
+
+你可以使用如下命令查看 Hydra 的日志:
+
+```shell
+docker logs ory-hydra-example--hydra
+```
+
+:::note
+
+如果未指定 Hydra 的密码,你可以在日志中查到密码信息。如果忘记密码将无法重新启动 Hydra。
+
+:::
+
+你也可以使用以下命令查看 Hydra 相关介绍及操作命令。
+
+```shell
+docker run -it --rm --entrypoint hydra oryd/hydra:v1.10.6 help serve
+```
+
+### 步骤三:部署登录和验证程序
+
+Login Provider 和 Consent Provider 可以是两个独立的 Web 服务。 Hydra
提供了示例程序,它在一个应用程序中结合了这两个功能。 接下来。我们将使用 Docker 部署该应用程序。
+
+```shell
+docker pull oryd/hydra-login-consent-node:v1.10.6 && \
+docker run -d \
+ --name ory-hydra-example--consent \
+ -p 9020:3000 \
+ --network hydraguide \
+ -e HYDRA_ADMIN_URL=https://ory-hydra-example--hydra:4445 \
+ -e NODE_TLS_REJECT_UNAUTHORIZED=0 \
+ oryd/hydra-login-consent-node:v1.10.6
+```
+
+你可以使用以下命令检查程序是否运行正常:
+
+```shell
+docker logs ory-hydra-example--consent
+```
+
+正常返回结果:
+
+```shell
+> [email protected] serve /usr/src/app
+> node lib/app.js
+
+Listening on http://0.0.0.0:3000
+```
+
+### 步骤四:执行 OAuth 2.0 授权代码流程
+
+Hydra 支持通过 CLI 设置 OAuth 2.0 使用者和 OAuth 2.0 回调 URL
的功能,这是一个请求访问服务器上的用户资源的第三方应用程序。
+
+配置 APISIX `openid-connect` 插件时需要提供这些信息:
+
+- `id` 对应的是下述路由中插件配置的 `client_id`。
+- `secret` 对应的是下述路由中插件配置的 `client_secret`。
+- `scope` 对应的是下述路由中插件配置的 `scope`。
+
+```shell
+docker run --rm -it \
+ -e HYDRA_ADMIN_URL=https://ory-hydra-example--hydra:4445 \
+ -- network hydraguide \
+ oryd/hydra:v1.10.6 \
+ clients create --skip-tls-verify \
+ --id facebook-photo-backup \
+ --secret some-secret \
+ --grant-types authorization_code,refresh_token,client_credentials,implicit
\
+ --response-types token,code,id_token \
+ --scope openid,offline,photos.read \
+ --callbacks http://127.0.0.1:9010/callback
+```
+
+以下示例将执行一个 OAuth 2.0 授权流程。为简化此操作,Hydra CLI 提供了一个名为 `hydra token user` 的辅助命令。
+
+```shell
+ docker run --rm -it \
+ --network hydraguide \
+ -p 9010:9010 \
+ oryd/hydra:v1.10.6 \
+ token user --skip-tls-verify \
+ --port 9010 \
+ --auth-url https://localhost:5444/oauth2/auth \
+ --token-url https://localhost:5444/oauth2/token \
+ --client-id facebook-photo-backup \
+ --client-secret some-secret \
+ --scope openid,offline,photos.read
+```
+
+返回结果如下则表示配置正常:
+
+```shell
+Setting up home route on http://127.0.0.1:9010/
+Setting up callback listener on http://127.0.0.1:9010/callback
+Press ctrl + c on Linux / Windows or cmd + c on OSX to end the process.
+If your browser doesn't open automatically, navigate to:
+
+ http://127.0.0.1:9010/
+```
+
+该步骤将会启动一个用户登录程序,我们将在下面的步骤中使用该程序。
+
+### 步骤五:启动 APISIX 并配置路由
+
+如果你还没有安装 APISIX,请参考:[安装
APISIX](https://apisix.apache.org/zh/docs/apisix/next/installation-guide)。
+
+安装完成后,仅需创建路由并配置 `openid-connect` 插件即可。为了更直观地验证效果,我们还需要启动了一个 NGINX
服务当做上游,你也可以使用已有的上游服务。
+
+:::note 注意
+
+本示例中的 APISIX 是安装在宿主机上,如果是使用 Docker 启动的 APISIX,可能会出现网络问题。
+
+:::
+
+1. 首先使用 Docker 创建一个 NGINX 上游。
+
+```shell
+docker run -d --name test-nginx -p 8083:80 nginx
+```
+
+2. 通过以下命令创建路由,并配置 `openid-connect` 插件。
+
+其中 `client_id` 和 `client_secret` 和 `scope` 是步骤四中设置的 ID。你可以参考 [Preparing for
Production](https://www.ory.sh/docs/hydra/production#exposing-administrative-and-public-api-endpoints)
获取其他信息。从上述链接的内容中,我们可以看到 `discovery` 的地址为
`https://{IP:Port}/.well-known/openid-configuration`。
+
+```shell
+curl http://127.0.0.1:9080/apisix/admin/routes/1 \
+-H 'X-API-KEY: edd1c9f034335f136f87ad84b625c8f1' -X PUT -d '
+{
+ "uri":"/*",
+ "plugins":{
+ "openid-connect":{
+ "client_id":"facebook-photo-backup",
+ "client_secret":"some-secret",
+
"discovery":"https://127.0.0.1:5444/.well-known/openid-configuration";,
+ "scope":"openid",
+ "token_endpoint_auth_method": "client_secret_basic",
+ "bearer_only": false,
+ "redirect_uri":"http://127.0.0.1:9080/callback";
+ }
+ },
+ "upstream":{
+ "type":"roundrobin",
+ "nodes":{
+ "127.0.0.1:8083":1
+ }
+ }
+}'
+```
+
+### 步骤六:访问 APISIX
+
+ 1. 在浏览器中输入 `http://127.0.0.1:9080/index.html`,由于已经开启了 `openid-connect`
插件,所以页面被重定向到登录页面。在此页面输入用户验证程序中默认的账号密码。
+
+ 
+
+ 2. 选择认证协议,并单击 `Allow Access`。
+
+ 
+
+ 3. 验证成功之后,就可以访问到上游服务的页面。
+
+ 
+
+## 总结
+
+本文主要介绍了 Hydra 如何与 APISIX 进行集成以及 Hydra 的应用场景。你只需要在服务器上安装 Hydra
相关的程序,就可以直接使用它作为你的身份认证程序。
+
+## 相关阅读
+
+- [使用 APISIX openid-connect
插件进行集中身份认证](https://apisix.apache.org/zh/blog/2021/08/25/using-the-apache-apisix-openid-connect-plugin-for-centralized-authentication)
+- [Using the Apache APISIX OpenID Connect Plugin for Okta Centralized
Authentication](https://apisix.apache.org/zh/blog/2021/08/16/using-the-apache-apisix-openid-connect-plugin-for-centralized-authentication)